MODEL REFERENCE
Roborock S4
21 errors · 27 guides

The checks and guides below come from the official manuals for this model.
No matches for this wording. Try a light name, error code or a shorter phrase.
Errors and spoken alerts
Spoken error numbers documented in the manualFind the indicator lights
Error 1laser head is jammed
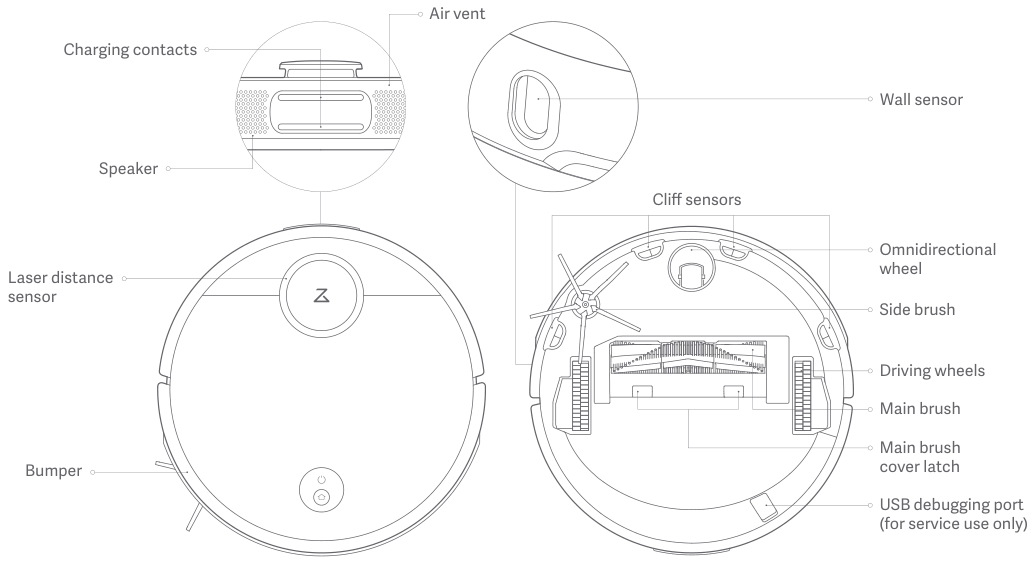
Check that the laser head turns freely. Remove anything blocking the LDS unit, move the robot to a new location and restart.
Error 2bumper is stuck
Clean and lightly tap the bumper; tap repeatedly to dislodge trapped items. If nothing falls out, move the robot to a new location and restart.
Error 3a wheel is suspended
Move the robot to a new location and restart.
Error 4robot is suspended or cliff sensors need cleaning
- The alert directs you to wipe the cliff sensors, move away from raised edges and restart.
- The troubleshooting explanation says to move the suspended robot to a new location and restart; if the problem persists, clean the cliff sensors.
Error 5main brush is tangled
Remove the main brush and clean both the brush and its bearings.
Error 6side brush is tangled
Remove and clean the side brush.
Error 7driving wheels are jammed
Look for anything stuck in the driving wheels, remove and clean them, then move the robot to a new location and restart.
Error 8robot is stuck
Clear obstacles from around the robot.
Error 9dustbin or filter is not installed properly
Reinstall the dustbin and filter and check that they are installed properly. If the problem persists, try replacing the filter.
Error 10filter is wet or blocked
Dry the filter for at least 24 hours if it is not completely dry. Clean it if required. If the problem persists, replace the filter.
Error 11high-intensity magnetic field detected
Move the robot away from barrier tape to a new location and restart.
Error 12battery is too low
Recharge before use.
Error 13charging contact error
Wipe the charging contacts on the robot and charging dock with a dry cloth.
Error 14battery temperature error
Wait until the battery temperature returns to normal.
Error 15wall sensor is dirty
Wipe the wall sensor clean.
Error 16robot is tilted
Move the robot to flat ground and restart.
Error 17side brush module fault
Reset the system.
Error 18vacuum fan fault
Reset the system.
Error 19charging dock has no power
Check the charging dock power cable, reinsert it if it has come loose, then retry recharging.
Error 24virtual no-go zone or barrier detected
Move the robot out of the virtual no-go zone or barrier to a new location and restart.
Internal errorinternal system fault
Reset the system. A system reset may not resolve every problem. If the problem persists after the table’s recommendations, contact the manufacturer’s after-sales service team.
Guides
Faqs
Instructions from the manualUnable to power on2 checks
- Low battery
- Charge the robot and retry.
- Battery temperature
- Retry when the battery is between 0°C (32°F) and 40°C (104°F). This is battery temperature; the separate ambient operating restriction is 4–40°C.
Unable to charge2 checks
- Dock has no power
- Check both ends of the power cable are properly connected.
- Poor contact
- Clean the contact areas of the dock and robot. The power indicator lights when power is restored.
Slow charging2 checks
- Very hot or cold environment
- Charging speed reduces to extend battery life in very hot or cold conditions.
- Dirty charging contacts
- Clean the charging contact points using a dry cloth.
Unable to recharge2 checks
- Too far from dock
- Place the robot closer to the charging dock.
- Obstacles near dock
- Place the charging dock in an open area.
Abnormal behavior1 check
- Abnormal behavior
- Restart the robot.
Noise during cleaning1 check
- Brush or main wheel jam
- Turn off the robot and clean the main brush, side brush or main wheel that may be jammed.
Poor cleaning ability or dust falling out3 checks
- Full dustbin
- Empty the dustbin.
- Blocked filter
- Wash the filter.
- Tangled main brush
- Clean the main brush.
Unable to connect to WiFi4 checks
- WiFi disabled
- Reset WiFi and retry.
- Weak WiFi signal
- Make sure the robot is within WiFi coverage.
- Abnormal WiFi connection
- Reset WiFi, download the latest mobile app and try reconnecting.
- Unsupported app model
- Check which robots are supported in the app.
Scheduled cleanups are not starting1 check
- Low battery
- Scheduled cleanup can begin only when battery level is above 20%.
Is power always being drawn when the robot is on the charging dock?1 check
- Maintaining battery performance
- The robot draws a very small amount of power while docked to maintain battery performance.
Does the robot need to be charged for at least 16 hours the first three times it is used?1 check
- Initial charging
- No: the robot can be used after it has been fully charged once.
Cleaning does not resume after recharging2 checks
- DND mode
- Make sure the robot is not in DND mode; DND prevents cleanup.
- Manual docking before automatic top-up
- A robot placed manually on the dock before its automatic top-up cannot continue that cleanup.
The robot cannot return to the charging dock after spot cleaning or when it has been moved manually.1 check
- Changed position and distant dock
- After spot cleaning or a significant position change the robot regenerates its map. If the dock is too far away, place the robot on the charger manually.
Safety information
Instructions from the manualPrepare the cleaning area and stop safely19 steps
- Use the robot only on indoor floors; do not use it outdoors, on furniture or in commercial or industrial environments.
- Do not use it on elevated surfaces without barriers.
- Keep ambient temperature within 4°C (39°F) to 40°C (104°F); do not clean liquid or sticky substances, burning objects, high-pile carpet, hard or sharp objects such as glass and nails.
- Effectiveness may be reduced on dark carpets.
- Move cables off the ground or to the side.
- Remove lightweight and fragile objects.
- The CB warning requires supervision or instruction for people, including children, with reduced physical, sensory or mental capabilities or lacking experience or knowledge.
- The EU instructions allow children aged eight or older and people with reduced capabilities or lacking experience or knowledge only with safe-use supervision or instruction and understanding of the hazards.
- Children must not play with the product or perform cleaning or maintenance without supervision.
- Keep cleaning tools away from children, put no people, pets or objects on the robot, and keep hair, clothing, fingers and body parts away from moving parts.
- Do not carry the robot by the laser scanner cap, cover or bumper.
- Switch it off and unplug before cleaning or maintenance.
- Do not use wet cloths or liquids to clean the robot; follow the separately documented removable dustbin/filter washing procedure.
- Only use the supplied roborock CDZ10RR dock.
- Do not charge non-rechargeable batteries, dismantle, repair or modify the battery or dock, or clean charger prongs with wet hands or cloths.
- Keep the dock away from heat.
- Stop immediately if the power cord is damaged; the manufacturer, service agent or similarly qualified person must replace it.
- Battery replacement is for skilled persons.
- Maintain at least 20 cm separation between the operating transmitter and people; do not co-locate its antenna with another antenna or transmitter.
Installation
Instructions from the manualSet up the dock and first charge12 steps
- Connect the power cable to the dock and tidy it in the cable channel.
- Avoid a cable running vertically to the ground: the robot may drag it and disconnect the dock.
- Place the dock against a wall on a flat surface and connect mains power.
- Leave more than 0.5 m (1.6 ft) on each side and more than 1 m (3.3 ft) in front.
- Choose strong WiFi coverage; keep the locator beacon clear and avoid direct sunlight.
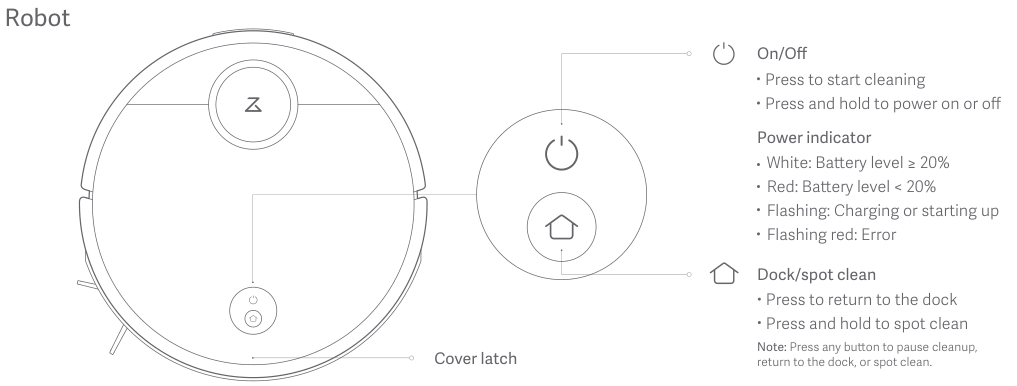
- Hold On/Off to turn on the robot.
- When the power indicator lights, place it on the dock to charge.
- If the battery is too low to turn on, place it directly on the dock.
- Keep the robot charged to maintain battery performance.
- White means battery at least 20%; red means below 20%; flashing means charging or starting; flashing red means an error.
- Connect the mobile app if desired.
- Once fully charged, the indicator stays lit; press On/Off or use the app to start cleaning.
Connect Mi Home and reset WiFi12 steps
- Download Mi Home from the App Store or Google Play, or use the manual’s QR code.
- Only 2.4 GHz WiFi is supported.
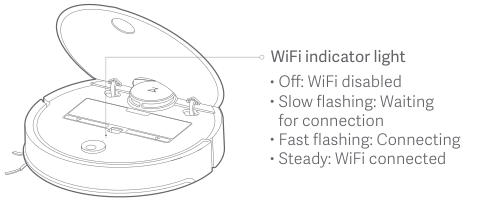
- Open the top cover to see the WiFi indicator.
- Hold On/Off and Dock/spot clean together until the Reset WiFi voice alert sounds.
- Slow flashing means network configuration mode.
- In Mi Home, press + at the top right and follow the in-app instructions.
- The robot appears on the homepage after adding.
- App development can change the process; follow the current in-app instructions.
- If the phone cannot connect, reset WiFi and add the robot as a new device.
- Reset after changes to the router or a forgotten password.
- WiFi disables after more than an hour of connecting, so reset before retrying.
- The WiFi indicator is off when disabled, flashes slowly while waiting, flashes quickly while connecting, and stays on when connected.
Instructions for use
Instructions from the manualPower on, clean, pause and sleep16 steps
- Hold On/Off to turn the robot on and enter standby.
- If asleep, hold On/Off to turn it off and end the cleanup.
- It cannot turn off while charging.
- Press On/Off to start cleaning.
- It scans and plans a route, follows zone walls then cleans in a Z-shaped route.
- Charge first if battery is too low, and remove cables including the dock cable.
- A cleanup finishing within ten minutes repeats by default.
- If the battery runs low before completion, the robot tops up and resumes where it stopped.
- Press any button while cleaning to pause.
- Press On/Off to continue or Dock/spot clean to stop and return to the dock.
- Manually docking a paused robot ends the current cleanup.
- After over ten minutes paused, the robot sleeps and the power light flashes slowly; press any button to wake it.
- It does not sleep on the dock and shuts down after over twelve hours asleep.
- An error makes the power light flash red quickly and plays a voice alert.
- Use the troubleshooting table.
- After over ten minutes in error it sleeps; placing it on the dock during an error stops that cleanup.
Recharge and spot clean8 steps
- After cleanup the robot returns automatically to the dock.
- While paused, press Dock/spot clean to return manually.
- The power light flashes slowly while charging.
- If cleaning began away from the dock and it cannot return, it returns to the starting point.
- Place it directly on the dock to recharge.
- In standby or pause, hold Dock/spot clean to clean a 1.5 m by 1.5 m square centered on the robot.
- It returns to the square’s center afterward.
- Press any button to cancel spot cleaning.
Schedule cleanup and choose app cleaning modes13 steps
- In Mi Home set scheduled cleanup start times and suction levels; the robot returns to the dock after each cleanup.
- Battery must be above 20% for a scheduled start.
- Choose Quiet, Balanced, Strong or MAX; Balanced is the default.
- Use Pin n go to choose a destination.
- Draw a specific zone in Mi Home for zone cleanup.
- The robot may move outside zone borders, so keep cables and obstacles away from the zone.
- DND prevents cleanups, suppresses voice alerts and dims the power indicator.
- Default hours are 22:00 to 08:00; modify or disable DND in Mi Home.
- For virtual no-go zones and barriers, turn on Map Saving Mode.
- Use them to customize the cleaning area, never to isolate hazards.
- Moving the robot manually or making significant changes to the home can lose these zones and barriers.
- Other documented app functions include live maps, cleaning history/records, voice packs, firmware updates, remote control, robot status/location and other Mi Home devices.
- Functions can change with app development.
Routine maintenance
Instructions from the manualClean the main brush8 steps
- Switch the robot off and unplug before maintenance.
- Weekly cleaning and replacement every 6–12 months are recommended.
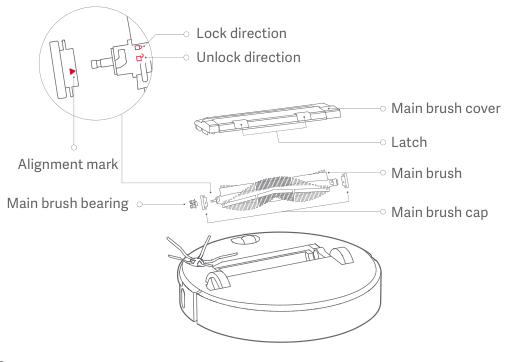
- Turn the robot over, unlatch and remove the main brush cover.
- Take out the brush and remove and clean its bearings.
- Rotate the cap in the unlock direction to remove it.
- Use the supplied main brush cleaning tool to remove tangled hair and dirt.
- Reinstall the cap and bearing following the lock direction.
- Reinsert the main brush and replace the cover.
Empty the dustbin and wash the filter10 steps
- Switch off and unplug before maintenance.
- Weekly dustbin cleaning and filter cleaning every two weeks are recommended.
- Open the top cover, squeeze the dustbin latch and remove the dustbin.
- Open its lid in the arrow direction and empty it.
- For filter cleaning, open the dustbin lid, fill it with fresh clean water without cleaning liquid, close it, gently shake and pour out the dirty water.
- Remove the filter and clean it with water.
- Do not touch its surface with hands, brushes or sharp objects.
- Rinse repeatedly and tap the filter frame to release as much dirt as possible.
- Leave the filter to dry before reinstalling it.
- It must be thoroughly dry; 24 hours of drying and alternating two filters are recommended.
Clean the side brush5 steps
- Switch off and unplug before maintenance.
- Monthly cleaning and replacement every 3–6 months are recommended.
- Turn the robot over and remove the side brush retaining screw.
- Remove and clean the side brush.
- Reinstall the side brush.
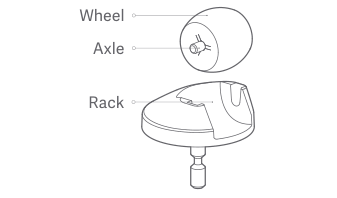
Clean the omnidirectional wheel5 steps
- Switch off and unplug before maintenance.
- Monthly cleaning is recommended.
- Turn the robot over and remove the omnidirectional wheel.
- Remove hair and dirt from the wheel and axle.
- Press the wheel back into its mounting point.
Clean sensors and dock charging contacts5 steps
- Switch off and unplug before maintenance.
- Use a soft dry cloth for the sensors and charging contacts.
- Wipe all four cliff sensors underneath, the wall sensor on the right, and the charging contact at the rear.
- Clean the dock charging contacts monthly using a soft dry cloth.
- Do not use wet hands or cloths on charger prongs.
Reset the system or restore factory settings6 steps
- If buttons do not respond or the robot cannot shut down, press the system Reset button.
- The robot restarts and schedules, WiFi and other settings return to factory settings.
- If it still does not function, turn it on and press Dock/spot clean.
- Then hold Reset until the Start restoring initial version voice alert; factory settings are restored.
- A system reset may not resolve all problems.
- If the table’s recommendations do not resolve the fault, contact the manufacturer’s after-sales service team.
Update firmware and store the robot7 steps
- Update firmware using the phone.
- Connect the robot to the dock and make sure the battery is higher than 20%.
- The power indicator flashes white quickly during the update.
- Keep the robot charged to maintain battery performance.
- For extended storage, fully charge it, switch it off and store it in a cool dry place.
- Recharge at least every three months to avoid over-discharge.
- For shipment, switch the robot off; original packaging is advised.
Environmental protection description
Instructions from the manualBattery handling and disposal14 steps
- Battery replacement is for skilled persons.
- The disposal instructions apply only when disposing of the robot or when its battery no longer functions normally: it cannot clean because of low battery despite charging.
- Do not remove the battery if continued use is intended.
- Before removal, completely drain the battery.
- Do not attempt removal while connected to the charging dock; disconnect from the supply mains.
- Turn the robot off.
- Unscrew the battery cover.
- Remove the cover.
- Press the clip to pull out the battery connector.
- Remove the entire battery pack without damaging its casing, to avoid short-circuit or hazardous leakage.
- Provide the battery to local authorities or a battery recycling facility.
- Do not discard waste batteries.
- If battery fluid touches you, rinse thoroughly with water and seek immediate medical care.
- Recycle the product separately from household waste through return/collection systems or the retailer.
Controls and parts
See the manual diagrams 1 diagram