MODEL REFERENCE
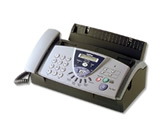
Brother FAX-T106
19 errors · 63 guides
The checks and guides below come from the official manuals for this model.
No matches for this wording. Try a light name, error code or a shorter phrase.
Errors and messages
Shown on the machine display BT CALL SIGN ONbT CALL SIGN ON
The fax machine is set BT Call Sign to ON. You cannot change the Receive Mode from Manual to another mode.: Set BT Call Sign to OFF. (See BT Call Sign (U.K. only) on page 5-14.)
CHECK PAPER RELOAD PAPER PRESS STOP KEYcHECK PAPER RELOAD PAPER PRESS STOP KEY2 checks
COVER IS OPEN CLOSE COVERcOVER IS OPEN CLOSE COVER
The cover is not closed completely.: Close the cover.
DOCUMENT JAM REMOVE JAM PRESS STOP KEYdOCUMENT JAM REMOVE JAM PRESS STOP KEY2 checks
LINE DISCONNECTlINE DISCONNECT
The other person or other person’s fax machine stopped the call.: Try to send again.
MEMORY NEAR ZERO CLEAR MEMORYmEMORY NEAR ZERO CLEAR MEMORY
The fax machine is almost out of memory.: Clear stored faxes and scheduled jobs, or print stored faxes. On the FAX-T106, press Play/Record. After voice messages finish, press 1 to print stored fax messages; printing deletes those messages from memory. Press 2 to exit without printing.
NOT REGISTEREDnOT REGISTERED
You tried to access a One-Touch or Speed-Dial number that is not programmed.: Set up the One-Touch or Speed-Dial number. (See Storing One-Touch Dial numbers on page 7-1 and Storing Speed-Dial numbers, page 7-2.)
OUT OF MEMORY CLEAR MEMORYoUT OF MEMORY CLEAR MEMORY
The data is too large for the fax machine’s memory.: During sending or copying, press Stop/Exit, wait for other operations to finish and try again. Alternatively, clear stored faxes and scheduled jobs, turn off Fax Storage to free memory, or print stored faxes. On the FAX-T106, press Play/Record; after voice playback, press 1 to print and delete stored fax messages, or 2 to exit without printing.
PAPER JAM PLS OPEN COVER REMOVE JAMpAPER JAM PLS OPEN COVER REMOVE JAM
The paper is jammed in the fax machine.: (See Document Jam or Paper Jam on page 13-4.)
PHONE LINE BUSYpHONE LINE BUSY
The number you dialled does not answer or is busy.: Verify the number and try again.
POLLING FAILEDpOLLING FAILED
You tried to poll a fax machine that is not in Polled Waiting mode.: Check the other fax machine’s polling setup.
PRINTHEAD OVERHEATED WAIT TO COOLpRINTHEAD OVERHEATED WAIT TO COOL
The print head has overheated.: Wait 30 minutes for it to cool or wait until the message disappears automatically.
RECEIVE FAILEDrECEIVE FAILED
Poor phone line quality caused a communication error.: If the problem continues, call the telephone company and ask them to check your phone line.
RIBBON EMPTY RESET OR REPLACErIBBON EMPTY RESET OR REPLACE
Your fax machine is out of ribbon or the print cartridge is not properly installed.: Install the print cartridge again or change the ribbon. (See Changing the ribbon on page 13-9.)
MEMORY DISABLEDmEMORY DISABLED
The fax machine has a mechanical problem. —OR— A foreign obstacle, such as a clip or ripped paper, is in the fax machine.: Open the top cover and remove any foreign obstacles from inside the fax machine. If the error message continues, disconnect the fax machine from the power for several minutes then reconnect it. You will lose all faxes in the memory. Please follow the steps below before disconnecting the fax machine so you will not lose any important messages. Check whether the fax machine has faxes in the memory 1. Press Menu/Set, 0, 0, 1. 2. If the fax machine does not have faxes in its memory, disconnect the fax machine from the power source for several minutes and then reconnect it. —OR— If faxes are present, you can transfer them to another fax machine. Go to Step 3. Transfer faxes to another fax machine 3. Enter the fax number to which faxes will be forwarded. 4. Press Fax Start. 5. After the faxes are transferred, disconnect the fax machine from the power source for several minutes and then reconnect it. Transfer Journal report to another fax machine You can transfer the Fax Journal report to another fax machine. 1. Press Menu/Set, 0, 0, 2. 2. Enter the fax number to which faxes will be forwarded. 3. Press Fax Start. If you have not set up your Station ID, you cannot enter fax transfer mode. If the error message still continues, contact Brother or your dealer for service.
TAD FAILUREtAD FAILURE
The fax machine has a mechanical problem. —OR— A foreign obstacle, such as a clip or ripped paper, is in the fax machine.: Open the top cover and remove any foreign obstacles from inside the fax machine. If the error message continues, disconnect the fax machine from the power for several minutes then reconnect it. You will lose all faxes in the memory. Please follow the steps below before disconnecting the fax machine so you will not lose any important messages. Check whether the fax machine has faxes in the memory 1. Press Menu/Set, 0, 0, 1. 2. If the fax machine does not have faxes in its memory, disconnect the fax machine from the power source for several minutes and then reconnect it. —OR— If faxes are present, you can transfer them to another fax machine. Go to Step 3. Transfer faxes to another fax machine 3. Enter the fax number to which faxes will be forwarded. 4. Press Fax Start. 5. After the faxes are transferred, disconnect the fax machine from the power source for several minutes and then reconnect it. Transfer Journal report to another fax machine You can transfer the Fax Journal report to another fax machine. 1. Press Menu/Set, 0, 0, 2. 2. Enter the fax number to which faxes will be forwarded. 3. Press Fax Start. If you have not set up your Station ID, you cannot enter fax transfer mode. If the error message still continues, contact Brother or your dealer for service.
UNABLE TO INITuNABLE TO INIT
The fax machine has a mechanical problem. —OR— A foreign obstacle, such as a clip or ripped paper, is in the fax machine.: Open the top cover and remove any foreign obstacles from inside the fax machine. If the error message continues, disconnect the fax machine from the power for several minutes then reconnect it. You will lose all faxes in the memory. Please follow the steps below before disconnecting the fax machine so you will not lose any important messages. Check whether the fax machine has faxes in the memory 1. Press Menu/Set, 0, 0, 1. 2. If the fax machine does not have faxes in its memory, disconnect the fax machine from the power source for several minutes and then reconnect it. —OR— If faxes are present, you can transfer them to another fax machine. Go to Step 3. Transfer faxes to another fax machine 3. Enter the fax number to which faxes will be forwarded. 4. Press Fax Start. 5. After the faxes are transferred, disconnect the fax machine from the power source for several minutes and then reconnect it. Transfer Journal report to another fax machine You can transfer the Fax Journal report to another fax machine. 1. Press Menu/Set, 0, 0, 2. 2. Enter the fax number to which faxes will be forwarded. 3. Press Fax Start. If you have not set up your Station ID, you cannot enter fax transfer mode. If the error message still continues, contact Brother or your dealer for service.
UNABLE TO PRINTuNABLE TO PRINT
The fax machine has a mechanical problem. —OR— A foreign obstacle, such as a clip or ripped paper, is in the fax machine.: Open the top cover and remove any foreign obstacles from inside the fax machine. If the error message continues, disconnect the fax machine from the power for several minutes then reconnect it. You will lose all faxes in the memory. Please follow the steps below before disconnecting the fax machine so you will not lose any important messages. Check whether the fax machine has faxes in the memory 1. Press Menu/Set, 0, 0, 1. 2. If the fax machine does not have faxes in its memory, disconnect the fax machine from the power source for several minutes and then reconnect it. —OR— If faxes are present, you can transfer them to another fax machine. Go to Step 3. Transfer faxes to another fax machine 3. Enter the fax number to which faxes will be forwarded. 4. Press Fax Start. 5. After the faxes are transferred, disconnect the fax machine from the power source for several minutes and then reconnect it. Transfer Journal report to another fax machine You can transfer the Fax Journal report to another fax machine. 1. Press Menu/Set, 0, 0, 2. 2. Enter the fax number to which faxes will be forwarded. 3. Press Fax Start. If you have not set up your Station ID, you cannot enter fax transfer mode. If the error message still continues, contact Brother or your dealer for service.
UNABLE TO SCANuNABLE TO SCAN
The fax machine has a mechanical problem. —OR— A foreign obstacle, such as a clip or ripped paper, is in the fax machine.: Open the top cover and remove any foreign obstacles from inside the fax machine. If the error message continues, disconnect the fax machine from the power for several minutes then reconnect it. You will lose all faxes in the memory. Please follow the steps below before disconnecting the fax machine so you will not lose any important messages. Check whether the fax machine has faxes in the memory 1. Press Menu/Set, 0, 0, 1. 2. If the fax machine does not have faxes in its memory, disconnect the fax machine from the power source for several minutes and then reconnect it. —OR— If faxes are present, you can transfer them to another fax machine. Go to Step 3. Transfer faxes to another fax machine 3. Enter the fax number to which faxes will be forwarded. 4. Press Fax Start. 5. After the faxes are transferred, disconnect the fax machine from the power source for several minutes and then reconnect it. Transfer Journal report to another fax machine You can transfer the Fax Journal report to another fax machine. 1. Press Menu/Set, 0, 0, 2. 2. Enter the fax number to which faxes will be forwarded. 3. Press Fax Start. If you have not set up your Station ID, you cannot enter fax transfer mode. If the error message still continues, contact Brother or your dealer for service.
Guides
Printing or receiving faxes
Instructions from the manualCondensed print and white streaks across the page or the top and bottom of sentences are cut off.1 check
- Condensed print and white streaks across the page or the top and bottom of sentences are cut off.
- If your copy looks good, you probably had a bad connection, with static or interference on the phone line.
- If the copy looks bad, clean the scanner. (See Cleaning the scanner on page 13-9.) If the problem continues, call Brother or your dealer for service.
Vertical black lines when receiving.1 check
- Vertical black lines when receiving.
- Your machine’s print head might be dirty.
- Clean the print head. (See Cleaning the print head on page 13-8.) The sender’s scanner may be dirty.
- Ask the sender to make a copy to see if the problem is with the sending machine.
- Try receiving from another fax machine.
- If the problem continues, call Brother or your dealer for service.
Phone line or connections
Instructions from the manualThe fax machine does not answer when called.1 check
- The fax machine does not answer when called.
- Make sure receive mode is not set to MANUAL. (See Choosing the Receive Mode on page 5-1.) Check for a dial tone.
- If possible, call the fax machine to hear it answer.
- If there is still no answer, check the telephone line cord connection.
- Connect a standard telephone to the fax machine’s telephone socket.
- If there is no ringing when you call the fax machine, ask your telephone company to check the line.
External Telephone answering device (TAD) does not answer when called1 check
- External Telephone answering device (TAD) does not answer when called
- Make sure that the external TAD is connected correctly. (See Connecting an external telephone answering device (TAD) on page 1-9.) Make sure the TAD is set to answer calls.
No dial tone on the handset1 check
- No dial tone on the handset
- Press Speaker Phone (FAX-T106 only)—OR—Lift the handset.
- If you don’t hear a dial tone, check telephone line cord connections at the fax machine and wall socket.
- Check that the handset is connected to the fax machine’s handset socket.
- Test the wall socket with another single line telephone.
- If there is no dial tone at the wall socket, call your telephone company.
Receiving faxes
Instructions from the manualCannot receive a fax3 checks
- Cannot receive a fax
- Make sure that the fax machine is in the correct receiving mode for your setup. (See Choosing the Receive Mode on page 5-1.)
- Cannot receive a fax
- If there seems to be interference on your phone line, try setting the Compatibility to BASIC. (See Compatibility on page 13-4.)
- Cannot receive a fax
- If you connect your fax machine to PABX or ISDN, set the Phone Line Type to your phone type. (See Setting the Phone Line Set on page 4-5.)
Sending faxes
Instructions from the manualCannot send a fax2 checks
- Cannot send a fax
- Ask the other party to check that the receiving machine has paper.
- Cannot send a fax
- Print the Transmission Verification Report and check for an error. (See Printing reports on page 10-1.)
Poor sending quality.1 check
- Poor sending quality.
- Try changing your resolution to FINE or S.FINE. Make a copy to check the fax machine’s scanner operation.
Dialling does not work1 check
- Dialling does not work
- Check all line cord connections.
- Check the power cord connection.
- Send a manual fax by pressing Speaker Phone (for FAX T-106 only) or by lifting the handset and dialling the number.
- Wait to hear fax receiving tones before pressing Fax Start.
- Change the Tone/Pulse setting. (See Setting Tone or Pulse dialling mode on page 4-5.)
Vertical black lines when sending.1 check
- Vertical black lines when sending.
- Use the fax machine to make a copy.
- If the copy shows the same problem, the scanner area is dirty.
- Lift the top cover and check the document path.
- Clean the white film and the scanner’s glass strip using isopropyl alcohol and a lint-free cloth. (See Cleaning the scanner on page 13-9.)
Transmission Verification Report prints “RESULT ERROR”1 check
- Transmission Verification Report prints “RESULT ERROR”
- There is probably temporary noise or static on the phone line.
- Try sending the fax again.
- Try setting the Compatibility to BASIC. (See Compatibility on page 13-4.) If the problem continues, call the telephone company to check your phone line.
Handling incoming calls
Instructions from the manualDouble-ring in FAX/TEL mode1 check
- Double-ring in FAX/TEL mode
- The fax machine knows the incoming call is not a fax so it is signaling you to answer the telephone call.
- Pick up the fax machine’s handset or answer from an extension phone, and then press the fax machine’s Telephone Answer Code (default setting is #51). (See For FAX/TEL mode only on page 5-6.)
Transferring a call to the fax machine1 check
- Transferring a call to the fax machine
- If you have answered at the fax machine’s handset, press Fax Start and hang up immediately.
- If you answered at an extension phone, press your three-digit Fax Receive Code (default setting is *51).
- When the fax machine answers, hang up.
The fax machine “hears” voice as fax tone1 check
- The fax machine “hears” voice as fax tone
- If the fax machine is set to Fax Detect ON, it is more sensitive to sounds.
- The fax machine may mistakenly interpret certain voices or music on the line as a calling fax machine and respond with fax receiving tones.
- Deactivate the fax by pressing #51 if you are at an extension phone or press Stop/Exit if you are at the fax machine or an external phone.
- Try avoiding this problem by turning Fax Detect to OFF. (See Recording the Fax/Tel Outgoing Announcement (F/T MESSAGE) (FAX-T106 only) on page 5-3.)
Custom features on a single line1 check
- Custom features on a single line
- If you have Call Waiting, Voice Mail, an alarm system or any other custom feature on a single phone line with the fax machine, it may create a problem sending or receiving fax data.
- For example: If you are sending or receiving a fax message while a custom feature signal comes through on the line, the signal can temporarily interrupt or disrupt the fax data.
- Your fax machine’s ECM feature should help overcome this problem.
- This condition is related to the telephone system industry and is common to all devices that send and receive data on a single, shared line with custom features.
- If avoiding a slight interruption is crucial to your business, we recommend a separate phone line with no custom features.
How to load paper
Instructions from the manualHow to load paper5 steps
- Remove all existing paper.
- Fan and tap the stack flat.
- Gently insert the paper with its print side down.
- Do not force it.
- Use A4 paper, 64–90 g/m², 0.08–0.12 mm thick, with no more than 30 sheets in the tray.
Setting the date and time
Instructions from the manualSetting the Date and Time6 steps
- Press Menu/Set, 1, 1.
- Enter the last two year digits and press Menu/Set.
- Enter two month digits and press Menu/Set.
- Enter two day digits and press Menu/Set.
- Enter the time in 24-hour format and press Menu/Set.
- Press Stop/Exit.
Turning on automatic daylight savings time
Instructions from the manualTurning on Automatic Daylight Savings TimeView
Press Menu/Set, 1, 2. Select ON or OFF with the up/down keys. Press Menu/Set, then Stop/Exit.
Setting the station id
Instructions from the manualSetting the Station ID7 steps
- Press Menu/Set, 1, 3.
- Enter a fax number of up to 20 digits and press Menu/Set.
- Enter a telephone number of up to 20 digits and press Menu/Set.
- Enter a name of up to 20 characters and press Menu/Set, then Stop/Exit.
- The fax number is required before the name or telephone number can be stored.
- Use + followed by the country code, omit the leading zero from the area code and leave a space before the local number; do not enter a hyphen.
- If an ID is already stored, press 1 to change it or 2 to leave it unchanged.
Setting the beeper volume
Instructions from the manualSetting the Beeper VolumeView
Press Menu/Set, 1, 4. Choose LOW, HIGH or OFF with the up/down keys. Press Menu/Set, then Stop/Exit.
Setting the phone line set
Instructions from the manualSetting the Phone Line SetView
Press Menu/Set, 1, 5. Select PBX, ISDN or NORMAL with the up/down keys. Press Menu/Set, then Stop/Exit.
Setting tone or pulse dialling mode
Instructions from the manualSetting Tone or Pulse dialling modeView
Press Menu/Set, 1, 6. Choose TONE or PULSE with the up/down keys. Press Menu/Set, then Stop/Exit.
Setting the ring pattern
Instructions from the manualSetting the Ring PatternView
Press Menu/Set, 9, 1. Choose SIGNAL or a listed melody with the up/down keys. Press Menu/Set, then Stop/Exit. The melody is for the initial ring, not the Fax/Tel pseudo-ring.
Setting the music on hold
Instructions from the manualSetting the Music on HoldView
Press Menu/Set, 9, 2. Select a listed melody or OFF with the up/down keys. Press Menu/Set, then Stop/Exit.
Choosing the receive mode
Instructions from the manualChoosing the Receive Mode5 steps
- Choose FAX ONLY for a dedicated fax line, FAX/TEL to receive fax and voice calls without an external answering device, or MANUAL to answer every call yourself.
- Press Receive Mode repeatedly until the mode is displayed; the display returns to date/time after two seconds.
- For the FAX-T106 internal answering device, first record its outgoing message, then press Digital TAD until it lights to select TAD:MSG MGR.
- If an external or extension telephone shares the line, use four rings for Ring Delay.
- Do not use FAX/TEL with an answering device or telephone-company voice mail.
Setting the ring delay
Instructions from the manualSetting the Ring Delay4 steps
- Press Menu/Set, 2, 1.
- Select RING DELAY and press Menu/Set.
- Select the required number of rings, then press Menu/Set and Stop/Exit.
- Turn Toll Saver off before using this ring-delay setting.
Setting the f/t ring time (fax/tel mode only)
Instructions from the manualSetting the F/T Ring Time (FAX/TEL mode only)4 steps
- Press Menu/Set, 2, 2.
- Select 20, 30, 40 or 70 seconds for alerting you to a voice call.
- Press Menu/Set, then Stop/Exit.
- The pseudo-ring continues for the selected time even if the caller hangs up.
Recording the fax/tel outgoing announcement (f/t message) (fax-t106 only)
Instructions from the manualRecording the Fax/Tel Outgoing Announcement (F/T MESSAGE) (FAX-T106 only)6 steps
- Press Menu/Set, 8, 4.
- Select F/T MESSAGE, press Menu/Set, select RECORD MSG and press Menu/Set.
- Pick up the handset and speak an announcement lasting no more than 20 seconds.
- Press Stop/Exit and replace the handset.
- The announcement plays back.
- Callers cannot leave a message in this mode.
Fax detect
Instructions from the manualFax Detect5 steps
- Press Menu/Set, 2, 3.
- Select ON, SEMI or OFF and press Menu/Set, then Stop/Exit.
- ON automatically receives a fax after you answer; SEMI does so only when you answer at the fax machine.
- With OFF, activate reception using Fax Start at the machine or the three-digit Fax Receive Code, initially *51, at an external or extension telephone.
- If the machine intercepts faxes sent from a computer on the same line, select OFF.
Printing a reduced incoming fax (auto reduction)
Instructions from the manualPrinting a reduced incoming fax (Auto Reduction)4 steps
- Press Menu/Set, 2, 5.
- Choose ON or OFF, press Menu/Set, then Stop/Exit.
- ON reduces an incoming fax to fit A4 paper.
- A fax longer than the supported printable length may still print on two pages.
Reception into memory
Instructions from the manualReception into memory5 steps
- Press Menu/Set, 2, 6.
- Choose ON or OFF, press Menu/Set, then Stop/Exit.
- ON stores later received faxes when paper runs out until memory is full.
- OFF finishes the current fax in available memory but will not answer subsequent fax calls until paper is loaded.
- Refill the tray to resume printing.
Changing the remote codes
Instructions from the manualChanging the remote codes6 steps
- Press Menu/Set, 2, 4.
- Choose ON or OFF, then press Menu/Set.
- If ON, enter the new Fax Receive Code and press Menu/Set; enter the Telephone Answer Code and press Menu/Set; enter the DECT Activation Code and press Menu/Set.
- Press Stop/Exit.
- Defaults are *51, #51 and *81 respectively.
- If calls disconnect when accessing an external answering device remotely, change the codes, for example to ### and 999.
Caller id (caller identification) (u.k. only)
Instructions from the manualCaller ID (Caller IDentification) (U.K. only)5 steps
- Caller ID requires the applicable BT service and is unavailable through a PBX.
- Press Menu/Set, 0, 3.
- Select ON or OFF and press Menu/Set, then Stop/Exit.
- Set Ring Delay to more than two rings before using Caller ID; one ring cannot receive the information.
- The machine retains the latest 30 caller IDs, replacing the oldest with the 31st call.
Bt call sign (u.k. only)
Instructions from the manualBT Call Sign (U.K. only)5 steps
- For the applicable BT service, press Menu/Set, 0, 4.
- Select ON or OFF, press Menu/Set and Stop/Exit.
- Enabling it sets reception to MANUAL and prevents changing the receive mode while enabled.
- After switching it off, select the desired mode again.
- The FAX-T106 retains TAD:MSG MGR if that mode was selected.
Automatic transmission
Instructions from the manualAutomatic transmission6 steps
- Use up to ten sheets in the automatic document feeder, face down and top edge first.
- Set the paper guides to the document width.
- Documents must be 148–216 mm wide and 150–600 mm long; feed heavier documents individually.
- Do not use curled, wrinkled, folded, ripped, stapled, paper-clipped or glued documents, cardboard, newspaper or fabric.
- Let ink dry.
- Enter the fax number and press Fax Start without picking up the handset or pressing Speaker Phone.
Manual transmission
Instructions from the manualManual transmission4 steps
- Load the document face down in the feeder.
- Lift the handset or press Speaker Phone, then dial.
- When you hear fax receiving tones, press Fax Start.
- If you lifted the handset, replace it.
Contrast
Instructions from the manualContrast5 steps
- Load the document face down.
- Press Menu/Set, 3, 3.
- Choose AUTO, LIGHT for a light original, or DARK for a dark original; press Menu/Set.
- Press 2 when finished, or 1 to select more sending settings.
- Enter the fax number and press Fax Start.
Cancelling a scheduled job
Instructions from the manualCancelling a scheduled job4 steps
- Press Menu/Set, 4.
- Select the scheduled job with the up/down keys and press Menu/Set.
- Press 1 to cancel it or 2 to exit without cancellation.
- Repeat for another job if necessary, then press Stop/Exit.
Delayed fax
Instructions from the manualDelayed Fax6 steps
- Load the document face down.
- Press Menu/Set, 3, 7.
- Enter the sending time in 24-hour format and press Menu/Set.
- Select 1 to leave the document in the feeder or 2 to scan it into memory.
- Press 1 for further settings or 2 to finish, then enter the fax number and press Fax Start.
- Memory-stored jobs occupy memory until removed through Cancelling a Job.
Memory transmission
Instructions from the manualMemory Transmission6 steps
- Load the document face down.
- Press Menu/Set, 3, 9.
- To change the default, select ON or OFF and press Menu/Set.
- Alternatively, select NEXT FAX ONLY with the up/down keys and press Menu/Set, then select ON or OFF for that fax and press Menu/Set.
- Press 2 when finished or 1 for further settings.
- Enter the fax number and press Fax Start.
Storing one-touch dial numbers
Instructions from the manualStoring One-Touch Dial numbers6 steps
- Press Menu/Set, 6, 1, then press the One-Touch key to store.
- Enter a number of up to 20 digits and press Menu/Set.
- Enter a name of up to 15 characters and press Menu/Set, or press Menu/Set to store without a name.
- Select FAX, TEL or FAX/TEL and press Menu/Set, then Stop/Exit.
- Redial/Pause inserts a 3.5-second pause.
- Power loss does not erase stored numbers.
Storing speed-dial numbers
Instructions from the manualStoring Speed-Dial numbers5 steps
- Press Menu/Set, 6, 2.
- Enter a two-digit location from 00 to 99 and press Menu/Set.
- Enter a number of up to 20 digits and press Menu/Set.
- Enter a name of up to 15 characters and press Menu/Set, or press Menu/Set for no name.
- Select FAX, TEL or FAX/TEL, press Menu/Set, then Stop/Exit.
Setting up voice store
Instructions from the manualSetting up voice store3 steps
- Press Menu/Set, 8, 1.
- Choose ON, EXT or OFF with the up/down keys and press Menu/Set, then Stop/Exit.
- ON stores voice messages internally; EXT requires an external answering device; OFF does not store voice messages.
Setting up fax forwarding
Instructions from the manualSetting up Fax ForwardingView
Press Menu/Set, 8, 2. Select FAX FORWARD and press Menu/Set. Enter the forwarding fax number of up to 20 digits and press Menu/Set, then Stop/Exit.
Setting up fax storage
Instructions from the manualSetting up Fax StorageView
Press Menu/Set, 8, 2. Choose FAX STORAGE and press Menu/Set, then Stop/Exit. Select OFF instead to print received faxes without storing them.
Recording the message manager’s outgoing message (tad message)
Instructions from the manualRecording the Message Manager’s Outgoing Message (TAD MESSAGE)6 steps
- Press Menu/Set, 8, 4.
- Select TAD MESSAGE and press Menu/Set.
- Select RECORD MSG and press Menu/Set.
- Lift the handset and record an announcement lasting no more than 20 seconds.
- Press Stop/Exit and replace the handset; the announcement plays.
- Use the TAD MESSAGE selection, not F/T MESSAGE, to enable Message Manager.
Activating message manager mode
Instructions from the manualActivating Message Manager Mode4 steps
- Press and hold Digital TAD until the key lights and TAD:MSG MGR is displayed.
- A flashing light indicates new voice messages or faxes.
- If memory fills, the machine changes to FAX/TEL; if memory is full and paper is also unavailable, it changes to MANUAL and will not answer calls.
- Clear memory or replenish paper as appropriate.
Playing voice messages
Instructions from the manualPlaying Voice Messages4 steps
- Press Play/Record to play new voice messages.
- Adjust playback volume with the left/right keys.
- Press the rewind key at the end of a message to repeat it, or the forward key to skip to the next message.
- Press Stop/Exit to stop playback.
Printing a fax message
Instructions from the manualPrinting a Fax MessageView
Press Play/Record. After voice messages play, press 1 to print stored faxes. Printing deletes those fax messages from memory. Press 2 to exit without printing.
Backup printing option
Instructions from the manualBackup Printing OptionView
Press Menu/Set, 8, 3. Choose ON or OFF and press Menu/Set, then Stop/Exit. ON also prints a backup copy while received faxes are stored in memory.
Erasing messages
Instructions from the manualErasing Messages4 steps
- To erase an individual voice message, press Play/Record and press Erase after its two short beeps or while it plays; press 1 to confirm or 2 to cancel, then Stop/Exit.
- To erase all messages of a selected type, press Erase, select VOICE, DOC or MSG and press Menu/Set; press 1 to confirm or 2 to cancel, then Stop/Exit.
- Fax messages cannot be erased individually.
- Erasing all faxes prints any newly received faxes first.
Setting the toll saver
Instructions from the manualSetting the Toll Saver5 steps
- Press Menu/Set, 2, 1.
- Select TOLL SAVER and press Menu/Set.
- Choose ON or OFF, press Menu/Set, then Stop/Exit.
- When enabled, the machine answers after three rings if messages exist and five if none exist; hang up after four rings to avoid a call charge when checking remotely.
- This setting overrides Ring Delay.
Recording a conversation
Instructions from the manualRecording a Conversation3 steps
- While speaking through the handset, press Play/Record to begin recording and Stop/Exit to end it.
- Recording is limited by the maximum incoming-message time and sounds a beep every 15 seconds.
- This function is unavailable through Speaker Phone.
Making a single copy
Instructions from the manualMaking a single copy5 steps
- Load the document face down and press Copy/Reports twice.
- Do not pull the paper during copying.
- Press Stop/Exit to cancel.
- The machine cannot receive a fax during copying.
- The default single-copy resolution is S.FINE; select PHOTO with Resolution for photographs.
Copy options: single or multiple copies, sort/stack, reduce/enlarge
Instructions from the manualCopy options: Single or Multiple copies, Sort/Stack, Reduce/Enlarge8 steps
- Load the document face down and press Copy/Reports.
- Enter 1–99 copies and press Menu/Set.
- Select SORT or STACK and press Menu/Set.
- Select AUTO, 50%, 75%, 87%, 93%, 100%, 120%, 125% or 150% with the up/down keys.
- Press Copy/Reports.
- If memory runs out on the first page, press Stop/Exit and use a single copy.
- During sorting after the first page, press Copy/Reports to copy scanned pages or Stop/Exit to cancel; STACK uses less memory.
- Higher resolution also uses more memory.
Compatibility
Instructions from the manualCompatibility4 steps
- Press Menu/Set, 0, 2.
- Select BASIC or NORMAL with the up/down keys.
- Press Menu/Set, then Stop/Exit.
- BASIC lowers modem speed to 9600 bps and should be used only when necessary for interference on the line; NORMAL uses 14400 bps on the FAX-T106.
Document jam
Instructions from the manualDocument Jam4 steps
- Remove any document that is not jammed from the feeder.
- Lift the lever on the right to open the top cover.
- Pull the jammed document toward the front.
- Close the top cover securely by pressing down on both sides.
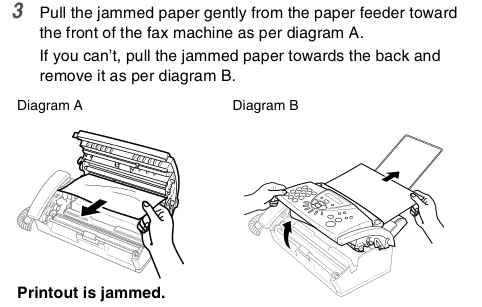
Paper jam
Instructions from the manualPaper Jam5 steps
- Remove any paper that is not jammed.
- Lift the lever on the right to open the top cover.
- Pull the jammed paper gently toward the front, as shown in diagram A.
- If it cannot be removed that way, pull it toward the back as shown in diagram B.
- Close the top cover securely by pressing down on both sides, then reload paper.
Cleaning the print head
Instructions from the manualCleaning the print head6 steps
- Disconnect the telephone-line cord first, then unplug the power cord.
- Parts inside can be extremely hot after use; take care.
- Open the top cover with the right-hand lever and remove the print cartridge.
- Clean the print head with a lint-free cloth that is dry or lightly moistened with isopropyl alcohol.
- Wait until it is completely dry.
- Reinstall the cartridge and close the cover securely on both sides.
Cleaning the scanner
Instructions from the manualCleaning the scanner5 steps
- Disconnect the telephone-line cord first, then unplug the power cord.
- Open the top cover using the right-hand lever.
- Clean the white film and glass strip with isopropyl alcohol on a lint-free cloth.
- Do not bend the white film or drop anything inside the machine.
- Close the top cover securely on both sides.
Changing the ribbon
Instructions from the manualChanging the ribbon10 steps
- Open the top cover with the right-hand lever.
- Remove the print cartridge and turn it upside down with the blue gear at the upper left.
- Snap out the upper and lower right white spools; slide the ribbon off the blue gear and lower-left spool, leaving those two parts in place.
- Remove the elastic band from the new ribbon and place its full roll in the lower position, with the shiny side facing down.
- Transfer the white spools from the used cardboard cores to the same positions on the new ribbon.
- Place the lower-left cardboard core on its white spool and the upper blue core on the blue gear.
- Fit the upper and lower right white spools into their holders, aligning each spool’s teeth with the holder cutouts.
- Turn the upper-right white spool clockwise to tighten the ribbon.
- Turn the cartridge over and reinstall it, inserting the recessed end first and seating all four spool holders.
- Close the top cover securely on both sides.
Attach the paper wire extension and paper tray
Instructions from the manualAttach the paper wire extension and paper trayView
Attach the paper wire extension. Attach the paper tray, inserting its wide pins firmly into the pockets on the top edge of the machine.
Connect the handset, power cord and telephone line cord
Instructions from the manualConnect the handset, power cord and telephone line cordView
- Connect the handset.
- Connect the power cord to the machine, then plug the power cord into an electrical socket.
- Connect the telephone-line cord to the machine’s socket marked LINE.
Controls and parts
See the manual diagrams 2 diagrams
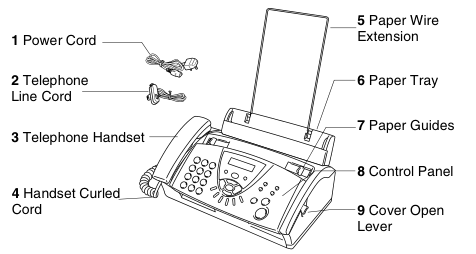
Diagram key
- 1: Power Cord — connects the machine to the electrical socket.
- 2: Telephone Line Cord — connects the machine to the telephone wall socket.
- 3: Telephone Handset — for receiving and making voice calls.
- 4: Handset Curled Cord — connects the handset to the machine.
- 5: Paper Wire Extension — supports paper in the paper tray.
- 6: Paper Tray — load recording paper here.
- 7: Paper Guides — press and slide to fit document width.
- 8: Control Panel — keys and display control the machine.
- 9: Cover Open Lever — lift to open the top cover.
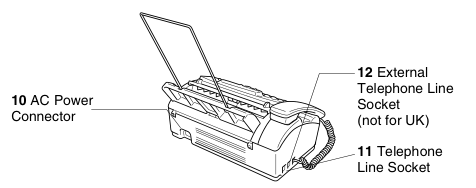
Diagram key
- 10: AC Power Connector — plug in the power cord here.
- 11: Telephone Line Socket (LINE) — plug in the telephone line here.
- 12: External Telephone Line Socket (EXT.) — not for UK models; the shared manual shows this socket for connecting an external telephone.