MODEL REFERENCE
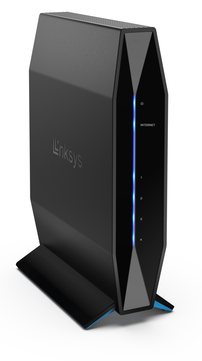
Linksys E7350
2 errors · 27 guides
The checks and guides below come from the official manuals for this model.
No matches for this wording. Try a light name, error code or a shorter phrase.
Software error messages
Messages shown by the scanning software —Your Internet cable is not plugged in4 checks
—Cannot access your router2 checks
Guides
Front
Instructions from the manualFront indicator states4 steps
- The Power light blinks blue during startup and WPS pairing, and blinks yellow if WPS pairing fails.
- The guide identifies the failed-pairing state but gives no separate remedy for that state.
- The Internet status light is solid blue when connected to the internet and solid yellow when not connected.
- Each Ethernet activity light is solid blue when a cable is connected to its corresponding port and blinks blue when the port has activity.
Back
Instructions from the manualBack controls and connections10 steps
- Press the WPS button (1) to configure wireless security on WPS-enabled devices.
- Its light blinks while pairing is active.
- Hold Reset (2) until the power LED starts flashing to restore factory settings.
- Connect Ethernet cables between ports (3), rated 10/100/1000, and wired network devices.
- The rear lights beneath these ports require both an inserted cable and data traffic.
- Connect the modem by Ethernet to the Internet port (4).
- Its rear light requires a cable and data traffic.
- Connect a USB drive to USB 3.0 (5) to share it on the network.
- Connect the supplied AC adapter to the power port (6).
- Press the power switch (7) to I (ON) to turn the router on.
How to install your router
Instructions from the manualAdd this router to existing mesh Wi-Fi8 steps
- If this router has been used before, restore factory settings before adding it: use the Administration tab or hold the rear Reset button for 10 seconds.
- Connect a computer or mobile device to the router already connected to the modem, by Ethernet or Wi-Fi.
- Visit myrouter.local, or enter 192.168.1.1, in a browser.
- A modem-router gateway may require 192.168.10.1.
- If these do not open setup, use the Linksys setup-IP support instructions named in the manual.
- Log in using the router password; the default is admin.
- Select Wi-Fi > Basic Wireless Settings > Add a new node.
- Follow the prompts.
Set up a traditional router or mesh parent13 steps
- Disconnect an existing router if replacing one.
- Plug this router into power using the included adapter and set its switch to I (ON).
- Connect the included Ethernet cable to the yellow Internet port.
- For a modem, connect the other end to its Ethernet (LAN) port.
- For a modem-router, connect the other end to any available port.
- Connect to the network name supplied in the Quick Start Guide.
- You can change the name and password later.
- Select automatic connection to this network if available; consult the device instructions if help connecting is needed.
- Internet access will remain unavailable until setup is complete.
- Enter http://myrouter.local or 192.168.1.1 in a browser and follow setup prompts.
- With a modem-router gateway, 192.168.10.1 may be needed.
- If none opens setup, use the Linksys setup-IP support instructions identified in the manual.
- At the end, register the router to receive security updates, product recalls and other product information.
How to open the browser-based utility
Instructions from the manualOpen the browser-based utility4 steps
- Connect to the router using Ethernet or Wi-Fi.
- Open http://myrouter.local or 192.168.1.1 in a browser.
- Enter the password changed during setup and click LOGIN.
- If the password was unchanged or setup was skipped, the default is admin.
Language
Instructions from the manualSelect utility languageView
Select a language from the Language drop-down menu. The browser utility changes language within five seconds.
Internet setup
Instructions from the manualChoose the Internet connection type10 steps
- Use the Internet Connection Type drop-down list to select the connection type supplied by your ISP.
- Keep Automatic Configuration – DHCP only when the ISP supports DHCP or a dynamic IP address; this generally applies to cable connections.
- Choose Static IP when a fixed address is required.
- Choose PPPoE for a DSL connection where the ISP uses Point-to-Point Protocol over Ethernet.
- PPTP generally applies in Europe: use Obtain an IP Address Automatically for DHCP/dynamic addressing, or Specify an IP Address and the displayed options for a required fixed address.
- L2TP generally applies in Israel.
- For PPPoE, PPTP and L2TP, select Connect on Demand or Keep Alive as appropriate.
- Keep Alive keeps the router always connected; check ISP charges for continuous access and select the option that fits.
- Bridge Mode turns the router into an access point and disables routing, the DHCP server, built-in firewall and NAT.
- Wireless Bridge connects wirelessly to the main router and shares that connection with devices connected to the bridge Ethernet ports.
Basic wireless settings
Instructions from the manualSelect wireless network mode7 steps
- Select the wireless standards the network will support.
- Keep Mixed, the default, for Wireless-N (2.4 GHz), G, B or AX devices.
- Wireless-A Only is for a network containing only Wireless-A devices.
- Wireless-N Only is for only Wireless-N (2.4 GHz) devices.
- Disabled is the listed selection when there are no Wireless-B, G or N (2.4 GHz) devices.
- For 5 GHz the choices are Mixed, Wireless-A/N Only or Disabled.
- If uncertain, keep Mixed.
Network name (ssid)
Instructions from the manualSet network names and reconnect after reset6 steps
- SSIDs are case-sensitive and must be no longer than 32 characters.
- The default 2.4 GHz name is LinksysXXXXX and the 5 GHz name is LinksysXXXXX_5GHz; XXXXX means the last five serial-number digits on the router underside.
- Changing the SSID gives both bands the new names.
- The browser utility can give them different names.
- Restoring factory settings with Reset or Administration > Factory Defaults restores the default network name.
- Change it back to its original name or reconnect every wireless device to the new name.
Channel width
Instructions from the manualChoose channel width2 steps
- For 2.4 GHz with B, G or N devices, retain Auto (20 MHz or 40 MHz) for the recommended performance, or choose 20 MHz only when that width is wanted.
- For 5 GHz retain the default 20, 40 or 80 MHz.
Channel
Instructions from the manualChoose wireless channelView
Select a channel from the drop-down menu. Keep Auto if uncertain which channel to use.
Ssid broadcast
Instructions from the manualControl SSID broadcasting3 steps
- Keep Enabled to broadcast the network name so nearby wireless clients can detect it.
- Hiding the name does not make Wi-Fi more secure, because an interested person can still find the network.
- If you still do not want broadcasting, choose Disabled.
Wireless security
Instructions from the manualWireless security options3 steps
- The table lists WPA3 Personal, WPA3/WPA2 Personal, WPA2 Personal and WPA2 Enterprise.
- It labels WPA3 Personal strongest.
- No additional strength rankings are supplied for the other rows.
Wpa2 personal
Instructions from the manualConfigure WPA2 Personal3 steps
- When selecting WPA2 Personal, every device on the wireless network must use WPA2 Personal and the same passphrase.
- Enter a passphrase of 8–63 characters.
- This network-access password can be the one entered during setup.
Disabled
Instructions from the manualWireless security disabled warning2 steps
- If wireless security is disabled, the first attempt to access the internet shows a warning.
- Choose to enable wireless security, or confirm that you understand the risks if you wish to continue without it.
Troubleshooting
Instructions from the manualYour router was not successfully set up3 checks
- Setup cannot be completed
- Use a paperclip or pin to hold Reset until the front power light goes off and begins blinking, about 10 seconds. Enter 192.168.1.1 in a browser and retry setup.
- Setup still cannot be completed
- Temporarily disable the computer firewall according to its security-software instructions and install the router again.
- Another computer is available
- Try installing the router using the other computer.
Restart using the power cord7 steps
- Disconnect power cords from both router and modem.
- Wait 10 seconds.
- Reconnect modem power and check it has power.
- Wait for the modem online indicator to stop blinking, about two minutes, then reconnect router power.
- Wait until the manual’s flashing rear green LED, located between Reset and the power port, is solid.
- Then wait two minutes before attempting internet access from a computer.
- This is the rear light described in the restart instructions, not a relabelling of the blue front Power indicator.
Safety notices
Instructions from the manualSafety notices3 steps
- Do not use the equipment near water, such as a wet basement or swimming pool.
- Avoid using it during an electrical storm because of the remote risk of lightning shock.
- The power adapter is the disconnect device: use a nearby, easily accessible socket outlet.
Fcc statement
Instructions from the manualUS FCC interference checks2 steps
- If turning the equipment off and on establishes that it causes radio/TV interference, try reorienting or relocating the receiving antenna, increasing equipment-to-receiver separation, using an outlet on a different circuit, or consulting the dealer or an experienced radio/TV technician.
- Unapproved modifications can void the authority to operate it.
Fcc radiation exposure statement
Instructions from the manualUS radio placement limits3 steps
- Install and operate with at least 35 cm between the radiator and your body.
- Do not locate this transmitter together with another antenna or transmitter except under FCC multi-transmitter product procedures.
- Use 2.4 GHz channels 1–11 only in the US; 5.15–5.25 GHz operation is indoor-only.
Innovation, science and economic development canada radiation exposure statement
Instructions from the manualCanada radio placement and 5 GHz limits4 steps
- Maintain at least 35 cm between the radiator and your body.
- Do not co-locate this device and its antennas or operate them with another antenna/transmitter except under IC multi-transmitter procedures.
- Use 5150–5250 MHz indoors only.
- High-power radars are primary users of 5250–5350 and 5650–5850 MHz and can cause interference or damage to LE-LAN devices.
National restrictions
Instructions from the manualEU indoor-use restrictionsView
Operate indoors only at 5150–5350 MHz in the countries identified by this manual: AT, BE, BG, CZ, DK, EE, FR, DE, IS, IE, IT, EL, ES, CY, LV, LI, LT, LU, HU, MT, NL, NO, PL, PT, RO, SI, SK, TR, FI, SE, CH, UK and HR.
Antenna restrictions
Instructions from the manualUse supplied antenna configurationView
Use the standard, integral or dedicated external antennas supplied with the equipment.
Third-party software or firmware
Instructions from the manualThird-party software and firmware noticeView
Using software or firmware not supported or provided by Linksys can make the equipment cease to comply with regulatory requirements.
Eu radiation exposure statement
Instructions from the manualEU radio placement limitView
Install and operate with at least 35 cm between the radiator and your body.
Weee information
Instructions from the manualEU separate collection and recycling4 steps
- Do not dispose of equipment bearing the WEEE symbol with unsorted municipal waste.
- Use designated government or local-authority collection facilities.
- For disposal information, contact the local authorities, waste-disposal service or retailer.
- Proper collection and recycling helps prevent environmental and health harm.
Controls and parts
See the manual diagrams 1 diagram
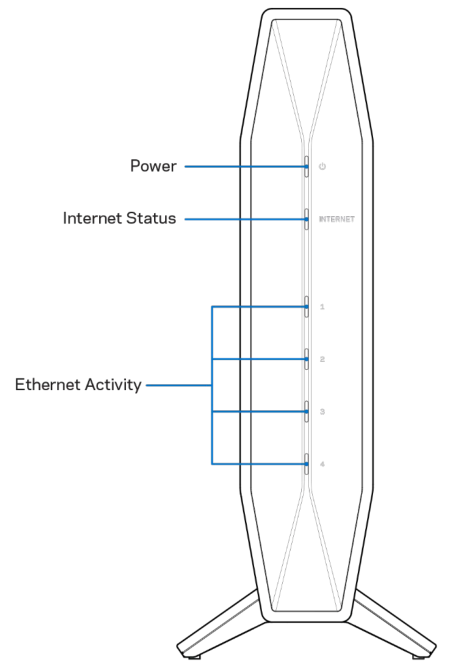
Diagram key
- Power: Blinks blue during router startup and WPS pairing; blinks yellow if WPS pairing fails.
- Internet Status: Solid blue when connected to the internet; solid yellow when not connected.
- Ethernet Activity: Each corresponding front port light is solid blue with a connected cable and blinks blue with port activity.
- 1: Ethernet activity for port 1.
- 2: Ethernet activity for port 2.
- 3: Ethernet activity for port 3.
- 4: Ethernet activity for port 4.