MODEL REFERENCE
Philips NeoPix 120 NPX120/INT
52 guides

The checks and guides below come from the official manuals for this model.
No matches for this wording. Try a light name, error code or a shorter phrase.
Guides
Setting up the product
Instructions from the manualSafe location, handling and stopping for service15 steps
- Use indoors on a stable flat surface and position cables so nobody trips.
- Do not operate in damp rooms or touch mains connections with wet hands.
- Do not use immediately after moving from cold to warm conditions.
- Provide ventilation; do not cover the projector or use it in a closed cabinet, box or enclosure.
- Protect it from direct sunlight, heat, temperature fluctuations and moisture; avoid heaters, air conditioners, very dusty environments and extreme vibration.
- Operate at 5–35 °C.
- Long operation heats the surface; overheating automatically puts it in standby.
- If liquid or foreign matter enters, turn it off, unplug it and have an authorised service centre inspect it.
- If excessive heat or smoke occurs, immediately shut it down, unplug it and have it checked.
- Keep away from open flames; do not place heavy or sharp objects on it or its cable, and avoid touching the lens.
- Keep batteries away from heat, sunlight and flames; an incorrect battery type risks explosion.
- Supervise children and keep packaging away from them.
- Do not use during thunderstorms with lightning.
- To prevent moisture after moving cold to warm, heating a cold room or using a damp room, seal the projector in a plastic bag before moving it.
- Wait one to two hours before removing it.
Repairs
Instructions from the manualPower supply
Instructions from the manualPower and eye-safety precautions7 steps
- Use only a power adapter certified for this product.
- Check the local mains voltage matches its rating and use a nearby accessible socket.
- The specified adapter input is 100–240 V AC, 50/60 Hz, maximum 1.4 A; output is 24 V DC, 3 A, 72 W.
- Always use the Power button to switch it off.
- Turn it off and unplug before surface cleaning.
- Use a soft lint-free cloth; do not use liquid, gaseous or flammable cleaners, sprays, abrasives, polishes or alcohol, and keep moisture out.
- Do not look directly into the bright LED projection lens during operation, as this can irritate or damage eyes.
Top view
Instructions from the manualTop controls7 steps
- The projection lens is callout 1.
- Use the focus knob (2) for sharpness and the keystone knob (3) for image shape.
- Right and left speakers are 4 and 9.
- The top Menu button (5) opens picture/sound setup options.
- OK (6) confirms selections or changes a current value.
- The four navigation buttons (7) move through items; Left/Right change a setting.
- Back (8) returns to or exits the previous/current screen.
Front view
Instructions from the manualFront, rear and bottom parts6 steps
- Front: 1 is the IR sensor, 2 the lens and 3 the angle knob.
- Turn the knob to adjust image height; unscrew it to expose the ceiling-mount screw hole.
- Rear: 1 is Power, which switches on or to standby; its LED is white when on and red in standby.
- 2 is the rear IR sensor; USB (3) accepts storage or a dongle; the 3.5 mm audio output (4) connects headphones or external speakers; HDMI (5) connects a playback device’s HDMI output.
- Bottom: 1 is the angle knob, 2 an anti-slip foot, 3 the DC input for the AC adapter, 4 the subwoofer and 5 the removable air filter.
- No filter-removal or filter-cleaning procedure is supplied in this manual.
Remote control
Instructions from the manualRemote control functions11 steps
- Source (1) displays the available input sources.
- OK (2) confirms a selection or changes a value.
- Option/Menu (3) displays and changes picture mode only while images are displayed.
- Home (4) opens the home screen.
- Volume (5) raises or lowers sound.
- Play/Pause (6) starts, pauses or resumes media.
- Previous/Next (7) changes media file.
- Back (8) returns to or exits a screen.
- Navigation (9) moves among items, with Left/Right changing values.
- Settings (10) opens picture/sound setup options.
- Power (11) turns on or enters standby.
Place the projector
Instructions from the manualPlace the projector3 steps
- Disconnect all devices from their power supplies before establishing or changing connections.
- Set the projector on a flat surface, such as a table facing the projection surface.
- If the direction is incorrect, use the remote Settings button, choose Panel Flip Rotation and use Left/Right or OK to select 0.
Connect to power supply
Instructions from the manualConnect the power supply5 steps
- Always use the Power button to switch on or off.
- Select the supplied EU, UK or US cable with the correct plug.
- Connect it to the AC adapter.
- Connect the adapter to the bottom DC power jack, then connect the cable to the electrical socket.
- The Power LED lights red.
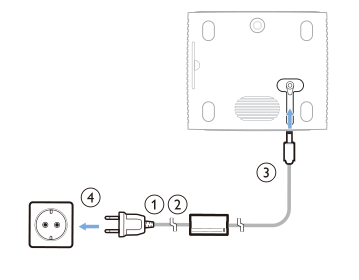
Diagram key
- 1: Select the supplied power cable with the correct plug.
- 2: Connect the power cable to the AC adapter.
- 3: Connect the AC adapter to the bottom DC power jack.
- 4: Connect the cable to the electrical socket; the projector power LED becomes red.
- Arrows: Insert the adapter connector into the bottom DC jack and the selected mains plug into the socket, in the printed sequence.
Prepare the remote control
Instructions from the manualPrepare and aim the remote6 steps
- Incorrect battery use can cause overheating, explosion, fire, injury or leaking damage.
- Do not expose the remote to direct sunlight or its batteries to fire or water.
- Do not deform, dismantle or recharge them.
- Replace empty batteries promptly and remove them when unused for a long time.
- Open the compartment, insert the supplied AAA batteries with the indicated +/− polarity, then close it.
- Point the remote at a projector IR sensor and keep the path unobstructed.
Power on/off the projector
Instructions from the manualPower on, standby and full shutdown3 steps
- Press Power on the projector or remote to turn it on; the LED changes red to white.
- For standby, hold Power for two seconds or press it twice; the LED changes white to red.
- To shut down fully, disconnect the power cable from the socket.
Screen size adjustment
Instructions from the manualScreen size and digital zoom4 steps
- Projection size depends on lens-to-screen distance.
- The recommended distance is 212 cm (83 inches), producing a maximum 65-inch (165 cm) image.
- The minimum wall distance is 88 cm (34 inches).
- To reduce image size digitally, press remote Settings, select Digital Zoom and adjust with Left/Right or OK.
Screen height adjustment
Instructions from the manualAdjust screen heightView
With the projector on a flat surface, turn the bottom angle-adjustment knob to change image height.
Image focus adjustment
Instructions from the manualAdjust focusView
Turn the focus-adjustment knob above the projection lens to sharpen the image.
Image shape adjustment
Instructions from the manualAdjust keystone shapeView
Turn the keystone-adjustment knob above the projection lens to change image shape.
Connect to devices through hdmi™
Instructions from the manualConnect HDMI playback devices5 steps
- Disconnect devices from power before making or changing connections.
- Use an HDMI cable between the projector HDMI input and the playback device HDMI output, such as a Blu-ray player, console, camcorder, digital camera or computer.
- The projector shows the image and plays its audio.
- It should select the correct source automatically.
- If it does not, press remote Source to open the input list and select HDMI.
Connect to a dongle
Instructions from the manualConnect a streaming dongle5 steps
- With devices disconnected from power before changing connections, connect the dongle to HDMI using an HDMI cable, then to USB using a USB cable.
- The USB supply limit is 5 V, 2 A.
- The dongle is not included.
- The image and audio play through the projector.
- If the source does not change automatically, press remote Source and select HDMI.
Connect to external speakers
Instructions from the manualConnect external speakers or headphones5 steps
- Before connections, disconnect devices from their power supplies.
- Turn down projector volume before connecting headphones; prolonged high volume can harm hearing.
- Connect the 3.5 mm output to headphones, or use a 3.5 mm audio cable to an external speaker’s analogue input, either a 3.5 mm jack or red/white inputs.
- The internal speakers deactivate automatically.
- After connecting, adjust volume to the desired level using the remote volume buttons.
Connect a usb storage
Instructions from the manualConnect supported USB media4 steps
- The player supports MP4, RMVB, AVI, RM and MKV video; MP3, WMA, OGG, AAC, FLAC, APE and WAV audio; BMP, PNG and JPEG images.
- The setup section describes FAT16/FAT32 storage.
- Check that the drive contains supported video or image files, then connect it to USB, with devices disconnected from power while changing connections.
- The separate unreadable-drive troubleshooting row prescribes FAT32 or NTFS and excludes exFAT; use that condition-specific remedy for an unreadable drive.
Play videos
Instructions from the manualPlay videos12 steps
- Press Home, choose MOVIE, then USB.
- Only supported videos appear, with folders/files in alphabetical order.
- Use navigation to select a file/folder.
- OK opens a folder; Up Folder returns to its parent.
- Back or RETURN exits the current folder/device.
- Selecting a video for more than three seconds starts a preview from its beginning.
- Press OK or Play/Pause to start the selected video.
- Play/Pause pauses/resumes; Previous/Next moves to the previous/next file in the folder.
- During playback, OK opens the bottom control bar.
- Down or Back hides it.
- With the bar visible, use Left/Right to select an option and OK to perform it or change its value; Back closes an option dialog.
- Back stops video and returns to the current folder’s file list.
Video playback control bar12 steps
- Play/Pause controls playback.
- FB rewinds and FF advances at 2X–32X; press Play/Pause to return to normal speed.
- Prev. and Next change files; Stop returns to the current file list.
- Repeat None stops after the folder’s last video; Repeat 1 loops the current file; Repeat ALL cycles the whole folder.
- For a segment loop, press OK at Set A for its beginning, then at Set B for its end.
- OK at None disables it.
- Playlist displays all current-folder files for inspection or changing video without first stopping.
- Info shows video information, including resolution and size.
- Slow Forward uses 1/2X–1/16X; Play/Pause restores normal speed.
- Step Forward freezes playback for frame-by-frame OK advances.
- Goto Time takes hours/minutes/seconds entered with navigation.
- Aspect Ratio cycles 16:9, 4:3 and Auto.
View images
Instructions from the manualView images and slide shows9 steps
- Press Home, select PHOTO, then USB.
- Only supported images appear, with folders/files alphabetical.
- Navigate to an image or folder; OK opens folders, Up Folder returns to the parent, and Back or RETURN exits.
- Selecting an image for over three seconds shows its preview.
- Press OK or Play/Pause to start a slide show of supported images in that folder from the selected image.
- Play/Pause pauses/resumes; Previous/Next changes image.
- OK shows the bottom controls; Down or Back hides them.
- Use Left/Right then OK to choose an option or change its value; Back closes its dialog.
- Back stops the slide show and returns to the file list.
Slide-show control bar8 steps
- Play/Pause controls the show; Prev. and Next change image; Stop returns to the list.
- Repeat None stops after the last image, Repeat 1 repeatedly displays the current image and Repeat ALL cycles the folder.
- Music starts or stops supported audio in the folder.
- Playlist displays image files to choose another starting image or inspect without stopping.
- Info shows resolution and size.
- Rotate pauses the show and rotates the image 90° clockwise.
- Zoom In/Out pauses and changes size.
- Move View is enabled only above 100% zoom; use navigation to move the image and expose other areas.
Picture settings
Instructions from the manualPicture settings4 steps
- Press remote Settings, select a picture option and use Left/Right or OK to change it.
- Picture Mode selects predefined colours; choose User to customise contrast, brightness, colour saturation and sharpness.
- Color Temperature sets colour temperature, Aspect Ratio sets screen proportions and Noise Reduction sets its level.
- The displayed sample values are examples, not a prescription for every source.
Sound settings
Instructions from the manualSound settings4 steps
- Press remote Settings, select a sound option and use Left/Right or OK to change it.
- Sound Mode selects a preset; User allows boost/cut at 120 Hz, 500 Hz, 1.2 kHz, 3 kHz and 12 kHz.
- Balance changes relative left/right speaker levels.
- Auto Volume reduces sudden volume changes when enabled.
Language settings
Instructions from the manualRestore default settings
Instructions from the manualRestore factory settingsView
Press remote Settings, select Restore Factory Default and press OK. Press Left to start restoration. The projector switches off after restoration.
Rotate/flip projection screen
Instructions from the manualRotate or flip the screenView
Press remote Settings, select Panel Flip Rotation and use Left/Right or OK to rotate or flip the image.
Set sleep timer
Instructions from the manualSet sleep timerView
Press remote Settings, select Sleep Timer and use Left/Right or OK to choose a period in minutes after which it switches off. Default is Off.
Set auto sleep
Instructions from the manualSet automatic sleepView
Press remote Settings, select Auto Sleep and use Left/Right or OK to choose an inactivity period in hours after which it switches off. Default is Never.
Hdmi™ cec settings
Instructions from the manualHDMI CEC settings6 steps
- Press remote Settings, choose HDMI CEC and OK.
- Select a CEC option and change it with Left/Right.
- Enable HDMI CEC to activate CEC.
- Auto Standby puts connected CEC-enabled devices in standby when the projector is turned off.
- Device control lets its remote control those devices.
- Device List uses OK to search for and display connected CEC devices.
Cleaning
Instructions from the manualClean the housing and lens6 steps
- Turn off with Power and unplug before surface cleaning.
- Wipe gently with a soft lint-free cloth to avoid scratches.
- Never use liquid, gaseous or flammable cleaners, sprays, abrasives, polishes or alcohol.
- Do not spray cleaning fluid or let moisture enter.
- Clean the lens with a soft brush or lens-cleaning paper.
- Do not use liquid agents, which can damage its coating.
Update software through usb
Instructions from the manualUpdate software through USB8 steps
- Before updating, check the current version with remote Settings > Info > OK.
- Do not switch off or remove the USB drive during an update.
- On the official Philips support site, find NPX120/INT and Software & drivers.
- Download its installation file to a USB flash drive.
- Unzip it and save the resulting file in the drive root.
- Turn the projector off, connect that drive, then turn it on.
- Updating starts automatically and the power LED blinks.
- Wait until it completes and the projector turns off by itself, then disconnect the USB drive.
Troubleshooting
Instructions from the manualPower cycling for an unresolved problem3 steps
- If the manual checks do not resolve a problem, turn it off by pressing Power twice.
- Wait at least 10 seconds, then press Power to turn it on.
- If the problem remains, contact a customer service centre or dealer.
The projector cannot be turned on.1 check
- The projector cannot be turned on.
- Disconnect and reconnect the power cable, then try switching on again.
The projector cannot be turned off.1 check
- The projector cannot be turned off.
- Hold Power for more than 10 seconds. If unsuccessful, disconnect the power cable.
No image from the external HDMI™ device.1 check
- No image from the external HDMI™ device.
- Check that HDMI is selected.
- Disconnect the HDMI cable or switch the HDMI device off, wait three seconds, then reconnect or switch it on.
- Disconnect all device power before changing cable connections, as instructed in initial setup.
No sound from the external connected device.3 checks
- No sound from the external connected device.
- Check external-device cables.
- No sound from the external connected device.
- Check that sound is enabled on that device.
- No sound from the external connected device.
- Only its manufacturer’s original cables may function.
No sound from external HDMI™ output device.1 check
- No sound from external HDMI™ output device.
- Set that HDMI-output device’s audio to Multichannel (Raw data) & Stereo (PCM).
No sound when you connect your computer using an HDMI™ cable.1 check
- No sound when you connect your computer using an HDMI™ cable.
- Check that computer sound is enabled.
The projector turns itself off.2 checks
- The projector turns itself off.
- Long operation makes its surface hot.
- The projector turns itself off.
- Check the power cable is correctly connected.
The projector cannot read the USB storage device.1 check
- The projector cannot read the USB storage device.
- exFAT is unsupported. Format the drive as FAT32 or NTFS, then use it. The setup section also describes FAT16/FAT32 storage.
The projector does not react to remote control commands.1 check
- The projector does not react to remote control commands.
- Check the remote batteries.
The temperature of the projector’s surface is warm.1 check
- The temperature of the projector’s surface is warm.
- Moderate heat during operation is normal for this projector; the row does not supply a repair instruction.
The projector does not work after I connect it to a laptop.2 checks
- The projector does not work after I connect it to a laptop.
- Check that HDMI is correctly plugged in.
- The projector does not work after I connect it to a laptop.
- Switch the laptop to projector-display output.
Black / White Pixels2 checks
- Black / White Pixels
- The manual describes a small number of non-functioning LCD pixels and states that no more than five dots meets factory specifications and is not a warranty defect.
- It gives no separate pixel-repair procedure.
- Black / White Pixels
- For dust, the manual states no more than three dots meets factory specifications and is not a warranty defect.
- Clean the lens with a gentle specific glass tissue.
- It also permits dry air through side holes to clean the optical engine.
- Retain the general power-off/unplug and no-liquid cleaning precautions.
Ce statement
Instructions from the manualCE temperature and connection limitsView
Use USB interfaces version 2.0 or later. Keep the adapter near the equipment and readily accessible; its plug is the disconnect device. Operate at 5–35 °C.
Fcc statement
Instructions from the manualFCC interference checks2 steps
- If switching the equipment off/on establishes radio/TV interference, try reorienting or relocating the receiving antenna, increasing separation, using an outlet on a different circuit, or consulting the dealer or an experienced radio/TV technician.
- Unapproved modifications can void operating authority.
Other notice
Instructions from the manualBattery, equipment and packaging disposal4 steps
- Take batteries to an appropriate collection point.
- Selectively dispose of electrical equipment bearing the crossed-out-bin symbol at a local collection point or a sales point when purchasing similar equipment.
- Recycle paper/cardboard packaging.
- Recycle or dispose of plastic wrapping according to the country’s requirements.
Quick start guide
Instructions from the manualQuick-guide remote key2 steps
- The quick guide’s numbered controls are: 1 Power On/Off, 2 Settings, 3 Navigate selection, 4 Back, 5 Previous/Next, 6 Source, 7 OK, 8 Option, 9 Home, 10 Volume +/−, 11 Play/Pause.
- Its numbers are scoped to this quick-guide figure and differ from the main guide’s figure numbering.
Fcc warning
Instructions from the manualFCC quick-guide radio placement and interference6 steps
- Do not co-locate or operate the transmitter with another antenna or transmitter.
- Install and operate at least 20 cm from the radiator.
- The stated RF limits apply to an uncontrolled environment.
- If switching off/on identifies radio/TV interference, reorient/relocate the receiver antenna, increase separation, use a different circuit outlet, or consult a dealer or experienced radio/TV technician.
- Unapproved modifications can void operating authority.
- The device must not cause harmful interference and must accept interference, including effects on operation.
Controls and parts
See the manual diagrams 3 diagrams
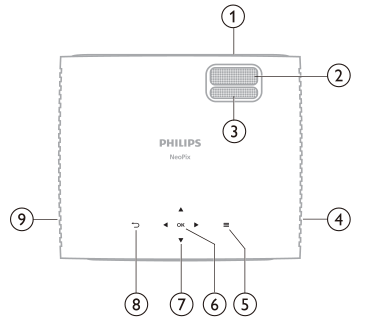
Diagram key
- 1: Projection lens.
- 2: Focus-adjustment knob for image sharpness.
- 3: Keystone-adjustment knob for image shape.
- 4: Right speaker.
- 5: Menu symbol; quick access to picture and sound setup options.
- 6: OK; confirms a selection or changes a current value.
- 7: Up, Down, Left and Right navigation buttons; move among on-screen items, with Left/Right changing a setting.
- 8: Back symbol; returns to or exits a screen.
- 9: Left speaker.
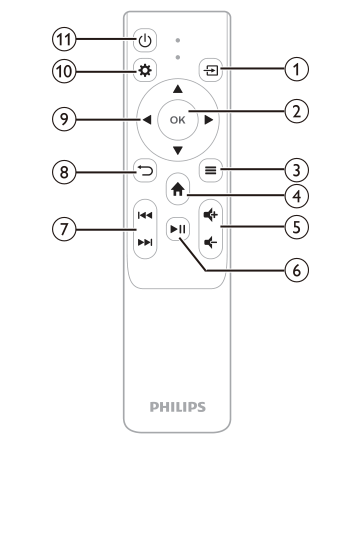
Diagram key
- 1: Source symbol; displays all inputs and lets you change the source.
- 2: OK; confirms a selection or changes a current value.
- 3: Option/Menu symbol; displays and changes picture mode only while images are on screen.
- 4: Home symbol; opens the home screen.
- 5: Volume plus/minus symbols; raise or lower sound.
- 6: Play/Pause symbol; starts, pauses or resumes media.
- 7: Previous/Next symbols; skips to the preceding or following file.
- 8: Back symbol; returns to or exits a screen.
- 9: Up, Down, Left and Right navigation buttons; move among items, with Left/Right changing values.
- 10: Settings gear; opens picture and sound setup options.
- 11: Power symbol; switches on or to standby.
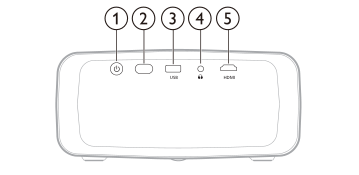
Diagram key
- 1: Power symbol; switches the projector on or into standby. Its LED is white when on and red in standby.
- 2: Rear infrared sensor for the remote control.
- 3: USB port; connects storage or a dongle.
- 4: Headphones symbol; 3.5 mm output for external speakers or headphones.
- 5: HDMI port; connects to an HDMI output on a playback device.