The checks and guides below come from the official manuals for this model.
No matches for this wording. Try a light name, error code or a shorter phrase.
Errors and indicators
Light patterns and messages documented in the manual
Message or indicatorWhat it meansCheck or action
Cover is opencover is open
Cover is open: Close the front cover of the printer.
Back Cover is openback Cover is open
Back Cover is open: Close the back cover of the printer.
Memory Fullmemory Full
2 checks
Memory Full
Press the Go button to print the data remaining in the printer. Cancel the print job if you want to delete the data remaining in the printer, see Cancel printing on page 3-7.
Memory Full
Reduce the print resolution or reduce the complexity of your document.
Print Overrunprint Overrun
4 checks
True Type Mode is excluded for HL-2030 and HL-2040 by the feature-table footnote.
Print Overrun
Press the Go button to print the data left in the printer. Cancel the print job if you want to delete the data remaining in the printer, see Cancel printing on page 3-7.
Print Overrun
If this does not clear the error, reduce the complexity of your document or reduce the print resolution.
Print Overrun
Set page protection to AUTO by using the supplied Windows® driver or Remote Printer Console program.
Print Overrun
If the remaining driver-setting check is needed, adjust Graphics mode and retry; the shared table also lists TrueType mode and printer TrueType fonts, but the model-specific feature table excludes True Type Mode for HL-2040.
These unavailable settings are not an instruction for this model.
No Paper Fed Tray 1no Paper Fed Tray 1
4 checks
No Paper Fed Tray 1 No Paper Fed Manual slot
The paper tray may be out of paper or not properly installed. If it is empty, put a new stack of paper in the paper tray and then press the Go button.
No Paper Fed Tray 1 No Paper Fed Manual slot
If there is paper in the paper tray, make sure it is straight.
If the paper is curled, straighten it before printing.
Sometimes it is helpful to remove the paper, turn the stack over and put it back in the paper tray.
No Paper Fed Tray 1 No Paper Fed Manual slot
Reduce the amount of paper in the paper tray, and then try again.
No Paper Fed Tray 1 No Paper Fed Manual slot
Check you use paper that meets Brother’s recommended paper specifications.
No Paper Fed Manual slotno Paper Fed Manual slot
4 checks
No Paper Fed Tray 1 No Paper Fed Manual slot
The paper tray may be out of paper or not properly installed. If it is empty, put a new stack of paper in the paper tray and then press the Go button.
No Paper Fed Tray 1 No Paper Fed Manual slot
If there is paper in the paper tray, make sure it is straight.
If the paper is curled, straighten it before printing.
Sometimes it is helpful to remove the paper, turn the stack over and put it back in the paper tray.
No Paper Fed Tray 1 No Paper Fed Manual slot
Reduce the amount of paper in the paper tray, and then try again.
No Paper Fed Tray 1 No Paper Fed Manual slot
Check you use paper that meets Brother’s recommended paper specifications.
Paper Jam Tray 1paper Jam Tray 1
Paper Jam Tray 1 Paper Jam Inside Paper Jam Rear: Take out the jammed paper from the indicated area.
Paper Jam Insidepaper Jam Inside
Paper Jam Tray 1 Paper Jam Inside Paper Jam Rear: Take out the jammed paper from the indicated area.
Paper Jam Rearpaper Jam Rear
Paper Jam Tray 1 Paper Jam Inside Paper Jam Rear: Take out the jammed paper from the indicated area.
Toner Life Endtoner Life End
Toner Life End: Replace the toner cartridge following the reviewed replacement instructions.
Toner Lowtoner Low
Toner Low: Purchase a new toner cartridge and have it ready for when the Toner Life End status is indicated.
Cartridge Position Errorcartridge Position Error
Cartridge Position Error: Take out the toner cartridge and put it back into the printer again.
Drum Life End Soondrum Life End Soon
Drum Life End Soon: The drum is near the end of it's life. Purchase a new drum unit to replace the current one.
Drum Errordrum Error
Drum Error: Clean the primary corona wire following the reviewed instructions.Related instructions: Cleaning the corona wire
Service Callservice Call
Service Call: Identify the LED service indication, restart once, and contact your dealer or an authorized Brother service representative if the indication remains.
MEMORY FULLmEMORY FULL
2 checks
MEMORY FULL
Press the Go button to print the data left in the printer. Cancel the print job if you want to delete the data remaining in the printer, see Cancel printing on page 3-7.
MEMORY FULL
Reduce the print resolution or reduce the complexity of your document.
PRINT OVERRUNpRINT OVERRUN
4 checks
PRINT OVERRUN
Press the Go button to print the data left in the printer. Cancel the print job if you want to delete the data remaining in the printer, see Cancel printing on page 3-7.
PRINT OVERRUN
If this does not clear the error, reduce the complexity of your document or reduce the print resolution.
PRINT OVERRUN
Set page protection to AUTO by using the supplied Windows® driver or Remote Printer Console program.
PRINT OVERRUN
Adjust Graphics mode and retry if needed.
The shared table lists additional TrueType settings; page 28 excludes True Type Mode for HL-2040, so unavailable typography settings are not prescribed for this model.
RESOLUTION REDUCED TO ENABLE PRINTINGrESOLUTION REDUCED TO ENABLE PRINTING
RESOLUTION REDUCED TO ENABLE PRINTING: Reduce the complexity of your document before you print to prevent automatic reduction in the resolution.
Sleep modesleep mode
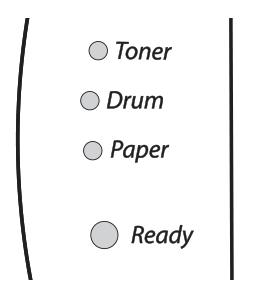
All four LEDs are off. The power switch is off or the printer is asleep. Press Go to wake it to Ready.
Official indicator pattern for Sleep mode. Read the complete state key below; a shared pattern may represent several conditions.
Diagram key
Toner: off.
Drum: off.
Paper: off.
Ready: off.
Ready to printready to print
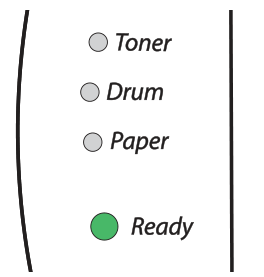
Ready is steady green and the other LEDs are off; the printer is ready.
Official indicator pattern for Ready to print. Read the complete state key below; a shared pattern may represent several conditions.
Diagram key
Toner: off.
Drum: off.
Paper: off.
Ready: steady green.
Warming upwarming up
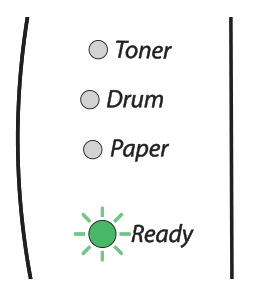
Ready blinks green while the printer warms up.
Official indicator pattern for Warming up. Read the complete state key below; a shared pattern may represent several conditions.
Diagram key
Toner: off.
Drum: off.
Paper: off.
Ready: blinking green.
Receiving datareceiving data
Ready blinks green while data is received, processed or printed.
Official indicator pattern for Receiving data. Read the complete state key below; a shared pattern may represent several conditions.
Diagram key
Toner: off.
Drum: off.
Paper: off.
Ready: blinking green.
Data remaining in memorydata remaining in memory
Ready blinks green. If it blinks for a long time without printing, press Go to print the data remaining in memory.
Official indicator pattern for Data remaining in memory. Read the complete state key below; a shared pattern may represent several conditions.
Diagram key
Toner: off.
Drum: off.
Paper: off.
Ready: blinking green.
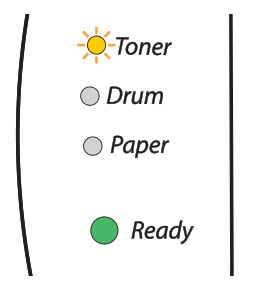
Toner lowtoner low
Toner blinks yellow for 2 seconds on and 3 seconds off, Ready is steady green, and Drum and Paper are off. Obtain a new cartridge before Toner Life End.
Official indicator pattern for Toner low. Read the complete state key below; a shared pattern may represent several conditions.
Diagram key
Toner: blinking yellow, two seconds on and three seconds off.
Drum: off.
Paper: off.
Ready: steady green.
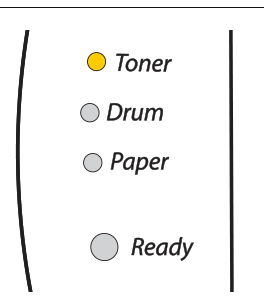
Toner life endtoner life end
Toner is steady yellow and the other LEDs are off. Replace the toner cartridge.
Official indicator pattern for Toner life end. Read the complete state key below; a shared pattern may represent several conditions.
Diagram key
Toner: steady yellow.
Drum: off.
Paper: off.
Ready: off.
Cartridge position errorcartridge position error
Toner is steady yellow and the other LEDs are off. Remove the toner cartridge and reinstall it.
Official indicator pattern for Cartridge position error. Read the complete state key below; a shared pattern may represent several conditions.
Diagram key
Toner: steady yellow.
Drum: off.
Paper: off.
Ready: off.
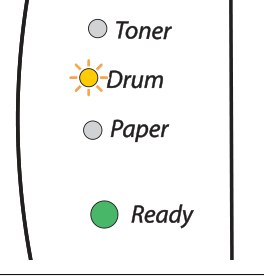
Drum life end soondrum life end soon
Drum blinks yellow for 2 seconds on and 3 seconds off, Ready is steady green, and Toner and Paper are off. Obtain a replacement drum unit.
Official indicator pattern for Drum life end soon. Read the complete state key below; a shared pattern may represent several conditions.
Diagram key
Toner: off.
Drum: blinking yellow, two seconds on and three seconds off.
Paper: off.
Ready: steady green.
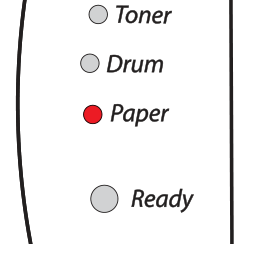
No paper fed tray 1no paper fed tray 1
Paper is steady red and the other LEDs are off. Load paper into the tray, then press Go.
Official indicator pattern for No paper fed tray 1. Read the complete state key below; a shared pattern may represent several conditions.
Diagram key
Toner: off.
Drum: off.
Paper: steady red.
Ready: off.
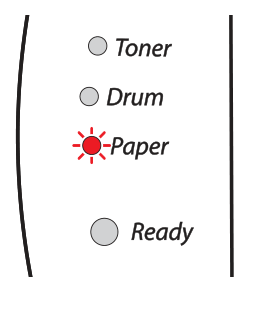
Front cover is openfront cover is open
Paper blinks red and the other LEDs are off. Close the front cover.
Official indicator pattern for Front cover is open. Read the complete state key below; a shared pattern may represent several conditions.
Diagram key
Toner: off.
Drum: off.
Paper: blinking red.
Ready: off.
Back cover is openback cover is open
Paper blinks red and the other LEDs are off. Close the back cover.
Official indicator pattern for Back cover is open. Read the complete state key below; a shared pattern may represent several conditions.
Diagram key
Toner: off.
Drum: off.
Paper: blinking red.
Ready: off.
Paper jampaper jam
Paper blinks red and the other LEDs are off. Clear the jam using the reviewed jam instructions; press Go if printing does not resume.
Official indicator pattern for Paper jam. Read the complete state key below; a shared pattern may represent several conditions.
Diagram key
Toner: off.
Drum: off.
Paper: blinking red.
Ready: off.
No paper fed manual feed slotno paper fed manual feed slot
Paper blinks red and the other LEDs are off. Load paper into the manual feed slot using the reviewed paper-loading instructions.
Official indicator pattern for No paper fed manual feed slot. Read the complete state key below; a shared pattern may represent several conditions.
Diagram key
Toner: off.
Drum: off.
Paper: blinking red.
Ready: off.
Memory fullmemory full
Paper blinks red and the other LEDs are off. Press Go to print the remaining data, or cancel the job to delete it. Reduce resolution or document complexity.
Official indicator pattern for Memory full. Read the complete state key below; a shared pattern may represent several conditions.
Diagram key
Toner: off.
Drum: off.
Paper: blinking red.
Ready: off.
Print overrunprint overrun
Paper blinks red and the other LEDs are off.
Print remaining data with Go or cancel the job to delete it.
If unresolved, reduce complexity or resolution and set Page Protection to AUTO.
Graphics mode is an applicable further driver check; the shared TrueType setting is excluded by the model-specific footnote.
Official indicator pattern for Print overrun. Read the complete state key below; a shared pattern may represent several conditions.
Diagram key
Toner: off.
Drum: off.
Paper: blinking red.
Ready: off.
Drum Errordrum Error
Paper blinks red and the other LEDs are off. Clean the primary corona wire according to the reviewed instructions.Related instructions: Cleaning the corona wire
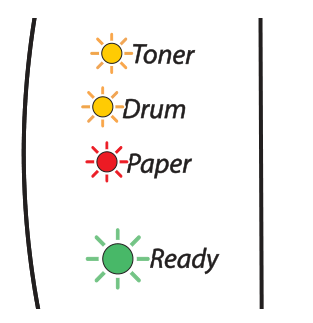
Service call indicationsservice call indications
All four LEDs blink: Toner and Drum yellow, Paper red, and Ready green.
Switch power off, wait a few seconds, switch it on and retry printing.
If the same indication remains, contact your dealer or an authorized Brother service representative.
With the front cover fully closed, hold Go to identify the specific indication and report it.
Official indicator pattern for Service call indications. Read the complete state key below; a shared pattern may represent several conditions.
Diagram key
Toner: blinking yellow.
Drum: blinking yellow.
Paper: blinking red.
Ready: blinking green.
fuser unit failurefuser unit failure
While Go is pressed, Toner is steady yellow and the other LEDs are off.
Switch off, wait a few seconds, then switch on and leave power on for 10 minutes.
If the fault returns, contact your dealer or an authorized Brother service representative.
Laser unit failurelaser unit failure
While Go is pressed, Drum is steady yellow and the other LEDs are off. Note the indication and report it to your dealer or an authorized Brother service representative.
Main motor failuremain motor failure
While Go is pressed, Toner is steady yellow and Paper steady red, with Drum and Ready off.
Note the indication and report it to your dealer or an authorized Brother service representative.
Main PCB failuremain PCB failure
While Go is pressed, Paper is steady red and the other LEDs are off. Note the indication and report it to your dealer or an authorized Brother service representative.
Guides
Paper handling
Instructions from the manual
The printer does not feed paper.3 checks
The printer does not feed paper.
If there is paper in the paper tray, make sure it is straight.
If the paper is curled, you should straighten it before printing.
Sometimes it is helpful to remove the paper, turn the stack over and put it back in the paper tray.
The printer does not feed paper.
Reduce the amount of paper in the paper tray, and then try again.
The printer does not feed paper.
Check that manual feed mode is not selected in the printer driver.
The printer does not feed paper from the manual feed slot.2 checks
The printer does not feed paper from the manual feed slot.
Re-insert the paper firmly, one sheet at a time.
The printer does not feed paper from the manual feed slot.
Check that manual feed mode is selected in the printer driver.
The printer will not feed envelopes.1 check
The printer will not feed envelopes.
The printer can feed envelopes from the manual feed slot.
Your application software must be set up correctly to print on the envelope size you are using.
This is usually done in the page setup or document setup menu of your software. see your software application manual.
A paper jam has occurred.1 check
A paper jam has occurred.
Clear the jammed paper.
Other problems
Instructions from the manual
The printer cannot print. There was an error writing to LPT1: (or BRUSB) for the printer error message occurs on your PC.2 checks
The printer cannot print. There was an error writing to LPT1: (or BRUSB) for the printer error message occurs on your PC.
Check that the printer cable is not damaged or broken.
The printer cannot print. There was an error writing to LPT1: (or BRUSB) for the printer error message occurs on your PC.
If an interface-switching device is in use, select the correct printer.
For macintosh® with usb
Instructions from the manual
The printer does not appear in Chooser (Mac OS® 9.1 to 9.2) or Print Center (Mac OS® X 10.2.4 or greater).3 checks
The printer does not appear in Chooser (Mac OS® 9.1 to 9.2) or Print Center (Mac OS® X 10.2.4 or greater).
Check power is on.
The printer does not appear in Chooser (Mac OS® 9.1 to 9.2) or Print Center (Mac OS® X 10.2.4 or greater).
Check the USB interface cable connection.
The printer does not appear in Chooser (Mac OS® 9.1 to 9.2) or Print Center (Mac OS® X 10.2.4 or greater).
Check that the printer driver is correctly installed.
Unable to print from application software.1 check
Unable to print from application software.
Check that the supplied Macintosh driver is installed on the hard disk and selected in Chooser (Mac OS 9.1–9.2) or Print Center (Mac OS X 10.2.4 or later).
Improving the print quality
Instructions from the manual
Faint4 checks
Faint
Check the printer’s environment. Conditions such as humidity, high temperatures, and so on may cause this print fault.
Faint
If the whole page is too light, Toner Save mode may be on. Turn off Toner Save mode in the printer Properties tab of the driver.
Faint
Try installing a new toner cartridge.
Faint
Try installing a new drum unit.
Gray background4 checks
Gray background
Check that you use paper that meets the recommended specifications.
Gray background
Check the printer’s environment - high temperatures and high humidity can increase the amount of background shading.
Gray background
Use a new toner cartridge.
Gray background
Use a new drum unit.
Ghost3 checks
Ghost
Check you use paper that meets our specifications. Rough-surfaced paper or thick print media may cause this problem.
Ghost
Check that you choose the appropriate media type in the printer driver.
Ghost
Try using a new drum unit.
Toner specks2 checks
Toner specks
Check that you use paper that meets our specifications. Rough-surfaced paper may cause the problem.
Toner specks
The drum unit may be damaged. Install a new drum unit.
Hollow print3 checks
Hollow print
Check that you use paper that meets our specifications.
Hollow print
Choose Thick paper mode in the printer driver, or use thinner paper than you are currently using.
Hollow print
Check the printer’s environment because conditions such as high humidity can cause hollow print.
All black2 checks
All black
Clean the primary corona wire inside the drum unit by sliding the blue tab. Check you return the blue tab to the home position (▲).
All black
The drum unit may be damaged. Install a new drum unit.
White Spots on black text and graphics at 75 mm (3.0 in.) intervals Black Spots at 75 mm (3.0 in.) intervals2 checks
White Spots on black text and graphics at 75 mm (3.0 in.) intervals Black Spots at 75 mm (3.0 in.) intervals
If the problem is not solved after printing a few pages, the drum unit may have glue from label stock on the OPC drum surface.
Clean the drum unit as follows: 1 Position the print sample in front of the drum unit, and find the exact position of the poor print.
2 Turn the drum unit gear by hand while looking at the surface of the OPC drum.
3 When you have located the mark on the drum that matches the print sample, wipe the surface of the OPC drum with a cotton swab until the dust or paper powder on the surface comes off.
Note Do not try to clean the surface of the photosensitive drum with a sharp object.
White Spots on black text and graphics at 75 mm (3.0 in.) intervals Black Spots at 75 mm (3.0 in.) intervals
The drum unit may be damaged. Install a new drum unit.
Black toner marks across the page2 checks
Black toner marks across the page
The drum unit may be damaged. Install a new drum unit. Use the related reviewed instructions.
Black toner marks across the page
Check that you use paper that meets our specifications. • If you use label sheets for laser printers, the glue from the sheets may sometimes stick to the OPC drum surface.
Clean the drum unit.
Use the related reviewed instructions. • Do not use paper that has clips or staples because they will scratch the surface of the drum. • If the unpacked drum unit is in direct sunlight or room light, the unit may be damaged.
White lines across the page4 checks
White lines across the page
Check that you use paper that meets our specifications. A rough surfaced paper or thick print media can cause the problem.
White lines across the page
Check that you select the appropriate media type in the printer driver.
White lines across the page
The problem may disappear by itself. Try printing multiple pages to clear this problem, especially if the printer has not been used for a long time.
White lines across the page
The drum unit may be damaged. Install a new drum unit.
Lines across the page2 checks
Lines across the page
Clean the inside of the printer and the primary corona wire in the drum unit.
Lines across the page
The drum unit may be damaged. Install a new drum unit.
Black lines down the page Printed pages have toner stains down the page.5 checks
Black lines down the page Printed pages have toner stains down the page.
Clean the primary corona wire of the drum unit.
Black lines down the page Printed pages have toner stains down the page.
Check the primary corona wire cleaner is at the home position (▲).
Black lines down the page Printed pages have toner stains down the page.
The drum unit may be damaged. Install a new drum unit.
Black lines down the page Printed pages have toner stains down the page.
The toner cartridge may be damaged. Install a new toner cartridge. Check that a torn piece of paper is not inside the printer covering the scanner window.
Black lines down the page Printed pages have toner stains down the page.
The fuser unit may be smudged. Call your dealer or Brother Customer Service.
The toner cartridge may be damaged. Install a new toner cartridge.
Page skewed5 checks
Page skewed
Check the paper or other print media is loaded properly in the paper tray and that the guides are not too tight or too loose against the paper stack.
Page skewed
Set the paper guides correctly.
Page skewed
For the manual feed slot, follow the reviewed plain-paper, bond-paper and transparency loading instructions.
Page skewed
The paper tray may be too full.
Page skewed
Check the paper type and quality.
Curl or wave2 checks
Curl or wave
Check the paper type and quality. High temperatures and high humidity will cause paper to curl.
Curl or wave
If you don’t use the printer very often, the paper may have been in the paper tray too long.
Turn over the stack of paper in the paper tray.
Also, try fanning the paper stack and then rotating the paper 180° in the paper tray.
Wrinkles or creases3 checks
Wrinkles or creases
Check that paper is loaded properly.
Wrinkles or creases
Check the paper type and quality.
Wrinkles or creases
Turn over the stack of paper in the tray or try rotating the paper 180° in the input tray.
Improving the print quality3 steps
Print a test page first.
If that printout looks good, the problem is probably elsewhere: check the interface cable or try the printer on another computer.
Otherwise use the applicable print-quality troubleshooting row below.
Solving print problems
Instructions from the manual
The printer prints unexpectedly or it prints garbage data.6 checks
The printer prints unexpectedly or it prints garbage data.
Check the parallel or USB cable is shorter than 2 metres (6.5 feet), as recommended by the troubleshooting row.
The printer prints unexpectedly or it prints garbage data.
Check that the printer cable is not damaged or broken.
The printer prints unexpectedly or it prints garbage data.
If you are using an interface-switching device, remove it. Connect your computer directly to your printer, and then try again.
The printer prints unexpectedly or it prints garbage data.
Check that you have chosen the appropriate printer driver with ‘Set as Default’.
The printer prints unexpectedly or it prints garbage data.
Check that the printer is not connected to the same port that is also connected to a storage device or scanner.
Take away all other devices and connect the port only to the printer.
The printer prints unexpectedly or it prints garbage data.
Turn off Printer Status Monitor in the Device Options tab in the printer driver.
The printer cannot print full pages of a document. An error message MEMORY FULL is printed out.2 checks
The printer cannot print full pages of a document. An error message MEMORY FULL is printed out.
Press the Go button to print the data left in the printer. Cancel the print job if you want to delete the data remaining in the printer, see Cancel printing on page 3-7.
The printer cannot print full pages of a document. An error message MEMORY FULL is printed out.
Reduce the print resolution or reduce the complexity of your document.
The printer cannot print full pages of a document. An error message PRINT OVERRUN is printed out.4 checks
The printer cannot print full pages of a document. An error message PRINT OVERRUN is printed out.
Press the Go button to print the data left in the printer. Cancel the print job if you want to delete the data remaining in the printer, see Cancel printing on page 3-7.
The printer cannot print full pages of a document. An error message PRINT OVERRUN is printed out.
If this does not clear the error, reduce the complexity of your document or reduce the print resolution.
The printer cannot print full pages of a document. An error message PRINT OVERRUN is printed out.
Set page protection to AUTO by using the supplied Windows® driver or Remote Printer Console program.
The printer cannot print full pages of a document. An error message PRINT OVERRUN is printed out.
Adjust Graphics mode and retry if needed; True Type Mode is not available for HL-2040 according to the model-specific feature-table footnote.
My headers or footers appear when I view my document on the screen but they do not show up when I print it.1 check
My headers or footers appear when I view my document on the screen but they do not show up when I print it.
Adjust the top and bottom margins of your document.
Positioning the printer
Instructions from the manual
Positioning the printer8 steps
Use AC 220–240 V, 50/60 Hz for the European model; USA/Canada variants use AC 110–120 V.
Keep the power cord including extensions no longer than 5 m (16.5 ft).
Avoid sharing a circuit with high-power appliances; if unavoidable, Brother recommends a voltage transformer or high-frequency noise filter.
Use a voltage regulator for unstable power.
Place near an accessible outlet, on a flat horizontal surface in a ventilated room, at 10–32.5 °C and 20–80% humidity without condensation.
Leave about 100 mm (4 in.) between the ventilation opening and wall.
Avoid dust, direct sunlight, magnets, strong shocks, vibration, open flames, salty or corrosive gases, and air conditioners.
Put nothing on top and keep the printer horizontal when carrying it.
Printing on plain paper, bond paper or transparencies from the paper tray
Instructions from the manual
Printing on plain paper, bond paper or transparencies from the paper tray9 steps
Select the paper size, media type and Tray1 source in the driver.
Pull the tray fully out.
Hold the blue guide-release lever and fit the guides firmly into the paper-size slots.
Load the paper below the maximum mark: at most 250 sheets of 80 g/m² (21 lb) plain or bond paper, or 10 transparencies.
For pre-printed stock, the blank printing side faces down with its top at the tray front.
Reinstall the tray fully.
Raise the output support flap, or remove pages immediately as they emerge.
Send the print job.
Remove each printed transparency immediately to prevent stacking, curling or jams.
Printing on plain paper, bond paper or transparencies from the manual feed slot
Instructions from the manual
Printing on plain paper, bond paper or transparencies from the manual feed slot9 steps
Select paper size, the appropriate plain-paper, bond-paper or transparency media setting, and Manual source in the driver.
Send the print job; the no-paper indicator remains until media is inserted.
Raise the output support flap, or remove pages as they emerge.
With both hands, fit the manual-feed guides to the paper width.
Insert one sheet or transparency, printing side up, until its leading edge touches the feed roller; release when the printer pulls it in.
Keep it straight and insert only one sheet at a time.
Inserting media before Ready may eject it without printing.
After each page emerges, insert the next the same way.
Remove every printed transparency immediately.
Printing on thick paper, labels and envelopes from the manual feed slot
Instructions from the manual
Printing on thick paper, labels and envelopes from the manual feed slot12 steps
Choose the paper size, Thick Paper, Thicker Paper or Envelopes setting as appropriate, and Manual source in the driver.
For Envelope #10 choose Com-10; use User Defined Size for an unlisted envelope such as #9 or C6.
Send the job and raise the output support flap, or remove sheets immediately.
Fit the manual-feed guides with both hands.
Insert one sheet or envelope, printing side up, until it touches the roller; release when the printer pulls it in.
Keep it straight and load only one at a time after Ready.
Wait for each page to emerge before inserting another.
Envelope joints must be secure and folds smooth.
Remove each output sheet or envelope promptly; do not stack it.
Do not duplex-print envelopes or mix paper types in the tray.
Avoid damaged, curled, wrinkled, shiny, textured, embossed or previously laser-printed envelopes; envelopes with clasps, snaps, strings, self-adhesive closures, windows, holes, cutouts or perforations; baggy or poorly creased stock; inside-printed envelopes; stock that will not stack evenly; overweight paper; or poorly made, uneven edges.
Test a suitable envelope before bulk printing, and set the application paper size to match.
Manual duplex printing from the paper tray
Instructions from the manual
Manual duplex printing from the paper tray9 steps
Use plain or recycled paper, not bond paper.
Thin paper may wrinkle; straighten curled stock and remove/reload it if feeding fails.
In the Advanced driver tab choose Manual Duplex; in Basic choose Auto Select or Tray1.
The printer prints even-numbered pages first.
Remove them from the output tray and empty the paper tray before reloading.
Put the sheets back with the blank printing side down and the printed side up, following the computer prompts.
The printer then prints the odd-numbered sides.
Do not place the printed sheets on top of an unprinted stack.
Manual duplex may produce jams or poor print quality; use the reviewed jam instructions if needed.
Manual duplex printing from the manual feed slot
Instructions from the manual
Manual duplex printing from the manual feed slot5 steps
Use plain or recycled paper, not bond paper, and avoid very thin or very thick stock.
Choose Manual Duplex in Advanced and Manual feed in Basic.
With both hands, insert each sheet with the first printing side up, following the computer prompts, until all even-numbered pages have printed.
Feed those sheets one by one in the same order with the blank second printing side up, following the prompts until all odd-numbered sides print.
Straighten curled stock before loading; use the reviewed jam instructions if necessary.
Control panel button (go button)
Instructions from the manual
Control panel button (Go button)6 steps
Press Go to wake the printer from Sleep to Ready.
Some errors clear automatically; for an error that does not, press Go for recovery.
If Ready blinks green for a long time, press Go to print remaining memory data.
During printing, hold Go for about 4 seconds until all LEDs light to cancel the job; Ready and Paper flash while cancellation occurs.
To reprint the last document, hold Go about 4 seconds until all LEDs light.
The reprint feature cannot provide multiple copies; clear Use Reprint in Job Spooling if others must not be able to reprint your data.
Print a test page
Instructions from the manual
Print a test page7 steps
Switch the printer off.
Ensure the front cover is shut and power cord connected.
Hold Go while switching power on.
Keep holding until Toner, Drum and Paper light, then release.
Check those three LEDs go off.
Press Go again to print the test page.
Alternatively, use Print Test Page in the General tab of the Brother Windows driver.
Print a Test Page6 steps
Keep the interface cable disconnected.
With the power switch off, connect the power cord to the printer and then a power outlet.
Switch on and unfold the output support flap.
Wait until Ready stops blinking and stays green.
Press Go to print a test page and check it.
This initial-setup one-press function is unavailable after the first print job from a computer; use the operation guide test-page sequence afterward.
Print a printer settings page
Instructions from the manual
Print a Printer Settings page4 steps
Ensure the front cover is closed and power cord connected.
Switch on and wait for Ready.
Press Go three times within 2 seconds to print current settings.
Alternatively, select Print Settings in the Support tab of the Brother Windows driver.
Replacing the toner cartridge
Instructions from the manual
Replacing the toner cartridge13 steps
Open the front cover and pull out the drum-and-toner assembly.
After recent printing, internal parts are hot: do not touch the shaded hot areas.
Avoid inhaling toner.
Put the assembly on disposable paper or cloth and avoid the illustrated electrodes to prevent static damage.
Push down the blue lock lever and separate the toner cartridge.
Seal the old cartridge in a bag and dispose of it separately from domestic waste according to local rules.
For toner on skin or clothes, wipe or wash it off immediately with cold water.
Unpack the new cartridge only when ready to install; hold it level with both hands and gently rock it side to side five or six times.
Remove its protective cover and immediately fit it firmly into the drum until it locks; the lever rises automatically when fitted correctly.
Do not touch the shaded cartridge/drum areas or expose the unpacked drum to sunlight or room light.
Gently slide the blue corona-cleaning tab right to left and back several times, then return it to the marked home position to avoid vertical print stripes.
Refit the assembly and close the front cover.
Brother recommends genuine replacement toner, no refilling, and cleaning during cartridge replacement; use the separate power-off cleaning instructions.
With the printer on and Drum blinking, open the front cover.
Hold Go about 4 seconds until all four LEDs light, then release.
Do not reset the drum counter when replacing only toner.
Pull out the drum-and-toner assembly; after recent printing, do not touch shaded hot parts.
Place it on disposable paper or cloth, avoid inhaling toner and do not touch the illustrated electrodes.
Push the blue lock lever down and remove the toner cartridge.
Seal the old drum in a bag and dispose of it separately from domestic waste according to local rules.
Wipe or wash spilled toner off skin or clothing immediately with cold water.
Unpack the new drum immediately before installing it; sunlight or room light may damage it.
Firmly fit the toner cartridge until it locks and the blue lever rises.
Reinstall the assembly, close the cover and check Drum is now off.
Brother recommends cleaning when replacing the drum; perform that separate cleaning only with power off and unplugged.
Cleaning the outside of the printer
Instructions from the manual
Cleaning the outside of the printer8 steps
Switch off and unplug.
Pull the paper tray fully out.
Use a soft, dry, lint-free cloth to wipe dust from the outside.
Remove anything stuck in the tray, then wipe dust from the tray with a soft cloth.
Reinstall the tray firmly, reconnect power and switch on.
The manual cautions that only neutral detergents are suitable for the exterior; volatile liquids such as thinner or benzine damage the surface, and ammonia-containing materials must not be used.
Do not use flammable substances near the printer.
For scattered toner, never use a vacuum cleaner; clean with a dry, lint-free cloth and dispose of it according to local rules.
Cleaning the inside of the printer
Instructions from the manual
Cleaning the inside of the printer7 steps
Switch off and unplug the power cord.
Let recently used internal parts cool before touching them.
Open the front cover and remove the drum-and-toner assembly.
Wipe the scanner window with a dry, lint-free cloth.
Reinstall the assembly, close the cover, reconnect power and switch on.
Do not use a vacuum cleaner for scattered toner; use a dry, lint-free cloth and local disposal rules.
Never use flammable substances near the printer or handle the plug with wet hands.
Cleaning the corona wire
Instructions from the manual
Cleaning the corona wire7 steps
Before cleaning the inside, switch off and unplug as required by the safety instructions.
Open the front cover and remove the drum-and-toner assembly.
Place it on disposable paper or cloth in case toner spills; do not touch the illustrated electrodes.
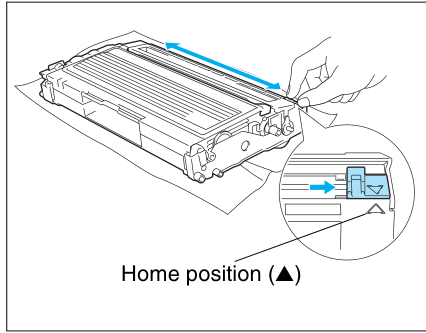
Gently slide the blue primary-corona cleaning tab right to left and back several times.
Return it to the marked home position before reinstalling the drum to prevent a vertical stripe.
Refit the assembly and close the front cover.
Recently used internal parts are hot; do not touch the shaded hot areas.
Slide the blue cleaning tab in both directions, then return it to the marked home position before refitting the drum.
Diagram key
Blue movement arrow: slide the blue tab right to left and left to right several times.
Blue inset arrow: return the tab to its home position before reinstalling the drum.
Home position (▲): park the tab at the marked triangle; otherwise printed pages may have a vertical stripe.
Paper jams and how to clear them
Instructions from the manual
Paper jams and how to clear them15 steps
After recent printing, avoid the shaded hot areas inside the front and back covers; let hot internal parts cool before touching them.
Pull the paper tray fully out, then pull jammed paper up and out.
Open the front cover and slowly remove the drum-and-toner assembly; trapped paper comes out with it.
Do not touch the illustrated electrodes.
Open the back cover.
Pull the tab toward you to open the rear chute cover.
Pull paper out of the fuser; if it resists, push the tab down with one hand while gently pulling with the other.
Close the back cover.
Push the drum lock lever down and separate the toner cartridge.
Remove any paper inside the drum.
Refit the cartridge until it locks and the lever rises.
Reinstall the assembly, firmly refit the paper tray and close the front cover.
Check Paper is off and the printer ready.
If printing does not resume automatically, press Go; if still stopped, check for remaining jammed paper and retry.
When adding paper, empty the tray first and straighten the stack to prevent multiple-sheet feeding.
Sleep time
Instructions from the manual
Sleep Time6 steps
After the default 5-minute idle timeout, the printer sleeps with all LEDs off but can still receive data.
Receiving a print job or pressing Go wakes it.
Intelligent Sleep adjusts the timeout to usage.
To disable Sleep, open Advanced > Device Options > Sleep Time, double-click Sleep Time to show Sleep Time Off, then select it.
Double-click again to hide that option.
Brother recommends leaving Sleep enabled to save power.
Status monitor
Instructions from the manual
Status MonitorView
The original user-guide driver reports printing errors through Status Monitor and describes its default as off. To enable it, open Advanced > Device Options > Status Monitor.
To use the printer safely
Instructions from the manual
To use the printer safely15 steps
Before cleaning inside, switch off and unplug the printer: it contains high-voltage electrodes.
Never handle the plug with wet hands.
After use, internal parts are extremely hot; avoid the shaded hot areas shown in the manual when opening either cover and let hot parts cool before touching them.
Never remove or damage the fuser caution label.
Never vacuum scattered toner: the dust may ignite inside the vacuum.
Carefully collect it with a dry, lint-free cloth and dispose of it under local rules.
Do not use flammable substances near the printer.
For exterior cleaning, switch off and unplug; use only neutral detergents, avoiding volatile liquids such as thinner or benzine and materials containing ammonia.
Never open the scanner unit: it contains invisible laser radiation.
Use only the controls and procedures specified in the guide.
Use the supplied three-pin plug in a properly grounded three-pin outlet; extensions must also be correctly grounded three-pin cords.
If grounding is uncertain, consult a qualified electrician.
Install near an accessible outlet; in an emergency unplug the power cord to shut off power completely.
For a UK plug fuse, any replacement must be ASTA-approved to BS1362 with the original rating; always replace its cover and never use a plug without a cover.
The printer must be earthed; consult a qualified electrician if in doubt.
Identifying your problem
Instructions from the manual
Identifying your problem4 steps
Check the AC cord is correctly connected and power is on.
Check all protective parts were removed, the toner and drum are installed correctly, the front cover is fully closed, and paper is correctly loaded.
Check the interface cable is securely connected at both ends, the correct driver is installed and selected, and the computer uses the correct printer port.
If these checks do not solve the problem, use the relevant reviewed LED, Status Monitor, printed error, paper-handling, print-quality or printout troubleshooting topic.
Paper orientation for manual duplex printing
Instructions from the manual
Paper orientation for manual duplex printing5 steps
The printer prints the second page first: for ten pages on five sheets, pages 2 then 1 share the first sheet, pages 4 then 3 the second, and so on.
For the manual feed slot, load the first printing side face up with the leading top edge first; for the second side, load face down with that top edge first.
For letterhead, load the heading face down and first, then face up and first for the second side.
For the paper tray, load the first printing side face down with the top at the tray front; for the second side, load face up with the top at the front.
Load letterhead with the heading face up at the front, then face down at the front for the second side.
Recommended paper
Instructions from the manual
Recommended paper6 steps
Test a small quantity before buying in bulk.
Use plain-copying paper of 75–90 g/m² (20–24 lb), neutral rather than acidic or alkaline, long grain, and approximately 5% moisture content.
Recycled paper meeting DIN 19309 is supported.
Do not use inkjet paper: it can cause jams or damage.
Unsuitable paper may jam or misfeed.
Use the reviewed media-type and size information for each tray.
Important information for choosing your paper
Instructions from the manual
Important information for choosing your paper7 steps
Before buying a large quantity, confirm the packaging says the paper is suitable for laser printers.
The manual recommends 75–90 g/m² (20–24 lb), though the printer accepts thinner or thicker paper within its media limits.
Choose long grain because short grain is too weak for the carriage, and neutralized paper rather than acid paper, including when choosing recycled stock.
An acid-paper check pen can distinguish these.
Follow the package indication for the print side; usually it is the opening side of the ream and may be marked with an arrow.
Paper normally contains about 5% water by weight and can reach about 10% in high humidity, impairing toner fixing.
The manual recommends 50–60% humidity for paper storage and use.
Printer driver for windows®
Instructions from the manual
Printer driver for Windows®4 steps
For a driver installed with the supplied installer on the historical Windows versions in this guide, choose Start > Programs (Windows 95/98/Me, NT 4.0 or 2000) or Start > All Programs (Windows XP), then the appropriate printer.
Select UnInstall and follow the prompts.
Restart afterward to remove files that were in use.
These steps do not apply to a driver installed with Windows Add Printer.
Brother laser driver for macintosh®
Instructions from the manual
Brother Laser driver for Macintosh®9 steps
For historical Mac OS 9.1–9.2, open Macintosh HD > System Folder > Extensions.
Move BR_PrintMonitor(laser), Brother Laser and Brother Laser(IP) to Trash.
The manual notes model-specific USB Print Driver and BR_PrintMonitor extension names may have different endings.
Restart the Mac, then empty Trash.
For Mac OS X 10.2.4 or later as covered by this guide, disconnect USB and restart.
Log in as Administrator.
Open Go > Applications > Utilities > Print Center, select the printer and Delete.
Select the printer name in the printer list and delete the Printer from the Finder menu.
Move Mac OS X 10.X > Library > Printers > Brother > HL-MFLPro to Trash, empty Trash, and restart.
How to use and install the remote printer console software
Instructions from the manual
How to use and install the Remote Printer Console software5 steps
Remote Printer Console can change settings independently of an application, including margins and sleep mode.
For the Windows versions covered by this guide, insert the supplied CD and close its opening screen.
Open Windows Explorer, select the CD drive, open RPC, and follow RPC_User’s_Guide.pdf for installation and use.
For Macintosh, insert the CD, open the HL2000 desktop icon, open RPC, and follow the same supplied guide.
The separate automatic-emulation selection instructions apply only to HL-2070N.
Install the drum unit assembly
Instructions from the manual
Install the Drum Unit Assembly4 steps
Keep the interface cable disconnected until driver installation requests it.
Open the front cover.
Unpack the drum-and-toner assembly and rock it side to side several times to distribute toner.
Insert it into the printer and close the front cover.
Load paper in the paper tray
Instructions from the manual
Load Paper in the Paper Tray6 steps
Pull the tray fully out.
Hold the paper-guide release lever and fit the adjusters firmly in the correct paper-size slots.
Fan the stack to prevent jams and misfeeds.
Load the stack flat below the maximum paper mark.
Reinstall the tray firmly.
For Legal paper, only in regions where it is supported, press the internal latches and extend the tray back.
For usb interface cable users (windows® 98/me/2000/xp users)
Instructions from the manual
For USB Interface Cable Users (Windows® 98/Me/2000/XP Users)9 steps
For these historical Windows versions, begin with the USB cable disconnected; remove it if already connected.
Cancel any Found New Hardware Wizard.
On the supplied CD menu select Install Printer Driver, then USB cable.
Read the licence and follow the prompts.
Connect USB between computer and printer only when requested, with the printer switched on, and choose Next.
Choose Finish.
For Windows 2000/XP, open Start > Printers and Faxes, select the correct printer and choose File > Set as Default printer.
Windows 98/Me setup is complete after Finish.
Online registration is optional.
For mac os® x 10.2.4 or greater users
Instructions from the manual
For Mac OS® X 10.2.4 or greater Users6 steps
For the historical Mac OS X version shown, select Install Printer Driver on the CD menu and the USB interface for HL-2040.
Follow the prompts and restart the Mac.
Connect USB directly between Mac and printer, avoiding keyboard ports and non-powered hubs.
Switch the printer on.
Open Go > Applications > Utilities > Printer Setup Utility, choose Add, then USB.
Select the appropriate printer and Add; quit Printer Setup Utility.
For mac os® 9.1 to 9.2 users
Instructions from the manual
For Mac OS® 9.1 to 9.2 Users5 steps
For historical Mac OS 9.1–9.2, insert the supplied CD, open Mac OS 9 and the correct language folder.
Run Printer Driver Installer, follow the prompts and restart.
Connect USB between Mac and printer, avoiding keyboard ports and non-powered hubs.
Switch on.
Open Chooser from the Apple menu, select Brother Laser and the correct printer, then close Chooser.
Shipment of the printer
Instructions from the manual
Shipment of the Printer4 steps
Switch off and unplug the power cord.
Remove the drum-and-toner assembly and seal it completely in a plastic bag.
Repack the printer, preferably in its saved original packaging, to protect it in transit.
Leaving the assembly inside during shipment can cause severe damage and may void the warranty; insure the shipment appropriately.
Insert the cd-rom into the cd-rom drive
Instructions from the manual
Insert the CD-ROM into the CD-ROM Drive5 steps
Keep the interface cable disconnected until driver installation requests it.
For the historical Windows setup, insert the supplied CD, select the model and language when the menu appears, then Initial Setup and follow the hardware setup steps.
For Mac OS 9.1–9.2, proceed to hardware setup.
For Mac OS X 10.2.4 or later covered here, insert the CD, open HL2000 on the desktop, open Start Here OS X and follow the prompts.
Choose Initial Setup and follow the hardware setup steps.
For parallel interface cable users (hl-2040/2070n users)
Instructions from the manual
For Parallel Interface Cable Users (HL-2040/2070N Users)6 steps
For the historical Windows versions covered by the setup guide, select Install Printer Driver on the CD menu, then Parallel interface.
Switch the printer off.
Connect the parallel cable to the computer and printer.
Read the licence and follow the prompts.
Choose Finish, then switch the printer on.
Online registration is optional.
For usb interface cable users
Instructions from the manual
For USB interface cable users11 steps
For Windows Vista or Windows 7, complete hardware setup using the Quick Setup Guide first.
Begin with USB disconnected; remove it if already connected.
Start the computer and log in with Administrator rights.
Insert the supplied CD, choose HL-2040 and the language, then Install Printer Driver > USB cable users.
The PS/BR-Script driver is unavailable for HL-2040.
At User Account Control choose Continue on Vista or Yes on Windows 7.
Read the licence and choose Yes if you agree.
When prompted, confirm printer power is on, connect USB to the computer and then printer, and choose Next.
Choose Finish.
On Windows 7, clear Set as Default Printer if desired; online registration is optional.
If the printer cannot print after installation, switch it off and on again.
For parallel interface cable users
Instructions from the manual
For parallel interface cable users7 steps
For Windows Vista or Windows 7, complete the Quick Setup Guide hardware setup first and leave the parallel cable disconnected until driver installation requests it.
Start the computer as Administrator, insert the supplied CD, select HL-2040 and language, then Install Printer Driver > Parallel cable users.
Use the HL-2040 driver; its PS/BR-Script option is unavailable as stated in the supplement’s model footnote.
At User Account Control choose Continue on Vista or Yes on Windows 7.
Read the licence and choose Yes if you agree.
Choose Finish; on Windows 7, clear Set as Default Printer if desired, and choose optional online registration if wanted.
Switch the printer off, connect the parallel cable to computer and printer, then switch it on.
About status monitor for windows® 7 users
Instructions from the manual
About Status Monitor for Windows® 7 users4 steps
For HL-2040 on Windows 7, the Status Monitor factory default is ON.
The supplement explicitly corrects the user guide’s OFF statement for these users.
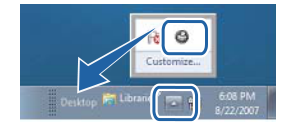
If Status Monitor is set as a taskbar indicator but its icon is hidden, open the taskbar’s hidden-icons window and drag the Status Monitor icon from that window onto the taskbar.
The complete reviewed taskbar figure identifies the actual buttons and icon; do not substitute a guessed symbol.
Windows 7 taskbar example from the official HL-2040 supplement. Open hidden icons, then drag the Status Monitor icon onto the taskbar.
Diagram key
Upper outlined Status Monitor icon: the printer-status icon in the hidden-icons window.
Lower outlined taskbar button: opens the hidden-icons window.
Large arrow: drag the Status Monitor icon from that window onto the taskbar.
Controls and parts
See the manual diagrams 2 diagrams
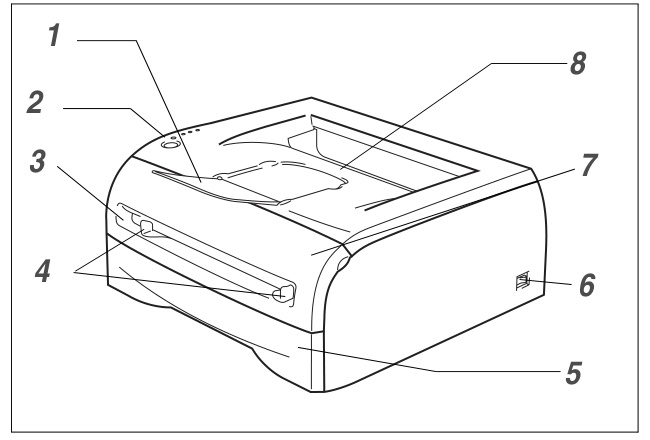
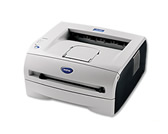
Shared-manual front parts view for HL-2040. The manual illustration is based on HL-2070N.
Diagram key
1: Face-down Output Tray Support Flap (Support Flap)
2: Control Panel
3: Manual Feed slot
4: Manual Feed Paper Guides
5: Paper Tray
6: Power Switch
7: Front Cover
8: Face-down Output Tray
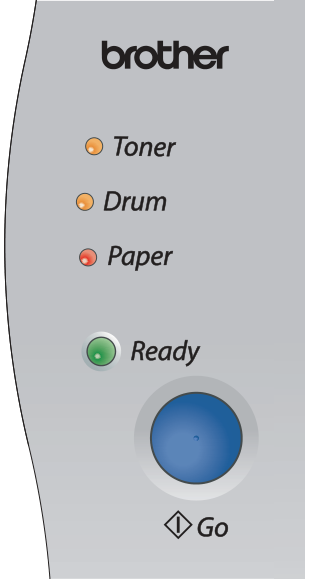
HL-2040 control-panel locations. The manual uses illustrative colors here; refer to the reviewed indicator-state descriptions for fault identification.
 sleep mode
 ready to print
 warming up
 toner low
 toner life end
 drum life end soon
 no paper fed tray 1
 front cover is open
 service call indications