MODEL REFERENCE
Brother DS-740D
5 errors · 68 guides
The checks and guides below come from the official manuals for this model.
No matches for this wording. Try a light name, error code or a shorter phrase.
Errors and indicators
Messages and indicator states from the manualFind the indicator lights
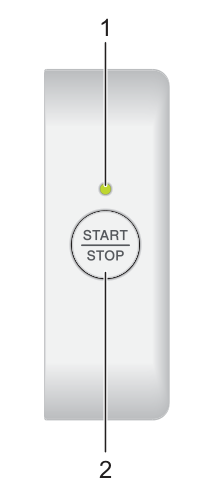
Diagram key
- 1: Power/Scan LED; it indicates machine status.
- 2: START/STOP Button; press to start or stop scanning.
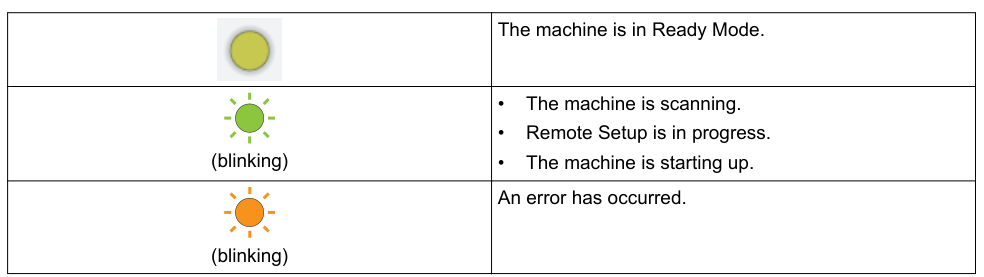

Diagram key
- Green and orange with double-headed arrow: Power/Scan LED alternates these colors while firmware is being updated.


Diagram key
- Blinking orange: Shared indication for Document Jam, Top Cover Open and Insufficient Storage Space.
Document Jamdocument Jam
document JamClear the jam using the reviewed Document Jam instructions. For a long document, select Long Paper in Scan Size or Document Size. Insert embossed cards embossed side up.
Top Cover Opentop Cover Open
top Cover OpenClose the Top Cover.
Insufficient Storage Spaceinsufficient Storage Space
insufficient Storage SpaceFor Scan to PC, press START/STOP to clear the error and ensure the destination folder has enough space to save the scanned data.
Updating the Firmwareupdating the Firmware
updating the FirmwareWait for the firmware update to finish.
Service Call Indicationsservice Call Indications
service Call IndicationsContact your Brother dealer or Brother Customer Service if this indication appears.
Guides
Scanning and other problems
Instructions from the manualTWAIN or WIA errors appear when starting to scan. (Windows)1 check
- The TWAIN or WIA driver has not been selected as the primary source in your scanning application.
- Check the Brother TWAIN or WIA driver is selected as the primary source in your scanning application.
- For example, in Nuance™ PaperPort™ 14SE, click Scan Settings > Select.
- Select the Brother TWAIN/WIA driver.
ICA errors appear when starting to scan. (Mac)1 check
- The machine is not selected from the DEVICES area (USB model).
- Check your Brother machine is selected.
Vertical lines are seen in the scanned image.1 check
- Paper dust has accumulated on the surface of the glass strips.
- Clean the glass strips inside the machine.
White vertical lines or white strips appear on the scanned image.1 check
- The scanner is near a light source or in direct sunlight.
- Check the scanner is located away from any direct light sources.
My scanned images have black lines running through them, blank spaces, or are of overall poor quality.1 check
- This problem occurs if the scanner is not calibrated correctly or if a foreign object, such as a paper clip or ripped paper, is stuck in the scanner.
- 1.
- Check that the Feeder Slot is clear.
- If foreign objects are found, remove them from your scanner.
- 2.
- Calibrate your scanner.
- If scan quality is not improved after you calibrate your scanner: 1.
- Clean the scanner.
- 2.
- Calibrate your scanner again.
The scanned image is missing.3 checks
- The Document Guide is not adjusted to fit the width of the document.
- Carefully adjust the Document Guide to fit the width of your document.
- The settings are not appropriate for your document. For example, a Letter/A4- sized document was fed when Executive/A5 Letter was selected as the document size.
- Check the document size settings are appropriate for your document. Configure the margin settings and adjust the scanning position.
- No separate cause is listed.
- Configure the margin settings and adjust the scanning position.
The scanned image is missing or has blank spaces when Auto is selected as the document size.2 checks
- Paper dust has accumulated on the surface of the glass strips inside the machine.
- Clean the glass strips inside the machine.
- Calibration needs to be performed.
- Calibrate following the reviewed calibration instructions.
The scanned image is skewed.7 checks
- The Document Guide is not adjusted to fit the width of the document.
- Carefully adjust the Document Guide to fit the width of your document.
- The Long Paper setting is selected.
- Select a setting other than Long Paper.
- The document was curled.
- Straighten the curled document and scan again.
- The embossed card was inserted with the embossed side down.
- Remove the embossed card and then reinsert it, embossed side up, into the Feeder Slot.
- The document is not inserted straight.
- Insert the document straight.
- The plastic card is scanned with the short edge first.
- Scan the plastic card with the long edge first.
- The Output Guide is open.
- Close the Output Guide.
Scanning is too slow.2 checks
- The resolution is not appropriate for your document.
- Decrease the scanner resolution.
- If a cable other than a USB 3.0 (Micro) cable is used, the scanning speed may become slow.
- Use USB 3.0 (Micro) cable.
The document was not fed.3 checks
- Your media is too thin or too thick.
- Check your media is acceptable for the machine.
- Remote Setup is in progress.
- Cancel Remote Setup.
- The document was curled.
- Straighten the curled document and scan again.
The document is jammed.3 checks
- Your document is not acceptable for the machine.
- Check your document is acceptable for the machine.
- The document was curled.
- Straighten the curled document and scan again.
- The Output Guide is open.
- Close the Output Guide. Confirm the paper weight is appropriate for scanning with the Output Guide.
The scan quality is poor.3 checks
- Paper dust has accumulated on the surface of the glass strips inside the machine.
- Clean the glass strips inside the machine.
- Calibration needs to be performed.
- Calibrate following the reviewed calibration instructions.
- The scanner resolution is too low.
- Increase the scanner resolution.
Bleedthrough is seen in the scanned data.1 check
- The settings are not appropriate for the type of document being scanned.
- Select the Remove Bleed-through / Pattern / Remove Background Color check box.
Colors in the scanned data are dark.2 checks
- The settings are not appropriate for the type of document being scanned.
- Do one of the following: • Select the Remove Bleed-through / Pattern / Remove Background Color check box, and then scan from your computer. • Increase the Brightness, and then scan from your computer. • Increase the Contrast, and then scan from your computer. • Change the Scan Type to Gray or Color, and then scan from your computer.
- Calibration needs to be performed.
- Calibrate following the reviewed calibration instructions.
A page that is not a blank page is skipped.1 check
- The document is too faint. Skip Blank Page is set to On.
- Set Skip Blank Page to Off. Alternatively, reduce the Skip Blank Page sensitivity.
Cannot scan a long document.1 check
- Long Paper is not selected for the document size.
- Select Long Paper for the document size.
Cannot scan to a computer from the machine.3 checks
- Scanning application (for example, Brother iPrint&Scan) is not installed on the computer.
- Install a scanning application (for example, Brother iPrint&Scan).
- The settings are not configured within the scanning application (for example, Brother iPrint&Scan).
- Configure the settings using a scanning application (for example, Brother iPrint&Scan).
- The Scan to PC settings were not configured in Remote Setup.
- Configure the Scan to PC settings in Remote Setup.
The plastic card is jammed.4 checks
- The machine was turned on with the plastic card inserted.
- Remove the plastic card. To prevent the card from getting jammed again, do not leave the card inserted in the machine.
- The embossed card was inserted with the embossed side down.
- Remove the embossed card and then reinsert it, embossed side up, into the Feeder Slot.
- The plastic card is not inserted straight.
- Insert the plastic card straight.
- The Output Guide is open.
- Close the Output Guide.
The plastic card was not fed.1 check
- The embossed card was inserted with the embossed side down.
- Remove the embossed card and then reinsert it, embossed side up, into the Feeder Slot.
Cannot save the settings in Remote Setup1 check
DS-740D uses Remote Setup; Web Based Management is restricted to DS-940DW.
- The machine is processing the settings.
- Wait until the machine finishes processing, and then try again.
Cannot start Remote Setup.3 checks
- The machine is not connected to your computer.
- Connect the machine to your computer, and then try again.
- An error is occurring.
- Clear all errors, check the status is Ready on Remote Setup and then try again.
- The machine is scanning.
- Wait until scanning has finished and try again.
I want to use a USB hub.1 check
- A USB hub may not be able to supply enough power to the scanner.
- Use your scanner without connecting it to a USB hub.
The machine is not turned on.1 check
- The USB cable is not connected correctly.
- Check the USB cable is securely connected to your scanner and computer.
Your computer cannot find the machine via USB interface.2 checks
- The scanner driver is not installed.
- Install the scanner driver.
- The USB cable is not connected correctly.
- Check the USB cable is securely connected to your scanner and computer. Disconnect the USB cable and then reconnect it to your scanner and computer.
My scanner gets warm.1 check
- It is normal for your scanner to became warm after prolonged use.
- If there is an odor coming from the scanner or the scanner feels a little bit hot to the touch, immediately disconnect the USB cable from your scanner and computer.
Calibrate your brother machine
Instructions from the manualVertical line appears.3 checks
- The environmental temperature has changed during calibration.
- Check the temperature is the same during scanner use and recalibration.
- The scanner may have vibrated during calibration.
- Place the scanner on a flat, stable surface and recalibrate.
- Dust on the paper path. Dust on the calibration sheet.
- • Clean the paper path and try to scan again. • Clean the paper path or calibration sheet. And then Recalibrate the scanner.
Vertical band appears.1 check
- Dust or fingerprint on the paper path. Dust, fingerprint, or scratch on the calibration sheet.
- • Clean the paper path and try to scan again. • Clean the paper path or use a new calibration sheet. And then recalibrate the scanner.
Color is different from normal.1 check
- An incorrect calibration sheet is used. The temperature is too high or too low. There is a problem with the computer's USB port.
- • Recalibrate the scanner using the correct calibration sheet. • Recalibrate the scanner. • Change to other USB port, and then recalibrate the scanner.
The calibration sheet is too short.1 check
- The calibration sheet has been cut or inserted incorrectly.
- Recalibrate the scanner using the correct calibration sheet.
Calibrate Your Brother Machine6 steps
- Calibrate only for fuzzy images, abnormally dark colors or after extended storage without use.
- Open Remote Setup through Windows Brother Utilities > model > Tools, or Mac Finder > Go > Applications > Brother > model.
- Choose Machine Info, Start under Calibration, then OK.
- Hold only the edges of the supplied calibration sheet and insert it as shown, without touching the white or black areas; marks or fingerprints can cause calibration errors.
- Choose OK in Remote Setup to feed the sheet and display the result, then OK at the confirmation.
- For unsuccessful results, use the complete reviewed calibration-difficulty checks.
Acceptable documents
Instructions from the manualAcceptable Documents11 steps
- Use one sheet at a time.
- For single-sided scans, use documents from 3.4 × 2.0 in. to 72 × 8.5 in. (86.4 × 50.8 mm to 1828.8 × 215.9 mm).
- For 2-sided scans, the maximum size is 16 × 8.5 in. (406.48 × 215.9 mm), with the same minimum size.
- With the Output Guide open, use documents from 4.13 × 2.91 in. to 11.69 × 8.5 in. (105 × 74 mm to 297 × 215.9 mm) and weights of 13.9–21.3 lb (52–80 g/m²).
- For the ordinary paper path, paper weight is 9.3–72 lb (35–270 g/m²).
- Thickness is 1.58–11.02 mil (0.04–0.28 mm); use a Carrier Sheet for thinner paper.
- The standard-paper sizes listed are A4: 8.3 × 11.7 in. (210 × 297 mm); A5: 5.8 × 8.3 in. (148 × 210 mm); A6: 4.1 × 5.8 in. (105 × 148 mm); B5: 7.2 × 10.1 in. (182 × 257 mm); B6: 5 × 7.2 in. (128 × 182 mm); Legal: 8.5 × 14 in. (215.9 × 355.6 mm); Mexican Legal: 8.5 × 13.38 in. (215.9 × 339.9 mm); India Legal: 8.46 × 13.58 in. (215 × 345 mm); Letter: 8.5 × 11 in. (215.9 × 279.4 mm); Executive: 7 1/4 × 10 1/2 in. (184.1 × 266.7 mm); Folio: 8 1/2 × 13 in. (215.9 × 330.2 mm); Index Card: 5 × 8 in. (13 × 20 cm); Business Card: 3.5 × 2.4 in. (90 × 60 mm).
- Non-standard photo sizes are Photo: 4 × 6 in. (10 × 15 cm); Photo L: 3.5 × 5 in. (9 × 13 cm); Photo 2L: 5 × 7 in. (13 × 18 cm).
- Load only one ISO-size PET plastic card, 3.37 × 2.13 in. (85.6 × 53.98 mm), at a time.
- Maximum thickness is 0.05 in. (1.24 mm) embossed or 0.04 in. (1 mm) without embossing.
- Certain embossed cards may not scan correctly.
Unacceptable documents
Instructions from the manualUnacceptable Documents2 steps
- Do not scan documents with staples or paper clips, wet ink, fabrics or metal sheets, overhead-projector sheets, glossy or mirrored media, or media outside the thickness limits.
- Damage caused by unacceptable documents may not be covered by warranty.
Carrier sheet recommendations
Instructions from the manualCarrier Sheet Recommendations6 steps
- Brother recommends the optional Carrier Sheet for carbon-backed or pencil-written documents; documents narrower than 2 in. (50.8 mm), shorter than 3.4 in. (86.4 mm), or thinner than 1.57 mil (0.04 mm); and uneven thicknesses such as envelopes.
- Also use it for large wrinkles or curls, bent or damaged documents, tracing or coated paper, photographs, perforated or irregularly shaped paper, documents with photos/notes/stickers attached, carbonless paper, and loose-leaf or other paper with holes.
- To avoid cuts, do not slide or scrape your hand or fingers along its edge.
- Keep the Carrier Sheet away from direct sunlight, high temperatures and high humidity.
- Do not bend or pull it.
- Do not use a damaged sheet because scan results may be incorrect.
Load documents
Instructions from the manualLoad Documents7 steps
- Insert only one page into the scanner at a time, inserting the next page only after the first is fully scanned.
- Multiple pages may cause malfunction.
- Let ink and correction fluid dry fully.
- Do not pull the document while it feeds.
- Do not use curled, wrinkled, folded, ripped, stapled, clipped, pasted or taped paper, cardboard or fabric.
- Leave sufficient space behind the Paper Output Slot for documents to emerge from the rear.
- To eject from the top, open the Output Guide.
Load standard size document
Instructions from the manualLoad Standard Size Document5 steps
- For index cards or business cards, confirm that the Output Guide is closed.
- Insert the document face up and align its left edge with the Left Edge of the Feeder Slot.
- For 2-sided scanning, insert the first page face up.
- Slide the Document Guide against the document’s right side.
- Gently insert the document until its top edge touches the inside of the scanner.
Load a plastic card
Instructions from the manualLoad a Plastic Card9 steps
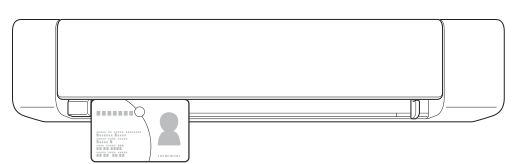
- Load one card at a time, long edge first.
- Some cards may be scratched; Brother recommends the optional Carrier Sheet to prevent damage.
- Remove grease or fingerprints first.
- Some embossed cards may not scan correctly.
- Confirm the Output Guide is closed.
- Insert the card top edge first, aligning its left edge with the Left Edge of the Feeder Slot.
- Insert embossed cards embossed side up.
- Slide the Document Guide until it touches the card’s right side.
- Insert gently until its top edge touches the inside of the scanner.
Load non-standard size document
Instructions from the manualLoad Non-standard Size Document8 steps
- Let ink and correction fluid dry completely.
- Non-standard documents include receipts, newspaper clippings and photos.
- Confirm the Output Guide is closed.
- Place the document face up in the top-left corner of the Carrier Sheet, aligned with the sheet’s top-left corner; the sheet header is face up.
- Insert the Carrier Sheet face up and header first, aligning its left edge with the Left Edge of the Feeder Slot.
- If a receipt is longer than the sheet, fold it in two places so that it overlaps inside the sheet.
- Slide the Document Guide against the Carrier Sheet’s right side.
- Insert gently until its top edge touches the inside of the scanner.
Before scanning
Instructions from the manualBefore ScanningView
Install the scanner driver as described in the Quick Setup Guide. Check that the USB cable is physically secure.
Save scanned documents on your computer
Instructions from the manualSave Scanned Documents on Your ComputerView
Use Brother iPrint&Scan from the model’s Downloads page to change resolution, file size and scan type. Load the document. Press START/STOP on the control panel to begin scanning.
Scan using nuance™ paperport™ 14se or other windows applications
Instructions from the manualScan Using Nuance™ PaperPort™ 14SE or Other Windows Applications10 steps
- The guide describes Nuance PaperPort 14SE, included in the scanner driver.
- Use the application’s Help > Getting Started Guide for detailed instructions; other Windows applications have similar steps.
- PaperPort supports TWAIN and WIA, with TWAIN recommended.
- Load the document.
- Start PaperPort: Windows 10 uses Start > Nuance PaperPort 14 > PaperPort; Windows 8.1 uses the PaperPort icon; Windows 7 uses Start > All Programs > Nuance PaperPort 14 > PaperPort.
- Choose Desktop > Scan Settings, then Select.
- Select TWAIN: TW-Brother followed by your model name, or the WIA-prefixed Brother driver to use WIA.
- Check Display scanner dialog box in Scan or Get Photo, then click Scan.
- Adjust settings in Scanner Setup as needed, then select Document Size.
- Click PreScan to preview and crop unwanted areas, then Start to scan.
Twain driver settings (windows)
Instructions from the manualTWAIN Driver Settings (Windows)22 steps
- Choose Photo, Web or Text profiles; their initial settings are respectively 300 dpi/24-bit color, 100 dpi/24-bit color and 200 dpi/black-and-white.
- Higher resolution increases memory and transfer time.
- Scan Type offers automatic color detection, black-and-white, error-diffusion gray, true gray and 24-bit color.
- Set Document Size or a custom size and Long Paper where needed.
- For 2-sided scanning, select Long-edge binding or Short-edge binding to match the original layout.
- Duplex is unavailable for Long Paper; Auto Size and Auto Deskew are unavailable above 400 × 400 dpi for DS-740D.
- Enable automatic deskew, document-end detection, crop and margins as applicable: positive margins reduce the output image and negative margins enlarge it.
- Options include rotation and auto orientation, edge filling, color-detection sensitivity, blank-page sensitivity, brightness and contrast.
- Increasing brightness lightens; increasing contrast emphasizes dark/light differences.
- Remove bleed-through, patterns or background color, drop a chosen color, emphasize edges, or adjust black/white threshold.
- Increasing the black/white threshold increases black areas; character correction is black-and-white only.
- Invert black/white when required.
- Use Carrier Sheet Mode for important, thin or irregular documents, and Continuous Scan for additional documents after the first scan.
- Barcode scanning requires third-party software and cannot convert barcode data with TWAIN alone; JPEG compression requires third-party software using disk file mode.
- Item names and available values vary by machine.
- True Gray uses up to 256 shades and 24bit Color up to 16.8 million colors.
- Auto Deskew turns on automatically with Auto Document Size.
- Margin Settings requires Auto Document Size.
- Auto Color Detect Adjust is available when Scan Type is Auto; increasing its slider makes color detection more likely.
- Diffusion Adjustment -Gray is only for Gray (Error Diffusion); Color Tone Adjustment and Edge Emphasis can be selected for color or gray images.
- Layout combines two pages into one or splits one page into two.
- Barcode Detection is available only when Layout is Off.
Scan using windows photo gallery or windows fax and scan
Instructions from the manualScan Using Windows Photo Gallery or Windows Fax and Scan3 steps
- Load the document.
- In the manual’s Windows 7 Photo Gallery workflow, choose File > Import from Camera or Scanner; in Windows Fax and Scan choose File > New > Scan.
- Select the Brother scanner and Import or OK, adjust the settings, then Scan.
Wia driver settings (windows)
Instructions from the manualWIA Driver Settings (Windows)5 steps
- Paper Source is Document Feeder.
- Choose Color, Grayscale, Black and white, or a custom image type.
- Advanced settings control brightness, contrast, resolution and picture type.
- Raise brightness for a lighter scan or lower it for a darker scan.
- Higher contrast emphasizes dark/light areas; lower contrast shows more gray detail.
Scan using kofax power pdf standard v3
Instructions from the manualScan Using Kofax Power PDF Standard v33 steps
- Use Kofax Power PDF Standard v3 to scan and convert PDF data into Word, Excel, PowerPoint, images and other formats.
- If installation asks for a serial number, use the scanner’s attached label.
- Consult the application’s Help for detailed operation.
Scan using brother iprint&scan (windows)
Instructions from the manualScan Using Brother iPrint&Scan (Windows)3 steps
- Launch Brother iPrint&Scan from the desktop or the manual’s Windows Start/Programs menu.
- If the machine is not selected, choose Select your Machine and select it.
- Choose Scan and follow the on-screen prompts.
Scan using brother iprint&scan (mac)
Instructions from the manualScan Using Brother iPrint&Scan (Mac)3 steps
- Install Brother iPrint&Scan from the App Store.
- In Finder, open Go > Applications and double-click Brother iPrint&Scan.
- Select the machine if needed, choose Scan and follow the prompts.
Scan using apple image capture
Instructions from the manualScan Using Apple Image Capture6 steps
- Launch Apple Image Capture.
- Select the Brother scanner under DEVICES for a USB connection.
- Load the document.
- Select its size.
- Select the destination folder or application from Scan To.
- Click Scan to begin.
Ica driver settings
Instructions from the manualICA Driver Settings4 steps
- Use Show Details to choose scan mode, color/black-and-white/text, resolution, size, orientation, destination, filename, output format and image correction.
- Select the Duplex check box to perform 2-sided scanning.
- With PDF or TIFF, select Combine into single document to combine pages into one file.
- Color correction offers brightness, tint, temperature and saturation for Color; brightness and contrast for Black & White; and threshold for Text.
Scan using kofax power pdf standard for mac v3
Instructions from the manualScan Using Kofax Power PDF Standard for Mac v32 steps
- The optional country-dependent application converts scans into PDF, Word, Excel, PowerPoint and image files.
- Use the scanner serial-number label for activation where needed and consult its Help for full application instructions.
Scan using presto! bizcard
Instructions from the manualScan Using Presto! BizCard3 steps
- Presto!
- BizCard organizes scanned business-card names, companies, addresses, phone/fax numbers and email addresses into contact records.
- Follow the application’s business-card scanning and import instructions; USB scanner operation remains as described in the main guide.
Brother iprint&scan overview
Instructions from the manualBrother iPrint&Scan Overview3 steps
- Use Brother iPrint&Scan on Windows or Mac to scan and check machine status.
- Obtain the Windows application from the model’s official Downloads page and the Mac application from the App Store.
- Screens vary with software version.
Document jam
Instructions from the manualDocument Jam7 steps
- Open the Output Guide, then open the Top Cover.
- Do not pull the jammed document out before opening the Top Cover; this can damage it.
- Gently pull the document out.
- Check for torn paper inside and remove any scraps.
- Close the Top Cover, then close the Output Guide.
- To avoid future jams, gently push the Top Cover’s center to close it correctly, configure the correct settings, use acceptable documents and load correctly.
- For long paper, select Long Paper in Document Size.
Check the serial number
Instructions from the manualCheck the Serial Number4 steps
- On Windows, open Brother Utilities, select the model, then Tools > Remote Setup.
- On Mac, open Finder > Go > Applications > Brother, select the model and double-click Remote Setup.
- Choose Machine Info to view the serial number.
- The wireless password and mode-switch steps apply only to DS-940DW.
Reset your brother machine
Instructions from the manualReset Your Brother Machine5 steps
- To reset DS-740D machine settings, open Remote Setup: Windows uses Brother Utilities > select model > Tools; Mac uses Finder > Go > Applications > Brother > model > Remote Setup.
- Select Machine Info, click Reset under Machine Reset and confirm OK.
- Factory settings are restored.
- Choose OK to close Remote Setup.
- The manual’s physical-button network reset is DS-940DW-only and is excluded.
Clean the outside of the machine
Instructions from the manualClean the Outside of the Machine5 steps
- Disconnect the USB cable from both scanner and computer.
- Wipe the exterior with a dry, soft, lint-free cloth.
- If necessary, first use a cloth lightly dampened with water or diluted detergent, followed by a dry cloth.
- Reconnect USB afterward.
- The safety guide prohibits alcohol- or ammonia-containing organic liquid and flammable sprays; do not use these products.
Clean the scanner and rollers
Instructions from the manualClean the Scanner and Rollers6 steps
- Clean if dirt or correction fluid causes vertical lines or missing areas in scans.
- Disconnect the USB cable from both scanner and computer.
- Open the Output Guide, then the Top Cover.
- Gently wipe the glass strips and rollers with a dry, soft, lint-free cloth.
- Close the Top Cover, then the Output Guide.
- Reconnect USB to scanner and computer.
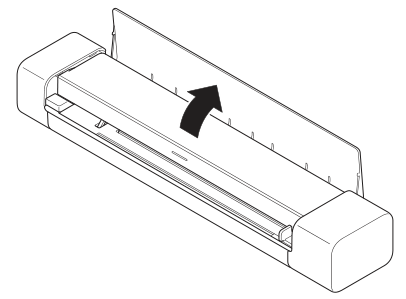
Diagram key
- Opening arrow: Open the Output Guide.
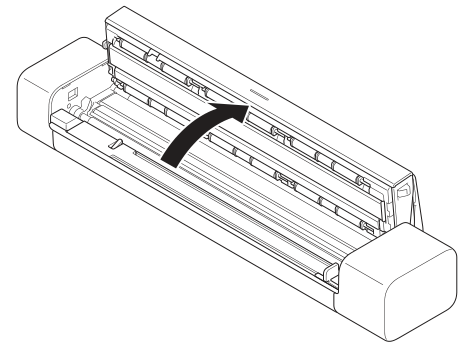
Diagram key
- Opening arrow: Open the Top Cover.
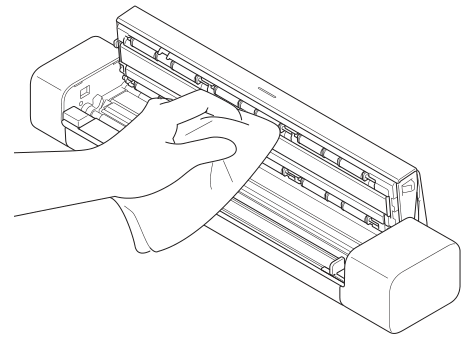
Supplies
Instructions from the manualSupplies3 steps
- The listed Carrier Sheet is CS-A3401, with a standard replacement cycle of 500 uses.
- Actual cycle varies with environment, documents and scanning frequency.
- Obtain replacement supplies through Brother retailers or official Brother supply channels.
Pack and ship your brother machine
Instructions from the manualPack and Ship Your Brother Machine6 steps
- Use the original packing materials and insure the shipment adequately; damage caused by incorrect packing may not be covered by warranty.
- Close the Output Guide.
- Wrap the scanner in its original bag.
- Pack the machine and printed materials in the original carton and packing material.
- For Brother Exchange Service, pack only the machine and keep separate parts and printed materials for the exchange machine.
- Close the carton and tape it shut.
Set up the brother machine using remote setup (windows)
Instructions from the manualSet Up the Brother Machine Using Remote Setup (Windows)8 steps
- Open Brother Utilities, select the model, then Tools > Remote Setup.
- Configure the settings.
- Export saves a configuration file; Import loads one.
- OK uploads settings and exits, Cancel exits without uploading, and Apply uploads without exiting.
- If an error appears, check the data and choose OK again.
- Complete with OK.
- A firewall may need to permit ports 52515–52614; Windows Firewall settings are configured by scanner-driver installation.
- Wireless passwords and Scan to PC wireless setup in this section are DS-940DW-only.
Set up the brother machine using remote setup (mac)
Instructions from the manualSet Up the Brother Machine Using Remote Setup (Mac)7 steps
- In Finder choose Go > Applications > Brother, select the model and double-click Remote Setup.
- If Discover Devices appears, select the model and Connect.
- Configure the settings.
- Export saves current settings, Import reads a saved file, OK uploads and exits, Cancel exits without uploading and Apply uploads without exiting.
- For an error, check the data and retry OK.
- Finish with OK.
- DS-940DW wireless-password and wireless Scan to PC notes are excluded.
Change the general settings using remote setup
Instructions from the manualChange the General Settings Using Remote Setup3 steps
- Set General Setup > Auto Power Off and Auto Power Off Time to control automatic shutdown after inactivity and save power.
- After auto shutdown on DS-740D, press START/STOP to turn it on.
- The date/time and battery-charge behavior are DS-940DW-only.
Notes for using carrier sheets
Instructions from the manualNotes for Using Carrier Sheets6 steps
- Do not load the Carrier Sheet upside down; follow its printed instructions to avoid jams.
- Insert only one document inside the Carrier Sheet at a time.
- Do not write on it, as writing may appear in scans.
- If dirty, wipe it with a dry cloth.
- Do not leave documents inside for extended periods because printing may bleed through.
- Damage from unacceptable documents may not be covered by warranty.
Use the output guide
Instructions from the manualUse the Output Guide6 steps
- Use the Output Guide when there is insufficient space behind the scanner.
- Closed, it ejects paper from the rear; open, it ejects from the top.
- Confirm that the paper size and weight are suitable for the Output Guide: 105 × 74 mm to 297 × 215.9 mm and 52–80 g/m².
- Do not use the Carrier Sheet or scan plastic cards with the Output Guide open.
- For better scan results in high or low temperatures and humidity, Brother recommends not using the Output Guide.
- Open the Output Guide to support scanned documents.
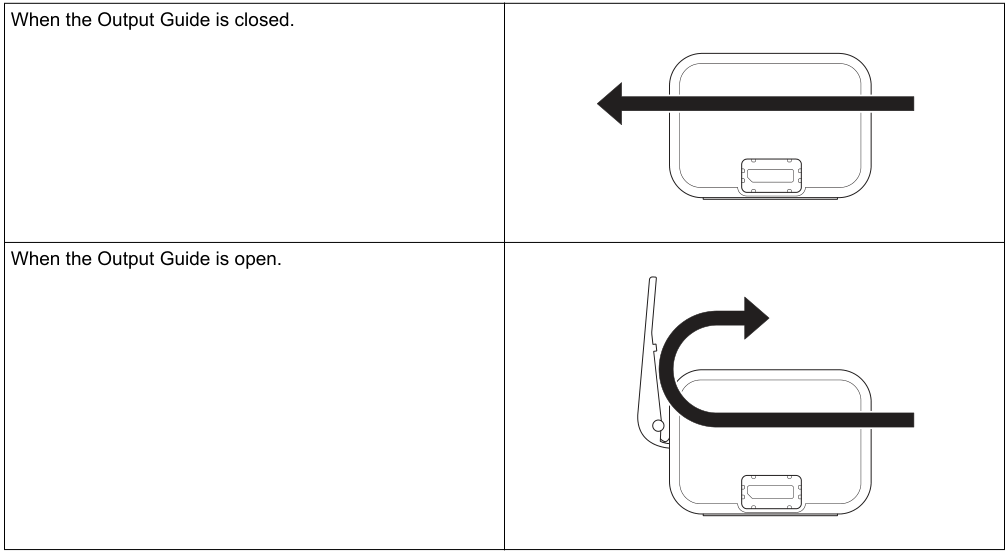
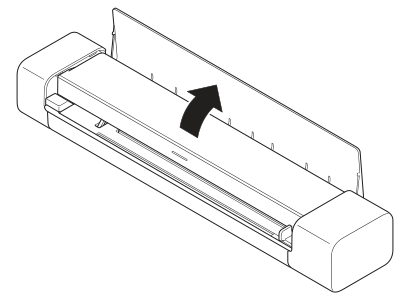
Diagram key
- Opening arrow: Open the Output Guide.
Unpack the machine and check the components
Instructions from the manualUnpack the machine and check the components5 steps
- Read the included Product Safety Guide before setup.
- Remove protective tape and film.
- Check the supplied USB 3.0 Micro cable, calibration sheet, setup/safety guide and warranty card; contents vary by country.
- Retain the original packaging for shipment.
- Keep packaging bags away from children, cribs, beds, carriages and play pens because of suffocation risk.
Connect your machine to the computer using a usb cable
Instructions from the manualConnect your machine to the computer using a USB cable3 steps
- Connect DS-740D to the computer with the included USB 3.0 Micro cable.
- The scanner powers on when connected.
- Memory cards, battery charging and the power button in the shared sheet are DS-940DW-only.
Install software
Instructions from the manualInstall software6 steps
- Use a powered-on computer and log in with Administrator rights.
- Download the full driver/software package from Brother’s Windows or Mac support download page.
- Follow the installation prompts and restart afterward.
- In the USA an Internet connection is required; if necessary request an installation disc from Brother Customer Support at 1-877-BROTHER (877-276-8437).
- Consult the full operation guide for scanning.
- Mobile Wi-Fi scanning is DS-940DW-only.
Choosing a location
Instructions from the manualChoosing a location5 steps
- Choose a stable, level, vibration-free surface in an operating environment of 5–35 °C and 20–80% humidity without condensation.
- Keep the scanner away from direct sunlight, excess heat, open flames, corrosive gases, moisture, dust, carpets, chemicals, water, magnetic sources, heaters and air conditioners.
- Do not use corrosive environments.
- Secure cables against tripping, keep the scanner fully supported and avoid high-traffic or unstable locations and heavy objects on it.
- Dry naturally before use if temperature changes have caused condensation.
Product safety guide
Instructions from the manualProduct Safety Guide6 steps
- For unusual heat, smoke, strong smells or a liquid spill, unplug immediately and contact the Brother dealer or Customer Service.
- Do not disassemble or modify the scanner.
- If foreign material enters or the scanner is damaged, stop using it, disconnect USB and contact the store or Brother service.
- Do not clean inside or outside with flammable substances, sprays, or alcohol- or ammonia-containing organic solvents/liquids.
- Keep USB cables bundled away from children; take care with sharp paper edges.
- Adjust only controls covered by the operation instructions; other adjustments may require qualified service.
Controls and parts
See the manual diagrams 1 diagram
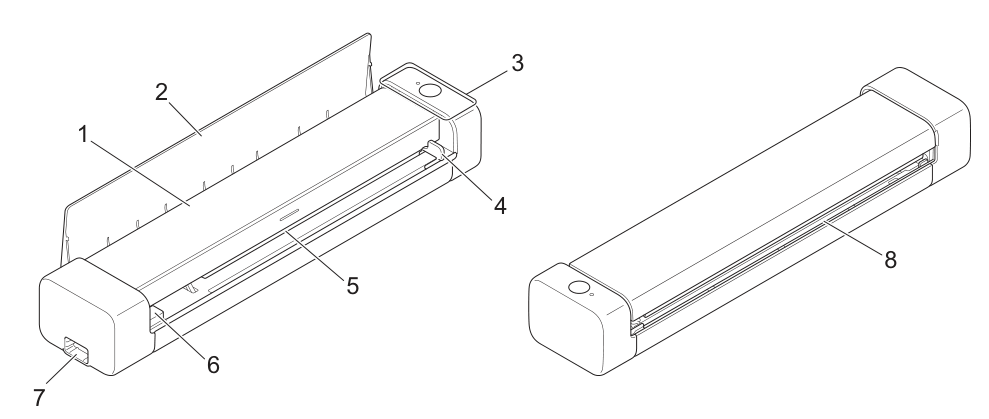
Diagram key
- 1: Top Cover
- 2: Output Guide
- 3: Control Panel
- 4: Document Guide
- 5: Feeder Slot
- 6: Left Edge of the Feeder Slot
- 7: USB 3.0 (Micro) Port for connecting to a computer
- 8: Paper Output Slot