The checks and guides below come from the official manuals for this model.
No matches for this wording. Try a light name, error code or a shorter phrase.
Errors and indicators
Light patterns and messages documented in the manual
Find the indicator lights
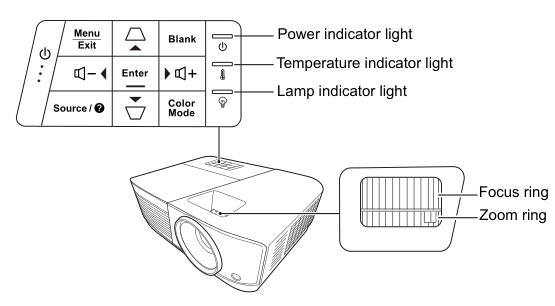
PA503S controls and POWER, TEMP and LAMP indicator locations. The full key identifies reused arrow/volume symbols and both lens rings.
Diagram key
Power: Switch between standby and Power On.
Menu / Exit: Menu opens the on-screen display; Exit closes and saves settings.
Up / keystone: Correct image keystone; select or adjust OSD items when the menu is active.
Blank: Hide the screen image.
Question-mark / Help: Hold for three seconds to show HELP.
Left / volume minus: Left selects or adjusts OSD items; volume minus lowers sound.
Enter: Confirm the selected OSD item.
Right / volume plus: Right selects or adjusts OSD items; volume plus raises sound.
Source: Display the source-selection bar.
Down / keystone: Correct image keystone; select or adjust OSD items when the menu is active.
Color Mode: Select an available picture mode.
Power indicator: Lights or flashes during operation; use the reviewed indicator table for the full combination.
Temperature indicator: Lights red if the projector temperature becomes too high.
Lamp indicator: Lights or flashes for a lamp problem.
Focus ring: Adjust projected-image sharpness.
Zoom ring: Adjust projected-image size.
Message or indicatorWhat it meansCheck or action
Password Errorpassword Error
A wrong password displays Password Error for five seconds then INPUT PASSWORD.
Retry another six-digit password or use the recall procedure if not recorded.
Five successive wrong entries automatically shut down the projector.
Blue flashing / Off / Offstand-by mode
POWER / TEMP / LAMP: Blue flashing / Off / Off. Standby state; this row supplies no repair.
Blue / Off / Offpowering up
POWER / TEMP / LAMP: Blue / Off / Off. Powering-up state; this row supplies no repair.
Blue / Off / Offnormal operation
POWER / TEMP / LAMP: Blue / Off / Off. Normal operating state; this row supplies no repair.
Blue flashing / Off / Offnormal power-down cooling
POWER / TEMP / LAMP: Blue flashing / Off / Off. Normal cooling for three seconds; wait for cooling to finish, and do not unplug before completion.
Red / Off / Offdownloading
POWER / TEMP / LAMP: Red / Off / Off. Downloading state; this row supplies no repair.
Blue / Blue / Blueburn in off
POWER / TEMP / LAMP: Blue / Blue / Blue. The table labels this state Burn in off; no user repair is supplied.
Blue flashing / Off / Redfirst Lamp-Lit error cooling
POWER / TEMP / LAMP: Blue flashing / Off / Red.
The table specifies 60 seconds of cooling for this first lamp-lit error; no individual repair is supplied.
Refer servicing to qualified personnel; the indicator table does not supply a component repair procedure.
Off / Off / Redlamp error in normal operation
POWER / TEMP / LAMP: Off / Off / Red.
Lamp error during normal operation, with 30 seconds specified; no individual repair is supplied.
Refer servicing to qualified personnel; the indicator table does not supply a component repair procedure.
Blue / Off / RedcW start fail
POWER / TEMP / LAMP: Blue / Off / Red.
CW start failure, with 30 seconds specified; the table does not expand CW or give a user repair.
Refer servicing to qualified personnel; the indicator table does not supply a component repair procedure.
Off / Red / Offfan 1 error
POWER / TEMP / LAMP: Off / Red / Off.
Actual fan speed is ±25% outside the desired speed; no user repair is supplied.
Refer servicing to qualified personnel; the indicator table does not supply a component repair procedure.
Off / Red / Redfan 2 error
POWER / TEMP / LAMP: Off / Red / Red.
Actual fan speed is ±25% outside the desired speed; no user repair is supplied.
Refer servicing to qualified personnel; the indicator table does not supply a component repair procedure.
Off / Red / Bluefan 3 error
POWER / TEMP / LAMP: Off / Red / Blue.
Actual fan speed is ±25% outside the desired speed.
The same light combination is also printed for thermal sensor 2 short error; lights alone do not distinguish them.
Refer servicing to qualified personnel; the indicator table does not supply a component repair procedure.
Off / Red / Purplefan 4 error
POWER / TEMP / LAMP: Off / Red / Purple.
Actual fan speed is ±25% outside the desired speed; no user repair is supplied.
Refer servicing to qualified personnel; the indicator table does not supply a component repair procedure.
Red / Red / Redthermal sensor 1 open error
POWER / TEMP / LAMP: Red / Red / Red.
The remote diode has an open-circuit condition; no user repair is supplied.
Refer servicing to qualified personnel; the indicator table does not supply a component repair procedure.
Red / Red / Bluethermal sensor 2 open error
POWER / TEMP / LAMP: Red / Red / Blue.
The remote diode has an open-circuit condition; no user repair is supplied.
Refer servicing to qualified personnel; the indicator table does not supply a component repair procedure.
Blue / Red / Redthermal sensor 1 short error
POWER / TEMP / LAMP: Blue / Red / Red.
The remote diode has a short-circuit condition; no user repair is supplied.
Refer servicing to qualified personnel; the indicator table does not supply a component repair procedure.
Off / Red / Bluethermal sensor 2 short error
POWER / TEMP / LAMP: Off / Red / Blue.
The remote diode has a short-circuit condition.
The same combination also appears for Fan 3 error; do not infer a unique cause from those lights.
Refer servicing to qualified personnel; the indicator table does not supply a component repair procedure.
Purple / Red / Redtemperature 1 error
POWER / TEMP / LAMP: Purple / Red / Red.
Temperature is over its limit; no individual row-specific user repair is supplied.
Refer servicing to qualified personnel; the indicator table does not supply a component repair procedure.
Purple / Red / Bluetemperature 2 error
POWER / TEMP / LAMP: Purple / Red / Blue.
Temperature is over its limit; no individual row-specific user repair is supplied.
Refer servicing to qualified personnel; the indicator table does not supply a component repair procedure.
Off / Blue / Redfan IC #1 I2C connection error
POWER / TEMP / LAMP: Off / Blue / Red.
The table identifies a Fan IC #1 I2C connection error; no user repair is supplied.
Refer servicing to qualified personnel; the indicator table does not supply a component repair procedure.
No Signalno Signal
Check that the input source is switched on and correctly connected. Select the desired input with Source; automatic searching displays No Signal when it finds no source.
Out of Rangeout of Range
Change the computer resolution to a compatible lower resolution or input timing in the timing chart.
Troubleshooting
Find the problem you are experiencing
The projector does not turn on.2 checks
No power from power cord
Plug into projector AC inlet and power outlet; turn the outlet switch on if fitted.
Attempting to restart during cooling
Wait until cooling finishes.
No picture3 checks
Video source off or not connected correctly
Turn the source on and check its cable connection.
Projector not connected correctly to input source
Check the connection.
Incorrect input selected
Select the correct input with Source.
Blurred image2 checks
Lens not correctly focused
Adjust focus with the focus ring.
Projector and screen not aligned
Adjust projection angle, direction and height if necessary.
Remote control does not work4 checks
Battery out of power
Replace the battery with a new one.
Obstacle between remote and projector
Remove the obstacle.
Too far from projector
Stand within eight metres (26 feet).
Projector and remote codes inconsistent
Adjust the remote-control code to match the projector.
Guides
Important safety instructions
Instructions from the manual
Safe placement and operation19 steps
Read and retain the instructions and warnings.
Remove the lens cap before switching on.
Do not look into the operating lens.
Refer servicing to qualified personnel.
The projector operates at 100–240 V AC, but power cuts or surges of ±10 V can fail it; in unstable supplies use a stabilizer, surge protector or UPS.
Do not block the lens with objects: press BLANK instead.
The lamp becomes extremely hot; let it cool about 45 minutes before removing its assembly and unplug before replacing it or electronic components.
Do not use lamps beyond their rated life.
Do not disassemble the projector.
Use a stable, level surface with at least 50 cm wall clearance and free airflow.
Avoid poor ventilation, car interiors, excessive heat, humidity, dust, smoke, fire alarms, temperatures above 40 °C and altitude above 3000 m.
Do not obstruct vents with soft surfaces, cloth or flammable items.
Do not tilt more than 10° left/right or 15° front/back.
Do not stand on end, step on it or place objects on it.
Do not place liquids nearby or on it.
If it gets wet, disconnect from the outlet and call the local service centre.
Air or odour from the vents during operation is described as normal.
Do not carry it by the security bar.
Use an earthed connection and an accessible socket or fixed-wiring disconnect.
General safety and qualified servicing11 steps
Read and keep the instructions; heed warnings.
Do not use near water or install near heat sources such as radiators, stoves or amplifiers.
Clean with a soft dry cloth and keep vents open.
Do not defeat the polarised or grounding plug.
If it does not fit, consult an electrician to replace the obsolete outlet.
Protect the cord from walking or pinching, especially at plugs, outlets and its exit.
Keep the nearby outlet accessible.
Use only manufacturer-specified accessories and supports.
Move a cart/unit carefully to avoid tipping.
Unplug when unused for long periods.
Refer all servicing to qualified personnel after any damage: cord/plug damage, liquid or objects inside, rain/moisture exposure, abnormal operation or dropping.
Safety instructions for ceiling mounting of the projector
Instructions from the manual
Ceiling mounting precautions6 steps
Use a properly fitting ViewSonic ceiling-mount kit and secure installation.
Wrong screw gauge or length can let it fall.
Have qualified service personnel install the projector and kit.
Attach a separate Kensington-compatible security cable to the anti-theft slot and the ceiling bracket as a secondary restraint.
Ceiling mounting projects inverted images.
Never use the security bar as a carrying handle.
Controls and functions
Instructions from the manual
Projector buttons, lens rings and status lights9 steps
Power toggles standby/on.
Up/Down keystone keys correct angled images; when the OSD is active Left/Right/Up/Down select items or adjust values.
Menu opens the OSD; Exit exits and saves settings; Enter confirms an OSD selection.
Source displays source selection.
BLANK hides the picture.
The power-indicator light illuminates or flashes during operation; TEMP lights red when temperature is too high; LAMP lights or flashes for a lamp problem.
A three-second press of Help (question-mark symbol) displays HELP.
Color Mode selects a picture mode and volume +/− raises or lowers sound.
Use the zoom ring and focus ring to adjust image size and sharpness.
Remote control
Instructions from the manual
Remote functions and available controls11 steps
On/Off toggles power/standby.
COMP selects Computer In, VIDEO selects video, HDMI selects HDMI, Auto Sync determines suitable image timings and Source opens source selection.
Keystone keys correct angled projection.
Arrows select or adjust OSD items; Enter confirms, Menu opens, Information displays information, and Exit exits and saves.
Aspect selects proportions; Freeze freezes the image; Pattern displays test patterns; BLANK hides the picture.
PgUp/PgDn works with a connected PC and its USB cable.
Controls marked PC-only are available only with PC input.
The operation-guide drawing and current quick-start drawing depict different remotes.
The remote-code instructions require the ID set and number buttons; apply those instructions only to a remote with those buttons.
Do not infer the location of an absent button from the older drawing.
Remote control code
Instructions from the manual
Set remote-control code6 steps
Set the projector code first in SYSTEM > Remote Control Code, choosing 1–8.
For a remote with ID set and number buttons, hold ID set and the matching number together for at least five seconds.
Code 8 can control every projector.
Different codes prevent response; the projector displays the code reminder.
Match the remote code to the projector.
The manual gives no equivalent button combination for the pictured remote without an ID set button.
Using the remote pgup/pgdn function
Instructions from the manual
Use remote Page Up and Page Down3 steps
Set a PC input signal.
Connect the projector to the PC with a USB cable before using the remote instead of a mouse.
For PC software responding to page commands, such as PowerPoint, press PgUp or PgDn.
Remote control effective range
Instructions from the manual
Aim the infrared remoteView
Hold it within 30° perpendicular to the infrared sensor and no farther than eight metres (about 26 feet). Keep the infrared path unobstructed.
Replacing the remote control batteries
Instructions from the manual
Replace remote batteries7 steps
Open the battery cover.
Remove old batteries if present and install two AAA batteries with +/− polarity as marked.
Close the cover.
Avoid excessive heat or humidity and incorrect battery type.
Replace only with the same or manufacturer-recommended equivalent; dispose of used batteries according to the manufacturer instructions.
Never throw a battery into fire.
Remove exhausted batteries, or batteries when unused for an extended period.
Choosing a location
Instructions from the manual
Choose projection placement5 steps
Consider screen size/position, outlet and equipment distances.
Front Table is the usual floor/table position in front.
Front Ceiling mounts upside-down in front; Rear Ceiling mounts upside-down behind a special rear-projection screen; Rear Table sits behind a special rear-projection screen.
After switching on, use SYSTEM > Projector Position to choose the correct position.
A ceiling kit is required for ceiling positions.
Projection dimensions
Instructions from the manual
Plan projection size and distance5 steps
Use the PA500S/PA503S/SP3/PA500X/PA503X/SP6/PA503SP/PA503XP tables for PA503S, not the separate PA503W tables.
They cover a 4:3 image on a 4:3 or 16:10 screen, including image height, lens-centre offset and minimum/maximum distance.
The figures have 3% optical-component tolerance.
Before permanent installation, physically test the actual projector’s image size and distance at the location.
Select the exact mounting position that best suits that projector.
Connection
Instructions from the manual
Before connecting equipment5 steps
Turn all equipment off before connections.
Use correct signal cables and insert firmly.
Not all pictured cables are supplied.
The main connection figure is a reference: rear jacks vary with model.
Use the PA503S-labelled connection drawing and PA503S specifications.
Connecting a computer
Instructions from the manual
Connect a computer3 steps
With all devices off, connect the supplied VGA cable from the computer D-Sub output to projector Computer 1 or Computer 2.
For remote mouse/page control, connect the larger USB cable end to the computer and the smaller end to projector Mini USB.
Laptop external video may need enabling with its function-key display combination; consult its documentation.
Connecting a monitor
Instructions from the manual
Connect a VGA monitor4 steps
To show the presentation on a monitor as well as the screen, connect the projector to a computer as described, then connect a VGA cable from monitor D-Sub input to projector Monitor Out.
For a monitor with DVI input, use VGA to DVI-A with its DVI end in the monitor and VGA end in Monitor Out.
This output works only when Computer 1 is connected.
To use it in standby, turn on POWER MANAGEMENT > Standby Settings > Active VGA Out.
Connecting video source devices
Instructions from the manual
Select video connection method3 steps
Connect using one supported method: HDMI, component Video or composite Video.
HDMI provides the best digital picture quality, component is the better analogue method, composite the least-quality analogue method.
Do not connect a second composite path when component input is already in use.
Connecting an hdmi device
Instructions from the manual
Connect HDMI3 steps
With equipment off, connect an HDMI cable between the source HDMI output and projector HDMI input.
For wrong colours when connecting a DVD player through HDMI, change the colour space to YUV.
HDMI input has the stated HDMI 1.4a and 3D support.
Connecting a component video source device
Instructions from the manual
Connect component Video3 steps
With equipment off, take a component Video-to-VGA/D-Sub adapter cable and connect its three RCA plugs to the source’s component outputs, matching green/blue/red.
Connect the D-Sub end to Computer 1 or Computer 2.
If the picture does not appear, check source operation, correct connection and source selection.
Connecting a composite video source device
Instructions from the manual
Connect composite Video3 steps
With equipment off, connect a Video cable from the source composite output to projector Video input.
If the picture is absent, check the source is on and correct cable/input selection.
Use composite only when component input is unavailable.
Playing sound through the projector
Instructions from the manual
Connect audio and external speakers6 steps
Use the projector’s built-in speaker for computer/source audio.
Connect the source audio output to projector Audio In with a suitable audio cable.
To use amplified external speakers, connect a suitable cable from projector Audio Out to their input.
Audio volume follows the projector volume/mute setting.
Audio Out works when an audio input signal is connected.
The built-in speaker mixes stereo input to mono.
Starting up the projector
Instructions from the manual
Start up the projector10 steps
Plug the power cord into projector and wall socket; switch the socket on if fitted.
Press Power to start; the lamp sounds the Power On Ring Tone and the power light stays blue.
If necessary, turn the focus ring for clarity.
If still hot, it runs the cooling fan approximately 90 seconds before energizing the lamp.
For lamp life, after switching on wait at least five minutes before switching off.
On first use choose the OSD language.
Switch on connected equipment.
It searches inputs and shows the source name; if none, No Signal appears.
Check source operation and choose the input with Source.
If Out of Range appears, change the computer to a compatible lower resolution or input timing listed in the timing chart.
Using the menus
Instructions from the manual
Use menus and select language6 steps
Press Menu.
Use Left/Right to highlight SYSTEM, Down to Language, then Enter.
Use arrows to choose the language.
Press Exit twice to leave and save; the first returns to the main menu and the second closes OSD.
OSD screenshots are examples; actual design and available menus vary by signal and model.
With no valid signal, only limited items are accessible.
Setting a password
Instructions from the manual
Set a startup password6 steps
Open SYSTEM > Security Settings, press Enter, then highlight Power On Lock and select On.
Enter a six-digit password using arrow keys: Up 1, Right 2, Down 3, Left 4.
Confirm by entering it again.
Record and retain the password safely.
Press Exit to leave the OSD.
Once Power On Lock is active, the correct password is needed each startup.
Entering the password recall procedure
Instructions from the manual
Recall a forgotten password3 steps
Hold Auto Sync on the remote for three seconds.
Record the displayed coded number and turn the projector off.
Seek the local service centre’s help to decode it; proof of purchase may be required.
Changing the password
Instructions from the manual
Change the password6 steps
Open SYSTEM > Security Settings > Change Password and press Enter.
At INPUT CURRENT PASSWORD enter the old password.
Correct entry displays INPUT NEW PASSWORD.
If incorrect, Password Error appears for five seconds before INPUT CURRENT PASSWORD; retry or press Exit to cancel.
Enter and confirm the new six-digit password.
Record the new password, then press Exit to leave the OSD.
Disabling the password function
Instructions from the manual
Disable startup password protection5 steps
Open SYSTEM > Security Settings > Power On Lock and select Off.
Enter the current password.
Correct entry sets Off, so startup no longer requires it.
Incorrect entry displays Password Error for five seconds then INPUT PASSWORD; retry or press Exit to cancel.
Keep the password even after disabling, because re-enabling requires it.
Switching input signal
Instructions from the manual
Switch input signal5 steps
Enable SYSTEM > Quick Auto Search for automatic signal searching.
To select manually, press Source, choose the source with Up/Down and Enter.
It can show only one full screen at a time.
For best results use its native resolution.
Non-native signals are scaled according to aspect settings and may distort or lose clarity.
Changing hdmi input settings
Instructions from the manual
Adjust HDMI format and range3 steps
For an incorrect-colour HDMI image, open ADVANCED > HDMI Settings > HDMI Format and choose Auto, RGB or YUV as appropriate.
For incorrect-range colours open HDMI Range: Enhanced is 0–255, Normal 16–235 and Auto detects the input.
These controls are available only with HDMI input.
Adjusting the projection angle
Instructions from the manual
Adjust projection angle4 steps
Turn the adjuster foot to fine-tune image height and vertical angle.
Use keystone if placement is not square.
Do not look into the operating lens.
Use care near the exhaust where hot air exits.
Auto-adjusting the image
Instructions from the manual
Synchronise a PC image3 steps
Press Auto Sync on the remote to readjust frequency and clock for picture quality within five seconds.
Current source information appears at the upper left for three seconds.
This is only for PC D-Sub analogue RGB input.
Fine-tuning the image clarity
Instructions from the manual
Set image size and focusView
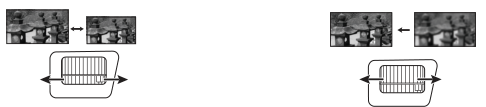
Adjust projected size using the zoom ring. Then sharpen the image with the focus ring.
PA503S lens-ring adjustments in the manual’s order: set image size first, then focus.
Diagram key
1: Adjust projected-image size using the zoom ring; the double-ended arrow shows turning the ring.
2: Sharpen the image by rotating the focus ring; the double-ended arrow shows turning the ring.
Correcting keystone
Instructions from the manual
Correct keystoneView
Use the remote keystone keys, or open DISPLAY > Keystone, then Enter. Down corrects keystoning at the top; Up corrects the bottom, as shown by the printed glyphs.
Magnifying and searching for details
Instructions from the manual
Magnify and pan the image5 steps
Press remote Zoom In repeatedly to enlarge.
Use arrows to navigate enlarged areas.
To reduce, press Zoom Out repeatedly; Auto Sync restores original size.
Alternatively open DISPLAY > Zoom and Enter to display the zoom bar, then use the remote-control navigation and size-reduction instructions above.
Panning is possible only after magnification; the adjustable range varies with aspect ratio and can be enlarged further while navigating.
Selecting the aspect ratio
Instructions from the manual
Set image aspect ratio5 steps
Press Aspect and then Left/Right, or use DISPLAY > Aspect Ratio and Enter, to choose a ratio.
PA503S supports Auto, 4:3, 16:9 and 2.35:1; 16:10, Panorama and Anamorphic are labelled PA503W-only.
Auto scales proportionally to fit native resolution width.
The fixed ratios centre their respective shape without altering its proportions.
Unused screen areas remain black.
Selecting a picture mode
Instructions from the manual
Choose a picture mode2 steps
Press Color Mode and choose with arrows, press it repeatedly, or use IMAGE > Color Mode.
Brightest maximizes brightness in well-lit rooms; Presentation suits daylight presentations; Standard normal daylight PC/movie viewing; Photo photographs; Movie darkened movie playback.
Using screen color
Instructions from the manual
Compensate for screen colour3 steps
Use DISPLAY > Screen Color when projecting on a coloured surface: Whiteboard, Greenboard or Blackboard.
This adjusts projected colours to reduce differences from the source.
Available only for PC timings from VGA or HDMI.
Adjusting brightness
Instructions from the manual
Adjust brightness and contrast4 steps
In IMAGE > Brightness use Left/Right.
Higher values brighten; lower values darken.
Adjust so black areas are black and dark-area detail remains visible.
After brightness, adjust IMAGE > Contrast: higher values increase contrast and peak white; set to suit the input and viewing environment.
Adjusting color
Instructions from the manual
Adjust colour saturation, tint and sharpness4 steps
Use IMAGE > Advanced > Color for saturation: lower values desaturate, excessive values overpower and become unrealistic.
Tint higher becomes greenish, lower reddish.
Sharpness higher sharpens, lower softens.
Color, Tint and Sharpness are available only for Video, YPbPr or YCbCr input.
Adjusting brilliant color
Instructions from the manual
Brilliant Color and noise reduction3 steps
IMAGE > Advanced > Brilliant Color enhances colour/brightness; choose the level to suit viewing.
Available only when a PC or Video input is selected.
Selecting a gamma setting
Instructions from the manual
Select gamma and colour temperatureView
IMAGE > Advanced > Gamma selects the relationship of source and picture brightness. IMAGE > Color Temp. offers Cool (bluish), Normal (normal white), Warm (reddish).
Setting a preferred color temperature
Instructions from the manual
Customize colour temperature5 steps
In IMAGE > Color Temp. choose Cool, Normal or Warm.
Open IMAGE > Advanced > Color Temp. and Enter.
Highlight Red/Green/Blue Gain or Offset and adjust with arrows.
Gain sets contrast for that colour; Offset brightness.
Available only for PC timings from VGA or HDMI.
Color management
Instructions from the manual
Adjust colour management8 steps
Use this only for controlled, reproducible installation/viewing conditions, not ordinary rooms where it is generally unnecessary.
Open IMAGE > Advanced > Color Management and Enter.
Choose Primary Color from Red, Yellow, Green, Cyan, Blue or Magenta.
Highlight Hue and adjust its range: setting zero selects the primary; widening includes neighbouring colours as described.
Highlight Saturation and adjust its level; lower settings reduce saturation, zero removes the colour.
Highlight Gain and adjust contrast for that primary.
Repeat selection, Hue, Saturation and Gain for other colours as needed.
Check that all desired adjustments are made.
Setting the presentation timer
Instructions from the manual
Set presentation timer8 steps
Open BASIC > Presentation Timer and Enter.
Set Timer Period with Left/Right: 1–5 minutes in one-minute steps or 5–240 minutes in five-minute steps.
Changing an active period restarts it.
Choose Timer Display: Always, last 1/2/3 minutes, or Never; choose Top-Left, Bottom-Left, Top-Right or Bottom-Right.
Select Count Up (zero to set time) or Count Down (set time to zero).
Enable Sound Reminder for two beeps in the last 30 seconds and three at the end.
Highlight Start Counting and Enter; select Yes in the confirmation to activate.
To cancel, choose Off and Enter, then Yes.
Hiding the image
Instructions from the manual
Hide the image with BLANK5 steps
Press BLANK on projector or remote.
Any projector/remote key restores the picture.
BLANK appears at lower right, and the projector enters SuperEco automatically.
Set BASIC > Blank Timer if a timed return is needed.
Do not block the lens with objects: they may become hot, deform or cause fire.
Blank Timer and Sleep Timer distinctions5 steps
BASIC > Blank Timer chooses how long the screen remains blank before restoring the image.
If the preset lengths do not suit, choose Disable.
This differs from POWER MANAGEMENT > Smart Energy > Sleep Timer, which shuts down after its chosen time.
Blank Timer choices are Disable or 5/10/15/20/25/30 minutes.
Sleep Timer choices are Disable, 30 minutes, or 1/2/3/4/8/12 hours.
Locking control keys
Instructions from the manual
Lock projector panel keys4 steps
In SYSTEM > Panel Key Lock choose On.
Only Power remains active on the panel; the remote remains usable.
Hold projector Right for three seconds to release, or use the remote to set SYSTEM > Panel Key Lock Off.
Switching off without releasing keeps the lock for next startup.
Operating in a high altitude environment
Instructions from the manual
High-altitude operation5 steps
Use SYSTEM > High Altitude Mode On at 1500–3000 m and 0–30 °C; select Yes in confirmation.
Do not use this mode at 0–1499 m and 0–35 °C, where it can overcool.
Fan noise increases.
Other extreme environments may cause protective auto-shutdown; the manual recommends high-altitude mode in such cases but does not guarantee operation under every harsh condition.
Operating specifications allow 0–40 °C at sea level, 0–35 °C at 0–1499 m, and 0–30 °C at 1500–3000 m with high-altitude mode; humidity 10–90%, non-condensing.
Using the cec function
Instructions from the manual
Use HDMI CEC4 steps
Enable CEC on each correctly HDMI-connected supported device.
In POWER MANAGEMENT > Auto Power On > CEC select Enable.
Powering a device can turn on the projector; projector power-off can turn devices off.
CEC works only with a compatible HDMI-connected device; some synchronised power functions may not work depending on the connected device.
Using the 3d functions
Instructions from the manual
Use 3D6 steps
Wear 3D glasses.
HDMI 1.4a compatible input is detected automatically.
Other 3D inputs may require ADVANCED > 3D Settings > 3D Sync and choosing the correct mode.
When enabled, brightness decreases, Color Mode is unavailable and zoom is limited.
If depth is inverted, set 3D Sync Invert to Invert.
Use the matching timing-chart format and frequency; 120 Hz modes are frame-sequential only; the SDTV480i mode also is frame-sequential only.
Using the projector in standby mode
Instructions from the manual
Use standby VGA and audio output2 steps
With cables correctly connected, POWER MANAGEMENT > Standby Settings > Active VGA Out On outputs Computer 1 to Monitor Out.
Active Audio Out On outputs Audio In to Audio Out during standby.
Adjusting the sound
Instructions from the manual
Adjust sound, mute and ringtone4 steps
To mute, press remote Mute or set BASIC > Audio Settings > Mute On.
Adjust level with remote volume +/− or BASIC > Audio Settings > Audio Volume.
To disable the power ringtone select BASIC > Audio Settings > Power On/Off Ring Tone Off.
Changing mute or volume does not affect this ringtone.
Shutting down the projector
Instructions from the manual
Shut down safely5 steps
Press Power or Off.
When the confirmation appears, press it again; without response it disappears after a few seconds.
Wait for cooling to complete and the Power Off Ring Tone.
Disconnect mains if unused for an extended period.
It does not respond to commands during cooling; do not unplug before cooling ends.
Description of each menu
Instructions from the manual
Signal-specific display adjustments6 steps
Menu items vary with signal type, model and at least one valid signal.
DISPLAY > Position moves the image with arrows and is available for PC D-Sub only.
Phase reduces distortion and H.
Size changes horizontal width, also PC D-Sub only.
OverScan adjusts 0–5 with composite Video or HDMI.
3X Fast Input reduces frame delay only with the native-resolution input; enabling resets Aspect Ratio, Keystone, Position, Zoom and OverScan.
Reset colour settingsView
In IMAGE > Advanced > Reset Color Settings restore current colour settings to their factory values.
Automatic power and Smart Energy5 steps
POWER MANAGEMENT > Auto Power On > Signal can turn on from VGA input; Direct Power On turns on when mains is supplied.
CEC has its separate supported-device conditions.
Smart Energy > Auto Power Off turns off after the selected no-input period (Disable/10/20/30 minutes).
Sleep Timer turns off after the selected period, even with input (Disable/30 minutes/1/2/3/4/8/12 hours).
Power Saving Enable enters Eco after five minutes without input and SuperEco after twenty minutes without input.
Smart Restart and Quick Power Off5 steps
POWER MANAGEMENT > Smart Restart lets restart occur within 120 seconds after shutdown, with more than four minutes prior operation.
Enabling automatically enables Quick Power Off.
Quick Power Off Enable skips normal cooling on shutdown.
Disable turns off Smart Restart.
If an immediate restart is attempted after quick shutdown, the projector may cool before starting.
Pattern, messages and splash screen3 steps
BASIC > Pattern displays test patterns to adjust size/focus and verify an undistorted picture.
Message enables or disables reminder messages.
Splash Screen chooses the startup logo.
Dynamic contrast and lamp settings4 steps
ADVANCED > DCR automatically adjusts black level for contrast, only with PC input timings.
Frequent lamp-mode switching may reduce lamp life and create noise.
ADVANCED > Lamp Settings selects Normal, Eco, Dynamic Eco or SuperEco and displays hours.
Do not reset hours unless the lamp has been newly replaced; use qualified lamp service.
Closed captionsView
ADVANCED > Closed Caption > Closed Caption Enable On works only with composite Video and NTSC carrying captions. Select CC1, CC2, CC3 or CC4 as appropriate.
Reset settings and menu display3 steps
ADVANCED > Reset Settings returns settings to factory values but preserves Keystone, Phase, H.
Size, OverScan, Language, Projector Position, High Altitude Mode, Security Settings, Remote Control Code, 3D Sync, Filter Mode and HDMI Settings.
SYSTEM > Menu Settings sets OSD duration 5–30 seconds in five-second increments and its position.
View source and projector informationView
INFORMATION displays Source, Color Mode, native input Resolution, Color System, Firmware Version, 3X Fast Input status and serial number.
Cleaning the lens
Instructions from the manual
Clean the lensView
Remove dirt/dust with canned compressed air. For smudges wipe gently with lens-cleaning paper, or a soft cloth moistened with lens cleaner. Never rub with abrasive materials.
Cleaning the projector case
Instructions from the manual
Clean the case4 steps
Shut down correctly and unplug before cleaning.
Use a soft lint-free cloth for dust/dirt.
For stubborn stains moisten with water and neutral-pH detergent, then wipe.
Never use wax, alcohol, benzene, thinner or other chemical detergents; they can damage the case.
Storing the projector
Instructions from the manual
Store and transport5 steps
Keep storage temperature/humidity within recommended ranges; consult the dealer or specifications.
Retract the adjuster foot.
Remove remote batteries.
Pack in original or equivalent packing.
Transport in original or equivalent packing.
Using the dust filter (optional accessory)
Instructions from the manual
Optional dust-filter precautions5 steps
Only use Filter Mode On after a correctly installed optional dust filter.
Clean every 100 operating hours and check periodically.
When a cleaning reminder appears, clean promptly; clogged dust reduces airflow and can cause overheating/malfunction.
Turn off and unplug before installing or cleaning.
For ceiling/high locations pay particular attention to personal safety.
Installing the dust filter
Instructions from the manual
Install the optional dust filter3 steps
Turn off and unplug.
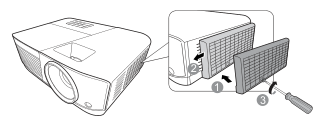
Align and insert the filter into the projector slots as shown; secure its screw.
Open ADVANCED > Filter Settings > Filter Mode On only with the correctly fitted filter.
Install the optional dust filter only with the projector off and unplugged. Align the filter with the slots and secure the screw before enabling Filter Mode.
Diagram key
1: First fitting arrow; align and insert the filter in the projector slots as illustrated.
2: Second fitting arrow; complete fitting into the slots in the printed arrow sequence.
3: Screwdriver and screw arrow; tighten the screw securing the dust filter.
Obtaining the filter hour information
Instructions from the manual
Read filter hoursView
Open ADVANCED > Filter Settings and Enter. The Filter Hours item shows hours.
Cleaning the dust filter
Instructions from the manual
Clean and reset the optional filter5 steps
Turn off and unplug.
Loosen its screw, remove the filter and remove dust with a small vacuum or brush.
Reinstall it and secure correctly.
To reset after cleaning open ADVANCED > Filter Settings > Reset Filter Hours, Enter, then Reset and Enter.
When using without a filter set Filter Mode Off; this does not reset hours, which resume when it is fitted and On again.
Lamp information
Instructions from the manual
Read lamp hours and choose lamp mode7 steps
Open ADVANCED > Lamp Settings and Enter; read Lamp Hours.
Hours are calculated automatically.
Press Exit to leave.
To select mode, open ADVANCED > Lamp Settings > Lamp Mode and use Left/Right, or use remote Eco Mode.
Normal gives full brightness.
Eco reduces power about 30%, Dynamic Eco up to 70% according to content, SuperEco about 70% and is not recommended for prolonged operation.
These modes reduce noise/power and can extend lamp life.
Timing of replacing the lamp
Instructions from the manual
Lamp replacement and overheating warnings4 steps
If the LAMP light lights, consult the dealer or arrange a new lamp; an old lamp can malfunction or explode.
Contact qualified service personnel for lamp replacement.
If LAMP and TEMP light because the lamp is too hot, switch off and cool for 45 minutes.
If either remains lit after switching on again, contact the dealer.
Ceiling mount installation
Instructions from the manual
Mount dimensions and fasteners4 steps
Ceiling-mount screws are M4 × 8, with maximum length eight millimetres.
Use the correct kit and qualified installation; do not infer bracket compatibility from size alone.
The operation guide specifies 294 mm wide, 110 mm high and 218 mm deep, excluding extrusions.
Its illustrated height line extends to the bottom of the feet; retain the measurement endpoints shown in the source drawing.
Ir control table
Instructions from the manual
Serial and IR control reference5 steps
Use the original IR control and RS-232 tables for exact command bytes, not inferred commands.
RS-232 pin assignment, baud 115200, eight data bits, no parity, one stop bit and no flow control are listed.
Match SYSTEM > Baud Rate to the computer when controlling/updating by a suitable RS-232 cable.
The complete table includes power, input, colour, image, lamp, sound, menu, timer, CEC, 3D, HDMI, remote-code and key commands.
It does not add user error-message remedies.
Timing chart
Instructions from the manual
Compatible timing reference4 steps
Consult the full analogue RGB, HDMI, component and composite tables for compatible resolutions, aspect ratios and refresh rates.
PA503S native resolution is 800 × 600, 4:3.
3D formats have separate constraints: 50/60 Hz side-by-side, top-bottom and frame-sequential as marked; 120 Hz only frame-sequential; SDTV480i only frame-sequential.
HDMI 3D frame packing, side-by-side and top-bottom list separate supported timings.
Fcc statement
Instructions from the manual
FCC interference checks2 steps
If switching the equipment off/on identifies radio or TV interference, reorient or relocate the receiving antenna, increase equipment/receiver separation, connect to an outlet on another circuit, or consult the dealer or an experienced radio/TV technician.
Unapproved changes can void operating authority.
Following information is only for eu-member states:
Instructions from the manual
EU equipment and battery disposalView
In EU member states, do not dispose of equipment, spent batteries or accumulators as unsorted municipal waste. Use the available return and collection systems.
Menu system
Instructions from the manual
Gamma and Brilliant Color optionsView
IMAGE > Advanced > Gamma offers C1–C8, G1–G5, sRGB and DICOM SIM. Brilliant Color offers Off or levels 1–10. These choices do not establish a recommended universal setting.
Quick start guide
Instructions from the manual
Quick-start connection and optical setup7 steps
With connected devices off, connect the source and mains, then press Power.
Use Source for input, the foot for angle, keystone keys for distortion, zoom ring for size and focus ring for clarity.
The complete graphical numbered sequence matches the operation instructions.
The quick-start guide body-height drawing is 94 mm; its height arrows span the body and exclude the feet.
Retain those drawing endpoints.
Ceiling screws M4 × 8, maximum eight millimetres.
Its 4:3 projection tables and 3% tolerance match the PA503S operation tables; test physical size/distance before permanent installation.
Replacing the lamp
Instructions from the manual
Qualified-service lamp replacement22 steps
This is the manufacturer’s qualified-service reference: the main guide requires qualified lamp replacement.
Turn off and unplug.
Allow at least 45 minutes cooling; keep power unplugged at least ten minutes.
Use only ViewSonic-certified lamps and working gloves.
Handle shattered glass carefully; clean the compartment, dispose of cleaning materials, avoid sharp edges and wash hands after replacement.
Loosen the lamp-cover screw until the cover loosens.
Remove cover and mylar.
Never turn on with the cover removed and do not insert fingers between lamp and projector.
Disconnect the lamp connector.
Loosen the inner-lamp screw.
Lift its handle.
Slowly pull out by the handle; pulling quickly can break/scatter glass.
Do not leave the lamp near water, children or flammable materials; never insert hands into the projector or touch internal optical components.
Align the new lamp with its alignment holes and gently push to the locked position.
Do not touch lamp glass with bare hands: oils can create a hot spot and damage it.
Insert the connector and tighten the securing screw.
Loose screws can cause malfunction, but do not overtighten.
Replace mylar and cover.
Tighten cover screws securely without overtightening.
After powering on, open ADVANCED > Lamp Settings > Reset Lamp Hours and Enter.
Select Reset and Enter to set hours to zero.
Never reset unless a new replacement lamp is fitted.
Model details
Model and compatibility
Applicable model and guide
PA503S (VS16905), current AP/non-Vietnam English guide 1d, 7 May 2026. Vietnam-only guide excluded. [1]
100–240 V AC, 50–60 Hz; maximum 280 W and standby below 0.5 W. [1]
Connections
Two Computer/RGB inputs, composite Video, one HDMI 1.4a, Monitor/RGB output, mini USB for firmware, audio input/output and RS-232; built-in 2 W speaker. No SP/XP-only USB-A supply or second HDMI. [1]