MODEL REFERENCE
Brother FAX-817
24 errors · 109 guides
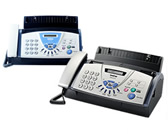
The checks and guides below come from the official manuals for this model.
No matches for this wording. Try a light name, error code or a shorter phrase.
Errors and messages
Shown on the machine display CHECK PAPER RELOAD PAPER PRESS STOP KEYcHECK PAPER RELOAD PAPER PRESS STOP KEY2 checks
COVER IS OPEN CLOSE COVERcOVER IS OPEN CLOSE COVER
The cover is not closed completely.: Close the cover.
DOCUMENT JAM REMOVE JAM PRESS STOP KEYdOCUMENT JAM REMOVE JAM PRESS STOP KEY2 checks
LINE DISCONNECTlINE DISCONNECT
The other person or other person’s fax machine stopped the call.: Try to send again.
MEMORY NEAR ZERO CLEAR MEMORYmEMORY NEAR ZERO CLEAR MEMORY
The fax machine is almost out of memory.: Clear stored faxes and scheduled jobs from memory, or print stored faxes. For FAX-817 fax forwarding or storage, press Menu/Set, 8, 3, then Fax Start. After printing finishes, press Stop/Exit.
NOT REGISTEREDnOT REGISTERED
You tried to access a One-Touch or Speed-Dial number that is not programmed.: Set up the One-Touch or Speed-Dial number.
OUT OF MEMORY CLEAR MEMORYoUT OF MEMORY CLEAR MEMORY5 checks
PAPER JAM PLS OPEN COVER REMOVE JAMpAPER JAM PLS OPEN COVER REMOVE JAM
The paper is jammed in the fax machine.: Remove any paper that is not jammed. Lift the lever on the right to open the top cover. Pull the jammed paper gently toward the front, as shown in diagram A. If it cannot be removed that way, pull it toward the back as shown in diagram B. Close the top cover securely by pressing down on both sides, then reload paper.
PHONE LINE BUSYpHONE LINE BUSY
The number you dialled does not answer or is busy.: Verify the number and try again.
POLLING FAILEDpOLLING FAILED
You tried to poll a fax machine that is not in Polled Waiting mode.: Check the other fax machine’s polling setup.
PRINTHEAD OVERHEATED WAIT TO COOLpRINTHEAD OVERHEATED WAIT TO COOL
The print head has overheated.: Wait 30 minutes for it to cool or wait until the message disappears automatically.
RECEIVE FAILEDrECEIVE FAILED
Poor phone line quality caused a communication error.: If the problem continues, call the telephone company and ask them to check your phone line.
RIBBON EMPTY RESET OR REPLACErIBBON EMPTY RESET OR REPLACE
Your fax machine is out of ribbon or the print cartridge is not properly installed.: Install the print cartridge again or change the ribbon.
UNABLE TO INITuNABLE TO INIT
The fax machine has a mechanical problem. —OR— A foreign obstacle, such as a clip or ripped paper, is in the fax machine.: Open the top cover and remove any foreign obstacles from inside the fax machine. If the error message continues, disconnect the fax machine from the power for several minutes then reconnect it. You will lose all faxes in the memory. Please follow the steps below before disconnecting the fax machine so you will not lose any important messages. Check whether the fax machine has faxes in the memory 1. Press Menu/Set, 0, 0, 1. 2. If the fax machine does not have faxes in its memory, disconnect the fax machine from the power source for several minutes and then reconnect it. —OR— If faxes are present, you can transfer them to another fax machine. Go to Step 3. Transfer faxes to another fax machine 3. Enter the fax number to which faxes will be forwarded. 4. Press Fax Start. 5. After the faxes are transferred, disconnect the fax machine from the power source for several minutes and then reconnect it. Transfer Journal report to another fax machine You can transfer the Fax Journal report to another fax machine. 1. Press Menu/Set, 0, 0, 2. 2. Enter the fax number to which faxes will be forwarded. 3. Press Fax Start. If you have not set up your Station ID, you cannot enter fax transfer mode. If the error message still continues, contact Brother or your dealer for service.
UNABLE TO PRINTuNABLE TO PRINT
The fax machine has a mechanical problem. —OR— A foreign obstacle, such as a clip or ripped paper, is in the fax machine.: Open the top cover and remove any foreign obstacles from inside the fax machine. If the error message continues, disconnect the fax machine from the power for several minutes then reconnect it. You will lose all faxes in the memory. Please follow the steps below before disconnecting the fax machine so you will not lose any important messages. Check whether the fax machine has faxes in the memory 1. Press Menu/Set, 0, 0, 1. 2. If the fax machine does not have faxes in its memory, disconnect the fax machine from the power source for several minutes and then reconnect it. —OR— If faxes are present, you can transfer them to another fax machine. Go to Step 3. Transfer faxes to another fax machine 3. Enter the fax number to which faxes will be forwarded. 4. Press Fax Start. 5. After the faxes are transferred, disconnect the fax machine from the power source for several minutes and then reconnect it. Transfer Journal report to another fax machine You can transfer the Fax Journal report to another fax machine. 1. Press Menu/Set, 0, 0, 2. 2. Enter the fax number to which faxes will be forwarded. 3. Press Fax Start. If you have not set up your Station ID, you cannot enter fax transfer mode. If the error message still continues, contact Brother or your dealer for service.
UNABLE TO SCANuNABLE TO SCAN
The fax machine has a mechanical problem. —OR— A foreign obstacle, such as a clip or ripped paper, is in the fax machine.: Open the top cover and remove any foreign obstacles from inside the fax machine. If the error message continues, disconnect the fax machine from the power for several minutes then reconnect it. You will lose all faxes in the memory. Please follow the steps below before disconnecting the fax machine so you will not lose any important messages. Check whether the fax machine has faxes in the memory 1. Press Menu/Set, 0, 0, 1. 2. If the fax machine does not have faxes in its memory, disconnect the fax machine from the power source for several minutes and then reconnect it. —OR— If faxes are present, you can transfer them to another fax machine. Go to Step 3. Transfer faxes to another fax machine 3. Enter the fax number to which faxes will be forwarded. 4. Press Fax Start. 5. After the faxes are transferred, disconnect the fax machine from the power source for several minutes and then reconnect it. Transfer Journal report to another fax machine You can transfer the Fax Journal report to another fax machine. 1. Press Menu/Set, 0, 0, 2. 2. Enter the fax number to which faxes will be forwarded. 3. Press Fax Start. If you have not set up your Station ID, you cannot enter fax transfer mode. If the error message still continues, contact Brother or your dealer for service.
WRONG PASSWORDwRONG PASSWORD
Enter the registered four-digit TX Lock password to unlock. If you have forgotten it, contact Brother or the dealer for assistance.
EXT. TEL IN USEeXT. TEL IN USE
An external phone or answering device is using the line. To disconnect that call and switch to the FAX-817 handset, lift the handset and press Hook.
CONNECTION FAILcONNECTION FAIL
The other fax machine was not set up for polling. It must be set up before you poll it.
DISCONNECTEDdISCONNECTED
The secure polling code did not match. Use the same four-digit secure code as the other Brother machine.
# WITHHELD# WITHHELD
The caller intentionally blocked Caller ID. The manual provides no repair for this Caller ID state.
NO CALLER IDnO CALLER ID
No Caller ID is stored for Call Reply. Caller ID requires the telephone-company service; choose a stored ID once one is available.
PICK UP PHONEpICK UP PHONE
- For Remote Call Transfer from the connected cordless phone, lift the FAX-817 handset and press Hook.
- Keep the cordless call connected until it can no longer hear or speak to the caller.
- If unanswered, the pseudo-ring stops after 30 seconds.
- In Caller ID use, the same message remains when no ID was transmitted.
Guides
Printing or receiving faxes
Instructions from the manualCondensed print and white streaks across the page or the top and bottom of sentences are cut off.1 check
- Condensed print and white streaks across the page or the top and bottom of sentences are cut off.
- If your copy looks good, you probably had a bad connection, with static or interference on the phone line.
- If the copy looks bad, clean the scanner.
- If the problem continues, call Brother or your dealer for service.
Vertical black lines when receiving.1 check
- Vertical black lines when receiving.
- Your machine’s print head might be dirty.
- Clean the print head.
- The sender’s scanner may be dirty.
- Ask the sender to make a copy to see if the problem is with the sending machine.
- Try receiving from another fax machine.
- If the problem continues, call Brother or your dealer for service.
Phone line or connections
Instructions from the manualThe fax machine does not answer when called.1 check
- The fax machine does not answer when called.
- Make sure receive mode is not set to MANUAL.
- Check for a dial tone.
- If possible, call the fax machine to hear it answer.
- If there is still no answer, check the telephone line cord connection.
- Connect a standard telephone to the fax machine’s telephone socket.
- If there is no ringing when you call the fax machine, ask your telephone company to check the line.
External Telephone answering device (TAD) does not answer when called1 check
- External Telephone answering device (TAD) does not answer when called
- Make sure the external TAD is connected correctly and set to answer calls.
No dial tone on the handset1 check
- No dial tone on the handset
- Lift the handset.
- If you don’t hear a dial tone, check telephone line cord connections at the fax machine and wall socket.
- Check that the handset is connected to the fax machine’s handset socket.
- Test the wall socket with another single line telephone.
- If there is no dial tone at the wall socket, call your telephone company.
Receiving faxes
Instructions from the manualCannot receive a fax2 checks
- Cannot receive a fax
- Make sure that the fax machine is in the correct receiving mode for your setup.
- Cannot receive a fax
- If there seems to be interference on your phone line, try setting the Compatibility to BASIC.
Sending faxes
Instructions from the manualCannot send a fax2 checks
- Cannot send a fax
- Ask the other party to check that the receiving machine has paper.
- Cannot send a fax
- Print the Transmission Verification Report and check for an error.
Poor sending quality.1 check
- Poor sending quality.
- Try changing your resolution to FINE or S.FINE. Make a copy to check the fax machine’s scanner operation.
Dialling does not work1 check
- Dialling does not work
- Check all line cord connections.
- Check the power cord connection.
- Send a manual fax by lifting the handset and dialling the number.
- Wait to hear fax receiving tones before pressing Fax Start.
- Change the Tone/Pulse setting.
Vertical black lines when sending.1 check
- Vertical black lines when sending.
- Use the fax machine to make a copy.
- If the copy shows the same problem, the scanner area is dirty.
- Lift the top cover and check the document path.
- Clean the white film and the scanner’s glass strip using isopropyl alcohol and a lint-free cloth.
Transmission Verification Report prints “RESULT ERROR”1 check
- Transmission Verification Report prints “RESULT ERROR”
- There is probably temporary noise or static on the phone line.
- Try sending the fax again.
- Try setting the Compatibility to BASIC.
- If the problem continues, call the telephone company to check your phone line.
Handling incoming calls
Instructions from the manualDouble-ring in FAX/TEL mode1 check
- Double-ring in FAX/TEL mode
- The fax machine knows the incoming call is not a fax so it is signaling you to answer the telephone call.
- Pick up the fax machine’s handset or answer from an extension phone, and then press the fax machine’s Telephone Answer Code (default setting is #51).
Transferring a call to the fax machine1 check
- Transferring a call to the fax machine
- If you have answered at the fax machine’s handset, press Fax Start and hang up immediately.
- If you answered at an extension phone, press your three-digit Fax Receive Code (default setting is *51).
- When the fax machine answers, hang up.
The fax machine “hears” voice as fax tone1 check
- The fax machine “hears” voice as fax tone
- If the fax machine is set to Fax Detect ON, it is more sensitive to sounds.
- The fax machine may mistakenly interpret certain voices or music on the line as a calling fax machine and respond with fax receiving tones.
- Deactivate the fax by pressing #51 if you are at an extension phone or press Stop/Exit if you are at the fax machine or an external phone.
- Try avoiding this problem by turning Fax Detect to OFF.
Custom features on a single line1 check
- Custom features on a single line
- If you have Call Waiting, Voice Mail, an alarm system or any other custom feature on a single phone line with the fax machine, it may create a problem sending or receiving fax data.
- For example: If you are sending or receiving a fax message while a custom feature signal comes through on the line, the signal can temporarily interrupt or disrupt the fax data.
- Your fax machine’s ECM feature should help overcome this problem.
- This condition is related to the telephone system industry and is common to all devices that send and receive data on a single, shared line with custom features.
- If avoiding a slight interruption is crucial to your business, we recommend a separate phone line with no custom features.
How to load paper
Instructions from the manualHow to load paper7 steps
- Before adding paper, remove all existing paper from the tray.
- Fan the stack to avoid jams and misfeeds, and tap it so the edges are even.
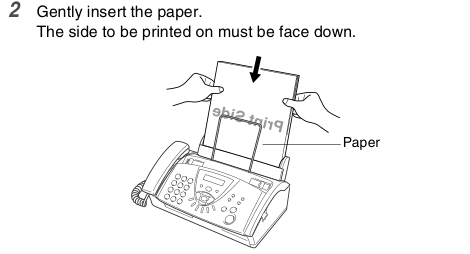
- Gently insert paper with the print side down.
- Use A4 paper, 64–90 g/m², 0.08–0.12 mm thick, with up to 30 sheets in the tray.
- Store paper flat in its sealed original packaging away from moisture, direct sunlight and heat.
- Do not use cardboard, newspaper, fabric, extremely shiny or highly textured paper, previously printer-printed paper, uneven stacks, short-grain paper, or paper that is curled, wrinkled, folded, ripped, stapled, paper-clipped, pasted or taped.
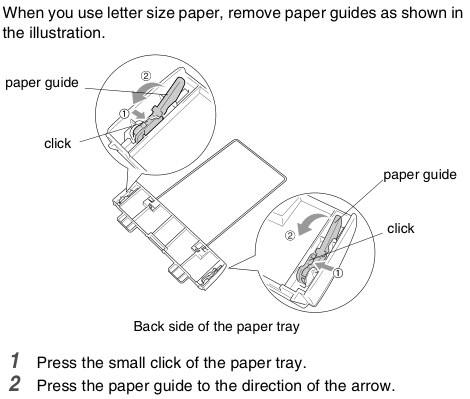
- For Letter size paper, remove the paper guides: press the small click of the paper tray, then press the paper guide in the direction of the illustrated arrow.
Setting the date and time
Instructions from the manualSetting the Date and Time7 steps
- Press Menu/Set, 1, 2.
- Enter the last two year digits and press Menu/Set.
- Enter two month digits and press Menu/Set.
- Enter two day digits and press Menu/Set.
- Enter the time in 24-hour format and press Menu/Set.
- Press Stop/Exit.
- Reset the date and time if needed after a power failure.
Setting the station id
Instructions from the manualSetting the Station ID7 steps
- Press Menu/Set, 1, 3.
- Enter a fax number of up to 20 digits and press Menu/Set.
- Enter a telephone number of up to 20 digits and press Menu/Set.
- Enter a name of up to 20 characters and press Menu/Set, then Stop/Exit.
- The fax number is required before the name or telephone number can be stored.
- Use the * key to enter +, followed by the country code, omit the leading zero from the area code and leave a space before the local number; do not enter a hyphen.
- If an ID is already stored, press 1 to change it or 2 to leave it unchanged.
Setting the beeper volume
Instructions from the manualSetting the Beeper VolumeView
Press Menu/Set, 1, 4. Choose LOW, HIGH or OFF with the up/down keys. Press Menu/Set, then Stop/Exit. The default is LOW.
Setting tone or pulse dialling mode (not available for new zealand)
Instructions from the manualSetting Tone or Pulse dialling mode4 steps
- The factory setting is TONE.
- For Pulse service, press Menu/Set, 1, 1.
- Choose PULSE or TONE with the up/down keys and press Menu/Set, then Stop/Exit.
- This feature is unavailable for New Zealand.
Choosing the receive mode
Instructions from the manualChoosing the Receive Mode6 steps
- Choose FAX ONLY for a dedicated fax line, FAX/TEL for fax and voice calls without an answering device on the same line, TAD:ANSWER MACH. for an external answering device, or MANUAL to answer every call yourself.
- With MANUAL, if you hear fax tones, wait for the machine to take over before hanging up.
- Press Receive Mode repeatedly until the desired mode appears; the display returns to date/time after two seconds.
- In FAX/TEL, set Ring Delay and F/T Ring Time; with extension phones, keep Ring Delay at four rings.
- In TAD:ANSWER MACH., the external device answers all calls and stores voice messages; the fax machine prints faxes.
- Ring Delay and F/T Ring Time do not operate in this TAD mode.
Setting the ring delay
Instructions from the manualSetting the Ring Delay5 steps
- Press Menu/Set, 2, 1.
- Choose the number of rings with the up/down keys and press Menu/Set, then Stop/Exit.
- The Singapore edition lists 0–10 rings.
- With extension phones in FAX/TEL, use four rings.
- Caller ID needs more than two rings; a setting of one ring cannot receive Caller ID.
Setting the f/t ring time (fax/tel mode only)
Instructions from the manualSetting the F/T Ring Time (FAX/TEL mode only)4 steps
- Press Menu/Set, 2, 2.
- Select 20, 30, 40 or 70 seconds for alerting you to a voice call.
- Press Menu/Set, then Stop/Exit.
- The pseudo-ring continues for the selected time even if the caller hangs up.
Fax detect
Instructions from the manualFax Detect6 steps
- Press Menu/Set, 2, 3.
- Select ON, SEMI or OFF and press Menu/Set, then Stop/Exit.
- ON automatically receives a fax after you answer; SEMI does so only when you answer at the fax machine.
- With OFF, activate reception using Fax Start at the machine or the three-digit Fax Receive Code, initially *51, at an external or extension telephone.
- If the machine intercepts faxes sent from a computer on the same line, select OFF.
- If detection with ON fails, press Fax Start at the machine or *51 at the extension phone to activate reception.
Printing a reduced incoming fax (auto reduction)
Instructions from the manualPrinting a reduced incoming fax (Auto Reduction)5 steps
- Press Menu/Set, 2, 5.
- Choose ON or OFF, press Menu/Set, then Stop/Exit.
- ON reduces an incoming fax to fit A4 paper.
- A fax longer than the supported printable length may still print on two pages.
- Smaller incoming documents retain their original size.
Reception into memory
Instructions from the manualReception into memory6 steps
- Press Menu/Set, 2, 6.
- Choose ON or OFF, press Menu/Set, then Stop/Exit.
- When paper runs out, the current fax is stored if enough memory remains.
- With ON, later faxes are stored until memory is full, then incoming calls are not answered.
- With OFF, no later fax calls are answered until paper is loaded.
- Insert paper to print all stored faxes.
Changing the remote codes
Instructions from the manualChanging the remote codes7 steps
- Press Menu/Set, 2, 4.
- Select ON or OFF with the up/down keys and press Menu/Set.
- Enter the new Fax Receive Code and press Menu/Set; enter the Telephone Answer Code and press Menu/Set; enter the Activation Voice Code and press Menu/Set.
- Press Stop/Exit.
- Defaults are *51, #51 and *81 respectively.
- Remote codes may not work with some telephone systems.
- If remote access to an external answering device always disconnects, try other three-digit codes using 0–9, * or #.
Automatic transmission
Instructions from the manualAutomatic transmission7 steps
- Load the document face down, top edge first in the automatic document feeder.
- Adjust the paper guides to its width.
- Enter the fax number using One-Touch, Speed-Dial, Search or the dial pad, then press Fax Start.
- Do not pick up the handset.
- Documents must be 148–216 mm wide and 150–600 mm long.
- The feeder holds up to ten sheets of standard 64–90 g/m² paper; feed heavier sheets individually.
- Do not use curled, wrinkled, folded, ripped, stapled, paper-clipped, pasted or taped paper, cardboard, newspaper or fabric.
Manual transmission
Instructions from the manualManual transmission5 steps
- Load the document face down in the feeder.
- Lift the handset and listen for a dial tone.
- Enter the fax number using the dial pad, One-Touch, Speed-Dial or Search/Mute.
- When you hear fax receiving tones, press Fax Start.
- Replace the handset.
Contrast
Instructions from the manualContrast5 steps
- Load the document face down.
- Press Menu/Set, 3, 3.
- Choose AUTO, LIGHT for a light original, or DARK for a dark original; press Menu/Set.
- Press 2 when finished, or 1 to select more sending settings.
- Enter the fax number and press Fax Start.
Cancelling a scheduled job
Instructions from the manualCancelling a scheduled job4 steps
- Press Menu/Set, 4.
- Select the scheduled job with the up/down keys and press Menu/Set.
- Press 1 to cancel it or 2 to exit without cancellation.
- Repeat for another job if necessary, then press Stop/Exit.
Delayed fax
Instructions from the manualDelayed Fax8 steps
- Depending on data size, schedule up to three faxes within the next 24 hours.
- Load the document face down.
- Press Menu/Set, 3, 7.
- Enter the sending time in 24-hour format and press Menu/Set.
- Select 1 to leave the document in the feeder or 2 to scan it into memory.
- Press 1 for further settings or 2 to finish, then enter the fax number and press Fax Start.
- The number of scanned pages depends on their data.
- Memory-scanned documents remain stored until removed using Cancelling a Job.
Memory transmission
Instructions from the manualMemory Transmission6 steps
- Load the document face down.
- Press Menu/Set, 3, 9.
- To change the default, select ON or OFF and press Menu/Set.
- Alternatively, select NEXT FAX ONLY with the up/down keys and press Menu/Set, then select ON or OFF for that fax and press Menu/Set.
- Press 2 when finished or 1 for further settings.
- Enter the fax number and press Fax Start.
Storing one-touch dial numbers/storing junk fax/call numbers
Instructions from the manualStoring One-Touch Dial numbers8 steps
- Press Menu/Set, 6, 1, then press the One-Touch key to store.
- Enter a number of up to 20 digits and press Menu/Set.
- Enter a name of up to 15 characters and press Menu/Set, or press Menu/Set to store without a name.
- Select FAX, TEL or FAX/TEL and press Menu/Set, then select ANTI JUNK ON or OFF and press Menu/Set, and repeat from selecting another One-Touch key, or press Stop/Exit to finish.
- Redial/Pause inserts a 3.5-second pause.
- Power loss does not erase stored numbers.
- For the Singapore Caller ID subscriber service, ANTI JUNK ON registers the number for rejection of incoming fax messages or telephone calls; OFF does not.
- Anti-Junk is unavailable in Australia and New Zealand.
Storing speed-dial numbers/storing junk fax/call numbers
Instructions from the manualStoring Speed-Dial numbers7 steps
- Press Menu/Set, 6, 2.
- Enter a two-digit location from 01 to 60 and press Menu/Set.
- Enter a number of up to 20 digits and press Menu/Set.
- Enter a name of up to 15 characters and press Menu/Set, or press Menu/Set for no name.
- Select FAX, TEL or FAX/TEL, press Menu/Set, then select ANTI JUNK ON or OFF and press Menu/Set, and repeat from selecting another location, or press Stop/Exit to finish.
- With the Singapore Caller ID subscriber service, ANTI JUNK ON registers an incoming fax or call number to reject; OFF does not.
- Anti-Junk is unavailable in Australia and New Zealand.
Making a single copy
Instructions from the manualMaking a single copy6 steps
- Load the document face down and press Copy/Reports twice.
- Do not pull the paper during copying.
- Press Stop/Exit to cancel.
- The machine cannot receive a fax during copying.
- The default single-copy resolution is S.FINE; select PHOTO with Resolution for photographs.
- Keep content out of the non-scannable margins in the manual’s A4 example: 4 mm at the top and bottom, and 1 mm at each side.
Copy options: single or multiple copies, sort/stack, reduce/enlarge
Instructions from the manualCopy options: Single or Multiple copies, Sort/Stack, Reduce/Enlarge9 steps
- Load the document face down and press Copy/Reports.
- Enter 1–99 copies; press Copy/Reports to start now, or Menu/Set for further options.
- Select SORT for collated copies or STACK for all copies of each page together.
- Press Copy/Reports to start without resizing, or Menu/Set to select a ratio.
- Choose AUTO to fit the paper size, 50%, 75%, 87% or 93% to reduce, 100% for original size, or 120%, 125% or 150% to enlarge, then press Copy/Reports.
- If memory runs out on the first page, press Stop/Exit and make a single copy.
- For SORT after the first page, press Copy/Reports to copy scanned pages or Stop/Exit to cancel; restart using stacked copies to use less memory.
- The default multiple-copy or resizing resolution is FINE.
- Use Resolution to select S.FINE for small print or artwork, or PHOTO for photographs; both use more memory than FINE.
Compatibility
Instructions from the manualCompatibilityView
For possible line interference affecting fax sending or receiving, press Menu/Set, 0, 2. Select BASIC or NORMAL with the up/down keys. Press Menu/Set, then Stop/Exit.
Document jam
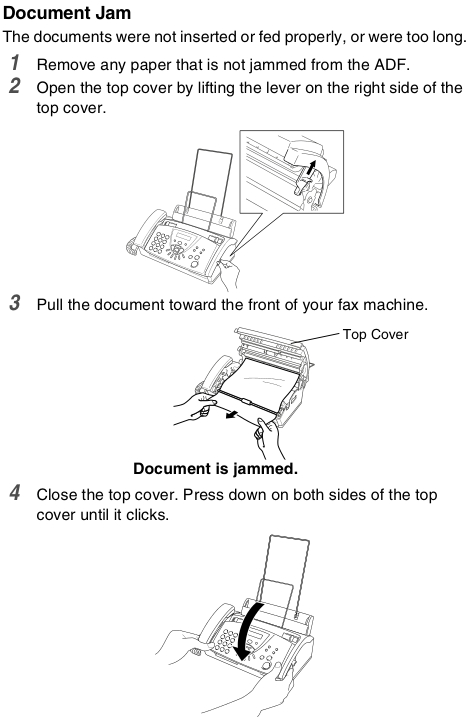
Instructions from the manualDocument Jam4 steps
- Remove any document that is not jammed from the feeder.
- Lift the lever on the right to open the top cover.
- Pull the jammed document toward the front.
- Close the top cover securely by pressing down on both sides.
Paper jam
Instructions from the manualPaper Jam5 steps
- Remove any paper that is not jammed.
- Lift the lever on the right to open the top cover.
- Pull the jammed paper gently toward the front, as shown in diagram A.
- If it cannot be removed that way, pull it toward the back as shown in diagram B.
- Close the top cover securely by pressing down on both sides, then reload paper.
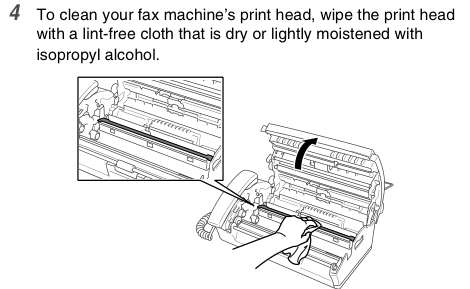
Cleaning the print head
Instructions from the manualCleaning the print head6 steps
- Disconnect the telephone-line cord first, then unplug the power cord.
- Parts inside can be extremely hot after use; take care.
- Open the top cover with the right-hand lever and remove the print cartridge.
- Clean the print head with a lint-free cloth that is dry or lightly moistened with isopropyl alcohol.
- Wait until it is completely dry.
- Reinstall the cartridge and close the cover securely on both sides.
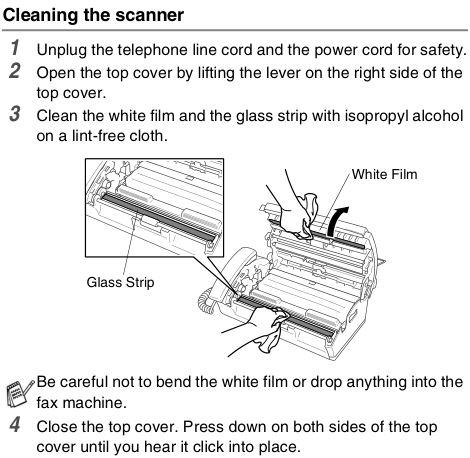
Cleaning the scanner
Instructions from the manualCleaning the scanner5 steps
- Disconnect the telephone-line cord first, then unplug the power cord.
- Open the top cover using the right-hand lever.
- Clean the white film and glass strip with isopropyl alcohol on a lint-free cloth.
- Do not bend the white film or drop anything inside the machine.
- Close the top cover securely on both sides.
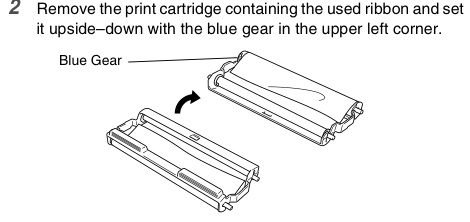
Changing the ribbon
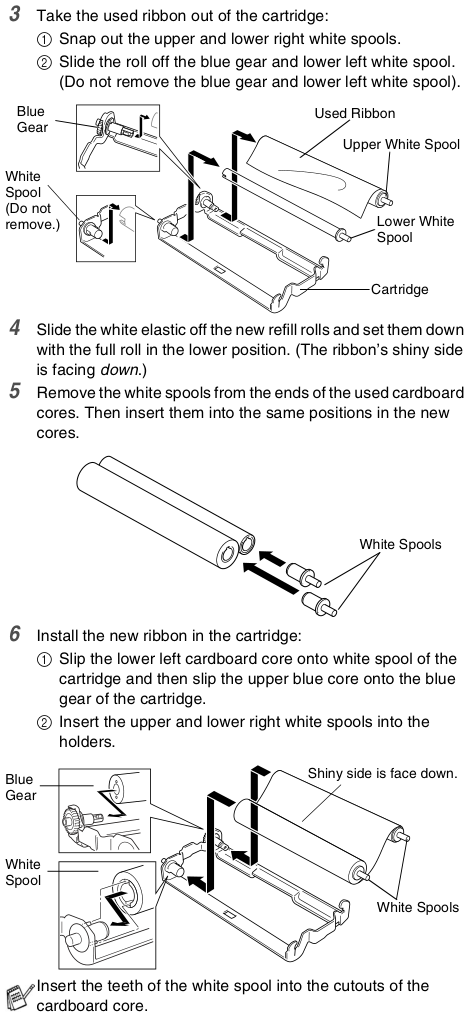
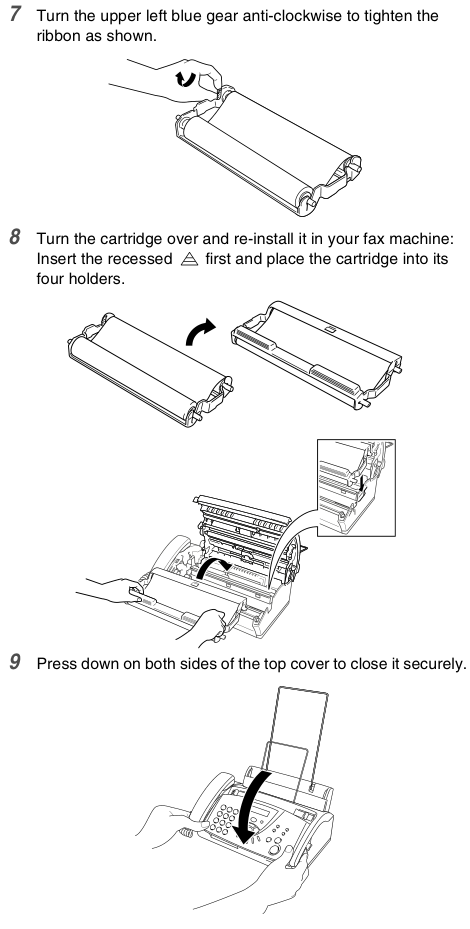
Instructions from the manualChanging the ribbon11 steps
- Open the top cover with the right-hand lever.
- Remove the print cartridge and turn it upside down with the blue gear at the upper left.
- Snap out the upper and lower right white spools; slide the ribbon off the blue gear and lower-left spool, leaving those two parts in place.
- Remove the elastic band from the new ribbon and place its full roll in the lower position, with the shiny side facing down.
- Transfer the white spools from the used cardboard cores to the same positions on the new ribbon.
- Place the lower-left cardboard core on its white spool and the upper blue core on the blue gear.
- Fit the upper and lower right white spools into their holders, inserting each white spool’s teeth into the cutouts of its cardboard core.
- Turn the upper-left blue gear anticlockwise to tighten the ribbon.
- Turn the cartridge over and reinstall it, inserting the recessed triangle first and seating all four spool holders.
- Close the top cover securely on both sides.
- The supplied ribbon may be a starter of up to 30 pages or a full ribbon of up to 144 pages, depending on the country of purchase.
Choosing a location
Instructions from the manualChoosing a location5 steps
- Put the machine on a flat, stable surface free of vibration and shocks, near a telephone socket and a standard grounded electrical socket, at 10–35°C.
- Avoid high-traffic areas, heaters, air conditioners, water, chemicals, refrigerators, direct sunlight, excessive heat, moisture, dust and interference from speakers or cordless-phone bases.
- Do not use sockets controlled by switches or timers, or circuits shared with large appliances that might disrupt power.
- Power interruption can erase memory.
- Use only the supplied power cord.
To use the fax machine safely
Instructions from the manualTo use the fax machine safely6 steps
- Before cleaning, unplug the telephone-line cord first, then the power cord from the electrical socket.
- Do not handle the plug with wet hands.
- Internal parts can be extremely hot after use.
- Never touch uninsulated telephone wires or terminals unless disconnected at the wall socket; never install telephone wiring during a lightning storm or a socket in a wet location.
- Install near an easily accessible electrical socket; disconnect the power cord there to shut off power completely.
- Do not use the machine near water, during an electrical storm, or to report a gas leak near the leak.
Connecting an external telephone
Instructions from the manualConnecting an external telephone5 steps
- Connect an external telephone to the machine as described in the manual.
- The drawn wall-socket example is specifically Australian.
- When the external phone or answering device is in use, EXT.
- TEL IN USE appears and lifting the machine handset sounds an alarm.
- To disconnect the external call and switch to the FAX-817 handset, lift it and press Hook.
Connecting an external telephone answering device (tad)
Instructions from the manualConnecting an external telephone answering device (TAD)6 steps
- Connect the external TAD in the arrangement described by the manual, not elsewhere on the same line; its wall-socket drawing is an Australian example.
- Set the TAD to one or two rings, record its outgoing message, set it to answer, and select TAD:ANSWER MACH. on FAX-817.
- It must answer within four rings, with two recommended, so the machine can hear fax calling tones.
- Do not use a toll saver exceeding four rings.
- If some faxes are missed, reset the TAD to four rings or fewer.
- The machine’s Ring Delay does not apply.
Recording outgoing message (ogm) on an external tad
Instructions from the manualRecording outgoing message (OGM) on an external TAD2 steps
- Record five seconds of silence at the beginning so the fax machine can detect calling tones before they stop, then limit speech to 20 seconds.
- If you omit the initial silence and fax reception is unreliable, record the message again with that silence.
Multi-line connections (pabx)
Instructions from the manualMulti-Line connections (PABX)4 steps
- Ask the telephone-system installer to connect the fax machine; a separate fax line is advisable.
- On a multiline system, ask to use the last line so every incoming call does not activate it.
- Correct operation with every PABX arrangement is not guaranteed; report difficulty first to the PABX company.
- If a switchboard operator answers all incoming calls, use MANUAL receive mode and initially treat calls as voice calls.
Setting the speaker volume
Instructions from the manualSetting the Speaker Volume4 steps
- On FAX-817, lift the handset and press Hook.
- Use the left/right keys to adjust the speaker volume shown on the LCD; each press moves to the next setting.
- The setting remains until changed.
- Press Hook again.
Setting the ring volume
Instructions from the manualSetting the Ring Volume3 steps
- While the machine is idle, use the left/right volume keys to select a ring volume or turn ringing off.
- The machine rings on each press and displays the setting.
- The selected level remains until changed.
Receiving a fax at the end of a conversation
Instructions from the manualReceiving a fax at the end of a conversation3 steps
- Ask the other party to load their document and press Start, waiting for your machine’s receiving tones before hanging up.
- When you hear calling beeps, press Fax Start.
- When RECEIVE is displayed, replace the handset.
Operation from extension telephones
Instructions from the manualOperation from extension telephones6 steps
- For a fax call answered on an extension phone, press *51, wait for receiving tones, then hang up.
- At an external phone in the correct connection, press *51 and wait until the phone disconnects and RECEIVE appears before hanging up.
- Your caller must press Start to send.
- If a call has no voice, assume a manual fax.
- For a FAX/TEL voice pseudo-ring, lift the handset during F/T Ring Time and press #51 between double rings.
- If the call is a fax instead, press *51 to return it to the fax machine.
Remote call transfer
Instructions from the manualRemote Call Transfer6 steps
- First set REMOTE CODE to ON.
- On the externally connected DECT cordless phone during an incoming voice call, press *81.
- When the fax machine pseudo-rings and shows PICK UP PHONE, lift its handset and press Hook.
- Do not hang up the cordless phone until it can no longer hear or speak to the caller; hanging up earlier loses the call.
- If nobody answers the fax machine, ringing stops after 30 seconds and the cordless phone may still speak to the caller.
- Transfer is only from the DECT phone to the fax machine; it cannot transfer back or act as an intercom.
Printing a fax from the memory (fax-817/827)
Instructions from the manualPrinting a fax from the memory (FAX-817/827)View
If Fax Forwarding or Fax Storage is selected with Menu/Set, 8, 1, print a stored fax by pressing Menu/Set, 8, 3, then Fax Start. After printing finishes, press Stop/Exit.
Setting up polling receive (standard)
Instructions from the manualSetting up Polling Receive (Standard)5 steps
- Both machines must support polling; some do not.
- Press Menu/Set, 2, 7.
- Select STANDARD with the up/down keys and press Menu/Set.
- Enter the other fax number and press Fax Start.
- You pay for the polling call.
Setup for polling receive with secure code
Instructions from the manualSetup for Polling Receive with Secure Code5 steps
- Secure polling works only with another Brother fax machine.
- Agree the same four-digit secure code with the other party.
- Press Menu/Set, 2, 7, select SECURE and press Menu/Set.
- Enter the matching four-digit code and press Menu/Set.
- Enter the number to poll, then press Fax Start.
Setup delayed polling receive
Instructions from the manualSetup Delayed Polling Receive6 steps
- Press Menu/Set, 2, 7.
- Select TIMER and press Menu/Set.
- Enter the polling time in 24-hour format and press Menu/Set.
- Enter the number to poll and press Fax Start.
- Only one delayed polling job can be set.
- The other machine must already be set up for polling; otherwise CONNECTION FAIL appears.
Sequential polling
Instructions from the manualSequential Polling6 steps
- Press Menu/Set, 2, 7.
- Select STANDARD, SECURE or TIMER and press Menu/Set.
- For SECURE, enter a four-digit code and press Menu/Set; for TIMER, enter a 24-hour polling time and press Menu/Set.
- Specify the destination machines using One-Touch, Speed-Dial, Search or a Group, then press Fax Start.
- The machine polls each destination in turn and prints a Sequential Polling Report.
- A wrong secure code displays DISCONNECTED.
Selecting a caller id from the memory for call reply
Instructions from the manualSelecting a Caller ID from the Memory for Call Reply6 steps
- Press Menu/Set, 0, 3, select DISPLAY ID and press Menu/Set.
- The latest stored ID appears; if none is stored, the machine beeps and shows NO CALLER ID.
- Scroll through IDs with the up/down keys, press Menu/Set for the selected number, wait for the prompt, then press Fax Start.
- To send a fax, load the document and press Fax Start.
- To cancel a wrong selection, press Stop/Exit and begin again; the ID remains stored.
- Automatic redial does not operate for a busy or unanswered Call Reply.
To activate certain network services when using call reply
Instructions from the manualTo Activate Certain Network Services When Using Call Reply5 steps
- After selecting the caller ID, wait two seconds for its date and time.
- Enter the service prefix with the number keys, up to 20 digits; the display clears as you type.
- Press Fax Start to dial the prefix and number.
- Stop/Exit cancels the prefix and restores the selected ID; pressing it again exits Call Reply.
- Ask the network operator about problems or questions concerning its service.
Printing caller id list
Instructions from the manualPrinting Caller ID ListView
Press Menu/Set, 0, 3. Select PRINT REPORT with the up/down keys and press Menu/Set. Press Stop/Exit.
Sending a fax at the end of a conversation
Instructions from the manualSending a fax at the end of a conversationView
Ask the other party to wait for fax beeps and press Start before hanging up. Load the document face down and press Fax Start. When SEND appears, replace the handset.
Fax resolution
Instructions from the manualFax resolution2 steps
- With a document in the feeder, press Resolution repeatedly to select a temporary setting for this fax: STANDARD for most typed text, FINE for small print, S.FINE for small print or artwork, or PHOTO for photographs or varying gray shades.
- FINE transmits more slowly than STANDARD, S.FINE more slowly than FINE, and PHOTO is slowest.
Cancelling a fax in progress
Instructions from the manualCancelling a fax in progressView
While scanning, dialling or sending a fax, press Stop/Exit to cancel it.
Broadcasting
Instructions from the manualBroadcasting6 steps
- Store the destination numbers as Groups, One-Touch or Speed-Dial first.
- Load the document face down, press Menu/Set, 3, 9 to select ON for Memory Transmission, then press Menu/Set.
- Enter One-Touch, Speed-Dial, Search or Group destinations one after another, up to 64 locations for FAX-817, and press Fax Start.
- The document is stored and sent to each destination, with redial for busy lines and a Broadcast Report afterwards.
- Stop/Exit during transmission cancels the current destination; Menu/Set, 4 cancels all locations.
- After broadcasting, return to Memory Transmission and select OFF if required.
Overseas mode
Instructions from the manualOverseas Mode4 steps
- For difficulty sending overseas due to possible line interference, load the document face down and press Menu/Set, 3, 5.
- Select ON or OFF with the up/down keys and press Menu/Set.
- Press 1 for further settings or 2 to finish, then enter the destination number and press Fax Start.
- Overseas Mode turns itself off after this fax.
Setting up polled transmit (standard)
Instructions from the manualSetting up Polled Transmit (Standard)7 steps
- Load the document face down and press Menu/Set, 3, 8.
- Select STANDARD and press Menu/Set.
- Choose 1 to leave the document in the feeder or 2 to scan it into memory.
- Press 1 for further settings or 2 to finish, then Fax Start.
- A feeder document remains until polled and can be retrieved only once; interrupt the job if the machine is needed first.
- A memory document remains available for retrieval until deleted using Cancelling a Job.
- Some machines do not support polling.
Setup for polling transmit with secure code
Instructions from the manualSetup for Polling Transmit with Secure Code6 steps
- Secure polling works only with another Brother fax machine.
- Load the document face down, press Menu/Set, 3, 8, choose SECURE and press Menu/Set.
- Enter a four-digit secure code and press Menu/Set.
- Choose 1 for DOC to scan when polled, or 2 for MEMORY to scan now.
- Press 1 for more settings or 2 to finish, then Fax Start and wait for polling.
- The polling machine must enter your four-digit code.
Interrupting delayed fax and polled transmit jobs
Instructions from the manualInterrupting Delayed Fax and Polled Transmit jobs6 steps
- For a scheduled job whose document remains in the feeder, press Menu/Set, 5.
- Wait two seconds, remove that document, and load the document to send now.
- Enter its destination number and press Fax Start.
- When transmission finishes, return the original document to the feeder and press Menu/Set, 5 to restore the scheduled job.
- Automatic redial and Menu mode cannot be used during the interruption.
- Memory-scanned scheduled jobs do not need interruption to send a fax or make a copy.
Setting up the password
Instructions from the manualSetting up the password4 steps
- For TX Lock, press Menu/Set, 0, 1.
- Enter a four-digit password and press Menu/Set.
- If VERIFY appears, enter it again and press Menu/Set.
- If you forget the password, contact Brother or the dealer for assistance.
Changing the tx lock password
Instructions from the manualChanging the TX Lock password5 steps
- Press Menu/Set, 0, 1.
- Select SET PASSWORD and press Menu/Set.
- Enter the current four-digit password and press Menu/Set.
- Enter a new four-digit password and press Menu/Set.
- If VERIFY:XXXX appears, re-enter it and press Menu/Set.
Turning tx lock on
Instructions from the manualTurning TX Lock on7 steps
- Press Menu/Set, 0, 1.
- Select SET TX LOCK and press Menu/Set.
- Enter the registered four-digit password and press Menu/Set.
- TX LOCK MODE appears and the machine goes offline.
- Receiving faxes, answering calls, previously enabled Fax Forwarding and previously enabled Fax Storage remote retrieval remain available; sending and copying are blocked.
- New delayed or polling jobs cannot be scheduled, but previously scheduled delayed faxes will be sent.
- Turn TX Lock off to print stored faxes.
Turning tx lock off
Instructions from the manualTurning TX Lock off5 steps
- Press Menu/Set.
- Enter the registered four-digit password and press Menu/Set.
- TX Lock turns off.
- A wrong password displays WRONG PASSWORD and leaves the machine offline and locked; enter the registered password.
- If it is forgotten, contact Brother or the dealer.
Changing one-touch and speed-dial numbers
Instructions from the manualChanging One-Touch and Speed-Dial numbers5 steps
- When the selected stored location asks, press 1 to change or 2 to leave it unchanged.
- Use the left/right keys to position the cursor and overwrite a character.
- To erase the whole number or name, place the cursor at its first character and press Stop/Exit; characters at and to the right of the cursor are deleted.
- Enter the new number and press Menu/Set, then enter a name of up to 15 characters or leave it blank and press Menu/Set.
- Select FAX, TEL or FAX/TEL and press Menu/Set, then select ANTI JUNK ON or OFF and press Menu/Set before storing another number or press Stop/Exit.
Setting up groups for broadcasting
Instructions from the manualSetting up Groups for Broadcasting5 steps
- First store each destination in One-Touch or Speed-Dial memory.
- Press Menu/Set, 6, 3, choose the One-Touch key for the group, enter a group number from 1 to 4 and press Menu/Set.
- Add One-Touch destinations by pressing their key; for Speed-Dial, press Search/Mute and the two-digit location.
- Press Menu/Set to accept the destinations, enter the group name and press Menu/Set, then Stop/Exit.
- Each group uses a One-Touch key; use up to four small groups or up to 63 numbers in one group.
On hook dialling
Instructions from the manualOn Hook dialling4 steps
- Dial with the dial pad or Quick-Dial keys.
- On FAX-817, press Fax Start, then lift the handset when the monitor speaker lets you hear the call answered.
- Pressing Hook before lifting the handset disconnects the call.
- Replace the handset to finish.
Mute
Instructions from the manualMute3 steps
- During a handset call, press Search/Mute to put it on hold.
- You may replace the handset without disconnecting; pick it up again to release the hold.
- Pressing Search/Mute without lifting the handset instead starts Search.
Tone or pulse
Instructions from the manualTone or PulseView
If a Pulse service needs temporary tone signals, lift the handset and press #. All following digits use tone signals. Hanging up restores Pulse service.
Setting up fax forwarding
Instructions from the manualSetting up Fax Forwarding6 steps
- Press Menu/Set, 8, 1.
- Select FAX FORWARD and press Menu/Set.
- Enter the forwarding number, up to 20 digits, and press Menu/Set.
- Choose BACKUP PRINT:ON or BACKUP PRINT:OFF and press Menu/Set, then Stop/Exit.
- ON prints a local backup to protect against power loss before forwarding.
- With OFF, memory data may be lost during a power failure.
Setting fax storage
Instructions from the manualSetting Fax StorageView
Press Menu/Set, 8, 1. Select FAX STORAGE and press Menu/Set, then Stop/Exit. Received faxes are stored for remote retrieval and a backup copy is automatically printed.
Turning off remote fax options
Instructions from the manualTurning off Remote Fax Options3 steps
- Set FORWARD/STORE to OFF using Menu/Set, 8, 1.
- If faxes remain in memory, press 1 to print and erase all unprinted faxes before the feature turns off; an already printed backup is not printed again.
- Press 2 to leave both memory and the setting unchanged.
Setting your remote access code
Instructions from the manualSetting your remote access code5 steps
- Press Menu/Set, 8, 2.
- Enter three digits using 0–9 and press Menu/Set; the final * is fixed.
- Press Stop/Exit.
- Do not choose the same code as Fax Receive *51, Telephone Answer #51 or Activation Voice *81.
- Enter a new code to change it, or press Stop/Exit instead of entering digits in the second step to restore the inactive ---* setting.
Using your remote access code
Instructions from the manualUsing your remote access code6 steps
- Dial the fax number from a touch-tone telephone or another fax machine.
- When answered, immediately enter your three-digit access code followed by *.
- One long beep means fax messages; no beeps means none.
- After two short beeps, enter a remote command within 30 seconds or the machine hangs up.
- Invalid commands produce three beeps.
- Press 90 when finished and hang up.
Remote commands
Instructions from the manualRemote commands8 steps
- After entering the remote access code and hearing two short beeps, use 951 for forwarding OFF, 952 for Fax Forwarding, 954 to register a forwarding number or 956 for Fax Storage.
- A long beep accepts a change; three short beeps mean a required setting is missing.
- OFF is available after registering or erasing all faxes.
- Use 961 and a remote fax number for a memory-status list, 962 for all stored faxes or 963 to erase faxes, accepted with a long beep.
- Use 971 to check for faxes: one long beep means yes, three short beeps means no.
- Use 981 for TAD:ANSWER MACH., 982 for FAX/TEL or 983 for FAX ONLY; a long beep accepts the change.
- Press 90 to exit, wait for the long beep, then replace the handset.
- After registering a forwarding number with 954, use 961 for the Memory Status List to verify it, as the supplied remote control card instructs.
Retrieving fax messages
Instructions from the manualRetrieving fax messages6 steps
- Dial your fax number and immediately enter the three-digit remote access code followed by * when it answers.
- A long beep means messages.
- After two short beeps, press 962.
- Wait for the long beep, enter the destination fax number of up to 20 digits followed by ##.
- Do not use * or # as number digits; # can store a pause.
- Hang up after the beep; your machine calls the destination, which prints the stored faxes.
Changing your fax forwarding number
Instructions from the manualChanging your Fax Forwarding number7 steps
- Dial your fax number and enter the three-digit remote access code followed by * as soon as it answers.
- A long beep means messages.
- After two short beeps, press 954.
- Wait for the long beep, then enter the new forwarding fax number of up to 20 digits followed by ##.
- Do not use * or # as dial-number digits; # stores a pause.
- Hang up after the beep.
- The remote control card also instructs using 961 for the Memory Status List to verify that the number was entered correctly.
Customizing the transmission verification report
Instructions from the manualCustomizing the Transmission Verification Report4 steps
- Press Menu/Set, 7, 1.
- Select ON or OFF with the up/down keys and press Menu/Set, then Stop/Exit.
- ON prints a report for every sent fax, showing date, time and success OK.
- OFF prints only on a transmission error, NG.
Setting the journal period
Instructions from the manualSetting the Journal Period8 steps
- Press Menu/Set, 7, 2.
- Choose OFF, every 30 faxes, every 6, 12 or 24 hours, or every 2 or 7 days.
- Press Menu/Set; for seven days, choose the starting day when prompted.
- Enter the start time in 24-hour format, press Menu/Set, then Stop/Exit.
- At a timed interval the journal prints and clears its recorded jobs; a full 30-job memory prints early and clears them.
- Printing an extra journal before it is due does not clear them.
- With OFF, print manually.
- The default interval is every 30 faxes.
How to print a report
Instructions from the manualHow to print a report3 steps
- Remove documents from the feeder.
- Press Copy/Reports, then the report number: 1 for the last XMIT VERIFY, 2 for HELP LIST, 3 for the numerical QUICK-DIAL list, 4 for FAX JOURNAL, 5 for the alphabetical TEL.INDEX, 6 for USER SETTINGS or 7 for MEMORY STATUS.
- The last transmission-report information remains only until the handset is lifted.
Shipment of the fax machine
Instructions from the manualShipment of the fax machineView
Pack the machine carefully to avoid transit damage, preferably with the saved original packaging, and arrange adequate insurance with the carrier.
Important safety instructions
Instructions from the manualImportant safety instructions15 steps
- Read, retain and follow all instructions and product warnings.
- Unplug before cleaning; do not use liquid or aerosol cleaners for general cleaning, and use a damp cloth.
- Keep the machine away from water and unstable surfaces.
- Keep ventilation openings clear; do not place it on a bed, sofa or rug, near a heater or in a built-in installation without ventilation.
- Use only the power type on the label; ask the dealer or power company if unsure.
- Use the grounded plug in a grounded socket and never defeat its ground; ask an electrician to replace an unsuitable socket.
- Keep objects off the power cord and keep the cord out of walking paths.
- Keep the fax output and its path clear, and wait for pages to exit before picking them up.
- Never insert objects through cabinet slots or spill liquid inside.
- Do not service the machine yourself; refer servicing to service personnel.
- Unplug and seek authorized service if the power cord is damaged or frayed, liquid enters, the product is exposed to rain or water, it fails to operate normally with the documented controls, it is dropped or its cabinet damaged, or performance distinctly changes.
- Adjust only controls covered by the instructions.
- A surge protector is recommended.
- The machine has no mains ON/OFF switch: keep the plug and socket accessible for emergency disconnection.
- Extension leads are not advised; if used, the total connected ampere ratings must not exceed the lead rating.
Caller id (caller identification) (not available for some countries)
Instructions from the manualCaller ID (Caller IDentification) (Not available for some countries)6 steps
- Apply to your telephone company for Caller ID.
- Calling-line identification is not generally delivered through a PABX or other routing device.
- The number appears while ringing, or the name if that number is stored.
- Picking up the handset removes the displayed ID.
- The last 30 incoming IDs are retained with date and time; the 31st replaces the oldest.
- Set Ring Delay to more than two rings before using Caller ID; one ring cannot receive it.
Setting the distinctive ringing
Instructions from the manualSetting the Distinctive Ringing6 steps
- For the Singapore or Hong Kong Distinctive Ringing subscriber service, press Menu/Set, 0, 4.
- Select ON or OFF, press Menu/Set, then Stop/Exit.
- ON automatically selects MANUAL, so the machine answers only its distinctive fax number.
- Leave MANUAL selected if an external TAD must answer only the main number; FAX/TEL or FAX ONLY would answer all numbers.
- You may switch the function off temporarily and back on.
- Reset it when given a new fax number.
Multiple resolution transmission
Instructions from the manualMultiple Resolution Transmission8 steps
- Load the document face down.
- Press Menu/Set, 3, 4.
- Select the resolution for page 1 and press Menu/Set.
- The printed instruction says to repeat the Menu/Set, 3, 4 step for each page; do not infer a different sequence.
- Press Stop/Exit when finished.
- Press 1 for more settings or 2 to finish.
- Enter the destination number and press Fax Start.
- Resolution returns to STANDARD after sending.
Entering text
Instructions from the manualEntering text5 steps
- Use the dial-pad keys repeatedly for letters: 2 ABC, 3 DEF, 4 GHI, 5 JKL, 6 MNO, 7 PQRS, 8 TUV, and 9 WXYZ.
- Press the right key once for a space between numbers, or twice between letters.
- To correct a character, move left under it, press Stop/Exit to delete it and every character to its right, then retype.
- For two successive letters on the same key, move the cursor right before entering the second.
- Press *, # or 0, then the left/right keys to choose the displayed special character or symbol and press Menu/Set.
Manual dialling
Instructions from the manualManual diallingView
Press the dial-pad digits for the telephone or fax number.
Manual diallingView
Lift the handset. At the dial tone, enter the number with the dial pad. Replace the handset to hang up.
One-touch dialling
Instructions from the manualOne-Touch diallingView
Press the One-Touch key for the number to call.
One-Touch dialling6 steps
- Lift the handset.
- At the dial tone, press the stored One-Touch key; replace the handset to hang up.
- If NOT REGISTERED appears, that key has no stored number.
- For a fax, press Fax Start after the key, or after hearing receiving tones if the handset is lifted.
- If you send with the handset lifted, hang up when SEND appears.
- The display returns to normal after the two-second unregistered warning.
Speed-dialling
Instructions from the manualSpeed-diallingView
Press Search/Mute, #, then the two-digit Speed-Dial location, such as 0 9 for 09.
Speed-Dialling4 steps
- Lift the handset.
- At the dial tone, press Search/Mute, #, and the stored two-digit location; replace the handset to hang up.
- For a fax, press Fax Start after entering the location, or after hearing receiving tones if the handset is lifted.
- With the handset lifted, hang up when SEND appears.
Search
Instructions from the manualSearch2 steps
- Press Search/Mute and use the navigation keys.
- Use the up/down keys for numerical search, or enter the first letter with the dial pad and use the left/right keys for alphabetical search.
Search3 steps
- Lift the handset.
- Press Search/Mute and enter the first letter of the name.
- Scroll with the left/right keys, press Fax Start when the wanted name is displayed, and replace the handset to hang up.
Fax redial
Instructions from the manualFax Redial3 steps
- For an automatically sent fax on a busy line, the machine retries three times at five-minute intervals.
- For a manual fax on a busy line, press Redial/Pause and then Fax Start.
- Redial/Pause works only after dialling from the control panel.
Pause
Instructions from the manualPauseView
Press Redial/Pause to insert a 3.5-second pause between dialled numbers. Additional presses make the pause longer.
Redial (telephone)
Instructions from the manualRedial (Telephone)View
Lift the handset and press Redial/Pause to dial the last number, then replace the handset to hang up.
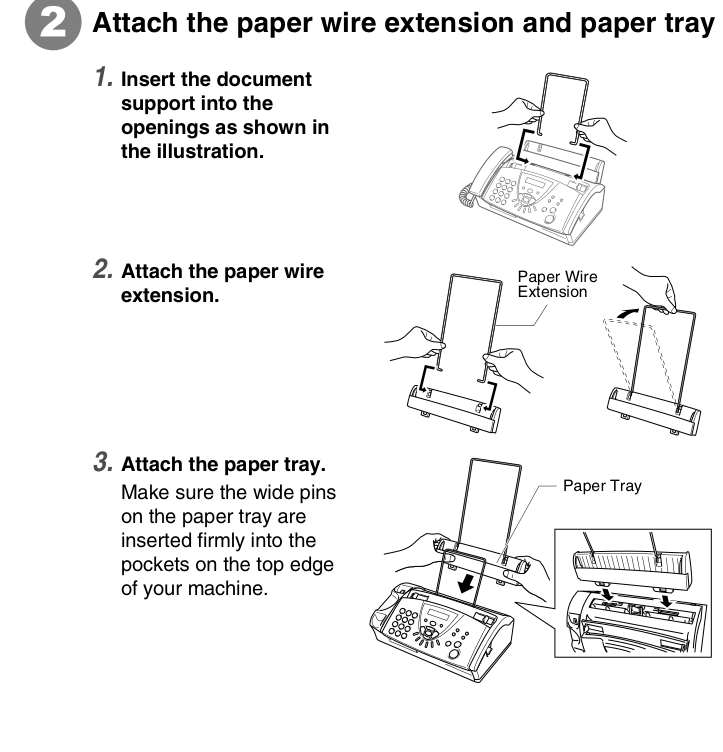
Attach the paper wire extension and paper tray
Instructions from the manualAttach the paper wire extension and paper tray3 steps
- Insert the document support into the openings shown in the illustration.
- Attach the paper wire extension.
- Attach the paper tray, making sure its wide pins fit firmly into the pockets on the machine’s top edge.
Connect the handset, power cord and telephone line cord
Instructions from the manualConnect the handset, power cord and telephone line cordView
- Connect the handset.
- Connect the power cord to the machine, then plug the power cord into an electrical socket.
- Connect the telephone-line cord to the machine’s socket marked LINE.
Controls and parts
See the manual diagrams 3 diagrams
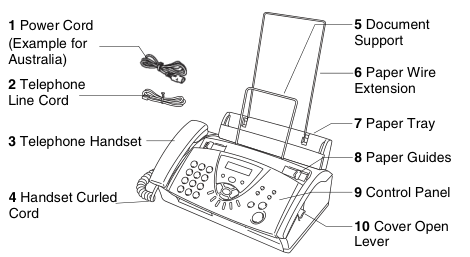
Diagram key
- 1: Power cord connects the machine to the electrical socket; illustrated cord is an Australian example.
- 2: Telephone line cord connects to a telephone wall socket.
- 3: Telephone handset is for receiving and making voice calls.
- 4: Handset curled cord connects the handset to the machine.
- 5: Document support supports documents in the ADF.
- 6: Paper wire extension supports paper in the paper tray.
- 7: Paper tray is where paper is loaded.
- 8: Paper guides press and slide to fit the document width.
- 9: Control panel provides the keys and display for operating the machine.
- 10: Cover-open lever lifts to open the top cover.
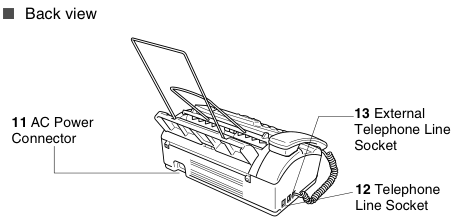
Diagram key
- 11: AC power connector accepts the power cord.
- 12: Telephone line socket (LINE) accepts the telephone line.
- 13: External telephone line socket (EXT.) accepts the line from an external telephone.
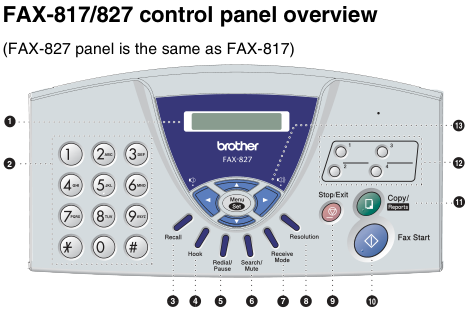
Diagram key
- 1: LCD displays messages for setting up and using the fax machine.
- 2: Dial pad enters telephone/fax numbers and information; # temporarily changes Pulse to Tone during a call, except in New Zealand.
- 3: Recall accesses an outside line in Australia/New Zealand, recalls the operator or transfers a call to another extension on a PABX.
- 4: Hook permits dialling without lifting the handset.
- 5: Redial/Pause redials the last number or inserts a pause in Quick-Dial numbers.
- 6: Search/Mute looks up stored numbers, puts calls on hold, and dials stored numbers using # and a two-digit location.
- 7: Receive Mode selects how incoming calls are handled.
- 8: Resolution adjusts fax or copy resolution.
- 9: Stop/Exit stops a fax, cancels an operation or exits a menu.
- 10: Fax Start starts an operation such as sending a fax.
- 11: Copy/Reports copies when a document is in the ADF; without a document it opens the Reports menu.
- 12: One-Touch keys access previously stored Quick-Dial numbers.
- 13: Navigation keys: Menu/Set opens menus and stores settings; left/right scroll menu selections or adjust beeper, ring and speaker volume; up/down scroll menus/options and perform numerical searches.
Model details
Model and compatibility
- Quick-Dial capacity
- Four One-Touch stations, 60 Speed-Dial stations, up to four groups and up to 64 broadcast locations for FAX-817. [1]
- Ribbon supplies
- PC-501 cartridge; PC-402RF, PC-404RF and PC-AS4RF refill packs. PC-AS4RF is unavailable in Australia and New Zealand. Use the correct Brother replacement ribbon. [1]
- Country of use
- Approved for use only in the country of purchase; local Brother companies support machines bought in their own countries. [1]