MODEL REFERENCE
Brother PT-1090
12 errors · 31 guides
The checks and guides below come from the official manuals for this model.
No matches for this wording. Try a light name, error code or a shorter phrase.
Errors and messages
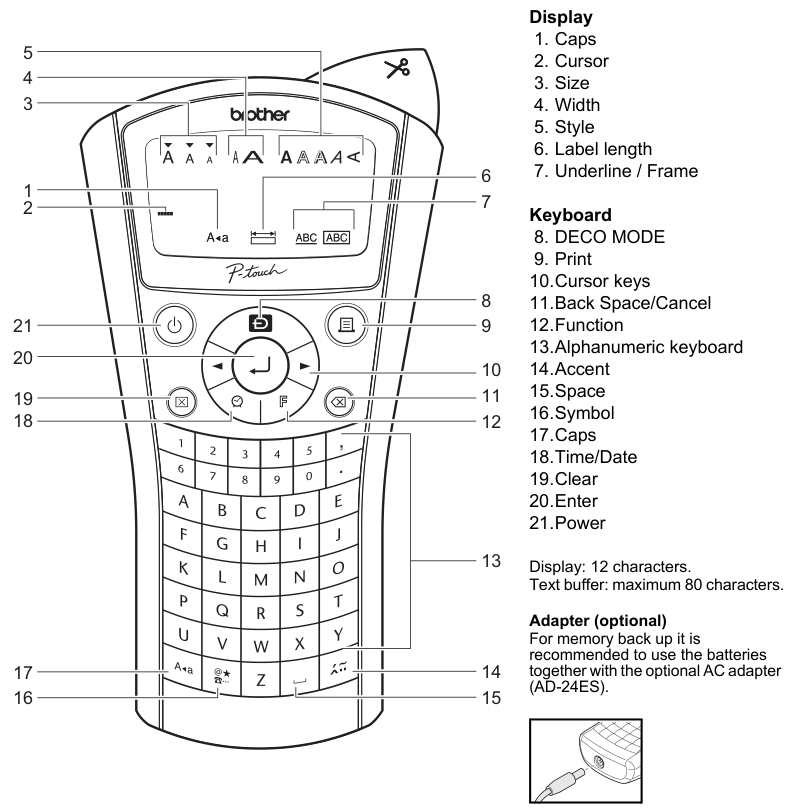
Messages and indicator states from the manual BATTERY!batteries are about to run out
Replace all batteries.
Invalid!label length number is invalid
Check the selected number for Label length.
No Text!no text is available3 checks
Line Limit!a third line was entered
Keep text to two lines. Use 9 mm or 12 mm tape for two-line text; do not press Enter after the second line.
Cutter Errorcutter lever pressed during printing
Do not push the cutter lever while the machine is printing.
Full!character limit reached
Keep regular text within 80 characters and DECO MODE text within 50 characters.
Text Limit!text exceeds the selected label length3 checks
No Frame OK?frame cannot print on 3.5 mm tape
Press Enter to print without a frame, or Back Space/Cancel to cancel.
OK to Feed?chain printing needs a feed decision
- During Chain Prt, press Back Space/Cancel after each intermediate label, clear the text, enter the next label and press Print.
- Repeat for additional labels.
- After the last label, press Enter to feed the tape, then press the cutter lever to cut the chain.
Coolingprint head is cooling
Wait for the displayed cooling time. Printing continues automatically after the head cools; do not touch the labeller while it is cooling.
Insert 12 mm!dECO MODE requires 12 mm tape
Use a 12 mm tape cassette for DECO MODE.
No Cassette!tape cassette is missing
Insert a tape cassette.
Guides
Troubleshooting
Instructions from the manualDisplay stays blank3 checks
- Batteries may be incorrectly inserted
- Check battery orientation.
- Batteries may be weak
- Replace weak batteries.
- Optional adapter may be incorrectly connected
- Check the AD-24ES connection.
Power turns off when printing starts2 checks
- Batteries are weak
- Replace all batteries.
- Batteries may be incorrectly inserted
- Check battery orientation.
Printed labels have too much marginView
Select Half or Narrow in Set margin (tape margin) to reduce margins on both sides.
Label maker stops respondingView
Follow RESETTING THE P-TOUCH: switch off, hold Function and R, press Power once while holding them, then release Function and R. This clears all text, settings and stored files.
Clear text and formatting for a new labelView
Press Clear, select Txt&Format with the cursor keys, and press Enter.
Label does not print or printing is blurry3 checks
- Cassette may be incorrectly inserted
- Check cassette installation.
- Cassette may be empty
- Replace an empty cassette.
- Cassette cover may be open
- Close the cassette cover properly.
Settings and text clear on their ownView
Replace weak batteries. Disconnecting power for more than two minutes clears all text, settings and stored text files.
Tape will not feed or gets stuck2 checks
- Tape end may not be under the guide
- Check the tape end feeds under the tape guide.
- Cutter lever pressed while printing
- Do not touch the cutter lever while printing.
Change the display languageView
Press Function, select Language with the cursor keys, press Enter, select the language and press Enter.
A blank horizontal line crosses the label3 steps
- Remove the cassette and gently wipe the print head up and down with a dry cotton swab.
- The optional TZ/TZe-CL3 cleaning cassette makes print-head cleaning easier.
- Never touch the print head.
Preparation
Instructions from the manualInstall batteries and tape7 steps
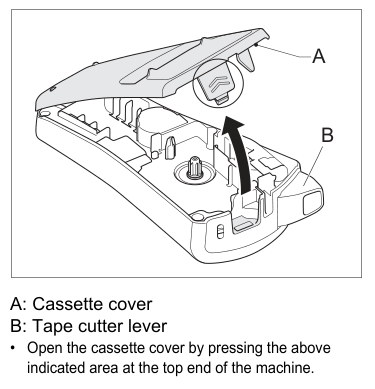
- Press the indicated area at the top end to open the cassette cover.
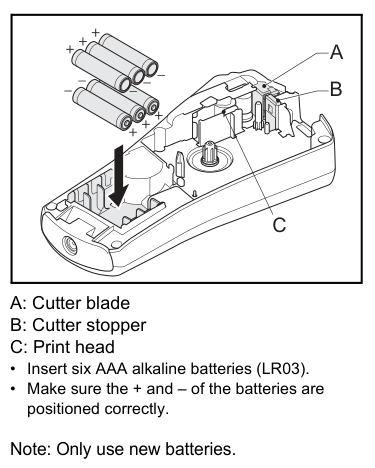
- Insert six new AAA LR03 alkaline batteries, matching all positive and negative marks.
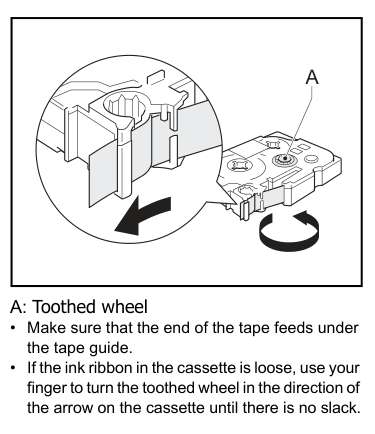
- Check that the tape end feeds under the guide.
- If the ink ribbon is loose, turn the toothed wheel in the arrow direction until no slack remains.
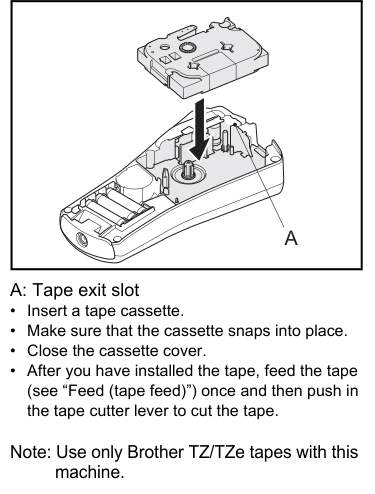
- Insert a Brother TZ/TZe cassette and ensure it snaps into place, then close the cover without trapping fingers.
- Use Function, select Feed with the cursor keys, and press Enter to feed the tape once; then push the cutter lever to cut.
- Do not touch the cutter blade or swallow the cutter stopper.
Resetting the p-touch
Instructions from the manualReset the label maker4 steps
- Switch off the labeller.
- Hold Function and R, then press Power once while holding both keys.
- Release Function and R.
- The internal memory resets and all text, settings and stored files are cleared.
Accessories
Instructions from the manualReplace a blunt cutter3 steps
- If repeated use makes the cutter blunt and tape no longer cuts cleanly, replace it with a TC-5 unit obtained from an authorized Brother reseller.
- The guide supplies no replacement sequence.
- Do not touch the blade directly with your fingers or swallow the cutter stopper.
Printing labels
Instructions from the manualUse the optional adapter for memory backup2 steps
- Use the optional AD-24ES adapter; batteries together with this adapter are recommended for memory backup.
- Use the specified voltage, keep the equipment and plug dry, and disconnect by holding the plug rather than pulling the cord.
Preview, feed and print labels5 steps
- Press Function, select Preview with the cursor keys and press Enter to preview text.
- Preview does not show size, font or additional features.
- To feed tape, press Function, select Feed with the cursor keys and press Enter.
- Press Print to print.
- Do not push the cutter lever during printing.
Set margins and chain-print labels7 steps
- Press Function, select Margin with the cursor keys, press Enter, choose Full, Half, Narrow or Chain Prt, and press Enter.
- Full leaves 25 mm on each side, Half 12 mm and Narrow 4 mm.
- For Chain Prt, when OK to Feed? appears after printing an intermediate label, press Back Space/Cancel.
- Clear the text, enter the next label and press Print.
- Repeat these two steps for each additional label.
- After the last label prints and OK to Feed? appears, press Enter.
- When tape has fed, press the cutter lever to cut the chain.
Print up to nine copies3 steps
- Press Function, choose Copies with the cursor keys and press Enter.
- Select a number from 1 to 9 and press Enter.
- Choose Narrow margins when printing the same labels with the narrowest margins.
Initial settings
Instructions from the manualSet language, units, date and time5 steps
- Supply power using batteries or the optional adapter and press Power.
- Press Function, select Language with the cursor keys and press Enter; select a listed language and press Enter.
- For measurement units, use Function, select Unit, press Enter, select mm and press Enter.
- To set the clock, use Function, select Time Date, press Enter, select Clock and press Enter.
- Enter day, month and two-digit year in DD/MM/YY order, confirming each with Enter; then enter hour and minute in hh:mm order, confirming each with Enter.
Settings (label designs)
Instructions from the manualSet text size, width, style and frames8 steps
- Press Function, choose Size, Width, Style or Undl/Frame with the cursor keys, and press Enter.
- Select the setting with the cursor keys and confirm with Enter.
- Size offers Large, Medium or Small and also adjusts automatically to tape width; actual printed size varies with tape width.
- Width offers Normal, ×2 or ×1/2.
- Style offers Normal, Bold, Outline, Shadow, Italic, I+Bold, I+Outline, I+Shadow or Vertical.
- The listed decorations are Underline, Round, Leaf, Tile, Star, Heart, Bubble and Flower.
- Frames cannot print on 3.5 mm tape.
- The illustrated designs refer to an enclosed insertion sheet.
Entering text
Instructions from the manualSwitch between upper and lower caseView
Press Caps to switch upper/lower case on or off.
Enter symbols or print their list6 steps
- Press Symbol, choose Basic or Pictograph with the cursor keys and press Enter.
- Select a symbol with the cursor keys and press Enter.
- Press Symbol again to move to the next group.
- Pictograph rows A–L can be selected with their corresponding letter keys.
- Available symbols refer to the enclosed insertion sheet.
- To print all pictograph symbols, press Symbol, choose Print List, press Enter, then confirm Print OK? with Enter.
Print two-line text4 steps
- Enter the first line and press Enter.
- Enter the second line and press Print.
- Do not press Enter after the second line, which causes Line Limit!
- Use 9 mm or 12 mm tape for two-line labels.
Enter accented characters3 steps
- Type the base character and press Accent.
- Choose the accented character with the cursor keys or Accent, then press Enter.
- The full character list refers to the enclosed insertion sheet.
Clear text with or without formatting3 steps
- Back Space/Cancel deletes characters one by one.
- To clear text and settings, press Clear, select Txt&Format with the cursor keys and press Enter.
- To clear only text, select Text Only instead and press Enter.
Time / date
Instructions from the manualAdd and format date and time4 steps
- Press Time/Date to insert the date/time into text.
- To choose a format, press Function, select Time Date and press Enter, select Format and press Enter, then choose a format and press Enter.
- The eight formats are D/M/Y, D/M/Y hm, D.M.Y, D.M.Y hm, Y-M-D, Y-M-D hm, M/D/Y and M/D/Y hm.
- To change the clock, follow INITIAL SETTINGS step 4.
Deco mode
Instructions from the manualCreate DECO MODE labels11 steps
- Press DECO MODE, choose a design with the cursor keys and press Enter.
- Available designs refer to the enclosed insertion sheet.
- Choose Auto or a length from 30–200 mm, press Enter, enter text and press Enter, then choose Print or Quit and press Enter.
- Use 12 mm tape only; the maximum is 200 mm and Auto adjusts length to print text once.
- Formats cannot be changed and some formats may not print all text.
- Only highlighted insertion-sheet symbols are available.
- Some marked designs pause to cool the head and resume automatically; do not touch the labeller during cooling.
- Press Clear to display Clear?; Enter clears text and Back Space/Cancel cancels.
- Reopening DECO MODE recalls the most recently printed text and length.
- Back Space/Cancel returns to the previous step; press it until the text-entry screen appears to exit, or select Quit in Print/Quit.
- Space restores label length to Auto.
Cable labelling
Instructions from the manualCreate cable labels5 steps
- Enter up to two lines of text.
- Press Function, select Cable with the cursor keys, press Enter, and confirm Print OK? with Enter.
- Print and wrap around the cable using Brother Flexible ID tape only.
- Follow the tape’s enclosed manual for recommended use conditions; these conditions are not supplied in this guide.
- Cable Labelling automatically sets label length and margin to Auto.
Saving labels
Instructions from the manualSave, open and print stored labels5 steps
- Up to nine labels can be saved, recalled, edited and overwritten.
- Press Function, select File and press Enter.
- Select Save, Print or Open and press Enter, choose file number 1–9 and press Enter.
- Overwrite? appears when the selected save number already contains a label.
- The guide provides no separate confirmation sequence for that message.
Shortcuts
Instructions from the manualUse function shortcuts and label length3 steps
- Press Function followed by a shortcut key, then Enter to confirm.
- The shortcuts are Enter for Language; 1 Size; 2 Width; 3 Style; 4 Undl/Frame; 5 Label Length; Print Copies; 6 File; 7 Cable; 8 Preview; 9 Feed; 0 Unit; Time/Date Time/Date; and comma Margin.
- Label Length is an available shortcut, but this guide supplies no separate regular-label length-setting sequence or full numeric range.
General precautions
Instructions from the manualClean and store the label maker8 steps
- Use only a soft dry cloth on the labeller, without alcohol or other organic solvents.
- Clean the print head with a cotton swab and never touch it.
- Keep foreign objects out of the tape exit and adapter.
- Avoid direct sun, rain, heaters, extreme temperatures, high humidity and dust.
- Do not press excessively on the cutter lever, print with an empty cassette or pull tape while printing or feeding.
- Before applying labels, check the material and conditions: labels may detach, become irremovable, change colour or transfer colour.
- Stored data may be lost through failure, repair or an expired battery when no adapter is connected.
- For extended non-use, remove batteries and disconnect the adapter.
Safety precautions
Instructions from the manualStop use when equipment or power is abnormal8 steps
- Use the specified voltage and suggested AD-24ES adapter.
- During an electrical storm, immediately unplug its cord and stop using the labeller.
- Keep the labeller, adapter and plug dry and out of high humidity.
- Do not overload, forcibly bend, pull or damage the cord, put heavy objects on it or use a loose outlet; hold the plug when disconnecting.
- Do not swallow the cutter stopper, disassemble or modify equipment or batteries, change batteries with metallic objects, or expose batteries to fire or heat.
- For abnormal odour, heat, discoloration, deformation or anything unusual during use or storage, disconnect the adapter, remove the batteries and stop use immediately.
- Keep organic solvents away from the machine and cables.
- Do not touch the cutter edge or metal near the print head, mix old and new batteries or alkaline batteries with other types, drop or hit the equipment, press hard on the LCD or trap fingers when closing the cover.
Controls and parts
See the manual diagrams 1 diagram