The checks and guides below come from the official manuals for this model.
No matches for this wording. Try a light name, error code or a shorter phrase.
Errors and messages
Shown on the machine display
CodeWhat it meansCheck or action
Change Unable XXmechanical problem or foreign object inside the machine
Mechanical problem or foreign object such as a clip or torn paper: Open the Upper Jam Clear Cover and remove foreign objects. If the error continues, protect stored messages by transferring faxes or the Fax Journal before disconnecting power. Then disconnect power for several minutes and reconnect.
Clean Unable XXmechanical problem or foreign object inside the machine
Mechanical problem or foreign object such as a clip or torn paper: Open the Upper Jam Clear Cover and remove foreign objects. If the error continues, protect stored messages by transferring faxes or the Fax Journal before disconnecting power. Then disconnect power for several minutes and reconnect.
Init Unable XXmechanical problem or foreign object inside the machine
Mechanical problem or foreign object such as a clip or torn paper: Open the Upper Jam Clear Cover and remove foreign objects. If the error continues, protect stored messages by transferring faxes or the Fax Journal before disconnecting power. Then disconnect power for several minutes and reconnect.
Print Unable XXmechanical problem or foreign object inside the machine
Mechanical problem or foreign object such as a clip or torn paper: Open the Upper Jam Clear Cover and remove foreign objects. If the error continues, protect stored messages by transferring faxes or the Fax Journal before disconnecting power. Then disconnect power for several minutes and reconnect.
Scan Unable XXmechanical problem or foreign object inside the machine
Mechanical problem or foreign object such as a clip or torn paper: Open the Upper Jam Clear Cover and remove foreign objects. If the error continues, protect stored messages by transferring faxes or the Fax Journal before disconnecting power. Then disconnect power for several minutes and reconnect.
Comm.Errorpoor phone line quality caused a communication error
Poor line quality caused communication error: Send again or try another line; if persistent ask the phone company to check it.
Cover Open Close all coversupper Jam Clear Cover or ink-cartridge cover is not fully closed
2 checks
Upper Jam Clear Cover not fully closed
Open and close the Upper Jam Clear Cover again.
Ink-cartridge cover not fully closed
Close it firmly until it clicks.
Disconnectedthe other person or fax machine stopped the call
Remote call stopped: Try sending or receiving again.
Document Jamdocument misfeed, excessive document length or open control-panel cover
2 checks
Misfed or overly long document
Check ADF loading and document limits; remove the document jam.
Control-panel cover open
Close the cover and press Stop/Exit.
DR Mode in Usedistinctive Ring is enabled and keeps the receive mode in Manual
Distinctive Ring enabled: Turn Distinctive Ring Off.
High Temperaturethe print head is too warm
Head too warm: Allow the machine to cool down.
Ink Empty Blackthe ink cartridge is empty
Ink empty: Replace the ink cartridge using the reviewed instructions.
Low Temperaturethe print head is too cold
Head too cold: Allow the machine to warm up.
Near Empty Blackthe ink cartridge is running out
Ink running out: Order a new ink cartridge.
No Caller IDno incoming Caller ID history is available
No incoming call history or no subscription: Ask the phone company about Caller ID service.
No Cartridgethe ink cartridge is not installed properly
Incorrect installation: Remove and reinstall the cartridge properly.
No Paper Fedempty or incorrectly loaded tray, or paper jam
2 checks
Out of paper or paper loaded incorrectly
Refill paper and Start, or remove and reload it and Start.
Paper jammed in machine
Remove the jam using the full printer-jam instructions.
No Response/Busythe called number does not answer or is busy
Remote number busy or no answer: Verify the number and try again.
Not Registeredthe selected Quick-Dial entry has not been programmed
Unprogrammed quick-dial entry: Program the corresponding Speed-Dial location or One-Touch key.
Out of Memorythe machine memory is full
3 checks
Other operations consume memory
Press Stop/Exit, wait for other operations to finish and try again.
Stored data fills memory
Clear memory by turning off Fax Storage.
Stored faxes
Print the faxes in memory.
Paper Jampaper is jammed inside the machine
Paper jammed: Follow the full printer-jam removal instructions.
Wrong Paper Sizethe loaded paper is not the correct size
Incorrect paper size: Load the correct Letter, Legal or A4 paper and press Start.
Wrong Passwordthe entered TX Lock password was incorrect
The TX Lock password was wrong and the machine remains locked. Enter the registered password; contact Brother if forgotten.
Out of Areathe incoming call is outside the Caller ID service area
Caller ID is unavailable because the incoming call is outside the service area. The manual provides no device repair for this state.
Private Callthe caller has blocked identification
The caller has blocked identification. The manual provides no device repair for this state.
Guides
Control panel overview
Instructions from the manual
Control panel overview13 steps
The LCD shows setup and use messages.
One-Touch keys dial stored numbers; hold Shift for 6–10.
Redial/Pause redials the last number or inserts a pause during quick-dial programming.
Resolution temporarily changes fax resolution.
Hook/Hold lets you check that a fax will answer before Start and places telephone calls on hold.
Receive Mode selects incoming-call handling.
Ink offers head cleaning, print-quality checking and ink-volume checking.
Menu opens programming; Search/Speed Dial finds stored numbers; left/right adjusts ring volume in Fax mode, and left goes back a menu selection; up/down scrolls menus/options.
Clear/Back cancels a setting, OK stores it.
Start begins black-and-white faxing or copying; Stop/Exit stops operations or exits menus; On/Off switches the machine; Fax and Copy select modes.
The # pulse-to-tone feature is Canada-only.
Using the adf
Instructions from the manual
Using the ADF7 steps
Use up to 20 standard 20 lb (80 g/m²) sheets and fan them first.
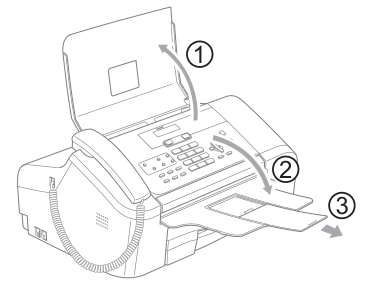
Open document support (1), tray (2), and extension (3).
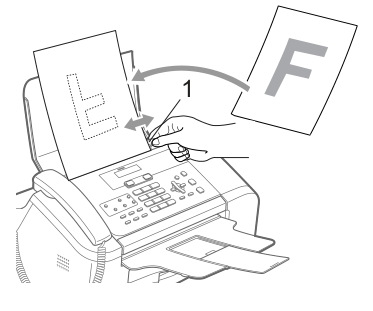
Insert documents face down, top edge first, until they touch the feed roller.
Adjust the paper guides (1) to their width.
Ink must be completely dry.
Do not pull a feeding document, or use curled, wrinkled, folded, ripped, stapled, clipped, pasted or taped sheets, cardboard, newspaper or fabric.
Open the document support, tray and extension before loading.
Diagram key
1: Document support.
1 curved opening arrow: Open the support.
2: Document tray.
2 curved opening arrow: Open the tray.
3: Document-tray extension.
3 extension arrow: Pull the extension out.
Load dry documents face down and top edge first; set the paper guides to the document width.
Diagram key
F on loose sheet: The lettered sample shows the printed face before turning the sheet down.
F on inserted sheet: The repeated lettered sample shows the document loaded face down.
curved insertion arrow: Put the document face down, top edge first, until it touches the feed roller.
1: Document paper guides.
upper guide arrow: Adjust a guide to the document width.
lower guide arrow: Adjust the opposite guide to the document width.
Scannable area
Instructions from the manual
Scannable area3 steps
Letter fax/copy scanning leaves 0.12 inch (3 mm) at top/bottom and 0.16 inch (4 mm) at left/right.
A4 scanning leaves 0.12 inch (3 mm) on all four edges.
The numbered drawing identifies top (1), bottom (2), left (3) and right (4).
Handling and using plain paper
Instructions from the manual
Acceptable paper and other media8 steps
Use plain paper only.
Test paper before buying large quantities; Brother BP60PL (USA only) is recommended.
Do not touch the printed surface immediately; it may be wet.
Store flat in the original sealed package away from sunlight, heat and moisture.
Avoid damaged, curled (0.08 inch/2 mm or greater may jam), wrinkled, irregularly shaped, extremely shiny or highly textured paper, paper already printed by a printer, paper that cannot be stacked uniformly, and short-grain paper.
Paper is A4, Letter or Legal, 17–32 lb (64–120 g/m²), 0.003–0.006 inch (0.08–0.15 mm) thick.
Input capacity is up to 100 sheets of 20 lb (80 g/m²), but only 50 sheets of Legal.
Output capacity is up to 50 Letter sheets of 20 lb or A4 sheets of 80 g/m².
How to load paper
Instructions from the manual
Loading paper and other media12 steps
If the paper-support flap is open, close it.
Open output-tray cover (2), then pull the paper tray completely out.
To load Legal, hold the universal guide-release button while extending the tray front.
Press and slide side guides (1) and length guide (2) to the paper size.
Fan the stack to prevent jams/misfeeds.
Gently place paper print side down, top edge first; check it lies flat.
Gently set the side guides with both hands so they touch the paper sides.
Do not push paper too far; it may lift at the back and cause feed problems.
Close the output-tray cover and slide it forward; for Legal it does not close all the way to the tray end.
Slowly push the tray fully into the machine.
Hold it in place while pulling support (1) until it clicks, then unfold flap (2).
Do not use the support flap for Legal.
Printable area
Instructions from the manual
Printable Area2 steps
For Letter, Legal and A4 plain paper, leave 0.12 inch (3 mm) top/bottom and 0.16 inch (4 mm) left/right.
The machine cannot print in these margins; these are printing margins, separate from the scanning margins.
On/off setting
Instructions from the manual
On/Off key7 steps
Hold On/Off until Shutting Down appears; the LCD turns off.
Press On/Off to switch on.
An external phone or TAD remains available.
Print-head cleaning continues periodically while off.
With Fax Receive On, Fax Only/External TAD/Fax/Tel permit fax receive, Easy Receive, previously configured delayed fax, forwarding, paging, storage and remote retrieval; Manual permits Easy Receive and previously configured delayed fax, but Start cannot receive while off.
With Fax Receive Off, no operations except periodic cleaning are available.
Voice calls remain possible with the handset.
On/Off setting4 steps
Press Menu, 1, 5.
Choose Fax Receive:Off or Fax Receive:On with up/down, press OK and Stop/Exit.
Fax Receive:Off is the default; periodic cleaning still occurs.
Fax Receive:On allows the off-state functions listed in the manual for the selected receive mode.
Mode timer
Instructions from the manual
Mode Timer3 steps
Press Menu, 1, 1.
Choose 0 Sec, 30 Secs, 1 Min, 2 Mins, 5 Mins or Off, press OK and Stop/Exit.
This controls return to Fax mode after the last Copy operation; Off keeps the last mode.
Paper size
Instructions from the manual
Paper Size3 steps
Press Menu, 1, 2.
Choose Letter, Legal or A4, press OK and Stop/Exit.
Change this setting whenever loading a different paper size, so incoming faxes and copies can be fitted correctly.
Ring volume
Instructions from the manual
Ring Volume2 steps
In Fax mode press left/right to adjust the displayed level; each press changes it and the setting persists.
Alternatively press Menu, 1, 3, 1, choose Low, Med, High or Off, press OK and Stop/Exit.
Beeper volume
Instructions from the manual
Beeper VolumeView
Press Menu, 1, 3, 2. Choose Low, Med, High or Off, press OK and Stop/Exit. The beeper sounds for keys, mistakes and completed send/receive operations when enabled.
Speaker volume
Instructions from the manual
Speaker Volume3 steps
Press Menu, 1, 3, 3.
Choose Low, Med, High or Off, press OK and Stop/Exit.
Alternatively press Hook/Hold, adjust with left/right and press Hook/Hold again; each press changes the displayed level and the setting persists.
Handset volume
Instructions from the manual
Handset Volume3 steps
Press Menu, 1, 3, 4, choose Low or High, press OK and Stop/Exit.
You may also adjust with left/right while speaking.
Volume Amplify Off gives the normal Low/High range and retains the setting until changed.
Choosing the handset volume
Instructions from the manual
Choosing the Handset Volume6 steps
WARNING: Permanent Amplify may damage the hearing of users who are not hearing-impaired.
Before Amplify, identify whether all or only some users need it.
With Volume Amplify Off, choose normal Low/High.
With On—Temporary (some hearing-impaired users), Low/High/Amplify is available while talking, and replacing the handset resets Low.
With On—Permanent (all users hearing-impaired), replacing the handset resets Amplify.
Choose a safe setting for every user.
Setting volume amplify
Instructions from the manual
Setting Volume Amplify4 steps
Press Menu, 1, 3, 5.
If nobody needs amplification, choose Off and press OK, then Stop/Exit.
Otherwise choose On, press OK, choose Permanent if all users are hearing-impaired or Temporary if only some are, press OK and Stop/Exit.
Permanent may damage normal hearing.
Automatic daylight savings time
Instructions from the manual
Automatic Daylight Savings TimeView
Press Menu, 1, 4. Choose On or Off, press OK and Stop/Exit. On advances one hour in spring and returns one hour in fall. Set the correct date and time first.
Lcd contrast
Instructions from the manual
LCD ContrastView
Press Menu, 1, 6. Choose Light or Dark, press OK and Stop/Exit.
Tx lock
Instructions from the manual
TX Lock3 steps
TX Lock prevents sending faxes, copying, changing new delayed/polling jobs while allowing reception and calls, previously configured forwarding/storage, remote retrieval and already scheduled delayed faxes.
You must set a password first.
If forgotten, contact Brother customer service.
Setting and changing the tx lock password
Instructions from the manual
Setting and changing the TX Lock password2 steps
For the first password press Menu, 2, 0, 1, enter four digits, OK, re-enter them, OK and Stop/Exit.
To change it, use the same menu, choose Set Password, OK, enter current four digits and OK, enter new four digits and OK, re-enter new digits and OK, then Stop/Exit.
Turning tx lock on
Instructions from the manual
Turning TX Lock on/off4 steps
To lock, press Menu, 2, 0, 1, choose Set TX Lock, OK, enter the registered four-digit password and OK.
TX Lock Mode appears.
To unlock, press Menu, enter the registered four-digit password and OK.
Wrong Password means the password was incorrect and the machine remains locked.
Entering fax mode
Instructions from the manual
Entering Fax modeView
Press Fax so the key is green. The LCD shows the date, time and receive mode; select Fax mode before fax settings or operations.
Faxing from the adf
Instructions from the manual
Faxing from the ADF3 steps
In Fax mode, load documents face down, dial using the dial pad, One-Touch, Speed-Dial or Search, and press Start.
If memory is full, sending uses real time.
Press Stop/Exit to cancel.
Broadcasting
Instructions from the manual
Broadcasting9 steps
In Fax mode load the document.
Enter each Group, One-Touch, Speed-Dial or manual number and press OK after each; repeat for all destinations, then Start.
You may include up to 50 manually dialed numbers; without stored Groups/access codes/credit-card numbers, the maximum is 160 destinations.
Available memory depends on jobs and numbers already stored.
At the maximum broadcast capacity dual access is unavailable.
Each stored One-Touch or Speed-Dial long sequence counts as one number and limits remaining locations.
If full, Stop/Exit cancels or Start sends pages already scanned (if more than one page scanned).
A broadcast report follows.
To cancel the current destination, Menu, 2, 6, OK and 1; when prompted for the entire broadcast, 1 cancels it, then Stop/Exit.
Sending faxes using multiple settings
Instructions from the manual
Additional sending operationsView
After choosing a sending setting and OK, press 1 to select another setting or 2 when finished; every setting must be confirmed before leaving.
Contrast
Instructions from the manual
Contrast3 steps
In Fax mode load the document, press Menu, 2, 2, 1, choose Auto, Light (light documents) or Dark (dark documents), then OK.
Auto is suitable for most documents.
Photo resolution uses Auto regardless of Light/Dark.
Changing fax resolution
Instructions from the manual
Changing Fax Resolution3 steps
For a temporary change, load the document in Fax mode, press Resolution, choose Standard, Fine, S.Fine or Photo and OK.
To change the default in Fax mode press Menu, 2, 2, 2, choose and OK.
Standard is normal text/fastest; Fine suits small print, S.Fine small print/artwork and is slower; Photo has varied gray shades and is slowest.
Dual access
Instructions from the manual
Dual access3 steps
Dial and scan into memory while sending from memory or receiving; LCD shows the new job number and available memory.
Memory use varies by document data.
On Out of Memory while scanning, Stop/Exit cancels or Start sends already scanned pages; more than one page must have been scanned.
Real time transmission
Instructions from the manual
Real time transmission3 steps
To send directly without waiting for a complete memory scan, enter Fax mode and press Menu, 2, 2, 5, choose On or Off and OK.
When memory is full it sends in real time even if Off.
For the next fax only, use the same menu, choose Next Fax Only, OK, then Next Fax:On or Next Fax:Off and OK.
Overseas mode
Instructions from the manual
Overseas ModeView
In Fax mode load the document, press Menu, 2, 2, 7, choose On or Off and OK. Try On when overseas faxing is difficult because of interference; it resets after sending.
Delayed fax
Instructions from the manual
Delayed Fax5 steps
You may store up to 50 faxes for the next 24 hours.
In Fax mode load the document and press Menu, 2, 2, 3.
Press OK to accept the displayed time, or enter the time in 24-hour format and OK.
Press 1 for Doc:ADF to leave the document in the ADF until sent, or 2 for Doc:Memory to scan it into memory.
The number of stored pages depends on their data; do not assume a fixed capacity.
Delayed batch transmission
Instructions from the manual
Delayed Batch TransmissionView
In Fax mode press Menu, 2, 2, 4, choose On or Off, OK and Stop/Exit. On combines delayed faxes scheduled for the same destination and time into one transmission.
Checking and canceling waiting jobs
Instructions from the manual
Checking and canceling waiting jobsView
Press Menu, 2, 6. If jobs wait, select one with up/down, OK, then 1 cancels it or 2 leaves it; repeat for other jobs and Stop/Exit. No Jobs Waiting appears if none are stored.
Sending a fax manually
Instructions from the manual
Sending a fax manually2 steps
In Fax mode load the document, lift the handset or press Hook/Hold and listen for dial tone.
Dial the destination, wait for fax tones, press Start and replace the handset if lifted.
Sending a fax at the end of a conversation
Instructions from the manual
Sending a fax at the end of a conversationView
Ask the other person to wait for fax tones and press their Start/Send before hanging up. In Fax mode load the document, press Start and replace the handset.
Out of memory message
Instructions from the manual
Out of Memory message3 steps
If Out of Memory occurs on the first fax page, Stop/Exit cancels.
On later pages, Start sends those scanned or Stop/Exit cancels.
If stored faxes keep memory full, real-time transmission can send a new fax.
Choosing the receive mode
Instructions from the manual
Choosing the Receive Mode5 steps
Choose the mode for your telephone service and attached devices.
If Distinctive Ring is subscribed, use its instructions.
If an external TAD handles voice messages, choose External TAD.
To answer every call yourself choose Manual; to answer fax and voice automatically choose Fax/Tel; for fax only choose Fax Only.
Press Receive Mode repeatedly until the selection appears, then OK; after two seconds the normal display returns with the new mode.
Using receive modes
Instructions from the manual
Using receive modes5 steps
Fax Only answers all calls as fax.
Fax/Tel automatically receives fax and gives fast double rings for voice.
Manual requires answering yourself (except Distinctive Ring service); hear fax tones and press Start, or use Easy Receive.
External TAD lets the answering device handle voice and the machine automatically receives fax.
Set the mode to match your connection.
Ring delay
Instructions from the manual
Ring Delay3 steps
Press Menu, 2, 1, 1, choose 0–4 rings, OK and Stop/Exit.
Zero rings answers immediately.
If external/extension phones share the line, use the maximum delay; Distinctive Ring does not use Ring Delay.
F/t ring time (fax/tel mode only)
Instructions from the manual
F/T Ring Time (Fax/Tel mode only)2 steps
Press Menu, 2, 1, 2, choose 20, 30, 40 or 70 seconds, OK and Stop/Exit.
The fast double-ring for voice calls sounds only at the machine and continues for the selected period even if the caller hangs up.
Easy receive
Instructions from the manual
Easy Receive6 steps
Press Menu, 2, 1, 3, choose On, Semi or Off, OK and Stop/Exit.
On receives a fax automatically when any phone on the line is answered; after Receiving appears or chirps sound, hang up.
Semi works automatically only if answered at the machine handset.
With Off, press Start after hearing fax tones on the handset, or *51 at an external/extension phone.
If On fails, use *51 from the extension/external phone to activate fax receive.
If the machine intercepts faxes sent from a computer on the same line, choose Off.
Printing a reduced incoming fax
Instructions from the manual
Printing a reduced incoming fax2 steps
In Fax mode press Menu, 2, 1, 5, choose On or Off, OK and Stop/Exit.
On automatically reduces each incoming page to fit Letter, Legal or A4 using the selected Paper Size and document size.
Receiving a fax at the end of a conversation
Instructions from the manual
Receiving a fax at the end of a conversationView
Ask the other person to place the document in their machine and press Start/Send. On hearing CNG fax tones press Start, then replace the handset.
Printing a fax from the memory
Instructions from the manual
Printing a fax from the memoryView
In Fax mode press Menu, 2, 5, 3, then Start to print stored faxes even when Fax Storage is enabled.
Making a telephone call
Instructions from the manual
Voice operations5 steps
Lift the handset and dial with the dial pad, One-Touch or Search/Speed Dial.
Replace the handset to end the call.
To hold a call press Hook/Hold; replace the handset without disconnecting.
Lift the machine handset to release hold.
Lifting an extension handset does not release hold.
Fax/tel mode
Instructions from the manual
Fax/Tel mode3 steps
When powered on, answer the fast double-ring at the machine handset.
At an extension phone during F/T Ring Time, press #51 to answer voice; if nobody answers or a fax caller is heard, send it back with *51.
When off with Fax Receive:On, only the machine handset can answer the pseudo-ring; an external or extension phone may answer before pseudo-ringing starts.
Distinctive ring
Instructions from the manual
Distinctive Ring4 steps
Distinctive Ring is a telephone-company subscription assigning separate numbers/ring patterns to one line.
If voice mail shares the main number, register the separate fax-number pattern so it receives only fax calls.
Reset registration if given a new fax number.
Ask the telephone company about availability.
Registering the distinctive ring pattern
Instructions from the manual
Registering the Distinctive Ring pattern5 steps
Select one supported fax-number pattern: long–long; short–long–short; short–short–long; or very long (normal).
Only one can be registered; ask the phone company if its pattern is unsupported.
Press Menu, 2, 0, 3, choose Set and OK, choose the pattern, OK and Stop/Exit.
This sets Manual automatically: do not change it while Distinctive Ring is on.
The first two rings are silent while the pattern is recognized, and only the registered pattern receives fax.
Turning off distinctive ring
Instructions from the manual
Turning off Distinctive RingView
Press Menu, 2, 0, 3, choose Off, OK and Stop/Exit. Receive Mode remains Manual, so select another receive mode if required.
Caller id
Instructions from the manual
Caller ID5 steps
Caller ID is a telephone-company service.
Enable it with Menu, 2, 0, 4, choose On or Off, OK and Stop/Exit.
Up to 16 characters of name or number display.
Out of Area indicates a call outside the service area; Private Call indicates blocked identification.
Up to 30 recent calls are stored; the 31st replaces the oldest.
Viewing caller id list
Instructions from the manual
Viewing Caller ID List4 steps
Press Menu, 2, 0, 4, choose Display# and OK.
If none, No Caller ID appears.
Scroll the entries with up/down; OK shows the number/name, date and time, and left returns to the list.
Press Stop/Exit.
Printing caller id list
Instructions from the manual
Printing Caller ID ListView
Press Menu, 2, 0, 4, choose Print Report and OK, press Start then Stop/Exit.
Connecting an external tad (telephone answering device)
Instructions from the manual
Connecting an external TAD (telephone answering device)6 steps
Without Distinctive Ring, connect the external TAD to the machine EXT jack, not elsewhere on the line.
Wall telephone cord goes to LINE; TAD telephone line cord uses its LINE jack, not handset jack, and connects to EXT.
Set the TAD to four rings or fewer (two recommended), record its outgoing message, set it to answer calls and select External TAD.
If some faxes are missed, reduce the TAD ring delay.
A toll saver exceeding five rings is not recommended because fax tones may not be detected.
With registered Distinctive Ring, a TAD on a separate wall jack is allowed, but must answer in at least four rings without toll saver; the machine answers only the registered fax number.
Recording an outgoing message (ogm) on an external tad
Instructions from the manual
Recording an outgoing message (OGM) on an external TAD4 steps
Begin with five seconds of silence so the machine can hear fax tones.
Limit speaking to 20 seconds.
End by explaining manual fax reception with *51 and Start.
The pause may be omitted only if reception works; otherwise re-record with it.
Special line considerations
Instructions from the manual
Special line considerations3 steps
In a rollover telephone system put the machine on the last line to avoid calls passed through other lines; a dedicated line is preferred.
A two-line RJ14 wall jack needs separate RJ11 line access for this machine: use separate sockets or a triplex adapter with L1, L2 and L1+L2.
Follow the exact two-line TAD arrangement rather than connecting arbitrary jacks.
Installing machine, external two-line tad and two-line telephone
Instructions from the manual
Installing machine, external two-line TAD and two-line telephone7 steps
Isolate L2 at the wall jack and TAD.
The TAD must have L1/L1-L2 and L2 jacks; use three cords (a fourth if adding a separate two-line telephone).
Connect machine LINE to triplex L2.
Connect TAD L1/L1-L2 to triplex L1.
Connect the remaining TAD L2 cord to machine EXT.
A separate two-line phone may connect to triplex L1+L2 or TAD TEL.
The diagram shows this complete arrangement.
Multi-line connections (pbx)
Instructions from the manual
Multi-line connections (PBX)2 steps
Ask the PBX installer to connect the machine to the last line and use Manual mode.
Fax operation through PBX is not guaranteed; report send/receive problems first to the PBX company.
Using external and extension telephones
Instructions from the manual
Using external and extension telephones5 steps
Connect an external telephone to EXT as illustrated, or use a separately connected extension.
If an extension answers fax tones, press *51, wait for Receiving or chirps and hang up.
For a voice call during the Fax/Tel pseudo-ring, press #51 between double-rings.
If nobody is speaking, assume a manual fax; press *51 and wait before hanging up.
At the machine handset, press Start.
Using a non-brother cordless external telephone
Instructions from the manual
Using a cordless external telephoneView
With a non-Brother cordless phone connected to EXT, answer within Ring Delay. If the machine answers first, press Hook/Hold at the machine to transfer to the cordless handset.
Changing the remote codes
Instructions from the manual
Using remote codes4 steps
Fax Receive Code *51 activates fax reception after an external/extension answer; Telephone Answer Code #51 takes voice calls during the fast double-ring.
To change, Menu, 2, 1, 4, choose On or Off and OK, enter a new receive code and OK, enter new answer code and OK, Stop/Exit.
Some phone systems do not support these codes.
If external TAD access causes disconnects, change receive/answer codes; the manual suggests ### and 999.
Manual dialing
Instructions from the manual
Manual dialingView
Press the dial-pad digits for the fax or telephone number.
One-touch dialing
Instructions from the manual
One-Touch DialingView
Press the stored One-Touch key; hold Shift for numbers 6–10. Not Registered means no stored number in that key.
Speed-dialing
Instructions from the manual
Speed-DialingView
Press Search/Speed Dial, # and the two-digit Speed-Dial location. Not Registered means that location is empty.
Search
Instructions from the manual
Search3 steps
Press Search/Speed Dial.
For numerical search use up/down; for alphabetical search enter the first letter of the name and use left/right.
Select the required entry and Start as illustrated.
Fax redial
Instructions from the manual
Fax Redial3 steps
On a busy automatic fax the machine retries once after five minutes.
For manual dialing from the control panel on a busy line, press Redial/Pause then Start.
Redial/Pause only works if the number was entered using the control panel.
Storing a pause
Instructions from the manual
Storing a pauseView
Press Redial/Pause to insert a 3.5-second pause between stored numbers. Additional presses make a longer pause.
Storing one-touch dial numbers
Instructions from the manual
Storing One-Touch Dial numbers5 steps
Press Menu, 2, 3, 1, choose the One-Touch key (hold Shift for 6–10).
Enter the fax/telephone number, up to 20 digits, and OK.
Enter a name up to 16 characters and OK, or OK for no name.
Repeat for another key or Stop/Exit.
Quick-Dial numbers remain stored through a power failure.
Storing speed-dial numbers
Instructions from the manual
Storing Speed-Dial numbers2 steps
Press Menu, 2, 3, 2, enter a two-digit location 00–99 and OK, enter a fax/telephone number up to 20 digits and OK, enter a name up to 16 characters and OK (or OK without a name).
Repeat for another location or Stop/Exit.
Changing one-touch and speed-dial numbers
Instructions from the manual
Changing One-Touch and Speed-Dial numbers4 steps
Select an already stored key/location in the appropriate storage menu.
Press 1 to change or 2 to exit.
Enter the new number and OK, then name and OK.
To correct a character, move left/right under it, press Clear/Back and re-enter it.
Setting up groups for broadcasting
Instructions from the manual
Setting up Groups for broadcasting7 steps
Each Group uses one One-Touch key or Speed-Dial location; store individual numbers first.
Press Menu, 2, 3, 3, choose an empty One-Touch key or Search/Speed Dial plus location and OK.
Enter group number 1–6 and OK.
Add stored One-Touch numbers (Shift for 6–10) or Search/Speed Dial plus two digits; repeat, then OK.
Enter the Group name and OK, then Stop/Exit.
Up to six Groups are possible; up to 99 numbers fit in a large Group.
The printed Quick-Dial List marks Group numbers with GROUP.
Dialing access codes and credit card numbers
Instructions from the manual
Dialing access codes and credit card numbers3 steps
Combine stored segments: for example Search/Speed Dial, #03, then Search/Speed Dial, #02, and Start joins their digits.
To change part temporarily, replace that stored segment with dial-pad digits.
Add a Redial/Pause pause if dial tone must be awaited.
Fax forwarding
Instructions from the manual
Fax Forwarding3 steps
Only one Remote Fax option can be used at a time.
Press Menu, 2, 5, 1, choose Fax Forward and OK, enter forwarding number up to 20 digits and OK, choose Backup Print:On or Backup Print:Off and OK, then Stop/Exit.
On prints a safety copy against a power failure before forwarding.
Paging
Instructions from the manual
Paging7 steps
Press Menu, 2, 5, 1, choose Paging and OK.
Enter pager number up to 20 digits followed by # # and OK; omit area code if the pager is in the same area.
If a PIN is needed, enter it, #, Redial/Pause, fax number and # #, then OK.
Without PIN enter Redial/Pause, fax number and # #, then OK.
Stop/Exit.
A backup fax copy prints automatically.
Pager number/PIN cannot be changed remotely; paging cannot use a cellular phone number.
Fax storage
Instructions from the manual
Fax StorageView
Press Menu, 2, 5, 1, choose Fax Storage and OK, then Stop/Exit. Incoming faxes store for remote retrieval and print a backup copy.
Changing remote fax options
Instructions from the manual
Changing Remote Fax Options3 steps
If received faxes remain in memory when changing options, the LCD asks Erase All Fax? or Print All Fax?.
Press 1 to erase or print before changing (an already printed backup is not printed again), or 2 to leave the setting unchanged.
To disable Remote Fax options press Menu, 2, 5, 1, choose Off, OK and Stop/Exit; the same stored-fax questions apply.
Setting a remote access code
Instructions from the manual
Setting a Remote Access Code5 steps
Press Menu, 2, 5, 2.
Enter a three-character code using 0–9, * or # and OK; the final * is fixed.
Stop/Exit.
Do not use the Fax Receive or Telephone Answer code.
To deactivate, Clear/Back at the code-setting step, then OK restores ---*.
Using your remote access code
Instructions from the manual
Using your Remote Access Code5 steps
From a touch-tone phone call your machine, enter the three-character remote code and fixed * when it answers.
One long beep means fax messages, no beeps means none.
After two short beeps enter a command within 30 seconds, or it hangs up; three beeps means invalid.
Press 90 to finish, wait for a long beep and hang up.
In Manual mode wait about two minutes for answer, then enter the code within 30 seconds.
Retrieving fax messages
Instructions from the manual
Retrieving fax messages4 steps
Call from touch-tone phone, enter remote code and fixed *, wait for two short beeps and enter 962.
After the long beep enter the receiving fax number, up to 20 digits, followed by ##.
Do not enter * or # as number digits; # may insert a pause.
Press 90, wait for the beep and hang up; the machine calls and sends the stored faxes.
Changing your fax forwarding number
Instructions from the manual
Changing your Fax Forwarding number3 steps
Call from touch-tone phone, enter remote code and fixed *, wait for two short beeps and enter 954.
After the long beep enter the new forwarding number, up to 20 digits, followed by ##; do not use * or # as number digits, but # may insert a pause.
Press 90, wait for the beep and hang up.
Remote fax commands
Instructions from the manual
Remote fax commands8 steps
After the remote access code, use these commands when two short beeps sound.
951 turns forwarding/paging/storage off only after all messages are retrieved or erased; 952 sets Fax Forward, 953 Paging, 954 registers a forwarding number, 956 Fax Storage.
One long beep confirms the change; three short beeps means required setup is missing.
962 retrieves all faxes to an entered destination followed by ##.
963 erases stored faxes (one long beep confirms).
971 checks fax status: one long beep means received, three short none.
981 selects External TAD, 982 Fax/Tel, 983 Fax Only; one long beep confirms.
90 exits; wait for its long beep before hanging up.
Transmission verification report
Instructions from the manual
Transmission Verification Report3 steps
Press Menu, 2, 4, 1, choose Off+Image, On, On+Image or Off, OK and Stop/Exit.
On/On+Image print after every fax; Off/Off+Image print only when an error occurs. +Image includes part of the first page.
Reports show date, time, sent pages and OK/NG result.
Fax journal (activity report)
Instructions from the manual
Fax Journal (activity report)6 steps
Press Menu, 2, 4, 2.
Choose Off, Every 50 Faxes, 6/12/24 hours, 2 days or 7 days and OK.
For 7 days choose the first day; for a timed interval enter the 24-hour start time and OK, then Stop/Exit.
Every 50 Faxes is the default.
At timed intervals, if memory fills with 200 jobs beforehand, the journal prints early and clears those jobs.
An extra manually printed report does not erase memory.
How to print a report
Instructions from the manual
How to print a report4 steps
Press Menu, 4.
Choose the report with up/down and OK, or its number: 1 Transmission, 2 Help List, 3 Quick-Dial, 4 Fax Journal, 5 User Settings.
Press Start.
Transmission is the last sent report; Help lists programming; Quick-Dial lists names/numbers; Journal lists the last incoming/outgoing fax jobs; User Settings lists current settings.
Setup for polling receive
Instructions from the manual
Setup for polling receiveView
Make sure Fax mode is selected. Press Menu, 2, 1, 6. Enter the destination and Start. The other machine must support polling and have its document set up for it.
Sequential polling
Instructions from the manual
Sequential polling4 steps
In Fax mode press Menu, 2, 1, 6.
Enter each Group, One-Touch, Speed-Dial or dial-pad destination, pressing OK between destinations, then Start.
The polling report prints after polling.
Stop/Exit while dialing cancels the current poll; cancel all remaining sequential-polling jobs through Menu, 2, 6.
Setup for polled transmit
Instructions from the manual
Setup for polled transmit4 steps
In Fax mode load the document, press Menu, 2, 2, 6, choose On or Off and OK.
Press 1 to leave the document in the ADF until polled, or 2 to scan into memory.
At Other Settings press 1 for more settings or 2 when done, then Start.
A memory-stored document may be retrieved more than once until deleted with the waiting-jobs cancellation procedure.
Making a single copy
Instructions from the manual
Making a single copyView
Press Copy, load the document and Start. Stop/Exit cancels. The LCD shows copy ratio, quality and quantity; the Mode Timer governs return to Fax mode.
Making multiple copies
Instructions from the manual
Making multiple copiesView
Press Copy, load the document, enter up to 99 copies with the dial pad and Start. Use Copy Options to sort copies. Stop/Exit cancels.
Changing copy quality
Instructions from the manual
Changing copy quality4 steps
For a temporary change press Copy, load the document, enter count, press Copy Options, choose Quality and OK, choose Normal, Fast or Best, OK and Start.
Normal balances speed/quality, Fast uses least ink for drafts/large jobs, Best gives highest quality and is slowest.
Temporary settings reset after copying or when Mode Timer returns to Fax.
To change the default press Menu, 3, 1, choose Normal/Fast/Best, OK and Stop/Exit.
Enlarging or reducing the image copied
Instructions from the manual
Enlarging or reducing the image copied4 steps
Press Copy, load the document, enter copy count, Copy Options, choose Enlarge/Reduce and OK.
Choose 50%, 78%, 83%, 93%, 97%, 100%, 104%, 142%, 186%, 198% or 200%, then OK; or choose Custom(25-400%), OK, enter a 25–400% ratio and OK.
Press Start.
Page Layout 2-in-1 or 4-in-1 is unavailable with enlargement/reduction.
Making n in 1 copies
Instructions from the manual
Making N in 1 copies3 steps
Use Letter or A4.
Enlargement/reduction is not available; P is portrait and L landscape.
Press Copy, load face-down documents in the source-drawn orientation, enter count, Copy Options, choose Page Layout and OK, choose Off(1 in 1), 2 in 1(P), 2 in 1(L), 4 in 1(P) or 4 in 1(L), OK and Start.
Sorting copies using the adf
Instructions from the manual
Sorting copies using the ADFView
Press Copy, load the document, enter count, Copy Options, choose Stack/Sort and OK, choose Sort, OK and Start. Output is collated in page order.
Adjusting brightness and contrast
Instructions from the manual
Adjusting Brightness and Contrast3 steps
For temporary brightness press Copy, load document, enter count, Copy Options, choose Brightness and OK, up/down for lighter/darker, OK and Start.
To set default brightness press Menu, 3, 2, choose lighter/darker with up/down, OK and Stop/Exit.
For default contrast press Menu, 3, 3, choose more/less with up/down, OK and Stop/Exit.
Paper options
Instructions from the manual
Paper options3 steps
If copying on paper other than Letter, change the size.
For a temporary setting press Copy, load document, enter count, Copy Options, choose Paper Size, OK, Letter/Legal/A4, OK and Start.
Change the default with Menu, 1, 2.
Choosing a location
Instructions from the manual
Choosing a location5 steps
Use a flat, stable, vibration-free surface near a telephone jack and standard AC outlet, at 50–95°F (10–35°C).
Avoid high traffic, carpet, heaters, air conditioners, refrigerators, medical equipment, chemicals, water, direct sunlight, excessive heat, moisture and dust.
Do not use switch- or timer-controlled outlets or the same circuit as large appliances that may disrupt power.
Power interruption can delete memory.
Avoid interference sources such as speakers or cordless-phone bases.
To use the machine safely
Instructions from the manual
To use the machine safely11 steps
Keep these instructions for later maintenance.
Before cleaning inside, unplug the telephone line first, then the power cord.
Do not handle plugs with wet hands; insert the power plug fully and never pull its middle.
Keep hands away from panel/document-cover edges, the output tray under the paper-tray cover, the paper-feed roller and shaded internal areas; they can injure you.
Lift from the base with a hand at each side, not the panel or covers.
If it becomes hot, smokes or smells strongly, immediately unplug power and contact Brother.
If metal, water or liquid enters, unplug and contact Brother.
Never touch exposed phone wires without disconnecting at the wall; do not install phone wiring in lightning storms or a jack in wet locations unless designed for it.
Use No.26 AWG or larger line cord and only the supplied power cord.
A surge protector is recommended for power and phone lines.
Do not use near water, during storms or to report a nearby gas leak.
Important safety instructions
Instructions from the manual
Important safety instructions13 steps
Read and keep all instructions and warnings.
Unplug power before cleaning and do not use liquid/aerosol cleaners on the machine generally; follow the separately specified component-cleaning methods.
Do not use near water or an unstable support.
Keep ventilation openings unobstructed, off beds/sofas/rugs and away from radiators or built-in installations without adequate ventilation.
Use the labeled supply; consult the dealer/local power company if unsure.
Do not put weight on or walk on the cord.
Do not block fax output or pick up pages before completion.
Do not push objects inside or spill liquid; do not service yourself.
Refer servicing to authorized personnel.
Unplug and refer service for damaged cord, liquid, rain/water, abnormal operation, a drop/damaged cabinet or distinct performance change.
Adjust only documented controls.
Protect against surges.
Avoid machine/telephone use during electrical storms and near a gas leak; use only the supplied power cord and No.26 AWG or larger line cord.
If you are having difficulty with your machine
Instructions from the manual
No printout3 checks
Power connection
Check that the machine is plugged in and switched on with On/Off.
Empty ink
Check whether Ink Empty appears and replace the ink cartridge if empty.
LCD error
Check the LCD and follow the matching error-message instructions.
Poor printing quality5 checks
Print quality
Run the print-quality check.
Ink freshness
Use fresh ink within its package expiry and within six months of installation. Cartridge package expiry can be up to two years; check the date.
Ink installation
Check that the ink cartridge is installed properly.
Ink storage
Use genuine Brother ink that was properly stored.
Environment
Recommended print-quality temperature is 68–91°F (20–33°C).
White horizontal lines appear in text or graphics1 check
Printed page condition
Clean the print head.
The machine prints blank pages1 check
Printed page condition
Clean the print head.
Characters and lines are stacked1 check
Printed page condition
Check the print alignment.
Printed text or images are skewed1 check
Printed page condition
Load the paper correctly and adjust the side guides; check that the Lower Jam Clear Cover is set properly.
Smudged stain at the top center of the printed page1 check
Printed page condition
Check that paper is not too thick or curled; use acceptable paper.
Stains appear on the reverse side or at the bottom of the page1 check
Printed page condition
Check that the printer platen is not dirty and that the paper support is being used.
Machine feeds multiple pages1 check
Paper feeding or stacking
Load paper properly. Check that more than one paper type is not loaded together.
Printed pages are not stacked neatly1 check
Paper feeding or stacking
Use the paper-support flap.
Printed pages double-feed and cause a paper jam1 check
Paper feeding or stacking
Close the output-tray cover and slide it forward; firmly push the paper tray into the machine and open the support flap.
Printing received faxes
Instructions from the manual
Condensed print and white streaks across received faxes or missing top/bottom sentences1 check
Bad connection
Ask the sender to send again.
Vertical black lines when receiving1 check
Sender scanner may be dirty
Ask the sender to make a copy to check their scanner. Try receiving from another fax machine.
Left and right margins cut off or a single page printed on two pages1 check
Incoming page does not fit
Turn on Auto Reduction.
Phone line or connections
Instructions from the manual
Dialing does not work (No dial tone)2 checks
Power
Check that the machine is plugged in and switched on.
Dialing
Check the telephone-line connections. Try the sending-a-fax-manually procedure; Tone/Pulse selection is Canada-only and is excluded from this US reference.
The machine does not answer when called2 checks
Receive mode
Select the correct receive mode.
Telephone line
Check for dial tone.
Call the machine to hear whether it answers.
If not, check the telephone-line cord and connection; if no ringing is heard when calling, ask the telephone company to check the line.
Receiving faxes
Instructions from the manual
Cannot receive a fax3 checks
Line
Check all line-cord connections.
Receive mode
Select the correct receive mode.
Interference
If interference is suspected, try Compatibility Basic.
Sending faxes
Instructions from the manual
Cannot send a fax5 checks
Connection
Check the line connections.
Mode
Make sure Fax is illuminated.
Other machine
Check that the receiving machine has paper.
Report
Print the Transmission Verification Report and check for an error.
Cover
Check that the panel cover is completely closed.
Transmission Verification Report says Result:NG or Result:ERROR2 checks
Noise or bad connection
Try sending again; if it continues, ask the phone company to check the line.
Interference
Try Compatibility Basic.
Poor fax send quality2 checks
Resolution
Try Fine or S.Fine.
Scanner
Make a copy to check the scanner; if it is poor, clean the scanner.
Vertical black lines when sending1 check
Scanner
Make a copy; if it has the same lines, clean the scanner.
Handling incoming calls
Instructions from the manual
The machine hears voice as a CNG Tone1 check
Easy Receive
If Easy Receive is On, the machine may mistake voices for fax tones. Press Stop/Exit to deactivate for the call and consider Easy Receive Off.
Sending a fax call to the machine2 checks
At the machine
Press Start and hang up immediately.
External or extension telephone
Press *51; when the machine answers, hang up.
Custom features on a single line1 check
Shared telephone services
Call Waiting, Caller ID, voice mail, answering devices, alarms or other custom features can interrupt faxing.
Brother ECM may help.
If routine interruption continues, a separate line without custom features is recommended.
Menu setting difficulty
Instructions from the manual
Machine beeps when accessing Setup Receive menu1 check
Fax mode needed
If Fax is not illuminated, press it. Setup Receive is available only in Fax mode.
Copying difficulty
Instructions from the manual
Cannot make a copy2 checks
Copy mode
Make sure Copy is illuminated.
Panel
Check that the panel cover is completely closed.
Vertical streaks appear on copies1 check
Scanner
Clean the scanner.
Transferring faxes to another fax machine
Instructions from the manual
Transferring faxes to another fax machine5 steps
Station ID must be set or transfer mode cannot be entered.
Press Stop/Exit to interrupt the error temporarily, then Menu, 9, 0, 1.
If No Data appears, no faxes are in memory: Stop/Exit.
If Enter Fax No. appears, enter the destination number and Start.
After transferring stored faxes, disconnect power for several minutes and reconnect if the error remains.
Transferring fax journal report to another fax machine
Instructions from the manual
Transferring Fax Journal report to another fax machineView
Station ID must be set. Press Menu, 9, 0, 2, enter the destination fax number and Start.
Document is jammed inside the front of the machine
Instructions from the manual
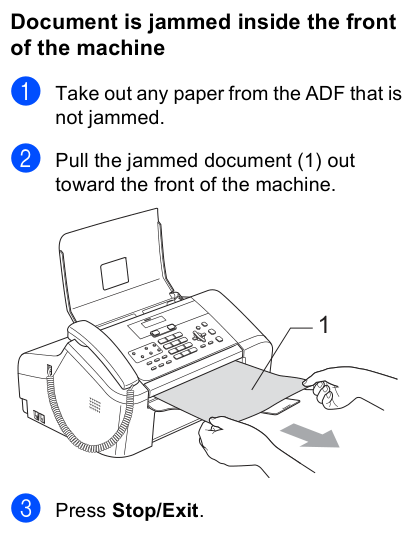
Document is jammed inside the front of the machineView
Remove any unjammed paper from the ADF. Pull the jammed document out toward the front, then Stop/Exit.
Front document-jam removal: all three source steps and the pulling direction.
Diagram key
1 step: Remove ADF paper that is not jammed.
2 step: Pull the jammed document toward the front of the machine.
1 document: The jammed document.
pull arrow: Pull outward toward the machine front.
3 step: Press Stop/Exit.
Document is jammed inside the panel cover
Instructions from the manual
Document is jammed inside the panel coverView
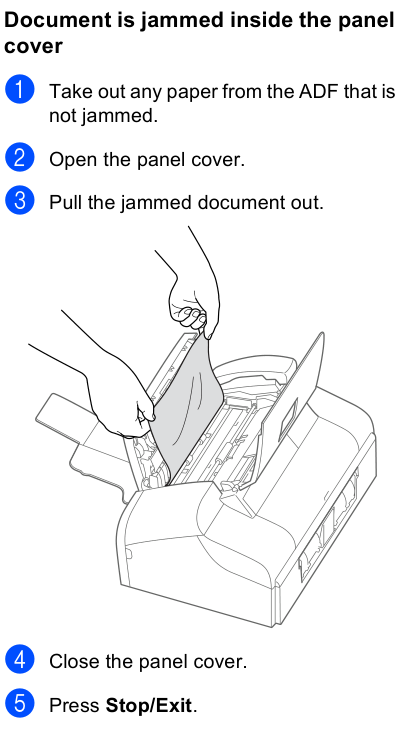
Remove unjammed ADF paper, open the panel cover, pull the jammed document out, close the panel cover and Stop/Exit.
Remove a document jammed under the panel cover after removing unjammed sheets and opening the cover. Close it and press Stop/Exit afterward.
Diagram key
1 step: Remove unjammed paper from the ADF.
2 step: Open the panel cover.
3 step: Pull the jammed document out.
withdrawal motion: Pull out through the opened panel cover as shown.
4 step: Close the panel cover.
5 step: Press Stop/Exit.
Printer jam or paper jam
Instructions from the manual
Printer jam or paper jam8 steps
Pull paper tray (1) out and pull jammed paper (1) from the front.
Reset by opening the Upper Jam Clear Cover and closing it.
If the paper cannot be removed or the error remains, remove the Lower Jam Clear Cover (1) at the back and pull out jammed paper.
Replace that cover properly as shown (incorrect seating is marked with a cross).
Open the Upper Jam Clear Cover (1), check inside and both corners for pieces.
If paper is under the print head, unplug power first, then move the head to remove it.
Close the Upper Jam Clear Cover.
Firmly push the tray back; while holding it, pull support until it clicks and unfold the flap.
Dial tone
Instructions from the manual
Dial ToneView
Press Menu, 0, 4, choose Detection or No Detection, OK and Stop/Exit. Detection shortens the pause before dialing.
Phone line interference
Instructions from the manual
Phone line interference3 steps
Press Menu, 2, 0, 2, choose Basic or Normal, OK and Stop/Exit.
Basic reduces modem speed to 9,600 bps and disables ECM; try it if line interference persists.
Normal is 14,400 bps and the default.
Replacing the ink cartridge
Instructions from the manual
Replacing the ink cartridge12 steps
Open the ink-cartridge cover.
When the LCD says Ink Empty Black, pull the release-lock lever down and remove the cartridge.
Unbag the new cartridge and remove protective yellow cap (1).
Do not touch the indicated ink-port area; a loose cap during opening does not damage the cartridge.
Insert in the arrow direction, lift the lock lever and gently push until it clicks, then close the cover.
When Did You Change Blck? appears, press 1 only for a new cartridge (resets the counter), or 2 for the old one; Ink Empty Black automatically resets the counter.
If No Cartridge appears, check installation.
If ink enters eyes rinse immediately with water and seek medical advice if concerned.
Do not remove unnecessarily, touch insertion slots, refill, dismantle or tamper.
For skin/clothing ink wash immediately with soap/detergent.
Use an opened cartridge within six months and an unopened one before package expiry.
Use genuine Brother supplies.
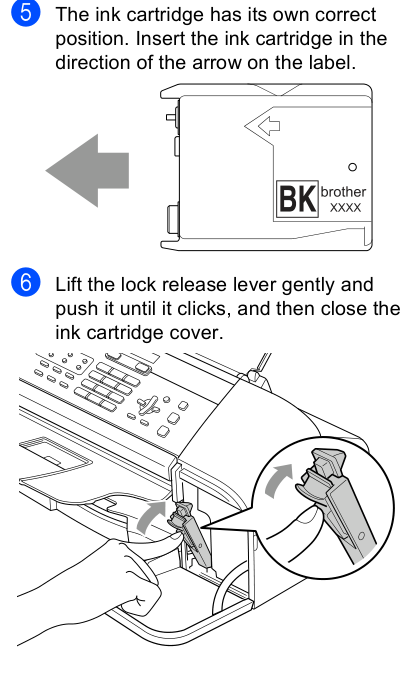
Ink replacement steps5–6: follow the cartridge arrow, then raise the lock lever until it clicks. Follow the complete replacement procedure.
Diagram key
5 step: Insert the cartridge in its correct position and in the direction of the label arrow.
BK: Black ink cartridge, as specified for this model.
cartridge-label arrow: The direction for inserting the cartridge.
large insertion arrow: Insert in the displayed arrow direction.
6 step: Lift the lock-release lever gently until it clicks, then close the cartridge cover.
main lever arrow: Lift the lock-release lever gently.
lever detail inset: Enlarged view of the same lock-release lever.
curved lever arrow: Lift the lever gently until it clicks.
Cleaning the outside of the machine
Instructions from the manual
Cleaning the outside of the machine7 steps
Use neutral detergent; volatile thinner/benzine can damage surfaces.
Do not use ammonia cleaners or isopropyl alcohol on the control panel.
Observe the general safety disconnection instructions.
Pull paper tray (1) completely out.
Wipe outside with a soft cloth.
Remove stuck objects from the tray.
Lift output-tray cover and wipe inside/outside the tray with a soft cloth; close the cover and push the tray firmly back.
Cleaning the scanner
Instructions from the manual
Cleaning the scanner3 steps
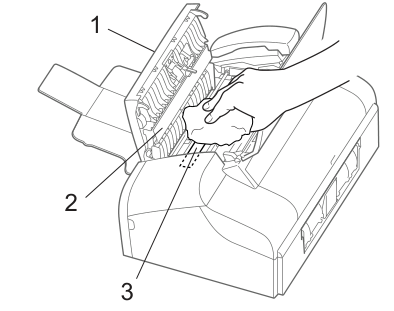
Unplug the machine and lift panel cover (1).
Clean white bar (2) and glass strip (3) with isopropyl alcohol on a soft lint-free cloth.
This component-specific method does not authorize alcohol on the control panel.
Scanner cleaning locations. Unplug first and use the manual’s component-specific cleaning method.
Diagram key
1: Open panel cover after unplugging the machine.
2: White bar: clean with isopropyl alcohol on a soft lint-free cloth.
3: Glass strip: clean with isopropyl alcohol on a soft lint-free cloth.
Cleaning the machine printer platen
Instructions from the manual
Cleaning the machine printer platenView
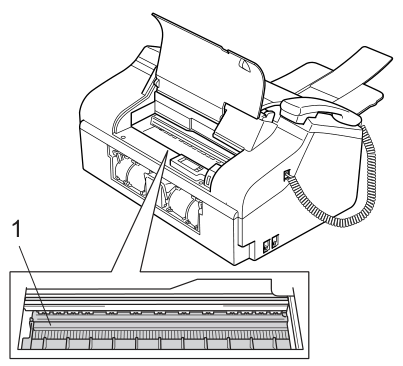
WARNING: unplug the machine from AC power before cleaning printer platen (1). Wipe ink on the platen with a soft, dry, lint-free cloth.
Printer platen and detail inset. Unplug AC power; wipe with a soft, dry, lint-free cloth.
Diagram key
1: Printer platen: unplug AC before cleaning ink with a soft, dry, lint-free cloth.
platen detail inset: Magnified view of the same printer platen (1), not a second component.
Cleaning the paper pick-up roller
Instructions from the manual
Cleaning the paper pick-up roller4 steps
Pull the paper tray completely out.
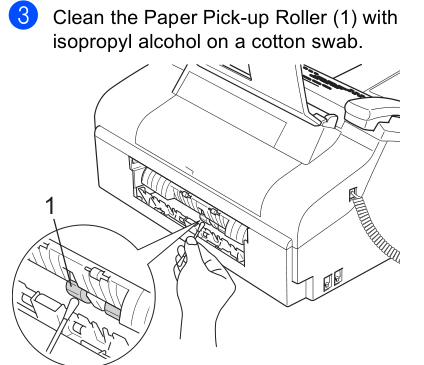
Unplug AC power and remove Lower Jam Clear Cover (1).
Clean paper pick-up roller (1) using isopropyl alcohol on a cotton swab.
Replace the Lower Jam Clear Cover properly, push the tray firmly back and reconnect power.
Paper pick-up roller cleaning location and wiping detail. Follow all preceding disconnection steps and subsequent reassembly steps.
Diagram key
3: Procedure step3: clean the paper pick-up roller with isopropyl alcohol on a cotton swab.
1: Paper pick-up roller.
roller detail inset: Magnified view of cotton-swab cleaning at roller (1).
Cleaning the print head
Instructions from the manual
Cleaning the print head5 steps
Press Ink, choose Cleaning with up/down and OK.
The machine cleans the head and automatically returns to standby.
Do not touch the head; doing so can permanently damage it and void its warranty.
If at least five cleanings do not improve print, contact Brother customer service.
Checking the print quality
Instructions from the manual
Checking the print quality6 steps
Press Ink, choose Test Print and OK, choose Print Quality and OK, then Start for the Print Quality Check Sheet.
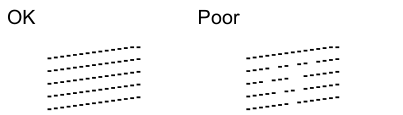
Check the block: if all lines are clear/visible press 1 (Yes), then Stop/Exit.
If missing short lines are visible, press 2 (No), then 1 (Yes) to start cleaning.
After cleaning Stop/Exit and repeat the check.
If at least five repeats still fail, replace the ink cartridge and check again; after at least five checks with new ink, contact Brother if ink is still missing.
Do not touch the print head.
Print-quality check patterns: clear lines and missing lines.
Diagram key
OK: All short lines are clear and visible: choose1(Yes), then Stop/Exit.
Poor: Missing short lines: choose2(No), then1(Yes) to clean. Follow the complete quality-check procedure.
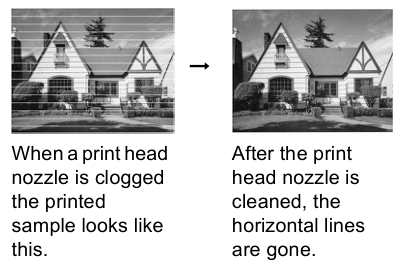
A clogged nozzle produces horizontal lines; the cleaned nozzle sample has none.
Diagram key
left sample: Sample printed with a clogged print-head nozzle.
right-pointing arrow: The illustrated change is after print-head nozzle cleaning.
right sample: Sample after cleaning: horizontal lines are gone.
Checking the print alignment
Instructions from the manual
Checking the print alignment3 steps
Press Ink, choose Test Print and OK, choose Alignment and OK, then Start for the Alignment Check Sheet.
If number 5 of the 600 dpi test best matches number 0, press 1 (Yes) to finish and Stop/Exit.
Otherwise press 2 (No), choose the sample number 1–8 that best matches number 0 and Stop/Exit.
Checking the ink volume
Instructions from the manual
Checking the ink volumeView
Press Ink, choose Ink Volume and OK. The LCD shows the ink level; press Stop/Exit.
Checking the serial number
Instructions from the manual
Checking the serial numberView
Press Menu, 5, 1, OK to show the serial number, then Stop/Exit.
Packing and shipping the machine
Instructions from the manual
Packing and shipping the machine12 steps
Wait until all mechanical noise stops so the print head parks; otherwise shipping can damage it.
Use original packing material.
Open the ink cover, release the lever and remove the cartridge.
Insert the yellow protective part, lift the lever and ensure it clicks, then close the cover.
If the protective part is unavailable, do NOT remove the ink cartridge: shipping without either can damage the head.
Unplug the telephone cord and remove it from the machine; unplug AC power; unplug any interface cable.
Remove handset and curled cord if present.
Wrap the machine in its bag and original carton with original packing.
Pack printed material and attachments as shown but not a used ink cartridge.
For an Exchange Service return, pack only the machine and retain the other parts and printed material for the replacement.
Tape the carton shut.
These are the US shipping instructions; the separate Canada warranty limitations are not applied.
On-screen programming
Instructions from the manual
On-screen programming4 steps
Use the LCD step-by-step prompts and menu table.
Menu accesses options; OK accepts and moves to the next level, left goes back, up/down scrolls, Clear/Back deletes incorrect text, and Stop/Exit exits.
Choose 1 General Setup, 2 Fax, 3 Copy or 0 Initial Setup; select the wanted option and OK until Accepted displays.
Permanently programmed settings survive power loss; temporary settings such as Contrast and Overseas Mode are lost and date/time may need resetting.
The printed table cycles to the key digit on the fourth press for 2–6/8, and for 7/9 uses all four letters.
Press right once for a space in a fax number or twice in a name.
To correct a letter, press left to place the cursor beneath it, Clear/Back and re-enter.
Move right before a second consecutive letter on the same key.
For a special character press *, # or 0, use left/right to choose it and OK.
Removing the protective parts
Instructions from the manual
Removing the protective partsView
Remove protective tape from the machine.
Installing the handset
Instructions from the manual
Installing the HandsetView
Connect one end of the curled handset cord to the machine and the other to the handset.
Opening the document support and document tray
Instructions from the manual
Opening the document support and document trayView
Open support (1), tray (2) and tray extension (3).
Loading paper
Instructions from the manual
Loading paper8 steps
Use up to 100 sheets of 20 lb (80 g/m²) plain paper.
Close the support flap if open, pull tray (1) out and lift output cover (2).
Hold the universal guide release while extending the front when loading Legal.
Press and slide side guides (1) and length guide (2) to the size, fan the paper, load print side down/top edge first and check it lies flat.
Set the side guides to touch the sides, without pushing paper too far.
Close output cover (1) and slide it forward; for Legal it does not close fully to the end.
Push tray fully in; while holding it pull support (1) until it clicks and unfold flap (2).
Do not use the flap for Legal.
Connecting the phone line
Instructions from the manual
Connecting the phone line3 steps
Connect the telephone-line cord to the machine LINE jack and a modular wall jack.
An external telephone connects to EXT, not LINE.
For an external answering device use the exact connection diagram and set External TAD mode after setup.
Connecting the power cord
Instructions from the manual
Connecting the power cordView
After the telephone-line connection, connect the power cord.
Installing the ink cartridge
Instructions from the manual
Installing the ink cartridge10 steps
Make sure power is on; No Cartridge appears.
If ink enters eyes rinse immediately with water and seek medical advice if concerned.
Open the ink cover (1), pull the release lever and remove yellow protective part (1).
Keep it for shipping.
Unbag the black LC51BK cartridge, carefully remove yellow cap (1), and do not touch the ink-port area.
Insert in arrow direction, lift the lock lever and gently push until it clicks; close the cover.
If Install Black appears check installation.
Initial preparation/cleaning takes approximately two minutes.
Do not shake or dismantle the cartridge; avoid needless removal/reinsertion, touching insertion slots, refilling/tampering, and use within six months of opening and before the printed expiry.
Wash ink on skin/clothing immediately with soap/detergent.
Print quality check
Instructions from the manual
Print quality check4 steps
After initial cleaning, when Set Paper and Press Start appears, load paper and Start for the sheet.
Do not touch the wet printed surface.
Check the block: if all short lines are clear press 1 (Yes) to finish; if missing press 2 (No).
At Start Cleaning? press 1 (Yes), then Start after cleaning to reprint; repeat from the quality check.
Setting the lcd contrast
Instructions from the manual
Setting the LCD contrastView
Press Menu, 1, 6, choose Light or Dark, OK and Stop/Exit.
Setting the date and time
Instructions from the manual
Setting the date and time3 steps
Press Menu, 0, 1.
Enter the last two digits of the year and OK, two-digit month and OK, two-digit day and OK, time in 24-hour format and OK, then Stop/Exit.
Print User Settings to confirm the date/time.
Setting your station id
Instructions from the manual
Setting your station ID4 steps
Press Menu, 0, 2, enter your fax number up to 20 digits and OK, enter your name up to 20 characters and OK, then Stop/Exit.
Repeated dial-pad presses choose characters.
For another letter on the same key move right; correct a mistake with left and Clear/Back.
To start again press Stop/Exit and restart the procedure.
Choosing a receive mode
Instructions from the manual
Choosing a Receive Mode5 steps
Use Distinctive Ring instructions if subscribed.
For an answering device handling voice choose External TAD.
Manual means you answer all calls yourself, Fax Only answers all as fax, Fax/Tel automatically receives fax and rings for voice.
Press Receive Mode, use up/down to choose, OK and Stop/Exit.
The user guide also gives repeated Receive Mode as another selection method.
Sending in the product registration and test sheet (usa only)
Instructions from the manual
Sending in the Product Registration and Test Sheet (USA only)3 steps
The supplied setup guide describes a USA registration test: fill the supplied sheet, place it face down in the ADF, make sure Fax is green, enter the guide’s toll-free test fax number 1-877-268-9575 and Start.
It says a confirmation fax follows and gives online registration as an alternative.
This is the printed 2006 setup-guide procedure; the number is not established here as a current support contact.
Controls and parts
See the manual diagrams 1 diagram
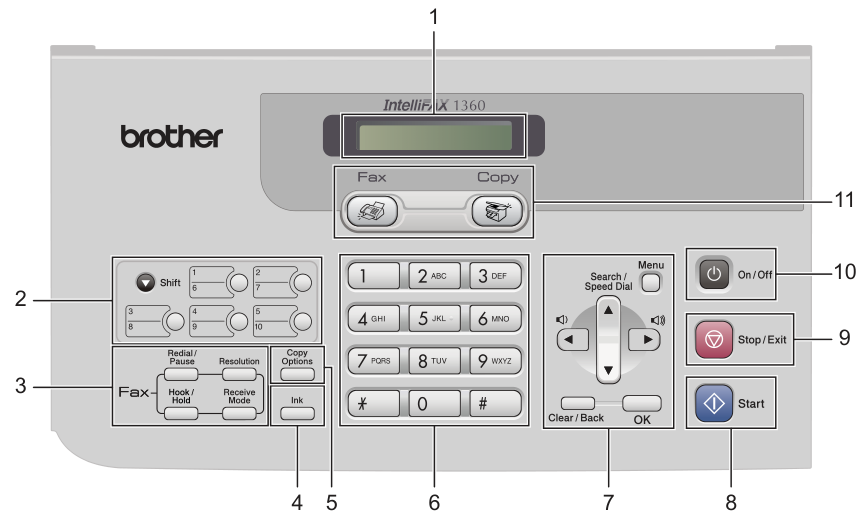
FAX-1360 controls. The complete key includes the continuation on the next manual page; pulse-to-tone # is Canada-only.
Diagram key
1: LCD displays setup and operating messages.
2: One-Touch keys access stored Quick-Dial numbers; hold Shift for numbers6–10.
3: Fax keys: Redial/Pause redials the last called number or inserts a pause; Resolution temporarily sets fax resolution; Hook/Hold checks the answering fax before Start and holds voice calls; Receive Mode selects incoming-call handling.
4: Ink offers head cleaning, print-quality checking and ink-volume checking.
6: Dial Pad enters telephone/fax numbers and text. The # temporary Pulse-to-Tone feature applies only to Canada.
7: Menu keys: Menu opens programming; Search/Speed Dial finds stored numbers; left/right adjusts ring volume in Fax mode, left returns to a previous menu, up/down scrolls options, Clear/Back cancels and OK stores the setting.
8: Start begins black-and-white fax transmission or copying.