The checks and guides below come from the official manuals for this model.
No matches for this wording. Try a light name, error code or a shorter phrase.
Troubleshooting
Find the problem you are experiencing
Bundled Windows software setup problems7 checks
Installation or setup is still failing
Review the installation steps in the operation guide and the supplied Quick Guide.
Disk space check in the bundled-software troubleshooting guide
Check for 800 MB of free disk space as the troubleshooting guide specifies.
Power connection
Check that the scanner is plugged in and powered.
USB cable
Use the USB cable supplied with the scanner.
Scanner-side cable end
Check that the square USB cable end is inserted into the rear of the scanner.
Computer-side cable end
Check that the rectangular USB cable end is connected to the back of the computer.
Installation did not follow the documented procedure
Unplug the USB cable from the scanner and reinstall the software from the DVD-ROM.
DocAction reports that the scanner is disconnected1 check
Scanner connection problem
Check all physical connections first.
DocAction has no system-tray display2 steps
No Display means the program was terminated, whether the scanner is connected or disconnected.
The guide does not prescribe a separate recovery for this state; for a scanner connection problem it first directs checking all physical connections.
Guides
Safety precautions
Instructions from the manual
Prevent condensation and use the scanner safely8 steps
Use the scanner indoors in a dry location.
Condensation can occur after a move from cold to warm surroundings, after heating a cold room, or in a damp room.
To let the scanner adapt to room conditions, seal it in a plastic bag and wait 1–2 hours before removing it.
Use the supplied USB cable.
Keep the power cord straight, without twisting, bending or scraping; a damaged wire can cause fire or electric shock.
Unplug the scanner when it will be unused, such as overnight or over a long weekend, to reduce fire risk.
Do not disassemble the scanner: electric shock is possible and opening it voids the warranty.
Avoid striking the fragile scanner glass; it can break.
Minimum system requirements
Instructions from the manual
Check the bundled Windows software requirements5 steps
For the bundled Windows software described in this guide, the listed minimum is an Intel Pentium IV 2.4 GHz or compatible processor, 1 GB RAM, an available USB 2.0 port, a DVD-ROM drive, 2 GB free disk space, a video card supporting at least 16-bit color, and Windows 7, 8 or 10.
For optimal performance the guide recommends 2 GB RAM and 3 GB free disk space.
It warns that scanning or editing large amounts of image data may require higher specifications; these requirements are guidelines.
The installation chapter says the bundled ABBYY FineReader Sprint, scanner driver and DocAction occupy about 400 MB after installation, and recommends at least 2 GB free disk space to allow installation, scanning and saving.
These are the supplied-guide requirements, not specifications inferred for a newer software package.
Box contents
Instructions from the manual
Check the supplied parts and retain the packaging4 steps
Check for the scanner, USB cable, Quick Guide and Setup/Application DVD-ROM.
Contact the seller or customer service if a supplied item is missing or damaged.
Retain the box and packing materials for future transport.
The packaging is recyclable.
Hardware requirements
Instructions from the manual
Find a suitable USB connection4 steps
The scanner uses USB with hot Plug and Play.
Check for a USB port on the computer; additional ports may be on a monitor or keyboard.
Consult the computer hardware manual if you cannot locate its USB port.
If the computer has no USB ports, the guide specifies adding a certified USB interface card.
Step 1. connecting the scanner to your computer
Instructions from the manual
Connect the scanner with the supplied USB cable4 steps
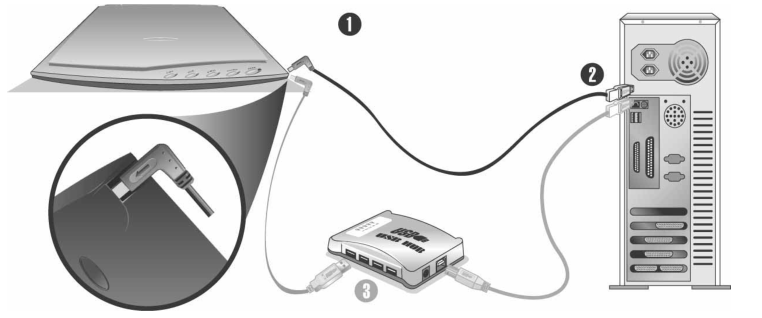
Plug the square end of the supplied USB cable into the scanner USB port.
Plug the rectangular end into an available USB port on the back of the computer.
If using a USB hub, first ensure the hub is connected to the computer USB port, then connect the scanner to the hub.
The hub is not supplied with the scanner.
Use the supplied USB cable. A USB hub is optional and is not included with the scanner.
Diagram key
1: Connect the square end of the supplied USB cable to the scanner USB port.
2: Connect the rectangular end to an available USB port on the back of the computer.
3: If using a hub, connect the hub to the computer first, then connect the scanner to the hub; the hub is not supplied.
Connector inset: Enlarged view of the scanner USB connection for the square cable end.
Step 2. installing the software
Instructions from the manual
Install the bundled Windows scanning software15 steps
With working USB components, Windows detects the scanner and opens Add New Hardware Wizard or Found New Hardware Wizard.
If the computer was off during connection, this happens after it is switched on and Windows starts.
For Windows 7 with a DVD containing several scanner models: insert the supplied Setup/Application DVD, choose Run install.exe in AutoPlay, accept Yes if User Account Control appears, and follow the installation message.
In that Windows 7 several-model case, open Device Manager, right-click this scanner under Other devices, select Update Driver Software, choose Browse my computer for driver software, then Browse.
Select the driver folder or DVD drive in Browse For Folder; choose OK, then Next, and Install this driver software anyway if Windows Security asks.
Continue to the common installation steps below.
For Windows 7 with a DVD for a single scanner model: insert the supplied DVD, choose Run install.exe in AutoPlay and Yes if User Account Control appears.
Continue to the common installation steps below.
For Windows 8 or Windows 10: insert the supplied DVD, open its notification and choose Run install.exe.
If you missed the notification, eject and reinsert the DVD.
Choose Yes if User Account Control appears, then continue to the common installation steps below.
Follow the on-screen instructions to install the required software.
If the wizard appears, choose Next, then Install this driver software anyway in Windows Security, then Finish in the wizard.
After installation, close all open applications and choose Finish to restart the computer.
Retain the Setup/Application DVD for future reinstalls.
Step 3. testing the scanner
Instructions from the manual
Test the scanner using the Custom button8 steps
Check that all connections are secure.
Open the document cover and place a document on the glass with its head toward the scanner button panel.
Close the cover gently.
Open Button Configuration by double-clicking the DocAction Windows system-tray icon, or right-clicking it and choosing Button Configuration.
Choose Custom in the left pane.
In Button Configuration, select File Utility from Button Template and note the default Saving folder.
Press the scanner Custom button.
A scan should start immediately; the scanned image in the default saving folder confirms correct operation.
Installing additional software
Instructions from the manual
Choose additional TWAIN-compatible softwareView
If buying additional scanning software, check that it conforms to TWAIN; the scanner is TWAIN compliant.
Operating the scanner
Instructions from the manual
Use OCR and the assigned scanning destinations5 steps
The scanner needs scanning software.
Image-editing software can view, edit, save and output acquired images.
To turn scanned text images into editable text files, install the OCR software supplied on the Setup/Application DVD.
DocAction can send scans to the assigned printer, email program, disk files or image-editing program through the scanner buttons or its on-screen scan menu.
For software-specific scanning questions, consult that program’s online help.
Preparation
Instructions from the manual
Place a document on the scanner glassView
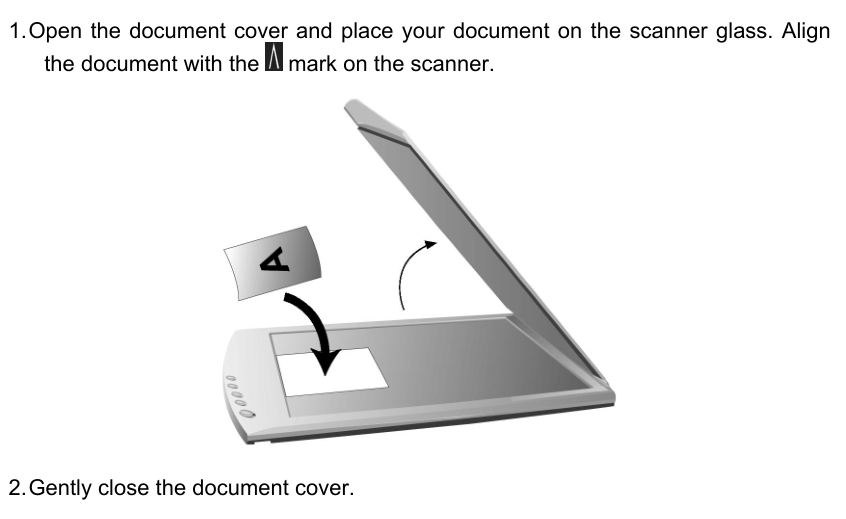
Open the document cover, place the document on the glass and align it with the scanner’s printed alignment mark shown in the reviewed diagram. Close the cover gently.
Open the cover, position the document on the glass at the printed alignment mark, and close the cover gently.
Diagram key
1: Open the cover, place the document on the scanner glass and align it with the printed mark.
Alignment mark: Align the document with this mark on the scanner as specified in Preparation.
Document orientation symbol: The illustrated document is placed with its head toward the scanner button panel, as specified in the testing instructions.
Cover arrow: Open the document cover before placing the document; close it gently after placement.
Document arrow: Place the document on the scanner glass and align it with the scanner’s printed alignment mark.
2: Close the document cover gently.
Scan the image(s)
Instructions from the manual
Check readiness and choose a scanning method3 steps
Before scanning, ensure the computer and scanner are powered, the DocAction icon appears in the Windows system tray, and the paper is positioned correctly on the flatbed glass.
The guide supports four methods: acquire through TWAIN within a TWAIN-compatible program, use a scanner scan button, scan within DocAction, or use an icon on the left of the DocAction window.
The scanner driver installation also installs the TWAIN interface and DocAction.
Scanning via twain interface
Instructions from the manual
Scan through a TWAIN-compatible application12 steps
Launch a TWAIN-compatible program.
If multiple scanners or imaging devices are installed, choose this scanner as the default scanning source before opening TWAIN; consult the application manual for the setting.
Open the TWAIN window from the application as described in its manual.
Select Flatbed Reflective as Scan Type.
Adjust the scan settings.
Choose Preview.
When the preview appears, drag the scan-area corners or edges to define margins and exclude unwanted areas.
Adjust the scan settings again if the preview is unsatisfactory.
Choose Scan.
When scanning finishes, choose Exit to close TWAIN.
The images appear in the application for editing.
Choose Help in TWAIN for additional setting information.
Configure button settings
Instructions from the manual
Configure the scanner buttons in DocAction5 steps
Before the first button scan, configure the buttons to your preferences.
Open Button Configuration by double-clicking the Windows system-tray DocAction icon, or right-clicking it and selecting Button Configuration.
Each left-side icon corresponds to a scanner button and the on-screen Execute menu.
Select an icon to view its settings on the right and adjust them as needed.
Choose Help within Button Configuration for further setting information.
Scan from the buttons
Instructions from the manual
Scan with a scanner button or the Execute menu4 steps
Place the document or image on the scanner as described under Preparation.
For OCR, place text documents only; do not use the OCR button for a photo.
Press the desired scanner button, or right-click the DocAction system-tray icon, choose Execute, then choose the desired button function.
The scanner scans immediately and carries out the action configured in Button Configuration.
Scanning from the icon in the left side of the docaction window
Instructions from the manual
Scan using an icon in the DocAction window4 steps
Place the document or image on the scanner.
Open Button Configuration and check the current button settings; change them if needed.
Double-click the desired left-side DocAction icon.
Scanning starts immediately and performs the configured action.
Calibrating the scanner
Instructions from the manual
Calibrate when scanned colors are inaccurate7 steps
Calibrate if colors appear where the original should be white, or the scanned colors differ substantially from the original; calibration compensates for changes in the optical component over time.
Open Start > All Programs > your scanner model > Calibration Wizard.
For Windows 8.1, point to the upper or lower right screen corner to open the Charm bar; select Start, then the lower-left down arrow for Apps.
Move to the right screen edge to scroll to your scanner model, then choose Calibration Wizard.
Choose Next in the wizard.
Choose Calibrate Now.
After calibration, choose OK and then Finish.
Usage & maintenance tips
Instructions from the manual
Clean the glass and protect the scanner4 steps
Avoid dusty surroundings; dust and foreign objects can damage the scanner.
Avoid excessive vibration, which can damage internal components.
Lightly spray a non-abrasive glass cleaner onto a soft, lint-free cloth, then wipe the glass thoroughly.
Never spray cleaner directly onto the glass: excess liquid can fog or damage the scanner.
Appendix b: customer service and warranty
Instructions from the manual
Prepare information before contacting support3 steps
If a scanner problem persists, first review the installation and troubleshooting suggestions.
Use the manufacturer website for customer-service information and the listed support phone number.
Before calling, gather the scanner name and model, serial number from the underside, detailed problem description, computer manufacturer and model, CPU speed, operating system and optional BIOS, software package names with version or release and manufacturer, and other installed USB devices.
Service & support information (for eu country only)
Instructions from the manual
Ask local suppliers about service and disposal in the EU3 steps
For EU countries, ask local distributors or suppliers about spare-part availability, possible upgrades and implementing-measure test information.
Before disposing of the scanner or an accessory, ask them for correct environmental methods and the nearest disposal provider.
For maintenance questions, ask local distributors or suppliers for the nearest maintenance centre and the appropriate maintenance or cleaning service.
Statement of limited warranty
Instructions from the manual
Obtain warranty service under the stated conditions10 steps
The statement applies to options originally bought for personal use, rather than resale, from an authorized reseller.
Keep the original receipt; the manufacturer warranty for parts and labour requires proof of purchase.
For service, contact the authorized dealer or distributor, consult the manufacturer service website, or request help by email.
For a transfer to another user, provide the proof of purchase and statement; service applies for the remaining warranty period.
Before warranty service, remove programs, data and removable storage media.
A returned product lacking guides and software is replaced without them.
The stated carry-in exchange exclusions include accident, disaster, vandalism, misuse, abuse, unsuitable surroundings, program changes, another machine and modifications outside the vendor.
An optional feature is covered only in a machine for which it was designed.
For warranty questions, contact the approved retailer or manufacturer.
The remaining legal limitations and jurisdiction exceptions are in the complete official statement; the guide states no fixed warranty duration here.
Fcc radio frequency statement
Instructions from the manual
Respond to harmful radio or television interference7 steps
If switching the equipment off and on identifies it as causing radio or television interference, try one or more of the guide’s measures.
Reorient or move the receiving antenna, or increase the distance between equipment and receiver.
The statement also suggests using a different electrical circuit for the equipment and receiver.
It requires supplied shielded interconnect and power cables where supplied; the scanner’s specification itself lists USB power.
If interference persists, consult the dealer or an experienced radio/TV technician.
Unapproved modifications can void permission to operate the equipment.
The FCC conditions require that it not cause harmful interference and that it accept received interference, including interference that causes undesired operation.
Controls and parts
See the manual diagrams 2 diagrams
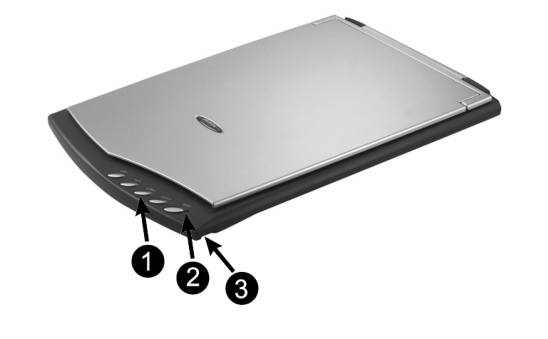
Scanner buttons, power indicator and USB connector as shown in the official OpticSlim overview.
Diagram key
1: Scanner buttons perform the predefined scanning tasks.
2: Power LED indicates scanner status: On means powered and ready to scan; Off means the scanner is off.
3: USB port connects to a computer USB port using the supplied USB cable.
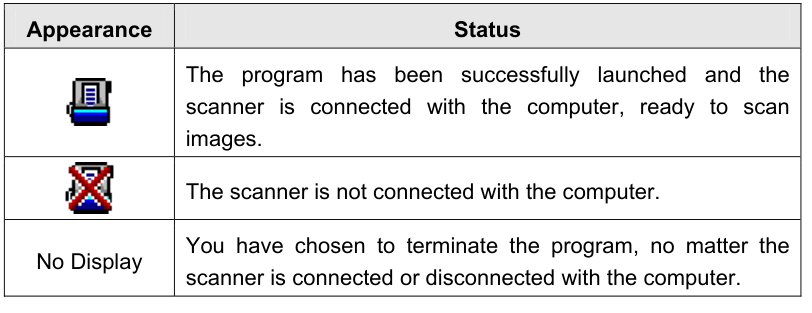
DocAction Windows system-tray states. The entire printed appearance/status key is included.
Model details
Model and compatibility
Connection and power
USB 2.0 connection; USB power rated 5 V / 0.5 A.
Scan area
Maximum scanning area: 216 × 297 mm (8.5 × 11.69 inches).
Optical resolution
1200 dpi optical resolution.
Scanner buttons
Copy, OCR, E-Mail, Custom and PDF.
Power LED
On means powered and ready to scan; Off means the scanner is off.
DocAction connection states
The scanner icon means DocAction is running and connected, the crossed icon means disconnected, and No Display means the program was terminated whether connected or not.
Software procedure scope
The user guide’s screen examples are from Windows 7; Windows 8 and 10 screens may differ but function the same.
Guide software scope
The operation guide assumes Microsoft Windows for its software instructions.