The checks and guides below come from the official manuals for this model.
No matches for this wording. Try a light name, error code or a shorter phrase.
Errors and spoken alerts
Spoken error numbers documented in the manual
Find the indicator lights
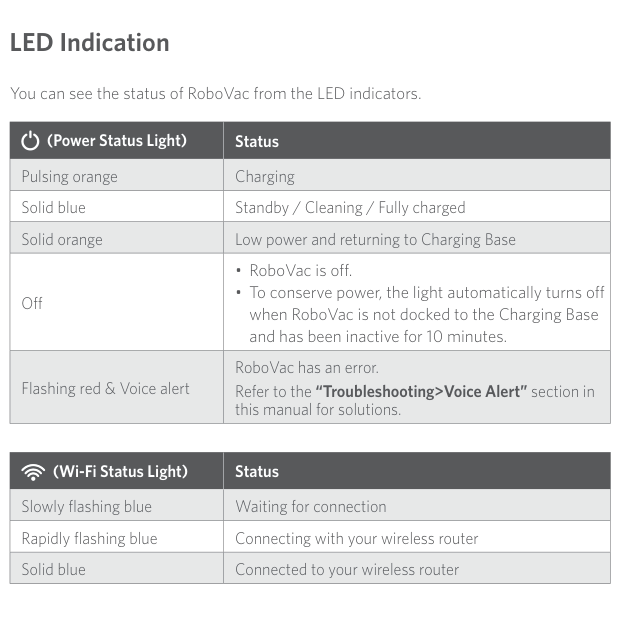
Complete power and Wi-Fi indicator tables, including both actual printed glyphs. US RoboVac G20 (T2257), non-Hybrid.
Message or indicatorWhat it meansCheck or action
Error 1front Bumper Stuck
Before cleaning or maintenance, turn the robot off and unplug its adapter.
The front bumper is stuck.
Tap it repeatedly to clear dust.
If that does not help, move the robot to another position and try again.
Error 2wheel Stuck
Before cleaning or maintenance, turn the robot off and unplug its adapter.
The wheel may be stuck or trapped.
Remove nearby obstacles and check for dust trapped in the wheel.
Move the robot to another position and try again.
Error 3side Brush Stuck
Before cleaning or maintenance, turn the robot off and unplug its adapter. The side brush may be stuck. Clean it and try again.
Error 4rolling brush stuck. Remove and clean the rolling brush
Before cleaning or maintenance, turn the robot off and unplug its adapter.
Remove the rolling brush, roller joint, roller brush cover and suction inlet for cleaning.
Refit the cleaned items and try again.
Error 5device Stuck or Trapped
The robot is trapped. Clear nearby obstacles and try again.
Error 6device Stuck or Trapped
The robot may be suspended in the air. Move it to a new position near its original position and try again. If it still cannot start, clean the edge sensor and try again.
Error 7wheel Stuck Hanging
The wheels may be suspended in the air. Move the robot onto a flat surface at a new position near the original position and try again.
Error 8low Battery, Shutting Down
The battery is low and the system will shut down. Charge the robot and try again.
Error 9magnetic Boundary Strip detected. Move device to a different area
The robot is too near a strong magnetic field or boundary strip. Move it to another area and try again.
Error S1battery Error
3 checks
Battery connection
Before cleaning or maintenance, turn the robot off and unplug its adapter. Open the battery compartment, check whether the battery is connected, and restart the robot.
Battery temperature
The battery temperature may be too high or low. Wait until it returns to the normal operating range, 0–40°C (32–104°F), before use.
Problem persists
If the problem remains, contact customer support.
Error S2wheel Module Error
2 checks
Wheel obstruction or dust
Before cleaning or maintenance, turn the robot off and unplug its adapter. Check whether the wheels are stuck or contain trapped dust before restarting.
Problem persists
Contact customer support if the problem remains.
Error S3side Brush Error
2 checks
Side-brush obstruction
Before cleaning or maintenance, turn the robot off and unplug its adapter. Check whether an object has trapped the side brush before restarting.
Problem persists
Contact customer support if the problem remains.
Error S4suction Fan Error
3 checks
Fan-blade obstruction
Before cleaning or maintenance, turn the robot off and unplug its adapter. Check whether an object has trapped the fan blades before restarting.
Dust bin and filter
Before cleaning or maintenance, turn the robot off and unplug its adapter. Clean the dust bin and filter before restarting.
Problem persists
Contact customer support if the problem remains.
Error S5rolling Brush Error. Refer to Owner's Manual or App for help
2 checks
Rolling-brush assembly and suction inlet
Before cleaning or maintenance, turn the robot off and unplug its adapter.
Remove and clean the roller brush, roller brush connection, roller brush cover and suction inlet before restarting.
Problem persists
Contact customer support if the problem remains.
Troubleshooting
Find the problem you are experiencing
RoboVac cannot be activated.3 checks
Main switch
Confirm that the main power switch is ON.
Battery charge
Ensure that the battery is fully charged.
Problem persists
If it still will not start, switch the main power off and back on.
RoboVac stops working suddenly.4 checks
Trapped robot
Check whether an obstacle has trapped the robot.
Low battery
Check whether the battery level is too low.
Problem persists
If the problem persists, turn the main switch off, wait 2 seconds, then turn it on.
Voice or LED alert
Check for voice prompts or LED alerts and consult Voice Alert.
You cannot schedule cleanings.4 checks
Main switch
Check that the bottom main power switch is on.
Scheduled time and time zone
Check the scheduled time and make the app time zone match the mobile device.
Low battery
Check that the robot has enough power to start cleaning.
Lost or unsynchronized schedule
Powering off or restoring factory defaults erases schedules. When powered on without Internet access, schedules will not synchronize; reset them in the app.
Suction power is weak.3 checks
Blocked suction inlet
Check the suction inlet for obstructions.
Dust collector
Empty the dust collector.
Wet filter
Check whether floor water or another liquid has wet the filter. Air-dry it fully before use.
RoboVac cannot be charged.3 checks
Charging-base indicator
Check that the base indicator lights. If not, reconnect its adapter and try another outlet. If the problem persists, ask the eufy service center to repair or replace the base.
Dirty charging contacts
Dust the charging contacts with a dry cloth.
Docking beep
Listen for a beep when docking. If there is no beep, ask the eufy service center to repair or replace the base.
RoboVac cannot return to the Charging Base.3 checks
Obstructions near the base
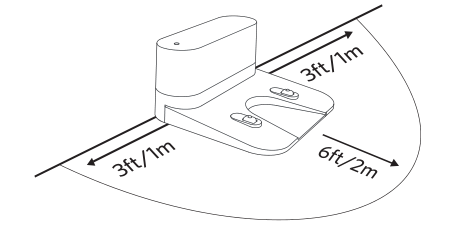
Clear objects within 3 ft/1 m on each side and 6 ft/2 m in front of the base.
Trapped robot
Check whether objects have trapped the robot.
Charging contacts
Clean the charging contacts.
RoboVac’s movements or travel path are abnormal.2 checks
Sensors
Carefully clean the sensors with a dry cloth.
Restart
Restart by switching the main power off and on.
RoboVac's cleaning time becomes shorter4 checks
Charge before cleaning
Fully charge before cleaning; the LED is solid blue when fully charged.
Suction mode and surface
Cleaning duration depends on suction mode and surface.
Floors: approximately 100/80/70/40 minutes in Quiet/Standard/Turbo/Max; rugs: approximately 80/60/55/30 minutes in those same modes.
Voice or LED alert
Check voice prompts and LED alerts; consult Voice Alert.
Duration much shorter
Contact eufy customer service if cleaning time is much shorter than the listed times.
RoboVac cannot connect to a Wi-Fi network.3 checks
Password
Check that the Wi-Fi password is correct.
Signal strength
Keep the robot, router and phone close enough for a strong signal.
Router compatibility
Use a router supporting 2.4 GHz and 802.11b/g/n; 5 GHz is unsupported.
You cannot control RoboVac with Amazon Alexa.4 checks
Internet
Check for Internet connection problems.
Alexa app and skill
Check that the Amazon Alexa app is installed and its EufyHome - RoboVac skill is enabled. Consult Smart Integrations in the EufyHome app.
Account and robot connection
Confirm that you have an EufyHome account connected to the robot.
Voice commands
Use the correct Alexa voice commands.
You cannot control RoboVac with the Google Assistant.4 checks
Internet
Check for Internet connection problems.
Google Home app and action
Check that Google Home is installed and its EufyHome action is initiated. Consult Smart Integrations in EufyHome.
Voice commands
Use the correct commands, beginning with Ok Google.
Unclear request
Repeat your request and speak clearly.
Guides
Important safety instructions
Instructions from the manual
Use and supervise the robot safely15 steps
Children aged 8 or older and people with reduced capabilities or limited experience may use it only with safe-use instruction or supervision and understanding of hazards.
Supervise children; they must not play with it or clean or maintain it without adult supervision.
Use indoors at room temperature.
Do not sit or stand on it; supervise small children and pets during operation.
Do not place anything on it, and take care not to step on the moving robot.
Do not collect burning or smoking materials, bleach, paint, chemicals or wet spills.
Do not operate around exposed floor outlets.
Remove loose clothing and paper, lift blind and curtain cords, and move power cords, sharp and fragile objects aside.
A dragged cord can pull objects from furniture.
Block balcony access with a physical barrier.
Use only hard floors or low-pile carpet; avoid unfinished, unsealed, waxed or rough floors, tasseled carpet and loose threads.
Test a small area for scratches before cleaning the whole room.
Use only recommended or documented attachments.
Do not handle the appliance or plug with wet hands.
Ensure the dust bag and/or filters are correctly fitted before use.
Observe electrical and battery precautions9 steps
Use only the supplied power unit and detachable adapter; the US/Canada adapter is GSCU0600S019V12E.
Unplug before cleaning or maintaining; disconnect from the mains before battery removal.
Only a skilled professional may replace the battery.
Do not expose the internal electronics, battery or charging base; there are no user-serviceable parts inside.
If the external flexible power cord is damaged, dispose of the power unit: its cord cannot be replaced.
Do not use a damaged or modified battery or appliance.
Do not expose them to fire or excessive heat: above 130°C creates an explosion risk.
Do not modify or repair the appliance or battery except as directed in the use and care instructions.
Follow all charging instructions and stay within their stated temperature range; improper charging risks damage and fire.
Dispose of the battery and appliance6 steps
Before disposal, disconnect the appliance from the mains.
Unscrew the bottom screws, remove the back cover, and disconnect the quick connector to remove the battery.
Seal the used battery in a plastic bag and dispose of it safely under local environmental rules.
Use separate electrical-waste collection, not unsorted municipal waste.
Ask the local authority about collection systems.
Landfill disposal can contaminate groundwater and the food chain; the manual states retailers must take back an old appliance without charge when supplying a replacement.
Fcc statement
Instructions from the manual
Reduce radio or television interference3 steps
If turning the equipment off and on confirms radio or TV interference, try reorienting or relocating the receiving antenna, increasing separation, or using an outlet on a different circuit.
Ask the dealer or an experienced radio/TV technician for help.
Unapproved changes can void the authority to operate the equipment.
Rf exposure compliance statement
Instructions from the manual
Observe RF exposure separationView
Install and operate with at least 20 cm between the radiator and your body.
What's in the box
Instructions from the manual
Identify the supplied accessoriesView
The printed US G20 box list shows the robot, charging base, power adapter, two side brushes, an additional filter, cleaning tool, five cable ties, and the owner's manual and other documents.
Robovac anatomy
Instructions from the manual
Identify controls, parts and charging contacts5 steps
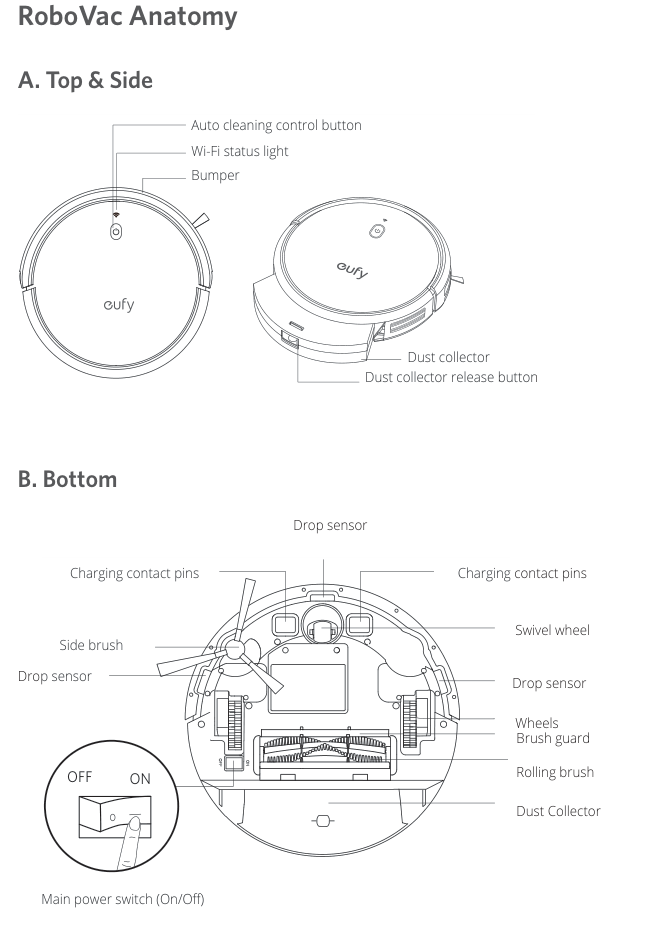
Top and side: auto-cleaning control button, Wi-Fi status light, bumper, dust collector and its release button.
Bottom: swivel wheel, three drop-sensor locations, charging contacts, side brush, wheels, brush guard, rolling brush, dust collector, and the main ON/OFF switch.
The collector contains the filter.
The suction inlet is shown at the collector and beneath the robot.
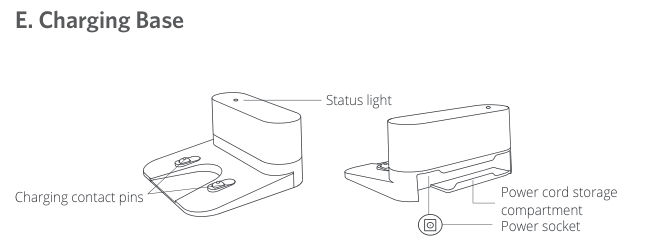
The charging base has a status light, contact pins, power socket and cord-storage compartment.
Led indication
Instructions from the manual
Read the power and Wi-Fi indicators4 steps
Pulsing orange means charging; solid blue means standby, cleaning or fully charged; solid orange means low power and returning to the base.
An unlit power indicator means off, or automatic power saving after 10 minutes inactive when not docked.
Flashing red with a voice alert means an error: follow Voice Alert.
The Wi-Fi light flashes blue slowly while waiting, rapidly while connecting, and stays blue when connected to the router.
Important tips before use
Instructions from the manual
Prepare the cleaning area8 steps
Remove power cords and small entangling objects; organize wires with the supplied cable ties.
Fold rug tassels underneath.
Avoid very dark high-pile rugs and rugs thicker than 1.02 in/26 mm.
The manual strongly recommends separately sold boundary strips before fireplaces and damaging areas such as air vents.
Keep the robot away from wet areas.
Remove objects lower than 0.67 in/17 mm if possible because the robot can climb onto them.
Drop sensors are less effective when dirty or on carpeted, reflective or very dark floors.
Put physical barriers where the robot could fall; sensors prevent falls in most cases, not all.
Preparation
Instructions from the manual
Prepare the robot and position the charging base9 steps
Remove the foam blocks beside the bumper.
Install the side brush.
Turn on the bottom main power switch.
Place the charging base on a level surface against a wall.
Clear 3 ft/1 m to either side and 6 ft/2 m in front.
If objects cannot be removed, move the robot to another position and check automatic return; contact eufy customer service if it cannot return normally.
Connect the adapter to the base and a wall outlet; the base LED becomes solid white on AC power.
Use an easily accessible location against a wall on hard, level flooring rather than carpet.
Keep the base plugged in for automatic return.
All charging-base clearance arrows. US RoboVac G20 (T2257), non-Hybrid.
Diagram key
Left clearance: Keep 3 ft/1 m clear to the left of the charging base.
Right clearance: Keep 3 ft/1 m clear to the right of the charging base.
Front clearance: Keep 6 ft/2 m clear in front of the charging base. If objects cannot be removed, move the robot and test return; ask eufy customer service if it cannot return normally.
Charge your robovac
Instructions from the manual
Charge and store the robot4 steps
Fully charge before use.
Align the robot's charging pins with the base pins to dock it.
The robot returns to the base when cleaning ends or the battery runs low.
For long non-use, turn the main switch off and recharge at least once every 6 months to preserve battery life.
Use your robovac with the eufyhome app
Instructions from the manual
Connect with the EufyHome app8 steps
The manual recommends EufyHome for all features.
Before setup, connect your phone or tablet to Wi-Fi; the manual specifies iOS 10.0 or newer, or Android 5.0 or newer.
Enable your router's 2.4 GHz wireless signal, confirm the robot's Wi-Fi light slowly flashes blue, and dock the robot for sufficient setup power.
Download EufyHome from the App Store or Google Play.
Open it and create an account.
Tap + to add RoboVac G20, then follow the app's Wi-Fi setup instructions.
After connection, the app controls cleaning mode, time, schedules, system status, notifications and additional features.
If the robot becomes stuck, use Find My Robot.
Reset the wi-fi connection
Instructions from the manual
Reset Wi-Fi and factory settings3 steps
Hold the top auto-cleaning/power button for 10 seconds until a voice prompt.
This also restores factory default settings.
The Wi-Fi indicator slowly flashes blue; follow EufyHome's Wi-Fi instructions to reconnect.
Schedule cleaning
Instructions from the manual
Schedule cleaning in the appView
Use EufyHome to set the time and customize cleaning schedules from Sunday through Saturday. Scheduling is available only in the app.
Start / stop cleaning
Instructions from the manual
Start and pause cleaning3 steps
Ensure the bottom main switch is on.
Press the top auto-cleaning/power button to start Auto cleaning; press it again to pause.
Cleaning can also be started or stopped through EufyHome.
Auto cleaning mode
Instructions from the manual
Use Auto cleaning mode4 steps
Press the top auto-cleaning/power button to start Auto cleaning.
It leaves the base, determines a bow-shaped route, and returns automatically after finishing.
If its battery becomes low during cleaning, it returns to charge and then resumes remaining work.
Auto is the default mode when turned on.
Spot cleaning mode
Instructions from the manual
Use Spot cleaning modeView
Select Spot cleaning in EufyHome. It intensively cleans a specific area in a spiral for 2 minutes, suited to concentrated dust or debris.
Select a suction power level
Instructions from the manual
Choose suction powerView
Choose Quiet, Standard (default), Turbo or Max in EufyHome. The robot remembers the selected level for the next cleaning.
Select boostiq™ feature
Instructions from the manual
Set BoostIQ4 steps
Choose BoostIQ in EufyHome.
It increases suction automatically when stronger cleaning is needed.
The manual recommends it for thicker carpets and difficult debris, but it increases noise and reduces total cleaning time.
Disable it if the extra noise disturbs you.
Use your robovac with amazon alexa / google assistant
Instructions from the manual
Configure Alexa or Google Assistant5 steps
Dock the robot for sufficient power and connect it to EufyHome.
Have a separately sold Alexa-enabled or Google Assistant device, the matching Alexa or Google Home app, and an account.
Open EufyHome and find Smart Integrations at top left.
Follow the displayed setup instructions.
The manual lists English, German, French and Spanish as supported languages and directs users to check the manufacturer's support page for additions.
Recommended cleaning / replacement frequency
Instructions from the manual
Follow the maintenance schedule6 steps
Before cleaning or maintenance, switch the robot off and unplug its adapter.
Frequencies depend on usage.
Empty/clean the dust collector after each use.
Clean the filter weekly, or twice weekly with a pet; replace it every 6 months or after 50 cleaning rounds.
Clean the side brush and brush guard monthly; replace each every 3–6 months or when visibly worn.
Clean sensors, charging pins and swivel wheel monthly.
Clean the dust collector and filter
Instructions from the manual
Clean the dust collector and filter9 steps
Switch off and unplug the adapter before maintenance.
Press the collector release button and pull it out.
Open and empty it, then remove the filter.
Brush the collector and filter with the cleaning brush.
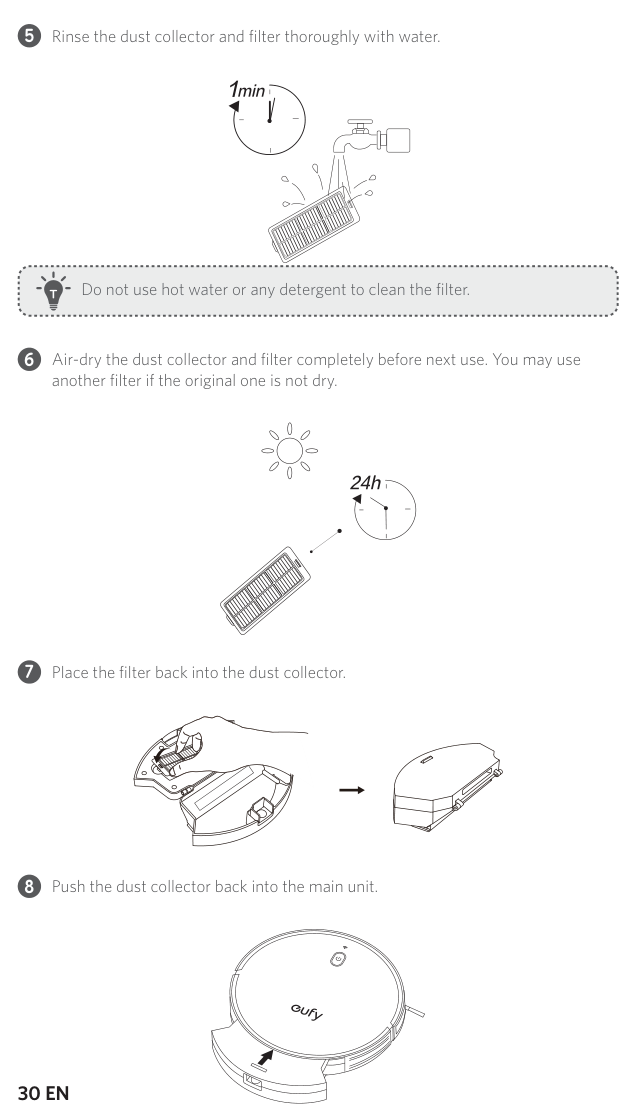
Rinse both thoroughly with water; the printed rinse figure shows 1 minute.
Never use hot water or detergent on the filter.
Air-dry both fully before reuse; the drying figure shows 24 hours.
Use another filter if the original is still wet.
Refit the filter in the collector, then push the collector into the robot.
Dust-collector/filter steps 5–8: rinse, fully dry, refit and reinstall; follow the complete instructions above. US RoboVac G20 (T2257), non-Hybrid.
Diagram key
5: Rinse the dust collector and filter thoroughly with water; the clock depicts 1 minute. Do not use hot water or detergent on the filter.
1min clock: Rinse for the 1 minute shown in the source figure; the faucet and water drops show water rinsing.
Warning bulb: Do not use hot water or detergent to clean the filter.
6: Air-dry the collector and filter completely before reuse. Use another filter if the original is not dry.
Sun symbol: Air-dry completely, as directed by step 6.
24h clock: The printed drying clock shows 24 hours before refitting.
7: Place the filter back in the collector; the arrow continues to the collector with the filter installed.
8: Push the collector into the robot in the printed arrow direction.
Clean the rolling brush
Instructions from the manual
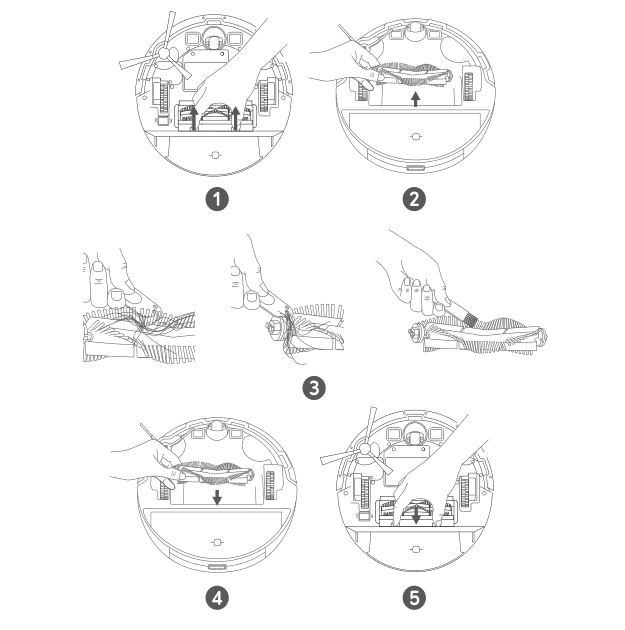
Clean the rolling brush5 steps
Switch off and unplug the adapter before maintenance.
Pull the release tabs to unlock the brush guard.
Lift out the rolling brush.
Clean it with the cleaning tool.
Insert the fixed protruding end first, click the brush into place, and press down to snap the guard into place.
Complete five-step rolling-brush sequence with every removal and refitting arrow. US RoboVac G20 (T2257), non-Hybrid.
Diagram key
1: With the robot off and adapter unplugged, pull the release tabs to unlock the brush guard; both release positions and lifting direction are retained.
2: Lift out the rolling brush in the upward-arrow direction.
3: Use the cleaning tool on the brush; all three repeated cleaning subpanels are retained.
4: Insert the fixed protruding end first, then click the brush into place in the downward-arrow direction.
5: Press the guard down to snap it into place; both press arrows are retained.
Clean the side brush
Instructions from the manual
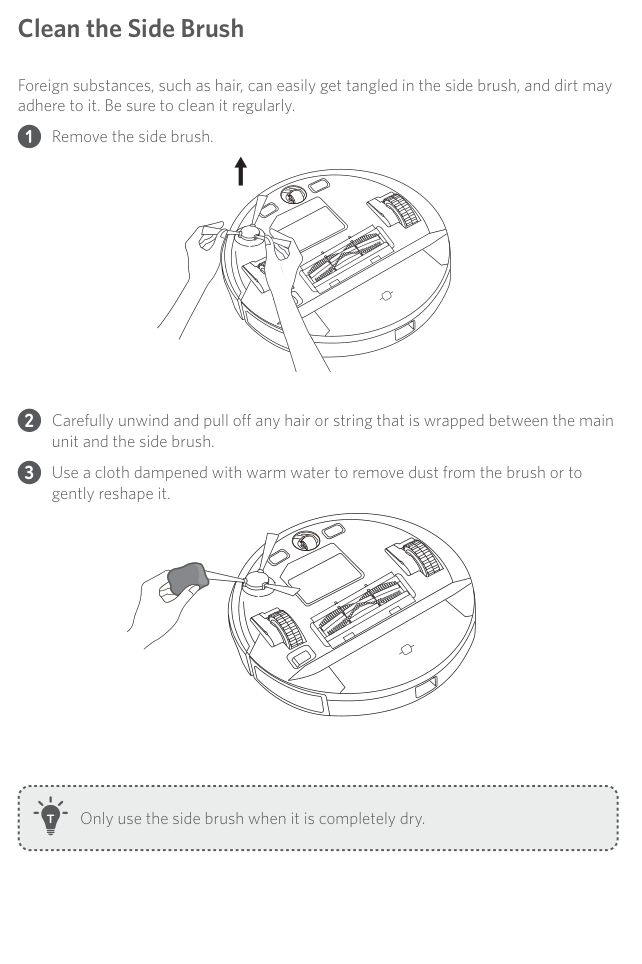
Clean the side brush5 steps
Switch off and unplug before maintenance.
Remove the side brush.
Carefully unwind and pull away hair or string between it and the robot.
Use a cloth dampened with warm water to remove dust or gently reshape it.
Reuse only when completely dry.
Complete side-brush cleaning sequence and dry-before-use warning. US RoboVac G20 (T2257), non-Hybrid.
Replace the side brush
Instructions from the manual
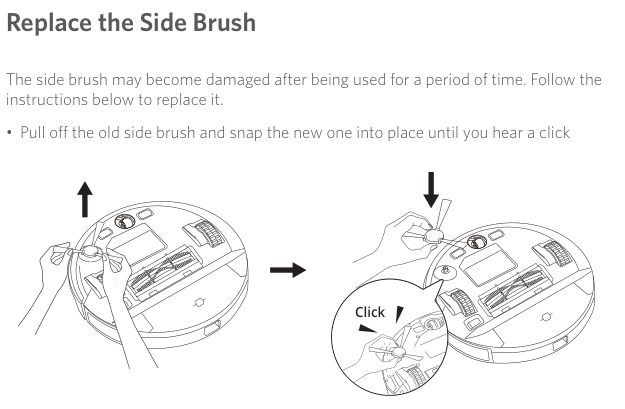
Replace the side brushView
Switch off and unplug before maintenance. Pull off the old side brush; snap on the new one until it clicks.
Complete side-brush replacement arrows and enlarged click inset. US RoboVac G20 (T2257), non-Hybrid.
Diagram key
Upward arrow: Switch off and unplug before maintenance. Pull off the old side brush.
Rightward sequence arrow: Proceed from old-brush removal to fitting the new brush.
Downward arrow: Snap the new side brush onto the same attachment point.
Click inset: Push until the new brush clicks into place; the complete enlarged attachment inset and arrow are retained.
Clean the sensors and charging pins
Instructions from the manual
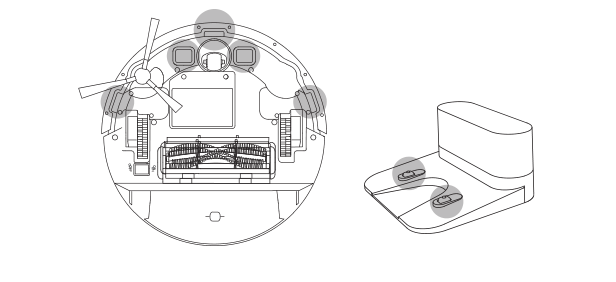
Clean sensors and charging pinsView
Switch off and unplug before maintenance. Regularly dust the drop sensors and charging contacts with a cloth or cleaning brush.
All drop-sensor and robot/base charging-contact highlights. US RoboVac G20 (T2257), non-Hybrid.
Diagram key
Three drop-sensor highlights: Front, left and right drop-sensor locations, matching all three labelled leaders on PDF10. Switch off and unplug; dust with a cloth or cleaning brush.
Two robot charging-contact highlights: Both robot charging-contact locations are included; dust them with a cloth or cleaning brush.
Two base charging-contact highlights: Both charging-base contacts are included; dust them with a cloth or cleaning brush.
Clean the swivel wheel
Instructions from the manual
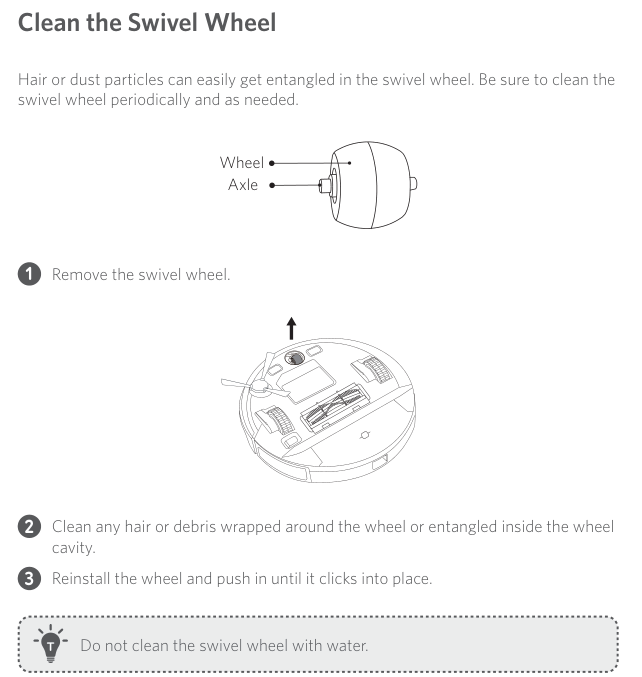
Clean the swivel wheel5 steps
Switch off and unplug before maintenance.
Remove the swivel wheel.
Clear hair or debris around the wheel and inside its cavity.
Reinstall the wheel and push it in until it clicks.
Never clean this wheel with water.
Complete swivel-wheel and axle key, removal arrow and three steps with no-water warning. US RoboVac G20 (T2257), non-Hybrid.
Voice alert
Instructions from the manual
Interpret voice alerts and seek further help4 steps
A flashing red indicator and a voice prompt signal a problem.
Match the heard prompt to the Voice Alert cause and solution.
Prompt wording can change slightly after voice-pack updates; the table's wording is for reference.
If general troubleshooting does not solve the problem, use the manufacturer's support website, EufyHome app or customer support.
Using your robovac
Instructions from the manual
Complete first-use setup8 steps
Remove the sticker beside the power switch and foam blocks at the bumper before use.
Install the side brush and turn the bottom main switch ON.
Place the base level against a wall with the illustrated clearances: 3 ft/1 m at each side and 6 ft/2 m in front.
If objects cannot be cleared, check unassisted return and contact customer service if it fails.
Plug in the base; its light is solid white on AC power.
Keep it plugged in for automatic return.
Fully charge before use: the robot indicator pulses orange while charging and is solid blue when fully charged.
Download EufyHome and follow its Wi-Fi setup instructions; consult the owner’s manual for details.
Important tips
Instructions from the manual
Observe the first cleaning and avoid hazards8 steps
During first use, follow the robot to observe and resolve problems.
Clear cords and small objects; use cable ties.
Fold rug tassels underneath and avoid very dark high-pile rugs or rugs thicker than 1.02 in/26 mm.
Use separately sold boundary strips before fireplaces or damaging areas such as vents.
Avoid wet areas.
Remove objects less than 0.67 in/17 mm high if possible.
Dirty sensors and carpeted, reflective or very dark floors reduce anti-drop effectiveness.
Place physical barriers wherever the robot could fall.
Controls and parts
See the manual diagrams 2 diagrams
Top, side and bottom controls, all three drop sensors, charging pins and ON/OFF inset. US RoboVac G20 (T2257), non-Hybrid.Charging-base light, both charging contacts, power socket and cord-storage compartment. US RoboVac G20 (T2257), non-Hybrid.
Model details
Model and compatibility
Model and manual scope
RoboVac G20 (T2257), US non-Hybrid model; English US manual V01 and matching T2257 quick-start guide. Other regional and Hybrid versions excluded.
Battery and charging
14.4 V lithium-ion, 2600 mAh; charging takes 300–360 minutes.
Dust collector
600 ml.
Power
55 W robot; charging base input/output 19 V DC, 0.6 A. Adapter input 100–240 V AC, 0.5 A maximum, 50/60 Hz; output 19 V DC, 0.6 A.