MODEL REFERENCE
Brother PT-80
6 errors · 9 troubleshooting topics · 30 guides
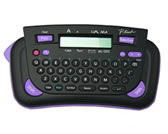
The checks and guides below come from the official manuals for this model.
No matches for this wording. Try a light name, error code or a shorter phrase.
Errors and messages
Messages and indicator states from the manual Batterybatteries are weak
Replace all four batteries together with new AAA LR03 alkaline batteries. Switch off before replacement.
Invalidinvalid label-length number
Check the Label Length setting. The supported choices are Auto or 30–300 mm. The error table gives no separate remedy.
No Textno text entered2 checks
Line Lmttwo-line limit exceeded
Keep the label to at most two printable lines. The message appears when Enter is pressed to start a third line.
Full80-character limit reached
The maximum is 80 characters. Backspace deletes a character; holding it deletes a whole line.
Text Lmttext exceeds selected length2 checks
Troubleshooting
Find the problem you are experiencingDisplay stays blank2 checks
- Batteries may be incorrectly inserted
- Check the battery orientation.
- Batteries are weak
- Switch off and replace all four together with new AAA LR03 alkaline batteries.
Incorrect display languageView
Switch off. Hold Shift and R, press Power to switch on, then release Shift and R. Text and formats are erased, and language and clock settings are cleared.
Labels do not print or characters are malformed3 checks
- Cassette may be incorrectly inserted
- Switch off and check cassette insertion.
- Cassette is empty
- Switch off and replace it with a Brother M cassette.
- Back cover may not be closed
- Close the back cover properly.
Settings have been lost2 checks
- Batteries may be weak
- Switch off and replace all four together with new AAA LR03 alkaline batteries.
- Power disconnected for more than two minutes
- Text, formats, language and clock settings are cleared after this interval.
Blank horizontal line crosses the labelView
Switch off before removing the tape cassette. Gently wipe the print head up and down with a dry cotton swab. Do not touch the print head mechanism.
Label maker is locked upView
Switch off. Hold Shift and R, press Power to switch on, then release Shift and R. Text and formats are erased, and language and clock settings are cleared.
Power turns off when printingView
Replace weak batteries. Switch off before replacement and replace all four together with new AAA LR03 alkaline batteries.
Tape does not feed or gets stuck2 checks
- Tape end may be outside guides
- Check that the tape end feeds under the tape guides.
- Cutter lever used during printing
- Do not touch the cutter lever during printing.
Clear text and formatting for a new label3 steps
- Press Backspace while holding Shift to clear text and formats.
- Alternatively press Function then O (shortcut 9), confirm AllClear with Enter and confirm Clear? with Enter.
- Clock and language settings are retained.
Guides
Power supply & tape cassettes
Instructions from the manualInstall batteries and tape10 steps
- Switch off before replacing batteries or tape.
- Press the rough area at the top of the machine to remove the back cover.
- Pull an installed cassette straight up and remove installed batteries.
- Insert four new AAA LR03 alkaline batteries with the poles in the marked directions.
- Replace all four together with brand-new batteries.
- Insert a Brother M tape cassette until it snaps into place.
- Check that the tape end feeds under the tape guides.
- Insert the cover’s two bottom hooks into the machine slots and push the cover down firmly until it snaps into place.
- Feed once with Shift+Print, then push in the tape cutter lever to cut.
- Do not cut while Print or Feed is displayed.
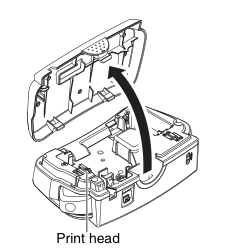
Diagram key
- Opening arrow: Press the rough top area to remove the back cover; switch off before replacing batteries or tape.
- Print head: The leader identifies the print head. Do not touch its mechanism; use a soft wipe for cleaning.
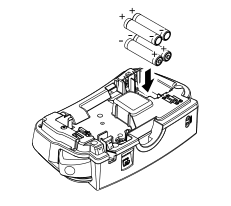
Diagram key
- Insertion arrow: Insert four new AAA LR03 alkaline batteries into the compartment.
- Four battery positions: Replace all four batteries together using brand-new cells.
- Positive marks: Align each of the four positive poles with the marked positive direction.
- Negative marks: Align each of the four negative poles with the marked negative direction.
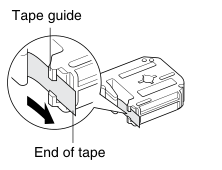
Diagram key
- Tape guide: Ensure the tape end feeds beneath the tape guides.
- End of tape: The leader identifies the tape end that must pass beneath the guides.
- Tape-path arrow: The enlarged detail depicts the tape path under the guide.
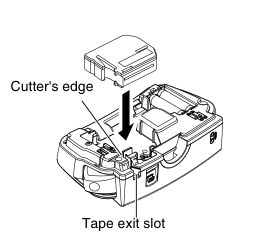
Diagram key
- Cassette insertion arrow: Insert the Brother M cassette until it snaps into place.
- Cutter’s edge: Do not touch the cutter’s edge, to avoid injury.
- Tape exit slot: The leader identifies the slot through which tape exits.
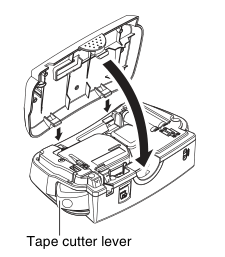
Diagram key
- Closing arrow: Insert the two bottom cover hooks into the slots, then push down firmly until the cover snaps into place.
- Two hooks and slots: Both bottom hooks must engage the machine slots before the cover is pushed down.
- Tape cutter lever: After installing the cassette, feed once and then push the lever to cut. Do not cut while Print or Feed is displayed.
Connect the AD-24ES adapter2 steps
- Insert the adapter cord plug into the machine’s adapter jack, then insert the mains plug into the nearest standard electrical outlet.
- Use AAA LR03 alkaline batteries for memory backup when the adapter is unplugged.
Keyboard & lcd
Instructions from the manualUse the keyboard and display2 steps
- The LCD shows one row of 12 characters; entered text may contain up to 80 characters and scrolls across the display.
- Hold Shift with a cursor key to move to the beginning or end of text.
Initial setting
Instructions from the manualSet language, date and time6 steps
- Install four AAA batteries and press Power.
- Choose a language with the cursor keys and press Enter.
- Available languages depend on the country of purchase.
- Set the clock in DD/MM/YY order, entering day, month and two-digit year and confirming each with Enter.
- Set hour and minute in hh:mm order, confirming each with Enter.
- The right cursor key can also confirm a setting and move to the next one.
Reset and cancel operations5 steps
- Switch off.
- Hold Shift and R, press Power to switch on, then release Shift and R to restore factory settings.
- Text, formats, language and clock settings are cleared.
- Press Backspace to cancel an operation.
- The machine automatically turns off after five minutes without a keypress.
Making text
Instructions from the manualSwitch upper and lower caseView
Press Caps to switch between upper case (Caps on) and lower case (Caps off).
Enter numbersView
Press Num Lock to switch between number entry (Num on) and letter entry (Num off).
Enter symbols3 steps
- Press Symbol, choose a symbol with the cursor keys and press Enter.
- Press Symbol to go to the next group; press Backspace to cancel.
- The printed inventory contains eleven groups; the guide gives no individual symbol meanings.
Enter accented characters3 steps
- Enter a base letter, press Accent, select the accented character with Accent or the cursor keys, and press Enter.
- Press Backspace to cancel.
- Character order depends on the selected LCD language.
Make two-line textView
Move the cursor to where the second line will start and press Enter. At most two printable lines are supported.
Designing labels
Instructions from the manualSet character sizeView
Press Function, select Size with the cursor keys and press Enter. Choose Large or Small and press Enter.
Set character widthView
Press Function, select Width with the cursor keys and press Enter. Choose Normal, ×2 or ×1/2 and press Enter.
Set print styleView
Press Function, select Style with the cursor keys and press Enter. Choose Normal, Bold, Outline, Shadow, Italic, I+Bold, I+Outl, I+Shadow or Vertical and press Enter.
Set underline or frameView
Press Function, select Undl/Frm with the cursor keys and press Enter. Choose Off, Undl (underline), Round, Candy, Callout, Banner or Wooden and press Enter.
Set label lengthView
Press Function, select Length with the cursor keys and press Enter. Select Auto or 30–300 mm using the cursor keys or Number keys and press Enter. Press Space to return to Auto.
Use Auto Format2 steps
- Press Function, select A/F with the cursor keys and press Enter.
- Choose a format and press Enter: VCR VHS cassette spine 140 mm; MiniDV cassette spine 42 mm; Audio cassette case spine 89 mm; File Tab 82 mm; Divider tab 42 mm.
Delete charactersView
Press Backspace to delete a character backwards; hold Backspace to delete a whole line.
Clear all text and settings3 steps
- Hold Shift and press Backspace to clear text and formats.
- Alternatively press Function, select AllClear and confirm with Enter, then confirm Clear? with Enter.
- Clock and language settings are unaffected.
Printing labels
Instructions from the manualPreview text3 steps
- Press Preview.
- The LCD shows the whole text and label length in inch/mm, then returns to the original text.
- Preview shows only text, not font, style, size, underline/frame or additional features.
Feed tapeView
Hold Shift and press Print to feed 25 mm of tape. Feed after installing a new tape cassette.
Print and cut a labelView
Press Print. After printing, push in the tape cutter lever at the upper-left corner to cut the label. Do not cut while Print or Feed is displayed.
Print multiple copiesView
Press Function, select Copies with the cursor keys and press Enter. Select 1–9 copies with the cursor keys or Number keys and press Enter.
Completed labels
Instructions from the manualRemove the label backing4 steps
- Insert the label into the built-in peeler as far as possible with its printed surface facing down.
- Fold the label back to the right and quickly pull it out.
- The end of the backing separates from the label.
- Peel the printed label from the backing and apply it.
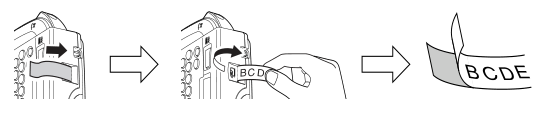
Diagram key
- Insertion arrow: Insert the label as far as possible into the built-in peeler with its printed surface facing down.
- First sequence arrow: Next fold the label back to the right and quickly pull it out.
- Fold-and-pull arrow: The centre drawing depicts folding right and pulling out the label.
- Second sequence arrow: The end of the backing is separated from the label.
- Separated backing: Peel the printed label from its backing and apply the label.
Useful functions
Instructions from the manualInsert and format the date and time4 steps
- Place the cursor where you want the date/time and press Time/Date.
- To set its format, press Function, select TimeDate and press Enter; choose Format and press Enter, choose a format and press Enter.
- Eight formats are available: D/M/Y, D/M/Y hm, D.M.Y, D.M.Y hm, Y-M-D, Y-M-D hm, M/D/Y and M/D/Y hm.
- Printed time and date follow the clock setting.
Change the clock setting4 steps
- Press Function, select TimeDate and press Enter; choose Clock and press Enter.
- Enter day, month and two-digit year, confirming each with Enter.
- Enter hour and minute, confirming each with Enter.
- The right cursor key can confirm a setting and advance.
Use function shortcutsView
Press Function and a shortcut key, then confirm with Enter: Q (1) Size; W (2) Width; E (3) Style; R (4) Underline/Frame; T (5) Label Length; Y (6) Auto Format; U (7) Copies; I (8) Time & Date; O (9) All Clear.
General precautions
Instructions from the manualClean the case and print head3 steps
- Use only a soft, dry cloth on the machine; do not use alcohol or other organic solvents.
- Do not touch the print head mechanism.
- If dust causes a blank horizontal line, switch off, remove the tape cassette and gently wipe the head up and down with a dry cotton swab.
Handle tape and the cutter safely3 steps
- Use only Brother M tape with the M mark.
- Do not touch the cutter’s edge.
- Do not pull tape while it feeds, cut during printing or feeding, or print with an empty cassette; these actions may damage the tape, cassette, label maker or print head.
Store and handle the label maker4 steps
- Do not press the LCD, put foreign or heavy objects on the machine, or leave rubber or vinyl on it for a long time.
- Keep it dry, away from wet hands and spills, extreme heat, high humidity, direct sunlight, rain and extreme dust.
- Do not leave it on a dashboard, in the back of a car, near heaters or hot appliances.
- Some characters or symbols may be difficult to read depending on conditions and settings.
Protect batteries and stored settings4 steps
- Switch off before replacing batteries or tape.
- Do not mix old and new batteries, alkaline and other types, or reverse polarity; batteries may leak or fracture.
- Remove batteries for extended disuse.
- More than two minutes without power clears all text, formats, language and clock settings.
Controls and parts
See the manual diagrams 1 diagram
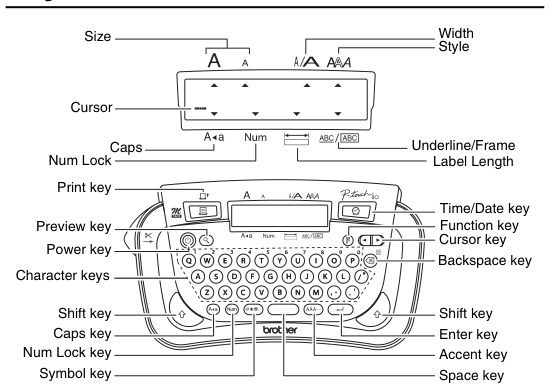
Diagram key
- Size: The display label identifies the character-size indicator.
- Width: The display label identifies the character-width indicator.
- Style: The display label identifies the print-style indicator.
- Cursor: The leader identifies the text cursor.
- Caps: The display label identifies upper-case mode.
- Num Lock: The display label identifies number-entry mode.
- Underline/Frame: The display label identifies the underline/frame setting.
- Label Length: The display label identifies the label-length setting.
- Print key: Press to print a label.
- Preview key: Press to preview text and label length; formatting is not previewed.
- Power key: Press to start the machine.
- Character keys: The labelled keys enter characters.
- Left Shift key: Hold Shift with a cursor key to move to the beginning or end of text.
- Caps key: Switch between upper and lower case.
- Num Lock key: Switch between numbers and letters.
- Symbol key: Open symbols; press again to move to the next group.
- Time/Date key: Insert the date/time at the cursor position.
- Function key: Choose functions or use the printed function shortcuts.
- Cursor key: Choose an option; with Shift, go to the beginning or end of text.
- Backspace key: Delete backwards or cancel an operation.
- Right Shift key: The second Shift key provides the Shift operation shown in the guide.
- Enter key: Confirm a selection; in text, start the second line.
- Accent key: Choose accented characters after entering the base letter.
- Space key: Space returns Label Length to Auto.
Model details
Model and compatibility
- Tape
- Brother M tape in 9 or 12 mm widths.
- Power
- Four AAA LR03 alkaline batteries or AD-24ES adapter.
- Display
- One row of 12 characters; entered text supports up to 80 characters.