The checks and guides below come from the official manuals for this model.
No matches for this wording. Try a light name, error code or a shorter phrase.
Errors and indicators
Messages and indicator states from the manual
Find the indicator lights
Exact ADS-2100e controls and indicators.
Diagram key
1: Error Indicator with LED reports errors such as document jam, open front cover, unusable/unsupported device or multifeed.
2: Power Indicator with LED blinks according to scanner status.
3: Stop button cancels a job, wakes the scanner, recovers from an error or disconnects Remote Setup.
4: Scan to PC button with LED scans to the computer or wakes the scanner.
5: Scan to USB button with LED scans to USB or wakes the scanner.
Official LED symbol key: off, on and blinking.
Message or indicatorWhat it meansCheck or action
Out of MemoryMemory full
2 checks
Memory full — clear the error
Press any scanner key, or unplug the AC cord and reconnect it.
Memory full — prevent recurrence
Reduce the number of documents, or set resolution or file size smaller.
ADS-2100e Out of Memory indicator pattern. Hollow symbols mean off, filled symbols mean on, and rays mean blinking.
Diagram key
Error indicator: Blinking.
Power indicator: On.
Scan to PC: Off.
Scan to USB: On.
Replace PadSeparation Pad used over 50,000 times
Separation Pad used over 50,000 times: Replace it with a new pad using Replace the Separation Pad. Scanning errors can result if it is not replaced.
ADS-2100e Replace Pad indicator pattern. Hollow symbols mean off, filled symbols mean on, and rays mean blinking.
Diagram key
Error indicator: On.
Power indicator: Off.
Scan to PC: On.
Scan to USB: Off.
Replace RollerPick-up Roller used over 50,000 times
Pick-up Roller used over 50,000 times: Replace it with a new roller using Replace the Pick-up Roller. Scanning errors can result if it is not replaced.
ADS-2100e Replace Roller indicator pattern. Hollow symbols mean off, filled symbols mean on, and rays mean blinking.
Diagram key
Error indicator: On.
Power indicator: Off.
Scan to PC: Off.
Scan to USB: On.
Replace PartsPad and roller both used over 50,000 times
Pad and roller both used over 50,000 times: Replace both parts with new ones using their reviewed replacement procedures.
ADS-2100e Replace Parts indicator pattern. Hollow symbols mean off, filled symbols mean on, and rays mean blinking.
Diagram key
Error indicator: On.
Power indicator: Off.
Scan to PC: On.
Scan to USB: On.
Unable to Scan XXMachine error; XX is the reported error code
Machine error; XX is the reported error code: Unplug and reconnect the AC cord, then try scanning. If the error remains, note the code and report it to a Brother dealer or customer service.
Document Jam/too LongGuides do not fit, unsuitable settings or dirty pad/roller
3 checks
Guides do not fit, unsuitable settings or dirty pad/roller
Clear the jam using Document Jam.
Adjust guides to the document width; for Auto size, put narrow sheets straight and centrally near the scanner.
Use Continuous Scanning if the document will not feed straight.
Document settings
Confirm settings using Document Jam and the supported scan-settings instructions.
Paper dust on pad or roller
Clean the pad and roller using Clean the Scanner.
ADS-2100e Document Jam/too Long indicator pattern. Hollow symbols mean off, filled symbols mean on, and rays mean blinking.
Diagram key
Error indicator: Blinking.
Power indicator: On.
Scan to PC: On.
Scan to USB: On.
MultifeedSeveral pages fed together
4 checks
Several pages fed together
Clear the multifeed using Document Jam.
Confirm the saved scans, then resume at the next page or the beginning.
For Scan to USB, data scanned before detection is not saved unless file type is JPEG.
Business card settings
Clear Multifeed Detection when scanning business cards.
Plastic card settings
Select Plastic Card Mode for plastic cards.
Carrier sheet settings
Select Carrier Sheet Mode for a carrier sheet.
ADS-2100e Multifeed indicator pattern. Hollow symbols mean off, filled symbols mean on, and rays mean blinking.
Diagram key
Error indicator: Blinking.
Power indicator: On.
Scan to PC: Off.
Scan to USB: Off.
Unusable DeviceUnusable device connected to USB
Unusable device connected to USB: Disconnect it, unplug and reconnect the scanner AC cord, then try scanning.
ADS-2100e Unusable Device indicator pattern. Hollow symbols mean off, filled symbols mean on, and rays mean blinking.
Diagram key
Error indicator: Blinking.
Power indicator: Off.
Scan to PC: Blinking.
Scan to USB: Blinking.
Unusable USB DeviceUnsupported device in direct USB port
Unsupported device in direct USB port: Remove it, for example a mouse or mobile device without USB mass-storage support.
ADS-2100e Unusable USB Device indicator pattern. Hollow symbols mean off, filled symbols mean on, and rays mean blinking.
Diagram key
Error indicator: Blinking.
Power indicator: On.
Scan to PC: On.
Scan to USB: Blinking.
USB Hub Not SupportedHub or flash drive with a hub
Hub or flash drive with a hub: Remove the unsupported hub or hub-containing drive from the direct USB port.
ADS-2100e USB Hub Not Supported indicator pattern. Hollow symbols mean off, filled symbols mean on, and rays mean blinking.
Diagram key
Error indicator: Blinking.
Power indicator: On.
Scan to PC: Blinking.
Scan to USB: Blinking.
Insufficient USB StorageUSB drive full
USB drive full: Press any key, then delete unused files/folders and try again, or use a drive with available space.
ADS-2100e Insufficient USB Storage indicator pattern. Hollow symbols mean off, filled symbols mean on, and rays mean blinking.
Diagram key
Error indicator: Blinking.
Power indicator: Off.
Scan to PC: Off.
Scan to USB: Blinking.
USB Access ErrorUSB flash drive removed during access
USB flash drive removed during access: Press any scanner key.
ADS-2100e USB Access Error indicator pattern. Hollow symbols mean off, filled symbols mean on, and rays mean blinking.
Diagram key
Error indicator: Blinking.
Power indicator: Off.
Scan to PC: On.
Scan to USB: Blinking.
USB Write-protectedInserted drive write-protected
Inserted drive write-protected: Remove it and press any key. Disable its write protection and try again, or use a drive with protection off.
ADS-2100e USB Write-protected indicator pattern. Hollow symbols mean off, filled symbols mean on, and rays mean blinking.
Diagram key
Error indicator: Blinking.
Power indicator: On.
Scan to PC: Off.
Scan to USB: Blinking.
Too Many Files on USBToo many files on the drive
Too many files on the drive: Remove it and press any key. Delete unused root-folder files and try again, or use a drive containing fewer than 999 files.
ADS-2100e Too Many Files on USB indicator pattern. Hollow symbols mean off, filled symbols mean on, and rays mean blinking.
Diagram key
Error indicator: Blinking.
Power indicator: Blinking.
Scan to PC: On.
Scan to USB: Blinking.
File Name Cannot Be UsedMaximum sequential filename reached
Maximum sequential filename reached: Press any key. Delete unused USB-drive files and try again, or change the filename using the reviewed Scan to USB or computer/device scan settings.
ADS-2100e File Name Cannot Be Used indicator pattern. Hollow symbols mean off, filled symbols mean on, and rays mean blinking.
Diagram key
Error indicator: Blinking.
Power indicator: Blinking.
Scan to PC: Off.
Scan to USB: Blinking.
Front Cover is OpenFront Cover open
Front Cover open: Close the Front Cover.
ADS-2100e Front Cover is Open indicator pattern. Hollow symbols mean off, filled symbols mean on, and rays mean blinking.
Diagram key
Error indicator: Blinking.
Power indicator: Off.
Scan to PC: On.
Scan to USB: Off.
All Blank Page SkippedAll scanned pages treated as blank
All scanned pages treated as blank: Press any key. Place the original face down, top edge first, or set Skip Blank Page Off using the reviewed ControlCenter4, ControlCenter2 or Scan to PC settings.
ADS-2100e All Blank Page Skipped indicator pattern. Hollow symbols mean off, filled symbols mean on, and rays mean blinking.
Diagram key
Error indicator: On.
Power indicator: On.
Scan to PC: Off.
Scan to USB: Off.
0xA7service call indication 0xA7
Service call cannot be cleared by the user: Unplug and reconnect the scanner AC cord and try again. If the error remains, press Scan to PC, then Scan to USB, and compare both LED responses with the reviewed LED Error Indication table. Record 0xA7 only when both patterns match; report the code to your Brother dealer or customer service.
Complete service-call table for 0xA7,0xA9 and0xE6. Press Scan to PC first, then Scan to USB; both rows are required to identify a code.
0xA9service call indication 0xA9
Service call cannot be cleared by the user: Unplug and reconnect the scanner AC cord and try again. If the error remains, press Scan to PC, then Scan to USB, and compare both LED responses with the reviewed LED Error Indication table. Record 0xA9 only when both patterns match; report the code to your Brother dealer or customer service.
Complete service-call table for 0xA7,0xA9 and0xE6. Press Scan to PC first, then Scan to USB; both rows are required to identify a code.
0xE6service call indication 0xE6
Service call cannot be cleared by the user: Unplug and reconnect the scanner AC cord and try again. If the error remains, press Scan to PC, then Scan to USB, and compare both LED responses with the reviewed LED Error Indication table. Record 0xE6 only when both patterns match; report the code to your Brother dealer or customer service.
Complete service-call table for 0xA7,0xA9 and0xE6. Press Scan to PC first, then Scan to USB; both rows are required to identify a code.
Service Call IndicationsService-call LED combination
Service-call LED combination: Unplug and reconnect the scanner AC cord and try again. If the error remains, press Scan to PC, then Scan to USB; identify the error from both patterns in the reviewed table and report the code to a Brother dealer or customer service.
Four service-call LED combinations printed by Brother. Use the reviewed restart and two-button diagnostic procedure if the error persists.
Diagram key
First combination: Error and Power blink; Scan to PC and Scan to USB blink.
Second combination: Error and Power blink; Scan to PC is on and Scan to USB is off.
Third combination: Error and Power blink; Scan to PC blinks and Scan to USB is on.
Fourth combination: Error and Power blink; Scan to PC and Scan to USB are on.
Error LED: Upper-left error indicator.
Power LED: Upper-right power indicator.
Scan to PC LED: Lower-left computer-scan key indicator.
Scan to USB LED: Lower-right USB-scan key indicator.
Cannot rotate the image.Insufficient memory
Insufficient memory: Delete unnecessary data to increase available memory.
The PDF file is in an unsupported format.Secure PDF, signed PDF or PDF/A
Secure PDF, signed PDF or PDF/A: The file cannot be opened by Brother Image Viewer. The source supplies no conversion or repair procedure.
XXX has been deleted. Press the Refresh button.Data may have been deleted in another application
Data may have been deleted in another application: Press Menu, then Refresh to show currently available documents.
Troubleshooting
Find the problem you are experiencing
TWAIN or WIA errors when starting to scan — Windows1 check
Brother driver not selected as primary source
Select Brother TWAIN or WIA as the primary source in the scanning application. In PaperPort 12SE use Desktop > Scan Settings > Select.
TWAIN errors when starting to scan — Macintosh1 check
Brother TWAIN not selected as primary source
In PageManager choose File > Select Source and select Brother TWAIN. Apple Image Capture can also scan using ICA.
OCR does not work2 checks
Resolution too low
Increase scanning resolution.
Presto! PageManager missing — Macintosh
Install Presto! PageManager using the reviewed procedure.
Vertical lines in the scanned image1 check
Dust on glass strips
Clean the glass strips using Clean the Scanner.
The scanned image is missing4 checks
Guides do not fit
Adjust guides to the document width. For Auto size, place narrow sheets straight and centrally near the scanner; use Continuous Scanning if feeding is not straight.
Auto Deskew was on
Set Auto Deskew Off.
Unsuitable document-size settings
Choose suitable settings, for example Letter or Legal size.
Card loaded horizontally
Load the card vertically.
The scanned image is skewed2 checks
Guides do not fit
Adjust guides to the width. For Auto size, place narrow sheets straight and centrally; use Continuous Scanning if feeding is not straight.
Auto Deskew off
Set Auto Deskew On.
The scan speed is too slow1 check
Unsuitable resolution
Decrease resolution; set scan size to a value other than Auto.
The document does not feed7 checks
Dust on pad or roller
Clean the Separation Pad and Pick-up Roller using Clean the Scanner.
Too many pages
Do not exceed the reviewed maximum pages for the document type.
Foreign objects or torn paper inside
Remove foreign objects and ripped paper from the feeder.
Paper too thin or thick
Use originals meeting Acceptable Documents.
Remote Setup running
Cancel Remote Setup.
Paper ejection paused
Finish ejecting the paper.
Separation Pad Cover not closed
Close the pad cover securely until its hooks fit into the Front Cover.
The document is jammed3 checks
Dust on pad or roller
Clean the Separation Pad and Pick-up Roller.
Foreign objects or torn paper
Remove them from the feeder.
Unsuitable document
Use originals meeting Acceptable Documents.
The scan quality is poor3 checks
Dust on pad or roller
Clean the Separation Pad and Pick-up Roller.
Dust on glass strips
Clean the glass strips using Clean the Scanner.
Resolution too low
Increase scanning resolution.
The machine pauses for about 3 seconds between each page1 check
Motor-save mode limits internal heating during continuous use
This is normal and scanning can continue. If internal temperature rises the scanner can enter motor-save mode; pause duration varies with scanning conditions.
Bleed through is seen in the scan data1 check
Unsuitable document settings
Select Bleed Through Prevention/Remove Background Colour.
Colours in the scanned data are dark4 checks
Document settings — background prevention
Select Bleed Through Prevention/Remove Background Colour, then rescan on the computer.
Document settings — brightness
Increase Brightness, then rescan on the computer.
Document settings — contrast
Increase Contrast, then rescan on the computer.
Document settings — scan type
Change Scan Type to Grey or Colour, then rescan on the computer.
A page that is not a blank page is skipped1 check
Document too light or Skip Blank Page enabled
Set Skip Blank Page Off.
Cannot scan a long document1 check
Long Paper not selected
Choose Long Paper, with Auto Deskew and two-sided scanning Off.
Cannot set Auto Deskew to On when trying to scan using Scan to USB1 check
Document Size not Auto
Set Document Size to Auto.
A multifeed occurs1 check
Document loaded incorrectly
Load correctly using Standard-size Documents and try again.
Cannot install software1 check
Windows software installation
Run Repair MFL-Pro Suite from the DVD to repair and reinstall.
Cannot find the Nuance serial number to install Nuance PDF Converter Professional 81 check
Windows Nuance installation
Use the serial number printed on the supplied MFL-Pro Suite DVD sleeve.
Cannot find how to start ControlCenter4 — Windows1 check
ControlCenter4 icon absent from tray
Open Brother Utilities, choose this model if necessary, then SCAN > ControlCenter4.
Cannot start ControlCenter2 — Macintosh1 check
Not logged in as administrator
Restart the computer and log in as administrator.
Cannot find how to start ControlCenter2 — Macintosh1 check
ControlCenter2 icon absent from Dock
In Finder choose Go > Applications > Brother and double-click ControlCenter2.
Cannot find how to configure settings from the Control Panel — ADS-2100e1 check
ADS-2100e configuration
Use Remote Setup with the reviewed Set Up the Brother Machine from Your Computer procedure.
Cannot save settings in Remote Setup2 checks
Machine processing
Wait until processing finishes and try again.
Machine being configured from its control panel
Stop configuring it from the control panel.
Cannot start Remote Setup6 checks
Machine off
Turn it on and try again.
Computer disconnected
Connect scanner and computer and try again.
Sleep Mode
Press any ADS-2100e key or open the Top Cover and try again.
Error occurred
Clear every error and try again.
Scanning in progress
Wait until scanning finishes and try again.
Control-panel configuration in progress
Stop configuring the machine from the control panel.
The machine is in Offline Mode1 check
Not connected to computer
Connect it to the computer and turn it on.
Guides
Set sleep mode
Instructions from the manual
Set Sleep Mode3 steps
Open ControlCenter4 from its Windows tray icon using Open, then Device Settings; on Mac open ControlCenter2 from the Dock and DEVICE SETTINGS.
Choose Remote Setup, General Setup, then the idle interval before Sleep Mode; click OK.
Wake the scanner by pressing any key, opening the Top Cover or loading a document.
Select your language
Instructions from the manual
Select Your Language4 steps
Open ControlCenter4 > Device Settings on Windows or ControlCenter2 > DEVICE SETTINGS on Mac.
Choose Remote Setup, then Language.
Select the language in Language on Remote Setup; click OK.
Close and start Remote Setup again.
Reduced noise mode
Instructions from the manual
Reduced Noise Mode3 steps
Open ControlCenter4 > Device Settings on Windows or ControlCenter2 > DEVICE SETTINGS on Mac.
Choose Remote Setup > General Setup.
Enable Reduced Noise Mode if needed and click OK; scanning speed is reduced.
Acceptable documents
Instructions from the manual
Acceptable Documents11 steps
For standard paper use length 70–355.6 mm, width 51–215.9 mm, weight 52–110 g/m² and thickness 0.08–0.12 mm.
Load at most 50 pages or 5 mm.
For thick paper use length 70–147 mm, width 51–147 mm, weight 110–200 g/m² and thickness 0.12–0.25 mm.
Load at most 25 pages or 5 mm.
Long paper is one sheet: length 355.6–863 mm, width 51–215.9 mm, weight 52–110 g/m² and thickness 0.08–0.12 mm.
Select Long Paper; no other sheet may accompany it.
A non-embossed PET plastic card is 85.6 × 54 mm, with 0.25–0.76 mm thickness.
Load one card and select Plastic Card Mode when scanning to a computer.
For carrier-sheet scanning, the sheet plus document must not exceed 0.6 mm; the document itself must not exceed 0.3 mm.
Load only one sheet and enable Carrier Sheet Mode when scanning to a computer.
Carrier sheets cannot be used for Scan to USB.
Unacceptable documents
Instructions from the manual
Unacceptable Documents3 steps
Do not directly feed carbon-backed or pencil-written paper; uneven, folded, curled, wrinkled, bent, ripped or damaged documents; envelopes, tracing paper, coated paper, photographs, perforated paper or unusual shapes.
Do not directly feed material bearing photographs, notes or stickers; carbonless paper; paper with holes, clips or staples; wet ink; fabric, metal or OHP sheets; glossy or mirror-finished material; or documents thicker than the recommended thickness.
Use the reviewed carrier-sheet instructions for the document types specifically allowed with a carrier sheet, rather than feeding those originals directly.
Carrier sheet recommendations
Instructions from the manual
Carrier Sheet Recommendations5 steps
Use a carrier sheet for carbon-backed or pencil-written paper, widths below 51 mm, lengths below 70 mm, paper thinner than 0.08 mm, uneven documents, folded or curled documents, damaged or torn documents, tracing or coated paper, photographs, perforated paper, unusual shapes, paper with photographs, notes or stickers, and carbonless paper.
Loose-leaf paper or paper with holes is also recommended for carrier-sheet use.
Handle the sharp sheet edges carefully.
Do not expose it to direct sunlight, high temperatures or humidity; do not bend, pull or place heavy objects on it.
Stop using damaged carrier sheets.
Notes for using carrier sheets
Instructions from the manual
Notes for using Carrier Sheets6 steps
Load one carrier sheet only; do not put it in upside down.
Avoid folds, scratches and damage.
Insert only one document inside a carrier sheet, not several small documents.
Do not write on the sheet.
Wipe dirt off using a dry cloth.
Do not leave documents in the sheet for an extended period: print may transfer.
Set up your scanner
Instructions from the manual
Scanner SetupView
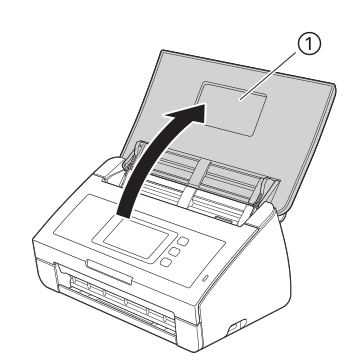
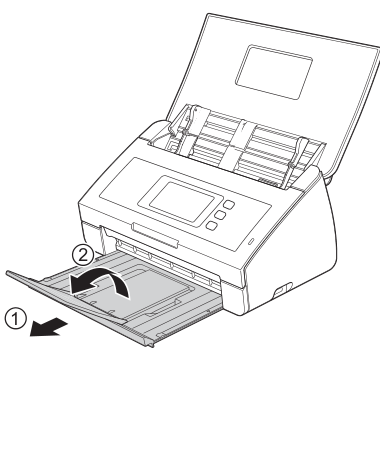
Open the Top Cover to turn the scanner on. Pull out the Output Tray and unfold the Document Stopper.
The shared manual illustrates ADS-2600We; this mechanical step applies to both listed models. Open the Top Cover to turn the scanner on.
Diagram key
1: Top Cover.
Opening arrow: Open the Top Cover before scanning.
The shared manual illustrates ADS-2600We; this mechanical step applies to both listed models. Pull out the Output Tray and unfold the Document Stopper.
Diagram key
1: Output Tray.
2: Document Stopper.
Tray arrow: Pull the Output Tray out.
Stopper arrow: Unfold the Document Stopper.
Standard-size documents
Instructions from the manual
Standard-size Documents7 steps
Ensure ink and correction fluid are completely dry.
Do not pull a document while it feeds; avoid unacceptable, curled or wrinkled originals, cardboard and fabric.
For 80 g/m² paper, load at most 50 pages.
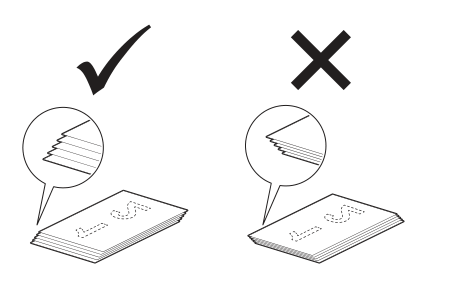
Fan the sheets in both directions, align the edges, and arrange the leading edges at a slight angle.
Set the guides to the document width.
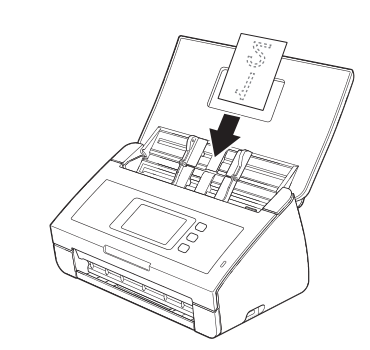
Insert the stack face down, top edge first, gently until it reaches the feed rollers.
Keep the guides against the document edges without bending the stack.
Stagger the leading edges at a slight angle in the feed direction; do not leave them aligned as a flat stack.
Diagram key
Check-mark example: Correct leading edges form a slight angle in the feed direction.
Crossed example: The un-staggered stack is not the shown correct arrangement.
Left magnified edges: Detail of correctly staggered leading edges.
Right magnified edges: Detail of the incorrect flat alignment.
Business cards and plastic cards
Instructions from the manual
Business Cards and Plastic Cards4 steps
Adjust the guides to the card width.
Insert only one card, face down, top edge first, in vertical orientation.
The scanner may scratch plastic cards.
A Plastic Card Carrier Sheet is recommended to avoid damage; use the reviewed Plastic Card Mode settings when scanning directly to a computer.
The shared manual illustrates ADS-2600We; this mechanical step applies to both listed models. Load one plastic card face down, top edge first and lengthwise.
Diagram key
Insertion arrow: Feed the card face down, top edge first and lengthwise until it touches the inside of the scanner.
Documents longer than a4 size
Instructions from the manual
Long Paper3 steps
Adjust the guides to the document width.
Insert one long sheet face down, top edge first, until it meets the feed rollers.
Support the sheet with your hand when it extends beyond the Top Cover; use the reviewed Long Paper settings.
Documents larger than a4 size
Instructions from the manual
Documents Larger than A4 Size5 steps
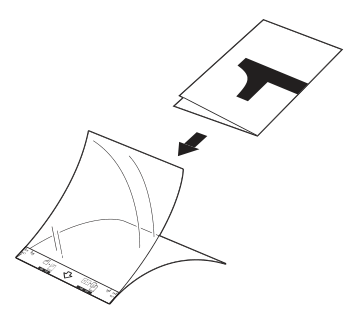
Fold the document in half and put it inside the carrier sheet.
Position it centrally with its top aligned to the sheet top.
Set the guides to the sheet width.
Insert the carrier sheet until it reaches the rollers.
For a folded document, keep the folded edge close to the RIGHT side of the carrier sheet.
Fold the original in half and centre/top-align it in the carrier sheet.
Diagram key
Document orientation mark: The original is folded in half as illustrated.
Insertion arrow: Put the folded document in the carrier sheet.
Folded document: Centre it and align its top with the carrier-sheet top; keep its fold near the right side when loading.
Carrier sheet: Supports the folded original for the reviewed two-sided scanning method.
Documents with facing pages
Instructions from the manual
Documents with Facing PagesView
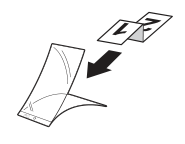
Use the reviewed Documents Larger than A4 Size procedure: fold and centre the original in the carrier sheet, align its top, and load the sheet with the folded edge near the RIGHT side.
Receipts, clippings, photos, and other documents
Instructions from the manual
Receipts, Clippings, Photos, and Other Documents4 steps
Make sure ink and correction fluid are dry.
Put the original in the middle of the carrier sheet with its top at the sheet top.
For a receipt longer than the carrier sheet, fold it in two places so the folded receipt overlaps the sheet as illustrated.
Adjust the guides to the sheet width and insert the sheet until it meets the feed rollers.
For a receipt longer than the carrier sheet, fold it in two places so the folded receipt overlaps, then insert it.
Diagram key
Folded receipt: Make two folds when the receipt is longer than the carrier sheet.
Insertion arrow: Insert the folded receipt into the carrier sheet.
Carrier sheet: Centre the document and align the top of the document with the sheet top.
Before scanning
Instructions from the manual
Before ScanningView
Install the Brother MFL-Pro Suite software and securely connect the scanner USB interface cable using the reviewed Quick Setup Guide installation.
Controlcenter4
Instructions from the manual
Select the ControlCenter4 mode3 steps
Open the ControlCenter4 tray icon > Open.
If the icon is absent, open Brother Utilities, select this model, then SCAN > ControlCenter4.
Choose Configuration > Mode Select; select Home Mode or Advanced Mode.
Basic scan
Instructions from the manual
Basic Scan — ControlCenter4 Home Mode8 steps
Load the document.
In ControlCenter4 Home Mode choose Scan, Document Type and Scan Size, then Scan.
Edit the displayed scan if needed.
To save choose Save, the folder or SharePoint settings, and OK.
To print choose Print, printer and settings, then OK.
To open an application choose Open with an Application, its target and OK; Evernote requires an installed Evernote application.
For editable text choose OCR and its settings, then OK; Nuance PaperPort 12SE must be installed.
To attach a scan to email choose Send E-mail, settings and OK.
Basic Scan — ControlCenter4 Advanced Mode4 steps
Load the document.
In ControlCenter4 Advanced Mode open Scan and choose Image, OCR, E-mail, File or Print.
Change the settings in the dialog and click Scan.
For Image or OCR, Evernote requires the application to be installed; OCR also requires Nuance PaperPort 12SE.
Scan specific and irregular sized documents using the carrier sheet
Instructions from the manual
Scan Using the Carrier Sheet — ControlCenter4 Home Mode5 steps
Load one carrier sheet.
Open ControlCenter4 Home Mode > Scan, set Document Type to Custom, then Custom Settings.
Select Carrier Sheet Mode and a Scan Size other than Auto; adjust the other permitted settings, then Scan.
Display Scanning Results makes the result dialog appear.
Finish using Save, Print, Open with an Application, OCR or Send E-mail as in the reviewed Home Mode basic scan.
Scan Using the Carrier Sheet — ControlCenter4 Advanced Mode4 steps
Load one carrier sheet.
In Advanced Mode > Scan select Image, OCR, E-mail, File or Print.
Enable Carrier Sheet Mode and choose a document size other than Auto; set other permitted settings, then Scan.
Select Do not show me again if this dialog should not reappear.
Scan Using the Carrier Sheet — ControlCenter24 steps
Load one carrier sheet and open ControlCenter2 from the Dock, or Finder > Go > Applications > Brother.
In SCAN choose Image, OCR, E-mail or File.
Enable Carrier Sheet Mode and a document size other than Auto, then other permitted settings.
Click Start Scanning.
Scan plastic cards
Instructions from the manual
Scan Plastic Cards — ControlCenter4 Home Mode4 steps
Load one plastic card.
In Home Mode > Scan choose Custom > Custom Settings and Plastic Card Mode; adjust other permitted settings and choose Scan.
Plastic Card Mode automatically uses 600 dpi, 2 in 1 (Auto), two-sided short-edge binding, Auto Deskew Off, Multifeed Detection Off and Auto Image Rotation Off.
Finish using the reviewed Home Mode basic-scan destinations.
Print alone allows Printer Name and Print Options.
Image, OCR and E-mail filenames use Change; set a prefix and Insert Date if wanted.
File also allows a filename.
File alone allows Show Save As Window and Scan Location: select Folder and browse, optionally Show Folder, or SharePoint and enter its URL then Connection Test.
Image, OCR and E-mail use Destination File Path > Change > folder icon.
Image, E-mail and File offer File size when the chosen format supports it.
Resolution applies to all five actions; higher values consume more memory and transfer time.
Choose Black & White for text/line art, Grey (Error Diffusion) for simulated-grey photographs/graphics, True Grey for up to 256 grey levels, 24bit Colour for up to 16.8 million colours at the greatest memory/time cost, or Auto.
Auto may fail depending on the original.
Document Size defaults to Auto, with accuracy dependent on the original; choosing the exact size can increase speed.
A 1 to 2 size splits into half-sized pages: 1 to 2 (A4) creates two A5 pages.
Clear Auto Image Rotation for 1 to 2.
A 2 in 1 size combines two images.
For Long Paper turn Auto Deskew and two-sided scanning Off.
Normal Width permits 215.9 × 863.0 mm; Narrow Width permits 107.9 × 863.0 mm.
Brightness is −50 to 50, default 0; reduce it for a light scan or increase it for a dark scan.
Contrast is −50 to 50, default 0; increasing accentuates light/dark, decreasing reveals grey detail.
Contrast is available only with Auto, Grey (Error Diffusion), True Grey or 24bit Colour.
Continuous Scanning offers Continue or Finish after a scan and permits a total exceeding ADF capacity.
Two-sided scanning is available through Legal length; choose long- or short-edge binding to suit the original.
Carrier Sheet Mode excludes Auto size.
Load one sheet, centre the original and align its top.
Fold A3, B4 or Ledger and select respectively 2 in 1 (A4), 2 in 1 (B5) or 2 in 1 (Letter), with two-sided scanning to combine the sides.
It also supports important originals, photos, contracts, thin receipts and irregular clippings.
Plastic Card Mode takes one card and sets 600 dpi, 2 in 1 (Auto), two-sided short-edge binding, Deskew Off, Rotation Off and Multifeed Off.
For different settings turn the mode Off and keep 600 dpi.
Default restores these scan settings to factory values.
In Advanced Settings, Auto Deskew corrects skew within 5 degrees; Auto Image Rotation uses text direction; Bleed Through Prevention/Remove Background Colour reduces two-sided show-through and base colour; Skip Blank Page removes blank scans.
These functions may be unreliable depending on the original.
Multifeed Detection uses ultrasound; on detection, check that previous scans were saved and restart at the next page or from the beginning.
Display Scanning Results shows total saved and skipped blank pages.
Controlcenter2
Instructions from the manual
Start ControlCenter2View
Open the ControlCenter2 icon in the Dock. If it is absent, in Finder choose Go > Applications > Brother, then double-click ControlCenter2.
Scan to image
Instructions from the manual
Scan to Image — ControlCenter25 steps
Load your document.
In ControlCenter2 > SCAN choose Image.
Select two-sided scanning and long- or short-edge binding when needed; choose the target application, file type, resolution, scan type and document size.
Use Add to add a target application, or Delete to remove one.
Click Start Scanning.
Set a PDF password — ControlCenter2View
For Image, E-mail or File choose Secure PDF, then Set PDF Password. Enter the password twice and click OK.
Scan to ocr
Instructions from the manual
Scan to OCR — ControlCenter26 steps
Install Presto!
PageManager for OCR.
Load the original and open ControlCenter2 > SCAN > OCR.
Set two-sided binding, target application, file type, OCR language, resolution, scan type and document size as needed.
Use Add or Delete for the target application.
Click Start Scanning.
Scan to e-mail
Instructions from the manual
Scan to E-mail — ControlCenter26 steps
Load the original.
In ControlCenter2 > SCAN choose E-mail.
Select duplex binding, a supported email application, format, resolution, scan type and document size.
Use Add or Delete for the application; if a custom application fails, choose a supported application in the list.
Click Start Scanning.
This action does not support webmail: for webmail scan to Image or File and attach the saved image separately.
Scan to file
Instructions from the manual
Scan to File — ControlCenter27 steps
Load the original.
In ControlCenter2 > SCAN choose File.
Set two-sided binding if needed.
Choose a filename prefix of at most 100 characters; the name receives the scan date and a sequential number.
Choose the format, folder using Browse, resolution, scan type and document size.
Show Folder displays the destination after scanning; Show Save As Window asks for it each time.
Click Start Scanning.
Change the default settings of a button
Instructions from the manual
Change Default Settings of Each Button — ControlCenter23 steps
Hold Control and click the desired scan button.
Choose Software Button or Device Button as appropriate.
Set File Type, Scan Type, Document Size, Brightness, Contrast, Continuous Scanning and two-sided settings; click OK.
Register custom scan settings using controlcenter2 (macintosh)
Instructions from the manual
Custom Button — ControlCenter28 steps
ControlCenter2 provides four custom buttons.
Hold Control and click one.
Enter a name up to 30 characters and choose Scan Action on General.
Use Image for a target application, OCR for text conversion, E-mail for attachment to a supported email application, or File for disk saving.
Set duplex binding, resolution, scan type, size and other action-specific settings.
Secure PDF is supported for Image, E-mail and File: set its password and enter it twice.
For File choose format and a folder with Browse; Show Save As Window lets you specify a destination each time.
Webmail is unsupported by E-mail; use Image/File and attach the resulting file.
Secure PDF for Image, E-mail or File needs Set PDF Password and matching entries.
Searchable PDF needs Presto!
PageManager and the matching OCR language.
Multi-page TIFF, PDF, secure PDF and JPEG offer compression options; TIFF provides Uncompressed or Compressed.
OCR target application does not support TIFF.
Image and OCR allow Target Application; OCR allows OCR Software and OCR Language.
Image, OCR and E-mail use Change for a filename prefix and destination path.
File allows its filename and Browse destination; Show Folder and Show Save As Window are File options.
Set Resolution and Scan Type.
Black & White is for text/line art; Grey (Error Diffusion) simulates grey; True Grey provides 256 grey shades; 24bit Colour offers up to 16.8 million colours but greatest memory/time cost; Auto selects colour based on the original and may be unreliable.
Auto Document Size is default and may be unreliable depending on the original.
Choosing the exact size can speed scanning.
1 to 2 divides an image in half, with A4 producing two A5 pages; 2 in 1 combines images.
Clear Auto Image Rotation for both 1 to 2 and 2 in 1.
Long Paper requires Deskew Off and two-sided Off.
Continuous Scanning permits more than one ADF load by choosing Continue or Finish.
Two-sided scanning supports documents through Legal length and requires the correct long- or short-edge binding.
Carrier Sheet Mode excludes Auto size.
Load one sheet, centre the document and align its top.
Fold A3, B4 or Ledger, select respectively 2 in 1 (A4), 2 in 1 (B5) or 2 in 1 (Letter), and use two-sided scanning to combine front/back.
It also supports important originals, thin receipts and irregular clippings.
Plastic Card Mode takes one card and sets 600 dpi, 2 in 1 (Auto), two-sided short-edge binding, Deskew ON, Rotation OFF and Multifeed OFF.
For custom settings turn the mode Off and use 600 dpi.
Default restores scan settings.
Advanced Brightness is 0–100, default 50: reduce for an overly light image, increase for a dark one.
Contrast is 0–100, default 50: increase for light/dark separation, decrease for grey detail; it requires Auto, Grey (Error Diffusion), True Grey or 24bit Colour.
Colour Drop removes chromatic colours except black, Red, Green, Blue or a Custom selected colour.
Auto Deskew corrects within 5 degrees; Rotation uses text direction; Bleed Through Prevention/Remove Background Colour reduces show-through/base colour; Skip Blank Page removes blanks.
These functions may fail depending on the original.
Multifeed Detection uses ultrasound; check previously saved data after a detection, then restart at the next page or beginning.
Display Scanning Results shows saved and skipped blank-page totals.
Scan using nuance™ paperport™12se or other windows® applications
Instructions from the manual
Scan Using the Nuance™ PaperPort™ 12SE Application or Other Windows® Applications8 steps
Load the document.
In Windows XP/Vista/7 choose Start > All Programs > Nuance PaperPort 12 > PaperPort; in Windows 8 choose the PaperPort application.
Open Desktop > Scan Settings, then Select.
Choose the Brother TWAIN USB ADS-2100e source, recommended for more functionality, or the WIA source; click OK.
Select Display scanner dialog box and Scan; adjust settings and Document Size.
Crop by dragging in the preview if needed, then Start.
Windows XP WIA cannot scan both sides.
Use the reviewed TWAIN/WIA settings for the selected interface.
Twain driver settings
Instructions from the manual
TWAIN Settings — Windows15 steps
Choose Image Type: Photo uses 300 dpi/24bit Colour, Web uses 100 dpi/24bit Colour, and Text uses 200 dpi/Black & White.
Choose 100, 150, 200, 300, 400, 600 or 1200 dpi.
Scan Type may be Auto, Black & White, Grey (Error Diffusion), True Grey or 24bit Colour.
Reduce Noise works only in 24bit Colour at 300, 400 or 600 dpi.
Brightness and Contrast range −50 to 50, default 0.
Increase Brightness for a dark image, reduce it for a light one.
Contrast requires a non-Black & White type.
Choose Document Size Auto or Custom and drag the crop area.
Long Paper requires Auto Deskew Off and two-sided Off.
Select appropriate long- or short-edge binding for duplex scanning.
Advanced Colour Drop can remove a selected colour.
Bleed Through Prevention reduces show-through/base colour; Auto Deskew corrects up to 5 degrees.
Detect End of Page is available only when size is neither Auto nor Long Paper.
Image Rotation and Document Language adjust orientation; Multifeed Detection needs checking previously saved data before resuming; Skip Blank Page removes blanks.
Carrier Sheet Mode requires one centred carrier sheet and a size other than Auto.
TWAIN Settings — Macintosh9 steps
Set Resolution and Scan Type.
256 Colour is unavailable with Presto!
PageManager and cannot be used at 1200 dpi.
Brightness and Contrast range −50 to 50, default 0.
Brightness is unavailable with 256 Colour; Contrast is unavailable with Black & White.
Increase Brightness for a dark image, reduce it for a light one.
Reduce Noise requires 24bit Colour at 300, 400 or 600 dpi.
Set the appropriate long- or short-edge binding for two-sided scanning.
Choose Auto or the actual Document Size, or Custom to drag a scan area.
Wia driver settings
Instructions from the manual
WIA Settings4 steps
Choose Document Feeder as Paper Source.
Select Color picture, Grayscale picture, Black and white picture or text, or Custom settings.
Adjust the scanned picture quality to change Resolution, Brightness and Contrast.
Brightness and Contrast range −50 to 50, default 0.
Scan using windows® photo gallery or windows® fax and scan
Instructions from the manual
Use Windows® Photo Gallery or Windows® Fax and Scan3 steps
For Photo Gallery choose File > Import from Camera or Scanner, select this scanner and Import.
For Windows Fax and Scan choose File > New > Scan.
Load the original, set the scanning options, then Scan.
Use nuance pdf converter professional 8
Instructions from the manual
Use Nuance PDF Converter Professional 83 steps
Insert the supplied DVD, choose the model and language, then Additional Applications and Nuance PDF Converter Professional 8; follow installation prompts.
The serial number is on the DVD sleeve.
Open the installed application and use its help for operating instructions.
Use newsoft presto! bizcard 6
Instructions from the manual
Use NewSoft Presto! BizCard 6 — Windows5 steps
Insert the DVD, choose the model and language, then Additional Applications > Presto!
BizCard and follow the prompts.
In Windows XP/Vista/7 launch Start > All Programs > NewSoft > Presto!
BizCard 6; in Windows 8 use the BizCard application.
Use the application help for its operating details.
Use NewSoft Presto! BizCard 6 — Macintosh4 steps
Install the Brother Full Driver & Software Package.
Open BROTHER > Brother Support and choose Presto!
BizCard.
Follow the installer and use the application help for operating details.
Installing presto! pagemanager
Instructions from the manual
Install Presto! PageManager5 steps
Install the Brother Full Driver & Software Package on Mac.
Open BROTHER and Brother Support.
Choose Presto!
PageManager, then follow its installer instructions.
This guide describes OS X 10.7.5, 10.8.x and 10.9.x.
Scan using presto! pagemanager or twain applications (macintosh)
Instructions from the manual
Scan Using the Presto! PageManager Application or Other Macintosh Applications5 steps
Open the application.
In PageManager choose File > Select Source, select Brother TWAIN and Select.
Load the original, then File > Acquire Image Data.
Set Resolution, Scan Type and Document Size; for Custom size drag the crop boundary.
Click Start.
Scan using apple image capture (ica driver)
Instructions from the manual
Scan Using Apple Image Capture (ICA Driver)4 steps
Open Image Capture.
Select this USB scanner under DEVICES.
Load the original and choose scan size and Scan To destination, then Scan.
If the scanner is absent, install the Brother Full Driver & Software Package; use the reviewed Print & Fax/Print & Scan scanner-list instructions.
Ica driver settings
Instructions from the manual
ICA Driver Settings4 steps
Choose Kind: Color, Black & White or Text; choose Resolution, Scan Size, Orientation and duplex scanning as required.
Set Scan To, Name and Format.
Combine into single document supports PDF or TIFF; on OS X 10.7.5 choose PDF first, then TIFF to activate combining with TIFF.
Image Correction offers Brightness, Tint, Temperature and Saturation for Color; Brightness and Contrast for Black & White; Threshold for Text.
Select your machine from print & fax or print & scan
Instructions from the manual
Select Your Machine from Print & Fax or Print & Scan4 steps
In System Preferences open Print & Fax or Print & Scan and select the scanner.
Click Open Scanner.
If absent, remove the scanner with − and add it again using +.
Load the document, choose options and Scan.
Scan using captiva® quickscan™ pro or isis® applications
Instructions from the manual
Scan Using Captiva® QuickScan™ Pro or ISIS® Applications5 steps
Install the Brother scanner driver first.
Insert the DVD, choose this model and language, then Custom Installation.
Choose ISIS Driver and Application > ISIS Driver and follow the instructions.
For the bundled trial choose Captiva QuickScan Pro Trial and follow installation prompts.
Use that application or another ISIS application with its own help.
Save scanned documents on your computer
Instructions from the manual
Assign Scan to PC5 steps
Open ControlCenter4 > Device Settings on Windows or ControlCenter2 > DEVICE SETTINGS on Mac.
Select Scan to PC Settings to open Remote Setup.
Assign the Scan to PC key to Image, OCR, E-mail or File and click OK.
Configure that action using the reviewed device-button settings.
Load the original and press Scan to PC.
Save scanned documents on a usb flash drive
Instructions from the manual
Save Scanned Documents on a USB Flash Drive6 steps
Open ControlCenter4 > Device Settings on Windows or ControlCenter2 > DEVICE SETTINGS on Mac, then Remote Setup.
Select Scan to USB in the folder tree and set the required settings.
Click Apply and OK.
Insert the USB flash drive, load the document and press Scan to USB.
Filenames use the current date and a two-digit sequence.
Do not remove the drive while a scan is being written; this risks damaging the drive or its data.
Save scanned documents on mobile devices
Instructions from the manual
Save Scanned Documents on Mobile Devices6 steps
Use a mobile device that supports USB mass storage; this scanner does not charge USB devices.
Turn the mobile device on BEFORE connecting it.
Connect using the mobile device’s USB cable, load the original and press Scan to USB.
The scanner saves the document to the mobile device.
Brother Image Viewer for Android can view and edit these scans; use its separately reviewed guide.
No wireless scan method is inferred for ADS-2100e.
Change scan to pc settings (windows®)
Instructions from the manual
Change Scan to PC Settings (Windows®)25 steps
Open the ControlCenter4 tray icon > Open; if absent use Brother Utilities, select this model and SCAN > ControlCenter4.
Choose Device Settings > Device Scan Settings, then the Image, OCR, E-mail or File tab.
All four action tabs offer File Type; Secure PDF needs its password; Searchable PDF needs PaperPort 12SE and matching OCR Language.
TIFF/Multi-page TIFF allow Compressed or Uncompressed; PDF, Secure PDF and JPEG offer a size slider, unavailable for OCR.
Target Application applies to Image/OCR; OCR Language to OCR.
File Name applies to all four: Image/OCR/E-mail use Change and may insert the date.
Image/OCR/E-mail use Change > folder for Destination File Path; File uses Destination Folder > browse, optionally Show Folder.
File size applies to Image/E-mail/File according to format.
All four offer Resolution and Scan Type: Black & White for text/line art, Grey (Error Diffusion) for simulated grey, True Grey for 256 shades, 24bit Colour for up to 16.8 million colours at greater memory/time cost, or Auto.
Document Size defaults to Auto; selecting the exact size speeds scanning.
1 to 2 halves the page (A4 becomes two A5 pages) and requires Rotation Off; 2 in 1 combines two scans.
Long Paper requires Deskew Off and two-sided Off.
Brightness and Contrast range −50 to 50, default 0.
Lower Brightness for a light scan; raise it for a dark scan.
Carrier Sheet Mode excludes Auto size: load one sheet, centre and top-align the document; fold A3/B4/Ledger and use two-sided 2 in 1 (A4)/(B5)/(Letter) respectively.
Important originals, photos, contracts, receipts and clippings are also supported.
Plastic Card Mode is for one non-embossed card: 600 dpi, 2 in 1 (Auto), two-sided short-edge binding, Deskew Off, Multifeed Off and Rotation Off.
For different settings turn the mode Off, use 600 dpi and leave Multifeed Detection Off.
Advanced Settings: Deskew corrects within 5 degrees; Rotation follows text direction; Bleed Through Prevention/Remove Background Colour reduces show-through/base colour; Skip Blank Page removes blanks.
Multifeed Detection uses ultrasound: check saved scans before resuming at the next page or beginning.
Display Scanning Results shows saved and skipped-page totals.
Configure the reviewed Windows device-button options.
Click Advanced Settings for those options, then OK and OK.
Change scan to pc settings (macintosh)
Instructions from the manual
Change Scan to PC Settings (Macintosh)30 steps
Open ControlCenter2 and hold Control while clicking Image, OCR, E-mail or File.
Choose Device Button.
Configure the reviewed Mac device-button options, then Advanced Settings as required.
Image and OCR support Target Application; Add takes a name up to 30 characters and Browse location and file type, and Delete removes a named application.
File Type applies to all four tabs; Secure PDF needs matching passwords.
Searchable PDF requires PageManager and matching OCR Language.
TIFF/Multi-page TIFF allow compression options; PDF, Secure PDF and JPEG offer a size slider, unavailable for OCR.
TIFF is unsupported for Scan to OCR.
OCR Software and OCR Language apply to OCR.
File Name is available on all four tabs; Image/OCR/E-mail use Change.
Their Destination File Path uses Change > folder; File uses Destination Folder > Browse and optionally Show Folder.
All four offer Resolution and Scan Type: Black & White for text/line art, Grey (Error Diffusion) for simulated grey, True Grey for 256 shades, 24bit Colour for up to 16.8 million colours with greatest memory/time cost, or Auto.
Document Size defaults to Auto; an exact size speeds scanning.
1 to 2 halves a page (A4 creates two A5 pages), 2 in 1 combines two scans; turn Rotation Off for either.
Long Paper requires Deskew Off and two-sided Off.
Default restores scan settings.
Carrier Sheet Mode excludes Auto size.
Load one centred/top-aligned sheet.
Fold A3/B4/Ledger and use two-sided 2 in 1 (A4)/(B5)/(Letter), respectively.
Important originals, photos, contracts, thin receipts and clippings are supported.
Plastic Card Mode takes one non-embossed card: 600 dpi, 2 in 1 (Auto), two-sided short-edge binding, Deskew ON, Multifeed OFF and Rotation OFF.
For custom settings turn the mode Off and use 600 dpi.
Advanced Brightness and Contrast range 0–100, default 50.
Lower Brightness for a light image and raise for a dark image.
Colour Drop removes chromatic colours except black, Red, Green, Blue or a selected Custom colour.
Deskew corrects within 5 degrees; Rotation follows text direction; Bleed Through Prevention/Remove Background Colour reduces show-through/base colour; Skip Blank Page removes blanks.
Multifeed Detection uses ultrasound: confirm saved scans before restarting at the next page or beginning.
Display Scanning Results shows saved and skipped blank-page totals.
Click OK to close Advanced Settings, then OK.
Monitor the status of the machine from your computer
Instructions from the manual
Monitor the Status of the Machine from Your Computer — Windows3 steps
Double-click the Brother Status Monitor tray icon, or use Brother Utilities, select the model, then Tools > Status Monitor.
The window shows machine status, a troubleshooting link, a genuine-supplies link and the Pick-up Roller and Separation Pad counts.
Right-click Brother Status Monitor > Help for application information.
Monitor the Status of the Machine from Your Computer — MacintoshView
Open ControlCenter2 > DEVICE SETTINGS > Status Monitor. Read status, troubleshooting and genuine-supplies links, and the Pick-up Roller and Separation Pad counts.
Error notifications
Instructions from the manual
Error NotificationsView
Right-click Brother Status Monitor and choose Enable error notifications; clear its check mark to disable notifications.
What are the status monitor indicators?
Instructions from the manual
What are the Status Monitor Indicators?View
A green icon means normal standby; yellow means warning; red means an error; grey means the scanner is offline.
Turn the autoload feature on/off (controlcenter2)
Instructions from the manual
Turn the AutoLoad Feature On/Off (ControlCenter2)View
Open ControlCenter2 > Configuration > Preferences. Select or clear Start ControlCenter on computer startup, then OK.
Set up the brother machine from your computer
Instructions from the manual
Set Up the Brother Machine from Your Computer9 steps
Clear scanner errors before starting Remote Setup.
In Windows open ControlCenter4 > Device Settings; on Mac open ControlCenter2 > DEVICE SETTINGS.
Click Remote Setup.
Alternatively use Brother Utilities > select this model > Tools > Remote Setup on Windows, or Finder > Applications > Brother > Remote Setup on Mac.
Select a menu in the folder tree and configure it.
OK uploads settings and exits; if an error appears, correct it and click OK again.
Apply uploads without exiting; Cancel exits without uploading.
Export saves the settings to a file.
Do not apply network-only Device Selector or network firewall instructions to this USB-only model.
Clean the outside of the machine
Instructions from the manual
Clean the Outside of the Machine6 steps
Wipe the exterior using a dry, soft, lint-free cloth.
Open the Top Cover and wipe the Control Panel with the same type of dry cloth.
Close the Top Cover.
Pull out the Output Tray and unfold the Document Stopper.
Wipe inside the tray using a dry, soft, lint-free cloth.
Fold the stopper and push the tray firmly back into the scanner.
Clean the scanner
Instructions from the manual
Clean the Scanner20 steps
Unplug the scanner from the AC outlet.
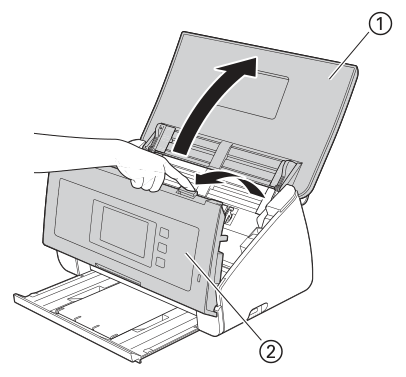
Open the Top Cover and Front Cover.
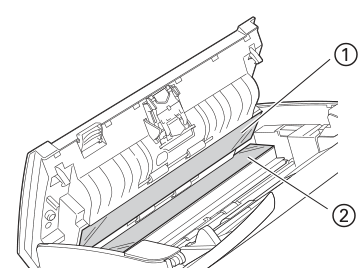
Wipe both glass strips in the feeder with a soft, lint-free cloth moistened with water.
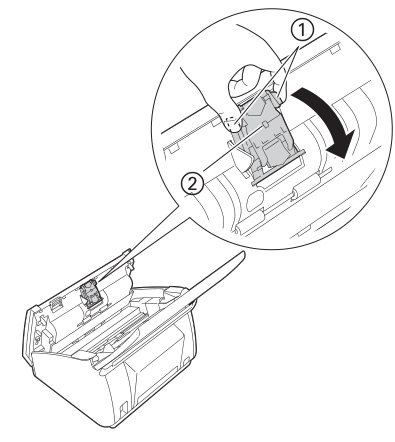
Hold the buttons inside the Front Cover and pull the Separation Pad Cover down.
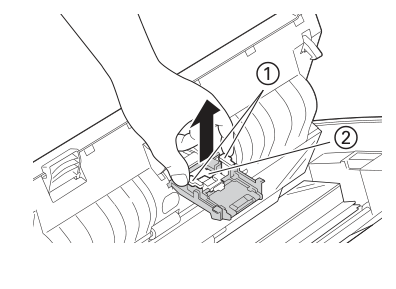
Hold the green Separation Pad buttons and lift out the pad.
Be careful around the pad: injury or serious scanner damage can result.
Clean the pad with a soft, lint-free cloth slightly moistened with water.
Attach it to its cover, then close the cover securely until its hooks fit the Front Cover.
Hold both sides of the Pick-up Roller Cover and pull it down.
Slide the roller right.
Rotate the roller until its shaft matches the narrow holder opening; pinch and pull it out.
Wipe it with a soft, lint-free cloth slightly moistened with water.
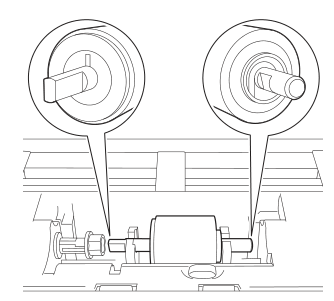
Identify the left and right sides before replacing it.
Reinsert the roller and slide it left while rotating it.
Close the roller cover, Front Cover and Top Cover.
For remaining glass contamination, the guide permits non-flammable glass cleaner.
Run a fingertip over the strips, focus cleaning on remaining dirt, and repeat three or four times if needed.
Test-scan after each cleaning.
Do not use flammable substances, sprays, or organic solvents/liquids containing alcohol or ammonia inside or outside the scanner.
The separate safety guide requires unplugging before accessing its inside.
The shared manual illustrates ADS-2600We; this mechanical step applies to both listed models. Unplug before opening the covers for interior cleaning.
Diagram key
1: Top Cover.
2: Front Cover.
Top-cover arrow: Open the Top Cover after unplugging from the AC outlet.
Front-cover arrow: Open the Front Cover for glass-strip access.
Both glass strips must be cleaned with a soft, lint-free cloth moistened with water.
Diagram key
1: First glass strip in the document feeder.
2: Second glass strip in the document feeder.
Hold the buttons inside the Front Cover while lowering the Separation Pad Cover.
Diagram key
1: Buttons on the inside of the Front Cover; press and hold them.
2: Separation Pad Cover.
Downward arrow: Pull the pad cover down while holding its buttons.
Magnified inset: Complete enlarged view of the same cover and its release buttons.
Hold both green pad buttons and lift the Separation Pad out before water-moistened cleaning.
Diagram key
1: Green buttons on the Separation Pad; press and hold them.
2: Separation Pad.
Upward arrow: Lift the pad upward while its green buttons are held.
Identify the left and right ends of the Pick-up Roller before refitting it.
Diagram key
Left end inset: Enlarged left roller end; confirm this side before fitting.
Right end inset: Enlarged right roller end; confirm this side before fitting.
Left guide line: Connects the left-end enlargement to its roller position.
Right guide line: Connects the right-end enlargement to its roller position.
Order supplies
Instructions from the manual
Order supplies3 steps
Order Separation Pad SP-A0001 and Pick-up Roller PUR-A0001 at their approximate 50,000-sheet replacement intervals.
Carrier Sheet CS-A3001 and Plastic Card Carrier Sheet CS-CA001 have approximate 500-use intervals.
Actual life depends on environment, document type and scan frequency; these parts are available from most Brother retailers.
Check supplies replacement cycle
Instructions from the manual
Check Supplies Replacement Cycle4 steps
On Windows double-click the Status Monitor tray icon.
On Mac use ControlCenter2 > DEVICE SETTINGS > Status Monitor.
Read the Pick-up Roller Count and Separation Pad Count.
If the LED or Status Monitor indicates replacement, obtain new parts and use the reviewed replacement procedures.
Replace the separation pad
Instructions from the manual
Replace the Separation Pad10 steps
Before accessing the inside, unplug the scanner from the AC outlet as required by the separate Product Safety Guide.
Open the Top Cover and Front Cover.
Hold the buttons inside the Front Cover and pull the Separation Pad Cover down.
Be careful around the pad: injury or damage can result.
Hold the green pad buttons and lift out the old pad.
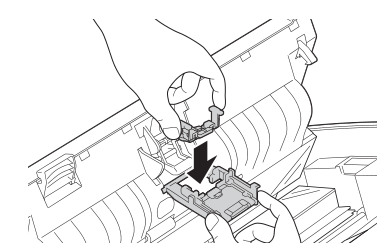
Support the cover while inserting the new pad.
Close the pad cover securely until its hooks fit the Front Cover.
Close the Front Cover and Top Cover.
Use Reset the Usage Counters.
Confirm the Separation Pad Count is 0, the Status Monitor error is clear and the LED no longer indicates Replace Pad or Replace Parts.
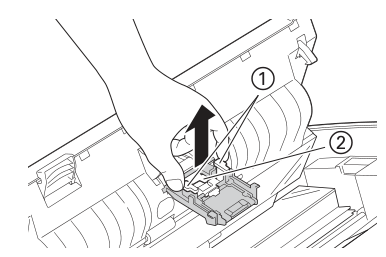
Release and lift the old pad by its green buttons; unplug before interior access and take care around the pad.
Diagram key
1: Green buttons on the Separation Pad; press and hold them.
2: Separation Pad.
Upward arrow: Pull the pad up while holding its green buttons.
Support the cover while inserting the new Separation Pad.
Diagram key
Downward arrow: Insert the new pad into its cover while supporting the cover.
Replace the pick-up roller
Instructions from the manual
Replace the Pick-up Roller10 steps
Before accessing the inside, unplug the scanner from the AC outlet as required by the separate Product Safety Guide.
Open the Top Cover and Front Cover.
Hold both sides of the roller cover and pull it down.
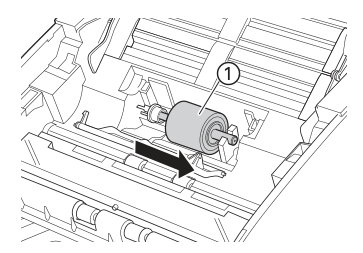
Slide the roller fully right.
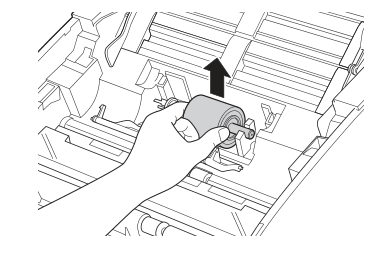
Rotate its shaft to match the narrow holder opening, then pinch and pull it out.
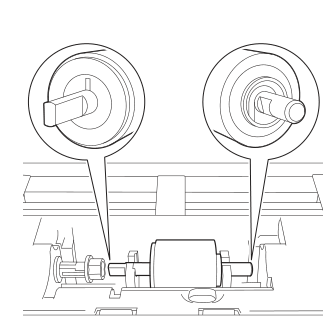
Identify left and right sides of the new roller before inserting it.
Insert the new roller and slide it left while rotating it.
Close the roller cover, Front Cover and Top Cover.
Use Reset the Usage Counters.
Confirm Pick-up Roller Count is 0, Status Monitor error is clear and the LED no longer indicates Replace Roller or Replace Parts.
Slide the Pick-up Roller fully right before aligning its shaft with the holder opening.
Diagram key
1: Pick-up Roller.
Rightward arrow: Slide the roller all the way to the right.
After rotating the shaft to match the holder opening, pinch and pull the roller out.
Diagram key
Upward arrow: Pinch and pull the Pick-up Roller out only after its shaft shape matches the holder opening.
Identify both roller ends before inserting the replacement.
Diagram key
Left end inset: Enlarged left end of the new roller; confirm its side before insertion.
Right end inset: Enlarged right end of the new roller; confirm its side before insertion.
Left guide line: Locates the enlarged left end on the roller.
Right guide line: Locates the enlarged right end on the roller.
Reset the usage counters
Instructions from the manual
Reset the Usage Counters4 steps
After replacing the applicable part, open ControlCenter4 > Device Settings on Windows or ControlCenter2 > DEVICE SETTINGS on Mac.
Select Remote Setup > Machine Info.
In Reset Counter for Consumables select Separation Pad, Pick-up Roller or both, as applicable.
Click Apply, then OK.
Packing and shipping the machine
Instructions from the manual
Packing and Shipping the Machine5 steps
Use the original packing materials and insure the shipment; incorrect packing may leave transit damage outside warranty.
Close the Panel Cover gently and push the Output Tray firmly into the scanner.
Put the scanner in its original bag, then in the original carton with its original packing materials.
Only for a Brother Exchange Service return, send the machine alone and keep the AC cord, carrier sheet, USB cable and printed material for the replacement.
Close and tape the carton.
Identifying your problem
Instructions from the manual
Identifying Your Problem3 steps
Check the AC power cord and that the scanner is on; remove all protective parts.
Close the Front Cover, Separation Pad Cover and Pick-up Roller Cover fully.
Securely connect the interface cable to scanner and computer, install the correct driver, and use the computer’s correct port.
Document jam
Instructions from the manual
Document Jam9 steps
Remove unjammed paper from the ADF.
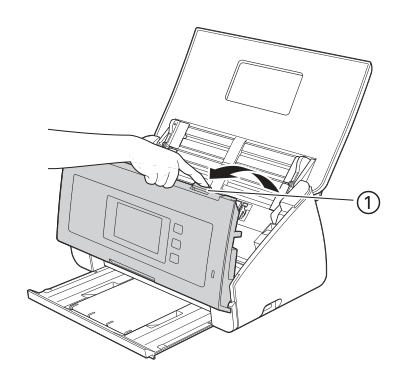
Do not pull jammed material before opening the Front Cover.
Pinch the Cover Release Lever and open the Front Cover.
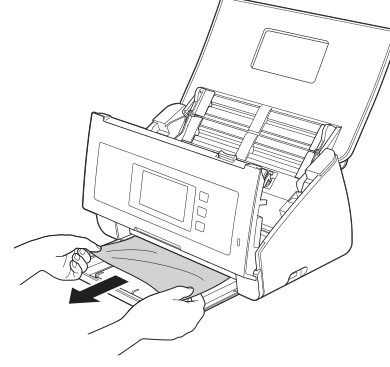
Pull out the jammed original, check for torn paper and remove every piece.
Remove any paper from the ADF before closing the Front Cover; close it gently in the middle.
Press any scanner key.
After a multifeed, confirm earlier scans were saved, then resume at the next page or beginning after clearing.
Be careful near the separation pad.
To prevent recurrence, set document options correctly, clean pad/roller using the reviewed methods, stagger leading edges, use acceptable originals and load correctly: at most 50 pages, with cards vertical.
The shared manual illustrates ADS-2600We; this mechanical step applies to both listed models. Open the Front Cover before pulling any jammed original.
Diagram key
1: Cover Release Lever; pinch it to open the Front Cover.
Opening arrow: Open the Front Cover before removing jammed paper.
The shared manual illustrates ADS-2600We; this mechanical step applies to both listed models. Pull out the jammed original, check for torn paper and remove every piece.
Diagram key
Withdrawal arrow: Pull the jammed document out with the Front Cover open; remove any ripped paper remaining inside.
Long paper jam
Instructions from the manual
Long Paper Jam2 steps
When scanning from a computer, select Long Paper in Scan Size or Document Size using the reviewed ControlCenter4/ControlCenter2 settings.
Turn Auto Deskew and two-sided scanning Off; do not apply the separate ADS-2600We control-panel instructions to ADS-2100e.
Check the serial number
Instructions from the manual
Check the Serial NumberView
Open ControlCenter4 > Device Settings on Windows or ControlCenter2 > DEVICE SETTINGS on Mac. Choose Remote Setup > Machine Info. Read the Serial Number.
Led indications (ads-2100e only)
Instructions from the manual
Sleep — LED indicationView
Press any key, open the Top Cover or load a document to wake the scanner and return to Ready mode.
Remote Setup — LED indicationView
Remote Setup is in progress. To cancel it, click Cancel in the Remote Setup window on the computer.
Ejecting Paper — LED indicationView
The scanner is ejecting paper. If no document is in the ADF or ejection is temporarily stopped, press Stop to finish ejecting.
Choose a safe location for the machine
Instructions from the manual
Choose a safe location for the machine5 steps
Use a flat, level, stable surface free of vibration and shocks, near a standard grounded outlet and ventilated location, at 5–35°C.
Avoid direct sunlight, excessive heat, flames, corrosive gases, dust, carpets/rugs, heaters, air conditioners, water, chemicals and liquid spills.
Keep vents clear: use a solid surface, not a bed, sofa, rug or built-in enclosure.
Keep the scanner and its tray safely back from the desk edge so it cannot protrude, fall or injure someone.
Do not put objects on it or place it near interference sources such as speakers or non-Brother cordless-phone bases.
General precautions
Instructions from the manual
General precautions8 steps
Keep packing plastic away from babies and children.
Do not insert objects into the casing: high voltage can cause fire or shock; unplug and contact Brother service if metal, water or another object gets inside.
Do not use flammable substances, sprays or organic solvents/liquids containing alcohol or ammonia inside or outside the scanner.
Do not disassemble or modify it; unplug before a thunderstorm and keep it away from liquids.
Do not pull or push pages during scanning.
Avoid touching the illustrated moving/internal areas and take care around the separation pad to prevent injury or damage.
Carry it with hands under the entire machine, never by the Top Cover.
Prevent clothing, sleeves, ties and hair from being drawn in; if something is caught, unplug immediately.
Connecting the machine safely
Instructions from the manual
Connecting the machine safely6 steps
Before accessing the inside for maintenance such as cleaning, unplug the power cord.
ADS-2100e has no Ethernet connection; that additional cable instruction is for ADS-2600We.
Never handle the plug with wet hands.
Do not connect to DC power or an inverter; consult a qualified electrician if unsure.
Do not use a frayed/damaged cord, pull the middle of the AC cord, place objects on it, or place the scanner where its cord can be stepped on.
Do not attempt self-service: opening or removing covers can expose dangerous voltage and void warranty; contact Brother service.
If dropped or damaged, unplug and contact Brother.
Immediately unplug if unusually hot, smoking, smelling strongly or containing a spill, then contact service.
If operation is abnormal, adjust only controls described in the operating instructions; improper changes may require qualified repair.
Product warranty & liability
Instructions from the manual
Product Warranty & LiabilityView
Use only the power cord supplied with this scanner. Install beside an accessible outlet; in an emergency unplug the cord to shut off power.
Wiring information (u.k. only)
Instructions from the manual
Wiring information (U.K. only)3 steps
The supplied mains plug must be earthed.
If replacing its fuse, use the same rating approved by ASTA to BS1362, replace the cover and never operate with that cover removed.
The mains lead colours are green/yellow for Earth, blue for Neutral and brown for Live.
Unlawful use of scanning equipment
Instructions from the manual
Unlawful use of scanning equipment4 steps
Respect legal copying restrictions.
Currency, bonds/debt certificates, deposit certificates, armed-forces/draft papers, passports, postage stamps, immigration papers, welfare documents, governmental cheques/drafts and identifying badges/insignia are listed examples that may not be copied.
Copyrighted works cannot lawfully be copied except under applicable fair-dealing exceptions.
Consult a legal adviser when in doubt.
Notice regarding the faithful reproduction of scanned documents
Instructions from the manual
Notice Regarding the Faithful Reproduction of Scanned Documents5 steps
Before scanning, confirm that accuracy and quality meet your needs.
Check both front and back of originals.
Unreliable output can result from worn, distorted or dirty originals; wrinkles, bends or holes; centred extreme brightness; low resolution; a blank reverse side; unsuitable size or material; scan-position margins; blank-page deletion; imperfect graphic reproduction; or repeated feed failures from worn pads, rollers or other consumables.
Replace consumables periodically.
Use acceptable originals and suitable resolution; fluorescent-marker colour may not reproduce properly.
Unpack the machine and check the components
Instructions from the manual
Unpack the machine and check the components5 steps
Read the Product Safety Guide before setup.
Remove protective tape and film from the machine and its Control Panel.
Check all supplied parts; contents can differ by country.
Save the original packing for shipping and use the supplied AC cord and USB cable.
Keep packing bags away from babies/children; do not use them in cribs, beds, carriages or play pens.
Connect the power cord
Instructions from the manual
Connect the power cordView
Do not connect the USB cable yet. Connect the supplied AC cord. Open the Top Cover, pull out the Output Tray and unfold the Document Stopper.
Install mfl-pro suite
Instructions from the manual
Install MFL-Pro Suite — Windows USB15 steps
This guide describes Windows XP, Vista, 7 and 8.
Turn scanner and computer on, close applications, and do NOT connect USB yet.
PaperPort 12SE needs XP Home SP3/XP Professional SP3 or later, Vista SP2 or later, Windows 7 or 8; update service packs first.
Insert the supplied DVD, choose model and language.
If needed open Computer/My Computer and the DVD, then start.exe; in Windows 8 use File Explorer > Computer first.
Choose Install MFL-Pro Suite and accept licences using Yes; allow the User Account Control prompt on Vista/7/8.
Choose Local Connection (USB), then Next.
Follow prompts.
When directed, connect the supplied USB cable to the scanner’s USB-symbol port on its back and a computer port.
Do not cancel installation screens.
If Online Registration appears, follow its prompts.
Click Finish to restart.
For errors run Brother Utilities > choose model > Tools > Installation Diagnostics; allow any security warning for the Brother software.
Follow Software Update Setting and Brother Product Research & Support prompts if shown; these require internet access.
Test Scan to PC when installation completes.
Install MFL-Pro Suite — Macintosh USB9 steps
The guide describes OS X 10.7.5, 10.8.x and 10.9.x; upgrade an OS X 10.6.x installation first.
Connect the scanner to power and turn the Mac on.
Connect the supplied USB cable to the scanner’s rear USB-symbol port and directly to the Mac.
Do not use a keyboard or non-powered hub.
Download the full driver/software package from Brother.
Double-click Start Here OSX, choose this model if shown, then Local Connection (USB) and Next.
Follow prompts and wait while the driver installs.
Choose the scanner from the list and Next.
Test Scan to PC after completion.
Install optional applications
Instructions from the manual
Install optional applications — Windows7 steps
The listed bundled applications are Presto!
BizCard 6 for scanned business-card data and Nuance PDF Converter Professional 8 for PDF creation/editing, annotation, e-forms and security.
Nuance installation needs the serial number on the MFL-Pro Suite DVD sleeve.
Insert or reinsert the DVD, choose model/language and Additional Applications.
Choose the desired application; availability varies by country.
After completion use Back for another installation, or Exit.
In XP/Vista/7 launch Start > All Programs > NewSoft > BizCard 6 or Start > All Programs > Nuance PDF Converter Professional 8; in Windows 8 move the mouse to the bottom-right, choose the Start icon and the desired application.
Install optional applications — Macintosh6 steps
The listed apps are Presto!
BizCard 6 for business-card data and Presto!
PageManager for OCR and page organisation/sharing.
Open Brother Support and choose the desired application; availability varies by country.
A browser opens the installation instructions.
Follow them.
Test scan (scan to pc)
Instructions from the manual
Test Scan (Scan to PC)6 steps
Check the computer connection.
Load the original; arrange multiple leading edges at a slight angle.
For ADS-2100e press Scan to PC.
The scanner feeds and scans.
The default test saves a PDF on the connected computer.
Other scan functions require the reviewed settings in the User’s Guide.
Downloading brother image viewer from the google play (android™ market)
Instructions from the manual
Downloading Brother Image Viewer from the Google Play (Android™ Market)3 steps
The original guide describes Android 2.1 or later.
Download and install Brother Image Viewer from Google Play and use its latest available version.
For download, installation or removal instructions use the mobile device guide; this does not assert current app-store availability.
Scanning to your mobile device
Instructions from the manual
Scanning to your mobile device3 steps
Use a mobile device supporting standard USB mass storage and the scanner’s reviewed direct USB scanning procedure.
Brother Image Viewer can view and edit these scans.
Its separate iPrint&Scan/network illustration applies only to network-capable devices and is not an ADS-2100e wireless feature.
Supported file formats
Instructions from the manual
Supported file formatsView
Use JPEG or PDF with Brother Image Viewer. Secure PDF, signed PDF and PDF/A are unsupported.
Opening the list of documents
Instructions from the manual
Opening the list of documents6 steps
Open the mobile device Launcher and tap Brother Image Viewer.
Read and accept the licence if shown.
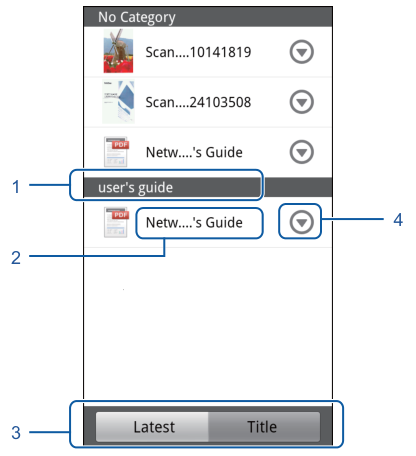
The document list shows category, title, Latest/Title sorting and the edit-menu icon.
Choose Latest or Title to sort.
JPEG files from a direct USB scan are grouped into one document for each scan date.
3: Latest/Title sorting buttons; choose the desired order.
4: Edit-menu icon for the document.
Renaming documents
Instructions from the manual
Renaming documentsView
In the document list tap the circular edit-menu icon beside the document. Choose Edit Data Profile, enter the desired name and tap OK.
Deleting documents
Instructions from the manual
Deleting documentsView
In the document list tap the edit-menu icon beside the document. Choose Delete and OK to confirm.
Rotating documents
Instructions from the manual
Rotating documentsView
In the document list tap the edit-menu icon beside the document. Choose Rotate R by 90 deg. or Rotate L by 90 deg.; every page rotates and the document is saved.
Combining documents
Instructions from the manual
Combining documents4 steps
In the document list press Menu > Combine.
Select the documents in the required order; they combine in selection order.
Tap OK, then OK to confirm.
The first selected document supplies title/category; an empty item is taken from the next document containing that information.
Sharing documents with other applications
Instructions from the manual
Sharing documents with other applications4 steps
In the document list tap the edit-menu icon beside the document, then Share.
Choose JPEG or PDF to suit the receiving application.
Tap that application in the resulting list.
Use the application’s own guide for its operation.
Opening a document to view each page
Instructions from the manual
Opening a document to view each page4 steps
Tap the document in the list, then choose a page thumbnail.
To delete from thumbnails, press Menu > Edit Image, select pages, then Delete > OK.
View other pages by flicking left/right.
To jump, hold the displayed page until the jump screen appears, slide the bar to the wanted page and tap OK.
Screen orientation setting
Instructions from the manual
Screen orientation settingView
With a page displayed, press Menu > Advanced Settings > Screen Orientation. Choose Fixed to Portrait, Fixed to Landscape or Device-dependent.
Page scale setting
Instructions from the manual
Page scale settingView
With a page displayed, press Menu > Advanced Settings > Scale. Choose Fit to Width or Fit to Height.
Page order setting
Instructions from the manual
Page order settingView
With a page displayed, press Menu > Advanced Settings > Flick Direction. Choose Go to Next by Left Flick or Go to Next by Right Flick.
Dividing a document
Instructions from the manual
Dividing a document4 steps
With the page before the required split displayed, press Menu > Edit Image.
Tap the split-document icon, then Split.
Read the new document titles and tap OK.
The original is deleted after splitting; only the new documents remain.
Deleting a page
Instructions from the manual
Deleting a pageView
With a page displayed, press Menu > Edit Image. Tap the trash-can icon, then OK to confirm.
Rotating a page
Instructions from the manual
Rotating a pageView
With a page displayed, press Menu > Edit Image. Tap the left- or right-rotation icon. The displayed page rotates 90 degrees and is saved.
Sharing a page with other applications
Instructions from the manual
Sharing a page with other applicationsView
With a page displayed, press Menu > Share. Tap the receiving application in the list. The page is shared as JPEG. Use the application’s own guide for operating instructions.
Model details
Model and compatibility
Control panel
ADS-2100e has Error and Power LEDs, Stop, Scan to PC and Scan to USB keys with the documented key LEDs; no touchscreen is shown for this model.
Error LED
Reports errors including document jam, open Front Cover, unusable/unsupported device and multifeed; the specific LED pattern identifies the condition.
Stop key
Cancels a job, wakes the scanner, recovers from an error or disconnects Remote Setup.
Computer scan key
Scan to PC key and LED start scanning to the computer.
USB scan key
Scan to USB key and LED start scanning to a USB device.
Memory and AC supply
256 MB; 220–240 V AC, 50/60 Hz.
Power consumption
Approximately 18 W scanning,1.5 W ready,1.5 W sleep and0.3 W power down; source footnotes define measurement conditions.
Closed dimensions and weight
299 × 220 × 179 mm (width × depth × height); approximately3.3 kg for ADS-2100e.
Operating environment
5–35°C and20–80% humidity.
Automatic feeder
Up to50 pages of80 g/m² A4 paper, or less than5 mm stack thickness.
Document dimensions
Multiple paper:51–215.9 mm wide,70–355.6 mm long. Single paper:51–215.9 mm wide,70–863 mm long.
Scan resolution and width
Optical up to600 ×600 dpi; interpolated up to1200 ×1200 dpi; scanning width up to212 mm.
USB mass-storage drives up to32 GB, formatted FAT12/FAT16/FAT32/exFAT; USB2.0 Full Speed direct USB interface.
USB computer interface
Hi-Speed USB2.0 with a Type A/B cable no longer than2 m; the scanner also supports computer USB1.1. LAN and WLAN specifications are ADS-2600We only.
Guide software scope
The 2014 guide describes Windows XP/Vista/7/8/8.1 and OS X10.7.5/10.8.x/10.9.x; software instructions use those original versions. Consult current Brother downloads for later driver updates.
Ready
Ready to scan.
Ready (PC connected)
Ready and connected to the computer.
Ready (USB connected)
Ready and connected to a USB device.
Ready (PC and USB connected)
Ready and connected to both computer and USB device.
Sleep
Acts as if turned off; wake with any key, opening Top Cover or loading a document.
Remote Setup
Remote Setup is in progress; Cancel in its computer window ends it.
Scanning to PC
Computer scanning in progress; the USB key lights if a USB drive is also attached.
Scanning to USB
USB scanning in progress; the PC key lights if a computer is also connected.
Ejecting Paper
Paper ejection in progress; Stop finishes when no ADF document is loaded or ejection is paused.
Checking Device
Checking the attached USB device; the PC key lights if a computer is also connected.
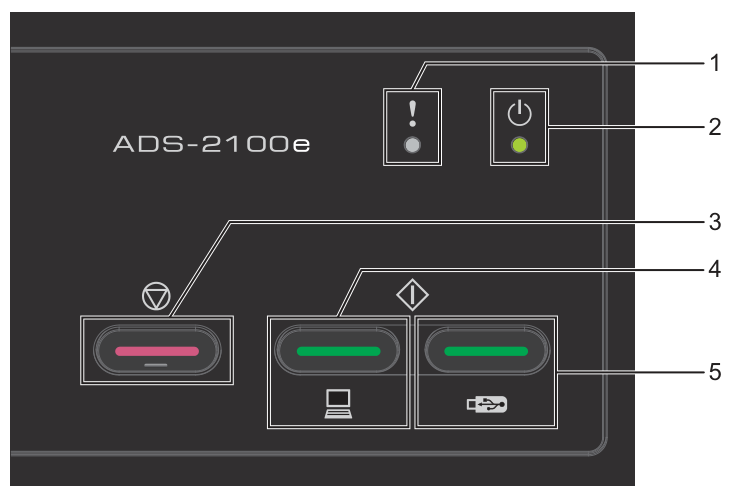

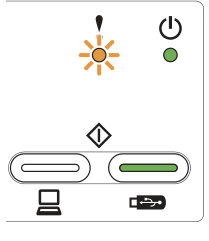 Memory full2 checks
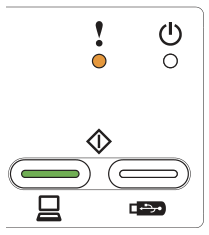 Separation Pad used over 50,000 times
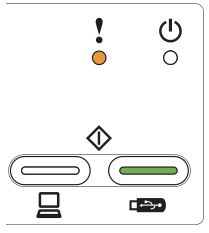 Pick-up Roller used over 50,000 times
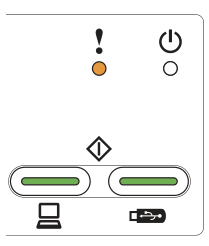 Pad and roller both used over 50,000 times
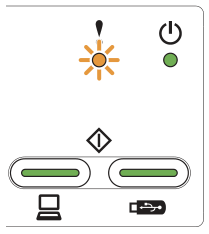 Guides do not fit, unsuitable settings or dirty pad/roller3 checks
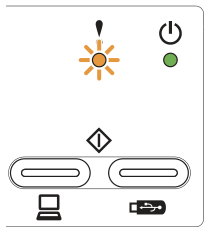 Several pages fed together4 checks
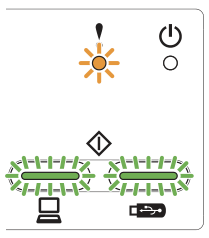 Unusable device connected to USB
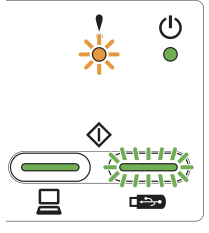 Unsupported device in direct USB port
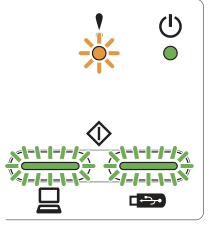 Hub or flash drive with a hub
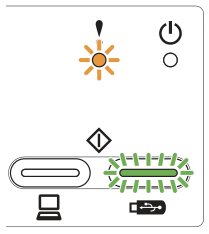 USB drive full
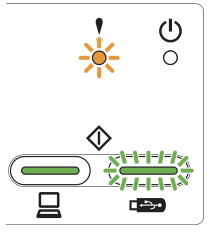 USB flash drive removed during access
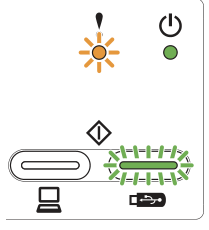 Inserted drive write-protected
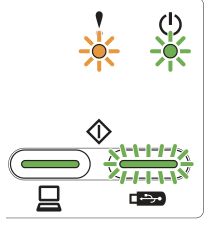 Too many files on the drive
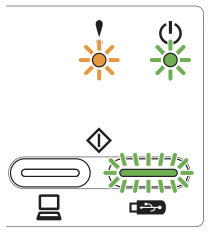 Maximum sequential filename reached
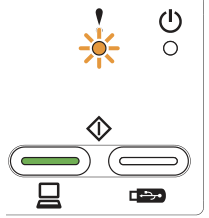 Front Cover open
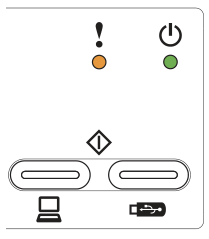 All scanned pages treated as blank
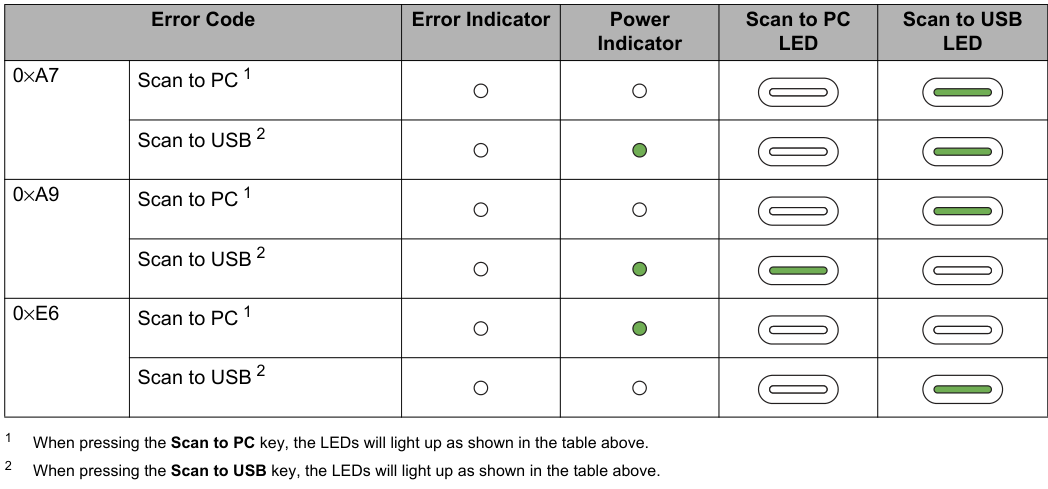 service call indication 0xA7
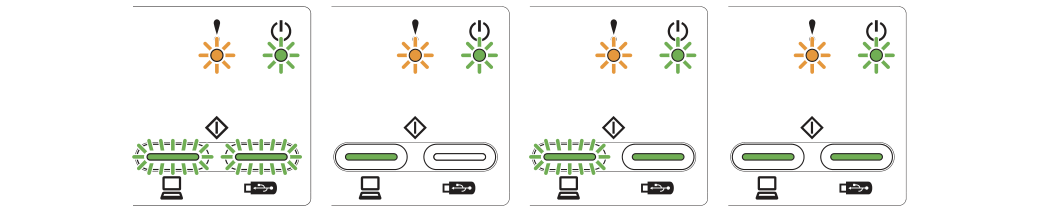 Service-call LED combination