The checks and guides below come from the official manuals for this model.
No matches for this wording. Try a light name, error code or a shorter phrase.
Troubleshooting
Find the problem you are experiencing
Problems with the scanner1 check
A problem with the product.
If there is a problem with the product, contact support before returning it to the place of purchase.
US support: kodak@camarketing.com or 844-516-1539.
International support: kodakintl@camarketing.com or 844-516-1540.
Guides
Introduction
Instructions from the manual
Check smartphone compatibility4 steps
Use a phone whose camera can focus at 8 cm: the space between the film and camera lens is 8 cm, and only phones that focus at that distance are compatible.
Read all directions before using the scanner and retain the guide for reference.
This scanner is intended for household use only.
A smartphone is required, and scan quality depends on the quality of its camera.
Product overview
Instructions from the manual
Identify the scanner partsView
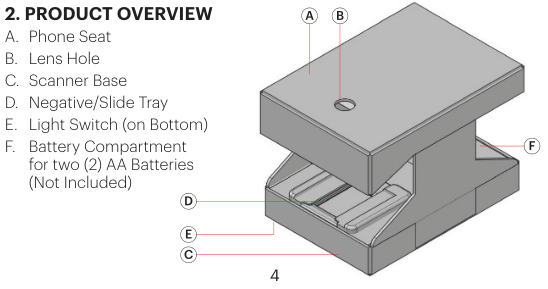
Locate the phone seat (A), lens hole (B), scanner base (C), negative/slide tray (D), light switch on the bottom (E), and compartment for two AA batteries, not included (F).
Safety precautions
Instructions from the manual
Use and store the scanner safely7 steps
Use the device only to scan film negatives and slides.
It cannot develop unexposed film; attempting this can permanently and irreversibly damage or destroy your photos.
Never use damaged batteries, batteries with torn wrappers, or batteries that appear swollen or abnormal.
Swelling indicates internal damage; dispose of such batteries correctly.
Do not mix battery brands.
Always use new batteries, and do not mix old and new batteries.
Do not store the scanner where it may become wet or damp, or in places exposed to high humidity.
Setup
Instructions from the manual
Prepare the scanner before loading filmView
Review the setup instructions carefully before using the scanner. Do not attempt to use negatives or slides before the unit is properly set up.
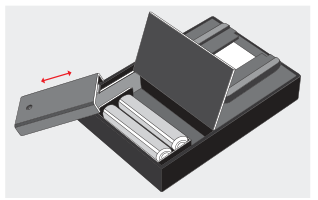
5a. install the batteries
Instructions from the manual
Install the batteriesView
Open the battery compartment on the scanner base. Remove its cover and insert two AA batteries, matching the indicated polarities. Replace the cover and close the compartment.
Install two AA batteries with the indicated polarities, then close the compartment.
Diagram key
Cover arrow: Remove the cover before inserting the batteries; replace it and close the compartment afterward.
First battery markings: Insert the first AA battery matching the indicated polarities.
Second battery markings: Insert the second AA battery matching the indicated polarities.
5b. assemble the mobile film scanner
Instructions from the manual
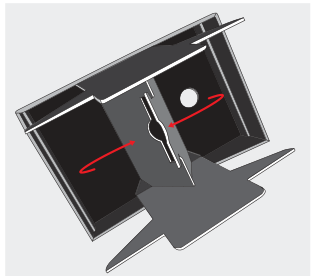
Assemble the mobile film scanner3 steps
Unfold the legs inside the scanner top lid to reveal the wings underneath.
Pull the wings inward so that the tab on one sits in the slot of the other, as illustrated.
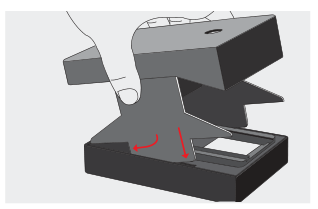
Slide the leg tabs into the slits on either side of the base.
Pull both wings inward and join the tab and slot.
Diagram key
Left wing arrow: Pull the wing inward so that the tab on one wing sits in the slot of the other.
Right wing arrow: Pull the wing inward so that the tab on one wing sits in the slot of the other.
Slide the leg tabs into the slits on both sides of the scanner base.
Diagram key
Left tab arrow: Slide this leg tab into the slit on its side of the base.
Right tab arrow: Slide this leg tab into the slit on its side of the base.
6a. download the mobile film scanner app
Instructions from the manual
Download the mobile film scanner appView
Open the Apple App Store or Google Play Store. Search for the KODAK Mobile Film Scanner app. Download the app.
6b. power on the scanner
Instructions from the manual
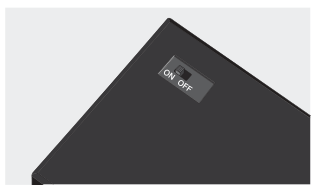
Power on the scanner lightView
Flip the power switch on the bottom of the scanner to ON to turn on the internal light.
Bottom power switch: the manual instructs using ON to illuminate the film.
Diagram key
ON: Set the bottom power switch to this position to turn on the internal light.
OFF: The other printed switch-position label; the manual provides no separate shutdown procedure.
6c. scan negatives and slides
Instructions from the manual
Scan negatives and slides6 steps
Open the app.
Select the desired negative or slide type from the menu.
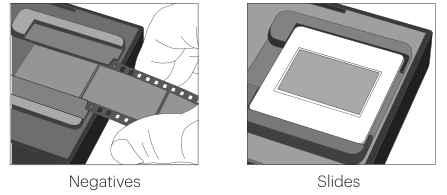
If using negatives, feed the negative through the tray as illustrated.
If using slides, place the slide on the tray as illustrated.
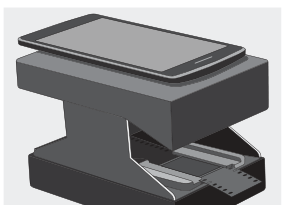
Place a phone on the phone seat with its camera lens over the lens hole.
Adjust the image and phone as needed, then take a picture to scan the photo.
Feed negatives through the tray, or place a slide on the tray, as illustrated.Place the phone with its camera lens over the scanner’s lens hole.
6d. edit and share photos
Instructions from the manual
Edit, save and share photos6 steps
Use the built-in editing features to crop, rotate, adjust and add filters to the photo.
When finished editing, tap Done.
To save the photo, tap the CAMERA icon.
To return to the home screen, tap the HOME icon.
To share the photo to social media or another sharing app, tap the SHARE icon.
For best results, the manual recommends editing scanned photos in a separate photo processing program.
Finish editing with Done; the printed CAMERA icon saves the photo and HOME returns to the home screen.
Warranty
Instructions from the manual
Request warranty service8 steps
The manual’s limited warranty is for the original consumer purchaser, not subsequent owners or transferees; its one-year period starts on the purchase date and is not extended by repair or replacement.
During that warranty period, call 844-516-1539 or email kodak@camarketing.com to obtain a Defective Merchandise Authorization (DMA) number.
No warranty service is provided without a DMA number.
The purchaser pays return shipping to the service facilities; the provider pays shipping of the replacement unit to the purchaser.
The warranty covers defects in materials and workmanship.
It excludes damage from transportation, storage, improper use, failure to follow product instructions or perform preventive maintenance, modifications, unauthorized repair, normal wear and tear, and external causes such as accidents or abuse.
For a covered defect, the provider may repair or replace the product or defective part without charge, or refund the purchase price if an exchange unit cannot be provided.
The limited warranty is subject to the limits, exclusions and legal-rights qualifications in the complete manual.
Waste electrical and electric equipment (weee)
Instructions from the manual
Recycle the scanner at end of life4 steps
Where the WEEE marking applies, do not dispose of the product with household waste at the end of its working life.
Separate it from other waste and recycle it responsibly.
Household users should ask the retailer or local government where and how to take it for environmentally safe recycling.
Business users should contact their supplier and check their purchase contract; do not mix the product with other commercial waste.
Controls and parts
See the manual diagrams 1 diagram
Scanner parts: the bottom light switch and battery compartment are shown on the assembled RODMFS50.
Diagram key
A: Phone seat.
B: Lens hole.
C: Scanner base.
D: Negative/slide tray.
E: Light switch on the bottom.
F: Compartment for two AA batteries, not included.
Model details
Model and compatibility
Film formats
Color and black-and-white 35mm negatives and 35mm slides. [1]
Phone focus
A phone camera capable of focusing at 8 cm is required. [1]