The checks and guides below come from the official manuals for this model.
No matches for this wording. Try a light name, error code or a shorter phrase.
Troubleshooting
Find the problem you are experiencing
Best possible scan quality1 check
How can I get the best quality scan possible?
Ensure slides and film are clean. Immediately before scanning, clean the inside with the supplied brush as described in the reviewed cleaning instructions.
Prepare film for the best scan1 check
How should I prepare the film/slides to ensure the best possible scan?
Remove dust and fingerprints from the slide or film with an appropriate cleaning cloth.
A consistent spot on every scanned slide1 check
I’ve noticed a consistent spot on every slide I have scanned. Is something wrong with my scanner?
A small amount of internal dust is likely. Use the included cleaning brush to remove debris, following the reviewed cleaning instructions.
Scanning without a computer1 check
Do I need a computer to begin scanning?
A computer is not needed to start scanning. Save to an SD card up to 128GB or the 64MB internal memory, then export to a computer later.
Saved image file format1 check
What file format are the images saved as?
Images are automatically saved in JPG format.
Screen is black although the scanner has power1 check
The scanner screen is black but it has power.
Ensure the TV Out cable is disconnected from the scanner’s back.
Scan developed film only1 check
Can I use this to scan raw film or do I need to develop the negatives first?
Use developed film only; the scanner does not work with raw film.
Not all images appear on the computer1 check
I cannot see all my images on the computer.
With an SD card inserted, the computer sees only images on that card. Remove the card to see images in internal storage.
TV Out image does not appear on the TV1 check
TV Out image is not showing on my TV.
The default output is NTSC. If the TV needs PAL, disconnect the TV Out cable, choose TV Out in the Main Menu and select PAL.
Recycle old film, slides and negatives1 check
Where can I recycle my old slides, negatives, film?
Older film and photographs can contain chemicals that make recycling difficult. Ask your local recycling company how to recycle or dispose of them.
Scanned images have faded colors1 check
My slides/negatives scanned images have faded colors.
Slides and negatives can degrade and lose color over time. Ensure they are clean and use the color adjustment options while scanning.
Scanned colors are reversed or negative1 check
The colors in my scanned images are reversed/negative.
Change the menu’s film type to Negative for correct scanning.
Guides
Safety alerts
Instructions from the manual
Stop using a damaged or abnormal scanner2 steps
If the scanner emits smoke or an unusual smell, has been exposed to rain, water or other liquids, does not operate normally when the instructions are followed, shows a distinct change in performance, or has been dropped or damaged, stop using it immediately.
Unplug the power cord and refer servicing to a qualified service professional.
Best practices for safe use
Instructions from the manual
Use the scanner safely8 steps
Use only standard-size films and manufacturer-specified attachments and accessories.
Unwind and straighten the USB cord before use.
Check that the voltage on the rating label matches the local electricity supply.
Unplug the wall power adapter during thunderstorms and when the scanner will be unused for a long time.
Do not use the scanner near water or immerse it, the power cord or accessories in any liquid.
Keep ventilation openings clear and follow the manufacturer’s installation instructions.
Keep the scanner away from radiators, heat registers, stoves and other heat sources, including amplifiers.
Do not service or disassemble the scanner yourself: opening or removing covers can expose dangerous voltages or other hazards.
Important safety instructions
Instructions from the manual
Check the supplied power adapter5 steps
The manual specifies an operating temperature of 25°C; it does not give a broader operating range.
Use the provided Shenzhen Shi Ying Yuan Electronics Co., Ltd.
AC/DC adapter, model SAW06B-050-1000U.
Keep the power socket easily accessible.
The scanner’s safety markings are on its bottom.
Cleaning and care
Instructions from the manual
Clean the scanner housing and lens5 steps
Ensure the scanner is clean before use.
Do not use liquid cleaners; clean the outside only with a dry cloth.
Use only the included cleaning brush inside the scanner.
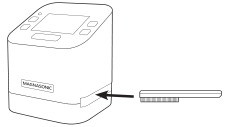
Insert the brush’s soft end face down into the film/slide holder slot.
Carefully move the brush around inside to remove dust or debris from the lens.
Insert the supplied brush soft end face down to clear dust from the lens.
Diagram key
Brush insertion arrow: Insert the soft end face down into the film/slide holder slot; carefully move it around inside to clear lens dust or debris.
Product information
Instructions from the manual
Identify the controls and connectionsView
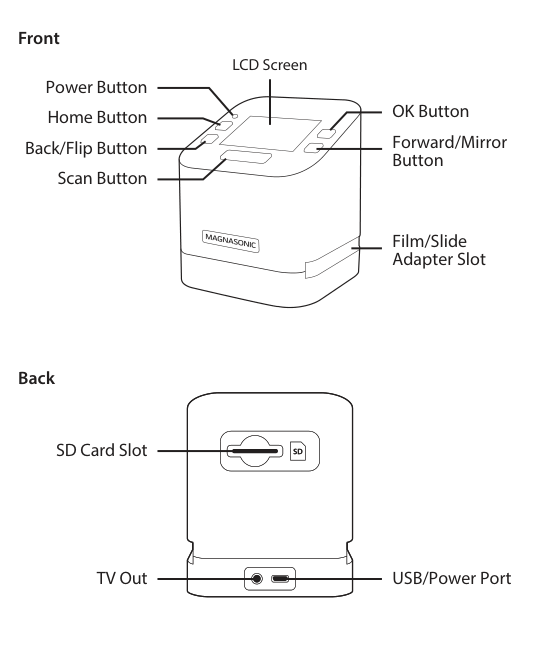
The front has the Power, Home, Back/Flip, Scan, OK and Forward/Mirror buttons, LCD screen and film/slide adapter slot. The back has the SD card slot, TV Out and USB/Power port.
Powering on your film scanner
Instructions from the manual
Power on the scanner4 steps
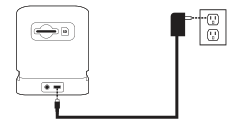
Connect the USB cable to the scanner’s USB port.
Connect its other end to the included USB wall adapter and plug the adapter into a power outlet.
Press and hold Power to turn on the scanner.
It automatically turns off after 10 minutes without activity.
Connect the scanner to the supplied USB wall adapter before holding Power.
Diagram key
Scanner-side connector: Connect the USB cable to the scanner USB port.
Wall-adapter connector: Connect the other end to the included USB wall adapter; plug that adapter into a power outlet.
SD marking: Identifies the rear SD card slot, as named in the controls figure.
USB/Power port marking: Identifies the rear port used for the USB power cable, as named in the controls figure.
Changing the language
Instructions from the manual
Change the languageView
In the Main Menu, select LANGUAGE and press OK. Use the left and right buttons to choose English, Espanol, Francais, Deutsch, Japanese or Chinese. Press OK to select the language.
Date and time setting
Instructions from the manual
Set the date and time4 steps
In the Main Menu, select DATE AND TIME and press OK.
Use the left and right buttons to select the correct year.
Press OK to move through Year, Month, Day, Hour, Minutes and Seconds, in that order.
Hours use a 24-hour clock; 12 and higher indicate PM.
Slide types
Instructions from the manual
Identify film and slide typesView
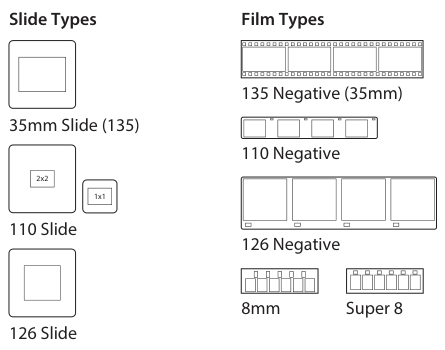
Compare your slides with the manual’s 35mm (135), 110 in 2×2 or 1×1 mounts, and 126 examples. Compare film with the 135 (35mm), 110, 126, 8mm and Super 8 negative examples.
Printed slide and negative examples for identifying the film type.
Slide adapters
Instructions from the manual
Choose a slide adapter3 steps
Use the pictured slide adapter for 35mm (135), 126 and 110 slides in 2×2 mounts.
For a 110 slide in a 1×1 mount, use the pictured 110 slide insert inside the slide adapter.
The complete source figure shows the adapter arrangements.
Negative adapters
Instructions from the manual
Choose a negative adapter4 steps
Use the pictured negative adapter for 135 (35mm) and 126 negatives.
For 110 negatives, use the 110 negative insert in the negative adapter.
For 8mm or Super 8 negatives, use the Super 8/8mm insert in the negative adapter.
The complete source figure shows each arrangement.
Prepping your film/slides
Instructions from the manual
Prepare the film or slide5 steps
Ensure slides or film are clean and free of dirt and debris.
Open the appropriate labelled slide or film adapter and insert the material.
If the type is uncertain, compare it with the manual’s examples.
Ensure the slide or film faces the correct way and is not bent.
Close the adapter and press its edges until it locks into place.
Preparing the film scanner
Instructions from the manual
Prepare the scanner and select film type6 steps
Press and hold Power to turn on the scanner.
Insert the prepared slide or film adapter into the slot on the scanner’s right side.
Use the arrow buttons in the Main Menu to highlight FILM TYPE and press OK.
Use the right button to cycle through Negatives, Slides or B&W, then press OK.
Use the right button on the next screen to select the correct size and press OK.
The original slide or film’s quality affects the scanned image’s quality.
Using an sd card
Instructions from the manual
Insert or remove an SD card3 steps
The scanner has 64MB of internal memory and accepts an SD card up to 128GB; a 128GB card may need formatting before first use.
Insert the card label up into the rear SD card slot until it clicks into place.
To remove it, press the card until it clicks and pops out, then take it out of the slot.
Formatting your sd card
Instructions from the manual
Format an SD card4 steps
Warning: formatting deletes every file on the SD card.
Download its files to your computer before formatting.
In the Main Menu, choose FORMAT SD and press OK.
At the confirmation prompt, use the left button to choose Yes and press OK to begin formatting.
Scanning your images
Instructions from the manual
Scan and save images12 steps
Press SCAN to enter Capture mode.
The film or slide image appears, with its type at the top right.
The screen image does not reflect scanned image quality.
To adjust brightness or color, press OK.
Use the left and right buttons to move among Brightness (EV), Red (R), Green (G) and Blue (B), pressing OK to adjust each individually.
When the settings are correct, press SCAN to return.
Before scanning, use the left button to flip the image or the right button to mirror it if needed.
When ready, press SCAN to capture and save the image to internal memory or to the SD card if one is inserted.
The FS52 cannot scan directly to a computer.
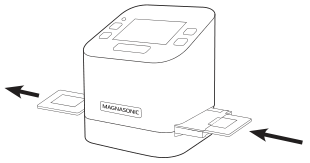
For multiple slides or negatives, push or pull them through the adapter without removing it.
Take care not to bend or damage film or negative strips.
Press HOME to return to the Main Menu when finished.
Feed multiple slides or negatives through the adapter without removing it.
Diagram key
Right feed arrow: Push or pull slides or negatives through the adapter without removing it. Avoid bending or damaging film/negative strips.
Left feed arrow: The material passes through the adapter without removing it; avoid bending or damaging film/negative strips.
Viewing your scanned images
Instructions from the manual
View saved images5 steps
Choose GALLERY and press OK to view saved images.
They play automatically as a slideshow.
Press OK to stop the slideshow and review manually.
Use the left and right buttons to move through saved images.
Press OK again to open Gallery options: resume the slideshow, delete the image or return to the Main Menu.
Transferring images to your computer
Instructions from the manual
Transfer images to a computer7 steps
Complete scanning on the FS52 first; it cannot scan directly to a computer.
Ensure the computer is on.
Connect the scanner to the computer with the included USB cable.
Turn on the scanner.
Choose USB UPLOAD in the scanner menu.
A new folder containing the saved images appears on the computer.
Move those images from the scanner to the computer.
Watching saved images from a tv screen
Instructions from the manual
View images on a TV6 steps
Turn on the scanner.
Connect the supplied TV Out cable to the scanner’s rear TV Out port.
Connect the other end to the TV’s Video input.
The scanner LCD automatically turns off when connected to the TV.
Set the TV to the correct input or video source.
The scanner screen should now appear on the TV.
Fcc information
Instructions from the manual
Radio or television reception interference5 steps
If scanner operation causes radio or TV interference, confirmed by turning it off and on, try one or more of the following measures.
Reorient or relocate the receiving antenna.
Increase separation between the scanner and receiver.
Connect the scanner to an outlet on a different circuit from the receiver.
Ask the dealer or an experienced radio/TV technician for help.
Scanner locks up after severe interference or staticView
In the rare case that severe interference, external noise or static electricity causes the scanner to lock up, turn it off. Wait at least five seconds, then turn it on again.
Magnasonic® warranty
Instructions from the manual
Request warranty assistance10 steps
For warranty assistance, provide proof of purchase from an authorized Magnasonic dealer.
The manual provides a one-year parts and labour warranty against defects in materials and craftsmanship.
If a covered product cannot be repaired, it is replaced; a discontinued product is replaced by its newest version or a current equivalent.
Replacement parts retain the original warranty’s remaining period.
The warranty excludes abusive use, negligence, accidents, improper installation or use contrary to the manual; tampering, modification, adjustment or repairs by other parties; cosmetic or normal-wear damage; environmental damage including voltage or liquid spillage; missing required model, serial or certification markings; rental or commercial use; installation, setup or programming charges; and incorrect supply voltage.
Use a voltage converter where applicable.
Visit Magnasonic’s support page for assistance.
Ship warranty returns prepaid in the original shipping container or an equivalent; you bear the risk of loss or damage in transit.
Deliver the product with proof of purchase.
For a manufacturer’s defect within the warranty period, Magnasonic covers parts, labour and return costs.
Controls and parts
See the manual diagrams 1 diagram
FS52 front controls and rear SD, TV Out and USB/Power connections.