MODEL REFERENCE
Brother PT-1880
10 errors · 9 troubleshooting topics · 32 guides
The checks and guides below come from the official manuals for this model.
No matches for this wording. Try a light name, error code or a shorter phrase.
Errors and messages
Messages and indicator states from the manual Battery Weak!batteries are weak
Replace all six batteries together with six new AA LR6 alkaline batteries, matching the marked polarity. Do not mix old and new batteries or alkaline batteries with other types.
Check Battery!batteries are about to run out
The installed batteries are about to run out.
Invalid!invalid numbering or length selection3 checks
No Text!no text available3 checks
Line Limit!line count exceeds tape capacity2 checks
No Cassette!no cassette installed
Install a tape cassette with power turned off.
Cutter Error!cutter used during printing
Do not touch the cutter lever during printing or feeding.
Full!text buffer full
The maximum 80 characters have already been entered.
Text Too Long!text exceeds selected length
The text length exceeds the selected Label Length or Auto Format setting length.
No Frame OK?frame unavailable on narrow tape
When printing on 3.5 mm tape with an invalid Frame setting, press OK to print without a frame or Esc to cancel.
Troubleshooting
Find the problem you are experiencingDisplay stays blank3 checks
- Battery insertion
- Check battery insertion.
- Weak batteries
- Replace all six batteries together with six new AA LR6 alkaline batteries, matching the marked polarity. Do not mix old and new batteries or alkaline batteries with other types.
- Adapter connection
- Check that the AC adapter is correctly connected.
Margins are too largeView
Select Half or Narrow under Margin to reduce margins.
Print fails or characters are malformed3 checks
- Cassette installation
- Check that the cassette is correctly inserted.
- Empty cassette
- Replace the cassette.
- Cassette cover
- Close the tape compartment cover correctly.
Settings clear on their own2 checks
- Weak batteries
- Replace all six batteries together with six new AA LR6 alkaline batteries, matching the marked polarity. Do not mix old and new batteries or alkaline batteries with other types.
- Power disconnected for more than five minutes
- Text and formats are lost, and language and unit settings are cleared.
Blank horizontal line on label2 checks
- Dust on print head
- Turn power off, remove the cassette and gently wipe the print head up and down with a dry cotton swab. Do not touch the print head mechanism.
- Optional cleaning cassette
- The optional TZ-CL4 print-head cleaning cassette makes cleaning easier.
Machine does not respondView
Turn off. Hold Shift and R, press Power to turn on, then release Shift and R. Display text and formats, language and unit settings are cleared.
Power turns off when printing2 checks
- Weak batteries
- Replace all six batteries together with six new AA LR6 alkaline batteries, matching the marked polarity. Do not mix old and new batteries or alkaline batteries with other types.
- Battery insertion
- Check battery insertion.
Tape does not feed or gets stuck2 checks
- Tape path
- Check that the tape end feeds under the guides.
- Cutter during printing
- Do not touch the cutter lever during printing.
Clear text and formatView
Hold Shift and press Backspace, then select Text & Format.
Guides
Tape cassettes
Instructions from the manualInstall a tape cassette8 steps
- Turn power off.
- Lift both sides of the tape compartment cover together; pull an existing cassette straight up.
- Insert the new cassette until it snaps into place.
- Check that the tape end feeds under the guides.
- If the ink ribbon is loose, turn the toothed wheel in the arrow direction with your finger.
- After installing tape, hold Shift and press Print to feed once, then push the cutter lever to cut.
- Securely close the front cover until it snaps into place.
- Do not pull tape or cut during printing or feeding.
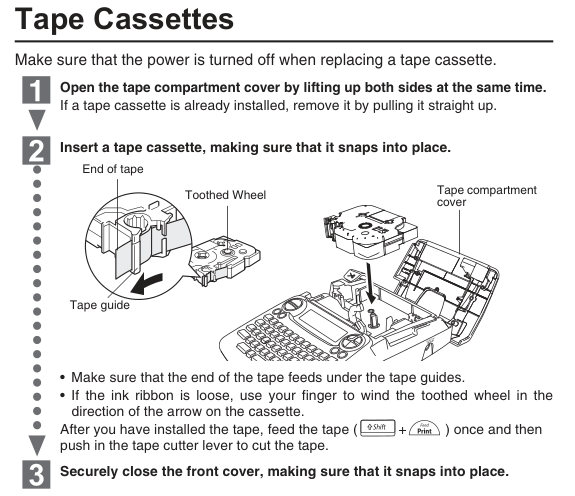
Diagram key
- End of tape: The tape end must feed under the guides.
- Tape guide: Tape guide.
- Toothed Wheel: If the ribbon is loose, wind the toothed wheel in the arrow direction with a finger.
- Tape compartment cover: Lift both sides together with power off; securely close until it snaps into place.
- Tape-path inset and arrow: The inset shows the end feeding under the tape guide.
- Cassette insertion arrow: Insert the cassette until it snaps into place.
- 1 and downward sequence arrow: Turn power off; lift both sides of the cover together and pull an existing cassette straight up.
- 2 and dotted sequence line: Insert the cassette until it snaps into place; check the tape path and wind a loose ribbon as documented.
- Shift + Print: Feed tape once after installation, then push the cutter lever to cut.
- 3 and downward sequence arrow: Securely close the front cover until it snaps into place.
Power supply
Instructions from the manualInstall batteries5 steps
- Turn power off.
- Turn the machine over, remove the battery cover and any existing batteries.
- Replace all six batteries together with six new AA LR6 alkaline batteries, matching the marked polarity.
- Do not mix old and new batteries or alkaline batteries with other types.
- Insert the three bottom battery-cover hooks into the slots, then press the cover firmly until it snaps into place.
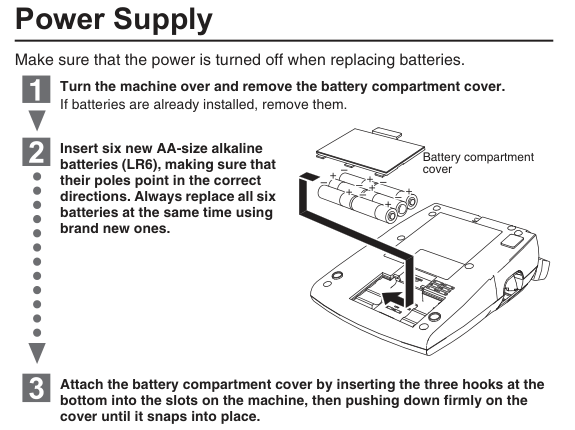
Diagram key
- Battery compartment cover: Turn power off and remove the battery cover and any existing batteries.
- Six battery positions and repeated +/− marks: Insert six new AA LR6 alkaline batteries with correct polarity; replace all six together. Do not mix old/new batteries or types.
- Cover hook insertion/closing arrow: Insert the three bottom cover hooks into the machine slots, then press down firmly until it snaps into place.
- 1 and downward sequence arrow: Turn power off, turn the machine over and remove the cover and existing batteries.
- 2 and dotted sequence line: Insert six new AA LR6 alkaline batteries with correct polarity, replacing all six together.
- 3 and downward sequence arrow: Insert the three bottom cover hooks into the slots and press down until it snaps into place.
Connect the optional adapter4 steps
- Use the specified voltage and suggested adapter AD-24, AD-24ES, AD-24ESA, AD-24ESAW, AD-24ESA-01 or AD-24-ESAW-01.
- Connect its cord to the right-side adapter jack, then plug it fully into the nearest standard electrical outlet.
- Do not use a loose outlet.
- AA LR6 alkaline batteries together with the adapter are recommended for memory backup.
Keyboard & lcd
Instructions from the manualRead the LCD and use cursor controls4 steps
- The LCD shows one row of 15 characters.
- Entered text can contain up to 80 characters and scrolls across the display.
- Hold Shift with a cursor key to move to the beginning or end.
- The labeled indicators show Size, Width, Style, Underline/Frame, Label Length, Caps and Cursor.
Turning the power on
Instructions from the manualPower on and reset5 steps
- Press Power to turn on.
- The machine turns off automatically after five minutes without a key press.
- Esc cancels operations.
- To initialize factory settings, turn off, hold Shift and R, press Power to turn on, then release Shift and R.
- Text, formats, language and unit settings are cleared.
Setting language
Instructions from the manualSet the display languageView
Press Function, choose Language with the cursor keys and OK, then select English, Spanish, French or Portuguese and confirm with OK.
Setting unit
Instructions from the manualSet inch or millimetre unitsView
Press Function, select Unit with cursor keys and OK, choose inch or mm and confirm with OK.
Setting font
Instructions from the manualChoose a fontView
Press F1 for Helsinki or F2 for Bohemia.
Switching upper case/lower case
Instructions from the manualSwitch uppercase and lowercaseView
Press Caps to switch uppercase on or off.
Making two line text
Instructions from the manualCreate two-line textView
Move the cursor to where the second line starts and press Enter. Use 9 mm, 12 mm or 18 mm wide tape for two-line text.
Entering symbols
Instructions from the manualEnter symbolsView
Press Symbol, choose a symbol using cursor keys, then press OK. Press Symbol to go to the next group; Esc cancels.
Entering accented characters
Instructions from the manualEnter accented charactersView
Enter the base letter, press Accent, select the accented character with the cursor keys and press OK. Esc cancels. Accented-character order depends on the selected LCD language.
To clear
Instructions from the manualDelete characters or clear text3 steps
- Backspace deletes characters individually.
- Press Function, select Clear and then Text Only to delete text while retaining format; select Text & Format to clear both.
- Hold Shift and press Backspace for direct access to Text Only or Text & Format.
Setting [size]
Instructions from the manualSet text size3 steps
- Press Function, select Size and choose Large, Medium, Small or MAX; confirm with OK.
- Size adjusts automatically to tape width.
- MAX requires 18 mm tape, all uppercase text, Normal style and Underline/Frame Off.
Setting [width]
Instructions from the manualSet text widthView
Press Function, select Width, choose Normal, ×2 or ×1/2 and confirm with OK.
Setting [style]
Instructions from the manualSet text styleView
Press Function, select Style and choose Normal, Bold, Outline, Shadow, Italic, Italic Bold, Italic Outline, Italic Shadow or Vertical; confirm with OK.
Setting [underline/frame]
Instructions from the manualSet underline or frameView
Press Function, select Underline/Frame, choose Off, Underline, Round, Candy, Callout, Banner, Wooden, Vine, Hand or Flower and confirm with OK. Frames cannot print on 3.5 mm tape.
Setting [label length]
Instructions from the manualSet label lengthView
Press Function, select Label Length and choose Auto or 1.2–12.0 inches; confirm with OK. Number keys can enter the length. Space restores Auto.
Setting [tab]
Instructions from the manualInsert a tabView
Position the cursor where a tab is needed, then press Tab. Tabs align text; the illustrated example separates ABC and D.
Setting [tab length]
Instructions from the manualSet tab lengthView
Press Function, select Tab Length and choose Auto or 0.0–4.0 inches; confirm with OK. Number keys can enter the length. Space restores Auto.
Setting [auto format]
Instructions from the manualChoose Auto FormatView
Press Auto Format and choose a format with cursor keys and OK: VHS Spine 5.5 inches, Mini DV Spine 1.6 inches, Audio Tape 3.5 inches, CD Case Spine 4.4 inches, File Tab 3.2 inches or Divider Tab 1.6 inches.
Text preview
Instructions from the manualPreview text3 steps
- Press Preview.
- The LCD shows all text and label length in inch/mm, then returns to the original text.
- Only text is previewed; font, style, size, underline/frame and additional features are not.
Feeding (tape feed)
Instructions from the manualFeed tapeView
Hold Shift and press Print to feed 1.0 inch of tape, needed when installing a cassette or using Chain Print.
Printing
Instructions from the manualPrint and cut a labelView
Press Print. Push the upper-left cutter lever to cut. Do not cut while Print or Feed is displayed. Peel the label from its backing and apply it.
Setting [margin]
Instructions from the manualSet tape margins and Chain Print6 steps
- Press Function, select Margin and choose Full, Half, Narrow or Chain Print; confirm with OK.
- Full leaves 1 inch on each side, Half 1/2 inch and Narrow 1/6 inch.
- Cut along printed dots with scissors to center the text.
- Chain Print prints multiple copies with minimum margins; to combine styles, print one style, enter the next text in another style before feeding and print.
- Feed tape before using the cutter or part of the text may be cut off.
- Do not pull tape.
Using [print option]
Instructions from the manualPrint multiple copiesView
Press Function, select Print Option and Copies, choose 1–9 and confirm with OK. Number keys can enter the copy count.
Print incrementing numbers3 steps
- Position the cursor at the number in the text.
- Select Print Option, Numbering and the highest number to print.
- The selected number increases by one after each label; the example prints 0123, 0124 and 0125.
Print mirror labelsView
Select Print Option, Mirror and confirm Mirror Print? with OK. Use clear tape so the label reads correctly from the opposite side of glass or other transparent surfaces.
Memory (file)
Instructions from the manualSave, print or open a label file3 steps
- Up to five original labels can be saved, recalled, edited or overwritten.
- Press Function, choose File, then Save, Print or Open and a file number using cursor keys and OK.
- Overwrite? appears when saving to an occupied number: OK saves the new label; Esc cancels.
Function shortcuts
Instructions from the manualUse function shortcutsView
Press Function with the shortcut key, then OK to confirm: 1 Size; 2 Width; 3 Style; 4 Underline/Frame; 5 File; 6 Label Length; 7 Margin; 8 Tab Length; 9 Print Option; 0 Language; hyphen Unit; Backspace Clear.
General precautions
Instructions from the manualClean and store safely12 steps
- Use only Brother TZ tape with the TZ mark.
- Do not disassemble or modify the machine or adapter.
- Use only a soft dry cloth, never alcohol or organic solvents.
- Do not touch the print-head mechanism; use a soft wipe such as a cotton swab.
- Avoid the cutter edge.
- Do not press the LCD, put foreign or heavy objects on the machine or leave rubber/vinyl on it for extended periods.
- Keep equipment, adapter and plug dry, away from extreme heat, humidity, direct sunlight, rain and dust.
- Do not pull feeding tape, cut during feeding/printing or print with an empty cassette.
- Remove batteries and disconnect the adapter for prolonged non-use.
- After more than five minutes without power all text, formats and saved files are cleared.
- Do not mix batteries, reverse polarity or exchange them using metallic objects.
- Some characters or symbols may be difficult to read depending on conditions and settings.
Fcc notice
Instructions from the manualReduce radio or television interference2 steps
- If interference is confirmed by turning equipment off and on, reorient or relocate the receiving antenna, increase separation, connect equipment to an outlet on a different circuit from the receiver, or consult the dealer or an experienced radio/TV technician.
- Unapproved changes may void operating authority.
Controls and parts
See the manual diagrams 1 diagram
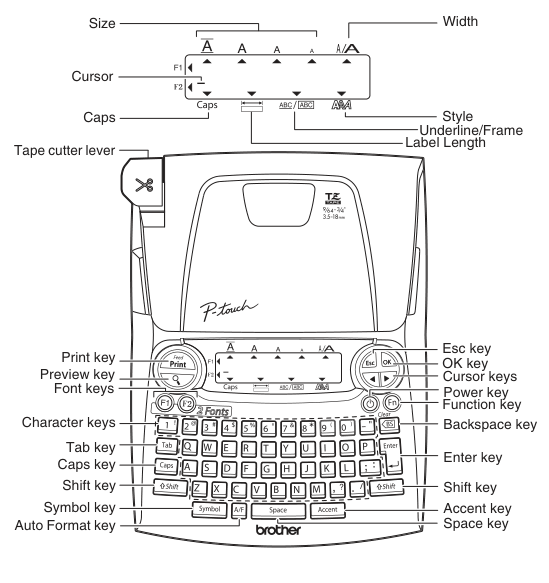
Diagram key
- Size and four size marks: Size indicator for Large, Medium, Small or MAX.
- Width and width mark: Width indicator for Normal, ×2 or ×1/2.
- Cursor and F1/F2 font markers: Cursor; F1 selects Helsinki and F2 selects Bohemia.
- Caps: Uppercase mode indicator.
- Style: Selected text style.
- Underline/Frame: Selected underline or frame.
- Label Length: Label-length indicator.
- Repeated LCD text and triangle indicators: Illustrative text and indicator positions; the LCD displays 15 characters while longer text scrolls.
- Tape cutter lever and scissors mark: Push the upper-left cutter lever to cut; do not cut while Print or Feed is displayed.
- Print key / Feed: Print; with Shift feed 1.0 inch of tape.
- Preview key: Preview text and label length.
- F1 / F2 font keys: Select Helsinki or Bohemia.
- Character keys and numbered positions: Enter text; number keys enter documented numeric settings.
- Tab key: Insert a tab at the cursor.
- Caps key: Switch uppercase on/off.
- Left Shift key: Used in the documented Shift combinations.
- Symbol key: Choose symbols.
- Auto Format key: Choose one of six fixed-length label formats.
- Esc key: Cancel operations.
- OK key: Confirm selections.
- Left/right cursor keys: Move the cursor or choose options; with Shift move to beginning/end.
- Power key: Turn power on/off.
- Function key: Select functions and documented shortcuts.
- Backspace key / Clear: Delete a character; Shift plus Backspace selects Text Only or Text & Format.
- Enter key: Start the second text line; Enter also confirms the depicted accented-character selection.
- Right Shift key: Used in the documented Shift combinations.
- Accent key: Select accented characters.
- Space key: Space; restores Auto for Label Length and Tab Length.
- Repeated keyboard letters, digits and punctuation: These are the marked text-entry controls, not fault codes.
- TZ and 3.5–18 mm mark: Brother TZ tape in the documented widths 3.5, 6, 9, 12 or 18 mm.