The checks and guides below come from the official manuals for this model.
No matches for this wording. Try a light name, error code or a shorter phrase.
Guides
Safety precautions
Instructions from the manual
Stop using a damaged or abnormal scanner3 steps
Do not attempt to disassemble or modify any part of the scanner.
Do not touch its inside after it has fallen or suffered other damage, to avoid injury.
If the scanner smells unusual or behaves abnormally, stop using it immediately.
Use and store the scanner safely6 steps
Do not use the scanner in wet, humid or dusty areas.
Do not overload the computer’s USB connections; overloading can make the scanner work poorly.
Use films of standard size.
Ensure the luminous area is clean before use to obtain a clean image.
Do not clean the scanner with alcohol, gasoline, diluent or other organic solvents.
Disconnect the USB cord or adapter from the computer or power outlet when leaving the scanner unused for a long period.
Scanner slows down or freezes with a large SD card1 check
Pre-reading a large-capacity SD card can slow response or freeze the system.
The scanner supports SD cards up to 128GB, but the manual recommends 16GB or less.
It pre-reads and calculates card capacity to determine the number of images that can be stored.
Large cards can slow its response or freeze the system.
If this occurs, disconnect the power cable to restart the scanner.
Resume after automatic shutdownView
To protect the scanner and save energy, it shuts down after 30 minutes without operation. Press Power again to resume operation.
3: package contents
Instructions from the manual
Check the supplied holders and accessories2 steps
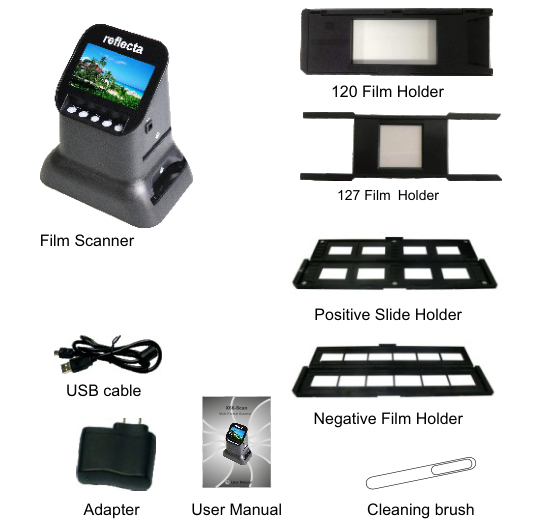
The package includes the film scanner; a 120 film holder for positive, negative and black-and-white 120 film; a 127 holder for 4×4cm 127 slides; a negative holder for 135 strips with 24×36mm frames; and a positive slide holder for 5×5cm mounted slides.
It also includes a 5V AC/DC adapter, USB cable, cleaning brush and user manual.
Description of parts
Instructions from the manual
Identify the scanner parts2 steps
The parts illustration identifies the scanner, 120 holder, 127 holder, positive slide holder, negative film holder, USB cable, adapter, cleaning brush and user manual.
When cleaning the backlight with the supplied brush, insert it from the side of the scanner.
Product indicator
Instructions from the manual
Identify the display and controlsView
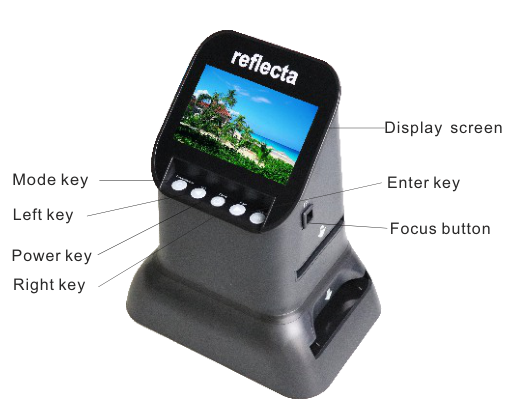
The English source illustration identifies the display screen; Mode, Left, Power, Right and Enter keys; and the Focus button.
120 holder loading method
Instructions from the manual
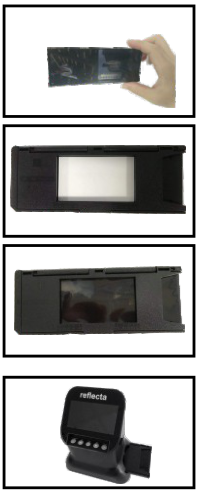
Load 120 film6 steps
Hold the film toward the light with its glossy side facing you.
Take out the 120 holder.
With the holder’s label facing up, insert the film strip from the right and centre the desired image in the window.
Insert the 120 holder horizontally into the lower slot from the scanner’s right side.
Handle film carefully to avoid scratches and fingerprints.
For best results, use cotton gloves.
120 film loading: four source panels in order; insert the holder into the lower slot.
Diagram key
a: Hold the film toward the light, with its glossy side facing you.
b: Take out the 120 holder.
c (first): With the holder label up, insert the film strip from the right and centre the desired image in the window.
c (second): Insert the holder horizontally into the lower slot from the scanner’s right side. Handle film carefully to avoid scratches and fingerprints; cotton gloves are recommended.
127 holder loading method
Instructions from the manual
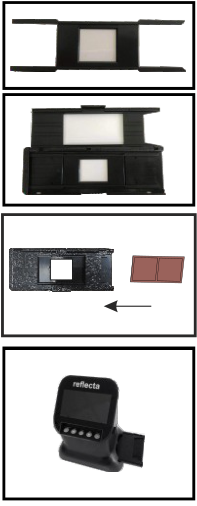
Load 127 film in the 120 holder4 steps
Take the 127 holder with its markings facing up.
Open the 120 holder, place the 127 holder inside it, then close the 120 holder.
Insert the negative from the right into the closed 120 holder.
Insert the assembled 120 holder horizontally into the lower slot from the scanner’s right side.
127 holder fits inside the 120 holder; all four panels and the film-insertion arrow are retained.
Diagram key
a: Take the 127 holder with its markings facing up.
b: Open the 120 holder, put the 127 holder inside it, then close the 120 holder.
c and left-pointing insertion arrow: Insert the negative from the right into the closed 120 holder.
d: Insert the assembled 120 holder horizontally into the lower slot from the scanner’s right side.
Positive slide holder
Instructions from the manual
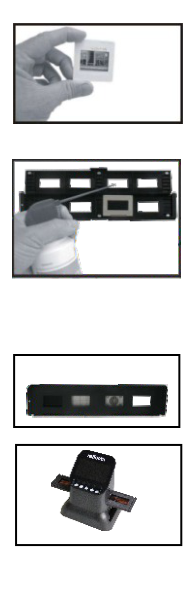
Load mounted slides7 steps
Take mounted slides with their glossy side facing up.
Open the slide holder at the marked spot on top.
With it open, place the slide in its recessed area; it should fit perfectly.
Handle slides carefully: dust, scratches and fingerprints appear on saved images.
The manual recommends compressed air to remove slide dust.
Close the holder and press its edges until it locks.
Insert the loaded holder horizontally into the upper slot from the scanner’s right side.
Mounted slide loading: complete four-panel sequence for the upper slot.
Diagram key
First panel: Take mounted slides glossy side up.
Second panel: Open the holder at its marked top spot and place the slide in its recessed area; it should fit perfectly. Handle carefully because dust, scratches and fingerprints appear in saved images; compressed air is recommended for dust.
Third panel: Close the holder and press its edges until it locks.
Fourth panel: Insert the loaded holder horizontally into the upper slot from the scanner’s right side.
Negative film holder
Instructions from the manual
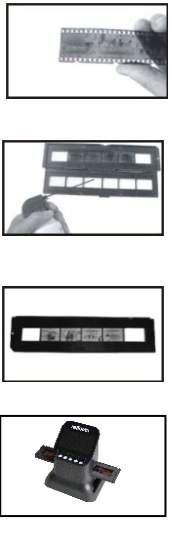
Load negative film7 steps
Take the film strip with its glossy side facing up.
Open the negative holder at the marked spot on top.
With it open, position the negative so its notches align with those on the holder.
Handle negatives carefully: dust, scratches and fingerprints appear on saved images.
Use cotton gloves if possible.
Close the holder and press its edges until it locks.
Insert the holder horizontally into the upper slot from the scanner’s right side.
Negative loading: complete four-panel sequence with notch alignment and upper-slot insertion.
Diagram key
First panel: Take the film strip glossy side up.
Second panel: Open the holder at its marked top spot and align the negative’s notches with the holder’s notches. Handle carefully because dust, scratches and fingerprints appear in saved images; use cotton gloves if possible.
Third panel: Close the holder and press its edges until it locks.
Fourth panel: Insert the holder horizontally into the upper slot from the scanner’s right side.
Introduction of menu
Instructions from the manual
Identify the main menuView
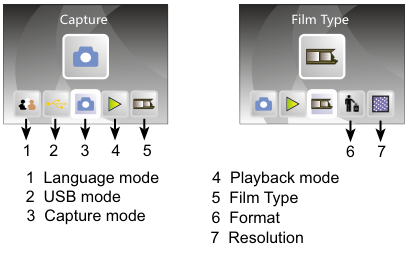
The seven numbered source callouts identify Language, USB, Capture, Playback, Film Type, Format and Resolution, in that order.
Main menu: all seven numbered callouts and their complete printed explanations.
Capture picture
Instructions from the manual
Clean the inner backlight before scanningView
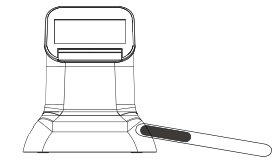
Before scanning, ensure the inner backlight panel is clean. Use the supplied brush, inserting it from the side of the scanner with the velvet side facing down.
Use the supplied brush from the side, velvet side down, before scanning.
Diagram key
Brush entering the side opening: Before scanning, ensure the inner backlight is clean. Insert the supplied brush from the side of the scanner with its velvet side down.
Select film type and frame size5 steps
In the main menu, use OK/ENTER to enter Film Type, then choose Negative, Slide or B&W and press OK/ENTER to enter the corresponding submenu.
For 127/120 negatives, set the Focus button to 120, press OK/ENTER and use Left or Right to select the required frame size.
The illustrated menu lists 127VPK and 120 sizes 60×45, 60×60, 60×70, 60×80 and 60×90.
For 126/135 negatives, set Focus to 135, press OK/ENTER and use Left or Right to select the required frame size.
The illustrated menu lists 126KPK and 135.
Capture and save an image2 steps
Alternatively, use Left or Right in the main menu to reach Capture, press OK/ENTER and enter the film format selected in Film Type.
The source flow shows the Capture preview, Convert/Mode to capture, and OK/Enter to save the captured picture.
Adjust exposure or sharpness before capture3 steps
Before capturing a picture, press OK to set exposure.
Press ENTER to set exposure compensation or sharpness (SHP).
The source adjustment menu identifies EV, R, G, B and SHP; its illustrated settings run from −2 through +2.
How to playback captured pictures
Instructions from the manual
Play back saved pictures4 steps
In the main menu, use Left or Right to reach Playback and press OK/ENTER to start automatic picture playback.
Press it again to stop automatic playback.
Use Left or Right to view captured pictures manually.
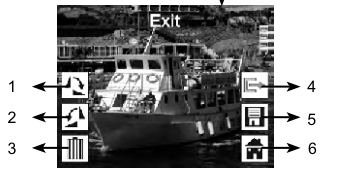
Press OK/ENTER again to enter editing, where you can rotate, delete, exit, save or return home to the main menu.
Edit a saved picture2 steps
Enter picture editing by pressing OK/ENTER during manual playback.
The six source callouts are: 1 rotates the current picture 90° clockwise; 2 rotates it 90° counter-clockwise; 3 deletes it from the memory card; 4 exits the editing submenu and goes back; 5 saves the current edited picture; 6 exits editing and returns to scanning.
Editing controls: six complete numbered explanations continue on PDF page16.
Diagram key
Exit: The editing submenu includes exit controls; callouts 4 and 6 distinguish going back and returning to scanning.
1: Rotate the current picture 90° clockwise.
2: Rotate the current picture 90° counter-clockwise.
3: Delete the current picture from the memory card.
4: Exit the editing submenu and go back.
5: Save the current edited picture.
6: Exit the editing submenu and return to scanning.
Setting language
Instructions from the manual
Change the language2 steps
In the main menu, use Left or Right to reach Language, then press OK/ENTER.
Use Left or Right and OK/ENTER to select English, French, German, Italian, Spanish, Traditional Chinese, Simplified Chinese or Japanese.
Formatting
Instructions from the manual
Format an SD card3 steps
Warning: formatting deletes all information on the SD card.
In the main menu, use Left or Right to reach Format and press OK/ENTER.
The source prompt asks “Format the media?” with YES and NO choices, followed by “Format is successful!” for successful formatting.
Connect to computer
Instructions from the manual
Transfer captured pictures to a computer3 steps
Connect the scanner successfully to the computer.
In the main menu, use Left or Right to reach USB MSDC and press OK/ENTER after the connection is established.
You can then transfer the captured pictures.
Resolution
Instructions from the manual
Choose image resolutionView
In the main menu, use Left or Right to reach Resolution and press OK/Enter. Choose 14M or 22M, where M means megapixels.
Controls and parts
See the manual diagrams 2 diagrams
Supplied scanner, film holders, USB cable, adapter, brush and manual.English manual controls and display, with every original leader and label.
Type126 Instamatic film requires the optionally available holder; it is not listed among supplied holders. [2]
Damaged scanner or power supply
If the scanner or power supply is defective or damaged, do not open it or attempt repairs. Opening the housing invalidates the warranty. Contact reflecta or your specialist dealer. [2]
Safe environment and disconnection
Use only in a dry environment. Switch the scanner off and unplug it when not in use. [2]
Children and pets
The scanner is not a toy. Keep the appliance, accessories and packaging away from children and pets to prevent accidents and suffocation. [2]
Intended use
Use only in perfect technical condition and as intended. Other use may damage the scanner or its surroundings. It is intended for private use and is not suitable for commercial use. [2]