MODEL REFERENCE
Singer 3223
9 troubleshooting topics · 32 guides
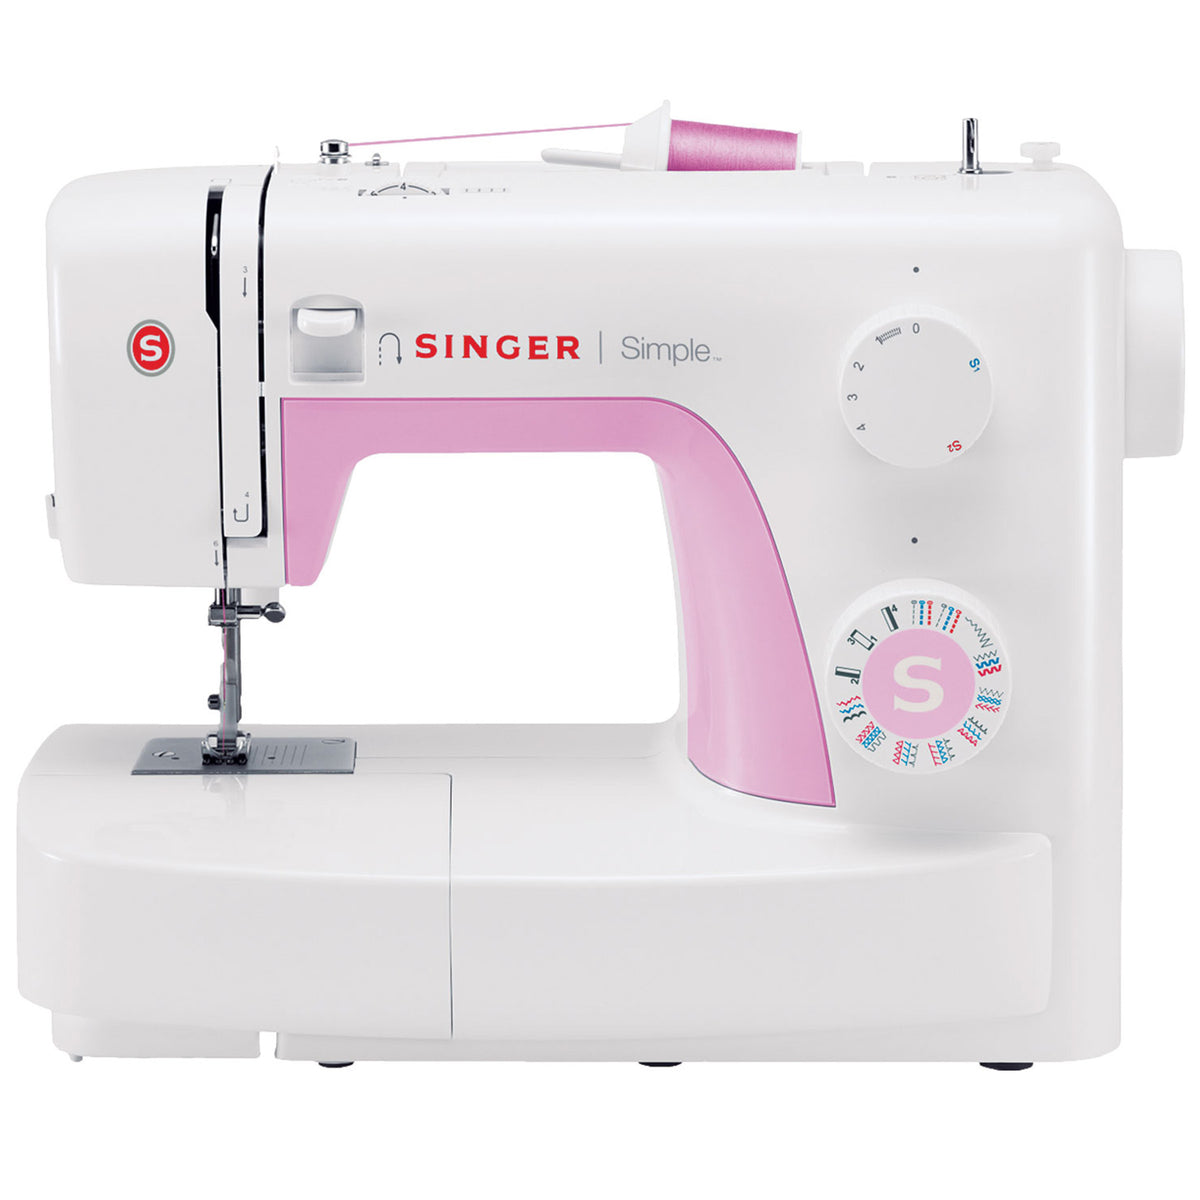
The checks and guides below come from the official manuals for this model.
No matches for this wording. Try a light name, error code or a shorter phrase.
Troubleshooting
Find the problem you are experiencingUpper thread breaks6 checks
- The machine is not threaded correctly.
- Rethread the machine.
- The thread tension is too tight.
- Reduce the thread tension. (lower number)
- The thread is too thick for the needle.
- Select a larger needle.
- The needle is not inserted correctly.
- Remove and reinsert the needle. (flat side towards the back)
- The thread is wound around the spool holder pin.
- Remove the reel and wind thread onto reel.
- The needle is damaged.
- Replace the needle.
Lower thread breaks3 checks
- The bobbin case is not inserted correctly.
- Remove and reinsert the bobbin case and pull on the thread. The thread should pull easily.
- The bobbin case is threaded wrong.
- Check both bobbin and bobbin case.
- The lower thread tension is too tight.
- Loosen lower thread tension as described.
Skipped stitches4 checks
- The needle is not inserted correctly.
- Remove and reinsert needle. (flat side towards the back)
- The needle is damaged.
- Insert a new needle.
- The wrong size or type of needle has been used.
- Choose a needle to suit the thread and fabric.
- The foot is not attached correctly.
- Check and attach correctly.
Needle breaks4 checks
- The needle is damaged.
- Insert a new needle.
- The needle is not correctly inserted.
- Insert the needle correctly. (flat side towards the back)
- Wrong needle size for the fabric.
- Choose a needle to suit the thread and fabric.
- The wrong foot is attached.
- Select the correct foot.
Loose stitches4 checks
- The machine is not correctly threaded.
- Check the threading.
- The bobbin case is not correctly threaded.
- Thread the bobbin case as illustrated.
- Needle/ fabric/ thread combination is wrong.
- The needle size must suit the fabric and thread.
- Thread tension wrong.
- Correct the thread tension.
Seams gather or pucker3 checks
- The needle is too thick for the fabric.
- Select a finer needle.
- The stitch length is incorrectly adjusted.
- Readjust the stitch length.
- The thread tension is too tight.
- Loosen the thread tension.
Uneven stitches, uneven feed3 checks
- Poor quality thread.
- Select a better quality thread.
- The bobbin case is incorrectly threaded.
- Remove bobbin case, thread and insert correctly.
- Fabric has been pulled.
- Do not pull on the fabric while sewing, let it be drawn through by the machine.
The machine is noisy4 checks
- The machine must be lubricated.
- Lubricate as described.
- The complete supplied manual contains no separate lubrication or hook/feed-dog cleaning procedure; no oil location, quantity or dismantling steps are supplied here.
- Lint or oil have collected on the hook or needle bar.
- Clean the hook and feed dog as described.
- The complete supplied manual contains no separate lubrication or hook/feed-dog cleaning procedure; no oil location, quantity or dismantling steps are supplied here.
- Poor quality oil has been used.
- Only use good quality sewing machine oil.
- The needle is damaged.
- Replace the needle.
The machine jams1 check
- Thread is caught in the hook.
- Remove the upper thread and bobbin case, turn the handwheel backwards and forwards by hand and remove the thread.
- Lubricate as described.
- The complete supplied manual contains no separate lubrication or hook/feed-dog cleaning procedure; no oil location, quantity or dismantling steps are supplied here.
Guides
Important safety instructions
Instructions from the manualUse the machine safely17 steps
- Use this machine only for household sewing and with manufacturer-recommended attachments.
- Never leave it unattended while plugged in; unplug immediately after use, before cleaning, removing covers, lubricating, other user servicing or replacing the bulb.
- Do not use it as a toy; supervise children near it and people with reduced abilities or limited experience unless a responsible person supervises or instructs them.
- Never operate with a damaged cord/plug, faulty operation, drop damage or water exposure; return it to an authorized dealer or service center for examination, repair or adjustment.
- Keep machine and foot-control ventilation clear of lint, dust and loose cloth.
- Keep fingers away from moving parts, especially the needle.
- Use the proper needle plate and unbent needles.
- Do not push or pull fabric while sewing.
- Switch off (O) for needle-area adjustments, threading, needle, bobbin or presser-foot changes.
- Never insert objects into openings.
- Do not use outdoors, where aerosol sprays are used or oxygen is administered.
- Turn controls off before unplugging; grasp the plug rather than pulling the cord.
- Normal operating sound pressure is 75 dB(A).
- Turn off or unplug if operation is faulty.
- Never put objects on the foot controller.
- Have a damaged foot-control supply cord replaced by the manufacturer, service agent or similarly qualified person.
- Replace the lamp with the same type rated 10 watts in 110–120 V areas or 15 watts in 220–240 V areas.
Machine basics
Instructions from the manualIdentify the front parts13 steps
- The shared diagram identifies: 1.
- Thread tension dial; 2.
- Thread take-up lever; 3.
- Thread cutter; 4.
- Presser foot; 5.
- Needle plate; 6.
- Removable accessory storage; 7.
- Reverse sewing lever; 8.
- Bobbin stopper; 9.
- Stitch width dial (Model 3229 only; absent on 3223); 10.
- Stitch length dial; 11.
- Pattern selector dial.
- The separately adjustable stitch-width dial is explicitly limited to Model 3229.
Identify the rear parts and foot control14 steps
- The diagram identifies: 12.
- Horizontal spool pin; 13.
- Bobbin winding spindle; 14.
- Hole for second spool pin; 15.
- Handwheel; 16.
- Power and light switch; 17.
- Main plug socket; 18.
- Bobbin thread guide; 19.
- Upper thread guide; 20.
- Face plate; 21.
- Handle; 22.
- Presser foot lifter; 23.
- Foot speed control; 24.
- Power cord.
Connect the machine to power9 steps
- Connect the machine as illustrated in the manual and use the appropriate polarized outlet.
- The foot control regulates sewing speed.
- Use KD-1902 in 110–120 V areas or KD-2902 in 220–240 V areas, made by Zhejiang Founder Motor Corporation Ltd. (China), or Wakaho Electric Ind.
- Co., Ltd. (Vietnam) 4C-316B in 110–120 V areas or 4C-326G in 230 V areas.
- Press the main switch to I for power and light.
- Unplug when unused.
- Consult a qualified electrician if unsure about the power connection.
- A polarized plug fits only one way: reverse it if it does not fit fully; if it still will not fit, have a qualified electrician install the proper outlet.
- Never modify the plug.
Raise the presser foot for thick fabricsView
When sewing several layers or thick fabrics, raise the presser foot to the higher position to position the work more easily.
Identify the supplied accessoriesView
Standard accessories are the all-purpose foot, zipper foot, buttonhole foot, button-sewing foot, seam ripper/brush, edge/quilting guide, pack of needles, spool holder, three bobbins, L-screwdriver, darning plate and soft cover.
Identify optional accessoriesView
Ten accessories are not supplied but can be obtained from a local dealer: auxiliary spool pin, satin-stitch foot, overcasting foot, hemmer foot, cording foot, blind-hem foot, darning/embroidery foot, gathering foot, quilting/straight-stitch foot and even-feed foot.
Threading the machine
Instructions from the manualWind the bobbin7 steps
- Place thread and the corresponding spool holder on the spool pin.
- Snap thread into the thread guide and wind it clockwise around the bobbin-winder tension discs.
- Thread the bobbin as illustrated and place it on the spindle.
- Push the spindle right, hold the thread end and step on the foot control.
- Cut the thread.
- Push the spindle left and remove the bobbin.
- With the spindle in winding position the machine will not sew and the handwheel will not turn; return it left to the sewing position.
Insert the bobbin6 steps
- Switch off (O) and fully raise the needle before inserting or removing the bobbin.
- Remove the extension table and open the hinged cover.
- Pull the bobbin-case tab and remove the case.
- Hold the case in one hand and insert the bobbin so the thread runs clockwise.
- Pull thread through the slit and under the finger, leaving a six-inch tail.
- Hold the case by its hinged latch and insert it into the shuttle.
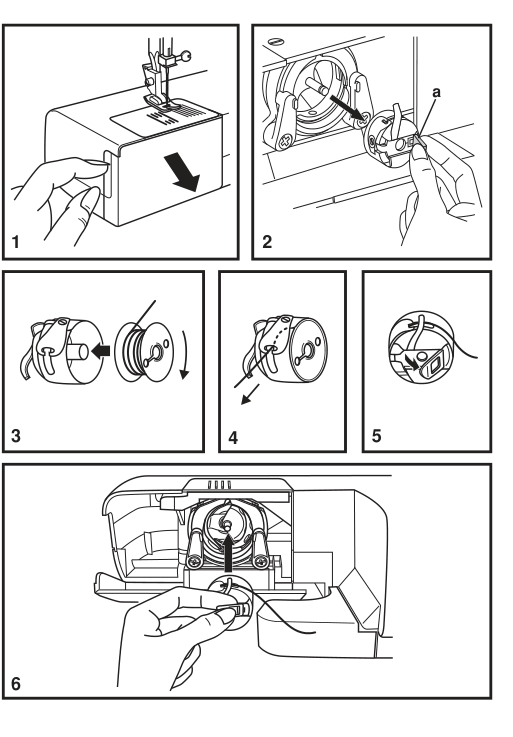
Diagram key
- 1: Remove the extension table and open the hinged cover.
- 2: Pull the bobbin-case tab and remove the case.
- a: Bobbin-case tab.
- 3: Insert the bobbin with its thread running clockwise.
- 4: Pull thread through the slit and under the finger; leave a six-inch tail.
- 5: Hold the case by its hinged latch.
- 6: Insert the case into the shuttle.
Adjust upper thread tension8 steps
- Start with tension setting 4.
- Increase the number for more tension and decrease it for less.
- For straight stitching, increase tension if too loose and decrease if too tight.
- For zigzag/decorative stitching, a little upper thread showing on the underside is correct.
- Proper tension matters, but no single setting fits every stitch, thread or fabric.
- Identical stitches on both sides are usually wanted only for straight-stitch construction.
- About 90% of sewing uses 3–5.
- Zigzag and decorative stitches generally need lower tension than straight stitching; upper thread appearing below improves decorative stitching and reduces puckering.
Test and adjust bobbin thread tension4 steps
- Switch off for bobbin removal.
- Remove the bobbin case and bobbin and suspend it by the thread.
- Jerk once or twice: correct tension unwinds about one or two inches; no unwinding is too tight, and dropping too much is too loose.
- Adjust the small screw on the side of the bobbin case.
Thread the upper thread9 steps
- Switch off before threading.
- Raise the needle to its highest point, then continue turning the handwheel counterclockwise until the needle just begins to descend.
- Raise the presser foot to release the tension discs.
- Lift the spool pin and place the spool with thread coming off as illustrated; put the small side of the spool holder next to a small spool.
- Draw thread through the upper guide and pre-tension spring.
- Lead thread down the right tension channel and up the left; holding it between the spool and guide helps.
- Pass right to left through the take-up lever’s slotted eye, then down.
- Pass behind the thin wire needle-clamp guide and thread the needle front to back.
- Pull 6–8 inches behind the needle eye and trim with the built-in cutter.
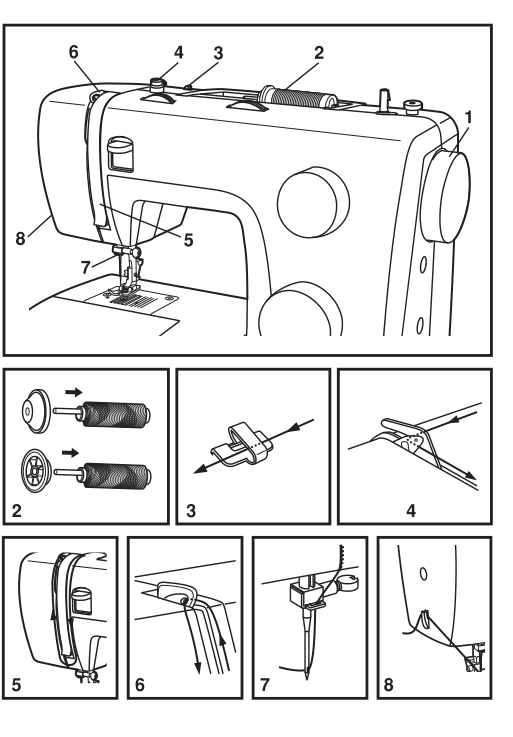
Diagram key
- Overview1: Raise the needle fully, then turn counterclockwise until it just starts to descend; raise the presser foot to release tension and switch off before threading.
- Overview2: Place the spool and spool holder on the lifted spool pin; use the small holder side for small spools.
- Overview3: Draw thread through the upper thread guide.
- Overview4: Pull thread through the pre-tension spring.
- Overview5: Lead thread down the right tension channel and up the left.
- Overview6: Pass right to left through the take-up lever’s slotted eye, then down again.
- Overview7: Pass behind the wire needle-clamp guide and thread the needle from front to back.
- Overview8: Pull 6–8 inches behind the needle eye and trim with the built-in cutter.
- Detail2: Place the spool and spool holder on the lifted spool pin; use the small holder side for small spools.
- Detail3: Draw thread through the upper thread guide.
- Detail4: Pull thread through the pre-tension spring.
- Detail5: Lead thread down the right tension channel and up the left.
- Detail6: Pass right to left through the take-up lever’s slotted eye, then down again.
- Detail7: Pass behind the wire needle-clamp guide and thread the needle from front to back.
- Detail8: Pull 6–8 inches behind the needle eye and trim with the built-in cutter.
Raise the bobbin thread5 steps
- Hold the upper thread with your left hand.
- Turn the handwheel toward you (counterclockwise), lowering and then raising the needle.
- If pickup is difficult, check that the thread is not trapped by the hinged cover or removable accessory storage.
- Gently pull the upper thread to bring the bobbin thread through the needle-plate hole.
- Lay both threads to the back under the foot.
Sewing
Instructions from the manualChoose a stitch pattern5 steps
- Turn the pattern selector in either direction to select a stitch.
- Select the illustrated straight-stitch pattern and adjust stitch length with the length dial.
- For zigzag, select the illustrated zigzag pattern and adjust length to the fabric.
- For other patterns, turn the length dial to S1 or S2 and select the desired pattern.
- The shared manual’s stitch-width dial adjustments apply only to Model 3229; Model 3223 has no separate width dial.
Adjust stitch length5 steps
- For Model 3223 zigzag, select the illustrated zigzag pattern.
- Stitch density increases as the length dial approaches 0; neat zigzag is usually achieved at 2.5 or below, and dense zigzag is called satin stitch.
- For straight stitch, select straight stitching: length decreases toward 0 and increases toward 4.
- Use a longer length for heavy fabrics or thick needles/thread and a shorter length for light fabrics or finer needles/thread.
- The width-dial function and adjustable needle-position instructions on this page are explicitly Model 3229 only.
Sew a straight stitchView
Select straight stitch. Put the fabric under the foot with its edge on the desired needle-plate seam guide. Lower the presser-foot lifter and step on the foot control to sew.
Secure a seam with reverse sewingView
To secure the start and end of a seam, press down the reverse lever and sew a few reverse stitches. Release it to sew forward again.
Remove the workView
Turn the handwheel toward you (counterclockwise) to raise the take-up lever fully. Raise the presser foot and remove the work behind the needle and foot.
Cut the threadView
Pull the threads under and behind the presser foot. Guide them to the side of the face plate into cutter B and pull down to cut.
Choose stretch stitch patterns5 steps
- Stretch patterns are blue on the selector.
- Select the desired pattern and set the length dial to S1.
- Straight stretch stitch adds triple reinforcement to stretch or hardwearing seams by sewing two stitches forward and one back.
- Ric rac is suitable for firm fabrics such as denim, corduroy, poplin and duck.
- The separate 3–5 width-dial adjustment is expressly Model 3229 only.
Sew a blind hem9 steps
- Use the illustrated blind-hem pattern for stretch or firm fabrics as appropriate, for curtains, trousers, skirts and similar hems.
- Choose stitch length within the illustrated range; blind hems normally use a longer stitch.
- Test on the fabric first.
- The shared guide’s width-dial instructions apply to 3229 only, as identified in the parts and dial sections.
- Turn up the hem to the desired width and press.
- Fold back against the fabric’s right side with the hem edge about 7 mm (1/4 inch) beyond the folded fabric.
- Sew slowly on the fold, catching only one or two fabric threads.
- Unfold and press.
- An optional blind-hem foot from a Singer retailer can make the work easier.
Sew on buttons10 steps
- Switch off for needle-area or foot adjustments.
- Install the darning plate and replace the all-purpose foot with the button-sewing foot.
- Position the work and button under the foot, then lower the foot.
- Select the illustrated securing pattern and sew a few securing stitches.
- Select one of the two narrow zigzag patterns to match the hole spacing.
- Turn the handwheel to check that the needle enters both holes without striking the button.
- Slowly sew about ten stitches.
- Select the illustrated securing pattern and sew a few securing stitches.
- If a shank is needed, place a darning needle on top of the button and sew.
- For a four-hole button, sew the front two holes, move the work forward and sew the back two.
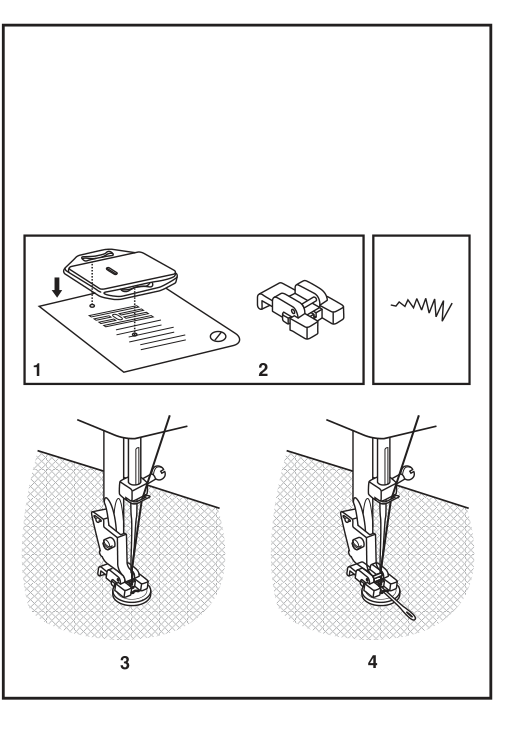
Diagram key
- 1: Install the darning plate.
- 2: Change the all-purpose foot to the button-sewing foot.
- Zigzag pattern: Select one of the two narrow zigzag patterns to match button-hole spacing and check clearance by turning the handwheel before sewing about ten stitches.
- 3: Sew a few securing stitches with the indicated pattern.
- 4: For a shank, place a darning needle on top of the button and sew.
General information
Instructions from the manualInstall or remove the accessory storage3 steps
- Hold the removable storage horizontally and push it in the illustrated arrow direction to install.
- Pull it left to remove.
- Standard accessories are stored inside; flip the cover down to open.
Attach the presser-foot shankView
Switch off (O). Raise presser bar a with the foot lifter and attach shank b as illustrated.
Attach or remove the presser footView
Switch off (O). Install foot pin d into cut-out c of the holder to attach the foot. To remove it, push the foot pin forward to separate.
Attach the edge or quilting guideView
Switch off (O). Put guide f in the illustrated slot and adjust for hems, pleats, quilting or similar work.
Match needle, fabric and thread5 steps
- Match needle size to thread size and fabric weight.
- Use 9–11 (70–80) for light fabrics: thin cottons, voile, silk, muslin, interlocks, cotton knits, tricots, jerseys, crepes, woven polyester, shirt and blouse fabrics, with light-duty cotton, nylon, polyester or cotton-wrapped polyester thread.
- Use 11–14 (80–90) for medium cotton, satin, kettlecloth, sailcloth, double knits and light woolens; 14 (90) for medium cotton duck, woolen, heavy knits, terrycloth and denim; or 16 (100) for heavy canvas, woolens, outdoor tent/quilted fabrics, denim and light-to-medium upholstery.
- Most medium threads suit these three groups: use polyester on synthetics and cotton on natural woven fabrics, with the same thread above and below.
- Use 18 (110) for heavy woolen, overcoat, upholstery fabrics, some leathers and vinyls, with heavy-duty thread.
Choose the needle type4 steps
- Singer 2020 standard sharp needles, 9 (70)–18 (110), suit natural woven wool, cotton and silk, and are not recommended for double knits.
- Singer 2045 scarfed semi-ball-point needles, 9 (70)–18 (110), suit natural/synthetic woven fabrics, polyester blends, polyester knits, interlocks, tricot, single/double knits, sweater knits, Lycra, swimsuit fabric and elastic.
- Singer 2032 leather needles, 12 (80)–18 (110), suit leather, vinyl and upholstery and leave smaller holes than a standard large needle.
- Use genuine Singer needles for best results; replace often, about every other garment, or at the first thread break or skipped stitches.
Use the darning plate4 steps
- Switch off for needle-area adjustments.
- Use the darning plate for darning or free-hand embroidery and install it as illustrated.
- Remove it for normal sewing.
- For free-motion sewing, the manual recommends an optional darning/embroidery foot from a Singer retailer and refers to the accessories list for its part number.
Maintenance and troubleshooting
Instructions from the manualInsert or replace the needle4 steps
- Switch off (O) before inserting or removing a needle.
- Replace regularly, especially when worn or causing problems; genuine Singer needles give best results.
- Loosen clamp screw A, insert the needle with flat shaft side B to the back, push fully up to C/D and retighten.
- Needles must be perfect: bent needles, damaged points and blunt needles can cause problems.
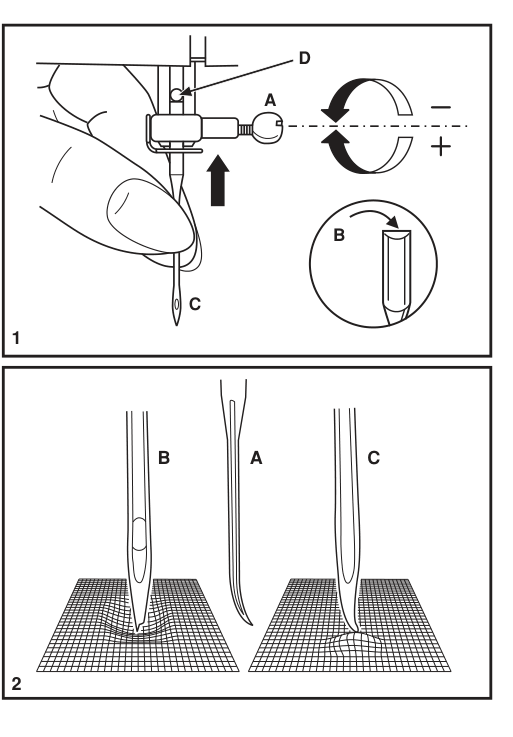
Diagram key
- 1: Needle insertion and clamp operation.
- A(insertion): Loosen the needle-clamp screw, then tighten after inserting the new needle.
- B(insertion): Flat shaft side faces the back.
- C(insertion): Insert as far up as possible.
- D(insertion): Upper insertion limit; push the needle fully up.
- −: Loosen the clamp screw.
- +: Tighten after needle insertion.
- 2: Needles must be in perfect condition; these examples can cause problems.
- B(defects): Damaged point.
- A(defects): Bent needle.
- C(defects): Blunt needle.
Replace the bulb5 steps
- Unplug from the power socket.
- Use the same bulb type rated 10 watts in 110–120 V areas or 15 watts in 220–240 V areas.
- Loosen screw A, remove face plate B, unscrew the bulb and install new bulb C.
- Replace the plate and tighten the screw.
- Consult a Singer retailer if there is any problem.
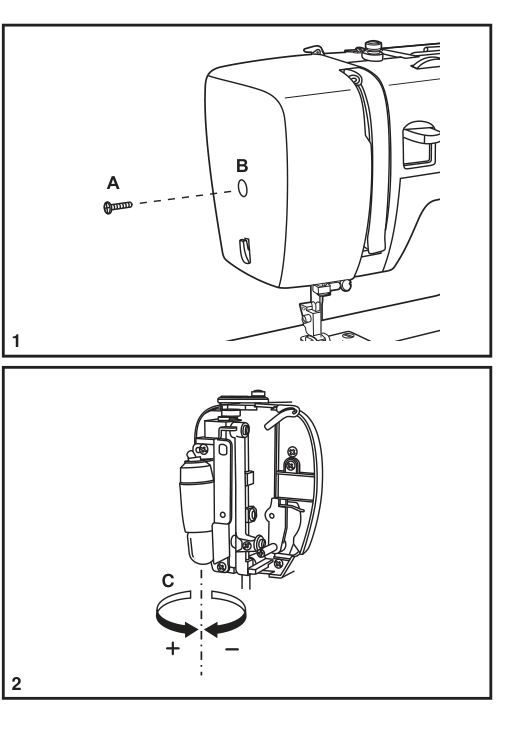
Diagram key
- 1: Loosen the screw and remove the face plate.
- A: Face-plate screw.
- B: Face plate.
- 2: Unscrew the old bulb and install its replacement.
- C: Bulb; use the same type, 10 watts in 110–120 V areas or 15 watts in 220–240 V areas.
- −: Unscrew the bulb.
- +: Install the replacement bulb.
Controls and parts
See the manual diagrams 2 diagrams
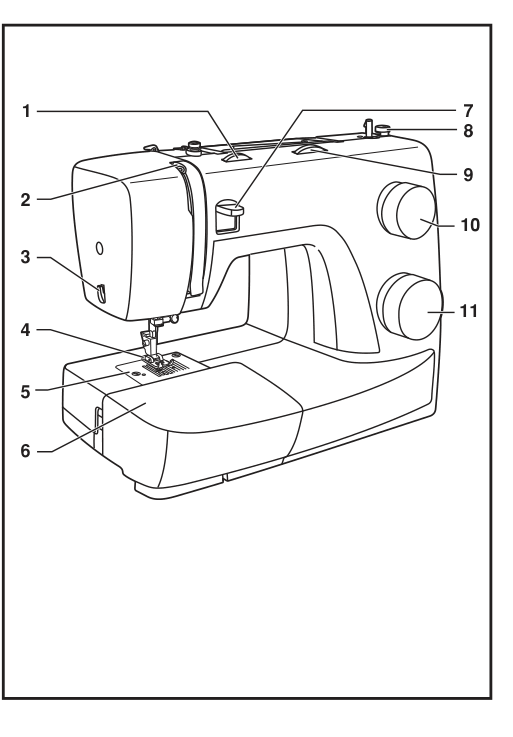
Diagram key
- 1: Thread tension dial
- 2: Thread take-up lever
- 3: Thread cutter
- 4: Presser foot
- 5: Needle plate
- 6: Removable accessory storage
- 7: Reverse sewing lever
- 8: Bobbin stopper
- 9: Stitch width dial, Model 3229 only; this numbered component is absent on 3223
- 10: Stitch length dial
- 11: Pattern selector dial
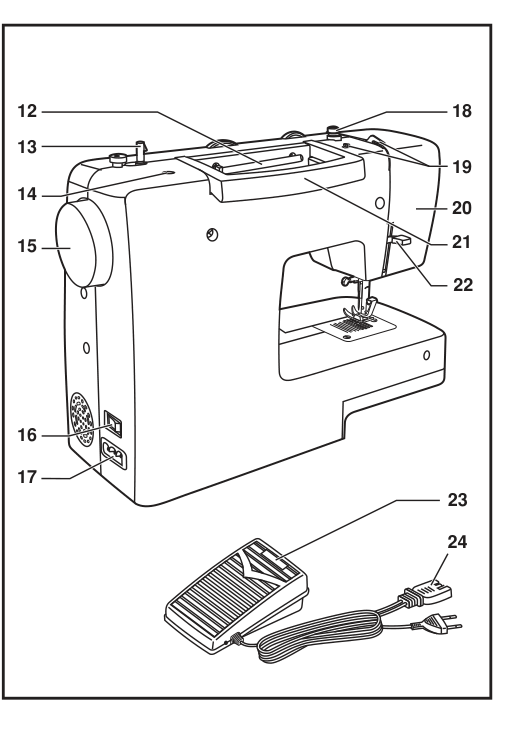
Diagram key
- 12: Horizontal spool pin
- 13: Bobbin winding spindle
- 14: Hole for second spool pin
- 15: Handwheel
- 16: Power and light switch
- 17: Main plug socket
- 18: Bobbin thread guide
- 19: Upper thread guide
- 20: Face plate
- 21: Handle
- 22: Presser foot lifter
- 23: Foot speed control
- 24: Power cord
Model details
Model and compatibility
- Accessories
- The manual lists three bobbins and ten optional accessories not supplied.
- Disposal
- Recycle safely under national electrical/electronic-product legislation; contact the retailer if unsure.