MODEL REFERENCE
TP-Link Deco X10 V1
2 errors · 25 guides

The checks and guides below come from the official manuals for this model.
No matches for this wording. Try a light name, error code or a shorter phrase.
Errors and indicators
Light patterns and messages documented in the manualFind the indicator lights
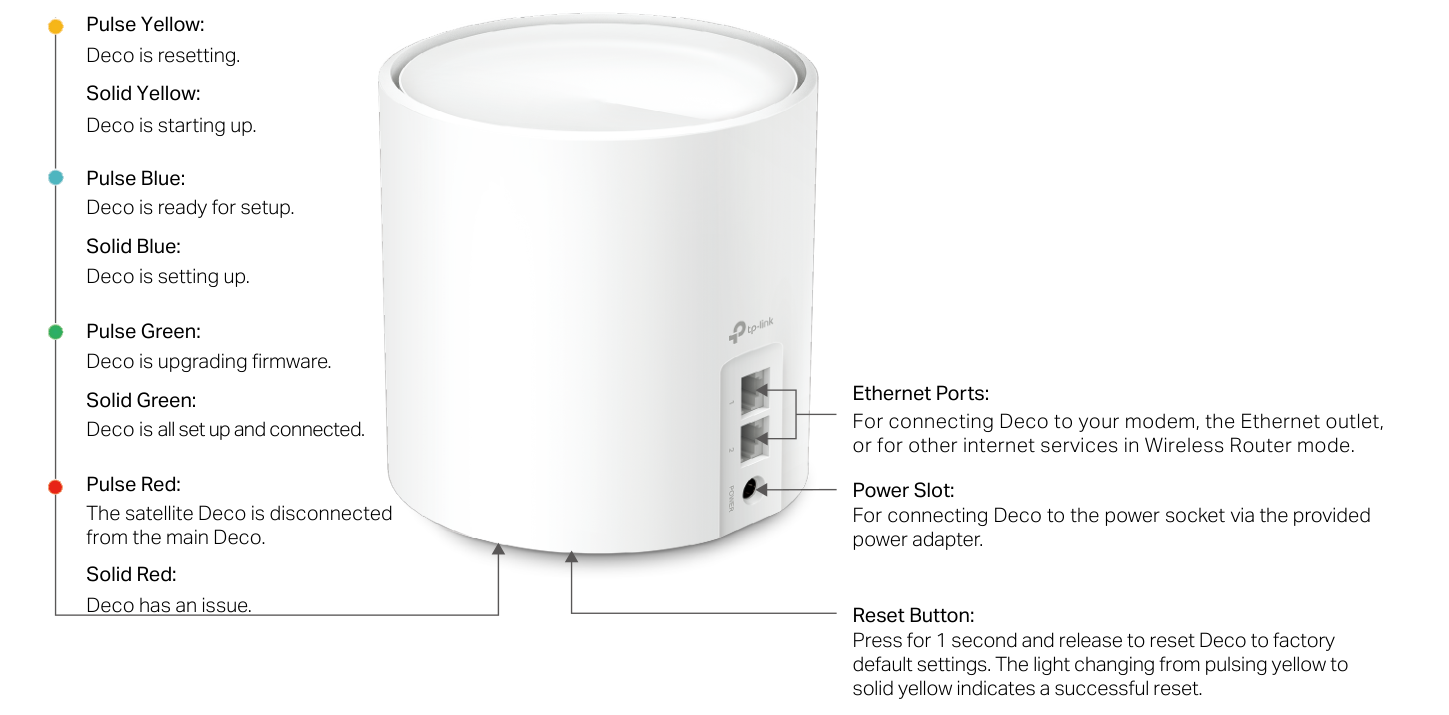
Diagram key
- Pulse Yellow: Resetting.
- Solid Yellow: Starting up.
- Pulse Blue: Ready for setup.
- Solid Blue: Setting up.
- Pulse Green: Upgrading firmware.
- Solid Green: Set up and connected.
- Pulse Red: The satellite Deco is disconnected from the main Deco.
- Solid Red: A Deco issue.
- Yellow marker: Pairs the yellow pulse and solid states in the complete printed list.
- Blue marker: Pairs the blue pulse and solid states in the complete printed list.
- Green marker: Pairs the green pulse and solid states in the complete printed list.
- Red marker: Pairs the red pulse and solid states in the complete printed list.
- Indicator pointer: The complete connecting line points from the status list to the unit indicator.
- 1 (upper Ethernet port): One of the two RJ-45 Ethernet ports for a modem, Ethernet outlet or other internet services in Wireless Router mode.
- 2 (lower Ethernet port): The other RJ-45 Ethernet port, with the same source-stated uses.
- Ethernet Ports bracket: Both Ethernet ports are covered; the figure assigns no permanently fixed WAN port.
- POWER / Power Slot: Connect to a socket using the supplied power adapter.
- Reset Button: Press for one second and release for factory defaults; pulsing yellow changing to solid yellow indicates a successful reset.
- TP-Link: Manufacturer wordmark shown on the unit.
Pulse Redsatellite Deco disconnected from the main Deco
- The satellite Deco is disconnected from the main Deco.
- The operation guide supplies no separate indicator-specific repair.
- Use its applicable troubleshooting topic; if problems remain, contact TP-Link support.
- Do not disassemble, repair or modify the device.
Solid Reddeco has an issue
- Deco has an issue.
- The operation guide supplies no separate indicator-specific repair.
- Use its applicable troubleshooting topic; if problems remain, contact TP-Link support.
- Do not disassemble, repair or modify the device.
Guides
About this guide
Instructions from the manualGuide scope and compatibility limits7 steps
- This reference uses the exact UK/EU V1 support listing and its Deco X10 REV1.0.0 operation guide.
- Features, images, steps and descriptions can vary by model, software, region and ISP; the guide’s examples are not promised defaults.
- Maximum wireless rates are physical IEEE rates.
- Actual throughput, coverage and device capacity depend on network conditions, client limitations and environmental factors.
- MU-MIMO needs compatible clients.
- Seamless roaming needs 802.11k/v/r clients and may require additional setup.
- IoT compatibility means smart devices controlled through the Deco app; other wireless devices may still connect for ordinary Wi-Fi.
Appearance
Instructions from the manualRead all eight indicator states4 steps
- Pulsing yellow means resetting; solid yellow means starting up.
- Pulsing blue means ready for setup; solid blue means setting up.
- Pulsing green means upgrading firmware; solid green means set up and connected.
- Pulsing red means the satellite is disconnected from the main Deco; solid red means a Deco issue.
Connections and factory reset5 steps
- Use the two RJ-45 Ethernet ports for a modem, Ethernet outlet or other internet services in Wireless Router mode.
- Connect the power slot using the supplied adapter.
- Press Reset for one second, then release it to restore factory defaults.
- Pulsing yellow changing to solid yellow indicates successful reset.
- The product label is underneath the unit.
Set up your deco
Instructions from the manualSet up the Deco network17 steps
- Download the Deco app from Google Play or the App Store, or scan the guide’s QR code, and install it on an Android or iOS smartphone or tablet.
- Log in using your TP-Link ID, or create one first.
- If you forgot the login password, tap Forgot Password? and follow the app.
- Search for and select Deco X10.
- If you have several Deco models, tap the question below the search box for the guide’s network-optimization information.
- Scan the QR code on the label underneath Deco for quicker setup, or set it up manually.
- Power off the modem, connect its LAN port to either Deco Ethernet port, then power both on.
- With no modem, connect Deco directly to the Ethernet outlet.
- Wait for the Deco LED to pulse blue; the phone/tablet then connects automatically to its default Wi-Fi.
- Choose a location or create a custom one; this becomes the Deco’s name.
- Choose the internet connection type and enter the required information.
- Contact your ISP if unsure.
- Set a Wi-Fi name and password for client connections.
- The illustrated password requires at least eight characters and recommends letters, numbers and symbols.
- Connect the phone/tablet to the newly created Deco Wi-Fi.
- Setup is complete.
- Connect client devices; plug in the other included Decos to join automatically within two minutes.
Troubleshooting
Instructions from the manualWe couldn’t find Deco1 check
- We couldn’t find Deco.
- The printed troubleshooting row directs you to TP-Link’s official FAQ 2239 for main Deco configuration; use the matching guide in Sources.
- The PDF provides a referral rather than a separate diagnostic sequence.
- If the problem remains, contact TP-Link support.
We couldn’t find another Deco1 check
- We couldn’t find another Deco.
- The printed troubleshooting row directs you to TP-Link’s official FAQ 1447 for satellite Deco configuration; use the matching guide in Sources.
- The PDF provides a referral rather than a separate diagnostic sequence.
- If the problem remains, contact TP-Link support.
Testing Internet Connection1 check
- Testing Internet Connection.
- The printed troubleshooting row directs you to TP-Link’s official FAQ 2239 for main Deco internet test; use the matching guide in Sources.
- The PDF provides a referral rather than a separate diagnostic sequence.
- If the problem remains, contact TP-Link support.
Wireless devices cannot connect to Deco1 check
- Wireless devices cannot connect to Deco.
- The printed troubleshooting row directs you to TP-Link’s official FAQ 2718 for wireless client connection; use the matching guide in Sources.
- The PDF provides a referral rather than a separate diagnostic sequence.
- If the problem remains, contact TP-Link support.
Deco suddenly lost internet access1 check
- Deco suddenly lost internet access.
- The printed troubleshooting row directs you to TP-Link’s official FAQ 2428 for lost internet access; use the matching guide in Sources.
- The PDF provides a referral rather than a separate diagnostic sequence.
- If the problem remains, contact TP-Link support.
Find a suitable spot for Deco1 check
- Find a suitable spot for Deco.
- The printed troubleshooting row directs you to TP-Link’s official FAQ 1446 for placement; use the matching guide in Sources.
- The PDF provides a referral rather than a separate diagnostic sequence.
- If the problem remains, contact TP-Link support.
Deco app is not working properly1 check
- Deco app is not working properly.
- The printed troubleshooting row directs you to TP-Link’s official FAQ 1456 for app operation; use the matching guide in Sources.
- The PDF provides a referral rather than a separate diagnostic sequence.
- If the problem remains, contact TP-Link support.
Fcc compliance information statement
Instructions from the manualCorrect radio or TV interference5 steps
- For the US/FCC notice, check whether switching the equipment off and on identifies it as the source of interference.
- Try reorienting or relocating the receiving antenna, increasing separation, or using an outlet on a different circuit from the receiver.
- Consult the dealer or an experienced radio/TV technician if needed.
- Do not make unauthorized modifications.
- The same interference measures are listed for the US power supply.
Ce mark warning
Instructions from the manualObserve EU and UK placement restrictions6 steps
- Use this EU/UK model indoors: the guide restricts use to indoors in EU member states, EFTA countries, Northern Ireland and Great Britain.
- Maintain 20 cm from the body.
- For 5150–5250 MHz the band notice permits only limited outdoor/UAS operation under its stated conditions, but this does not override the stricter model-wide indoor restriction.
- The band notice excludes use in road vehicles and train carriages; 5250–5350 MHz excludes road vehicles, trains, aircraft and outdoor use.
- The guide lists 2412–2472 MHz at 20 dBm and 5150–5350 MHz at 23 dBm maximum transmitted power.
- These are the specifically stated band limits, not a claim about unspecified bands.
Fcc rf radiation exposure statement
Instructions from the manualKeep regional radio notices separate3 steps
- For US/FCC operation, antennas need at least 20 cm separation from all persons and cannot be co-located or operated with another antenna/transmitter.
- For Canada, use 5150–5250 MHz indoors and keep 20 cm between the radiator and body.
- These national notices do not establish that the US adapter is the EU adapter.
Safety information
Instructions from the manualUse the router and power supply safely9 steps
- Keep the device away from water, fire, humidity and hot environments.
- Do not disassemble, repair or modify it; contact TP-Link for service.
- Do not use damaged chargers or USB cables, unapproved chargers or the device where wireless equipment is prohibited.
- Install the adapter near the equipment where easily accessible.
- Use only manufacturer-provided supplies from the original package; contact TP-Link if unsure.
- Operate at 0–40°C (32–104°F).
- Keep the router and adapter more than 15 cm (6 inches) from pacemakers or other implanted medical devices.
- If interference is suspected, turn the product off and consult the physician about the implanted device.
- Read and follow all safety information; improper use can cause accidents or damage.
Explanation of the symbols on the product label
Instructions from the manualRead the complete product-label symbol key5 steps
- Labels are underneath the router and I.T.E. supply.
- Symbols vary by product; the generic key does not prove every symbol is present on this model.
- The key explains Class II equipment, Class II with functional earthing, AC, DC voltage, output polarity, indoor use and dangerous voltage.
- It continues with electric-shock caution, energy efficiency, protective earth, earth, frame/chassis, functional earthing, hot-surface caution, caution, operator’s manual, standby, ON/OFF push-push, fuse and neutral-N fuse.
- The final page explains WEEE recycling, avoiding prolonged high-volume listening, disconnecting all power plugs, m for mini-gap construction, µ for a US micro-gap switch or micro-gap/micro-disconnection outside the US, and ε for a semiconductor switch without contact gap.
Recycle electrical equipment2 steps
- The WEEE symbol requires handling under European Directive 2012/19/EU for recycling or dismantling to reduce environmental impact.
- Give the product to a competent recycling organization or return it to the retailer when buying new electrical/electronic equipment.
Getting started
Instructions from the manualStay online during app setup — EU1 12-language guideView
Remain online through Wi-Fi or mobile data during app download and login. Download Deco for iOS or Android and follow the app.
Stay online during app setup — 28-language guideView
Remain online through Wi-Fi or mobile data during app download and login. Download Deco for iOS or Android and follow the app.
Led status
Instructions from the manualInterpret generic-series indicator variants — EU1 12-language guide4 steps
- The shared guide lists the same yellow, blue and red states as the X10 manual.
- Pulsing green or white means upgrading; solid green or white means set up and connected to the internet.
- White is a shared-series alternative; the exact Deco X10 operation guide specifies green.
- Do not infer a white X10 indicator from this generic table.
Interpret generic-series indicator variants — 28-language guide4 steps
- The shared guide lists the same yellow, blue and red states as the X10 manual.
- Pulsing green or white means upgrading; solid green or white means set up and connected to the internet.
- White is a shared-series alternative; the exact Deco X10 operation guide specifies green.
- Do not infer a white X10 indicator from this generic table.
English: safety information
Instructions from the manualFollow indoor Deco safety — EU1 12-language guide9 steps
- This X10 is an indoor Deco; outdoor waterproofing, covers and skilled-mounting instructions in this shared guide apply to outdoor models.
- Keep it away from fire and hot environments.
- Do not disassemble, repair or modify it; contact TP-Link for service.
- Do not use it where wireless equipment is prohibited.
- Do not use damaged chargers/USB cables or unapproved chargers.
- Keep the adapter or supply-cord plug nearby and easily accessible.
- Use only manufacturer-provided supplies in the original package; refer to the exact model manual for applicable supplies.
- Earthing through the cord applies only to products with three-pin supply-cord plugs.
- Read all applicable instructions and use with care.
Follow indoor Deco safety — 28-language guide9 steps
- This X10 is an indoor Deco; outdoor waterproofing, covers and skilled-mounting instructions in this shared guide apply to outdoor models.
- Keep it away from fire and hot environments.
- Do not disassemble, repair or modify it; contact TP-Link for service.
- Do not use it where wireless equipment is prohibited.
- Do not use damaged chargers/USB cables or unapproved chargers.
- Keep the adapter or supply-cord plug nearby and easily accessible.
- Use only manufacturer-provided supplies in the original package; refer to the exact model manual for applicable supplies.
- Earthing through the cord applies only to products with three-pin supply-cord plugs.
- Read all applicable instructions and use with care.
English
Instructions from the manualCheck local warranty terms — EU1 12-language guide4 steps
- TP-Link warrants its originally packaged branded hardware against material and workmanship defects under normal use following its guidance.
- The period depends on local service and starts at original retail purchase by the end user.
- Warranty remedies are exclusive only to the extent permitted by local law; other rights vary by jurisdiction.
- Use the local support site for the period, policy and procedure; do not assume another country’s term.
Check local warranty terms — 28-language guide4 steps
- TP-Link warrants its originally packaged branded hardware against material and workmanship defects under normal use following its guidance.
- The period depends on local service and starts at original retail purchase by the end user.
- Warranty remedies are exclusive only to the extent permitted by local law; other rights vary by jurisdiction.
- Use the local support site for the period, policy and procedure; do not assume another country’s term.
Model details
Model and compatibility
- Connections
- Two RJ-45 Ethernet ports, power slot and Reset button.
- Factory reset
- Press for one second then release; pulsing yellow changing to solid yellow indicates success.
- Operating temperature
- 0–40°C (32–104°F).
Related reviewed instructions
Manuals and sources
- TP-Link operation manual
- TP-Link model support and details
- TP-Link manual download listing
- TP-Link operation manual
- TP-Link operation manual
- FAQ 2239 — main Deco setup failures
- FAQ 1447 — satellite setup failures
- FAQ 2718 — clients cannot connect
- FAQ 2428 — unstable internet
- FAQ 1446 — Deco placement
- FAQ 1456 — Deco app problems