The checks and guides below come from the official manuals for this model.
No matches for this wording. Try a light name, error code or a shorter phrase.
Errors and indicators
Light patterns and messages documented in the manual
Find the indicator lights
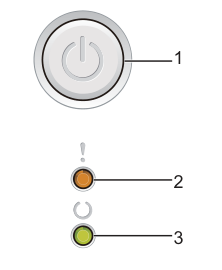
HL-1112 Power On/Off key and two indicator lights.
Diagram key
1: Power On/Off key. Hold it to turn the machine on or off; it also cancels jobs, recovers errors and prints remaining memory data.
Power symbol: The Power On/Off key shown at the top of the control panel.
2: Error LED. Its state and combinations with other LEDs identify an error.
!: Error LED marker.
3: Ready LED. It blinks according to the machine status.
Ready symbol: The lower Ready LED marker.
Official LED symbol key: off, on, dimmed and blinking.
Diagram key
Off circle: LED is off.
Orange on circle: LED is on.
Green on circle: LED is on.
Dimmed circle: LED is dimmed.
Orange blink rays: LED is blinking.
Green blink rays: LED is blinking.
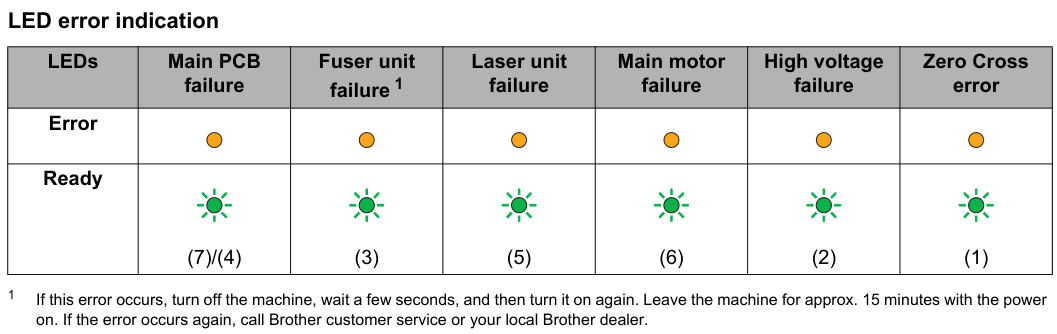
Service-call decoding while the Power On/Off key is pressed. All six failure columns and the complete fuser timing exception are retained.
Diagram key
Error row: The Error LED is on for all six decoded failures.
Ready row: The Ready LED blinks; the number beneath each symbol is its blink count.
Main PCB (7)/(4): Main PCB failure; seven or four Ready LED blinks.
Fuser (3): Fuser-unit failure; three Ready LED blinks.
Fuser footnote 1: Turn the machine off, wait a few seconds and turn it on again. Leave it powered on for approximately 15 minutes. If the error occurs again, call Brother Customer Service or your local dealer.
Laser (5): Laser-unit failure; five Ready LED blinks.
Main motor (6): Main-motor failure; six Ready LED blinks.
High voltage (2): High-voltage failure; two Ready LED blinks.
Zero Cross (1): Zero Cross error; one Ready LED blink.
All six orange on circles: Error LED on.
All six green blink symbols: Ready LED blinking.
Message or indicatorWhat it meansCheck or action
Sleeplow-power sleep
The Ready LED is dimmed in Sleep mode. The machine can still receive data; sending a print job wakes it and starts printing.
Sleep — actual manual LED crop.
Diagram key
! / Error: The upper Error LED marker.
Ready marker: The lower Ready LED marker.
Error light circle: Off.
Ready light circle: Dimmed.
Deep Sleepdeeper power-saving sleep
The Ready LED is dimmed in Deep Sleep mode, which uses less power than Sleep. Sending a print job wakes the machine and starts printing.
Deep Sleep — actual manual LED crop.
Diagram key
! / Error: The upper Error LED marker.
Ready marker: The lower Ready LED marker.
Error light circle: Off.
Ready light circle: Dimmed.
Readyready to print
The machine is ready to print.
Ready — actual manual LED crop.
Diagram key
! / Error: The upper Error LED marker.
Ready marker: The lower Ready LED marker.
Error light circle: Off.
Ready light circle: On.
Printingjob is printing
The machine is printing.
Printing — actual manual LED crop.
Diagram key
! / Error: The upper Error LED marker.
Ready marker: The lower Ready LED marker.
Error light circle: Off.
Ready light circle: On.
Please Waitmachine is warming up
The machine is warming up; the Ready LED blinks at one-second intervals.
Please Wait — actual manual LED crop.
Diagram key
! / Error: The upper Error LED marker.
Ready marker: The lower Ready LED marker.
Error light circle: Off.
Ready light circle: Blinking at one-second intervals.
Blink rays: The source symbol for a blinking LED; the timing for this state is stated above and in the instructions.
Cooling Downmachine pauses to cool
The inside is extremely hot and the current job pauses while the machine cools. Wait until Ready mode; the Ready LED blinks at one-second intervals.
Cooling Down — actual manual LED crop.
Diagram key
! / Error: The upper Error LED marker.
Ready marker: The lower Ready LED marker.
Error light circle: Off.
Ready light circle: Blinking at one-second intervals.
Blink rays: The source symbol for a blinking LED; the timing for this state is stated above and in the instructions.
Receiving Datareceiving or processing data
The machine is receiving data or processing it in memory; the Ready LED blinks at half-second intervals.
Receiving Data — actual manual LED crop.
Diagram key
! / Error: The upper Error LED marker.
Ready marker: The lower Ready LED marker.
Error light circle: Off.
Ready light circle: Blinking at half-second intervals.
Blink rays: The source symbol for a blinking LED; the timing for this state is stated above and in the instructions.
Data Remainingprint data remains in memory
Print data remains in memory. If the Ready LED blinks at half-second intervals for a long time and nothing prints, press the Power On/Off key to print the remaining data.
Data Remaining — actual manual LED crop.
Diagram key
! / Error: The upper Error LED marker.
Ready marker: The lower Ready LED marker.
Error light circle: Off.
Ready light circle: Blinking at half-second intervals.
Blink rays: The source symbol for a blinking LED; the timing for this state is stated above and in the instructions.
Toner Lowtoner cartridge nears end of life
2 checks
LED Toner Low: Error blinks once every 1.5 seconds while Ready is on
Buy a new toner cartridge and have it ready for Replace Toner.
If output is faint, hold the drum-and-toner assembly level with both hands and gently shake it side to side several times to distribute toner evenly.
Status Monitor reports Toner Low
Order a new toner cartridge so it is ready when Replace Toner appears. Printing can still continue; the cartridge is nearing the end of its life.
Toner Low — actual manual LED crop.
Diagram key
! / Error: The upper Error LED marker.
Ready marker: The lower Ready LED marker.
Error light circle: Blinking once every 1.5 seconds.
Ready light circle: On.
Blink rays: The source symbol for a blinking LED; the timing for this state is stated above and in the instructions.
Replace Toner (Continue mode)continue printing until Toner Ended
The Error LED blinks once at 1.5-second intervals while Ready remains on.
Continue mode permits printing until Toner Ended; see the reviewed Toner Setting instructions.
Print quality is not guaranteed and output may be faint.
Replace Toner (Continue mode) — actual manual LED crop.
Diagram key
! / Error: The upper Error LED marker.
Ready marker: The lower Ready LED marker.
Error light circle: Blinking once every 1.5 seconds.
Ready light circle: On.
Blink rays: The source symbol for a blinking LED; the timing for this state is stated above and in the instructions.
Replace Toner (Stop mode)printing stops for toner replacement
2 checks
Stop mode: Error blinks once every 1.5 seconds and Ready is off
Replace the toner cartridge with a new one, following the instructions supplied with the cartridge. Printing stops until replacement.
Status Monitor reports Replace Toner: toner is at end of life and printing stops
Replace the toner cartridge using its supplied instructions.
Replace Toner (Stop mode) — actual manual LED crop.
Diagram key
! / Error: The upper Error LED marker.
Ready marker: The lower Ready LED marker.
Error light circle: Blinking once every 1.5 seconds.
Ready light circle: Off.
Blink rays: The source symbol for a blinking LED; the timing for this state is stated above and in the instructions.
No Tonertoner cartridge is missing or needs reseating
The Error LED blinks once at 1.5-second intervals and Ready is off.
Remove the drum-and-toner assembly, remove the toner cartridge from the drum, reinstall the cartridge in the drum, then reinstall the complete assembly.
If the problem continues, replace the toner cartridge following its supplied instructions.
No Toner — actual manual LED crop.
Diagram key
! / Error: The upper Error LED marker.
Ready marker: The lower Ready LED marker.
Error light circle: Blinking once every 1.5 seconds.
Ready light circle: Off.
Blink rays: The source symbol for a blinking LED; the timing for this state is stated above and in the instructions.
Toner Endedtoner replacement is required
The Error LED blinks once at 1.5-second intervals and Ready is off. Replace the toner cartridge with a new one, following the instructions supplied with it.
Toner Ended — actual manual LED crop.
Diagram key
! / Error: The upper Error LED marker.
Ready marker: The lower Ready LED marker.
Error light circle: Blinking once every 1.5 seconds.
Ready light circle: Off.
Blink rays: The source symbol for a blinking LED; the timing for this state is stated above and in the instructions.
Cartridge Errordrum-and-toner installation or genuine-supply check
3 checks
LED Cartridge Error: Error blinks four times, then turns off for one second; drum-and-toner assembly is not correctly installed
Remove the drum-and-toner assembly and reinstall it. Use only genuine Brother Original drum and toner units.
Status Monitor: toner cartridge not installed correctly
Remove the drum-and-toner assembly, remove the toner cartridge, reinstall it in the drum, and reinstall the assembly. If the problem continues, call Brother Customer Service.
Status Monitor: verify genuine Brother toner
Use only genuine Brother Original drum and toner cartridges.
Cartridge Error — actual manual LED crop.
Diagram key
! / Error: The upper Error LED marker.
Ready marker: The lower Ready LED marker.
Error light circle: Blinking four times, then off for one second.
Ready light circle: Off.
Blink rays: The source symbol for a blinking LED; the timing for this state is stated above and in the instructions.
Drum End Soon / Replace Drumdrum replacement or counter reset is due
4 checks
LED drum-end indication: Error blinks three times, then turns off for one second while Ready is on
Keep a Brother Original drum ready. Replace the drum and reset its counter using the new drum’s insertion instructions; the linked HL sheet supplies the reviewed sequence.
Status Monitor reports Drum End Soon
Order a replacement drum now so it is available when Replace Drum appears.
Status Monitor reports Replace Drum: replacement is due
Replace the drum using the instructions supplied with the new drum; the linked HL insertion sheet supplies the reviewed sequence.
Status Monitor reports Replace Drum after a new drum was installed: counter was not reset
Reset the drum counter using the supplied drum instructions. The linked HL insertion sheet shows four Power On/Off key presses with the cover still open.
Drum End Soon / Replace Drum — actual manual LED crop.
Diagram key
! / Error: The upper Error LED marker.
Ready marker: The lower Ready LED marker.
Error light circle: Blinking three times, then off for one second.
Ready light circle: On.
Blink rays: The source symbol for a blinking LED; the timing for this state is stated above and in the instructions.
The Error LED blinks three times, then turns off for one second and Ready is off. Clean the corona wire as described in the reviewed print-quality troubleshooting instructions.
Drum ! — actual manual LED crop.
Diagram key
! / Error: The upper Error LED marker.
Ready marker: The lower Ready LED marker.
Error light circle: Blinking three times, then off for one second.
Ready light circle: Off.
Blink rays: The source symbol for a blinking LED; the timing for this state is stated above and in the instructions.
No Drumtoner was installed without a drum
The Error LED blinks three times, then turns off for one second and Ready is off.
If the toner cartridge was installed without a drum, put it in the drum unit and reinstall the complete drum-and-toner assembly.
No Drum — actual manual LED crop.
Diagram key
! / Error: The upper Error LED marker.
Ready marker: The lower Ready LED marker.
Error light circle: Blinking three times, then off for one second.
Ready light circle: Off.
Blink rays: The source symbol for a blinking LED; the timing for this state is stated above and in the instructions.
Jam Tray / Jam Inside 1 / Jam Inside 2 / Jam Inside 3paper is jammed
The Error LED blinks twice, then turns off for one second and Ready is off.
Follow the complete reviewed Paper jams sequence.
If printing does not restart, press the Power On/Off key.
Jam Tray / Jam Inside 1 / Jam Inside 2 / Jam Inside 3 — actual manual LED crop.
Diagram key
! / Error: The upper Error LED marker.
Ready marker: The lower Ready LED marker.
Error light circle: Blinking twice, then off for one second.
Ready light circle: Off.
Blink rays: The source symbol for a blinking LED; the timing for this state is stated above and in the instructions.
Wrong Paper Typepaper width or length is too small
The Error LED blinks twice, then turns off for one second and Ready is off.
The paper width or length is too small.
Load usable A4, Letter, Legal or Folio paper and press the Power On/Off key.
Wrong Paper Type — actual manual LED crop.
Diagram key
! / Error: The upper Error LED marker.
Ready marker: The lower Ready LED marker.
Error light circle: Blinking twice, then off for one second.
Ready light circle: Off.
Blink rays: The source symbol for a blinking LED; the timing for this state is stated above and in the instructions.
No Paperpaper tray needs paper
The Error LED blinks twice, then turns off for one second and Ready is off. Put paper in the paper tray.
No Paper — actual manual LED crop.
Diagram key
! / Error: The upper Error LED marker.
Ready marker: The lower Ready LED marker.
Error light circle: Blinking twice, then off for one second.
Ready light circle: Off.
Blink rays: The source symbol for a blinking LED; the timing for this state is stated above and in the instructions.
Cover is Opentop cover is not completely closed
The Error LED blinks four times, then turns off for one second and Ready is off. Close the top cover completely.
Cover is Open — actual manual LED crop.
Diagram key
! / Error: The upper Error LED marker.
Ready marker: The lower Ready LED marker.
Error light circle: Blinking four times, then off for one second.
Ready light circle: Off.
Blink rays: The source symbol for a blinking LED; the timing for this state is stated above and in the instructions.
Out of Memorydocument exceeds memory
The Error LED blinks four times, then turns off for one second and Ready is off.
Hold the Power On/Off key for about two seconds until all LEDs light, then release it to cancel the job and clear its data.
The machine also cancels and clears the job automatically one minute after entering this state.
Reduce document complexity or lower print quality.
Out of Memory — actual manual LED crop.
Diagram key
! / Error: The upper Error LED marker.
Ready marker: The lower Ready LED marker.
Error light circle: Blinking four times, then off for one second.
Ready light circle: Off.
Blink rays: The source symbol for a blinking LED; the timing for this state is stated above and in the instructions.
Job Cancelprint job is being cancelled
The machine is cancelling the print job. The Error and Ready LEDs light alternately.
Job Cancel — actual manual LED crop.
Diagram key
! / Error: The upper Error LED marker.
Ready marker: The lower Ready LED marker.
Error light circle: On, alternating with ready.
Ready light circle: On, alternating with error.
Service callan uncleared error needs service
Both LEDs flash for an error the user cannot clear.
Turn the machine off and on, then try printing again.
If the error remains, press the Power On/Off key and record the indicated pattern.
Make sure the top cover is completely closed, then report the pattern to Brother Customer Service or your local Brother dealer.
Main PCB failuremain circuit board failure needs service
After the service indication persists following an off/on restart, press the Power On/Off key.
The Error LED stays on and Ready blinks 7 or 4 times, as printed in the service table.
Make sure the top cover is completely closed; record and report the pattern to Brother Customer Service or your local Brother dealer.
Fuser unit failurefuser failure needs service
After the service indication persists following an off/on restart, press the Power On/Off key.
The Error LED stays on and Ready blinks 3 times, as printed in the service table.
Make sure the top cover is completely closed; record and report the pattern to Brother Customer Service or your local Brother dealer.
For this failure, turn the machine off, wait a few seconds and turn it back on.
Leave it powered on for approximately 15 minutes.
If the error occurs again, call Brother Customer Service or your local Brother dealer.
Laser unit failurelaser unit failure needs service
After the service indication persists following an off/on restart, press the Power On/Off key.
The Error LED stays on and Ready blinks 5 times, as printed in the service table.
Make sure the top cover is completely closed; record and report the pattern to Brother Customer Service or your local Brother dealer.
Main motor failuremain motor failure needs service
After the service indication persists following an off/on restart, press the Power On/Off key.
The Error LED stays on and Ready blinks 6 times, as printed in the service table.
Make sure the top cover is completely closed; record and report the pattern to Brother Customer Service or your local Brother dealer.
High voltage failurehigh voltage failure needs service
After the service indication persists following an off/on restart, press the Power On/Off key.
The Error LED stays on and Ready blinks 2 times, as printed in the service table.
Make sure the top cover is completely closed; record and report the pattern to Brother Customer Service or your local Brother dealer.
Zero Cross errorzero Cross error needs service
After the service indication persists following an off/on restart, press the Power On/Off key.
The Error LED stays on and Ready blinks 1 times, as printed in the service table.
Make sure the top cover is completely closed; record and report the pattern to Brother Customer Service or your local Brother dealer.
Troubleshooting
Find the problem you are experiencing
Corona-wire cleaning for poor print quality4 steps
Follow this troubleshooting check.
Unplug the machine before cleaning and allow at least 15 minutes before touching internal parts.
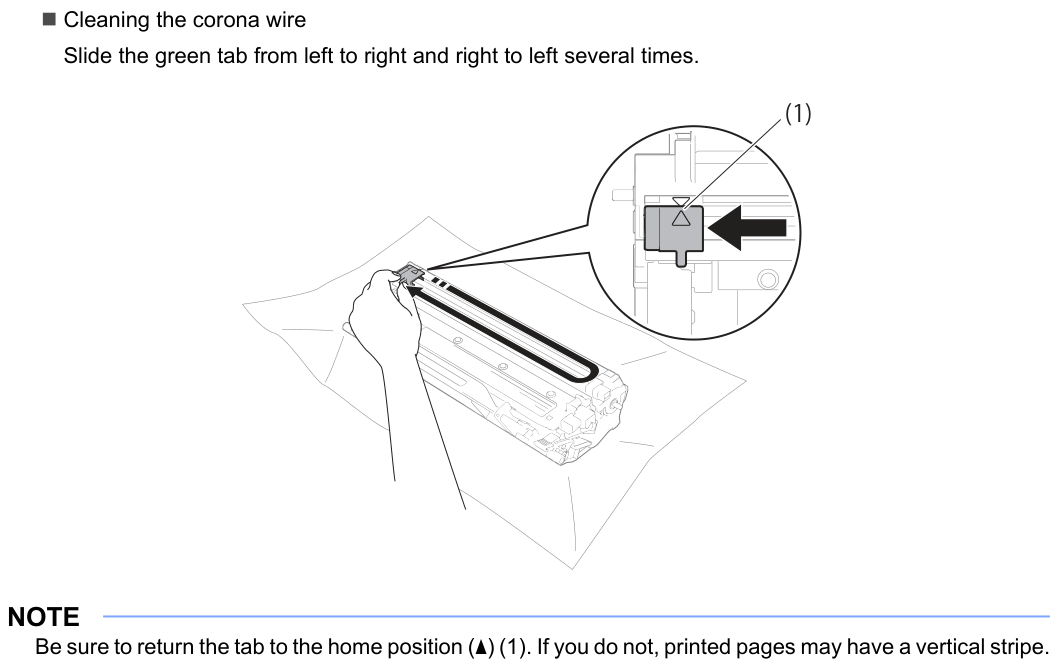
Slide the green corona-wire tab left to right and right to left several times.
Return it to the marked home position, labelled (1); otherwise printed pages may have a vertical stripe.
Corona-wire tab and home position. Return the green tab to the triangle home mark to prevent a vertical stripe.
Diagram key
(1): The tab’s home position.
Triangle home mark: Return the green tab to this mark; otherwise printed pages may have a vertical stripe.
Tab movement arrow: Slide the green tab left to right and right to left several times.
Black or white dots on printed pages6 steps
Follow this troubleshooting check.
Unplug before cleaning and allow at least 15 minutes before touching internal parts.
Push down the lock lever and remove the toner cartridge from the drum.
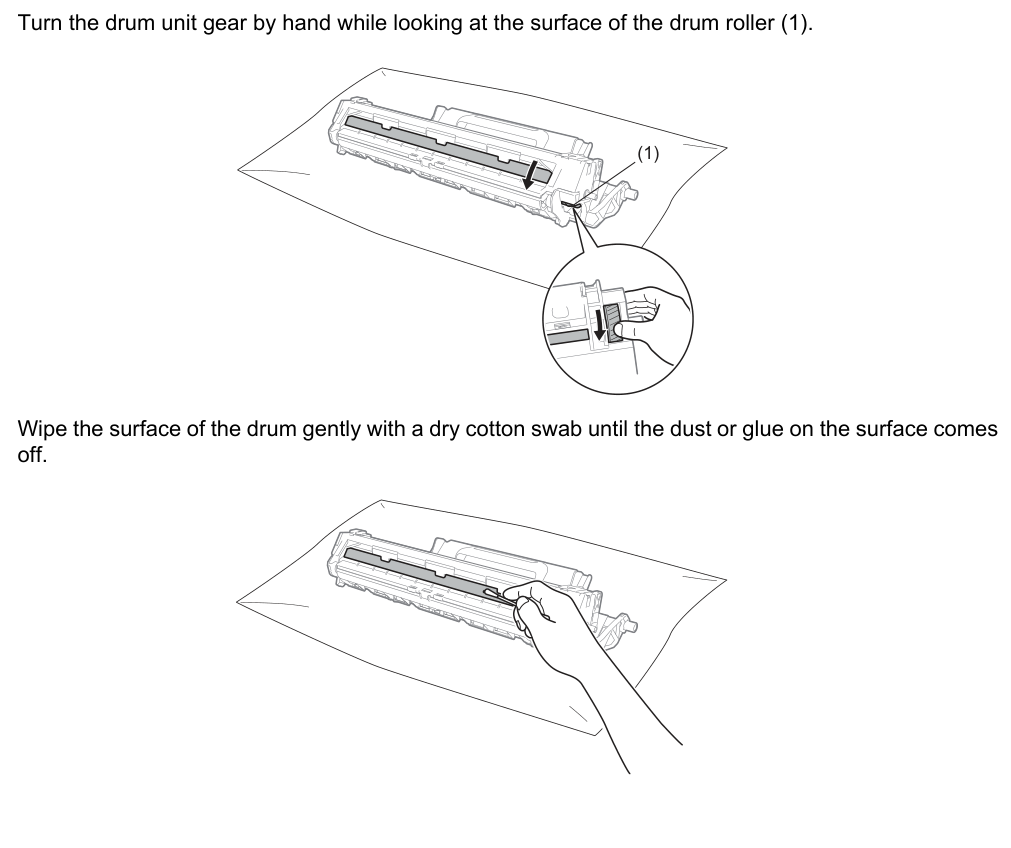
Turn the drum gear by hand while examining the drum roller, labelled (1).
Gently wipe the drum surface with a dry cotton swab until dust or glue comes off.
Do not use a sharp object or liquids on the photosensitive drum.
Inspect the drum roller while turning its gear, then clean with a dry cotton swab.
Diagram key
(1): The drum roller surface to inspect while turning the gear by hand.
Gear-turning arrow: Turn the drum unit gear by hand while inspecting the roller surface.
Cotton-swab cleaning image: Gently wipe the drum surface with a dry cotton swab until dust or glue comes off.
No printout7 checks
Driver selection
Check that the correct printer driver has been installed and selected.
LED error indication
Check the LEDs and follow the reviewed LED or Status Monitor error instructions.
(For Windows® 8)
Windows 8: move the mouse to the lower-right desktop corner; choose Settings > Control Panel > Hardware and Sound > View devices and printers.
Right-click Brother HL-XXXX series, choose See what’s printing > Printer, and clear Use Printer Offline.
(For Windows Server® 2012)
Windows Server 2012: move the mouse to the lower-right desktop corner; choose Settings > Control Panel > Hardware > View devices and printers.
Right-click Brother HL-XXXX series, choose See what’s printing > Printer, and clear Use Printer Offline.
(Windows® 7 and Windows Server® 2008 R2)
Windows 7 or Server 2008 R2: choose Start > Devices and Printers. Right-click Brother HL-XXXX series, choose See what’s printing > Printer, and clear Use Printer Offline.
(Windows Vista® and Windows Server® 2008)
Windows Vista or Server 2008: choose Start > Control Panel > Hardware and Sound > Printers. Right-click Brother HL-XXXX series and deselect Use Printer Offline.
(Windows® XP and Windows Server® 2003)
Windows XP or Server 2003: choose Start > Printers and Faxes. Right-click Brother HL-XXXX series and deselect Use Printer Offline.
Machine does not print or prints unexpectedly3 steps
Follow this troubleshooting check.
Hold the Power On/Off key for about two seconds until all LEDs light, then release it.
This cancels the print job and clears it from memory; the printout may be incomplete.
Guides
Identifying your problem
Instructions from the manual
First checks when the machine does not work4 checks
The machine's power cord
Connect the power cord correctly and turn the machine on.
All of the protective parts
Remove all protective parts.
Paper is inserted
Load paper correctly in the tray.
The interface cable
Connect the interface cable securely at the printer and computer.
Improving the print quality
Instructions from the manual
Print quality is poor6 checks
The machine's environment.
Keep the temperature at 10–32.5°C and humidity at 20–80%, without condensation.
Brother does not recommend refilling used toner cartridges or using cartridges other than genuine Brother Original ones.
Acceptable paper is loaded
Use paper allowed by the Acceptable paper section.
The paper is loaded correctly
Turn the paper over or adjust the guides if that makes loading smoother.
Replace a toner cartridge or a drum unit.
Replace the toner or drum as appropriate using the drum insertion instructions or toner-box instructions.
Clean the inside of the machine.
Clean the corona wire and, for black or white dots, the drum surface, using the separate reviewed troubleshooting checks.
Unplug before cleaning and wait at least 15 minutes before touching hot internal parts.
Check the printer driver settings.
Try changing Print Settings on the Basic tab. For curled paper or poor toner fixing, use Improve Print Output in Other Print Options on the Advanced tab.
Paper jams
Instructions from the manual
Clear a paper jam11 steps
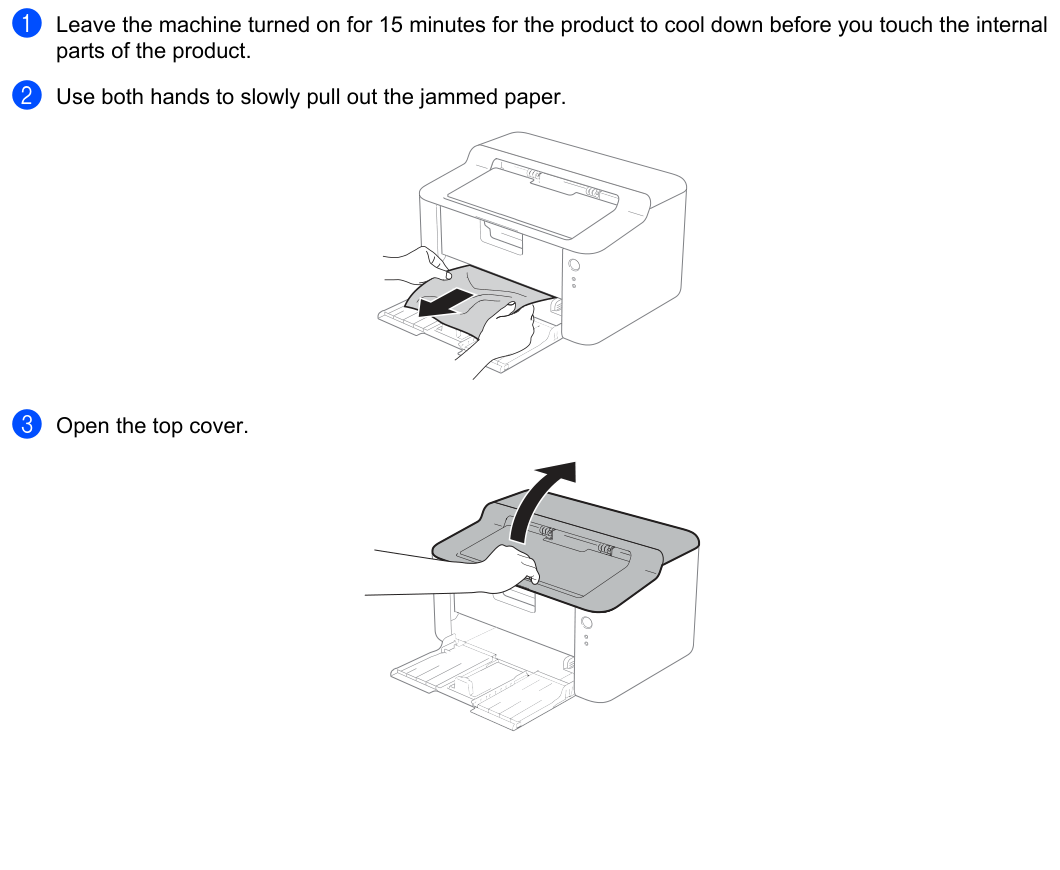
Leave the machine on for 15 minutes to cool before touching internal parts.
Use both hands to pull jammed paper out slowly.
Open the top cover.
Slowly remove the drum-and-toner assembly; paper may come out with it, or this may release paper for removal from inside.
Internal parts can be extremely hot; do not touch the hot internal parts identified in the official manual’s warning.
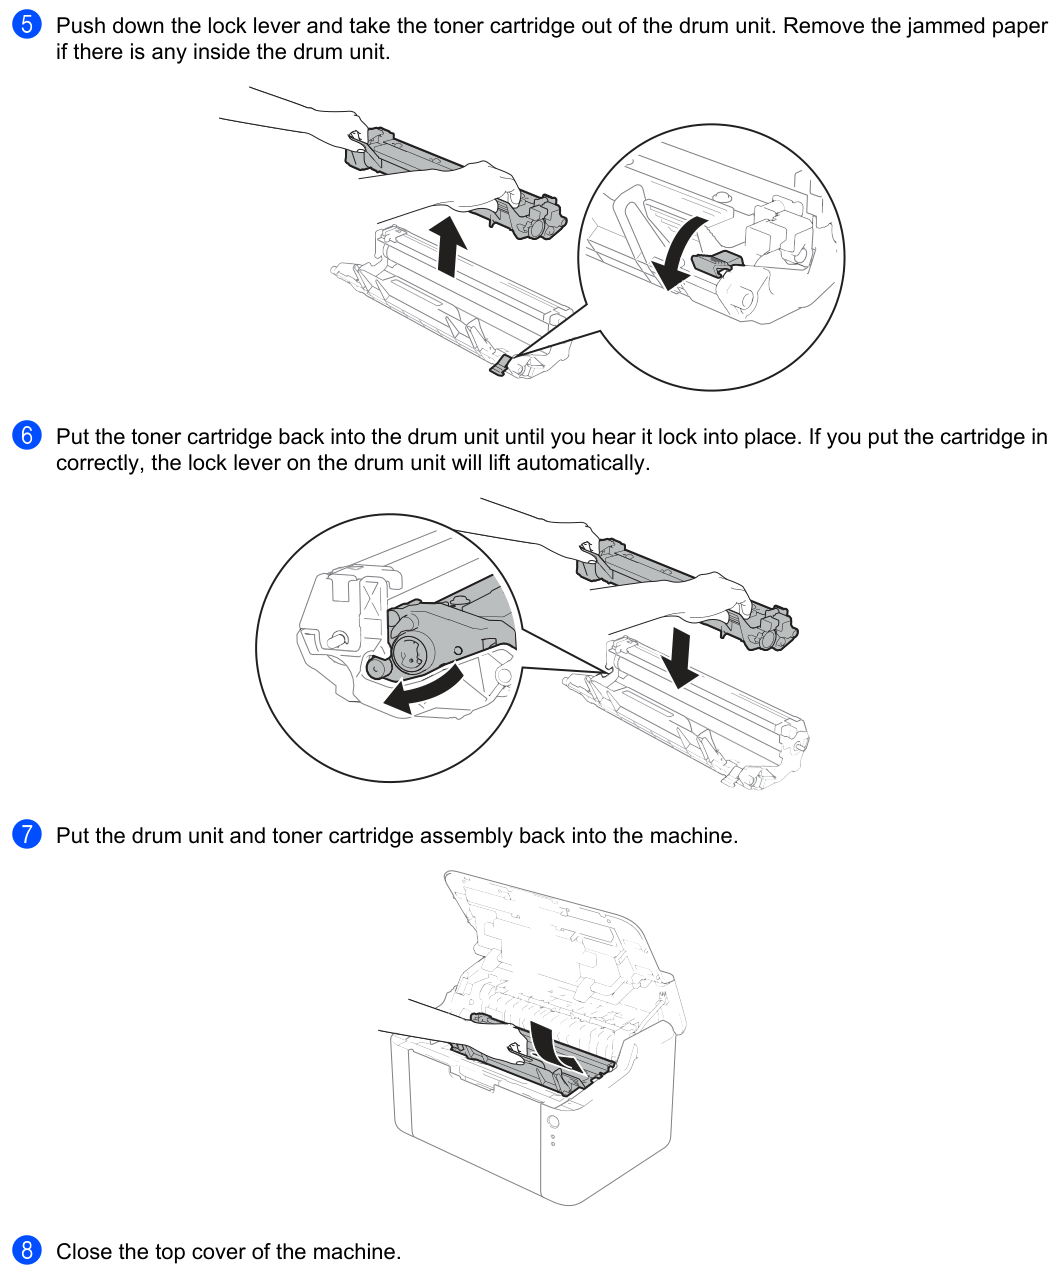
Push down the lock lever, remove the toner cartridge from the drum, and remove any paper trapped in the drum.
Reinstall the toner in the drum until it locks; the lever lifts automatically when correctly fitted.
Reinstall the complete assembly and close the top cover.
Keep paper below the protruding rear-guide section, adjust guides to paper size and seat them firmly in the slots.
Check Error is off and Ready is green.
If you turned the machine off during the jam, delete the computer print-spool job before turning it on to avoid printing incomplete data.
Paper-jam first steps: keep the machine on for 15 minutes to cool, slowly pull paper with both hands, then open the top cover.
Diagram key
1: Leave the machine turned on for 15 minutes to cool before touching internal parts.
2: Slowly pull out jammed paper using both hands.
3: Open the top cover.
Paper-removal arrow: Slowly pull out the jammed paper with both hands.
Cover-opening arrow: Open the top cover.
Paper-jam continuation: remove toner and trapped paper, refit toner until it locks, reinstall the assembly, then close the top cover.
Diagram key
5: Push down the lock lever and take the toner out of the drum; remove any paper jammed inside the drum.
6: Put the toner back into the drum until it locks. The lock lever lifts automatically when correctly fitted.
7: Put the drum-and-toner assembly back into the machine.
8: Close the top cover.
Lock-lever arrow: Push down the lock lever.
Toner-removal arrow: Lift the toner cartridge out of the drum.
Toner-insertion arrow: Refit the toner cartridge into the drum until it locks.
Lever-lock inset: The lock lever lifts automatically when the toner is correctly installed.
Assembly-insertion arrow: Put the drum-and-toner assembly back into the machine.
Acceptable paper
Instructions from the manual
Choose acceptable paper4 steps
Use plain or recycled A4, Letter, Legal or Folio paper, 65–105 g/m²; the tray holds up to 150 sheets of 80 g/m² paper.
Folio is 215.9 × 330.2 mm.
Do not mix paper types.
Match the application paper size to the loaded paper, avoid touching print immediately after printing, and test a small quantity before buying a large supply.
Guidelines for printing on both sides of the paper
Instructions from the manual
Prepare paper for two-sided printing4 steps
Thin paper may wrinkle.
Straighten curled paper and reload it; replace it if curling continues.
If paper feeds poorly, remove and straighten it, and replace it if curling continues.
Manual two-sided printing may cause jams or poor quality; use the reviewed jam and print-quality topics.
Manual 2-sided printing
Instructions from the manual
Print two-sided with the Windows driver5 steps
Choose a tray-supported Paper Size and Media Type, then 2-sided (Manual).
In 2-sided Settings choose one of four binding directions for the orientation, and optionally set Binding Offset.
Send the job: even-numbered pages print first; follow the Windows popup to reinsert paper for odd pages.
Straighten paper before reinsertion.
Very thin or thick paper is not recommended.
Printing a document
Instructions from the manual
Print a document4 steps
In your application choose Print.
If other drivers are installed, choose Brother HL-XXXX series, with XXXX matching the model, then click OK or Print.
Ready blinks while data is processed and stops after printing.
Set paper size and orientation in the application; if a custom size is unsupported, choose the next larger size and adjust the print area with right and left margins.
Accessing the printer driver settings
Instructions from the manual
Open Windows printer-driver settings9 steps
Windows XP/Server 2003: Start > Printers and Faxes.
Vista/Server 2008: Start > Control Panel > Hardware and Sound > Printers.
Windows 7/Server 2008 R2: Start > Devices and Printers.
Windows 8: lower-right desktop corner > Settings > Control Panel > Hardware and Sound > View devices and printers.
Server 2012: the same route uses Hardware > View devices and printers.
Right-click Brother HL-XXXX series and select Properties on XP/Server 2003/Vista/Server 2008, or Printer properties on 7/Server 2008 R2/8/Server 2012.
Select the driver if choices appear.
On General, click Preferences (Printing Preferences).
Screens in the guide are Windows 7 examples.
Basic tab
Instructions from the manual
Set Windows basic print options5 steps
Choose Paper Size, Orientation, Copies, Media Type, Print Quality and Print Settings; choose Multiple Page and 2-sided / Booklet.
Check the current-settings window and click OK.
To restore defaults, click Default then OK.
Check Print Preview to preview the job.
The left-hand page illustration can also change layout.
Orientation
Instructions from the manual
Choose orientation, copies, media and quality4 steps
Choose Portrait or Landscape.
Set the copy count; Collate prints complete document copies, while clearing Collate repeats each page for all copies first.
Select Plain Paper or Recycled Paper to match the media.
Choose Draft, Normal or Fine print quality.
Print settings
Instructions from the manual
Set Windows graphics or text printingView
Choose Graphics for documents with graphics or Text for text documents. To adjust brightness, contrast and other settings manually, choose Manual and click Manual Settings.
Set Macintosh media and qualityView
Select Plain Paper or Recycled Paper to match the media and choose Draft, Normal or Fine quality.
Multiple page
Instructions from the manual
Print multiple pages or a poster3 steps
Multiple Page reduces pages to fit several on one sheet or enlarges one page across several sheets.
For N in 1 choose Page Order and a solid, dashed or absent Border Line.
For 1 in NxN Pages, Print cut-out line can add a faint line around the printable area.
2-sided / booklet
Instructions from the manual
Set Windows manual two-sided or booklet options5 steps
Choose None to disable two-sided printing.
2-sided (Manual) prints even pages first, pauses for reinsertion instructions, then prints odd pages after OK; 2-sided Settings offers four binding directions per orientation and a binding offset in inches or millimetres.
Booklet (Manual) arranges pages for folding at the centre, prints even sides then pauses for reinsertion, and prints odd sides after OK.
Its settings offer two binding directions per orientation.
Divide into Sets creates smaller booklet sets of 1–15 sheets; Binding Offset can be set in inches or millimetres.
Print preview
Instructions from the manual
Use Windows Print Preview3 steps
Select Print Preview to open its viewer before printing.
Choose a page in Page List Area to inspect it in Preview Area; clear its checkmark to omit it.
Print Preview cannot be used with 2-sided (Manual) or Booklet (Manual).
Advanced tab
Instructions from the manual
Use Windows advanced print settingsView
Select Scaling, Reverse Print, Use Watermark, Header-Footer Print, Toner Save Mode, Administrator or Other Print Options on the Advanced tab.
Scaling
Instructions from the manual
Scale or reverse Windows print dataView
Scaling changes the print-image size. Select Reverse Print to reverse the data from top to bottom.
Use watermark
Instructions from the manual
Add a Windows watermark7 steps
Select Use Watermark then Settings.
Choose a preset or click Add for a new watermark and select Use Text or Use Bitmap File.
Enter a title.
For text set the text, font, style, size and darkness; for bitmap enter its path or Browse and set scaling.
Set Position for placement.
Bring to Front overlays the document; In Outline Text is available only for text watermarks.
Use Custom Settings to select the watermark for first or later pages.
Header-footer print
Instructions from the manual
Print a Windows header or footer2 steps
Enable Header-Footer Print to include the computer clock date and time and either the PC login name or entered text.
Click Settings to customise; ID Print uses Login User Name or Custom text.
Toner save mode
Instructions from the manual
Use Windows Toner Save Mode3 steps
Turn Toner Save Mode on to reduce toner use and make output lighter; it is off by default.
Brother does not recommend it for photo or greyscale images.
It is unavailable with Fine Print Quality.
Administrator
Instructions from the manual
Restrict Windows printing functions3 steps
Administrators can restrict printing functions with a password.
Increase or decrease print density with Density Adjustment in Other Print Options. It is unavailable when Fine Print Quality is selected.
Improve print output
Instructions from the manual
Reduce curl or improve toner fixing in Windows2 steps
In Other Print Options choose Reduce Paper Curl to reduce curling; it is unnecessary for only a few pages and lowers the fusing temperature.
Choose Improve Toner Fixing to improve toner attachment; it raises the fusing temperature.
Skip blank page
Instructions from the manual
Skip blank pages in Windows2 steps
Select Skip Blank Page to omit detected blank pages.
It does not work with Use Watermark, Header-Footer Print, N in 1 or 1 in NxN Multiple Page, 2-sided (Manual), Booklet (Manual), or Print Preview.
Print text in black
Instructions from the manual
Print Windows text in blackView
Select Print Text in Black to print text in black instead of greyscale. It may not work with certain characters.
Print profiles tab
Instructions from the manual
Use or add a Windows print profile3 steps
Choose an editable preset in the profile list and click OK.
Check Always show Print Profiles tab first to open it first next time.
Add Profile supports 20 new profiles: enter a Name, choose an icon, then click OK to save the current driver settings shown at the left.
Delete profile
Instructions from the manual
Delete a Windows print profileView
Choose an added profile in the list, click Delete then Yes. The selected profile is deleted.
Device settings tab
Instructions from the manual
Detect the printer serial number in Windows3 steps
Click Auto Detect to read the machine serial number and available driver settings.
A failed read displays dashes.
Auto Detect is unavailable while the machine is off, in an error state, connected by USB to a print server in a shared network, or incorrectly connected by cable.
Support
Instructions from the manual
Use Windows driver support tools3 steps
Click Support in Printing Preferences.
Brother Solutions Center supplies FAQs, guides, driver updates and tips; Original Supplies Website opens genuine supplies information; CreativeCenter opens business and home resources.
Print Settings prints the internal settings, Check Setting shows current driver settings, and About lists driver files and versions.
Uninstalling the printer driver
Instructions from the manual
Uninstall the Windows printer driver4 steps
These steps do not apply to drivers originally installed with Windows Add a printer.
On XP, Vista or 7, choose Start > All Programs > Brother > model > Uninstall and follow the prompts.
On Windows 8 open Brother Utilities, select the model, choose Tools > Uninstall and follow the prompts.
Restart afterward to remove files that were in use.
Choosing page setup options
Instructions from the manual
Set Macintosh page and print options5 steps
For the manual’s Mac OS X 10.6.8, 10.7.x or 10.8.x driver, choose File > Page Setup, select Brother HL-XXXX in Format For, set Paper Size, Orientation and Scale, then OK.
Choose File > Print to print.
In 10.6.8 open the disclosure triangle beside Printer for more options; in 10.7.x/10.8.x click Show Details.
Save a preset with Save As in 10.6.8 or Save Current Settings as Preset in 10.7.x/10.8.x.
The guide screenshots are 10.7 examples.
Choosing printing options
Instructions from the manual
Choose Macintosh printing options and cover pageView
Select Print Settings from the Print dialog to control special features. Print Cover Page adds a cover; choose Cover Page Type, and enter Billing Info if needed.
Layout
Instructions from the manual
Set Macintosh layout options2 steps
Pages per Sheet fits several pages on a sheet; choose Layout Direction and an optional Border.
Reverse page orientation reverses top to bottom; Flip horizontally produces a left-to-right reflection.
Advanced print settings
Instructions from the manual
Set Macintosh advanced printing options5 steps
Open the triangle beside Advanced.
Toner Save makes output lighter and is off by default; it is not recommended for photos or greyscale and is unavailable with Fine quality.
Graphics Quality offers Graphics for text and figures with sharp shaded-area contrast, or Text for text documents.
Reduce Paper Curl lowers fusing temperature and is unnecessary for only a few pages; Improve Toner Fixing raises fusing temperature.
Density Adjustment changes print density, and Skip Blank Page excludes detected blank pages.
2-sided printing
Instructions from the manual
Print two-sided with the Macintosh driverView
Select Paper Handling, choose Even Only and Print. Reload printed sheets with the blank side face down, choose Odd Only and Print.
Removing the printer driver
Instructions from the manual
Remove the Macintosh printer driverView
Log in as an Administrator. Choose Apple > System Preferences > Print & Scan (Print & Fax on Mac OS X 10.6.8). Select the printer, click the minus button, then Delete Printer.
Status monitor
Instructions from the manual
Open Windows Status Monitor6 steps
Double-click the tasktray Status Monitor icon or choose Start > All Programs > Brother > HL-XXXX > Status Monitor.
On Windows 7 open the taskbar hidden-icons button and drag the Status Monitor icon to the taskbar.
On Windows 8 open Brother Utilities, select the model, choose Tools > Status Monitor.
Right-click its icon and choose Help for details.
Its automatic update feature is active with Status Monitor and can receive Brother application and firmware updates.
Green means normal standby, yellow a warning and red a printing error; the monitor can be displayed in the tasktray or desktop.
Use Macintosh Status Monitor4 steps
Choose System Preferences > Print & Scan (Print & Fax on 10.6.8), select the machine, choose Options & Supplies > Utility > Open Printer Utility.
Refresh requests current status; Brother Status Monitor > Preferences sets update intervals.
Hide Status Monitor hides the window; its dock icon shows it again.
Choose Brother Status Monitor > Quit Status Monitor to close it.
Remote printer console (windows® only)
Instructions from the manual
Install or use Remote Printer Console4 steps
Remote Printer Console changes settings such as margins independently of the application, and the machine remembers them.
Application and driver settings take priority.
It is unavailable in countries subject to applicable export regulations.
Insert the installer CD, close its opening screen, open the CD drive in Windows Explorer, open tools then rpc, and consult RPC_User’s_Guide.pdf for installation and use.
Power on/off key
Instructions from the manual
Use the Power On/Off key5 steps
To turn off, ensure Ready mode and hold the Power On/Off key about two seconds until all LEDs are off.
To cancel the current job, hold it about two seconds: the machine ejects paper and Error/Ready light alternately, then release.
To cancel all received jobs, cancel the current job first and press the key again while the LEDs alternate.
Some errors recover automatically; press the key if an error does not clear.
If Ready blinks for a long time, press the key to print remaining memory data.
Print a printer settings page
Instructions from the manual
Print the printer-settings page3 steps
Close the top cover and ensure the power cord is plugged in.
Turn on and wait for Ready, then press the Power On/Off key three times.
Alternatively, in the Windows driver click Print Settings in Support.
Ecology features
Instructions from the manual
Use toner and sleep-saving features5 steps
Toner Save produces lighter print and is off by default; change it in the driver.
After one idle minute the machine enters Sleep, and a new print file resets the timer.
Ready glows dimly.
With no jobs for a further period it enters Deep Sleep automatically, reducing power more; Ready remains dim.
A print job wakes either sleep mode.
Power off mode
Instructions from the manual
Use Power Off mode4 steps
The Version B guide describes automatic Power Off after one hour in Deep Sleep.
To resume, hold the Power On/Off key until all LEDs light and then send the job.
To enter it manually, ensure the top cover is closed and the power cord connected, turn on and wait for Ready, then hold the key about two seconds; all LEDs turn off.
The guide allows changing the Power Off mode setting with Remote Printer Console.
Consumable items
Instructions from the manual
Choose original consumables4 steps
For UK/IRE HL-1112 use the separate TN-1050 toner cartridge and DR-1050 drum as one installed assembly; TN-1030/DR-1030 belong to the E variants.
Follow the new drum’s insertion instructions and the toner-box instructions for replacement.
Brother recommends original drum and toner, and does not recommend refilled or other-specification cartridges; they may be misdetected, reduce quality or machine life, and resulting damage may not be covered by warranty.
Return used toner via Brother’s collection programme or dispose of it under local rules separately from household waste.
Toner setting
Instructions from the manual
Change toner Stop or Continue mode5 steps
Default Stop mode stops printing at Replace Toner until a new cartridge is fitted.
With the top cover closed and no LED error mode active, press the Power On/Off key seven times to select Continue: all LEDs blink twice and Ready comes on.
Printing then continues until Toner Ended.
Press seven times again to return to Stop; all LEDs blink once.
Continue mode can produce faint output and print quality is not guaranteed.
Cleaning and checking the machine
Instructions from the manual
Clean and check the machine4 steps
Unplug before cleaning and wait at least 15 minutes before touching hot internal parts.
Regularly clean the exterior and interior with a dry, lint-free cloth, including when replacing toner or drum or when output has toner stains.
Do not use flammable substances, sprays or organic liquids containing alcohol or ammonia: these can cause fire or electric shock.
Use only a dry, lint-free cloth.
Factory reset
Instructions from the manual
Perform a partial factory reset6 steps
This partially restores default printer settings; page counters cannot be changed.
Turn off the machine.
Ensure the top cover is closed and power connected.
Hold the Power On/Off key while opening and closing the top cover once.
Release the key and check all LEDs are off.
Press the key eight times; all LEDs light to confirm reset, then the machine restarts.
Settings reset
Instructions from the manual
Reset all machine settings6 steps
This restores all machine settings to factory values; page counters cannot be changed.
Turn off the machine.
Ensure the top cover is closed and power connected.
Hold the Power On/Off key while opening and closing the top cover once.
Release the key and check all LEDs are off.
Press the key ten times; the machine restarts.
Important information for choosing your paper
Instructions from the manual
Choose suitable laser-printer paper5 steps
Test paper before buying a large quantity.
Choose laser-printer-suitable paper; 70–90 g/m² is recommended, within the broader supported range.
Long-grain paper is recommended because short grain is weak for transport.
Neutralised paper is recommended; acid-paper check pens distinguish acid from neutral paper.
Faces can differ; follow the package print-side indication, normally marked by an arrow.
Choose a safe location for your product
Instructions from the manual
Choose a safe location8 steps
Use a flat, level, stable surface without vibration or shocks, near a standard earthed socket.
Operate at 10–32.5°C and 20–80% humidity without condensation.
Avoid sun, excessive heat, flames, corrosive gas, moisture, dust, chemicals, heaters, air conditioners, fans, refrigerators and water.
Keep ventilation unobstructed with at least 150 mm to the wall; use a solid surface, not a bed, sofa or rug, and avoid built-in placement without adequate ventilation.
Secure cords against tripping and protect the machine from accidental knocks.
Avoid switched/timed sockets and circuits shared with large appliances.
Do not place heavy objects or other objects on it, obstruct output or place it on unstable furniture.
Keep it away from electromagnetic interference sources; power interruption may delete memory.
General precautions
Instructions from the manual
Handle and clean the printer safely12 steps
Keep packaging bags away from babies and children.
Do not burn toner cartridges or assemblies.
Do not use flammable substances near the machine, cleaning sprays, liquids or aerosols.
Unplug before cleaning and use a dry, lint-free soft cloth.
Never vacuum spilled toner; wipe it with a dry, lint-free soft cloth and dispose of it locally.
Avoid use during electrical storms.
Wait at least 15 minutes before touching hot internal parts; the HL top cover can be hot during and after use, so do not touch it or put anything on it.
Avoid fingers in the indicated cover areas.
Do not remove warning labels.
Place the drum-and-toner assembly on a clean, flat surface over disposable paper.
Wipe or wash spilled toner off hands or clothing with cold water at once.
Do not touch the shaded toner/drum areas shown in the source, use volatile cleaners, or clean the photosensitive drum with sharp objects or liquids.
Respond to toner contact6 steps
The Product Safety Guide specifies the following toner-contact actions.
Inhalation: obtain immediate medical attention, move the affected person to fresh air and keep them at rest.
Skin contact: immediately remove contaminated clothing and wash the affected skin with plenty of water or soap and water.
Eye contact: obtain medical attention and immediately rinse the eyes with plenty of water for at least 15 minutes.
Ingestion: obtain immediate medical attention, rinse the mouth with water, and give 200–300 ml of water to drink.
For further toner safety information, consult Brother’s Safety Data Sheets.
Connecting the product safely
Instructions from the manual
Connect the printer safely7 steps
Before internal cleaning unplug the power cord.
Do not handle plugs with wet hands; fully insert the plug.
Use the AC supply range on the rating label, never DC or an inverter; ask a qualified electrician if unsure.
Keep objects and feet off the cord and prevent stretching or strain.
Do not use a frayed or damaged cord.
Use a standard correctly wired socket and, where supplied, a properly earthed three-pin socket.
For the 220–240 V model, the product is a Class 1 laser product but the internal laser diode is Class 3B and emits invisible radiation.
Never open the laser unit.
Controls, adjustments or procedures outside the manual can expose hazardous radiation.
Wiring information (u.k. only)
Instructions from the manual
Check the UK plug and fuse5 steps
The printer must be earthed.
A replacement fuse must be ASTA-approved to BS1362 and match the original rating.
Replace the fuse cover and never use a plug without it.
Green/yellow is Earth, blue Neutral and brown Live.
If unsure, consult a qualified electrician.
Recycling information in accordance with the weee and battery directives
Instructions from the manual
Dispose of marked equipment separatelyView
The recycling mark means end-of-life products or batteries must be taken to an appropriate collection point separately from unsorted household waste.
Installing the drum and toner
Instructions from the manual
Install the drum and toner for initial setup3 steps
Read the Product Safety Guide first.
Follow the complete illustrated installation sequence: remove the toner’s orange protective piece, open the cover, remove the drum, fit the toner to the drum, put the assembly in the machine and close the cover.
The supplied guide illustrates each operation and arrow; do not use this as the drum-counter replacement reset sequence.
Loading paper
Instructions from the manual
Load paper for initial setup3 steps
Follow the complete Loading paper panel in the official Quick Setup Guide, retaining its tray, paper-stack and paper-guide movement arrows.
Use the types, sizes, weight range and 150-sheet capacity in the reviewed User’s Guide.
The source supplies the ordered setup graphics; no extra step or unexplained quantity is inferred.
Installing the printer driver
Instructions from the manual
Install the initial printer driver3 steps
For Windows, follow the official Quick Setup Guide and on-screen installation instructions to complete setup; the source shows power connection, the Power On/Off key, the supplied disc, Install Printer Driver and Finish.
For Macintosh, download the driver, software and manuals from Brother’s model support site.
Windows 8 needs Adobe Reader for the CD PDF manuals; if installed but PDFs will not open, change the .pdf association to Adobe Reader in Control Panel.
Replacing the drum unit
Instructions from the manual
Replace the HL drum unit and reset the drum counter5 steps
Use the seven-step HL-XXXX sequence in the official drum insertion sheet.
Keep the machine powered on.
Open the top cover, remove the drum-and-toner assembly, push the lock lever down and lift out the toner, unpack the new drum and fit the toner to it, then reinstall the assembly.
Keep the top cover open, press the Power On/Off key four times, and then close the top cover.
The MFC/DCP menu-based sequence on the second page does not apply.
Controls and parts
See the manual diagrams 1 diagram
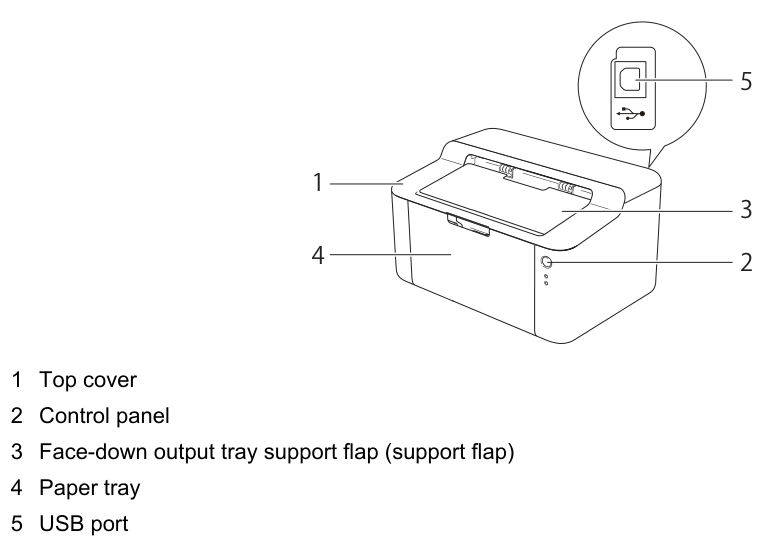
HL-1112 machine overview. Complete five-part printed key; USB symbol identifies the enlarged USB port.
Diagram key
1: Top cover.
2: Control panel.
3: Face-down output tray support flap (support flap).
4: Paper tray.
5: USB port.
USB symbol: Identifies the enlarged USB port.
Model details
Model and compatibility
Consumables
The UK/IRE HL-1112 uses separate TN-1050 toner and DR-1050 drum units, installed together. TN-1030 and DR-1030 belong to the E variants in this shared guide. [1]
Connection
The guide specifies Full-Speed USB 2.0 and recommends a Type A/B USB cable no longer than 2 metres. [1]
Paper
Use plain or recycled A4, Letter, Legal or Folio paper, 65–105 g/m². The tray holds up to 150 sheets of 80 g/m² paper. [1]

 low-power sleep
 ready to print
 machine is warming up
 toner cartridge nears end of life2 checks
 printing stops for toner replacement2 checks
 drum-and-toner installation or genuine-supply check3 checks
 drum replacement or counter reset is due4 checks
 corona wire needs cleaning
 paper is jammed
 top cover is not completely closed
 print job is being cancelled