MODEL REFERENCE
CZUR Lens Pro
1 error · 3 troubleshooting topics · 71 guides

The checks and guides below come from the official manuals for this model.
No matches for this wording. Try a light name, error code or a shorter phrase.
Error messages
Messages and indicator states from the manualTroubleshooting
Find the problem you are experiencingPower indicator is not working2 checks
- Power connection
- Check that the Type-C cable is plugged into the scanner and its USB Type-A end is properly connected to the computer.
- Computer power and USB ports
- Check that the computer is powered on and that its USB ports work correctly.
Software cannot be installed or reports an error4 checks
- Operating system
- Check the operating system against the applicable software guide; the operation guide lists XP/Windows7/8/10 in32-bit/64-bit and macOS.
- Serial number
- Check that the serial number was entered correctly.
- Security software or startup restrictions
- Check antivirus, firewall and startup restrictions. The manual directs exiting antivirus or adding trust and closing the firewall or lowering its security level.
- Incomplete download
- If downloaded from the official website, verify that the download completed successfully before installing.
No software image and scanning fails on first use6 checks
- Cable or software session
- Reconnect the Type-C cable or restart the computer software.
- USB port performance
- Try a different computer USB port; ports can perform differently.
- Defensive software
- Exit antivirus, security guards or defensive background software as directed by the manual.
- Driver recognition
- In Device Manager check for CZUR Exxxx.
- If a yellow exclamation mark or unknown device appears, right-click to update its driver, or disable and re-enable it, then restart the software.
- Other device drivers
- Use Device Manager to disable other Scanner, Monitor or Camera drivers.
- Computer
- Restart the computer or try another computer.
Guides
2 preparation
Instructions from the manualPrepare the scanner and black pad5 steps
- Unpack the device and connect it to the computer with the Type-C cable.
- Open the software.
- Place the black soft pad on the table with its notch aligned to the edge of the base.
- Check in the software that the pad fills the preview; incorrect coverage affects processing and scanning results.
- Turn on the fill light to avoid a shadow from the crossbar.
1 software installation
Instructions from the manualInstall the appropriate scanner software4 steps
- On the official CZUR website, open Download Software, select your exact device and download and install its software.
- The operation guide also allows installation, update checking or upgrades from the supplied CD.
- Follow the installer prompts.
- The operation guide lists XP/Windows7/8/10 in32-bit or64-bit and macOS; use the separate current Windows/Mac guides for their platform-specific requirements.
3 instructions
Instructions from the manualUse the manufacturer software instructions2 steps
- Open Download Software on the official CZUR website and select the matching model to download the CZUR Lens software instructions, also provided on the CD.
- Open the software and follow the corresponding Windows or Mac instructions.
3 product details
Instructions from the manualIdentify the scanner parts and fill-light controls10 steps
- The crossbar casing, vertical bar and base are identified as1,2 and3; the vertical bar/base rotate through0–180° and can be fixed.
- The main camera scans documents through the client software.
- The fill light turns on as the crossbar unfolds around60° and off as it folds around60°; lightly tap the Light Control Button to control it.
- The cushion reduces contact impact.
- The secondary camera is an optional feature, not established as fitted to this12MP Lens Pro.
- A white indicator means power is on.
- The microphone records sound during video recording.
- When the crossbar is folded the main camera can photograph through the vertical-bar camera window.
- The Type-C port connects the computer; the cable slot secures the cable.
- The complete13-part key accompanies the reviewed diagram.
1 after sales services and warranty
Instructions from the manualObserve operating and service limitations6 steps
- The maximum working temperature is40°C.
- The scanner is supplied without a power adapter and receives power from the computer USB port.
- Warranty exclusions include incorrect installation or an unsuitable hot/humid environment, nonmanufacturer components or user replacements, natural disasters/accidents, inappropriate storage including rodents/liquid, unauthorized repairs or modifications, abuse, unauthorized repair centers and computer/software/virus faults.
- After-sales policies are subject to national rules; the guide describes a seven-day quality-issue return, one-year warranty and lifetime maintenance.
- Consumables and external appearance are excluded.
- No user repair procedure is provided.
2 contact
Instructions from the manualGet manufacturer technical supportView
Part ii software installation
Instructions from the manualInstall Windows software7 steps
Windows instructions in the manufacturer-linked software manual. Functions vary by purchased device; use only functions present in your software/device configuration. This does not establish optional secondary camera or laser hardware.
- The linked Windows software guide lists Windows XP,7,8,10 and11 in32-bit or64-bit.
- Choose the setup language and click OK.
- Enter the serial number from beneath the base; the guide warns that the number1 is not included and an incorrect serial prevents installation.
- Click Next, choose the installation path, then click Next to set the Start Menu shortcut.
- Click Next and select any additional shortcuts.
- Click Next to review readiness and previous settings, then Install.
- Wait for completion and click Complete; ticking its checkbox starts the software immediately.
Install Mac software3 steps
Mac instructions in the manufacturer-linked software manual. Functions vary by purchased device; use only functions present in your software/device configuration. This does not establish optional secondary camera or laser hardware.
- This linked guide requires macOS13 or later on Apple Silicon, or macOS12 or later on Intel.
- Open the .dmg and drag the installer icon into Applications.
- At first launch enter the correct serial number; a failed verification requires reentry before use.
1 software startup
Instructions from the manualStart Windows softwareView
Windows instructions in the manufacturer-linked software manual. Functions vary by purchased device; use only functions present in your software/device configuration. This does not establish optional secondary camera or laser hardware.
After installation double-click the shortcut. Once data and startup items load, enter the scanner main interface.Start Mac softwareView
Mac instructions in the manufacturer-linked software manual. Functions vary by purchased device; use only functions present in your software/device configuration. This does not establish optional secondary camera or laser hardware.
At startup select Scanner to enter the main interface.2.1 file list
Instructions from the manualWindows file import and folder location2 steps
Windows instructions in the manufacturer-linked software manual. Functions vary by purchased device; use only functions present in your software/device configuration. This does not establish optional secondary camera or laser hardware.
- Use the upper-right plus icon to select one or more JPG/JPEG images; images in other folders may also be imported if they are JPG.
- Click the folder icon to the right of plus to open the directory of the current preview file.
Windows selection and file views3 steps
Windows instructions in the manufacturer-linked software manual. Functions vary by purchased device; use only functions present in your software/device configuration. This does not establish optional secondary camera or laser hardware.
- Tick All above the right-hand file list to select every file; the count changes accordingly.
- Untick All to deselect.
- Use List Mode to show filenames or Thumbnail Mode to show thumbnails.
Windows delete, reproduce and file details4 steps
Windows instructions in the manufacturer-linked software manual. Functions vary by purchased device; use only functions present in your software/device configuration. This does not establish optional secondary camera or laser hardware.
- Del applies only to the current image, not a batch: move it to the recycle bin or remove it from the list.
- Rep returns to scan preview so you can rescan.
- The new scan replaces the old one; after Back, the new file appears in the list.
- Details displays width, height, modification time and file size.
Mac import and locate files3 steps
Mac instructions in the manufacturer-linked software manual. Functions vary by purchased device; use only functions present in your software/device configuration. This does not establish optional secondary camera or laser hardware.
- Click the upper-right plus icon to import JPG images.
- The dialog shows files under ~/CZURImages; select a folder to import its JPG files.
- Use the folder icon to open the directory containing the current displayed file.
Mac select files and switch viewsView
Mac instructions in the manufacturer-linked software manual. Functions vary by purchased device; use only functions present in your software/device configuration. This does not establish optional secondary camera or laser hardware.
Select All above the right-hand list selects every file; clicking again deselects them. Use List Mode for filenames or Thumbnail Mode for thumbnail browsing.Mac delete, reproduce, insert and add scans5 steps
Mac instructions in the manufacturer-linked software manual. Functions vary by purchased device; use only functions present in your software/device configuration. This does not establish optional secondary camera or laser hardware.
- Del deletes only the current file, not a batch.
- Rep returns to preview for a rescan; the new scan replaces the old image.
- Click Back to show it in the file list.
- Ins inserts a new scanned image before the current one; Add inserts it after.
- Details shows size, dimensions, creation and last-modification times.
2.2 batch processing
Instructions from the manualWindows batch color and rotation3 steps
Windows instructions in the manufacturer-linked software manual. Functions vary by purchased device; use only functions present in your software/device configuration. This does not establish optional secondary camera or laser hardware.
- Under Batch select Color mode and choose Auto Enhance, Color, B&W, Grayscale, Stamps, Patterns or No Filter.
- Rotate processes selected images in a batch.
- Its default is Rotate left90°; other options are Rotate right90°, vertical/horizontal flip and180° rotation.
Windows batch overlapping-edge cropping5 steps
Windows instructions in the manufacturer-linked software manual. Functions vary by purchased device; use only functions present in your software/device configuration. This does not establish optional secondary camera or laser hardware.
- Select a Facing Pages image and open Overlapping Edge Cropping.
- Apply the choices to one image or a batch.
- Page width runs from the hinge to each side: increasing its value crops less width.
- Increasing Crop Hinge Line removes more hinge area; increasing Clear upper and lower edges removes more of those edges.
- Drag the baseline outside the preview to apply it to all selected images, or inside to apply it only to the current image.
Windows batch crop4 steps
Windows instructions in the manufacturer-linked software manual. Functions vary by purchased device; use only functions present in your software/device configuration. This does not establish optional secondary camera or laser hardware.
- Open Crop.
- Larger Crop N Pixels values remove more pixels; larger Keep N Pixels values retain more.
- Top/bottom/left/right edges can be whitened or cut.
- A baseline dragged outside the preview affects all selected images; inside affects only the current image.
Windows batch delete and standardize4 steps
Windows instructions in the manufacturer-linked software manual. Functions vary by purchased device; use only functions present in your software/device configuration. This does not establish optional secondary camera or laser hardware.
- Open Delete to remove a file from the list or move it to the recycle bin.
- Cancel returns to the main interface.
- Open Standardize and set background Size, Orientation, DPI and Color, then horizontal/vertical Alignment.
- Set Match with BG to Unchanged, Maximized or Overspread to control the content/background relationship.
Windows fill holes and erase handwriting5 steps
Windows instructions in the manufacturer-linked software manual. Functions vary by purchased device; use only functions present in your software/device configuration. This does not establish optional secondary camera or laser hardware.
- For Holes filling set the minimum/maximum hole-radius range on the right.
- Both limits lie between20 and80pixels; the defaults are20minimum and80maximum.
- Enable Preview, then Confirm to save.
- Handwritten erase removes handwriting, answers and tick marks on test papers.
- Background color purification gives additional processing.
Windows watermark and image quality3 steps
Windows instructions in the manufacturer-linked software manual. Functions vary by purchased device; use only functions present in your software/device configuration. This does not establish optional secondary camera or laser hardware.
- Open Watermark; its default is Confidential.
- Open Quality and use the left preview while adjusting Contrast, Sharpness and Thickness on the right.
- A completion window appears after batch quality processing.
Windows batch print and rename4 steps
Windows instructions in the manufacturer-linked software manual. Functions vary by purchased device; use only functions present in your software/device configuration. This does not establish optional secondary camera or laser hardware.
- Open Print.
- Use the preview and set Paper size, Orientation, Landscape layout, Portrait layout, Ratio and Copies.
- For selected images set Rename prefix, digit count, starting serial number and increment.
- Review the filename preview and Confirm.
2.3 export
Instructions from the manualWindows OCR exports6 steps
Windows instructions in the manufacturer-linked software manual. Functions vary by purchased device; use only functions present in your software/device configuration. This does not establish optional secondary camera or laser hardware.
- Word (OCR) recognizes image text with ABBYY OCR and saves Word; background recognition is supported.
- The current language defaults to the installation language, or the most recently manually chosen OCR language.
- Select other languages on the right.
- Word page-size choices are Auto,A3,A4,A5,B3,B4 andB5.
- Excel (OCR) recognizes to Excel and uses the same language selection.
- Searchable PDF recognizes text to PDF and uses the same language selection; background recognition is supported.
Windows PDF export4 steps
Windows instructions in the manufacturer-linked software manual. Functions vary by purchased device; use only functions present in your software/device configuration. This does not establish optional secondary camera or laser hardware.
- Select PDF for the selected images and review the live preview.
- Combined output makes one PDF; Output one by one makes separate PDFs.
- Quality options are50% for smaller storage,75% for medium and100% for largest.
- Choose default or standardized sizes:A3,A4,A5,B3,B4,B5,Portrait orLandscape.
Windows TIFF export3 steps
Windows instructions in the manufacturer-linked software manual. Functions vary by purchased device; use only functions present in your software/device configuration. This does not establish optional secondary camera or laser hardware.
- Select TIFF.
- Color modes are Color or Grayscale; compression choices are none,LZW,JPEG orGroup4.
- Choose Combined output or Output one by one, Confirm, and select the path and filename.
Mac Word OCR export6 steps
Mac instructions in the manufacturer-linked software manual. Functions vary by purchased device; use only functions present in your software/device configuration. This does not establish optional secondary camera or laser hardware.
- Select Word(OCR) to recognize text.
- Choose the recognition language, using keyword search and ticking languages as needed.
- Set page size toAuto,A3,A4,A5,B3,B4 orB5; choose No Processing orAuto Adjustment.
- Tick Show Sort window to reorder images with its buttons.
- Confirm the language,size,processing andorder; enter a name and path, then Save to start OCR.
- Move to background shows recognition progress.
Mac Excel, searchable PDF and TXT OCR3 steps
Mac instructions in the manufacturer-linked software manual. Functions vary by purchased device; use only functions present in your software/device configuration. This does not establish optional secondary camera or laser hardware.
- Excel(OCR) exports recognized text to Excel with the same language-selection process as Word.
- Searchable PDF exports recognized text to PDF; its quality choices areLow,Medium andHigh, and languages are selected as for Word.
- TXT exports recognized text as a text document using the Word language-selection process.
Mac PDF and TIFF exports6 steps
Mac instructions in the manufacturer-linked software manual. Functions vary by purchased device; use only functions present in your software/device configuration. This does not establish optional secondary camera or laser hardware.
- For PDF choose the paper size and review the left preview.
- Combined output puts selected images into one PDF; Output one by one creates separate PDFs.
- PDF quality choices are50% for smaller storage,75% medium,100% largest.
- Use default or standardizedA3,A4,Portrait orLandscape; PDF/A is supported.
- For TIFF choose Color/Grayscale and compression:none,LZW,JPEG orGroup4.
- Choose Combined output orOutput one by one, Confirm, then a save path andfilename.
2.4 edit bar
Instructions from the manualWindows display and manual selection5 steps
Windows instructions in the manufacturer-linked software manual. Functions vary by purchased device; use only functions present in your software/device configuration. This does not establish optional secondary camera or laser hardware.
- Use Fit Height to switch display options.
- For Manual Select drag the mouse to select an image region.
- Drag it to move it or use CTRL+C to copy it.
- Moving leaves the original area blank; Delete whitens it.
- Save displays the result in the main interface.
Windows edit crop and rotate3 steps
Windows instructions in the manufacturer-linked software manual. Functions vary by purchased device; use only functions present in your software/device configuration. This does not establish optional secondary camera or laser hardware.
- In Crop hold the left mouse button and select a region.
- Clear(whiteout), the default, keeps page dimensions and makes the unselected background white; Cut retains only the selected region.
- Rotate supports90° left/right, horizontal/vertical flip,180°, and custom angles up to±15°.
Windows edit quality, color and undo4 steps
Windows instructions in the manufacturer-linked software manual. Functions vary by purchased device; use only functions present in your software/device configuration. This does not establish optional secondary camera or laser hardware.
- Adjust Contrast, Sharpness and Thickness within±5 while watching the left preview.
- Choose Auto Enhance, Color, B&W, Grayscale, Stamps, Patterns or Non-filter.
- The preview changes with the choice.
- The guide illustrates the Undo page without supplying further operation steps; do not infer additional behavior.
Windows edit print and one-file OCR4 steps
Windows instructions in the manufacturer-linked software manual. Functions vary by purchased device; use only functions present in your software/device configuration. This does not establish optional secondary camera or laser hardware.
- Use the Print icon for the batch print window: Paper size, Orientation, Landscape/Portrait layout, Ratio and Copies.
- The edit-bar OCR icon applies to the current file only.
- Choose a size:Auto,A3,A4,A5,B3,B4,B5(the size choice applies only to Word).
- Confirm and select a path to create PDF,Word orExcel.
Windows recognize QR codes and barcodesView
Windows instructions in the manufacturer-linked software manual. Functions vary by purchased device; use only functions present in your software/device configuration. This does not establish optional secondary camera or laser hardware.
Scan QR Code recognizes codes in the current image and lists results in a dialog. Copy one or selected results; click the icon again to close recognition.Windows auxiliary correction4 steps
Windows instructions in the manufacturer-linked software manual. Functions vary by purchased device; use only functions present in your software/device configuration. This does not establish optional secondary camera or laser hardware.
- For a Flat Single Page image open Auxiliary Correction, drag border dots to change the crop and Preview.
- Cancel or Save; Save changes the result.
- For a Facing Pages image adjust left/right edges for overlapping crops, the center seam for the inner book section, and upper/lower dots to fit real page edges.
- Remove and redraw deletes default upper/lower dots so you can redraw both pages.
Windows report a problem imageView
Windows instructions in the manufacturer-linked software manual. Functions vary by purchased device; use only functions present in your software/device configuration. This does not establish optional secondary camera or laser hardware.
If processing is unsatisfactory, use Report a Problem Picture to submit the current image to the developer for algorithm improvement.Mac fit, one-to-one view and box selection5 steps
Mac instructions in the manufacturer-linked software manual. Functions vary by purchased device; use only functions present in your software/device configuration. This does not establish optional secondary camera or laser hardware.
- Fit switches display choices;1:1 display shows the current preview at one-to-one scale.
- With Box Select hold the left mouse button and drag a selection.
- Move it, or use Command+C to copy.
- Moving leaves the original blank; Delete whitens it.
- Save shows the result in the main interface.
Mac edit crop and rotation4 steps
Mac instructions in the manufacturer-linked software manual. Functions vary by purchased device; use only functions present in your software/device configuration. This does not establish optional secondary camera or laser hardware.
- Select Crop and drag an area with the left mouse button.
- Clear(whiteout),the default, retains page dimensions and whitens the unselected background.
- Cut keeps only the selected region and deletes the rest.
- Rotate offers90° left/right,horizontal/vertical flip,180° andCustom Rotation.
Mac edit quality, color, undo and print4 steps
Mac instructions in the manufacturer-linked software manual. Functions vary by purchased device; use only functions present in your software/device configuration. This does not establish optional secondary camera or laser hardware.
- Quality adjusts Contrast,Sharpness andThickness within±5 with a live left preview.
- Color modes areAuto Enhance,Color,B&W,Grayscale,Stamps,Patterns,Antiquarian andNon-filter.
- Undo applies only to the current file and cannot undo batch operations.
- Print calls the system to print the current image.
Mac edit OCR and code recognition3 steps
Mac instructions in the manufacturer-linked software manual. Functions vary by purchased device; use only functions present in your software/device configuration. This does not establish optional secondary camera or laser hardware.
- Use OCR to choose recognition language,file format such asPDF/Word/Excel,and save path.
- Scan QR Code lists QR/barcode results from the current image.
- Copy one or selected results; clicking again closes the recognition box.
Mac flat-page auxiliary correction3 steps
Mac instructions in the manufacturer-linked software manual. Functions vary by purchased device; use only functions present in your software/device configuration. This does not establish optional secondary camera or laser hardware.
- Select an image scanned as Flat Single Page, open Auxiliary Correction and drag recognition-box dots to align with the page edges.
- Preview the result and readjust if necessary.
- Confirm saves it; Cancel exits without adjustment.
3.1 file saving
Instructions from the manualWindows open scan preview and save files4 steps
Windows instructions in the manufacturer-linked software manual. Functions vary by purchased device; use only functions present in your software/device configuration. This does not establish optional secondary camera or laser hardware.
- Use Browse for Folder in the upper left to choose the saving path; the documented default is System Disk:\My Documents\ShineDoc\sources.
- Open Containing Folder shows the current scan location.
- Flat Single Page names use IMG year_month_day_hour_minute_second S.jpg.
- Facing Pages uses L.jpg for left andR.jpg for right pages with the same timestamp.
Mac save files and return from preview4 steps
Mac instructions in the manufacturer-linked software manual. Functions vary by purchased device; use only functions present in your software/device configuration. This does not establish optional secondary camera or laser hardware.
- Browse for Folder at the upper left sets the saving path; the default is~/CZURImages on the system disk.
- Open Containing Folder shows the current image path under~/CZURImages/XXXX.
- Preset image naming rules sets a prefix andserial number.
- Back leaves preview and returns to the main interface.
3.3 processing method
Instructions from the manualWindows scan color and processing methods5 steps
Windows instructions in the manufacturer-linked software manual. Functions vary by purchased device; use only functions present in your software/device configuration. This does not establish optional secondary camera or laser hardware.
- Flat Single Page automatically crops paper edges and rotates according to text direction; place the original on the black pad.
- Facing Pages flattens a curved book page and splits it into two slightly rotated pages.
- Combine Sides joins front/back of a document such as an ID into one image.
- Manual Selection saves only a mouse-selected area; No Processing keeps the original without flattening/cropping.
- Use only modes supplied for the purchased device.
Mac Flat Single Page settings8 steps
Mac instructions in the manufacturer-linked software manual. Functions vary by purchased device; use only functions present in your software/device configuration. This does not establish optional secondary camera or laser hardware.
- Use the black pad.
- Flat Single Page crops paper edges automatically; its adjacent settings expose available functions.
- Positive crop-adjustment values remove more pixels than Auto Crop; negative values retain more.
- Smart black edge optimization detects/improves borders and removes black edges.
- White space for round corners of ID preserves rounded corners and adds white background.
- Multi-target paging recognizes multiple objects and produces separate pages.
- Auto page mending restores missing portions as far as possible.
- Choose Flat Single Page and Scan; processing shows a dynamic thumbnail on the left.
Mac Facing Pages and combined sides9 steps
Mac instructions in the manufacturer-linked software manual. Functions vary by purchased device; use only functions present in your software/device configuration. This does not establish optional secondary camera or laser hardware.
- Where supplied for the purchased device, Facing Pages processes curved books with flattening,finger-cot removal,tilt adjustment andedge cropping.
- Open its adjacent settings.
- Finger removal choices areWith finger cots/Without finger cots.
- Smart paging keeps both pages with configurable order,or saves only left/right.
- Auto page mending restores missing portions.
- Positive crop values remove more; negative values retain more.
- Scan shows a dynamic processing thumbnail.
- Combine Sides joins document front/back into one image.
- For rounded corners enable White space for round corners in the right-hand settings.
Mac manual selection and no processingView
Mac instructions in the manufacturer-linked software manual. Functions vary by purchased device; use only functions present in your software/device configuration. This does not establish optional secondary camera or laser hardware.
Manual Selection saves only the region selected with the mouse in preview. No Processing leaves the original without flattening or cropping.3.4 scan
Instructions from the manualWindows scan, auto scan and preview rotation3 steps
Windows instructions in the manufacturer-linked software manual. Functions vary by purchased device; use only functions present in your software/device configuration. This does not establish optional secondary camera or laser hardware.
- Click the scan-interface button to scan.
- Except in Facing Pages, use the90° left/right controls beside it to set preview rotation; this affects newly scanned images.
- Tick Auto Scan to scan automatically when the target changes.
Windows recognize codes during scanning4 steps
Windows instructions in the manufacturer-linked software manual. Functions vary by purchased device; use only functions present in your software/device configuration. This does not establish optional secondary camera or laser hardware.
- Enable Barcode/QR Code Recognition for real-time results in a pop-up; untick it to disable.
- Copy selects the desired result.
- Enable Name File with Recognition Result to name new scans with the recognition text; when several results exist, the first names the file.
- Click again to disable.
4.1 visual presenter
Instructions from the manualWindows visual presenter3 steps
Windows instructions in the manufacturer-linked software manual. Functions vary by purchased device; use only functions present in your software/device configuration. This does not establish optional secondary camera or laser hardware.
- After startup loads, select Visual Presenter and then Display for a real-time view.
- The guide supplies markup,brush,rectangle,text,screenshot and video-recording tools.
- Use functions available to your purchased device; an optional secondary camera is not implied.
5.2 system settings
Instructions from the manualWindows system settings5 steps
Windows instructions in the manufacturer-linked software manual. Functions vary by purchased device; use only functions present in your software/device configuration. This does not establish optional secondary camera or laser hardware.
- Open Settings in the upper right to access System Settings and Scanner Settings.
- Software version shows the version and offers an online upgrade when available.
- Language changes the software language; Help opens CZUR technical support.
- Privacy shows the statement.
- Untick Send network request to stop all software network requests.
5.3 scanner settings
Instructions from the manualWindows scanner settings and flickerView
Windows instructions in the manufacturer-linked software manual. Functions vary by purchased device; use only functions present in your software/device configuration. This does not establish optional secondary camera or laser hardware.
For a stroboscopic preview switch frequency between50Hz and60Hz. Image format changes format/quality; Storage path selects where scans and recordings are saved.2.5 go to scan preview
Instructions from the manualWindows go to scan previewView
Windows instructions in the manufacturer-linked software manual. Functions vary by purchased device; use only functions present in your software/device configuration. This does not establish optional secondary camera or laser hardware.
Click Scan for scan preview; defaults are Color and Flat Single Page.Mac open scan previewView
Mac instructions in the manufacturer-linked software manual. Functions vary by purchased device; use only functions present in your software/device configuration. This does not establish optional secondary camera or laser hardware.
Click Scan at the lower right to open preview. With a connected device it shows scan video; defaults areColor andFlat Single Page.3.2 color mode
Instructions from the manualWindows scan color modeView
Windows instructions in the manufacturer-linked software manual. Functions vary by purchased device; use only functions present in your software/device configuration. This does not establish optional secondary camera or laser hardware.
Scan color options are Auto Enhance,Color,B&W,Grayscale,Stamps,Patterns andNon-filter.Mac scan color modes9 steps
Mac instructions in the manufacturer-linked software manual. Functions vary by purchased device; use only functions present in your software/device configuration. This does not establish optional secondary camera or laser hardware.
- Select a preview color mode; after Back and reentering preview the last selection remains.
- Auto Enhance strengthens colors and black/white contrast.
- Color preserves color while slightly brightening, for colorful paper.
- B&W produces black/white for black text on white paper and saves space.
- Grayscale retains gray detail while reducing space.
- Stamps whitens the background and strengthens stamp colors.
- Patterns purifies the background while keeping watermarks/background patterns.
- Antiquarian preserves old-book colors without enhancement and repairs missing portions.
- Non-filter preserves unprocessed original color.
2.2 batch
Instructions from the manualMac batch selection and color mode4 steps
Mac instructions in the manufacturer-linked software manual. Functions vary by purchased device; use only functions present in your software/device configuration. This does not establish optional secondary camera or laser hardware.
- Select target images in the right-hand list before batch processing; otherwise the software prompts you to tick files and retry.
- Open Color mode.
- Choose Auto Enhance,Color,B&W,Grayscale,Stamps,Patterns,Antiquarian orNon-filter, and use an available intensity slider while viewing the preview.
- Confirm applies the mode to all selected files and shows completion.
Mac batch rotate and quality5 steps
Mac instructions in the manufacturer-linked software manual. Functions vary by purchased device; use only functions present in your software/device configuration. This does not establish optional secondary camera or laser hardware.
- Open Rotate.
- The default is90° left; choices also include90° right, vertical/horizontal flip and180°.
- Confirm rotates the selected images and shows completion.
- Open Quality and adjust Contrast,Sharpness andThickness with plus/minus controls while viewing the left preview.
- Confirm processes the selected images and shows completion.
Mac overlapping-edge cropping6 steps
Mac instructions in the manufacturer-linked software manual. Functions vary by purchased device; use only functions present in your software/device configuration. This does not establish optional secondary camera or laser hardware.
- Select the book-page images and open Overlapping Edge Cropping.
- Apply the choices to one image or a batch.
- Page width is calculated from hinge to sides; larger values crop less page width.
- Larger hinge values remove more hinge, and larger upper/lower-edge values crop more of those edges.
- Drag the baseline outside the preview for all selected files, or inside for the current file.
- A completion message follows processing.
Mac batch crop5 steps
Mac instructions in the manufacturer-linked software manual. Functions vary by purchased device; use only functions present in your software/device configuration. This does not establish optional secondary camera or laser hardware.
- Open Crop.
- Larger Crop N Pixels values remove more pixels; larger Keep N Pixels values retain more.
- Edges may be whitened or cut.
- Drag the baseline outside the preview for all selected files or inside for the current file.
- Confirm completes cropping; Video guideline provides further instruction.
Mac batch standardize5 steps
Mac instructions in the manufacturer-linked software manual. Functions vary by purchased device; use only functions present in your software/device configuration. This does not establish optional secondary camera or laser hardware.
- Open Standardize and configure background settings, Orientation,DPI andColor.
- Background size choices include A3/A4 landscape/portrait; the preview updates with choices.
- Align content horizontally left/center/right and vertically top/center/bottom.
- Match with BG offers Unchanged,Maximize andOverspread, each described as retaining content-page ratio.
- Confirm completes standardizing.
Mac rename and blank-page detectionView
Mac instructions in the manufacturer-linked software manual. Functions vary by purchased device; use only functions present in your software/device configuration. This does not establish optional secondary camera or laser hardware.
Rename names selected files by rules and copies/saves them into other folders. Blank page detection finds suspected blank pages; delete these as needed.Mac fill holes and add watermarks5 steps
Mac instructions in the manufacturer-linked software manual. Functions vary by purchased device; use only functions present in your software/device configuration. This does not establish optional secondary camera or laser hardware.
- Open Holes filling to preview results and set minimum/maximum hole radii for the document.
- Open Watermark; Confidential is the default.
- Plus creates a custom text or image watermark.
- For text, edit its content,font,size,color,layout,horizontal/vertical alignment andopacity.
- For an image, select it with plus, move it or adjust opacity.
Mac file size, print, handwriting and batch deletion5 steps
Mac instructions in the manufacturer-linked software manual. Functions vary by purchased device; use only functions present in your software/device configuration. This does not establish optional secondary camera or laser hardware.
- Set file size lets you enter a KB/MB value in the allowed range and choose Compress or Image Size Compression to adjust selected-image quality/size.
- Print opens the system printing interface.
- Handwritten erase removes handwriting,answers andtick marks; Background color purification adds processing.
- Delete above the list asks whether to permanently delete files.
- Confirm removes them from the list and corresponding folder; Cancel returns to the main interface.
3.4 auto scan
Instructions from the manualMac automatic scanningView
Mac instructions in the manufacturer-linked software manual. Functions vary by purchased device; use only functions present in your software/device configuration. This does not establish optional secondary camera or laser hardware.
Tick Auto Scan to detect page turns and capture automatically.4 visual presenter
Instructions from the manualMac visual presenter and display2 steps
Mac instructions in the manufacturer-linked software manual. Functions vary by purchased device; use only functions present in your software/device configuration. This does not establish optional secondary camera or laser hardware.
- Visual Presenter previews saved screenshots,plays recordings andviews live camera images; the guide supplies recording,comment,freeze andscreenshot functions.
- Use functions available in the purchased configuration.
4.2 file list of video presenter
Instructions from the manualMac presenter file listView
Mac instructions in the manufacturer-linked software manual. Functions vary by purchased device; use only functions present in your software/device configuration. This does not establish optional secondary camera or laser hardware.
For a video use the bottom controls to play,pause orstop. For an image use Fit With,Fit Height or1:1 Display. Tick an image and select the top-right PDF icon to convert it to PDF.5.1 system settings
Instructions from the manualMac system settings7 steps
Mac instructions in the manufacturer-linked software manual. Functions vary by purchased device; use only functions present in your software/device configuration. This does not establish optional secondary camera or laser hardware.
- Open the upper-right Settings icon for System Settings andScanner Settings.
- Software version shows the version; download updates from the official website when available.
- You can change the current serial number.
- Firmware version shows firmware when a device is connected.
- Language offers12languages including simplified/traditional Chinese andEnglish.
- Help opens official technical support.
- Privacy shows the statement; disable Send network request to stop all software network requests.
5.2 scanner settings
Instructions from the manualMac scanner and presenter settings3 steps
Mac instructions in the manufacturer-linked software manual. Functions vary by purchased device; use only functions present in your software/device configuration. This does not establish optional secondary camera or laser hardware.
- Frequency switches50Hz/60Hz; Resolution changes photo resolution; DPI sets scan DPI.
- Image format sets image quality.
- Paging settings controls automatic separate pages after Facing Pages correction and left-to-right/right-to-left ordering.
5.3 visual presenter
Instructions from the manualMac presenter saving format and pathView
Mac instructions in the manufacturer-linked software manual. Functions vary by purchased device; use only functions present in your software/device configuration. This does not establish optional secondary camera or laser hardware.
Format and Path selects saving paths for videos andimages.4.1 display
Instructions from the manualMac presenter displayView
Mac instructions in the manufacturer-linked software manual. Functions vary by purchased device; use only functions present in your software/device configuration. This does not establish optional secondary camera or laser hardware.
Display opens the live display. Click the recording icon to expose the lower recording controls; the red button records. Use the right-hand drawing tools for marks.Controls and parts
See the manual diagrams 2 diagrams
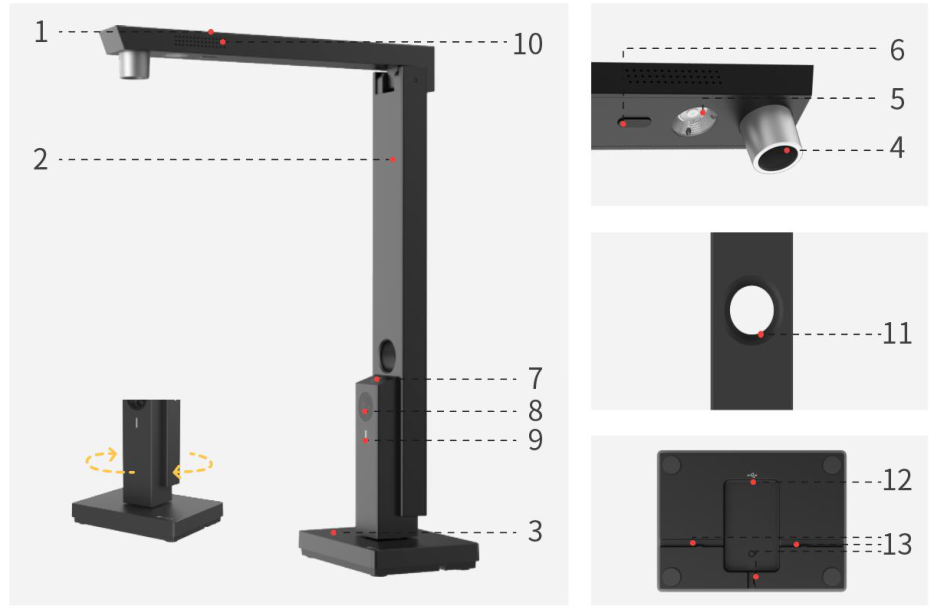
Diagram key
- 1: Crossbar casing.
- 2: Vertical bar; the vertical bar and base can rotate 0–180 degrees and be fixed.
- 3: Base; the vertical bar and base can rotate 0–180 degrees and be fixed.
- 4: Main camera scans contracts, documents, forms, vouchers and identification documents through the client software.
- 5: Top fill light turns on when the crossbar is unfolded about 60 degrees and off when folded about 60 degrees; the light control button also controls it.
- 6: Cushion softens collision between the crossbar casing and vertical bar.
- 7: Light control button; tap lightly to control the top fill light.
- 8: Optional secondary camera supports preview, photographs and video in the client software; this shared diagram does not establish that it is fitted to every Lens Pro.
- 9: White indicator means the device is powered on.
- 10: Microphone collects sound during video recording.
- 11: Camera window allows the main camera to take photographs with the crossbar folded.
- 12: Type-C port connects to a computer.
- 13: Cable slot holds the Type-C cable.