MODEL REFERENCE
Elna eXplore 130
55 guides

The checks and guides below come from the official manuals for this model.
No matches for this wording. Try a light name, error code or a shorter phrase.
Guides
Important safety instructions
Instructions from the manualUse the machine safely12 steps
- Read all instructions before use.
- Use this household machine only for its intended purpose with manufacturer-recommended attachments.
- Never leave it unattended while plugged in; unplug immediately after use and before cleaning.
- It is not a toy; closely supervise use by or near children.
- Stop using a machine with a damaged cord or plug, faulty operation, drop damage or water exposure; return it to an authorized dealer or service center for examination, repair or electrical/mechanical adjustment.
- Keep machine and foot-control ventilation clear of lint, dust and loose cloth.
- Never insert objects into openings, use outdoors or operate near aerosol sprays or administered oxygen.
- Set all controls to O before unplugging; grasp the plug rather than pulling the cord.
- Keep fingers away from moving parts, especially the needle or cutting blade.
- Use the correct needle plate and straight needles; never push or pull fabric while stitching.
- Switch off for needle-area adjustments, including threading, needle changes, bobbin threading and presser-foot changes.
- Unplug before removing covers, lubricating or other manual adjustments.
Observe regional supervision and disposal requirements4 steps
- In Europe, children at least 8 years old and people with reduced physical, sensory or mental capabilities or limited experience/knowledge require supervision or safe-use instruction and understanding of the hazards.
- Children must not play with the machine or clean/maintain it without supervision.
- Outside Europe, except the USA, people including children with those limitations require supervision or instruction by a person responsible for safety; supervise children to prevent play.
- In the EEA and UK, recycle safely according to applicable national electrical/electronic-product legislation; ask the retailer if unsure.
Essential parts
Instructions from the manualIdentify the parts and carry the machine31 steps
- The diagram identifies: 1.
- Reverse stitch lever; 2.
- Pattern selector dial; 3.
- Stitch length dial; 4.
- Stitch width dial; 5.
- Bobbin winder stopper; 6.
- Bobbin winder spindle; 7.
- Spool pin; 8.
- Bobbin winder thread guide; 9.
- Thread guide; 10.
- Thread take-up lever; 11.
- Thread tension dial; 12.
- Face cover; 13.
- Thread cutter; 14.
- Needle plate; 15.
- Extension table (Accessories storage box); 16.
- Foot holder; 17.
- Needle clamp screw; 18.
- Needle; 19.
- Presser foot (Zigzag foot A); 20.
- Setscrew; 21.
- Carrying handle; 22.
- Handwheel; 23.
- Ventilation openings; 24.
- Power switch; 25.
- Machine socket; 26.
- Free arm; 27.
- Presser foot lifter; 28.
- Foot control.
- Carry using the handle in one hand and support the machine with the other.
- The supplied foot-control plug may differ from the drawing; designs and specifications can change without notice.
Remove the extension table and use the free arm4 steps
- The extension table adds a sewing surface.
- Pull it away from the machine to remove it for free-arm sewing.
- Use the free arm for sleeves, waistbands, trouser legs and other tubular garments, or for darning socks and mending knees or elbows.
- Accessories are stored in the extension table.
Identify the supplied accessories2 steps
- The manual lists three bobbins, seam ripper/buttonhole opener, needle set, felt, sliding buttonhole foot, blind-hem foot, zipper foot and darning plate.
- Sewing accessories are stored in the extension table.
Getting ready to sew
Instructions from the manualConnect power and control sewing speed12 steps
- Check that the voltage marked on the machine matches the electrical supply.
- Turn the switch off.
- Insert the machine plug in its socket, then the supply plug in the wall outlet.
- Turn the switch on.
- The foot control varies speed: pressing harder makes the machine run faster.
- Keep your eyes on the sewing area and do not touch moving parts such as the take-up lever, handwheel or needle.
- Switch off and unplug before leaving it unattended, attaching/removing parts or cleaning.
- Place nothing on the foot control, which could make the machine run intermittently.
- Use foot-control model YC-482J-EC.
- In the USA and Canada, the polarized plug fits only one way: reverse it if it does not fit; if still unsuitable, ask a qualified electrician to install the proper outlet.
- Never modify the plug.
- The included plug may differ from the drawing.
Prepare for first useView
Before first use, place scrap fabric under the foot and run the machine without thread for a few minutes. Wipe away any oil that appears.
Raise the presser footView
The lifter raises and lowers the foot. Its highest position is about 1/4 inch (0.6 cm) above normal up position, helping remove the foot or place heavy fabric beneath it.
Change the presser foot4 steps
- Switch off before changing the foot and use the correct foot for the selected pattern; a wrong foot can break the needle.
- Turn the handwheel toward you to raise the needle bar fully.
- Raise the foot and push its toe to snap it off the holder.
- To attach, position the foot so its pin lies directly below the holder groove.
Remove or attach the foot holder4 steps
- Switch off before changing the holder.
- Remove its setscrew by turning counterclockwise with a screwdriver.
- To attach, align the holder hole with the threaded hole in the presser bar.
- Insert the setscrew and tighten clockwise with a screwdriver.
Change and check the needle6 steps
- Switch off and disconnect power before changing the needle.
- Raise the needle with the handwheel and lower the foot.
- Loosen the clamp screw counterclockwise and remove the needle.
- Insert the new needle with its flat side to the rear, push it against the stopper pin and firmly tighten the clamp screw.
- To check straightness, place the flat side on a flat surface such as a needle plate or glass: the gap must remain consistent.
- Never use a blunt needle.
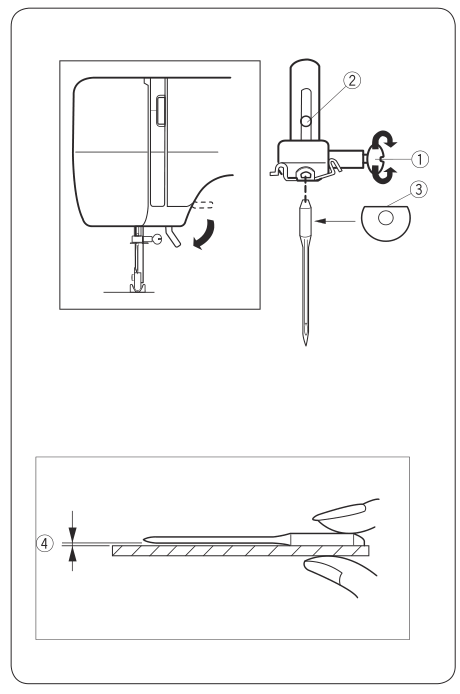
Diagram key
- 1: Needle clamp screw
- 2: Stopper pin
- 3: Flat side of the needle
- 4: Gap between needle and flat surface
Match fabric, needle and thread9 steps
- For general sewing, use 11/75 or 14/90 needles.
- Use fine thread and needles on lightweight fabric to avoid damage, and needles large enough for heavy fabric without fraying thread.
- Test the size on scrap of the actual fabric.
- Generally use the same needle and bobbin thread.
- For fine lawn, georgette, tricot, organza or crepe, use cotton or synthetic thread #80–100 and needles #9/65–11/75.
- For medium sheeting, jersey, broadcloth or fleece, use cotton or synthetic #50–80 and #11/75–14/90 needles.
- For heavy denim, tweed, coating or quilting, use cotton or synthetic #40–50 and #14/90–16/100 needles.
- Three #14/90 needles are supplied, part 639804000.
- For stretch, very fine or synthetic fabrics, use the separately sold blue-tip needle 990311000 to prevent skipped stitches.
Set the spool pinsView
Pull up a spool pin to hold and feed a thread spool; push it down for storage.
Remove or insert the bobbin case5 steps
- Switch off for bobbin threading.
- Pull the extension table left and open the hook cover.
- Raise the needle by turning the handwheel toward you.
- Hold the latch to take out the case.
- When inserting it, put the horn into the hook-race recess.
Wind the bobbin9 steps
- Pull the handwheel out.
- Draw thread from the spool around the bobbin-winder thread guide.
- Pass thread through the bobbin hole from inside to outside and place the bobbin on the spindle.
- Push the spindle right.
- Hold the free end and press the foot control.
- Stop after a few turns and cut thread near the bobbin hole.
- Press the control again; stop when full.
- With the machine stopped, move the spindle left to its original position and cut thread.
- Push the handwheel back into its original position.
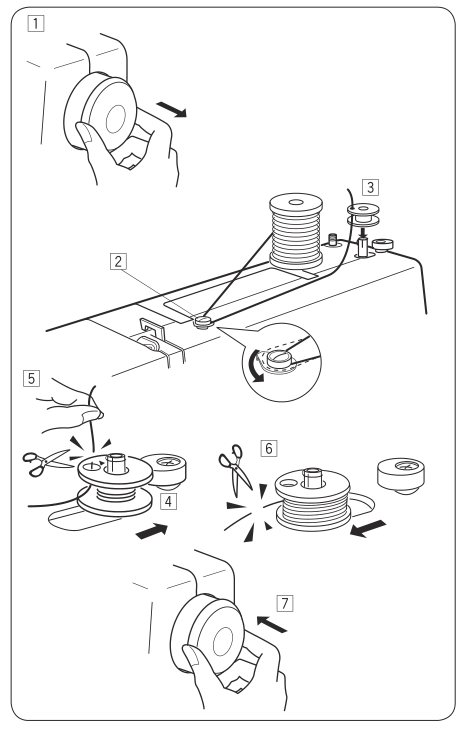
Diagram key
- 1: Pull the handwheel out.
- 2: Draw thread through the bobbin winder guide.
- 3: Pass thread through the bobbin from inside to outside and place it on the spindle.
- 4: Move the spindle right.
- 5: Hold the thread end, run a few turns, stop and cut the tail.
- 6: Wind until full, stop, move spindle left and cut thread.
- 7: Push the handwheel in.
Thread the bobbin case4 steps
- Switch off for bobbin threading.
- Put the bobbin in its case with thread unwinding in the illustrated direction.
- Pull thread into the case slot, then under the tension spring and into the delivery eye.
- Leave about 10 cm (4 inches) free.
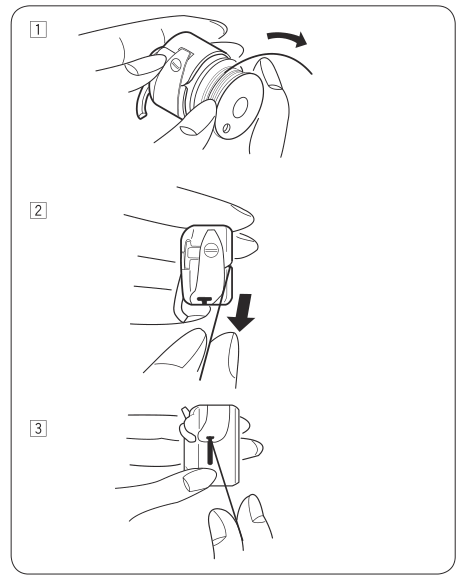
Diagram key
- 1: Insert the bobbin in the direction shown.
- 2: Pull thread into the case slot.
- 3: Draw it under the tension spring through the delivery eye, leaving about 10 cm (4 inches).
Thread the machine8 steps
- Switch off before needle threading.
- Raise the take-up lever fully by turning the handwheel toward you and raise the foot.
- Put the spool on its pin with thread coming from the back.
- Draw thread into the guide using both hands.
- Hold it near the spool and draw down into the tension area and around the check-spring holder.
- Draw firmly up through the take-up lever from right to left.
- Draw down into the needle-bar guide on the left.
- Thread the needle front to back.
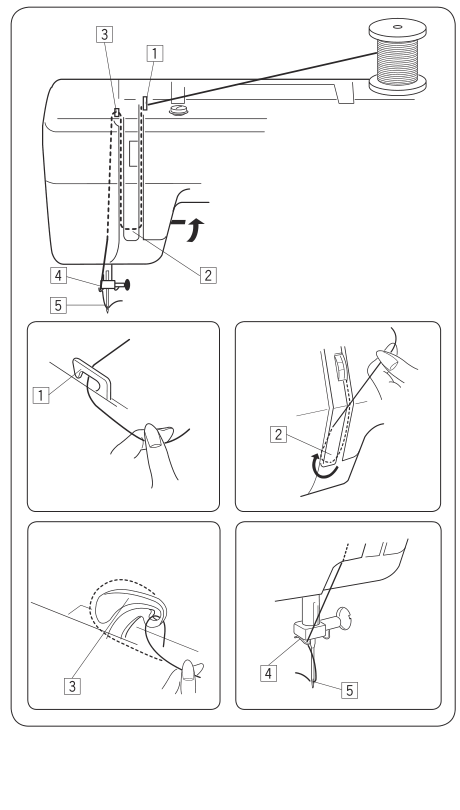
Diagram key
- 1: Draw thread into the guide with both hands.
- 2: Draw it down around the check spring holder.
- 3: Pass it firmly through the take-up lever from right to left.
- 4: Draw it down into the left-side needle bar thread guide.
- 5: Thread the needle from front to back.
Draw up the bobbin thread4 steps
- Raise the foot and hold the needle thread lightly in your left hand.
- Slowly turn the handwheel toward you with your right hand until the needle descends and the take-up lever returns fully up.
- Gently draw the needle thread up to make a bobbin-thread loop.
- Pull 10 cm (4 inches) of both threads back beneath the foot.
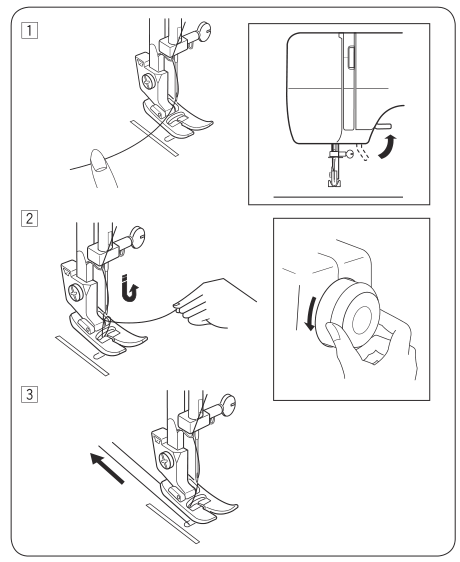
Diagram key
- 1: Raise the foot and hold the needle thread lightly.
- 2: Turn the handwheel slowly toward you and draw up the bobbin thread.
- 3: Pull both threads 10 cm (4 inches) back under the foot.
Adjust needle thread tension5 steps
- Adjust for materials, layers and sewing method.
- An ideal zigzag keeps bobbin thread off the right/top side and shows a little needle thread on the wrong/bottom side.
- If bobbin thread appears on top, reduce needle tension by selecting a lower number.
- If needle tension is too loose and needle thread appears beneath, increase it with a higher number.
- The diagram distinguishes the normal zigzag appearance from the loose-tension example.
Select a stitch and set its length5 steps
- Keep the needle up and out of the fabric to avoid damage while selecting a stitch.
- Align the selector setting mark with the desired pattern symbol.
- Align the length-dial mark with the required length; higher numbers give longer stitches.
- Use 0.5–4 for zigzag and S.S. for stretch patterns.
- Compress uneven stretch patterns by turning toward − or expand them toward +.
Set stitch widthView
Raise the needle above the fabric before adjusting width. Align the desired width with the setting mark; higher numbers make a wider stitch.
Reverse stitchView
Hold the reverse button down to sew backwards.
Fit the darning plateView
Switch off and unplug when attaching parts. Fit the plate’s three underside pins into the needle-plate holes. The feed dogs show through the plate holes.
Basic sewing
Instructions from the manualSew a straight stitch and finish the seam9 steps
- Use selector A, zigzag foot, tension 2–6, length 1.5–4 and width 0 or 5.
- Raise the foot and align the fabric edge with a needle-plate seam guide.
- Lower the needle into the fabric and lower the foot.
- Smooth threads backwards and press the foot control.
- Guide gently along the line, allowing the machine to feed.
- With the sliding buttonhole foot, draw threads left.
- Secure the beginning with several reverse stitches then sew forward.
- Secure the end with several reverse stitches.
- Raise the foot, draw fabric and threads backwards, then cut using the thread cutter; thread ends are ready for the next seam.
Change sewing directionView
Stop and turn the handwheel toward you to lower the needle into the fabric. Raise the foot, pivot the fabric around the needle, lower the foot and continue in the new direction.
Read seam guide lines4 steps
- Needle-plate numbers show distance from the center needle position.
- Front numbers are metric and rear numbers are inch fractions.
- Mark 10 is 1 cm, 15 is 1.5 cm and 20 is 2 cm.
- Rear 3/8, 4/8, 5/8 and 6/8 correspond to 3/8, 1/2, 5/8 and 3/4 inch.
Change straight stitch needle positionView
With straight pattern A selected, turn the width dial to move the needle between center and left positions.
Turn a square corner4 steps
- For a corner 5/8 inch (1.6 cm) from the fabric edge, line up the fabric edge facing you with the illustrated cornering guide.
- Stop and lower the needle by turning the handwheel counterclockwise.
- Raise the foot and turn the fabric so its edge aligns with the 5/8-inch (1.6 cm) seam guide.
- Lower the foot and continue in the new direction.
Utility stitches
Instructions from the manualSew basic zigzagView
Use selector C, zigzag foot, tension 2–5, length 0.5–4 and width 2–5. Simple zigzag is used for overcasting, sewing buttons and similar work.
Finish an edge with tricot stitch4 steps
- Use selector D, zigzag foot, tension 1–4, length 0.5–4 and width 5.
- This finishes raw edges on synthetics and fabrics prone to puckering.
- Allow a 1.6 cm (5/8-inch) seam.
- Trim the allowance after sewing without cutting the stitches.
Sew knit stitch3 steps
- Use selector F, zigzag foot, tension 1–4, length S.S. and width 5.
- This elastic, strong stitch suits swimwear and stretch velour.
- Allow a 1.6 cm (5/8-inch) seam and trim after sewing without cutting the stitches.
Sew straight stretch stitch4 steps
- Use selector A, zigzag foot, tension 2–6, length S.S. and width 0 or 5.
- Two forward stitches and one backward make a strong seam.
- Use it to reinforce crotch or armhole seams and items such as backpacks.
- Guide carefully as fabric moves back and forth.
Sew zigzag stretch stitchView
Use selector C, zigzag foot, tension 2–6, length S.S. and width 2–5. Use on stretch fabric where a zigzag is appropriate, or as decorative topstitching.
Insert a zipper5 steps
- Use selector A, zipper foot, tension 2–6, length 1.5–4 and width 5.
- Pin or baste the zipper tape to fabric and place under the foot.
- Smooth threads backwards and lower the foot.
- For the left side, guide teeth along the foot edge and stitch through fabric and zipper tape.
- Turn the fabric and sew the other side the same way.
Sew a blind hem7 steps
- Use selector E, blind-hem foot, tension 2–4, length 1–3 and width 5.
- Overcast raw edges first on heavy fabric that ravels.
- Fold as illustrated leaving 1/4 inch (0.7 cm) showing.
- Position the fabric so the leftmost needle just pierces the fold edge.
- Turn the guide screw to align the guide with the fold.
- Sew along the fold so the needle catches its edge.
- Press both sides of the finished hem together.
Sew pintucks4 steps
- Use selector A, blind-hem foot, tension 3–6, length 2 and width 0 or 5.
- Fold wrong sides together and lower the needle 1/16 inch (0.1–0.2 cm) inside the fold.
- Lower the foot and adjust its guide screw to the fold.
- Sew slowly along the guide, unfold and press the tucks.
Decorative stitching
Instructions from the manualSew shell tucks5 steps
- Use selector G, zigzag foot, tension 6–8, length 2–3 and width 5.
- On lightweight fabric such as tricot, fold and stitch on the bias.
- Slightly increase needle tension if needed and let the needle just clear the folded edge.
- Space rows at least 5/8 inch (1.5 cm) apart.
- Shell stitching can also run in any direction on knits or soft silky woven fabric.
Sew smocking7 steps
- Use selector D, zigzag foot, tension 1–4, length S.S. and width 5 for the decorative stitch.
- Choose soft lightweight fabric such as batiste, gingham or challis and cut it three times the project width.
- For gathering, increase length to 4 and loosen tension to 1.
- Sew straight rows 3/8 inch (1 cm) apart.
- Knot threads at one end; pull bobbin threads at the other to distribute gathers evenly and secure.
- Restore original tension.
- Sew smocking rows between gathering stitches, then remove the gathering stitches.
Sew an applique3 steps
- Use selector C, zigzag foot, tension 1–4, length 0.5–1 and width 3–5.
- Baste applique pieces to the fabric or fuse using an iron-on fabric joiner.
- Stitch around them so the needle falls along the outer edge.
Join heavy fabric with box stitchView
Use selector G, zigzag foot, tension 1–4, length 0.5–2 and width 5. Overlap two raw edges of heavyweight fabric and sew this stitch to join them.
Sew fagoting5 steps
- Use selector H, zigzag foot, tension 3–6, length 0.5–1 and width 3–5.
- Fold each fabric edge under 1/2 inch (1.3 cm) and press.
- Pin both edges 1/8 inch (0.3 cm) apart to paper or tearaway backing.
- Sew slowly so the needle catches each folded edge.
- Tear away the backing after sewing, leaving the openwork join.
Sew decorative satin patterns3 steps
- Use selector I–L, zigzag foot, tension 1–4, length 0.5–1 and width 5.
- Use satin stitches to decorate table linen or similar projects.
- When reducing length, test first to confirm smooth fabric feeding.
Balance stretch stitch patterns2 steps
- Use selector A–L, zigzag foot, tension 1–4, length S.S. and width 5.
- If the fabric causes uneven forward and reverse feeding, turn the length dial toward + for compressed patterns or toward − for drawn-out patterns.
Maintenance of your machine
Instructions from the manualClean and reassemble the bobbin case and shuttle10 steps
- Switch off and unplug before dismantling or cleaning.
- Dismantle only as this section directs.
- Avoid high humidity, radiators and direct sunlight for storage.
- Raise the needle fully and open the hook cover.
- Open the case latch and remove the case.
- Open the shuttle-race ring holders, remove the ring and shuttle.
- Brush the race and wipe with a soft dry cloth.
- Hold the shuttle by its center pin and carefully replace it so it forms a complete circle with the shuttle driver.
- Fit the ring with its bottom pin in the notch.
- Turn the holders back to lock the ring and insert the bobbin case.
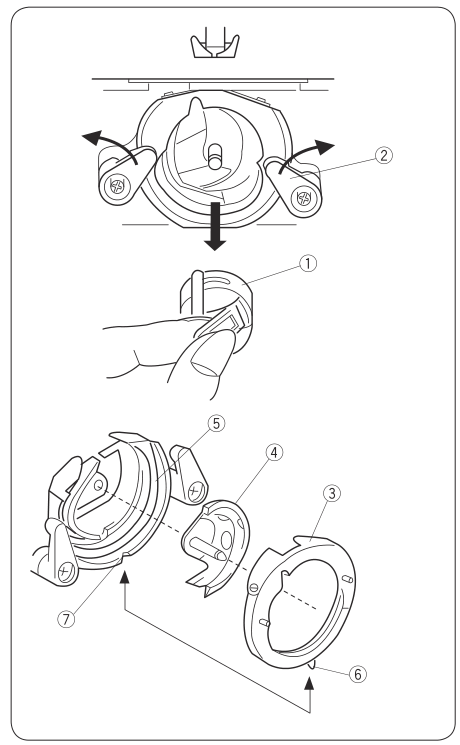
Diagram key
- 1: Bobbin case
- 2: Shuttle race ring holder
- 3: Shuttle race ring
- 4: Shuttle
- 5: Shuttle race
- 6: Pin
- 7: Notch
Clean the feed dog4 steps
- Switch off and unplug before cleaning.
- Remove the needle and presser foot.
- Remove the needle-plate setscrew and plate.
- Brush dust and lint out of the feed-dog teeth, then refit the needle plate.
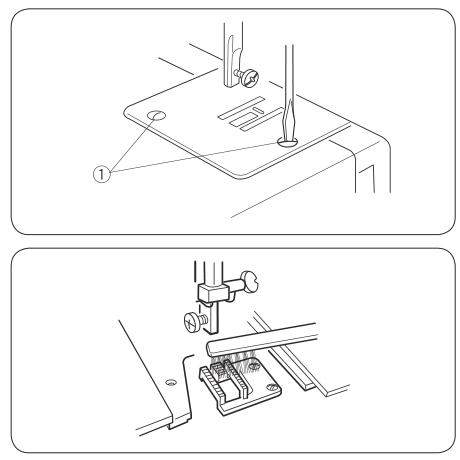
Diagram key
- 1: Needle-plate set screw
Troubleshooting
Instructions from the manualThe needle thread breaks.7 checks
- The needle thread is not threaded properly.
- Thread the machine using the reviewed upper-threading instructions.
- The needle thread tension is too tight.
- Use a lower tension-dial number to loosen needle thread tension.
- The needle is bent or blunt.
- Inspect the needle and replace it using the reviewed needle-change instructions.
- The needle is incorrectly inserted.
- Insert the needle with its flat side to the rear, fully against the stopper, and tighten the clamp.
- The needle thread and the bobbin thread are not set properly under the presser foot at the beginning of sewing.
- Draw up the bobbin thread and pull 10 cm (4 inches) of both threads back under the foot.
- The fabric is not drawn to the rear when the sewing has finished.
- Raise the foot and remove the fabric with the threads drawn backwards.
- The thread is either too heavy or too fine for the needle.
- Use the reviewed fabric, thread and needle chart and test on scrap fabric.
The bobbin thread breaks.3 checks
- The bobbin thread is not threaded properly in the bobbin case and shuttle.
- Thread the bobbin case using the reviewed slot, spring and delivery-eye instructions.
- Lint has collected in the shuttle area.
- Clean and reassemble the shuttle using the reviewed maintenance instructions.
- The bobbin is damaged and does not turn smoothly.
- Replace the bobbin.
The needle breaks.6 checks
- The needle is incorrectly inserted.
- Insert the needle with its flat side to the rear, fully against the stopper, and tighten the clamp.
- The needle is bent or blunt.
- Inspect and replace the needle using the reviewed instructions.
- The needle clamp screw is loose.
- Firmly tighten the needle clamp screw.
- The needle thread tension is too tight.
- Use a lower tension-dial number to loosen needle thread tension.
- The fabric is not drawn to the rear when the sewing has finished.
- Raise the foot and remove the fabric with threads drawn backwards.
- The needle is too fine for the fabric being sewn.
- Choose a needle large enough to pierce heavy fabric without fraying the thread, using the reviewed chart.
Skipped stitches.6 checks
- The needle is incorrectly inserted.
- Insert the needle with its flat side to the rear, fully against the stopper, and tighten the clamp.
- The needle is bent or blunt.
- Inspect and replace the needle using the reviewed instructions.
- The needle and/or threads are not suitable for the work being sewn.
- Match fabric, thread and needle using the reviewed chart.
- A blue tip needle is not being used for sewing stretch, very fine fabrics and synthetics.
- Use separately sold blue-tip needle 990311000 for stretch, very fine or synthetic fabric.
- The needle thread is not threaded properly.
- Review the complete upper-threading procedure. The table prints Page 7 for this cause; the actual Threading the Machine heading and instructions are on printed page 10.
- The wrong needle is being used.
- Choose the needle using the reviewed fabric and needle chart.
Seam puckering4 checks
- The needle thread tension is too tight.
- Use a lower tension-dial number to loosen needle thread tension.
- The needle thread is not threaded properly.
- Thread the machine using the reviewed upper-threading instructions.
- The needle is too heavy for the fabric being sewn.
- Use fine thread and a fine needle for lightweight fabric, following the reviewed chart.
- The stitch length is too long for the fabric.
- Make the stitch shorter.
The fabric is not feeding smoothly.2 checks
- The feed dog is packed with lint.
- Clean the feed dog using the reviewed maintenance instructions.
- The stitches are too fine.
- Make the stitch longer.
The machine does not work.3 checks
- The machine is not plugged in.
- Follow the reviewed power connection sequence, checking voltage before connecting.
- A thread is caught in the shuttle race.
- Clean and reassemble the shuttle race using the reviewed instructions.
- The clutch is disengaged.
- Return the bobbin-winder spindle left with the machine stopped and push the handwheel into its original position.
Noisy operation2 checks
- There is thread caught in the shuttle race.
- Clean and reassemble the shuttle race using the reviewed instructions.
- Lint has built up in the shuttle or the shuttle race.
- Clean and reassemble the shuttle race using the reviewed instructions.
Controls and parts
See the manual diagrams 1 diagram
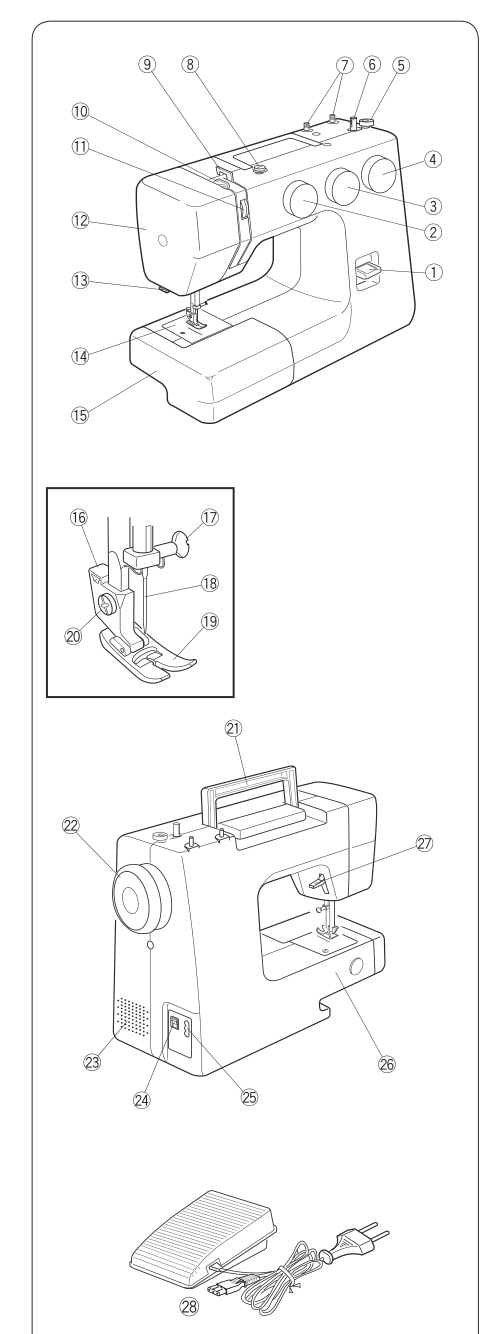
Diagram key
- 1: Reverse stitch lever
- 2: Pattern selector dial
- 3: Stitch length dial
- 4: Stitch width dial
- 5: Bobbin winder stopper
- 6: Bobbin winder spindle
- 7: Spool pins
- 8: Bobbin winder thread guide
- 9: Thread guide
- 10: Thread take-up lever
- 11: Thread tension dial
- 12: Face cover
- 13: Thread cutter
- 14: Needle plate
- 15: Extension table (accessory storage box)
- 16: Foot holder
- 17: Needle clamp screw
- 18: Needle
- 19: Presser foot (zigzag foot A)
- 20: Set screw
- 21: Carrying handle
- 22: Handwheel
- 23: Ventilation openings
- 24: Power switch
- 25: Machine socket
- 26: Free arm
- 27: Presser foot lifter
- 28: Foot control