MODEL REFERENCE
instax mini Link 2
4 errors · 14 troubleshooting topics · 26 guides

The checks and guides below come from the official manuals for this model.
No matches for this wording. Try a light name, error code or a shorter phrase.
Errors and indicators
Light patterns and messages documented in the manualFind the indicator lights
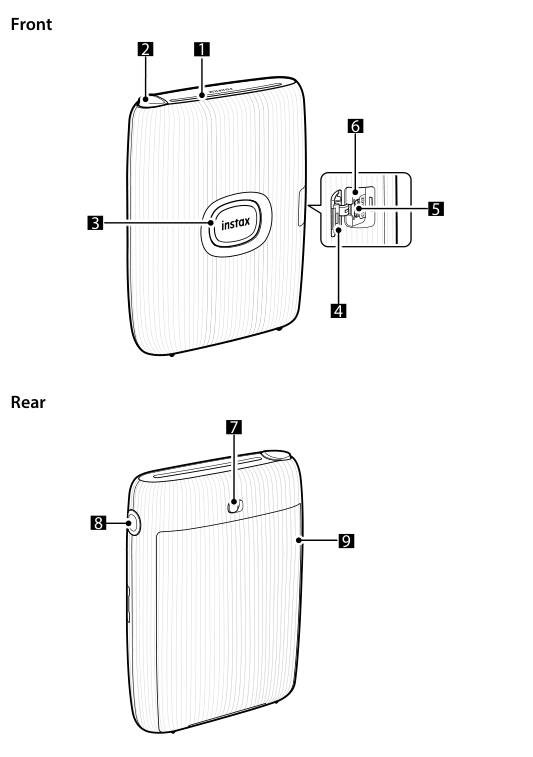
Diagram key
- Front: Front view of the printer.
- 1: Film ejection slot.
- 2: Feature button.
- 3: Power button/LED; pages 4 and 6 explain its charging and status indications.
- instax marking: The front instax-marked button is the Power button/LED.
- 4: Micro USB port cover.
- 5: Micro USB port.
- 6: Reset button; press it if the printer does not work properly to reset the printer.
- Rear: Rear view of the printer.
- 7: Film door lock.
- 8: Side LED.
- 9: Film door.
—Blue flashing LED
The LED flashes blue while firmware is being updated.
—Purple flashing LED
The LED flashes purple while reprinting.
—Yellow steady LED, then power off
A steady yellow LED means the printer cannot be charged or the battery is low. The printer turns off after 3 seconds.
—Yellow flashing LED
A flashing yellow LED means a film ejection error occurred.
Troubleshooting
Find the problem you are experiencingCannot turn on the printer2 checks
- The battery may not be charged.
- Charge the printer.
- The Power button was not held long enough.
- Press and hold the Power button for approximately 1 second.
Battery loses charge quickly1 check
- A very cold environment drains the battery quickly.
- Keep the printer warm before printing.
Power cuts off during use1 check
- The battery level may be low.
- Charge the printer.
Charging does not start1 check
- The USB power adapter plug may not be connected properly.
- Make sure the plug is properly connected to the outlet.
Charging takes too long1 check
- The temperature is low.
- Charging may take longer at low temperatures.
Charging stops during charging1 check
- Charging temperature may be out of range.
- Charge between+5°C and+40°C. If it will not charge in that range, contact your FUJIFILM dealer or support center.
Printer does not function normally2 checks
- There may be a temporary malfunction.
- Press the Reset button. If normal operation is not restored, contact the repair service center.
- The battery may not be charged.
- Charge the printer.
Film pack does not load correctly2 checks
- The film may not be the supported type.
- Use only FUJIFILM instax mini Instant Film; other films cannot be used.
- The yellow alignment marks may not be aligned.
- Align the yellow mark on the film pack with the yellow marker on the printer body, then load it.
Film does not unload2 checks
- Vibration or dropping may have misaligned the film.
- Load a new film pack.
- The film may be jammed.
- Turn the printer off and on again. If the problem persists, remove the jammed film and load a new film pack.
Some or all finished prints are white1 check
- Opening the film door with sheets remaining exposes them and turns them white.
- Do not open the film door until all film is used up.
Print is uneven2 checks
- The print may have been handled immediately after printing.
- Do not shake, bend, fold or hold the print immediately after printing.
- The ejection slot may be obstructed.
- Do not obstruct the film ejection slot.
Cannot reprint images1 check
- The stored last image is deleted when the printer turns off.
- The last stored printed image is deleted when power is turned off.
Cannot change app mode1 check
- The app-linked setting or printer orientation may be wrong.
- Set Camera operation settings in the mini Link app to ON and check the printer’s orientation.
Tilting the printer does not control the app1 check
- The app-linked setting may be off.
- Confirm Camera operation settings in the mini Link app is ON.
Guides
Before use
Instructions from the manualBefore first useView
Check the supplied Micro USB charging cable (BOD 700) and User’s Guide are included. The factory battery is not fully charged; fully charge it before first use.
Notes on disposing of the printer
Instructions from the manualPrinter disposal7 steps
- The printer has a built-in lithium-ion battery.
- Do not remove it yourself: injury may result.
- Follow local disposal rules and the supplied CONTACT INFORMATION sheet; if your region is not listed, contact your local distributor.
- In the EU and other European countries with separate collections, take electrical/electronic equipment to an appropriate recycling collection point, not household waste.
- Contact the city office, household waste service or retailer for details.
- Outside the EU, ask local authorities for the correct disposal method.
- The crossed-out battery symbol likewise means batteries or accumulators are not household waste.
Part names
Instructions from the manualParts and controls5 steps
- The front diagram identifies the film ejection slot, Feature button, Power button/LED, Micro USB port cover, Micro USB port and Reset button.
- The rear identifies the film door lock, Side LED and film door.
- Fully charge the battery before first use.
- Pages 4 and 6 explain the Power-button LED states.
- If the printer does not work properly, press the Reset button to reset it.
Installing the app
Instructions from the manualInstalling the app5 steps
- Install the mini Link Smartphone App before using the printer.
- For Android, search Google Play Store; for iOS, search the App Store.
- This guide specifies Android 7.0 or later with Google Play Store, or iOS 12.0 or later.
- Some smartphone models may still be unsupported even when they meet these requirements.
- Check the instax mini Link app download site for the latest system requirements; these are the guide’s historical requirements, not a claim of current compatibility.
Charging the battery
Instructions from the manualCharging the battery9 steps
- Ensure the Micro USB plug is attached correctly in the orientation shown in the source figure.
- Use the supplied Micro USB cable to connect the printer to the USB AC adapter supplied with your smartphone, then connect the adapter to an indoor power supply.
- Fully charge before first use.
- Printing is possible while charging.
- Charging takes approximately 80–120 minutes, depending on temperature.
- The battery cannot be removed.
- Use a charging temperature of+5°C to+40°C; below+5°C or above+40°C the battery will not charge.
- Charging takes longer below+10°C or above+35°C.
- Promptly unplug the Micro USB cable once fully charged.
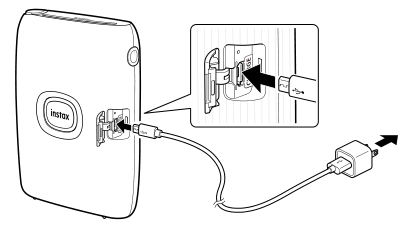
Diagram key
- Printer-side plug: Attach the supplied Micro USB charging cable correctly to the printer’s Micro USB port, in the orientation shown.
- Enlarged port inset: The inset enlarges the port and plug orientation; its arrow points into the Micro USB port.
- Cable end and arrow: The other end connects to the smartphone’s USB AC adapter before connecting the adapter to an indoor power supply.
- USB markings: The USB symbols identify the charging cable ends shown in the source diagram.
- instax marking: Printed branding on the front Power button/LED, identified in the parts diagram.
Charging from a computer4 steps
- Connect directly to the PC; do not use a USB hub or keyboard.
- If the PC sleeps, charging stops.
- Exit sleep mode and reconnect the Micro USB cable to resume.
- Charging may not be possible because of the PC’s specifications, settings or condition.
Led charging status indicator
Instructions from the manualCharging LED states4 steps
- When connected to the app, check charging status with your smartphone.
- A steady white LED means not charging; a flashing white LED means charging.
- With the printer off, the LED goes out after charging completes.
- With it on but not connected to the app, the LED lights white after charging completes.
Loading/unloading the “instax mini” film pack
Instructions from the manualFilm pack precautions8 steps
- Do not open the film door until all film is used: remaining sheets would be exposed and turn white, making them unusable.
- Never press the two rectangular holes on the back of a loaded film pack.
- Never use film beyond its shelf life; it may damage the printer.
- Use only FUJIFILM instax mini Instant Film. instax SQUARE and instax WIDE cannot be used.
- Each pack contains a black protective cover and 10 film sheets.
- Keep it in the inner foil package until ready to load.
- Closing the film door ejects the cover automatically.
- Follow the film packaging’s instructions and warnings.
Loading the film pack
Instructions from the manualLoading the film pack5 steps
- Slide and hold the film door lock down, then open the film door.
- Insert the film pack with its yellow marks aligned with the yellow marks on the printer.
- Close the film door.
- The black cover ejects automatically.
- Remove and dispose of it.
Unloading a used film pack
Instructions from the manualUnloading a used film packView
After using all the film, slide and hold the film door lock, then open the film door. Grasp the rectangular holes on the empty pack, remove the empty cartridge and dispose of it.
Turning the printer on/off
Instructions from the manualTurning the printer on or off3 steps
- Press and hold the Power button for approximately 1 second to turn the printer on or off.
- The LED lights when the printer turns on.
- It switches off automatically after a period without use.
When connecting to the printer for the first time
Instructions from the manualFirst connection and printing22 steps
- Press and hold the Power button for approximately 1 second; the LED lights.
- Open the instax mini Link app.
- Set up access to the printer.
- The illustrated app flow requests access to photos/media/files, device location and taking pictures/recording video; the initial screen explains access is used to authenticate the device’s location.
- Read the terms of use, check Agree to this content and tap Agree to this content →.
- Tap Set.
- Bluetooth connection can also be set during printing.
- When a printer is detected, tap Connect.
- If several are detected, choose the intended one from the list; its device name is on the printer’s bottom.
- If Bluetooth is off, tap Please turn on Bluetooth.
- If the illustrated printer-selection screen appears, select instax mini Link 2.
- When the pairing message appears, check its box and tap PAIR.
- After connection, tap Close.
- Set a four-digit password.
- Read the quick instructions and tap Let’s Play! →.
- Set up Print with video download settings and tap OK.
- Select the image.
- Before printing, the editing controls let you enter text/add a sticker, zoom/rotate, apply a filter or adjust brightness.
- Tap the illustrated print icon or swipe up on the screen.
- Printing starts; select the number of copies during image transfer if required.
- When the film has ejected and the printer stops making a sound, hold the film’s edge and remove it.
- The app shows the remaining print count.
When the printer and smartphone are already connected
Instructions from the manualPrinting with an existing connection8 steps
- Press and hold the Power button for approximately 1 second to switch on; the LED lights.
- Open the instax mini Link app.
- Select the image.
- Before printing, use the editing controls to add text or a sticker, zoom or rotate, apply a filter or adjust brightness.
- Tap the illustrated print icon or swipe up.
- Printing starts; select the number of copies during image transfer if required.
- When the film is ejected and the printer stops making a sound, hold its edge and remove it.
- The app shows how many prints remain.
Reprinting an image
Instructions from the manualReprinting an image4 steps
- Turn the printer over with the film ejection slot facing down and press the Power button to reprint the last image.
- Keep at least 10 cm between the printer and other objects when reprinting this way.
- Reprinting is unavailable when connected to the app in instax Camera Mode.
- The stored last image is deleted when the printer turns off; in that case, print it from the app.
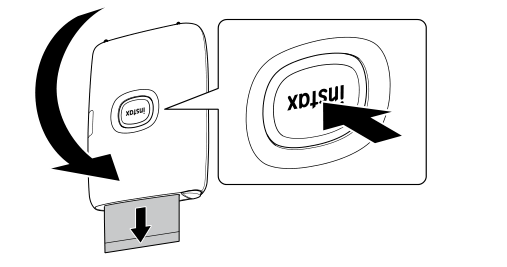
Diagram key
- Curved arrow: Turn the printer over so the film ejection slot faces downwards.
- Power-button arrow: Press the Power button to reprint the last printed image.
- Downward film-exit arrow: The film ejection slot faces down; keep at least 10 cm clearance from other objects. Reprinting is unavailable in app instax Camera Mode; turning off deletes the stored image, which can then be printed from the app.
- instax markings: The printer and enlarged inset both show the Power button with its instax branding.
Changing the app mode when the home screen is selected on the app
Instructions from the manualChanging Print and Fun modes5 steps
- With the printer linked to the smartphone or tablet app, set Camera operation settings to ON; the linked function is unavailable when OFF.
- When the app home screen is selected, stand the printer upright to switch to Print Mode.
- Lay it down with the Power button upward to switch to Fun Mode.
- Printer orientation changes app mode only on the home screen.
- The app’s Fun Mode and Print Mode buttons can be used regardless of the selected mode.
Controlling zoom and shutter when using the instax camera on the app
Instructions from the manualCamera zoom and shutter control3 steps
- With Camera operation settings ON and the printer linked to the app, tilt it forward to zoom in and backward to zoom out.
- Press the Power button to release the shutter.
- Refer to the mini Link app FAQ for details.
Instax air feature
Instructions from the manualinstax AiR feature3 steps
- Press and hold the top Feature button and move the printer around to draw on the image.
- Print a QR code on the image to view the video.
- The guide directs readers to the instax AiR feature site for more details.
Troubleshooting
Instructions from the manualWhen troubleshooting does not resolve the problem2 steps
- Check the table before treating a problem as a malfunction.
- If it persists after the stated action, contact the FUJIFILM service center for repair in your country or visit the FUJIFILM website.
Important safety notice
Instructions from the manualSafety warnings and when to stop10 steps
- Use the printer and instax mini film only as instructed in the User’s Guide and film instructions; keep the guide for future reference.
- If the printer becomes hot, emits smoke or a burnt smell, functions abnormally, falls into water or receives a foreign object, immediately unplug the Micro USB cable, turn it off and stop using it.
- The built-in battery must not be heated, thrown into fire, dropped or subjected to impact: it could explode.
- Never take the product apart or attempt repairs yourself.
- If damage exposes the inside, do not touch it; contact your FUJIFILM dealer.
- Do not touch parts inside the back cover.
- Never get the product wet or handle it with wet hands.
- Promptly unplug the cable when the battery is fully charged.
- Keep it away from small children.
- Do not wrap or cover the printer or adapter with cloth or a blanket, which could cause heat buildup, distortion or fire.
Simple printer care
Instructions from the manualHandling the printer and battery3 steps
- Do not expose it to excessive heat such as sunshine or fire during use, storage, transport or disposal: explosion or leakage of flammable liquid or gas may result.
- Do not put the battery into fire or a hot oven, crush or cut it, or subject it to extremely low air pressure at high altitude.
- These can cause explosion or leakage of flammable liquid or gas.
Printer care9 steps
- Do not open the film door until all exposures are used; remaining film would be prematurely exposed and unusable.
- The printer is fragile: keep it away from water, sand and gritty materials.
- Do not use solvents such as thinner or alcohol to remove dirt.
- Keep the film chamber and interior clean to avoid film damage.
- Do not leave the printer in direct sunlight, hot places such as a car interior or damp places for prolonged periods.
- Keep the printer and prints in a safe, dry place, away from moth-repellent gases such as naphthalene.
- Use it only between+5°C and+40°C.
- Respect copyright, image rights, privacy and other personal rights and public decency; violations may be punishable or legally actionable.
- The printer is for domestic/personal use, not commercial use.
Battery life and temperature5 steps
- Fully charge the factory battery before first use using the supplied Micro USB cable.
- Charging takes longer below+10°C or above+35°C; do not attempt charging below+5°C or above+40°C because it will not charge.
- At normal temperatures, the battery can be recharged about 300 times.
- A noticeable reduction in charge duration indicates end of service life.
- The battery and printer body may feel warm after extended use; this is normal.
Cautions during printing
Instructions from the manualCautions during printingView
Do not shake or drop the printer while printing. Do not cover the film ejection slot while printing.
“instax mini” film and print care
Instructions from the manualFilm and print care16 steps
- Follow all FUJIFILM instax mini film instructions.
- Store film in a cool place; do not leave it for hours in extreme heat such as a closed car.
- Do not puncture, tear or cut the film.
- Do not use damaged film.
- Use loaded film as soon as possible.
- After very high or low temperature storage, bring film to room temperature before printing.
- Use film before its expiration or Use Before date.
- Avoid airport checked-luggage scanning and other strong X-rays, which can fog unused film.
- Carry the printer or film as hand luggage; check each airport’s rules.
- Avoid strong light and keep developed prints in a cool, dry place.
- Film contains a small amount of highly alkaline caustic paste.
- Do not puncture or cut it.
- Never let children or animals put it in their mouths; keep paste off skin and clothing.
- If paste contacts skin or clothing, immediately wash it off with plenty of water.
- If it reaches eyes or mouth, immediately wash with plenty of water and contact a doctor.
- The alkali remains active for about 10 minutes after printing.
Cautions on handling the film and prints
Instructions from the manualFilm and print handling precautionsView
For full details, follow the instructions and warnings on the packaging of FUJIFILM instax mini Instant Film.
Bluetooth® devices: cautions
Instructions from the manualBluetooth use and safety12 steps
- Use only as part of a Bluetooth network.
- Do not use this device in applications requiring high reliability, such as medical devices or systems directly or indirectly affecting human life.
- Where greater reliability than Bluetooth is needed, take appropriate precautions for safety and malfunction prevention.
- Use it only in its country of purchase and obey local Bluetooth rules; conformity is country-specific.
- Wireless images can be intercepted, and transmitted data security is not guaranteed.
- Avoid microwave ovens, magnetic fields, static electricity and radio interference; nearby 2.4 GHz wireless equipment can cause mutual interference.
- The transmitter operates at 2.400–2.4835 GHz with maximum radio-frequency power 9.10 mW.
- Its frequency is shared with commercial, educational and medical equipment and licensed or unlicensed low-voltage RFID tracking systems.
- Confirm RFID transmitters are not operating before use.
- If it interferes with low-voltage RFID tracing systems, contact a FUJIFILM representative.
- Do not disassemble or modify the device or remove certification labels; this may be punishable by law.
- Contact an authorized FUJIFILM dealer for inquiries.
Model details
Model and compatibility
- Manufacturer
- instax is the product brand; the manufacturer is FUJIFILM Corporation, Japan.
- Film and printing
- Use only FUJIFILM instax mini Instant Film, sold separately; instax SQUARE and WIDE are unsupported. Each pack contains10sheets and a protective cover.
- Connectivity
- Bluetooth4.2 BLE; Micro USB is used for charging. Printing uses the mini Link Smartphone App.
- Dimensions and mass
- 91.9×36.4×124.8mm excluding projecting parts;210g excluding film pack.
- Operating conditions
- Use at+5°C to+40°C and20–80% humidity without condensation. The internal lithium-ion battery is not removable.
- Charging and capacity
- Charging approximately80–120minutes depending on temperature; approximately100prints from full charge depending on use. The guide lists an auto-power-off setting of5minutes or Off; disabling it increases energy consumption.