MODEL REFERENCE
GL.iNet GL-AR300M16
39 guides

The checks and guides below come from the official manuals for this model.
No matches for this wording. Try a light name, error code or a shorter phrase.
Guides
开始设置gl 迷你旅行路由器
Instructions from the manualControls and connector labels5 steps
- The shared source illustration labels the WAN/LAN Ethernet connectors, power connector, USB2.0 port and Reset button.
- Its three LED callouts are Wireless, Configuration and Power.
- It gives no fault-state or color combinations for those LEDs.
- The side switch is literally labelled “button for future development” in this shared illustration; the manual supplies no operating procedure for that switch.
- These are the labels of this selected manual version, not an inferred function for other firmware.
开机
Instructions from the manualPower on the mini routerView
Insert the Micro USB power cable into the router’s power port. Use a standard 5V/2A power adapter; the manual warns that an unsuitable adapter can cause malfunction.
连接
Instructions from the manualConnect a computer by LAN or Wi-Fi4 steps
- Connect the client to the router’s LAN port by Ethernet, or find the router’s SSID on the client and enter the default Wi-Fi password goodlife.
- This establishes only a local-network connection; complete the Internet settings below before expecting Internet access.
- The SSID is printed on the bottom label.
- For this GL-AR300M16 reference the manual gives the GL-AR300M-XXX-NOR pattern; GL-MT300N-V2-XXX is the other model’s pattern.
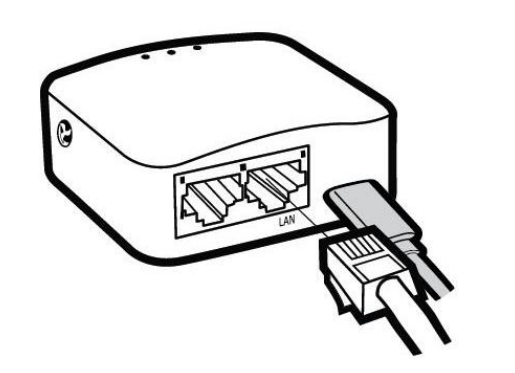
Diagram key
- LAN: The labelled LAN port accepts the wired client connection. The unlabelled adjacent port is not the target of this figure.
- Ethernet cable: The complete plug and cable show the client connection entering LAN. This establishes local connectivity, not Internet setup.
- Three top LED dots: Repeated top LED positions are the Power, Configuration and Wireless lights keyed on PDF4. This figure supplies no status meanings.
通过app 连接
Instructions from the manualConnect using the GLiNet router appView
Search for the glinet router app in the phone’s app store, or use the app download resource linked by the manual. Follow the app’s instructions to complete setup.
访问web 管理界面
Instructions from the manualOpen the web administration interface4 steps
- Open a browser, preferably Chrome or Firefox, and visit http://192.168.8.1.
- Complete the initial language selection.
- The manual lists English, Simplified Chinese, Traditional Chinese, German, French, Spanish, Italian and Japanese.
- If the browser continually opens LuCI at http://192.168.8.1/cgi-bin/luci, visit http://192.168.8.1/index.html instead of the base address.
管理员密码设置
Instructions from the manualSet the initial administrator password6 steps
- There is no default administrator password.
- Set your own password and submit it.
- Use 10–63 characters and at least two of uppercase letters, lowercase letters, numbers and symbols.
- Letters are case-sensitive.
- This password applies to the web administration and LuCI interfaces; it does not change the Wi-Fi password.
- After initial setup, use the administration interface to check network status and manage settings.
互联网
Instructions from the manualChoose an Internet connection method2 steps
- The manual supports four Internet methods: Ethernet, wireless repeater, a USB 3G/4G modem, and phone tethering.
- Click Internet to create a connection; the corresponding icon opens its settings.
以太网
Instructions from the manualEthernet and repurposing the WAN port5 steps
- Connect the router’s WAN port by Ethernet to a modem or upstream router for Internet access.
- Before plugging Ethernet into the WAN port, you can choose Use as LAN to convert it to a LAN port.
- This provides an additional LAN port when the router is a repeater.
- After an Ethernet cable is connected to WAN, connection information appears in the Ethernet section.
- DHCP is the default protocol; click Modify to change it.
Dhcp
Instructions from the manualConfigure Ethernet DHCPView
DHCP is the default and most commonly used protocol. No manual connection information is needed. Click Apply.
Static
Instructions from the manualConfigure a static Ethernet connectionView
If the ISP provides a fixed IP address, select Static. Enter the supplied IP address, subnet mask, gateway and other network information, then click Apply.
Pppoe
Instructions from the manualConfigure Ethernet PPPoEView
If the ISP requires PPPoE, use its supplied modem and connection credentials. Select PPPoE, enter the ISP username and password, and click Apply.
中继
Instructions from the manualConnect as a wireless repeater6 steps
- Repeater connects the router to an existing wireless network, such as hotel or café Wi-Fi.
- The default WISP mode creates a private subnet and firewall.
- In Repeater, click Connect to scan nearby networks.
- Select an SSID and enter its password.
- Optionally enable Save Network, then click Apply.
- This router can repeat only 2.4GHz Wi-Fi.
蜂窝网络
Instructions from the manualConnect a USB 3G/4G modem14 steps
- Insert the SIM into the USB modem, then insert the modem into the router’s USB port.
- When detected, the Cellular section becomes available.
- Dial settings normally use the defaults; enter dial information if supplied.
- Select the 3G/4G protocol.
- The manual describes cdc-wcdm0 as faster and ttyUSBX as more compatible.
- Enter the required APN; ask the carrier if you do not know it.
- Enter the USB modem’s PIN when required.
- Some carriers detect router use by TTL.
- If the SIM cannot work in the router, the manual suggests a TTL other than 64 or 128, such as 65.
- Choose the SIM’s service type and authentication NONE, PAP, CHAP or PAP/CHAP.
- An IP address in the status means the modem is connected.
- The manual lists tested Huawei E8372h-155, E5576-855 and 8372h-150a, and ZTE MF833U, MF79U and MF932.
- Many Xunyou and Feimao devices work, but some modules do not.
- Some modem drivers are recognized as tethering; the manual says this does not prevent use.
热点共享
Instructions from the manualTether an iPhone or Android phone3 steps
- Use a USB data cable to connect the phone to the router’s USB port.
- For iPhone, open Settings > Personal Hotspot and enable it, then choose Trust when prompted.
- For Android, select Charge only for the USB connection and enable USB tethering in the additional sharing settings.
无线
Instructions from the manualManage wireless settings8 steps
- Open Wireless to inspect the current network and use ON/OFF to enable or disable it.
- Click Modify to edit settings.
- SSID is the Wi-Fi name; security is its encryption method.
- Set a Wi-Fi password of 8–63 characters; the manual recommends changing it after receiving the router.
- Choose whether the SSID is visible, wireless mode 11b/g/n, and 20/40MHz bandwidth.
- Choose the channel manually; the router does not automatically choose the best channel.
- In repeater mode the channel is fixed by the upstream wireless network.
- Choose transmit strength Maximum, High, Medium or Low.
客户端
Instructions from the manualInspect, block and edit connected clients3 steps
- Open Clients to inspect each client’s name, IP address, MAC address and connection method.
- Use the button on the right to block a client from the network.
- Use the ellipsis under Actions to change the client name, choose its device type or apply a speed limit.
软件包
Instructions from the manualManage software packagesView
Open Packages to install or uninstall packages. Click Update each time you visit this page. Software sources can also be managed here.
Goodcloud
Instructions from the manualGoodCloud management overview2 steps
- The manual describes GoodCloud as managing router groups, checking router status in real time, configuring routers remotely, carrying out batch operations and monitoring connected clients.
- This page provides an overview and illustration, not a separate numbered cloud-registration procedure.
防火墙
Instructions from the manualFirewall rule categoriesView
Open Firewall to manage port forwarding, open router ports and DMZ rules.
端口转发
Instructions from the manualConfigure port forwarding7 steps
- To expose a LAN server through the WAN, use its internal IP address and service port to create a forwarding rule.
- If enabled rules have conflicting external ports, the higher-priority rule takes precedence.
- Set the rule name and protocol TCP/UDP, TCP or UDP.
- Choose an external zone WAN, Guest or LAN and enter the external port.
- Choose an internal zone LAN, Guest or WAN and enter the router-assigned IP address of the device requiring remote access.
- Enter the internal service port; leave it blank if it is the same as the external port.
- Set the rule’s enabled or disabled state.
开放路由器端口
Instructions from the manualOpen a router service port3 steps
- For a web or FTP server running on the router itself, open its port to permit WAN clients to access that service.
- Choose Open Router Ports and click +/Add.
- Enter the rule name, port and protocol TCP/UDP, TCP or UDP, and choose enabled or disabled status.
Dmz
Instructions from the manualConfigure a DMZ hostView
A DMZ host is fully exposed to the WAN to provide services. Enable DMZ and enter the internal host IP, for example 192.168.8.200. That device receives all incoming packets.
多线负载
Instructions from the manualMonitor connections and configure multi-WAN10 steps
- Ensure the Internet interfaces are available before setting either multi-WAN mode.
- With connection monitoring disabled, the router judges availability from physical interface state, such as whether Ethernet is plugged in.
- With IPv6 enabled, choose monitoring for IPv4 only, IPv6 only or both.
- If both are monitored, both must work before the interface is considered available.
- Monitoring periodically sends ping or httping requests to detection IP addresses.
- Consecutive responses change an unavailable interface to available; consecutive missing responses change an available interface to unavailable.
- Failover switches to another interface when the current one fails.
- Set interface priority and whether to force-refresh existing connection flows when interfaces change.
- Load balancing uses multiple interfaces to increase total bandwidth.
- Configure the ratio for new connections; this is a connection-allocation ratio, not the proportion of actual traffic.
内部网络
Instructions from the manualManage private and guest LAN addressing7 steps
- The default private LAN address is 192.168.8.1, also the administration address.
- Set an address within 192.168.x.x, 172.16.x.x–172.31.x.x or 10.x.x.x if necessary.
- Change it if it conflicts with the upstream router.
- The DHCP starting and ending host numbers must be 2–254, with the ending number greater than the starting number.
- Devices connected to guest Wi-Fi use the guest network.
- Its default gateway is 192.168.9.1.
- If guest Wi-Fi is enabled and the address conflicts with your network, change it.
Dns
Instructions from the manualConfigure DNS and rebind protection5 steps
- Configure DNS services and edit Hosts as needed.
- DNS servers are obtained automatically by default; alternatives are encrypted DNS, manually entered DNS or DNS proxy.
- DNS rebind protection can make private DNS lookups fail.
- Disable it if the network requires captive-portal authentication.
- Override All Client DNS Settings accepts DNS requests from all connected clients.
网络模式
Instructions from the manualChange operating network mode8 steps
- Choose a network mode appropriate to the use, then reconnect all client devices after changing it.
- Router mode creates a private network and provides NAT, firewall and DHCP.
- AP mode extends the upstream network over a wired connection.
- Extender mode extends existing Wi-Fi coverage.
- WDS resembles extender mode; choose it if the upstream router supports WDS.
- The manual limits its current WDS mode to GL.iNet routers.
- In AP, extender or WDS mode, 192.168.8.1 might no longer open administration.
- Use the address assigned by the upstream router, or hold Reset for 4 seconds to return to router mode.
Ipv6
Instructions from the manualConfigure IPv6 modes and DNS9 steps
- Use IPv6 to enable and configure the router’s IPv6 connection.
- The manual warns that current firewall, VPN, client list and cloud services might not support IPv6; use only the settings within this IPv6 interface.
- Using VPN and IPv6 together may leak IPv6 data.
- The LAN mode applies to the private network; the guest network always uses NAT6.
- Native mode obtains a public IPv6 address and uses DHCPv6 or an ISP-delegated prefix to assign addresses to clients.
- Passthrough sends IPv6 packets without processing or translation.
- NAT6 assigns internal dynamic IPv6 addresses.
- Static IPv6 supplies fixed addresses for devices or services that need them.
- DNS can be configured automatically or with one or two manually supplied DNS servers.
Mac 地址
Instructions from the manualManage or clone the MAC address6 steps
- In the left menu choose Network > MAC Address.
- This page was called MAC Clone before version 4.2.
- Choose the factory-default address, clone the client’s MAC, enter an address manually or generate a random address.
- New devices may use different randomized MAC addresses for different Wi-Fi networks, so the displayed address may differ from the physical device address.
- These may be called Private Wi-Fi Address or Random Hardware Address.
- The manual suggests a random address on public hotspots if you do not want the hotspot to know the real MAC or restrict access based on it.
旁路由器
Instructions from the manualConfigure drop-in gateway mode4 steps
- Drop-in mode extends an existing LAN without modifying that LAN.
- Connect this router’s WAN port to the main router’s LAN port.
- Existing devices retain their IP and DNS settings, but traffic passes first through the drop-in router and then the main router.
- The manual suggests a traceroute tool to check the path.
Igmp snooping
Instructions from the manualEnable IGMP snooping4 steps
- Enable IGMP Snooping for multicast.
- It learns membership from IGMP packets and forwards multicast to group members instead of other hosts.
- IGMPv3 is compatible with v1 and v2.
- If there are problems, the manual suggests trying v3 first.
概要
Instructions from the manualInspect system overviewView
Open Overview to inspect average CPU load, memory use, LED status, flash storage and system information.
在线升级
Instructions from the manualCheck and install an online firmware update4 steps
- Open Upgrade to inspect the current firmware.
- When connected to the Internet, the router checks for the latest downloadable firmware.
- The manual recommends clearing Keep Configuration.
- If an upgrade with Keep Configuration selected causes problems, reset the router.
本地升级
Instructions from the manualUpload local firmware3 steps
- Open Local Upgrade and drag the firmware file into the displayed upload area.
- Local upgrades support only official GL.iNet firmware or firmware compiled from GL.iNet’s official source.
- Find official firmware at dl.gl-inet.cn by searching for the device model, then choose the required version.
定时任务
Instructions from the manualConfigure daily scheduled tasksView
Set daily schedules for switching LEDs, rebooting the router or switching 2.4GHz Wi-Fi on and off.
管理员密码
Instructions from the manualChange the administrator passwordView
When weak passwords are disallowed, the new administrator password must contain at least 10 characters. Enter the current login password before setting the new one.
时区
Instructions from the manualSet time zoneView
Set the router’s time according to your location’s time zone.
日志
Instructions from the manualView or export logsView
View or export system, kernel, crash, cloud-platform and Nginx logs.
重置固件
Instructions from the manualReset firmware to factory settings4 steps
- For a fault that cannot otherwise be resolved, try restoring factory state.
- Reset erases all current settings, applications and data.
- It takes about 3 minutes.
- Do not disconnect the router’s power during the reset.
高级设置
Instructions from the manualOpen LuCI advanced administration4 steps
- The advanced-settings link opens the native LuCI interface.
- GL.iNet does not maintain or continue developing that interface.
- Open 192.168.8.1/cgi-bin/luci to reach its login page.
- The username is root, and its password is the same as the web administrator password.
Controls and parts
See the manual diagrams 1 diagram
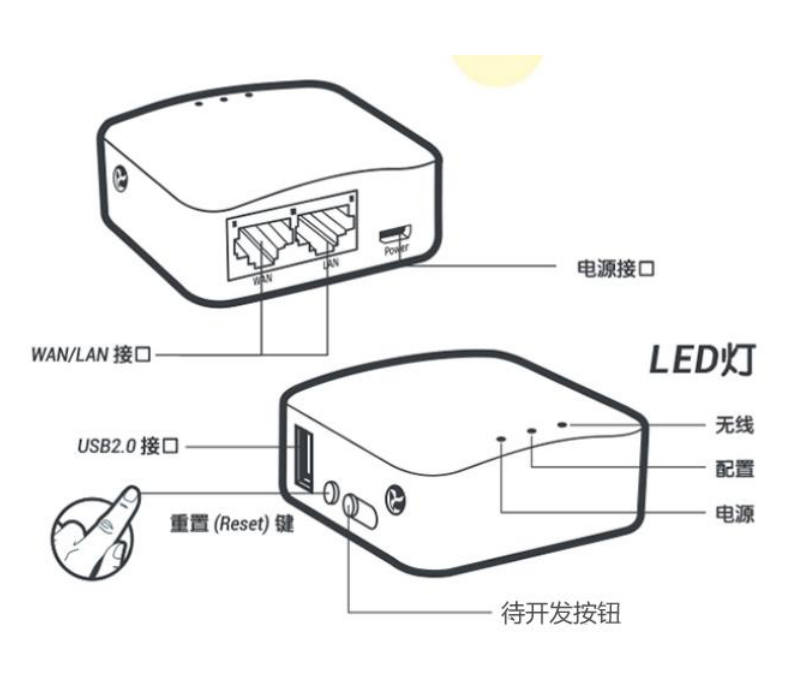
Diagram key
- WAN/LAN 接口: Bracket and two complete leaders identifying the two Ethernet connectors.
- WAN: WAN is the Internet connection to a modem or upstream router, as described on PDF9.
- LAN: LAN accepts the wired client connection described on PDF5.
- Power: Engraved label of the Micro USB power connector.
- 电源接口: Complete leader identifying that same power connector. Use the Micro USB cable and recommended5V/2A adapter from PDF4.
- Three repeated rear-view LED dots: These repeat the three LED positions keyed in the lower view: Power, Configuration and Wireless. No upper-view position mapping or fault states are inferred.
- USB2.0 接口: USB2.0 connector. The manual uses it for USB modem and phone tethering.
- 重置 (Reset) 键: Reset button. The network-mode chapter describes holding Reset for4 seconds to return to router mode.
- Finger illustration: The finger points to the Reset button; it is not a separate control or additional instruction.
- 待开发按钮: Side switch literally marked “button for future development” in this shared figure. No switch procedure appears in this manual.
- LED灯: Group of three LED positions; all three are explained by the following source labels.
- 无线: Wireless LED label. No fault color or blinking meaning is specified.
- 配置: Configuration LED label. No fault color or blinking meaning is specified.
- 电源: Power LED label. No fault color or blinking meaning is specified.
Model details
Model and compatibility
- Power adapter recommendation
- Use a standard5V/2A Micro USB power adapter as instructed by this manual.
- Wi-Fi repeater band
- 2.4GHz only.
- Administration address
- http://192.168.8.1
- Factory reset warning
- Erases settings, applications and data; takes about3 minutes. Keep power connected.