MODEL REFERENCE
シャープ UX-310CW
29 errors · 43 troubleshooting topics · 57 guides

The checks and guides below come from the official manuals for this model.
No matches for this wording. Try a light name, error code or a shorter phrase.
Errors and messages
Shown on the machine display インクリボン ナシ UX-NR8G/GWbase: Ink-ribbon warning2 checks
ウシロカバー ヲ シメテ クダサイbase: Close the rear cover
Check 1: Close the rear cover again until its marked area clicks shut.
オウトウ ナシbase: No response to fax transmission
Check 1: Use the manual sending method after speaking to the recipient.
ガイセン シヨウ中base: Outside line occupied by a handset
Check 1: A handset is in use; numbers 1–4 identify the handset. Wait until it finishes. The base may also sound a busy tone.
キロクシ ヅマリbase: Recording paper jammed2 checks
キロクシ ヅマリ トリノゾクbase: Remove jammed recording paper2 checks
キロクシ ナシbase: No recording paper
Check 1: Load recording paper if empty; if paper is already present, check that it is correctly loaded.
ゲンコウ ヅマリbase: Original jammed2 checks
ゲンコウ ヅマリ トリノゾクbase: Remove jammed original2 checks
コキ シヨウ中base: Handset in use
Check 1: A handset is in use. The base may also sound a busy tone.
コキヲ カクニン シテクダサイbase: Check the handset
Check 1: Check whether the handset is unavailable because its battery is empty or it is outside radio range.
コキヲ ゾウセツ シマスbase: Handset registration mode2 checks
ジドウオウトウ中base: Automatic answering in progress
Check 1: The machine is playing its greeting and answering automatically, for example in answering-machine mode.
ツウシンエラー(1~15)base: Communication error; numbers 1–15 are service diagnostics
Check 1: Check with the other party and resend, or ask them to resend to you. Numbers 1–15 are for Sharp service personnel to assess communication conditions; the manual does not assign separate meanings or remedies to each number. Contact Sharp support if this occurs frequently. The machine may announce that a communication error occurred.
チャクシン アリ [ケッテイ]ヲ オスbase: Calls or faxes arrived while you were away
Check 1: Calls or faxes arrived while you were away. Press Menu/Confirm to inspect the incoming-call record.
ファクス アリ [ファクス]ヲ オスbase: A received fax is stored; press Fax
Check 1: Print the fax data stored in memory on the base.
ヘッド コウオンbase: Recording head too hot
Check 1: Extended continuous printing or copying can activate thermal protection and stop operation. Wait for a while.
メモリー フソク ファクス アリ [ファクス]ヲ オスbase: Insufficient memory; received faxes remain2 checks
メモリー フソク フヨウナ ロクオンヲ ケシテ クダサイbase: Insufficient memory; remove unneeded recordings
Check 1: Delete recordings you no longer need.
ロクオン アリ [サイセイ]ヲ オスbase: Recordings remain; press Playback
Check 1: Unplayed answering-machine or other recordings remain. Play or delete them.
ロクオン アリ [ルス]ヲ オスbase: Recordings remain; press Answer
Check 1: Unplayed answering-machine or other recordings remain. Play or delete them.
オヤキケンサクチュウhandset: Searching for the base4 checks
ケンガイhandset: Outside radio range4 checks
- Check 1
- Connect the base power plug.
- Check 2
- Avoid interference from other electrical equipment.
- Check 3
- Use the handset within the base radio range.
- Check 4
- Press the handset End key; this can clear the display and restore operation.
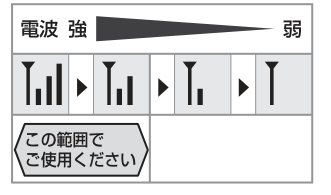
Diagram key
- 電波 強: Left end represents stronger radio reception.
- 3本: Antenna with three bars: strongest of these four examples, inside the recommended use range.
- ▶ 1: Arrow moves towards a weaker example.
- 2本: Antenna with two bars: inside the recommended use range.
- ▶ 2: Arrow moves towards a weaker example.
- 1本: Antenna with one bar: outside the highlighted recommended range.
- ▶ 3: Arrow moves towards a weaker example.
- 0本: Antenna without bars: weakest of these examples, outside the highlighted recommended range.
- 弱: Right end represents weaker reception.
- この範囲でご使用ください: Use within the highlighted first two states. Even an adequate display does not guarantee freedom from noise; location and environment still matter.
ガイセンシヨウチュウhandset: Base outside line is in use
Check 1: The base is in use. Wait until it finishes.
シンチャク アリhandset: New recordings remain
Check 1: Unplayed recordings remain. Play them using the base or handset.
ジドウオウトウチュウhandset: Automatic answering in progress
Check 1: The machine is playing its greeting and answering automatically, for example in answering-machine mode.
ジュシンファクスアリhandset: Received fax data remains on the base
Check 1: Print the fax data stored in memory on the base.
デンチアリマセンhandset: battery depleted; charge before use2 checks
Troubleshooting
Find the problem you are experiencingHandset: Two beeps during a call, followed by disconnection (ピーピー)2 checks
- Check 1
- Use the handset in a location with less interference.
- Check 2
- Keep it as far as possible from PHS equipment.
Handset: Two warning beeps (ピーピー)4 checks
- Check 1
- The base or another registered handset may be in use.
- Check 2
- Connect the base power plug.
- Check 3
- Avoid interference from other electrical equipment.
- Check 4
- Use the handset within the base radio range.
Handset: Low-battery warning beeps (ピピッ……ピピッ……)2 checks
- Check 1
- End the call and return the handset to its charger. The call will disconnect after about one minute.
- Check 2
- If the battery runs down quickly despite prolonged charging, replace it with the specified battery.
Handset: four beeps when a registration exceeds its range1 check
- Check 1
- The entered name length, date/time setting or other registration exceeds its permitted range. This table supplies no further remedy for this sound.
Cannot make any calls, including after changing to an optical line3 checks
- Check 1
- Check that the base power plug and telephone cord are correctly connected. For optical/IP service check the connection to the compatible equipment.
- Check 2
- Initial line-type detection can be incorrect. Confirm your subscribed line type and set it manually, then make a test call.
- Check 3
- If dialing is delayed after lifting the receiver, dial first and then lift it.
Cannot call particular numbers such as 0120 or 05702 checks
- Check 1
- With optical telephone service, some service numbers are unavailable; ask the provider.
- Check 2
- With IP telephone service, check whether you also subscribe to a conventional line.
- If so, dial the IP-release number before the destination number.
- Without that conventional-line subscription these service numbers cannot be called; consult the IP provider.
Cannot call a mobile number or hear a warning about numbers beginning 003 checks
- Check 1
- Check the mobile-discount dialing setting. It is unavailable on optical service and IP-only service without a conventional line; disable it in those cases.
- Check 2
- With a conventional-line subscription, check the carrier ID and, for IP service, the IP-release number. Correct them and test a mobile call; call charges apply.
- Check 3
- If calls still fail, ask the provider about unavailable numbers or services.
Base receiver volume is too low, too loud or echoes2 checks
- Check 1
- Adjust the base receiver volume.
- Check 2
- If your own voice echoes, adjust the transmit-volume setting; an excessively high setting can cause this.
Noise in the base receiver2 checks
- Check 1
- An excessively high receiver-volume setting can cause noise.
- Check 2
- If noise continues and Call Waiting Display is enabled without a subscription, disable that setting.
Handset speech cuts out, is noisy, or changes loudness4 checks
- Check 1
- Use the handset where the antenna indicator has at least two bars.
- Check 2
- Check base distance, placement and environment.
- Check 3
- Raise the base antenna straight upright.
- Check 4
- Automatic call-level adjustment may take about two to three minutes; temporary noise or unstable volume during it is not a fault.
The other party cannot hear you clearly2 checks
- Check 1
- Check that you are not covering the microphone.
- Check 2
- Line conditions can make speech difficult to hear; increase the transmit-volume setting.
Cannot send a fax5 checks
- Check 1
- Check correct original loading.
- Check 2
- Check correct original-feed roller installation.
- Check 3
- If the recipient rejects withheld numbers, prefix the call with 186.
- Check 4
- Ask the recipient whether their fax is ready to receive, including available recording paper.
- Check 5
- If dialing is delayed after lifting the receiver, dial first and then lift it.
Recipient receives a blank fax1 check
- Check 1
- Load the original with the sending side facing down.
Fax image received by the other party is poor1 check
- Check 1
- Clean the original-feed roller and scanner glass using the cleaning instructions.
Cannot receive a fax4 checks
- Check 1
- If memory is full, delete or print stored received faxes and delete unneeded recordings.
- Check 2
- If memory is not full and direct-to-paper reception is selected, load paper and ask the sender to try again.
- Check 3
- When receiving through automatic answering, short greeting or recording-tone delays can prevent reception; increase those waiting-time settings.
- Check 4
- Photo originals can fill memory during reception. Select direct-to-paper reception and load paper in that case.
Base does not ring1 check
- Check 1
- Enable the base ringtone.
Handset does not ring2 checks
- Check 1
- Enable the handset ringtone.
- Check 2
- Wait for base copying or printing to finish; the handset cannot be used during those operations.
Neither base nor handset rings2 checks
- Check 1
- Cancel fax-priority or fax-only mode if enabled.
- Check 2
- Cancel the relevant rejection settings if enabled.
Recording paper does not feed correctly7 checks
- Check 1
- Use Sharp genuine ink ribbon.
- Check 2
- Use the recommended recording paper.
- Check 3
- Check that paper is loaded correctly and straight between the holders.
- Check 4
- Fan the paper, align its leading edges and place it gently. When opening the tray or adding paper, remove the entire stack and reload it.
- Check 5
- Load no more than 15 sheets at once.
- Check 6
- Close the rear cover firmly before loading paper.
- Check 7
- If feeding remains incorrect, clean the recording-paper feed roller.
Cannot copy4 checks
- Check 1
- Adjust the original guides to match the original width.
- Check 2
- Load the original in the correct position.
- Check 3
- Remove paper fragments or other obstructions in the original slot.
- Check 4
- Check original-feed roller installation.
Printed image is dirty or has white/black lines6 checks
- Check 1
- Use Sharp genuine ink ribbon.
- Check 2
- Use the recommended recording paper.
- Check 3
- Check and clean the recording head and paper-feed roller.
- Check 4
- Calls arriving during fax reception while using Call Waiting can disturb the image.
- Check 5
- Check and clean the recording head and scanner glass; for copies, also check the original for dirt.
- Check 6
- Low temperatures or printing immediately after powering on can produce faint or patchy output.
Nothing is printed on recording paper2 checks
- Check 1
- For a received fax, ask the sender to check which side of their original faces the scanner.
- Check 2
- For copying, check that your original is facing down.
Cannot enable answering-machine mode1 check
- Check 1
- If memory is full, delete or print received faxes and delete recordings you no longer need.
Cannot record a message or receive a fax through answering2 checks
- Check 1
- Reduce the answering-machine ring count.
- Check 2
- Very quiet speech or a very short message may stop recording partway or not be recorded.
Recorded greeting does not play3 checks
- Check 1
- Record the greeting correctly.
- Check 2
- When memory is exhausted the machine automatically switches to its built-in greeting.
- Check 3
- Enable the call-monitoring setting お声拝聴.
Answer button keeps flashing after answering mode is cancelled1 check
- Check 1
- Play all unplayed recordings; the lamp then goes out.
Caller number is not displayed5 checks
- Check 1
- Caller-ID service requires a subscription and completed provider installation; consult NTT if not completed.
- Check 2
- Caller ID cannot be displayed through a PBX or home-telephone system.
- Check 3
- Enable the Caller-ID setting.
- Check 4
- For optical/IP service, consult your provider.
- Check 5
- For ISDN, use a Caller-ID-compatible terminal adapter and enable its Caller-ID setting.
Caller name is missing or distinctive ringing does not change2 checks
- Check 1
- Register the full telephone number including area code.
- Check 2
- Spoken caller announcement and distinctive ringing cannot be used together; disable spoken caller announcement to use distinctive ringing.
Your telephone number is not displayed to the recipient2 checks
- Check 1
- If your subscription withholds numbers by default, prefix the call with 186.
- Check 2
- The recipient needs Caller-ID service; if they subscribe and your number is still missing, consult the service provider.
Caller ID or dial-in services do not work on an optical line1 check
- Check 1
- Check your contract details and ask the optical service provider.
Noise, feedback or Caller-ID problems with an ISDN terminal adapter2 checks
- Check 1
- For a high-pitched tone when lifting the receiver, booming/excessive volume, faint speech or noise, adjust the terminal adapter transmit and receive volumes.
- Consult its manufacturer if this does not improve matters.
- Check 2
- Caller ID requires terminal-adapter configuration; follow that adapter manual.
Machine does not respond correctly despite correct operation3 checks
- Check 1
- Correctly connect the telephone cord and power plug.
- Check 2
- Try restarting, cycling power or a forced reset as described in the repair-check procedure.
- Check 3
- If it still does not improve, contact Sharp support.
Registered date/time changes automatically1 check
- Check 1
- Changing the base clock overwrites the handset clock automatically. Disable clock backup if you do not want the base time transferred.
Spoken caller/phonebook announcements are hard to understand3 checks
- Check 1
- Adjust base ringtone or speaker volume.
- Check 2
- Change the spoken name accent.
- Check 3
- Synthesized speech can be harder to understand than a human voice.
Call unexpectedly switches to fax reception1 check
- Check 1
- Speech may rarely activate automatic fax detection. If it happens repeatedly, disable おまかせ受信.
Ink ribbon has run out1 check
- Check 1
- Use only Sharp gear-equipped UX-NR8G (33 m, one roll) or UX-NR8GW (33 m, two rolls). Gearless ribbon cannot be used.
Product demonstration appears or demonstration sounds play1 check
- Check 1
- The showroom demonstration mode has started. Set demonstration startup to disabled.
Base display is blank1 check
- Check 1
- After about three minutes without operation, power saving turns off the display. Press any button to restore it.
CS digital television has noise or interference2 checks
- Check 1
- Move the fax away from CS reception equipment.
- Check 2
- Use well-shielded CS/BS-compatible splitters, distributors, mixers and connection cables.
Fax, line-occupied, Caller-ID or audio trouble on IP/ADSL service2 checks
- Check 1
- For inability to send/receive faxes, an outside-line-in-use message while idle, Caller-ID failure, faint/noisy speech or high-pitched receiver noise, temporarily remove the ADSL equipment including the splitter and check whether operation improves.
- Also shorten the wiring between the line and splitter.
- Check 2
- If it improves, consult the ADSL provider. If it does not, consult Sharp support.
Operation and stored data during a power interruption5 checks
- Check 1
- Neither the base nor handset can call or answer; services are unavailable and active calls disconnect. Caller-ID incoming records remain.
- Check 2
- An active answering call disconnects and is not recorded; existing recordings remain.
- Check 3
- Faxes cannot be sent or received.
- After power returns, eject and resend an interrupted outgoing original, ask the sender to resend an interrupted incoming fax, and clear any jam before retrying.
- Stored received-fax data remains.
- Check 4
- Copying is unavailable; retry after power returns.
- Check 5
- Registered phonebook contents remain, but the base date/time clears.
- Enabled clock backup can restore it from an in-range handset with registered time; otherwise reset the clock manually.
Guides
安全について
Instructions from the manualJapan-only power and safe handling19 steps
- Use this Japan-only unit on domestic AC 100 V; do not use it overseas.
- Fully insert the plug; avoid overloaded sockets, damaged plugs and loose sockets.
- Do not modify, strain, twist, bundle, heat or load the cord, or pull it to unplug.
- Do not handle plugs with wet hands.
- Before lightning reaches the area, unplug the mains lead and disconnect the telephone cord from the base.
- Keep liquids, small metal items and pets’ urine away.
- Never dismantle, repair or modify the unit yourself; consult the retailer.
- If liquid or a foreign object enters, or unusual noise, smoke or smell occurs, unplug the mains lead, remove the battery and contact the retailer.
- Contact the retailer after a drop or cabinet damage.
- Do not use in prohibited locations such as hospitals.
- Keep the unit dry and away from bathrooms or rain.
- Do not remove or damage the battery covering.
- Rinse battery liquid off skin or clothing immediately.
- Keep batteries away from young children.
- Do not touch the recording head directly.
- Avoid prolonged contact with hot areas, pinch hazards when closing covers, and metal objects on the charger.
- Keep magnetic cards away from the charger.
- Ventilate it; do not cover it with cloth or bedding.
- Unplug and let hot parts cool before inspection or cleaning.
Rechargeable battery safety5 steps
- Use only the specified rechargeable battery and dedicated charger, and only in the handset.
- Do not reverse polarity, short the terminals with metal, heat, solder, dismantle, or place the battery in fire or water.
- Do not carry or store it together with metal jewellery or pins.
- Do not pinch the battery lead under its cover.
- If battery liquid enters an eye, do not rub it: immediately rinse with clean water and obtain medical treatment.
ご使用の前に
Instructions from the manualInstall the base and handset without interference14 steps
- Use a stable, ventilated location away from heat, direct sunlight, flames, oily smoke and steam; avoid carpets, unstable or vibrating surfaces.
- Raise the base antenna straight upright and do not wrap cords around it.
- Obstacles such as metal doors, reinforced concrete, steel frames, mortar walls, metal-wire glass and insulation reduce range; different floors or buildings also reduce range.
- The approximately 100 m range applies without obstacles.
- Keep both base and handset about 3 m or more from other radio devices.
- Keep television/radio equipment at least 3 m away, or try a different mains socket for the base if reception suffers.
- For handset noise, use at least two antenna bars, keep other chargers/adapters and cables away, use a separate mains socket, and separate base and handset charger by at least 50 cm.
- Charge the handset adequately and do not cover its antenna during calls.
- Motion, passing vehicles, electrical noise and some hearing aids can cause interference.
- For CS television interference, move the unit away from the receiving equipment and use well-shielded CS/BS cables and distribution components.
- Stop use and contact Sharp support if harmful radio interference occurs.
- Use the base for confidential calls; deliberate radio interception remains possible.
- Return an unused handset to its charger.
- Near another 1.9 GHz cordless system, use the base temporarily if handset operation fails.
準備
Instructions from the manualConnect and initialize the base21 steps
- Allow at least 10 cm behind the unit, 20 cm on the receiver side, 3 cm on the antenna side, and the original length plus 5 cm in front.
- Optical, ADSL and IP services use the separate connection instructions.
- Connect both ends of the receiver cord until they click and place the receiver on the base.
- Raise the antenna straight upright.
- Connect the supplied telephone cord to the telephone-line socket and the base line connector until they click, before connecting mains power; otherwise automatic line detection may be incorrect.
- Direct wiring requires a qualified installer; a three-pin telephone outlet requires an adapter or qualified installation.
- PBX/home systems require installation advice.
- Then insert the mains plug into AC 100 V.
- At ヒヅケ・ジコク [ケッテイ]ヲ オス, press Menu/Confirm.
- Enter a four-digit year and two-digit month and day, then the time in 24-hour format; check and confirm.
- If the clock setup does not appear, use the date/time-setting procedure.
- Complete the mobile-discount dialing setup appropriate to your line; use no discount dialing on optical service or IP-only service.
- With IP and a conventional-line subscription, enter the IP-release number (up to six digits).
- The unit then returns to standby and checks the line type.
- A beep indicates completion.
- If no beep occurs, set the line type again and use the cannot-call checks.
- The manual instructs making a chargeable test call to 177 after setup.
- Do not connect another telephone/fax in parallel.
- Use the supplied telephone cord or specified extension; other replacements must be labelled six-position, two-conductor.
- After moving to a different line or acquiring the unit used, set its line type manually.
- Clock transfer overwrites the handset clock when clock backup is enabled.
Check the factory-installed ribbon and take up slack6 steps
- The factory-tested trial ribbon prints only about ten A4 sheets.
- Obtain genuine gear-equipped UX-NR8G (33 m, one roll) or UX-NR8GW (two 33 m rolls).
- Open the recording-paper tray backwards and the operation panel forwards using their tabs.
- Lift the green rear-cover release lever and open the rear cover backwards.
- Turn the green gear two or three times in the indicated direction to remove slack.
- Close the rear cover first, pressing its marked area until it clicks; then close the operation panel and recording-paper tray in that order.
Install and charge the handset battery13 steps
- Insert the battery connector into the handset as shown, with its red and black leads correctly oriented.
- Route the lead beneath its guide and avoid pinching it.
- Place the battery in the compartment.
- Fit the cover from above and slide it upwards with light pressure until it clicks.
- Connect the handset charger to AC 100 V, place the handset on it and charge continuously for at least ten hours before first use or after battery replacement.
- A blank display may appear after a few minutes of charging.
- Use the handset where its antenna indicator has at least two bars.
- Full charge supports up to about eight hours of continuous calling.
- Low-charge warning beeps precede disconnection by about one minute: end the call and charge, or transfer the call to the base.
- Avoid charging close to magnetic/electromagnetic sources; charging may fail.
- Inductive charging can produce AM-radio noise.
- Keep multiple handsets from being too close together; radio interference can prevent ringing.
- Taking a handset off or returning it to the charger briefly blanks its display, which returns normally.
電話がかけられないときは
Instructions from the manualSet the telephone line type4 steps
- For automatic detection, press base Menu/Confirm, 1, 4, 4 in order and allow detection.
- For manual selection, press Menu/Confirm, 1, 4; choose 1 for プッシュ(トーン), 2 for ダイヤル 20PPS, or 3 for ダイヤル 10PPS, then Stop.
- Confirm your subscribed line type for IP service, PBX, business or home-telephone systems, because automatic detection can fail.
- Some optical/IP service numbers remain unavailable; ask the provider.
特別設定
Instructions from the manualDisable demonstration modeView
To disable demonstration startup, press Menu/Confirm, # four times, 7, then 1 for シナイ, and Stop.
Use the special fax, answering, audio and telephone settings14 steps
- On the base press Menu/Confirm, # four times, then dial the printed menu sequence.
- Bold choices in the source tables are factory defaults.
- Answering options include greeting-delay and recording-tone delay of 1, 2, 4 or 8 seconds, call monitoring on/off, per-message recording time of 30 seconds, one minute or two minutes, and retrospective recording length of one, three or 12 minutes.
- Fax options select memory or direct-to-paper reception; fax-priority ringing of 4–25, fax-only, or neither; home response rings of 1–25 or unlimited; automatic fax-tone detection on/off; approximately 93% reduction on/off; and dial-tone detection on/off for automatic sending via stored numbers.
- Disable dial-tone detection or lift the receiver to send if automatic sending fails.
- Memory reception preserves data when paper/ribbon runs out; direct-to-paper reception cannot receive without both and may print on two sheets.
- Disabling reduction can split A4 output or produce a blank sheet.
- Automatic fax-tone detection works after answering an incoming automatic-fax call.
- Audio settings supply low/standard/high base transmit, handset transmit and handset receive levels; low/standard/high receive sound quality for base and all handsets; and base key sounds on/off.
- Low quality emphasizes bass and high emphasizes treble; handset quality can also be altered during a call.
- Telephone settings enable/disable Caller ID and Call Waiting Display and set Call Waiting release duration to 0.4, 0.6 or 0.8 seconds.
- Other settings control location announcements/region prefixes, missed-call notification, clock backup/manual transfers, non-phonebook initialization and demonstration startup (disabled, linked to line detection, or always).
- Clock transfer requires registered time and an in-range handset.
- Sending to several handsets proceeds from handset 1; receiving tries handset 1, then 2 if unavailable, and finishes without transfer if none can transfer.
自分の番号・名前の登録
Instructions from the manualRegister the fax sender number/name and handset name8 steps
- On the base, register the sending number with Menu/Confirm, 1, 2, 1; enter up to 20 digits, confirm and Stop.
- To change it, first delete it with Menu/Confirm, 1, 2, 2, 1, then Stop and register anew.
- Correct digits with the erase key.
- Register the sender name with Menu/Confirm, 1, 3, 1; enter up to 24 characters, confirm and Stop.
- Delete it with Menu/Confirm, 1, 3, 2, 1 before changing it.
- These sender details print on outgoing faxes.
- On the handset, open Menu/Confirm, システムセッテイ, シヨウシャヒョウジ.
- Enter up to nine characters and confirm; repeat to change it, or erase the name and confirm to cancel.
いろいろな接続
Instructions from the manualConnect optical, ADSL, ISDN or PBX service14 steps
- For optical service, connect the unit telephone cord to the compatible equipment TEL port.
- For IP service over ADSL, use the telephone port on the provider’s compatible modem/router or adapter and consult the provider’s connection documentation.
- For ordinary ADSL, connect to the splitter attached to the modem.
- For ISDN, connect to the terminal adapter analog port; do not connect the incoming telephone-line cord directly to the fax.
- For PBX, business or home-telephone systems, ask that system manufacturer about required installation/adapters.
- Caller ID may not work: disable it if unavailable.
- Fax switching after answering on another telephone may also fail.
- Do not connect telephone/fax equipment in parallel.
- Port names vary and the splitter may be integrated.
- If calls fail, check line type.
- Disable mobile discount dialing on optical service.
- For fax, caller-ID or audio trouble, check optical-service contract details.
- With ADSL, temporarily remove ADSL equipment including the splitter and check improvement; also shorten the wiring before the splitter; if that helps, consult the ADSL provider.
- If trouble continues, consult Sharp support.
電話をかける
Instructions from the manualMake, receive and hold calls16 steps
- For a base call, lift the receiver, confirm dial tone and dial; dialing before lifting is also supported.
- On the handset, lift it from its charger, dial and press Talk.
- End a base call by replacing the receiver; end a handset call with End or return it to its charger.
- To answer, lift the base receiver or lift the handset from its charger and press Talk.
- Handset End silences its ringing if you cannot answer.
- Press Hold during a call: both parties hear music and cannot hear each other.
- On the base, replace the receiver and lift it again to resume.
- On the handset, press Hold or Talk to resume.
- During a connected pulse-line call, press * before dialing additional buttons to send tone signals.
- For PBX outside calls, dial the outside-line prefix, then the base Redial or handset right-direction key to insert about three seconds before the remaining number; the displayed hyphen pause can be saved in the phonebook.
- On the handset, dial and press Speakerphone; speak towards the microphone from about 50 cm.
- Press End to finish.
- To answer in speakerphone mode, lift the handset, press Speakerphone, speak and End.
- For listening without speaking, use base On-hook and dial, or hold the handset Speakerphone key for at least three seconds until the listening symbol appears and dial.
- Lift the base receiver or press handset Speakerphone to change to a normal call.
- Automatic level adjustment can take about two to three minutes and temporarily affect noise/volume.
再ダイヤル(親機)
Instructions from the manualRedial and delete redial records10 steps
- The base retains the last 20 outgoing numbers and the handset the last ten, separately.
- Only up to 32 digits can be redialed.
- On the base press Redial; on the handset lift it from the charger and press the redial direction.
- Select the number and lift the receiver or press handset Talk.
- End the call normally.
- Base Redial after lifting the receiver calls the most recent number.
- To delete one base number, press Redial, select it, press Erase twice and Stop.
- Delete all base redials with Erase, 2, 1.
- On the handset select a redial, confirm, select ショウキョ and confirm twice.
- To delete all, open Menu/Confirm, ゼンショウキョ, サイダイヤル and confirm twice.
聞いてから応答
Instructions from the manualScreen a caller before answering14 steps
- Use the base only for screening.
- Leave the receiver down and press Nuisance-call.
- Choose 1 to request the caller’s name, 2 to reject, or 3 to record and answer (lift the base receiver or press handset Talk).
- After requesting the name, listen to the speaker and lift the receiver to answer.
- Alternatively press 1 to request the name again, 2 to reject, or 3 to record and answer.
- Stop ends the call; without action it ends after about 30 seconds.
- You may answer with the receiver or handset Talk while menus/messages are playing.
- Rejection plays its message three times then hangs up.
- With Caller ID a notified number is saved as rejected, or withheld/payphone/out-of-area blocking lasts about two hours.
- Remove any mistakenly saved number/category block.
- During recording, base Stop then Confirm or handset Menu/Confirm stops it.
- Hold, intercom or three-party calls interrupt recording, which resumes on returning to the outside call; nuisance-call rejection stops it.
- Recordings consume shared fax memory.
- Screening is unavailable during Call Waiting and displaying its screen overrides the automatic answering/fax ring count for that call.
迷惑電話お断り
Instructions from the manualRespond to nuisance calls14 steps
- During a call, use base Nuisance-call or handset Menu/Confirm.
- Choose Chime (base 3; handset チャイムデオコトワリ), Rejection message (base 4; メッセージオコトワリ), or Recording rejection (base 5; ロクオンデオコトワリ).
- Chime supplies an excuse to end the call.
- Message rejection plays three times and hangs up.
- Recording rejection plays the preceding 15 seconds and hangs up without retaining it; during screening-recording it plays from the beginning instead.
- With Caller ID, rejection adds a notified number after disconnection unless all 30 rejection slots are occupied.
- Withheld/payphone/out-of-area rejection applies for about two hours.
- For mistaken chime rejection, base Stop within ten seconds cancels the blocking; the handset cannot cancel chime rejection.
- For message/recording rejection, replace and relift the base receiver or press handset Talk.
- Remove any mistakenly saved rejection number/category.
- Automatic blocking after chime is initially enabled; change it on the base with Menu/Confirm, 5, 5, choosing 2 to enable or 1 to disable, then Stop.
- Rejection is unavailable during Call Waiting Display calls.
- Message and recording rejection cannot be used for calls you initiated.
- Returning the handset to its charger while recording-rejection playback is running interrupts playback; wait until it ends if the complete playback is wanted.
内線通話
Instructions from the manualUse internal calling and transfer an outside call15 steps
- Lift the base receiver or handset, then press Hold/Internal.
- Dial 1–4 for a handset, 0 for the base, or * on the base to call all handsets.
- The receiving party answers normally.
- Calling stops after about 30 seconds.
- Handset-to-handset calls still pass through the base, so both must remain in its range.
- To transfer an outside call, press Hold/Internal while connected, choose the destination as above, let that party answer, explain the call and replace the base receiver or press handset End.
- To return to the outside caller instead, press Hold/Internal twice.
- For a three-party call after the internal party answers, press base Menu/Confirm or handset Menu/Confirm.
- End normally.
- For a one-person transfer from base to handset, press Hold/Internal, replace the receiver, lift the handset and press Talk.
- From handset to base/another handset, press Hold/Internal, then End or return it to the charger; when ringing begins, answer on the destination.
- For an outside call arriving during intercom, the base rings and handsets beep.
- Replace then lift the base receiver, or press handset End, wait for its ringtone and press Talk.
- Handset End can silence an unanswered intercom call.
- Base Stop or handset End silences an unanswered intercom call; the calling side hears four short beeps and finishes.
ワンタッチダイヤル
Instructions from the manualRegister, use and edit one-touch dialing23 steps
- One-touch entries are separate from the phonebook: three base numbers and three handset entries.
- Press an unused one-touch button.
- On the base enter up to 24 digits and confirm; names cannot be entered there.
- On the handset enter an optional name of up to 12 characters, confirm, then up to 24 digits and confirm.
- An assigned handset button places a call; an assigned base button in registration opens its menu.
- To inspect/edit a base entry, press Menu/Confirm then its one-touch button.
- Choose 4 to inspect or 2 to edit; erase back to the required digits, enter the correction and confirm.
- Finish with Stop.
- To delete an entry choose 3 then 1 after selecting it.
- On the handset use Menu/Confirm, デンワチョウ, ワンタッチ トウロク, then ワンタッチ1 through ワンタッチ3.
- Choose トウロク カクニン to inspect, ヘンコウ to edit name then number, or ショウキョ and confirm twice to delete.
- To delete all handset entries use ゼンショウキョ, ワンタッチ and confirm twice.
- To call on the base, press the registered one-touch key then lift the receiver; leaving it down switches to on-hook dialing.
- The base announces the recorded name or the one-touch number.
- On the handset lift it and press its one-touch button; only the number is displayed.
- End normally.
- To record a base one-touch name, first register the number, press Menu/Confirm then its one-touch key and 1.
- For an existing recording press 1 again to re-record.
- Lift the receiver, record for five seconds after the beep (Stop ends early), and replace it after the final beep.
- Delete the recording with Menu/Confirm, its one-touch key, 1, 2.
- Disabling spoken phonebook names also disables these announcements.
- With spoken Caller ID enabled the recorded one-touch name plays on incoming calls, but a matching base phonebook name takes precedence.
- Delete all base one-touch numbers with Erase, 7, 1.
電話帳
Instructions from the manualRegister, edit, delete and transfer phonebook entries18 steps
- Each base/handset phonebook holds 100 entries with one number each.
- The base cannot register directly: enter an entry on the handset and transfer it to the base.
- Its two factory entries occupy capacity; remove them to store 100 other entries.
- On the handset use Menu/Confirm, デンワチョウ, デンワチョウトウロク.
- Enter an optional name up to 12 characters and confirm, then a number up to 24 digits and confirm.
- Include the area code for Caller ID.
- To edit a handset entry, open Phonebook, select it, confirm, choose ヘンコウ and confirm; edit name and number in order, confirming unchanged fields too.
- To copy a redial or incoming number, select the record, confirm, choose トウロク, then set name and number.
- To change a base entry, delete it on the base, correct it on the handset and transfer it again.
- Delete one base entry by Phonebook, select entry, Erase twice and Stop.
- Delete one handset entry by Phonebook, select, confirm, ショウキョ and confirm twice; delete all via Menu/Confirm, ゼンショウキョ, デンワチョウ and confirm twice.
- To transfer one handset entry, select it in Phonebook, confirm, テンソウ, choose the destination and confirm.
- To transfer all, use Menu/Confirm, デンワチョウ, ゼンケン テンソウ, choose destination and confirm.
- To transfer from base, use Menu/Confirm, 3, 3; choose 1 for all or 2 to select one and confirm, then destination handset number 1–4.
- Transfer copies rather than moves entries.
- Identical name/number pairs are skipped; factory entries beginning ≫ cannot be transferred.
- An incoming call interrupts transfer.
- Do not subject the handset to impact during transfer.
文字入力(子機)
Instructions from the manualEnter names with the dial buttons10 steps
- Change input mode with base Hold/Internal or handset Kana/Catch: Kana, ABC and 123 cycle in that order.
- Press the dial buttons repeatedly according to their source character table.
- Use directional keys to move the cursor.
- Base Erase/Character or handset Internal/Erase removes the preceding character, as indicated by the cursor.
- Hold the handset erase key for at least two seconds to clear the whole entry.
- For consecutive characters on the same dial key, move the cursor right before entering the next character.
- Move right to insert a space; the base Playback key also inserts one.
- Confirm with Menu/Confirm when finished.
- Base character entry is used for its fax sender and recipient-announcement names.
- The base ABC table supplies uppercase letters, while the handset ABC table also supplies lowercase letters; use the manual’s complete table for punctuation and Kana small letters.
おしゃべり電話帳
Instructions from the manualEnable and adjust spoken phonebook names10 steps
- On the base press Menu/Confirm, 3, 1, then 1 to enable or 2 to disable, and Stop.
- Disabling also suppresses prerecorded and custom one-touch names.
- For the さん suffix, open Phonebook, select the entry, press Playback twice to toggle, and Stop.
- The two factory time/weather entries cannot take that suffix.
- For name accents, select a phonebook entry and press Playback.
- Use * for the family-name accent or # for the given-name accent; the space separates them.
- Within three minutes press 1–8 to accent that character from the left, 9 for automatic accent or 0 for a flat accent.
- Stop when finished.
- Some names containing letters, digits or symbols may only be partly spoken. * # . @ & have spoken names; hyphen, spaces, comma, colon, slash, exclamation/question marks, parentheses and square brackets are silent.
- Announcements do not operate after lifting the receiver or using on-hook dialing.
電話帳で電話をかける(親機)
Instructions from the manualCall using the phonebook and chain long numbers10 steps
- Open Phonebook on the base, or lift the handset and open Phonebook.
- Select the destination, optionally searching with dial keys 1–9 for Kana rows or 0 for ワ.
- Lift the base receiver or press handset Talk, then end normally.
- For a number of 25 digits or more, register it in pieces.
- Lift the receiver/handset, open Phonebook, select and dial the first part, then reopen Phonebook before the call is sent and select/dial the next part.
- End normally.
- A chain of 33 digits or more cannot be reproduced completely by redial.
- On the handset, to prefix 184, 186 or another special number, select a phonebook entry, confirm, choose トクバンダイヤル, enter a prefix up to eight digits and press Talk.
- End normally.
- Handset calls are unavailable while the base is copying, printing or saving recordings.
留守番電話を使う
Instructions from the manualEnable or cancel answering-machine mode15 steps
- Press the base Answer button to enable: it lights red and the greeting plays.
- Less than about five minutes remaining recording time is announced; no remaining capacity prevents enabling.
- Delete recordings or print/delete received faxes to free shared memory.
- Press Answer again to cancel.
- New recordings play automatically; replay controls and deletion are described in the playback procedure.
- On the handset, use Menu/Confirm, ルスバンデンワ, ルス セッテイ, then セッテイ スル or セッテイ シナイ and confirm.
- Cancelling from the handset does not automatically play recordings.
- The unit answers after the configured rings, plays the greeting, waits for the configured greeting/tone delays, then records or receives a fax.
- Short delays can impair fax reception.
- Incoming callers incur call charges when answered.
- Automatic fax tones switch reception if reception is possible; answering during the greeting/recording connects your call.
- All recordings share about 12 minutes or 30 messages.
- The initial per-message answering limit is 30 seconds, adjustable separately.
- A blinking Answer lamp indicates new recordings; after cancellation, rapid blinking persists until all have been played for at least about three seconds.
- Stored fax messages clear after all received data is printed/deleted.
録音を再生/消去する
Instructions from the manualPlay and delete recordings, and check remaining memory18 steps
- Press base Playback.
- In answering mode this plays recordings since that mode was set; outside it, unplayed recordings play, or all from the first if none are unplayed.
- After about three seconds a recording counts as played.
- Stop with base Stop. * replays the current recording, or goes to the previous recording if pressed within about three seconds. # skips forward.
- After three seconds, * twice goes back one recording; repeat to go further back.
- Playback cycles fast, slow and normal speed.
- Erase twice deletes the current recording; after playback choose Playback to listen again, Erase twice to delete what was played, or Stop to finish.
- Delete all base recordings with Erase, 1, 1.
- Check memory with Menu/Confirm, 7, then Stop.
- On the handset use Menu/Confirm, ルスバンデンワ, サイセイ and confirm.
- Stop with End; during a call use Talk to stop playback.
- Use 1 to replay, 3 to advance, 1 twice after three seconds to go back, and 6 to toggle fast/normal speed.
- Use Internal/Erase, then 1 to delete the playing recording.
- Delete all via ルスバンデンワ, ロクオン ショウキョ, ショウキョ スル and confirm.
- During a call the base Playback key plays recordings and Stop stops; you can speak while ordinary recordings play, but cannot during retrospective recording playback.
- On the handset use ロクオン サイセイ; speaking is unavailable during playback.
- Older unplayed messages may play first.
- Delete unneeded recordings because they can prevent further recording/fax reception.
留守番電話の設定
Instructions from the manualChoose or record an answering greeting16 steps
- On the base use Menu/Confirm, 4, 3.
- Choose 1 for built-in greeting 1, 2 for built-in greeting 2, or 3, 1 for your recorded greeting.
- If none is recorded, that choice begins recording.
- Select a greeting with up/down then Playback to inspect it.
- To record, use Menu/Confirm, 4, 3, 3, 1.
- Lift the receiver within 20 seconds, and press Confirm within 20 seconds to start.
- Record no more than 20 seconds; a longer greeting can impede fax reception.
- Press Stop to finish, listen to playback and replace the receiver.
- Your recording becomes the selected greeting.
- To change a custom greeting, delete it first with Menu/Confirm, 4, 3, 3, 2, 1 and Stop, then record again.
- Deletion restores the previously selected built-in greeting.
- When recording or fax reception becomes unavailable, the greeting changes to indicate what remains possible.
- If neither is possible the unit does not answer and keeps ringing.
- For answering ring count use Menu/Confirm, 4, 2, choose 1–25 and confirm, then Stop.
- Initially it is four; seven or more can prevent automatic fax reception, so reduce to six or fewer if needed.
- Ring patterns may not match the chosen count exactly.
ファクスを送る
Instructions from the manualLoad originals and send after speaking to the recipient14 steps
- Open the recording-paper tray and extend its extension.
- Adjust the original guides to the original width.
- Place originals sending side down between the guides, no more than five at once.
- Add further originals one at a time from above without exceeding five.
- Select image quality if required; fine/photo settings take longer to send.
- Lift the receiver and dial, or dial before lifting.
- Redial, one-touch, phonebook and caller records can also select the destination; caller records need Caller ID.
- If the recipient answers, tell them you want to fax and have them select reception.
- When a fax receive tone is heard, press Fax and replace the receiver.
- If a greeting requests a fax, press Fax; when reception is already active, automatic sending may start.
- Ordinary ringing means you cannot yet send; a busy tone means the recipient is engaged.
- A completion on your unit does not guarantee delivery if the recipient has no paper/ribbon/memory, has fax reception disabled or is using a telephone without fax functions.
- Check with the recipient.
- Stop before sending by replacing the receiver; during sending press Stop, leaving the original to be ejected/cleared.
Send from the handset or without speaking14 steps
- Load the original on the base.
- From the handset select/dial the recipient and press Talk.
- When the recipient answers, have them receive the fax; at the fax tone open Menu/Confirm, ファクス ソウシン, confirm and return the handset to its charger.
- A fax greeting or receive tone without spoken answer uses the same final actions.
- Base Stop cancels transmission.
- For sending without speaking, load the original, press On-hook, wait for dial tone, enter the number and press Fax after connection.
- Alternatively choose a redial, one-touch, phonebook or caller record and press Fax or Confirm; one-touch dialing starts on pressing the registered key.
- Automatic sending cannot work unless the recipient answers with fax reception enabled or operates reception.
- If オウトウ ナシ appears, speak to the recipient and use manual sending.
- The automatic fax tone can trigger sending on either base or handset; if it does not, use Fax on the base or the handset send menu.
- To eject loaded originals, first remove all but the bottom original, then press Menu/Confirm, 0.
- If it is not ejected, use the original-jam procedure.
- Before transmission On-hook cancels; during transmission Stop cancels and leaves the original to clear.
- There is no automatic redial-and-resend function.
使用できる原稿
Instructions from the manualChoose fax/copy quality and acceptable originals13 steps
- With originals loaded, press the upper quality/volume key to cycle 普通字, 小さな字, 精細, 写真 and their four darker variants in the printed eight-setting order.
- Use a darker variant for faint originals, then perform fax/copy operation.
- Small type scans at twice normal density; fine scans at four times.
- Fine falls back to small type if unsupported by the receiver.
- Photo suits shaded/color/photo originals.
- If no quality is chosen, fax sending uses normal type and copying uses small type.
- Quality cannot be changed after lifting the receiver or pressing On-hook.
- Original limits are width 148–210 mm, length 128–500 mm and thickness 0.06–0.18 mm.
- Only one original at a time is allowed if longer than 297 mm, thicker than 0.12 mm, or sizes/thicknesses differ.
- Maximum scanned width is 205 mm; top and bottom unscanned margins are each 2–6 mm.
- Make a photocopy first of originals that are too small/thin, transparent or film, wrinkled/torn/folded/curled, carbon-backed/thermal/coated, taped/glued together, or have clips/staples.
- Avoid adhesive, correction-fluid or ballpoint originals if possible; if used, let them dry completely.
- Carrier sheets cannot be used.
ファクスを受ける
Instructions from the manualReceive a fax after answering the call10 steps
- Remove any original from the base before receiving; with an original loaded, Fax would send it instead.
- Lift the receiver when it rings.
- After hearing the sending fax tone or the other party starting transmission, press Fax.
- Automatic fax detection may do this itself; if it does not, press Fax after the tone.
- Automatic detection does not work on a call you initiated.
- When reception starts, replace the receiver; the call ends automatically after reception.
- On the handset, lift it, press Talk, then at the tone open Menu/Confirm, ファクス ジュシン and confirm.
- Return the handset to its charger.
- The initial unanswered-call setting rings indefinitely and cannot receive a fax while you are away.
- Use answering mode or a reviewed automatic-reception setting.
Configure automatic fax reception20 steps
- For automatic detection, press Menu/Confirm, 6, confirm the screen and press Confirm, 2.
- Select 6–25 total rings, confirm and Stop.
- To cancel use Menu/Confirm, 6, Confirm, 1 and Stop. ファクス ジドウ appears outside answering mode.
- Detection first rings three times, pauses about five seconds while distinguishing fax/phone, then receives a fax or resumes ringing until the configured total and a fixed greeting.
- Ring counts depend on ringtone; spoken caller announcement occurs only during the resumed ringing.
- The other party also experiences the five-second silence.
- Automatic detection does not operate while answering mode is set.
- A sender that emits no automatic fax tone or never presses Start cannot be received automatically.
- If ribbon or memory is unavailable, ringing continues; after the call replace ribbon and/or delete recordings and print/delete received faxes.
- For a fixed home ring count, use Menu/Confirm, # four times, 2, 3, 1, choose 1–25, confirm and Stop.
- The fixed greeting then requests fax transmission and asks telephone callers to call again; you may answer while ringing.
- Seven or more rings can impair automatic reception.
- For fax priority, use Menu/Confirm, # four times, 2, 2, 1, select 4–25 rings for phone calls, confirm and Stop.
- The initial detection rings are silent; phone callers wait while detection happens.
- The base then uses its telephone-bell ringtone and spoken caller/recipient/location announcements do not operate.
- For fax-only mode use Menu/Confirm, # four times, 2, 2, 2, then Stop.
- All calls go to fax without ringing and ordinary calls cannot be received, except when fax reception is unavailable, when it rings and you can answer.
- Fax-priority/fax-only do not operate during answering mode; their corresponding display labels appear otherwise.
- These automatic answers incur caller charges.
- To cancel priority/only select セッテイシナイ in the special reception-mode setting; unlimited home ringing is the separate ムセイゲン choice.
ファクス受信時の印刷のしかた
Instructions from the manualChoose fax storage and delete received data12 steps
- Default memory reception stores received faxes first.
- With paper loaded they print automatically and are deleted from memory; without paper, or if paper/ribbon runs out during printing, the data remains stored.
- Full memory prevents reception.
- Direct-to-paper reception prints without storing in memory and works regardless of free memory, but requires paper and ribbon throughout.
- Select the required method in the special fax reception-method setting.
- About 37 A4 standard 700-character originals can be stored in normal quality; content changes this, with maxima about 60 sheets or 30 receptions.
- Recordings share the same memory and reduce fax capacity.
- Print or delete memory-received faxes.
- To delete all received faxes on the base, press Erase, 4, 1.
- Check memory via Menu/Confirm, 7.
- Print reduction is about 93% to accommodate receipt date and the sender number.
- To suppress reduction, disable 縮小受信 in special fax settings; this can split even A4 faxes across two sheets or eject a blank sheet.
記録紙のセット
Instructions from the manualLoad A4 recording paper9 steps
- Use recommended A4 PP110MA4 plain paper, no more than 15 sheets.
- Do not use wrinkled, folded, curled, torn or previously printed paper.
- Nonrecommended paper can produce poor density.
- Open the recording-paper tray and extend the extension.
- Fan the stack and align the leading edges.
- Place it gently at the rearmost position between the paper holders; do not push it hard into the slot.
- Avoid contact with a wall that leans the paper forward.
- To add paper, remove the entire stack and reload it; never add during printing.
- When not using fax/copy, remove paper and close the tray securely.
印刷
Instructions from the manualPrint stored received faxes and registration lists6 steps
- Load recording paper.
- For stored received faxes press Fax, 1.
- The printed faxes are deleted automatically from memory.
- If ribbon runs out, data remains: remove the stopped paper, replace ribbon and resume from the start of the interrupted page.
- Stop cancels printing.
- For base lists use Menu/Confirm, 9, choose 1 for incoming calls, 2 for phonebook or 3 for rejection numbers, then 1 to print.
音の設定
Instructions from the manualAdjust call volume, audio quality and boost6 steps
- During a call use base up/down or handset up/down to adjust receive volume over five levels; initial level is three.
- While speaker audio is playing use the same keys to adjust speaker volume over five levels, initially three.
- During handset calls press Talk to cycle high and normal; normal beeps twice.
- For IP/ADSL/ISDN audio that is excessively loud, try setting base transmit, handset transmit and handset receive special settings to low.
- Press the volume-boost button at standby or during a call, and again to cancel.
- It raises only the base receiver volume by about two or three steps; it does not change the handset, ringtone or speaker volume.
Set ringing volume and ringtone10 steps
- On the base with receiver down, use up/down for five ringing levels, initially three.
- Hold the down key about five seconds until a beep to silence ringing; up enables it again.
- It cannot be changed while originals are loaded.
- On the handset choose Menu/Confirm, チャクシン オンリョウ, select one of five levels or キリ, and confirm.
- Internal calls still ring even when ordinary ringing is off.
- Base ringtone: Menu/Confirm, 2, 2, select one of the nine listed tones and confirm, then Stop.
- With spoken caller announcement enabled a confirmation appears; press 1 to cancel it and change ringtone.
- Initial tone is デンワ ベルオン.
- Handset ringtone: Menu/Confirm, チャクシンオンセンタク, select and confirm.
- Its choices are three ringing patterns, five short melodies, ジムノペティ and ジュピター; initial is プルルル プルルル.
日時の設定
Instructions from the manualSet date/time and clock backup9 steps
- On the base press Menu/Confirm, 1, 1.
- Enter four-digit year, two-digit month/day and 24-hour time.
- Use the correction direction key if needed, inspect and confirm, then Stop.
- On the handset choose Menu/Confirm, システムセッテイ, ヒヅケ・ジコク.
- Enter the same date/time format, use left/right to correct a digit if needed, and confirm.
- Clock error is about ±60 seconds per month at 25°C; the display is a guide, so reset when necessary.
- With clock backup enabled, base setup automatically overwrites handset time.
- A power interruption can clear base time and restore it from an in-range handset; otherwise set it manually.
- The special clock menu permits manual base-to-handset transfer or reception from a handset with registered time.
携帯とくとくダイヤル
Instructions from the manualSet or disable mobile discount dialing14 steps
- This feature automatically prefixes a carrier ID such as 0033 to mobile numbers.
- Confirm current rates, service numbers and eligibility with the carrier; it does not always reduce charges and other services may be incompatible.
- It cannot be used on optical service or IP-only service without a conventional line: disable it in those cases.
- To set it on the base press Menu/Confirm, 1, 6, 1; select 1 for 0033 or 2 for another carrier and enter up to six digits, confirm and Stop.
- To disable press Menu/Confirm, 1, 6, 1, 3, then Stop.
- Prefix 0000 to one outgoing call to bypass it temporarily, including unavailable mobile-voicemail numbers.
- With IP service and a conventional-line subscription, set the IP-release number via Menu/Confirm, 1, 6, 2, 1; enter up to six digits, confirm and Stop.
- Do not set it when you do not use IP service.
- To add a qualifying mobile-number prefix, use Menu/Confirm, 1, 6, 3, Confirm, enter four digits, confirm and Stop.
- To delete, use the same menu, select the prefix, Erase, 1 and Stop.
- Inspect settings with Menu/Confirm, 1, 6, 4 then Stop.
- Charges come from the chosen carrier and the service is not governed by Myline.
- The qualifying-prefix registry holds up to 30 four-digit entries, initially the 18 prefixes 0801–0809 and 0901–0909.
- Do not ordinarily add or delete them.
通話録音
Instructions from the manualRecord an ongoing call or retrospectively save it14 steps
- For current-call recording on the base press Record during the call.
- Stop ends it; Playback replays, and Stop ends replay.
- On the handset choose イマカラ ロクオン in Menu/Confirm, then Menu/Confirm to stop; use ロクオン サイセイ to replay and Talk to stop replay.
- Full memory stops recording.
- A time stamp is recorded.
- For retrospective recording up to about 12 minutes earlier, press base Nuisance-call, 1, or choose handset モドッテ ロクオン.
- Replay with base Playback or handset ロクオン サイセイ, and stop replay normally.
- To alter retrospective length use base Menu/Confirm, # four times, 1, 5; choose 1 for one minute, 2 for three minutes or 3 for 12 minutes, then Stop.
- To play a recording to the caller and reject them, use recording rejection; that replays only the preceding 15 seconds and does not retain the call.
- Current-call recording and retrospective recording cannot be used together in one call.
- Internal calls cannot be recorded.
- Recording uses shared memory; a retrospective save can fill it in one operation.
- Current-call recording prevents putting the call on hold.
- All recordings together are limited to about 12 minutes or 30 entries; a long entry reduces how many fit.
メモ録音
Instructions from the manualRecord a memo7 steps
- Lift the base receiver and press Record to begin.
- Press Stop when finished, then replace the receiver.
- The Answer lamp flashes and a time stamp is recorded.
- An incoming call stops memo recording.
- Replace the receiver and lift it again to answer.
- Handset/intercom calls are unavailable during memo recording.
- Use the playback/deletion procedure to listen or free shared memory.
もっと便利に
Instructions from the manualAdjust display contrast, missed-call notification and handset convenience settings11 steps
- Base display contrast: Menu/Confirm, 1, 5, adjust with up/down and confirm, then Stop.
- There are seven levels, initially four.
- Handset contrast: Menu/Confirm, システムセッテイ, LCDコントラスト, select one of sixteen levels and confirm; initially it is level nine.
- For a missed-call notification press Menu/Confirm at チャクシン アリ [ケッテイ]ヲ オス and inspect the incoming record with up/down; Stop finishes, and Stop removes the notification.
- To suppress notification, use Menu/Confirm, # four times, 4, 4, 2, then Stop.
- The record symbols distinguish unanswered, fax-only and rejected calls.
- On the handset, システムセッテイ → キータッチ オン enables/disables button sounds (initially enabled). システムセッテイ → クイックツウワ enables/disables answering by lifting from the charger (initially disabled).
- Confirm the chosen option.
- In standby hold # until キーロック セッテイシマシタ appears, about three seconds, to enable; repeat until キーロック カイジョシマシタ appears to disable.
- While locked only answering an incoming call is available.
- It does not lock the base.
キャッチホン/キャッチホン・ディスプレイ
Instructions from the manualUse Call Waiting and Call Waiting Display11 steps
- These NTT services require a paid subscription.
- At a call-waiting tone press base Erase/Catch or handset Kana/Catch; press again to return to the first call.
- Do not use the receiver hook switch: it can disable Catch/Hold.
- For Call Waiting Display enable Caller ID first, then use base Menu/Confirm, # four times, 4, 2, 1, then 1 to enable or 2 to disable, then Stop.
- Initially it is disabled.
- If switching fails or disconnects, adjust the special switch duration to 0.4, 0.6 or 0.8 seconds; a shorter setting can help disconnections caused by exchange type.
- Fax reception can be interrupted or show lines if another call arrives.
- Call Waiting II with zero interruption tones can avoid this; ask NTT.
- On a base call-waiting fax, replacing the receiver ends the call and prevents returning to the first call.
- Handset call-waiting fax reception also loses the first call.
- Nuisance-call rejection does not work during Call Waiting Display calls.
子機増設
Instructions from the manualAdd or unregister compatible handsets11 steps
- Up to four handsets total, including the two supplied handsets, can be registered.
- This June 2012 manual lists JD-KS100 only.
- Place the fully charged handset beside the base; registration/unregistration disables all other operations including answering.
- For JD-KS100 remove its battery cover and battery, reinstall them, and confirm ゾウセツシマスカ? when shown.
- Complete the following base operation within two minutes: hold Hold/Internal about three seconds until コキヲ ゾウセツ シマス appears, then release.
- A beep means success; four short beeps means failure.
- To unregister every handset on the base, hold Hold/Internal about three seconds until that registration message appears.
- Within three seconds, hold 0 about five seconds until [[ナイセン]デ コキヲ ショウキョ] appears, then press Internal.
- A beep confirms deletion.
- For individual removal use the optional handset’s own registration instructions.
- If power fails or the plug is disconnected while removing registrations, repeat from the start.
ナンバー・ディスプレイを利用する
Instructions from the manualConfigure Caller ID and understand incoming displays11 steps
- Caller-ID service needs a subscription and completed provider installation.
- It is initially enabled on the unit.
- For another provider ask about equivalent service.
- To set it on the base, press Menu/Confirm, # four times, 4, 1; choose 1 for use or 2 for no use, then Stop.
- Enable it for Caller ID or Call Waiting Display.
- Disable it for PBX, business/home systems or other connected equipment when unavailable.
- ISDN requires a compatible configured terminal adapter.
- Unknown callers display their number; separately registered base/handset phonebooks show the saved name.
- Withheld, payphone and out-of-area calls show ヒツウチ, コウシュウデンワ and ヒョウジケンガイ.
- Unreceived caller data shows ガイセン チャクシン.
- Some other services cannot be combined; ask the provider.
着信を音声でお知らせ
Instructions from the manualConfigure spoken caller, recipient and location announcements20 steps
- These announcements require Caller ID and use the base phonebook.
- Caller announcement is initially enabled.
- Use base Menu/Confirm, 2, 3, 1, choose 1 to enable or 2 to disable and Stop.
- Distinctive ringing is incompatible; confirm cancellation if prompted.
- Disabling caller announcement also disables recipient/location announcements.
- Recipient announcement requires caller announcement enabled.
- Use Menu/Confirm, 3, 2, select a phonebook entry and confirm, choose the recipient name and confirm, then Stop.
- Select トクテイシナイ to cancel per entry; there is no single all-recipient mute.
- Up to nine recipient names can be kept, six preset and three initially empty.
- Use Menu/Confirm, 2, 3, 2, select slot and confirm, enter up to 20 characters, confirm and Stop.
- Editing a name changes every phonebook announcement using it.
- For accent editing select the name in that menu, press Playback and within three minutes adjust with 1–9/0 as in spoken phonebook, then Stop.
- For location announcement use Menu/Confirm, # four times, 4, 3, 1; choose 1 to enable or 2 to disable, then Stop.
- Caller announcement must remain enabled.
- Location naming can be altered for up to 30 area prefixes through the special region-prefix menu: add prefix, confirm, choose 00 for silence, 1–47 for prefecture, 48 for mobile or 49 for PHS, confirm and Stop.
- To edit, delete then register again.
- Phonebook names take precedence over location.
- One-touch-only callers use the recorded/preset one-touch name and cannot receive a recipient setting; a matching phonebook entry takes precedence.
- Letters/digits/symbols can truncate spoken names.
- These announcements use their own ringtone, are incompatible with distinctive ringing, and are unavailable during intercom, fax priority, copying or Call Waiting.
着信記録
Instructions from the manualInspect, dial and erase incoming records11 steps
- Caller ID permits each base and handset to retain 20 incoming records separately, including time and up to 20 number digits.
- On the base press Redial/Incoming twice, or open the handset incoming direction after lifting it; select a record.
- Stop/End finishes inspection; lift the base receiver or press handset Talk to call.
- To register a base incoming number as rejected, select it, press Nuisance-call, inspect the confirmation, press 1 and Stop.
- To erase one base record, select it, Erase twice and Stop; erase all with Erase, 3, 1.
- On the handset, select a record, confirm, choose トクバンダイヤル to prefix 184/186 or another prefix up to eight digits, then Talk.
- To erase one choose ショウキョ and confirm twice; erase all through Menu/Confirm, ゼンショウキョ, チャクシンキロク and confirm twice.
- Record numbers can be saved to its phonebook or used for fax sending via the reviewed procedures.
- Unanswered calls and calls abandoned before answering also appear.
- Rejected callers appear only in the base records.
- Without Caller ID the base still shows incoming date/time.
着信鳴り分け
Instructions from the manualConfigure distinctive ringing by caller category11 steps
- Caller ID is required.
- Choose among base-phonebook, withheld, payphone and out-of-area calls; you cannot assign a separate ringtone to each telephone number.
- Initial distinctive ringing is off on both devices.
- For the base use Menu/Confirm, 2, 4; choose category 1–4 in that order, select a ringtone and confirm.
- 0 cancels the selected distinctive ringtone.
- If spoken caller announcement is active, confirm its cancellation; otherwise the features cannot coexist.
- Stop finishes.
- On the handset choose Menu/Confirm, チャクシンナリワケ, select the category and confirm, select a ringtone and confirm.
- Choose カイジョ to cancel (two beeps).
- Disable spoken caller announcement on the base first.
- Tone choices match each device’s ordinary ringtone list.
着信お断り
Instructions from the manualReject anonymous categories or specific incoming numbers12 steps
- Caller ID is required.
- Category rejection is initially off.
- On the base press Menu/Confirm, 5, choose 1 for withheld, 2 for payphone or 3 for out-of-area, then 2 to reject and Stop; 1 cancels that rejection.
- The rejection greeting plays three times then hangs up without ringing.
- For withheld calls it asks the caller to notify their number, for example by prefixing 186.
- To reject a specific number, use Menu/Confirm, 5, 4, Confirm; enter up to 20 digits, confirm and Stop.
- Up to 30 numbers can be stored.
- To delete one, open 5, 4, select it, Erase, 1 and Stop.
- To delete all, use Erase, 5, 1.
- Incoming records provide another registration method.
- Blocked calls do not ring even if urgent, though the base display lights.
- Their incoming records are saved only on the base.
読み取り部を清掃する
Instructions from the manualClean scanner glass and reinstall the original-feed roller10 steps
- For cleaning, unplug the mains lead and wait for hot parts to cool.
- Open the recording-paper tray backwards and operation panel forwards.
- Move the green release lever at the left of the original-feed roller forwards and lift the roller.
- Do not dismantle its roller, end gear or release lever.
- Wipe the glass underneath with a cotton swab or dry cloth.
- For heavy dirt use a water-dampened, well-wrung cloth and then dry with a soft cloth.
- Insert the roller’s right end into its hole, then lower the left end and return the release lever backwards.
- Install fully before closing: incomplete installation can damage the base, prevent copying/sending.
- Close the operation panel, then the recording-paper tray.
- If cleaning the glass does not remove lines, clean the ribbon guide in front of the recording head using the internal-cleaning procedure.
原稿がつまった
Instructions from the manualClear a jammed original10 steps
- First press Menu/Confirm, 0 to eject the original.
- If it stays stuck, remove recording paper before continuing.
- Open the operation panel forwards.
- Move the green left roller-release lever forwards and lift the original-feed roller.
- Do not dismantle its roller, end gear or release lever.
- Carefully remove the jammed original without forcing or tearing it.
- If it tears, remove every fragment from inside.
- Insert the roller’s right end into its hole, lower the left end and return the release lever backwards.
- Incomplete installation can damage the base when the panel closes, prevent copying/sending.
- Close the operation panel and reload originals/recording paper correctly.
記録紙がつまった
Instructions from the manualClear jammed recording paper9 steps
- Remove any unused recording paper and open the operation panel.
- Lift the green rear-cover release lever and open the rear cover backwards.
- Remove the stuck paper.
- Never pull it out with the operation panel/rear cover closed.
- Remove every fragment if it tears.
- Turn the green ribbon gear two or three times in the shown direction to remove slack.
- Close the rear cover until the marked area clicks, then close the operation panel.
- Reload recording paper.
- If the jam occurred because ribbon ran out during printing, replace the ribbon after clearing the paper.
故障かな?と思ったときは(修理依頼される前に)
Instructions from the manualRestart the handset or base before repair14 steps
- For a handset that cannot be used, disconnect and reconnect its battery.
- Its date/time clears; clock backup can transfer the base time, otherwise set it manually.
- For garbled displays, unresponsive buttons, corrupt printed lists, persistent copy/print failures or other abnormal base operation, hold Stop about 15 seconds until オマチ クダサイ appears.
- It restarts automatically without erasing registered content.
- If it does not restart or trouble remains, unplug the base mains lead and reconnect.
- Base time clears; enabled clock backup can restore handset time, otherwise set it manually.
- If restart/power cycling does not improve the fault, the manual offers forced reset, but it deletes all stored data including the phonebook.
- Unplug, then hold 7 and Stop while reconnecting power.
- When メモリークリア中 appears, release both keys.
- Do not unplug while clearing.
- Reset restores the two factory phonebook entries.
- Set date/time again; automatic line detection then takes about 20 seconds, so wait before calling.
- If the fault persists or recurs, consult Sharp support.
- The separate initialization procedures may also resolve settings that trigger unintended functions.
お手入れ
Instructions from the manualClean the exterior, recording head, rollers and ribbon guide11 steps
- Unplug the mains lead and let the recording head/other hot parts cool before cleaning.
- Use a dry soft cloth, such as a lens cloth, for the exterior.
- For heavy dirt use a well-wrung water-dampened cloth, then dry thoroughly.
- For dirty originals/recording paper, clean the original-input roller, original-feed roller, recording-paper feed roller, recording head and ribbon guide with a dry soft cloth.
- Rotate rollers while wiping.
- Open the rear cover using the ribbon-preparation steps.
- Do not use alcohol, benzine, thinner or other volatile cleaners.
- For heavy paper dust, poor feeding or stubborn dirt, a well-wrung damp cloth may clean rollers, but never wipe the recording head with water.
- Test by copying.
- If the copy remains dirty, clean again.
- If copies are clean but received faxes are dirty, the sender’s scanner may be responsible.
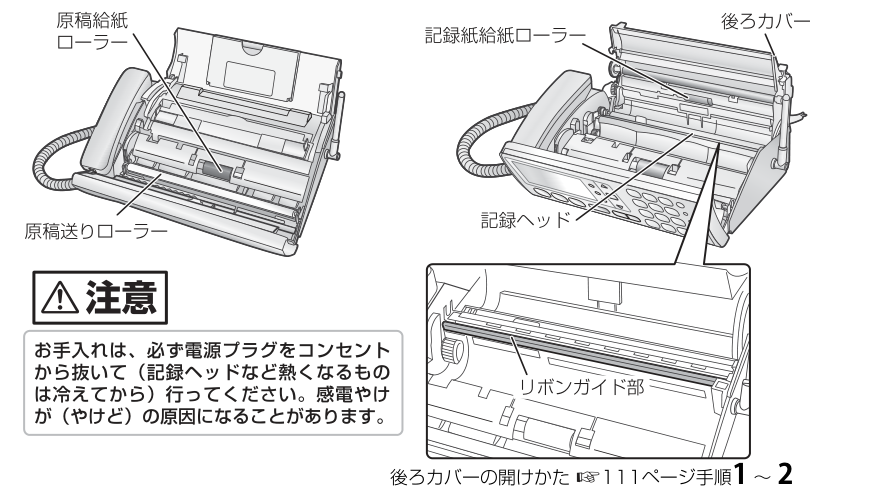
Diagram key
- 原稿給紙ローラー: Original-input roller.
- 原稿送りローラー: Original-feed roller.
- 記録紙給紙ローラー: Recording-paper feed roller.
- 後ろカバー: Rear cover; use the opening method in ribbon preparation (manual page 111, steps 1–2).
- 記録ヘッド: Recording head: clean with a dry soft cloth; do not wipe it with water.
- リボンガイド部: Ribbon-guide area, shown in the enlarged inset.
- 注意: Before care, unplug the power plug and let the recording head and other hot parts cool to prevent shock, injury or burns.
- 後ろカバーの開けかた: Rear-cover opening reference: manual page 111, steps 1–2, preserved in the reviewed preparation instructions.
インクリボン交換
Instructions from the manualReplace the ink ribbon and dispose of the used roll13 steps
- If インクリボン ナシ UX-NR8G/GW appears, remove all recording paper and obtain genuine Sharp gear-equipped UX-NR8G (one 33 m roll) or UX-NR8GW (two 33 m rolls).
- Gearless types cannot be used.
- A 33 m roll prints up to about 105 A4 sheets under the manual’s repeated five-sheet-fax test condition.
- Open the recording-paper tray backwards and operation panel forwards.
- Lift the green rear-cover release lever and open the rear cover.
- Remove the used ribbon, lifting its left side first.
- Fit the new ribbon to the blue projection, then seat the green gear’s shaft in its front groove and the white gear’s shaft in its rear position.
- Do not touch the recording-paper sensor lever.
- Turn the green gear two or three times in the shown direction to remove slack.
- Close the rear cover until the marked area clicks, then the operation panel and recording-paper tray.
- The used ribbon retains copies of printed information.
- Cut it into small pieces if confidentiality is needed, and dispose according to local combustible/noncombustible rules.
- Do not remove/reuse the old gears; use a new gear-equipped roll.
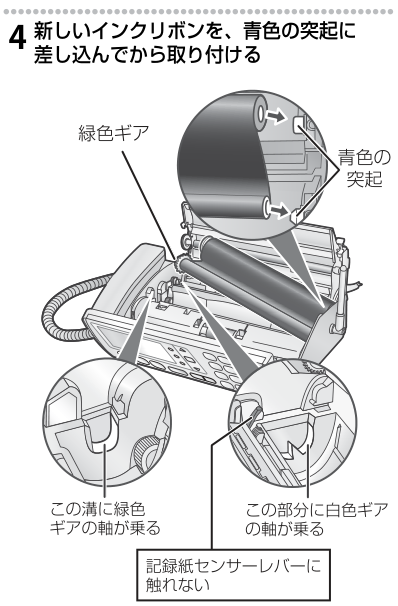
Diagram key
- 4: Step 4: fit the new ribbon to the blue projection, then install it.
- 緑色ギア: Green ribbon gear.
- 青色の突起: Blue projection: fit the ribbon to it before lowering it into place.
- 上段の矢印: The two complete upper arrows show fitting the ribbon to the projection.
- この溝に緑色ギアの軸が乗る: Seat the green gear shaft in this groove.
- この部分に白色ギアの軸が乗る: Seat the white gear shaft at this position.
- 記録紙センサーレバーに触れない: Do not touch the recording-paper sensor lever.
充電池交換
Instructions from the manualReplace and recycle the handset battery6 steps
- Capacity declines with use, typically after about two years.
- If it empties quickly despite prolonged charging, replace with specified M-003 (UBATM0030AFZZ; distribution code 142 932 0086).
- Remove the battery cover and old battery.
- Install the new battery following the battery-installation instructions, keeping its lead clear of the cover, then charge at least ten hours.
- Recycle the NiMH battery through a participating Sharp retailer.
- Tape the positive and negative terminals for recycling; do not remove the outer covering or dismantle it.
登録や設定・電話帳を初期化
Instructions from the manualErase registered content before disposal or transfer11 steps
- Initialization deletes recordings and stored received faxes as well as the affected settings.
- To prevent personal-data disclosure before disposal/transfer, perform base non-phonebook initialization and base phonebook erasure, plus full handset initialization.
- Base forced reset also clears base data.
- Base non-phonebook initialization: Menu/Confirm, # four times, 6, 1, then Stop.
- It retains phonebook, recipient-announcement settings and date/time, but erases one-touch registrations.
- Afterward automatic line detection takes about 20 seconds; wait before calling.
- Erase all base one-touch entries with Erase, 7, 1, or all base phonebook entries with Erase, 6, 1.
- Handset partial initialization: Menu/Confirm, システムセッテイ, トウロク ショキカ, デンワチョウイガイ, confirm twice.
- It retains one-touch and phonebook entries.
- For full handset erasure choose スベテノトウロク and confirm twice.
- Individual handset one-touch/phonebook erasure is described in their procedures.
保証とアフターサービス(よくお読みください)
Instructions from the manualWhen to stop and request repair6 steps
- Use the reviewed troubleshooting first.
- If abnormal operation remains, stop using the unit, unplug it and contact the retailer or Sharp support.
- Unusual cord heat, burning smell, deep cord damage/deformation or other faults also require stopping use and retailer inspection.
- Faults or repairs can change or erase stored information.
- Give support the product type and exact UX-310CW model, and be ready to explain line type, optical/IP usage and Caller-ID subscription.
- Consult the current support site for current contact details; the manual’s telephone/address listings are dated June 2012.
コピー
Instructions from the manualCopy originals8 steps
- To copy, leave the receiver down, load paper and up to five originals face down with guides adjusted.
- Select quality if wanted, then Fax, 2.
- Default copying quality is small type.
- Changing quality while copying affects the next original, not the one currently scanning.
- Stop cancels and ejects original/paper; a bird sound indicates completion.
- Base printing/copying prevents intercom and handset calls.
- Copies need not be exactly true size because machine/paper conditions vary.
- Observe the manual’s restrictions on reproducing currency, securities, stamps and other protected documents, and copyright restrictions.
液晶ディスプレイ
Instructions from the manualBase and handset display indicators8 steps
- The base backlight turns off after about one minute of inactivity; after about two further minutes its display turns off.
- Press a button to restore it.
- The backlight flashes when received fax data remains.
- Its indicators distinguish receiver lifted, on-hook dialing, mobile-discount dialing, ringtone off, nuisance-call operation, rejection enabled and spoken-caller announcement.
- Its text identifies automatic, priority or fax-only reception, date/number/call time and recording count.
- The handset shows its name/number and date in standby, settings/dialed numbers/call duration as appropriate, radio strength, Talk, speakerphone, redial, incoming records, answering mode, ringtone off and remaining battery.
- Use at least two antenna bars.
- The diagrams are examples; all indicators do not appear at once.
Controls and parts
See the manual diagrams 2 diagrams
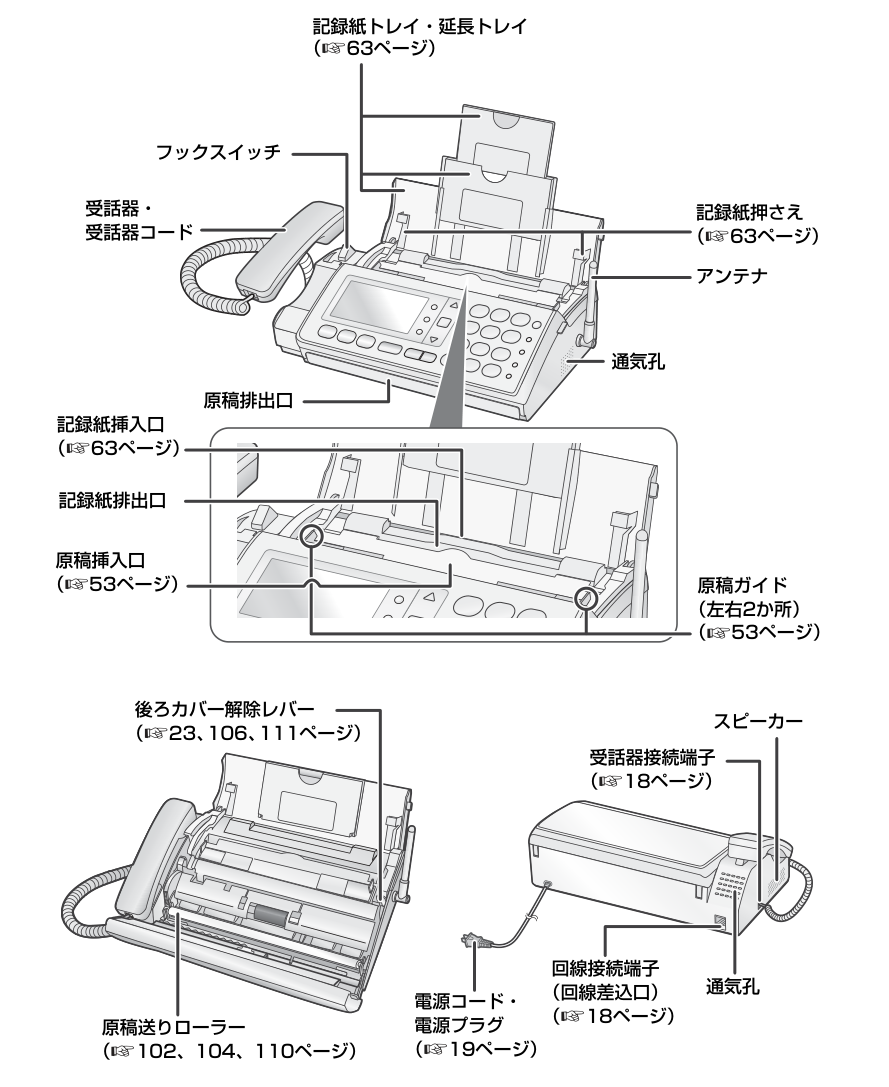
Diagram key
- 記録紙トレイ・延長トレイ: Recording-paper tray and extension tray.
- フックスイッチ: Receiver hook switch.
- 受話器・受話器コード: Receiver and receiver cord.
- 記録紙押さえ: Recording-paper holders.
- アンテナ: Base antenna.
- 通気孔(前面側): Front/right body vent.
- 原稿排出口: Original exit slot.
- 記録紙挿入口: Recording-paper entry slot.
- 記録紙排出口: Recording-paper exit slot.
- 原稿挿入口: Original entry slot.
- 原稿ガイド(左): Left original-width guide.
- 原稿ガイド(右): Right original-width guide; adjust both guides to the original width.
- 後ろカバー解除レバー: Rear-cover release lever.
- 原稿送りローラー: Original-feed roller.
- 受話器接続端子: Receiver-cord connector.
- スピーカー: Speaker.
- 電源コード・電源プラグ: Power cord and mains plug.
- 回線接続端子: Telephone-line connector.
- 通気孔(背面): Rear vent.
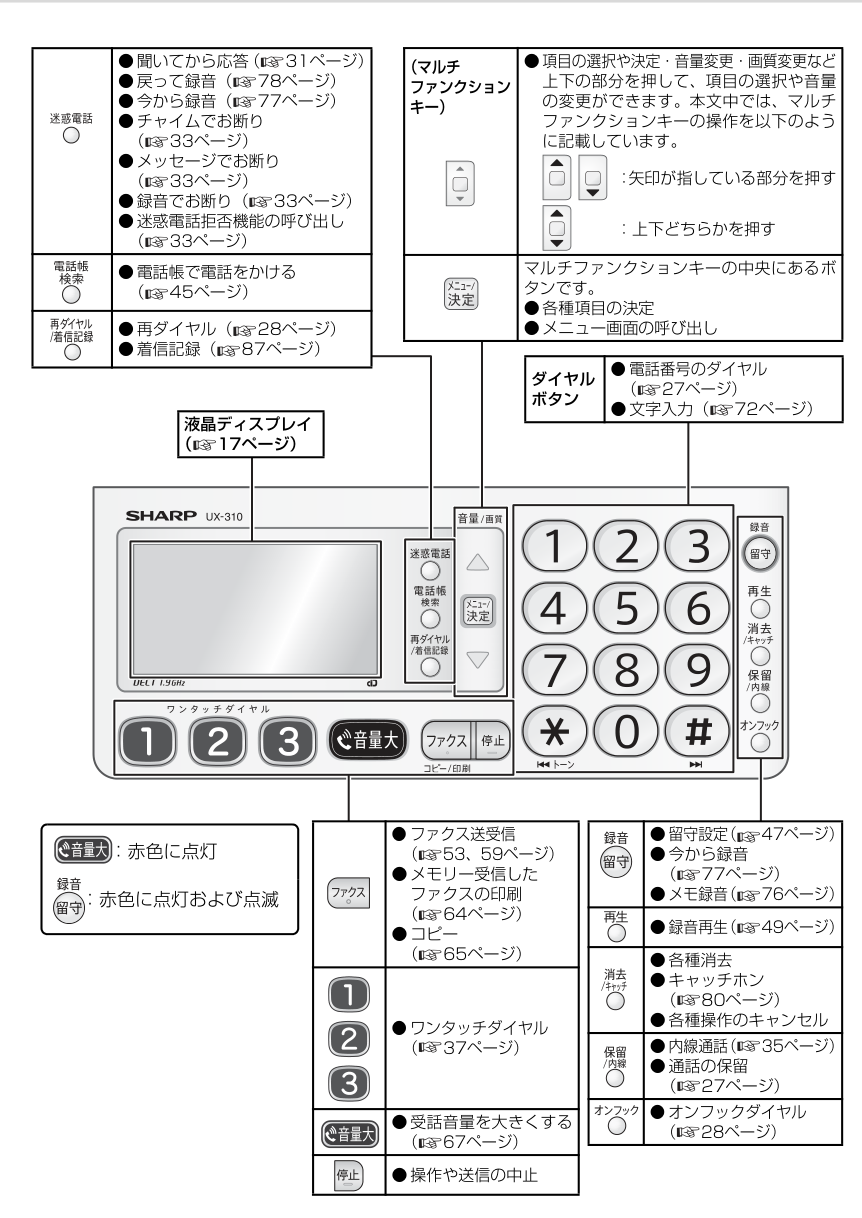
Diagram key
- 液晶ディスプレイ: Liquid-crystal display; the manual gives display explanations on page 17.
- 迷惑電話: Nuisance-call button: screen before answering; reject with a chime, message or recording; record from now; or save the preceding call retrospectively.
- 電話帳検索: Phonebook search button.
- 再ダイヤル/着信記録: Redial and incoming-record button.
- ▲: Upper multifunction-key direction: selection, volume and fax/copy quality.
- メニュー/決定: Centre multifunction button: open menus and confirm the selected item.
- ▼: Lower multifunction-key direction: selection and volume.
- ワンタッチ1: First one-touch dialing button.
- ワンタッチ2: Second one-touch dialing button.
- ワンタッチ3: Third one-touch dialing button.
- 音量大: Receiver-volume boost toggle.
- ファクス: Fax send/receive, stored-fax printing and copy control.
- 停止: Stop an operation or transmission.
- 1: Dial digit 1; also used for character entry or selecting the documented numbered menu item.
- 2: Dial digit 2; also used for character entry or selecting the documented numbered menu item.
- 3: Dial digit 3; also used for character entry or selecting the documented numbered menu item.
- 4: Dial digit 4; also used for character entry or selecting the documented numbered menu item.
- 5: Dial digit 5; also used for character entry or selecting the documented numbered menu item.
- 6: Dial digit 6; also used for character entry or selecting the documented numbered menu item.
- 7: Dial digit 7; also used for character entry or selecting the documented numbered menu item.
- 8: Dial digit 8; also used for character entry or selecting the documented numbered menu item.
- 9: Dial digit 9; also used for character entry or selecting the documented numbered menu item.
- *: Star; sends tone signals during a connected pulse-line call. During playback it repeats or returns to a recording.
- 0: Dial digit zero; also a documented menu selection.
- #: Hash; during playback skips forward.
- 録音/留守: Answering-mode, call-recording and memo-recording button; its red lamp indicates answering/recording status as explained in the answering procedure.
- 再生: Recording playback button.
- 消去/キャッチ: Erase, Call Waiting and cancellation control.
- 保留/内線: Hold and internal-call button.
- オンフック: On-hook listening/dialing control.
- 方向キーの凡例: Press the indicated upper or lower portion; an unmarked up/down symbol permits either direction.
- 赤色に点灯および点滅: The Answer/Record button lights red when answering mode is enabled. Flashing indicates new recordings; after cancellation, rapid flashes continue until all unplayed recordings have been played for about three seconds each.
- 音量/画質: The upper multifunction direction adjusts volume or fax/copy quality in the documented operating state.
- ◀◀/トーン(*下): Star: sends tone signals in a pulse-line call; during playback repeats or goes back to a recording.
- ▶▶(#下): Hash: advances to the next recording during playback.
Model details
Model and compatibility
- Power
- Domestic AC100V, 50/60Hz; do not use overseas.
- Fax system
- G3/ECM monochrome thermal-transfer fax, 64-level halftone.
- Paper
- A4 recording paper, up to15 sheets; maximum recording and scanning width205mm.
- Ribbon
- Genuine gear-equipped UX-NR8G (one33m roll) or UX-NR8GW (two rolls). Gearless ribbon unsupported.
- Handsets
- June2012 guide lists JD-KS100 only; at most four total including the two supplied handsets.
- Battery
- M-003 NiMH handset battery; DC2.4V,600mAh.
- Phonebook
- 100 entries per base/handset, one number each; base searches entries transferred from handset.
- One-touch dialing
- Three one-touch entries on each base and handset, separate from phonebook.
- Environment
- 5–35°C;30–85%RH.
- Supplied handset package
- UX-310CW includes two cordless handsets, two chargers, two battery covers and two M-003 batteries. The official shared photograph illustrates the base and one handset; it does not show the complete package.
Related reviewed instructions
- Check the factory-installed ribbon and take up slack
- Install and charge the handset battery
- Set the telephone line type
- Load A4 recording paper
- Receive a fax after answering the call
- Configure automatic fax reception
- Choose fax storage and delete received data
- Clean scanner glass and reinstall the original-feed roller
- Clear a jammed original
- Clear jammed recording paper
- Restart the handset or base before repair
- Clean the exterior, recording head, rollers and ribbon guide
- Replace the ink ribbon and dispose of the used roll
- Replace and recycle the handset battery
- Set date/time and clock backup