MODEL REFERENCE
Presto 0283501
6 troubleshooting topics · 12 guides
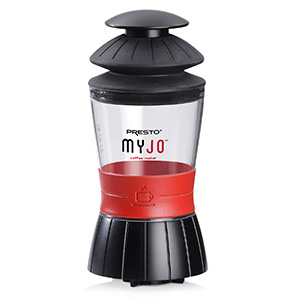
The checks and guides below come from the official manuals for this model.
No matches for this wording. Try a light name, error code or a shorter phrase.
Troubleshooting
Find the problem you are experiencingWater seeps between the base and reservoir1 check
- Base not screwed tightly to the reservoir
- Tighten the base onto the water reservoir, then refill the reservoir with water.
Reservoir leaks when detached from the base2 checks
- Silicone valve not seated properly
- Use the tip of an index finger or fingernail to press around the valve edge until it fits snugly in the groove on the reservoir floor.
- Dirty valve
- Remove the valve and clean it using the reviewed silicone-valve cleaning instructions.
Nothing happens when pressing the pump3 checks
- Silicone-valve slit resealed after manufacturing
- Remove the valve from the inside bottom of the reservoir. Pinch and rotate it between your fingers until the slit opens, reposition it, and proceed to make coffee.
- Pump not fully attached; air escapes
- Press all the way around the pump edge so that its ridged portion is fully engaged inside the reservoir rim.
- Insufficient pumping pressure
- Stand directly over the coffee maker and press the pump. Hold it down until coffee stops flowing, release and let it return to its original position, then repeat.
Compatible single serve packs and their limitations4 steps
- The manual says that packs for Keurig K-Cup system brewers, including mesh-bottom packs, work with MyJo.
- Vue and Rivo packs do not work with Keurig K-Cup brewers and do not work with MyJo.
- Pack construction varies: boiling water can deform thin plastic walls; thin internal filters work with gentle pumping but can break under heavy pressure; rigid tops of varying thickness may be difficult to pierce.
- Presto is not affiliated with the named pack-system companies.
Unusual pumping difficulty with a single serve pack2 checks
- Brown water: a thin pack filter has broken under pressure
- Discard the liquid, clean the unit, and start again with gentle, steady pumping pressure.
- Clear water: check that the pack top and bottom are pierced
- Carefully unscrew the reservoir from the base.
- For a pack with a plastic bottom, press it down to ensure the bottom is pierced.
- Check the top; if there is no small hole in its middle, make one with a knife.
- Reassemble and resume pumping.
- Keep fingers out of the pack holder because its needle is sharp.
Using loose coffee grounds or tea leaves3 steps
- Use only the refillable MyJo Cup designed for MyJo; do not use another brand of cup.
- The manual identifies it as Part 44364 on PDF page 4 for ground coffee or tea leaves.
- It supplies no separate cup-filling procedure; no additional steps are inferred.
Guides
Important safeguards
Instructions from the manualSafe use and when to stop12 steps
- Read all instructions.
- Use extreme caution when handling a coffee maker containing hot liquid.
- Do not touch hot surfaces; grasp the red reservoir grip when handling the reservoir containing hot water.
- Avoid contact with the needle in the pack holder to prevent injury.
- Supervise closely when any appliance is used by or near children.
- Do not use the coffee maker if it malfunctions or has been damaged in any way.
- Accessories not recommended by the manufacturer may damage the unit or cause injury.
- Use only water in the MyJo coffee maker; do not fill it with another liquid.
- Do not fill above the 10-ounce fill line.
- Do not place on or near a hot gas or electric burner or in a heated oven.
- Use only for its intended purpose.
- Retain these instructions.
Before first use
Instructions from the manualBefore first use6 steps
- Read the instructions and become familiar with the parts in Figure A on PDF page 2.
- Unscrew the base from the reservoir.
- Pull the pump out of the reservoir and remove everything from inside the reservoir.
- Wash the parts in warm, soapy water and rinse thoroughly to remove soap residue.
- Do not wash MyJo in the dishwasher.
- The pack holder contains a sharp needle for puncturing the pack: do not put fingers inside the pack holder.
To prepare coffee or tea
Instructions from the manualChoosing coffee or tea strength and inserting the pack6 steps
- For the first use, fill with water to the 8-ounce line for normal strength, 6-ounce line for stronger coffee or tea, or 10-ounce line for weaker coffee or tea.
- Later, adjust the water amount to taste.
- The markings provide water for 6, 8 or 10 ounces of brewed coffee or tea.
- Never exceed the 10-ounce line.
- Place a single serve pack in the pack holder and press firmly until its bottom is punctured.
- The pack holder contains a sharp needle: do not put fingers inside it.
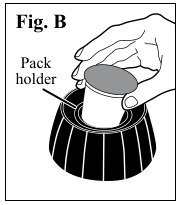
Diagram key
- Fig. B: Place the pack in the holder and press firmly until its bottom is punctured.
- Pack holder: Contains a sharp needle; do not place fingers inside the holder.
Heating water and assembling with a microwave10 steps
- After inserting the pack into the base as directed in the reviewed pack-insertion instructions, fill the water reservoir with the desired amount of water.
- Place only the filled reservoir in the microwave, with the base detached: the base is not microwave safe.
- Heat water to the desired temperature.
- Always handle the hot reservoir by its red grip because its other surfaces will be very hot.
- Push the pump cap onto the top of the pump.
- Insert the ridged portion of the pump into the reservoir.
- Press around the pump edge until it is firmly attached.
- Press only the edge; do not press the cap or pump.
- Grasp the red grip of the filled reservoir, place it on the base, and screw clockwise until tight.
- Then follow the reviewed brewing instructions.
Heating water and assembling with a kettle10 steps
- After inserting the pack into the base as directed in the reviewed pack-insertion instructions, heat water to the desired temperature with an electric or stovetop kettle.
- Attach the base to the reservoir before adding water.
- Screw the reservoir clockwise until tight.
- Place it on a dry, level surface and carefully fill with the desired amount of heated water.
- Do not hold the reservoir while pouring hot water into it.
- Push the pump cap onto the top of the pump.
- Insert the ridged portion of the pump into the reservoir.
- Press around the pump edge until it is firmly attached.
- Press only the edge; do not press the cap or pump.
- Then follow the reviewed brewing instructions.
Brewing coffee or tea into a suitable mug12 steps
- Before pumping, check that the base ribs fit within the mug’s inner rim.
- Its inner-rim diameter must be at least 2¼ inches and no more than 3¾ inches; the mug must also hold the amount of coffee or tea being brewed.
- Place the assembled coffee maker over the selected mug, positioned directly in front of you.
- Grasp the base with one hand and place the palm of the other hand on the pump cap.
- With a tall travel mug, grasp the top of the mug instead of the base.
- Alternatively, place one hand over the other to pump, but never use this alternative with tall mugs such as travel mugs.
- Gradually press the cap with your palm and hold it down until coffee or tea stops flowing.
- Release, let the pump return to its original position, and press again.
- Repeat until all water has passed through the pack into the mug.
- A swoosh indicates that all water has been expelled.
- Lift MyJo off the mug and place it on a plate or in the sink to catch residual drops.
- Enjoy the brewed coffee or tea.
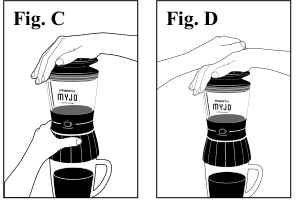
Diagram key
- Fig. C: With the maker and mug directly in front of you, hold the base with one hand and place the other palm on the pump cap. For a tall travel mug, hold the top of the mug instead of the base.
- Fig. D: Alternative method with one hand over the other; do not use it with tall mugs such as travel mugs. Press gradually, hold until flow stops, release and repeat.
To prepare hot cocoa and other beverages
Instructions from the manualPreparing cocoa, cappuccino or hot cider5 steps
- For single serve hot cocoa, cappuccino, hot cider or similar beverages, place the base over the mug BEFORE inserting the pack.
- These packs have no filter, so this catches powder residue in the mug when the pack is punctured.
- For first use, fill the reservoir to the 6-ounce line.
- Adjust the amount for later uses as desired; use only water and never exceed the 10-ounce line.
- Follow the reviewed heating, assembly and brewing instructions.
Care and cleaning
Instructions from the manualCleaning after use and cleaning the silicone valve12 steps
- Unscrew the base from the reservoir.
- Turn the base over and use a finger to push the bottom of the used pack out of the holder; discard it.
- Do not put fingers inside the holder because its needle is sharp.
- Pull the pump off the reservoir.
- Wash the pump, reservoir and base in warm, soapy water, then rinse and dry.
- Do not wash MyJo in the dishwasher.
- If the silicone valve in the inside bottom of the reservoir contains grounds or residue, remove it for cleaning.
- From underneath the reservoir, gently push it at an angle with a blunt object such as a Q-tip cotton swab or a pencil’s eraser end.
- Push gently on the outer edge because the centre has a slit.
- Wash the valve in warm, soapy water and rinse.
- Reposition it in the inside bottom of the reservoir.
- Use the tip of an index finger or fingernail to press its outer edge tightly into the groove on the reservoir floor.
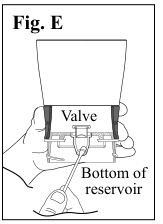
Diagram key
- Fig. E: From underneath the reservoir, gently push the valve at an angle with a blunt object such as a cotton swab or pencil eraser.
- Valve: Push gently on its outer edge because its centre has a slit. Wash in warm, soapy water, rinse and reinstall, pressing its outer edge firmly into the groove.
- Bottom of reservoir: The valve sits in the inside bottom; reach it from underneath for removal and reinstall it inside the reservoir.
Consumer service information
Instructions from the manualContacting service and identifying genuine parts11 steps
- For operating questions or parts, the 2016 manual lists 1-800-877-0441 on weekdays from 8 a.m. to 4 p.m.
- Central Time; the contact form at www.GoPresto.com/contact; or National Presto Industries, Inc., Consumer Service Department, 3925 North Hastings Way, Eau Claire, WI 54703-3703.
- Inquiries are answered by telephone, email or letter.
- When emailing or writing, include a phone number and a weekday time when you can be reached if possible.
- Give the model and series numbers from the bottom of the coffee maker base when contacting service.
- Record those numbers and the purchase date.
- The manual’s factory-service address is Canton Sales and Storage Co., Presto Factory Service Department, 555 Matthews Drive, Canton, MS 39046-3251.
- Its factory service supplies genuine Presto parts manufactured to the appliance standards and designed for it.
- Presto guarantees only genuine parts; similar-looking parts may differ in quality or function.
- Look for the Presto trademark.
- These are the contact details printed in Form 76-145C (2016).
Perfect companions for your presto® myjo™ coffee maker
Instructions from the manualAccessories described in the 2016 manual4 steps
- The manual describes the Presto Electric Tea Kettle, Part 02703, as a companion for heating MyJo water: up to one quart, a whistle when boiling, automatic shutoff if boiled dry, a flip-up stainless lid for filling and directing steam away when pouring, and an anodized interior base that resists mineral buildup.
- These are descriptions of the separate kettle, not features of MyJo.
- The MyJo Cup, Part 44364, is identified for brewing favourite ground coffee or tea leaves.
- This manual provides no separate filling procedure for it.
How to order
Instructions from the manualOrdering the listed accessories5 steps
- The 2016 manual lists toll-free 1-800-995-9960, weekdays 8 a.m.–4 p.m.
- Central Time, for ordering the listed accessories.
- Have the credit-card number and expiration date ready; payment is by credit card only.
- The manual limits these products to addresses in the United States, Puerto Rico and the US Virgin Islands.
- These are historical Form 76-145C ordering terms, not a claim of current stock.
Presto® limited warranty
Instructions from the manualLimited warranty in the 2016 manual10 steps
- The Form 76-145C warranty applies only in the United States and Canada, to normal household use.
- Presto pledges to the original owner to repair or replace material or workmanship defects, at its option, during the first year after purchase.
- Shipping damage is excluded; coverage does not apply outside the United States and Canada.
- For warranty service, call 1-800-877-0441.
- If the problem cannot be resolved, you will be instructed to send the appliance to factory service for inspection at your shipping expense.
- Include your name, address, phone number, purchase date and a description of the problem.
- Follow the enclosed instructions.
- Failure to follow them, damage from improper replacement parts, abuse, misuse, alterations or neglect voids the pledge.
- It gives specific legal rights; other rights may vary by state.
- It replaces other express warranties and is the pledge of National Presto Industries, Inc., Eau Claire, WI 54703-3703.
Controls and parts
See the manual diagrams 1 diagram
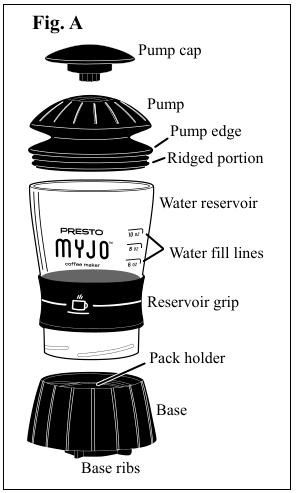
Diagram key
- Fig. A: Complete parts layout for the hand-pumped MyJo coffee maker; use the red grip for the hot reservoir.
- Pump cap: Push onto the pump before attaching it; press with your palm during brewing.
- Pump: Attach its ridged portion firmly inside the reservoir; release after each stroke so it returns to its original position.
- Pump edge: Press only around this edge when attaching the pump, not the pump or cap.
- Ridged portion: Engage this portion fully inside the reservoir rim to prevent escaping air.
- Water reservoir: Holds only water. For microwave heating, detach the base first.
- Water fill lines: 6 ounces for stronger coffee or tea, 8 ounces for normal strength, 10 ounces for weaker; never fill above 10 ounces.
- Reservoir grip: Grasp the red grip when handling the reservoir containing hot water; other surfaces will be very hot.
- Pack holder: Press the single serve pack firmly into this holder until its bottom is punctured. Its needle is sharp; keep fingers out.
- Base: Screw tightly onto the reservoir. The base is not microwave safe.
- Base ribs: Fit inside the mug rim; the inner-rim diameter must be2¼–3¾ inches and the mug must hold the beverage.
Model details
Model and compatibility
- Beverage sizes
- Fill markings provide6,8or10ounces of brewed coffee or tea. [1]
- Mug fit
- Inner-rim diameter at least2¼inches and no more than3¾inches, with enough capacity for the beverage. [1]
- Dishwasher restriction
- Do not wash MyJo in the dishwasher. [1]
- Microwave restriction
- Detach the base before microwaving the filled reservoir; the base is not microwave safe. [1]