MODEL REFERENCE
Magnasonic FS50
12 troubleshooting topics · 16 guides

The checks and guides below come from the official manuals for this model.
No matches for this wording. Try a light name, error code or a shorter phrase.
Troubleshooting
Find the problem you are experiencingGet the best scan quality2 checks
- Film/slide cleanliness
- Ensure film/slides are clean.
- Scanner cleanliness
- Immediately before scanning, clean inside with the included brush using the Cleaning and Care instructions.
A consistent spot appears on every scanned slide1 check
- Possible internal dust
- Use the included brush to remove foreign debris; follow Cleaning and Care.
Scan without a computer1 check
- Computer availability
- Scan without a computer to an SD card up to 128 GB or 128 MB internal memory; export to a computer later.
Saved image file format1 check
- File format question
- Images save automatically as JPG files.
The scanner screen is black but has power2 checks
- TV Out connection
- Ensure the TV Out cable is disconnected from the scanner rear.
- USB power source
- Verify a 5 V 1 A USB power source and test a different USB power source.
The TV image is black and white1 check
- TV input compatibility
- Connect TV Out to a yellow RCA input. If using a Component input, a TV setting may need changing for RCA compatibility.
Not all images appear on the computer1 check
- Inserted SD card
- With an SD card inserted, the computer sees only its images. Remove the card to view internal-storage images.
TV Out image does not appear on the TV1 check
- TV signal format
- The FS50uses NTSC video output. If the TV requires PAL, disconnect TV Out, select TV Out in Main Menu and choose PAL.
Recycle old slides, negatives and film1 check
- Film/photo chemicals
- Old film/photos may contain chemicals that make recycling difficult. Consult the local recycling company for disposal/recycling instructions.
Scanned slide or negative colors are faded1 check
- Age and cleanliness
- Slides/negatives can degrade and fade over time. Ensure they are clean and use scan color-adjustment options.
Scanned colors are reversed or negative1 check
- Film-type selection
- Change the menu film type to Negative.
Raw film versus developed negatives1 check
- Development requirement
- Use developed film only.
Guides
Powering on your film scanner
Instructions from the manualPower the scanner4 steps
- Connect the miniUSB end of the included miniUSB-to-USB cable to the scanner miniUSB port.
- Connect the other end to a USB wall adapter (not included) or USB power source rated 5 V 1 A.
- Hold Power to turn the scanner on.
- It shuts off automatically after 10 minutes of inactivity.
Changing the language
Instructions from the manualPrepping your film/slides
Instructions from the manualPrepare film and slide adapters5 steps
- Ensure slides/film are clean and free of dirt/debris.
- Open the appropriate labelled slide/film adapter and insert the film/slide.
- Use the manual’s film/slide identification figures if unsure of the type.
- Ensure the film/slide faces the correct direction and is not bent.
- Close the adapter and press its edges until locked.
Preparing the film scanner
Instructions from the manualPrepare the film scanner6 steps
- Hold Power to turn the scanner on.
- Insert the prepared adapter into the scanner right-side slot.
- In Main Menu, use the arrows to highlight FILM TYPE and press OK.
- Use the right arrow to cycle through Negatives, Slides or B&W; press OK to confirm.
- At the size screen, use the right arrow to choose the correct size and press OK.
- Original film/slide quality affects scanned image quality.
Cleaning and care
Instructions from the manualClean the lens with the included brush3 steps
- Use the included cleaning brush to remove lens dust/debris.
- Insert its soft end face down into the film/slide holder slot.
- Carefully move the brush inside to remove dust or debris on the lens.
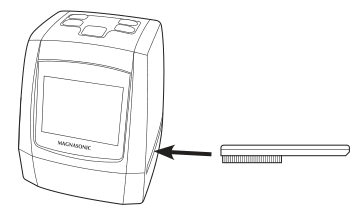
Diagram key
- brush: Included cleaning brush; insert its soft end face down and carefully move it inside to remove lens dust or debris.
- left-pointing insertion arrow: Insert the brush into the film/slide holder slot in the direction shown.
Using an sd card
Instructions from the manualInsert and remove an SD card4 steps
- The scanner has 128 MB built-in memory and accepts SD cards up to 128 GB.
- A 128 GB card may require formatting before first use.
- Insert the SD card label down into the rear SD slot until it clicks.
- To remove it, press until it clicks and pops out, then remove it.
Formatting your sd card
Instructions from the manualFormat an SD card4 steps
- Warning: formatting deletes all files on the SD card.
- Download them to your computer first.
- In Main Menu select FORMAT and press OK.
- At the prompt, use the left arrow to choose Yes and press OK to start formatting.
Scanning your images
Instructions from the manualScan film and slides12 steps
- Press SCAN to select Capture mode and press OK.
- The film/slide image appears with its type at lower left.
- The screen image does not represent final scanned quality.
- For Brightness or Color, press OK.
- Use left/right arrows to select EV, Red (R), Green (G)or Blue (B); press OK to adjust each individually.
- When settings are correct, press SCAN to return.
- Before scanning, use the left arrow to mirror or right arrow to flip the image.
- When ready, press SCAN then OK to capture/save to internal memory or an inserted SD card.
- The FS50 cannot scan directly to a computer.
- Multiple slides/negatives can be pushed/pulled through the adapter without removing it.
- Handle strips carefully to avoid bending or damage.
- When done, press MENU twice to return to Main Menu.
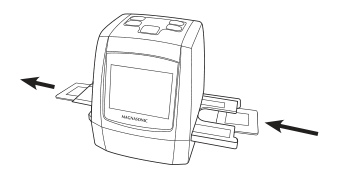
Diagram key
- left outward arrow: Film/negatives may be pulled through the adapter without removing it.
- right inward arrow: Film/negatives may be pushed through the adapter without removing it.
- film/negative strip: Handle strips cautiously to avoid bending or damage.
Viewing your scanned images
Instructions from the manualView saved images5 steps
- In Main Menu select GALLERY and press OK.
- Saved images play automatically as a slideshow.
- Press OK to stop the slideshow and review manually.
- Use left/right buttons to browse saved images.
- Press OK again for Gallery options: resume slideshow, delete the image or return to Main Menu.
Transferring images to your computer
Instructions from the manualTransfer saved images to a computer6 steps
- Important: scan on the FS50first; direct scanning to a computer is unsupported.
- Ensure the computer is on.
- Connect the scanner to the computer using the included USB cable.
- Turn the scanner on.
- Select USB MSDC in its menu.
- A new folder appears on the computer with saved images; move them from the scanner to the computer.
Watching saved images from a tv screen
Instructions from the manualWatch saved images on a TV6 steps
- Turn the scanner on.
- Connect the included TV Out cable to the scanner rear TV Out port.
- Connect the other end to the TV video input.
- The scanner LCD turns off automatically when connected to a TV.
- Select the correct TV input/video source.
- The scanner screen should now appear on the TV.
Safety alerts
Instructions from the manualStop for unsafe or abnormal operationView
Stop immediately, unplug the power cord and seek a qualified service professional for smoke/unusual smell; rain, water or liquid exposure; failure to operate normally despite following instructions; a distinct performance change; or any dropping/damage.
Best practices for safe use
Instructions from the manualUse the scanner safely8 steps
- Use only standard-size film and manufacturer-specified attachments/accessories.
- Straighten/unwind the USB cord before use.
- Confirm rating-label voltage matches local electricity supply.
- Unplug the adapter for extended nonuse and thunderstorms.
- Keep away from water; do not immerse the product, cord or accessories in any liquid.
- Do not obstruct ventilation; install according to manufacturer instructions.
- Keep away from radiators, heat registers, stoves, amplifiers and other heat sources.
- Do not service/disassemble the product yourself; opening covers may expose dangerous voltages or other hazards.
Maintenance
Instructions from the manualMaintain the scanner safely4 steps
- Ensure the scanner is clean before use.
- Do not use liquid cleaners; wipe the outside only with a dry cloth.
- Clean the inside only with the included brush.
- Insert its soft end into the film/slide holder slot and carefully move it inside to remove lens dust/debris.
Fcc information
Instructions from the manualResolve radio interference and rare lockup2 steps
- For harmful radio/TV interference, try reorienting/relocating the receiving antenna, increasing equipment/receiver separation, connecting to a different circuit than the receiver, or consulting the dealer or an experienced radio/TV technician.
- For rare lockup from severe interference, external noise or static electricity, turn the unit off, wait at least 5 seconds, and turn it on again.
Magnasonic® warranty
Instructions from the manualArrange manufacturer warranty service11 steps
- The manual provides a one-year parts and labour warranty against material and workmanship defects.
- Proof of purchase from an authorized dealer is required.
- For covered defects, the manufacturer repairs free; if repair is impossible, it replaces the product.
- Discontinued products are replaced by the newest version or current equivalent.
- Replacement parts remain covered for the unexpired original warranty term.
- Exclusions cover abusive operation, negligence, accident, improper installation or use; unauthorized tampering, modification, adjustment or repair; cosmetic wear or damage; external or environmental damage including voltage or liquid; missing model, serial or certification markings; rental or commercial use; installation, setup or programming charges; and incorrect supply voltage.
- Use voltage converters where applicable.
- For a covered defect, deliver the product with proof of purchase.
- Ship prepaid in its original container or equivalent; the customer bears transit loss or damage risk.
- The manufacturer covers applicable parts, labour and return costs.
- Seek help through its support page.
Controls and parts
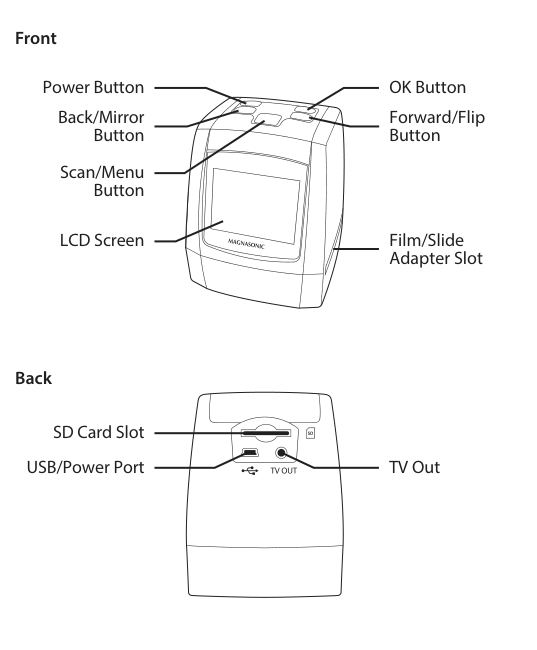
See the manual diagrams 1 diagram