MODEL REFERENCE
CASIO XJ-UT351W
16 errors · 16 troubleshooting topics · 62 guides

The checks and guides below come from the official manuals for this model.
No matches for this wording. Try a light name, error code or a shorter phrase.
Errors and indicators
Light patterns and messages documented in the manualFind the indicator lights
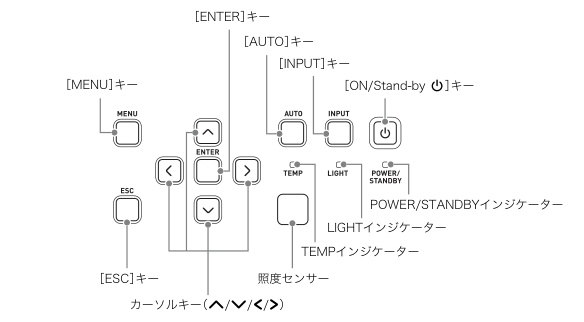
Diagram key
- ENTER: Confirm a menu selection or execute a function.
- AUTO: Automatically adjust RGB frequency and phase.
- INPUT: Select the input source.
- MENU: Open or close the settings menu.
- ON/Stand-by power symbol: Switch projector power on or off.
- POWER/STANDBY: Power and standby status indicator; colours and flashing combinations are given in the reviewed instructions.
- LIGHT: Light-source indicator; interpret with POWER/STANDBY and TEMP.
- TEMP: Temperature indicator; interpret with POWER/STANDBY and LIGHT.
- ESC: Close a menu or cancel the current operation.
- Four cursor keys: Navigate menus or change values; with no menu/dialog Up/Down opens keystone, then Up/Down adjusts vertical and Left/Right horizontal distortion. Left/Right adjusts light output with Light Control On.
- Illuminance sensor: Ambient-brightness sensing when the Brightness Sensor setting is On.
内部が高温になっています。設置状況を確認してください。high internal temperature warning2 checks
内部が高温になっています。電源をオフにします。high-temperature automatic shutdown2 checks
ID-02no firmware USB connection3 checks
Troubleshooting
Find the problem you are experiencingMissing picture dotsView
Manual section: その他のご注意 (PDF page 14).
Some unlit dots may occur despite precision manufacturing; the manual says this is not a fault.Image discolouration after impact4 steps
Manual section: その他のご注意 (PDF page 14).
- Avoid impact during projection.
- If an impact interrupts or discolours the image, use INPUT to reselect the previous source.
- If colour does not recover, turn off and on.
- For an error follow the reviewed error-indicator table.
Blur after condensationView
Manual section: 使用上のご注意 (PDF page 11).
Cold-to-warm movement or rapid room heating can cause condensation and blur or faults. Turn off, leave it for a while, then turn on again. No fixed waiting time is specified.Power will not turn on2 checks
Manual section: 本機のトラブルと対処について (PDF page 45).
- POWER/STANDBY not lit
- Connect the power cord correctly.
- TEMP or LIGHT stays lit/blinking
- Consult the reviewed error-indicator table.
No picture or abnormal picture3 checks
Manual section: 本機のトラブルと対処について (PDF page 45).
- Source equipment off or no video
- Check the connected computer/video equipment is powered and operating normally.
- Wrong input selected
- Select the input matching the connected device.
- Component output not compatible through COMPUTER IN 1/2
- Try the projector VIDEO or S-VIDEO input instead.
Extreme colour or display displacement1 check
Manual section: 本機のトラブルと対処について (PDF page 45).
- COMPUTER IN signal mode does not match RGB/component source
- Set Input Settings > COMPUTER IN 1 or 2 Terminal to Auto instead of the incorrect forced RGB or Component mode.
No sound4 checks
Manual section: 本機のトラブルと対処について (PDF page 45).
- Projector volume low or muted
- Adjust with VOLUME+ or VOLUME−.
- Source volume low or absent
- Adjust the connected source volume.
- Wrong audio port connection/assignment
- Check the audio output connection to the assigned input using the reviewed audio-input guide.
- Audio Output is Line
- Set Device Settings 2 > Audio Output to Speaker.
Incorrect picture colours3 checks
Manual section: 本機のトラブルと対処について (PDF page 45).
- Brightness mismatch
- FUNC > Brightness; adjust.
- Colour mode mismatch
- FUNC > Colour Mode; change it.
- Colour balance mismatch
- Adjust Image Adjustment 1 > Colour Balance.
Blurred text3 checks
Manual section: 本機のトラブルと対処について (PDF page 45).
- Focus not adjusted
- Adjust the focus lever.
- RGB frequency or phase mismatch
- For RGB only press AUTO.
- RGB still requires manual adjustment
- For RGB only adjust Image Adjustment 2 > Frequency and Phase.
Cannot pass the password prompt1 check
Manual section: 本機のトラブルと対処について (PDF page 45).
- Power On Password enabled
- Enter the correct password and ENTER. If remote keys cannot enter it, follow the remote control checks.
Remote control does not work3 checks
Manual section: 本機のトラブルと対処について (PDF page 45).
- Batteries exhausted
- Replace remote batteries.
- Outside range
- Operate within approximately 5 m.
- IDs mismatch
- Match remote/projector IDs or set one ID to All.
TEMP or LIGHT stays lit or blinking1 check
Manual section: 本機のトラブルと対処について (PDF page 45).
- An error has occurred
- Consult the reviewed error-indicator table.
Light-source unit does not light2 checks
Manual section: 本機のトラブルと対処について (PDF page 45).
- BLANK temporarily switched light off
- Press BLANK or ESC.
- Light-source unit end of life or faulty
- Ask service/dealer for replacement; do not perform internal repair.
Unexpected shutdown and restart1 check
Manual section: 本機のトラブルと対処について (PDF page 45).
- Automatic self-check restart
- Rare automatic self-check restart is not a fault; continue use. If repeated continuously contact service/dealer.
General abnormal operation recovery1 check
Manual section: 本機のトラブルと対処について (PDF page 45).
- An abnormality may clear after the stated reset
- Wait for the fan to stop after an error, unplug and leave at least 10 minutes. Reconnect and turn on. If not restored contact service/dealer.
Guides
安全上のご注意
Instructions from the manualStop for smoke, unusual smell or abnormal heat3 steps
- Use adult supervision if children can approach or touch the projector.
- If smoke, unusual smell or abnormal heat occurs, stop using it: continuing risks fire or electric shock.
- Unplug the power plug immediately, then contact the repair enquiry service or dealer.
Stop for faults, liquid ingress or damage7 steps
- Do not continue use with abnormal operation or an abnormal image.
- Turn off, unplug, then contact the repair enquiry service or dealer.
- If water, liquid or metal/other foreign matter enters, or the projector is dropped or damaged, turn off, unplug, then contact service/dealer.
- Keep water and liquid containers away.
- Do not open, dismantle or modify the cabinet: high voltage can cause shock, burns or injury and voids warranty/repair eligibility.
- Internal inspection, adjustment and repair belong to service/dealer.
- Never throw the projector into fire.
Safe placement, ventilation and projection light15 steps
- Use a firm flat stable surface; lock cart wheels.
- Keep at least 6 cm between the projection-facing front and screen/wall and 30 cm at all other sides.
- Keep the space between projector and screen empty and leave intake/exhaust unobstructed.
- Do not enclose it, cover it, place it on soft carpet/bedding/towels/soft seats, or use it standing vertically.
- Operate at 5–35°C.
- Avoid vibration, damp, dust, kitchen fumes, heaters, heated carpets, direct sun and extreme temperatures.
- Do not place it in a bathroom/wet area, on an unstable stand or high shelf, load it or stand on it.
- Do not look into the illuminated lens, intake or exhaust.
- Before switching on check nobody is looking into them; supervise children.
- Do not place magnifiers, mirrors, aquariums, refracting/reflecting objects or anything blocking the projection beam in its path.
- Do not touch the lens.
- Do not touch the hot exhaust or place heat-sensitive plastic near or below it.
- Do not open the cabinet.
- Do not use flammable-gas sprays inside or around it.
- During lightning do not touch the power plug.
電源コードについて
Instructions from the manualJapan-only electrical and model scope9 steps
- Use this Japan-domestic unit only in Japan, on 100 V AC 50/60 Hz.
- Use only its supplied power cord, never with another appliance.
- Connect earth before plugging into a grounded 100 V outlet; disconnect earth only after unplugging.
- Keep the plug accessible.
- Do not overload or share the outlet with other appliances.
- Observe extension-cord ampere ratings.
- Do not bundle, heat, load, modify, damage, trap, cover with a rug, forcibly bend, twist or pull the cord.
- Keep it away from heaters; never touch cord or plug with wet hands.
- When away, keep pets away from the product and unplug: chewing can short the cord and cause fire.
Care for the power cord and move safely8 steps
- Insert the plug fully.
- After use and during long non-use unplug by holding the plug, never pulling the cord.
- Turn off and remove the cord before moving.
- At least yearly unplug and remove dust from plug blades and surroundings using a dry cloth or vacuum.
- Do not use detergent on the cord, especially the plug.
- During and immediately after operation the exhaust is hot.
- Carry by the two sides shown in the source movement figure, avoiding the exhaust.
- Keep important stored settings in a separate written record because malfunction/repair may erase them.
電池について
Instructions from the manualRemote and battery safety7 steps
- Use the specified two AAA alkaline batteries with correct polarity.
- Do not disassemble, short, heat, burn or recharge batteries; do not mix old/new batteries or different types.
- Remove exhausted batteries promptly and remove batteries for long non-use.
- Dispose under local rules.
- For alkaline-battery liquid in an eye, do not rub: rinse immediately with clean water and obtain medical treatment immediately; untreated exposure can cause blindness.
- Do not dismantle or modify the remote or expose it to water; ask service/dealer for inspection or repair.
- Replace its batteries at least yearly regardless of use and do not store with keys held down.
磁石について
Instructions from the manualMagnets, internal cleaning and disposal6 steps
- The projector contains magnets.
- Keep it away from pacemakers and other medical electrical equipment.
- If an abnormality is felt, move away immediately and consult a doctor.
- Keep magnetic cards, tapes, disks, prepaid cards and tickets away to avoid erased recordings.
- Arrange paid internal cleaning with service/dealer at least once a year, preferably before the humid rainy season: dust can reduce brightness or cause fire/failure.
- Do not dismantle it for disposal; follow local rules.
光源ユニットについて
Instructions from the manualLight-source life and laser precautions8 steps
- Laser/LED light-source life is approximately 20,000 hours depending on individual unit, conditions and settings; it is not a guarantee.
- Light-source warranty ends at the earlier of the product warranty period or 6,000 hours.
- If the light no longer lights or becomes markedly dim, ask service/dealer for replacement.
- Never dismantle or modify it.
- Do not stare into the light and supervise small children.
- The non-USA label is Class 1 under IEC 60825-1:2014; the separate USA label is Class 2 under IEC 60825-1:2007 and does not authorize overseas use of the Japan unit.
- Do not use adjustments or procedures outside the manual.
- The exhaust is hot during projection; do not touch or obstruct it or insert foreign objects.
その他のご注意
Instructions from the manualStorage and image-quality precautions7 steps
- Avoid static, extreme temperature, humidity, rapid temperature change, dust, unstable/tilted surfaces, water, oil/smoke, salt damage and corrosive gases.
- Keep strong fluorescent light and sunlight off the remote receiver.
- Do not trap a hand beneath the projector during installation or underside adjustments.
- Keystone correction compresses the picture and may lower quality.
- Place it as squarely as possible to the screen; if picture quality matters use a placement needing no correction and cancel correction.
- Continuous 24-hour operation or ignoring installation requirements may incur paid repair even within warranty.
- High heat, dust, oil/tobacco smoke can shorten optical-engine replacement intervals; ask service about timing and cost.
内容物のご確認
Instructions from the manualCheck the supplied items2 steps
- Package: projector, YT-160 remote, two trial AAA batteries, power cord, cable cover, safety notes, before-use notes and warranty.
- YT-131 belongs to XJ-UT351WN and does not define this model’s supplied remote.
投映までの操作の流れ
Instructions from the manualInitial setup and shutdown12 steps
- Insert the supplied two AAA alkaline batteries in the remote with the illustrated polarity.
- Place the projector on a firm table or stand with adequate clearance; read the safety/use/placement precautions.
- For wall mounting purchase its dedicated bracket and consult the dealer.
- Adjust its installation angle.
- Connect the supplied cord to AC inlet and specified outlet.
- Connect the source video/audio equipment and turn those devices on.
- Press the power key.
- On first use select the language in the initial-language screen.
- Press INPUT and choose the source.
- Use the focus lever to focus.
- Adjust keystone and light output if needed.
- To finish press the power key to turn off.
各部の名称
Instructions from the manualIdentify parts, controls and model-specific ports6 steps
- Exterior: illuminance sensor, control panel, indicators, power key, left exhaust, two intakes, AC inlet, remote receiver, terminal area, focus lever, security bar, Kensington-compatible lock hole and projection lens.
- Body controls: MENU, ENTER, AUTO, INPUT, power, ESC and four cursors.
- Indicators: POWER/STANDBY, LIGHT, TEMP.
- Focus is manual via the lever; the lens has fixed zoom.
- XJ-UT351W ports: DC 5 V/2 A power-only Type A, LOGO Micro-USB Type B, HDMI 1/2, AUDIO IN 1/2, MONITOR OUT, COMPUTER IN 1/2, MIC, AUDIO OUT, AUDIO IN R/L, VIDEO, S-VIDEO and SERIAL.
- No LAN or USB host/media input applies.
設置する
Instructions from the manualPlace projector and adjust its feet6 steps
- Use a firm table or stand with ample clearance, lens centered and projector perpendicular to the screen.
- Use the test pattern to check size, tilt and other adjustments.
- Turn the one front underside adjustment foot to fine-tune elevation.
- Turn the two rear underside feet to fine-tune side-to-side tilt.
- Keep the plug accessible, 6 cm at the projection front and 30 cm elsewhere.
- If exhaust heat blown toward the lens by air-conditioning causes image shimmer, change air flow direction or projector location.
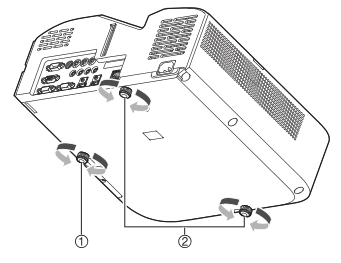
Diagram key
- 1: Turn the one front underside adjustment foot to fine-tune elevation. Both rotation directions are retained.
- 2: Turn the two rear underside adjustment feet to fine-tune side-to-side tilt. Both foot positions and all rotation arrows are retained.
外部機器との接続
Instructions from the manualConnect video and audio source devices11 steps
- Connect before projection using cables matching both device terminals; cables not supplied must be obtained separately.
- Multiple video sources may be connected; select with INPUT.
- Computer RGB or component video uses COMPUTER IN 1/2 mini D-sub 15 via an RGB or component cable.
- S-video uses S-VIDEO mini DIN 4; composite uses VIDEO RCA.
- HDMI equipment uses HDMI 1/2 with High Speed HDMI cable.
- Analogue audio uses AUDIO IN 1/2 stereo mini or AUDIO IN R/L RCA.
- MIC accepts a microphone but does not support plug-in-power microphones.
- External analogue RGB display uses MONITOR OUT and RGB cable.
- External speakers use AUDIO OUT and an audio cable; set Device Settings 2 > Audio Output to Line.
- DC 5 V is power only.
- RS-232 C uses SERIAL and cross serial cable.
ケーブルカバーの取り付けと取り外し
Instructions from the manualAttach and remove the cable cover5 steps
- Turn off, unplug and wait for the projector to cool before attaching or removing the cover.
- Attachment: turn the projector over; insert cover hooks into body hook holes (Figure 1).
- Rotate the cover in Figure 2’s direction onto the body.
- Align cover screw with body screw receiver (Figure 3) and tighten with a Phillips screwdriver (Figure 4).
- Removal: loosen the cover screw with a Phillips screwdriver and detach it from the body; separate the cover screw side from the body, then withdraw the hooks.
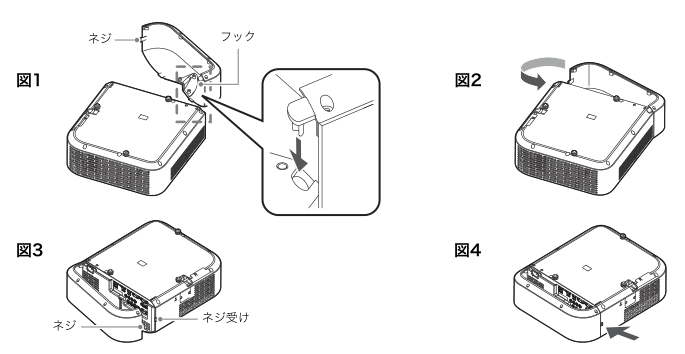
Diagram key
- Figure 1 screw: Cover screw, aligned with the body receiver in Figure 3.
- Figure 1 hooks: Insert the cover hooks into the body hook holes. The complete enlarged inset retains its insertion arrow and both ends of the callout.
- Figure 2 rotation arrow: Rotate the cover onto the body in this direction after inserting the hooks.
- Figure 3 screw: Align the same cover screw with its receiver.
- Figure 3 screw receiver: Body receiver for the cover screw.
- Figure 4 arrow: Tighten with a Phillips screwdriver. Removal: loosen and detach the screw, separate the screw side, then withdraw the hooks.
リモコンについて
Instructions from the manualUse the supplied YT-160 remote5 steps
- Aim the emitter at a projector remote receiver from within approximately 5 m.
- Avoid holding keys down in storage, because this drains batteries.
- Grouped controls: emitter, power, ESC, ID buttons 1–4, cursor Up/Down/Left/Right and ENTER, function keys.
- Power toggles on/off; ESC exits/cancels; cursor keys navigate or change values; ENTER confirms/executes.
- Network-only playback keys are not part of this model’s functions.
基本操作一覧
Instructions from the manualSelect the input source7 steps
- Press INPUT; use INPUT or Up/Down to select the desired source; press ENTER.
- Without ENTER the source switches after approximately 3 seconds.
- The source name shows briefly in the upper right.
- If no signal is detected, 「入力信号がありません」 appears.
- Choose Computer 1/2 RGB or component, Video, S-Video, HDMI 1 or HDMI 2.
- Computer 1 defaults to AUDIO IN 1, Computer 2 to AUDIO IN 2, Video/S-Video to AUDIO IN R/L, and HDMI 1/2 to its own audio.
- File Viewer, CASIO USB Tool and Network do not apply.
Manually correct keystone distortion4 steps
- With no onscreen menu/dialog press body Up/Down or remote KEYSTONE+/−.
- Use Up/Down for vertical and Left/Right for horizontal correction.
- Both adjust within±5 degrees.
- Press ESC to finish.
Enlarge and pan part of the imageView
Temporarily blank picture and sound4 steps
- Press BLANK to interrupt picture and sound and show the configured Blank Screen.
- If Black is selected, the projection light turns off.
- Auto Power Off is disabled until blank is cancelled.
- Press BLANK or ESC to restore; the power key also restores only when the Blank Screen setting is Black.
Freeze the pictureView
Automatically adjust RGB videoView
Choose an aspect ratio6 steps
- Press ASPECT repeatedly.
- WXGA Computer RGB/HDMI-PC cycles Standard, Full, 16:9, 4:3, Real; Video, S-Video, Component/HDMI-DTV cycles Standard, 16:9, 16:10, 4:3, Letterbox.
- Standard preserves aspect at maximum fit; Full stretches to maximum size.16:9 corrects 16:9 squeezed into 4:3; 16:10 fits a 16:10 screen; 4:3 forces 4:3.
- Real maps one input dot to one output pixel, cropping excess resolution; RGB below SVGA is enlarged to SVGA.
- Letterbox preserves ratio, resizes width to 1280 dots and projects the central 800 rows.
- Public/commercial screen resizing may infringe copyright.
Select a colour mode3 steps
- Press FUNC, select Colour Mode, ENTER; choose with Up/Down and ENTER.
- Colour mode cannot be selected when Light Control is Off.
- Choices: Standard (default for PC), Graphics, Theater (default for S-Video, Video, Component, HDMI-DTV), Blackboard, Natural.
Adjust volume or muteView
入力ソースについて
Instructions from the manualMatch computer resolution to the projector2 steps
- If images are rough, text unclear or moiré appears, set computer output to the native WXGA 1280×800 of XJ-UT351W following the computer instructions.
- Alternatively select Real aspect on this WXGA model for pixel-mapped projection.
ライトコントロール
Instructions from the manualAdjust light output and brightness sensing5 steps
- Light Control On (default) allows seven output levels 1–7.
- With no menu/dialog press Left/Right to show the current level and use Left/Right to adjust; ESC finishes.
- MENU > Device Settings 1 > Light Control > Brightness Sensor On enables ambient-light adjustment; default Off.
- For maximum source brightness set Light Control Off, which disables level adjustment and sensing.
- Light Control Off Mode offers Bright (brightness priority) or Normal (default, colour priority).
デジタルスクリーンシフト
Instructions from the manualChange or reset digital screen shift5 steps
- MENU > Screen Settings > Digital Screen Shift > Change Digital Screen Shift, ENTER.
- Use D-ZOOM−/+ to resize 84–100 percent.
- Below 100 percent use Up/Down to move vertically and Left/Right horizontally; at 100 percent skip movement.
- ESC closes the dialog; MENU closes the settings.
- To reset: MENU > Screen Settings > Digital Screen Shift > Reset Digital Screen Shift, ENTER; Up selects Yes, then ENTER.
テストパターンの投映
Instructions from the manualProject a test pattern4 steps
- MENU > Screen Settings > No Signal Screen or Blank Screen; use Left/Right to select Test Pattern; MENU closes.
- For No Signal Screen choose an input with no signal using INPUT; for Blank Screen press BLANK.
- Use for position, size, keystone, focus, aspect and digital screen shift adjustments after wall installation.
- Auto Power Off is disabled while test pattern is projected.
音声入力の変更
Instructions from the manualAssign or reset audio inputs5 steps
- MENU > Device Settings 2 > Audio Input, ENTER; choose the source with Up/Down; use Left/Right to assign its audio input.
- Repeat for other sources as needed, then MENU closes.
- AUDIO IN 1, AUDIO IN 2 or AUDIO IN R/L may replace the default assignment.
- To reset all assignments, run Device Settings 2 > Initialize Device Settings 2.
- This resets ALL settings in Device Settings 2, not just audio.
操作パネルロック
Instructions from the manualLock or unlock the body controls4 steps
- To enable: MENU > Device Settings 2 > Control Panel Lock; Left selects On; ENTER confirms the dialog; MENU closes.
- All body keys except power are locked; remote control still works.
- To unlock with body keys: with no menu/dialog hold Down until the unlock message appears, then release.
- Or use the remote in the above menu path, Right selects Off, then MENU.
リモコンidとプロジェクターidの設定
Instructions from the manualSet and inspect remote and projector IDs6 steps
- IDs 1–4 avoid cross control for up to four nearby projectors.
- Both default All, which communicates regardless of other ID.
- Matching IDs or All are necessary for all normal remote operations.
- Remote only, even with projector off: hold ESC and press 1, 2, 3 or 4 to set that remote ID; ESC+MENU sets All.
- During projection set projector ID: MENU > Device Settings 1 > Projector ID, ENTER; Up/Down chooses 1–4 or All; ENTER.
- Hold ESC and press INPUT to display both IDs for approximately 10 seconds, even when IDs conflict.
プレゼンテーションタイマーを使う(timer)
Instructions from the manualConfigure the presentation countdown8 steps
- With no timer displayed, press TIMER once to show it.
- With Continuous Display Off it disappears after about 5 seconds.
- To open timer functions, press TIMER twice if hidden or once if visible.
- Use Up/Down to select Display Position, Continuous Display or Set Time; Left/Right change selection.
- Position: bottom right (default), top right, top left, bottom left.
- Continuous Off (default) hides after 5 seconds; On keeps it until another dialog or ESC.
- Set Time is 5–60 minutes in 5-minute increments (default 20 minutes).
- ESC saves and closes; to immediately start choose Start Timer and ENTER before ESC.
計時の各種操作
Instructions from the manualStart, pause, resume or reset the timer4 steps
- Open the timer functions menu.
- Select Start Timer and ENTER to start countdown and close the menu.
- At 00:00 it counts up in red for 60 minutes from−00:01 to−60:00.
- Select Pause Timer and ENTER to pause; Resume Timer and ENTER to resume; Reset Timer and ENTER to return to the configured countdown time.
設定メニュー項目一覧
Instructions from the manualUse settings and adjust picture quality10 steps
- Press MENU to open/close Settings.
- Asterisk marks defaults.
- R=RGB, C=Component, V=S-Video/Video, H=HDMI-PC, D=HDMI-DTV; items apply only to indicated sources.
- N-marked network items and F/T/Network inputs are inapplicable.
- Image Adjustment 1: Brightness, Contrast; V-only Sharpness (higher sharper), Colour Saturation (higher richer) and Tint (higher bluer, lower redder; NTSC/NTSC 4.43 only).
- Colour Balance offers Warm, Standard (default), Cool and individual RGB adjustments.
- Image Adjustment 2: Vertical/Horizontal Position for RGB/Component/Video; Frequency for RGB vertical bands, Phase for RGB flicker.
- If manual frequency makes RGB disappear, press AUTO.
- Overscan for Component/Video/HDMI-DTV is 0–5 percent (default 5); lower values display more of the input.
- Initialize Image Adjustment 1/2 or Volume Adjustment resets all items in that group for the current source.
Screen and projection settings9 steps
- Screen Settings vertical/horizontal keystone correct distortion.
- Correction Priority Shape reduces keystone-related distortion but slightly narrows projection; Size (default) keeps normal area but may distort.
- Aspect and Digital Screen Shift use the reviewed guides.
- Projection Method Front (default) projects from in front; Rear horizontally mirrors for rear projection.
- Ceiling Projection On is for upside-down wall mounting and flips both axes; Off (default) is for table top.
- No Signal Screen choices Blue (default), Black, Logo (built-in or user logo), Test Pattern.
- Blank Screen has the same choices with Black default.
- Test Pattern disables Auto Power Off.
- Initialize Screen Settings resets all current-source screen items.
Input signal and automatic adjustment settings6 steps
- Input Settings > COMPUTER 1/2 Terminal: Auto (default) detects RGB/Component; RGB or Component forces that interpretation.
- RGB 1/2 Level Adjustment On (default) usually optimizes RGB; if image is disturbed change to Off.
- Video/S-Video Signal: Auto (default) or NTSC, NTSC 4.43, PAL, PAL-M, PAL-N, PAL 60, SECAM.
- Signal Name Display On (default) shows input name after INPUT selection; Off hides it.
- Initialize Input Settings resets current-source input items.
- Device Settings 1 > Auto Adjustment On (default) detects RGB resolution/frequency and adjusts; Off preserves manual vertical/horizontal position, frequency and phase across power cycles.
Power, language and device settings11 steps
- Auto Power Off acts after both no key activity and no input for 5, 10 (default), 15, 20 or 30 minutes; Off disables it.
- Direct Power On set to On starts upon connecting mains; default Off.
- Device Settings 1 > Language selects English, French, German, Italian, Spanish, Swedish, Portuguese, Dutch, Norwegian, Polish, Finnish, Czech, Turkish, Russian, Lithuanian, Vietnamese, Thai, Malay, Indonesian, Arabic, Simplified Chinese, Traditional Chinese, Korean or Japanese.
- Initialize Device Settings 1 resets all current-source items in that group.
- Device Settings 2 > Audio Output: Speaker (default) or Line (AUDIO OUT).
- High Altitude On for 1500–3000 m improves fan cooling; Off (default) below 1500 m.
- Never use above 3000 m.
- Closed Captions for Video with captions: Off (default), CC 1, CC 2, CC 3, CC 4.
- Timer Function opens timer functions.
- Microphone Input Level 0 (default, mute)–3 (maximum).
- Initialize Device Settings 2 resets all current-source items in that group.
Enable standby RGB and audio output4 steps
- Device Settings 2 > Standby RGB/Audio: Output enables MONITOR OUT and AUDIO OUT while powered but in standby; Do Not Output is default.
- Standby video is only COMPUTER IN 1; audio is that assigned to Computer 1 plus MIC.
- Standby audio always uses AUDIO OUT regardless of Audio Output Speaker/Line.
- COMPUTER IN 2 video cannot output during standby.
Inspect information and initialize settings4 steps
- Information lists input signal, signal name, resolution, horizontal/vertical frequency, scanning method, audio input, projector ID, light use time and Version (ROM version).
- Unit Use Time is cumulative and cannot be reset.
- All Initialization resets Settings except Language, Password, Light Use Time, Version and Unit Use Time.
- Transferred user logo is not erased.
パスワード機能の利用
Instructions from the manualChange or enable the power-on password14 steps
- Password protection discourages unauthorized use but does not prevent theft.
- Keep the remote, replace weak batteries and match IDs or set either to All.
- Record the password separately and change the factory password promptly.
- MENU > Device Settings 1 > Password, ENTER.
- Enter current password then ENTER.
- Factory sequence: Up, Down, Left, Right, Up, Down, Left, Right.
- Down selects Change Password, ENTER.
- Enter up to eight key operations, ENTER; re-enter the same password, ENTER.
- On registered message press ESC.
- If mismatch message appears, ESC and retry the new password entry.
- Permitted keys: INPUT, MENU, BLANK, FREEZE, the printed light-control key, VOLUME+/−, D-ZOOM+/−, KEYSTONE+/−, four cursors, TIMER, AUTO, ASPECT, FUNC.
- To enable/disable, repeat the current-password menu steps; with Power On Password selected use Left/Right to choose On/Off.
- When Off→On, ENTER confirms asking at power-on or ESC cancels.
- MENU closes.
ご自分のパスワードを忘れてしまった場合には
Instructions from the manualForgotten password service procedure2 steps
- Take projector and identification (employee ID, driving licence, etc.; copy accepted) to the repair enquiry service and request paid password removal.
- This resets all settings except light use time.
本機外部のクリーニング
Instructions from the manualClean the projector exterior3 steps
- Turn off, unplug and allow it to cool fully before cleaning.
- Wipe the exterior using a soft cloth dampened with diluted neutral detergent and wrung out firmly.
- Never use benzine, alcohol, thinner or other chemicals.
レンズのクリーニング
Instructions from the manualClean the projection lensView
吸気口などのクリーニング
Instructions from the manualVacuum intake and exhaust vents4 steps
- Turn off, unplug and allow it to cool fully.
- Carefully vacuum dust from both illustrated intakes approximately monthly.
- Dust can overheat the interior and cause failure.
- Depending on environment dust may also accumulate on the exhaust; clean it in the same way.
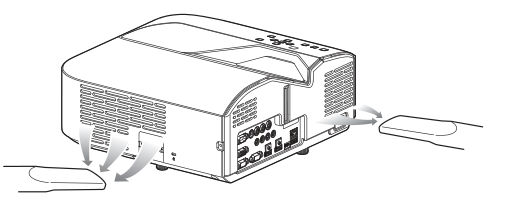
Diagram key
- Left nozzle and arrows: Carefully vacuum the first illustrated intake approximately monthly.
- Right nozzle and arrows: Carefully vacuum the second illustrated intake approximately monthly. Turn off, unplug and cool fully before cleaning; treat dusty exhaust in the same way.
インジケーター表示について
Instructions from the manualRead normal indicator combinations9 steps
- Read POWER/STANDBY, LIGHT, TEMP together: solid red/solid orange/solid orange immediately after connection; wait for standby before turning on.
- Solid red/off/off is standby.
- Blinking green/solid orange/solid orange is warm-up.
- Solid green/off/off is ready with Light Control Off; solid green/solid green/off is ready with Light Control On.
- Blinking red/off/off is internal processing just after shutdown.
- Solid dot means lit, double circle blinking, open circle off.
- Error-table em-dash means unspecified, not a guessed off state.
- Before unplugging after an error wait for the fan to stop, otherwise it may not recover at reconnection.
- ESC dismisses warning messages.
外部機器への給電について
Instructions from the manualSupply power to an external USB device7 steps
- DC 5 V/2 A Type A on XJ-UT351W is a power-only terminal, not USB host.
- Before powering an external device set Device Settings 1 > Auto Power Off to Off.
- Shutdown, self-check restart, Auto Power Off or error stops power and may erase/damage unsaved external data; save often.
- Use CASIO-tested devices where possible; other devices up to DC 5 V/2 A may work with limited functions and are not guaranteed.
- Follow the external device instructions, especially for rechargeable batteries: wrong connection risks rupture, smoke or fire.
- CASIO disclaims responsibility for connected device/data failures.
- To interrupt projection while continuing supply press BLANK.
ファームウェア更新、ユーザーロゴ転送について
Instructions from the manualConnect for firmware or user-logo transfer2 steps
- Connect the computer USB port to the projector LOGO Micro-USB Type B terminal using a commercial matching cable.
- Follow the complete separate firmware or user-logo transfer guide; do not use DC 5 V as a data-input port.
本機を壁に設置する
Instructions from the manualWall-installation precautions5 steps
- Use the dedicated wall bracket with the projector upside-down; ask the dealer for details.
- Keep as far as possible and at least 1 m from fire detectors/alarms to avoid false activation from hot exhaust.
- Avoid strong lights/fluorescent lamps near the receiver and test remote operation at the proposed position before mounting.
- Set upside-down projection with Screen Settings > Ceiling Projection On; Off is for table top.
- No mounting screw dimensions or vertical projection permission is inferred.
Monitor out端子の利用について
Instructions from the manualUse MONITOR OUT4 steps
- While on, Computer 1 sends COMPUTER IN 1 through MONITOR OUT; Computer 2 sends COMPUTER IN 2.
- For Video, S-Video, HDMI 1/2 it continues the later-selected Computer 1 or Computer 2 input, e.g.
- Computer 1→S-Video keeps the IN 1 signal.
- Standby can output only COMPUTER IN 1 when Standby RGB/Audio is enabled; IN 2 cannot output in standby.
投映距離と投映サイズについて
Instructions from the manualProjection-distance and geometry reference3 steps
- Approximate WXGA installation guides: screen inches/diagonal cm/Lcm/hcm: 50/127/6/24; 60/152/13/27; 80/203/27/32; 100/254/40/38; 110/279/47/40.
- L is measured from the product front to the projection surface; h from product bottom to picture bottom.
- Use only the WXGA branch for XJ-UT351W.
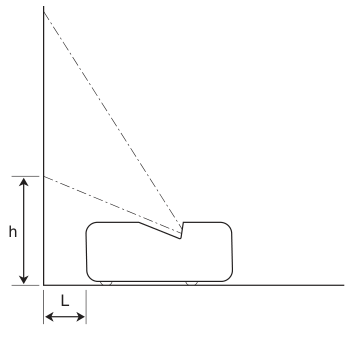
Diagram key
- h: Height from the product bottom to the picture bottom, shown by the complete vertical two-ended arrow.
- L: Distance from the product front to the projection surface, shown by the complete horizontal two-ended arrow. Approximate screen inches/L cm/h cm: 50/6/24; 60/13/27; 80/27/32; 100/40/38; 110/47/40.
プロジェクターのrs-232c制御について
Instructions from the manualRS-232C connection and protocol10 steps
- Connect computer and SERIAL with a commercial cross serial cable.
- Use 19200 bps, 8 data bits, no parity, 1 stop bit, no flow control.
- Commands use ASCII and decimal integers.
- Read format (COMMAND?) returns (setting-range, current-value); write (COMMAND value).
- Example (VOL?) returns (0-30, 15); (VOL 0) mutes.
- Unrecognized command returns?; unsupported setting values are ignored.
- Wait for the previous command or body/remote key operation to complete before sending the next.
- While off send only PWR?, LMP? or PWR 1.
- BLK and ARZ require a valid input signal.
- Only model-supported commands/values apply.
コマンド一覧
Instructions from the manualRS-232C picture and audio command values14 steps
- PWR 0/1 Off/On.
- SRC 0 RGB 1, 1 Component 1, 2 Video, 3 RGB 2, 4 Component 2, 6 Auto 1, 7 HDMI 1, 9 S-Video, 10 Auto 2, 14 HDMI 2; network/media/calculator values do not apply.
- AIS 1 AUDIO IN 1, 2 AUDIO IN 2, 3 AUDIO IN R/L, 4 HDMI 1 audio, 5 HDMI 2 audio.
- BLK 0/1 blank; VOL 0–30 (mute–max); VLP/VLM raise/lower by the amount sent (e.g.
- VLP 5/VLM 5); MUT 0/1 mute.
- PST 1 Graphics, 2 Theater, 3 Standard, 4 Blackboard, 5 Natural.
- ARZ 0 Standard for RGB/HDMI-PC, 2 Standard for Component/HDMI-DTV/Video/S-Video; 1=16:9, 3 Letterbox, 4 Full, 5 Real, 6=4:3, 7=16:10 subject to source-supported choices.
- LMP reads cumulative light hours.
- PMD 0 Bright, 1 Normal (only Light Control Off); 2 brightness sensor On; 3–9 Light Output 7, 6, 5, 4, 3, 2, 1.
- FRZ 0/1 Freeze.
- KST 0–120 is vertical keystone (GUI−60..60); KSP/KSM increment/decrement by amount.
- HKS 0–120 horizontal keystone (GUI−60..60); HKP/HKM increment/decrement by amount.
- MIC 0–3 microphone level.
- Audio adjustment applies to the current source.
RS-232C key, status and installation commands6 steps
- KEY values correspond to the remote key operations and must follow the same operation order: 1 Up, 2 Down, 3 Left, 4 Right, 5 ENTER, 6 ESC, 10 FUNC, 11 MENU, 12 POWER, 13 AUTO, 14 INPUT, 15 TIMER, 16 ASPECT, 17 BLANK, 18 FREEZE, 19 printed light-control key, 20 KEYSTONE+, 21 KEYSTONE−, 22 D-ZOOM+, 23 D-ZOOM−, 24 VOLUME+, 25 VOLUME−.
- Playback KEY 26–30 belongs to the network branch.
- POS 0 top-up/front, 1 top-down/rear, 2 top-up/rear, 3 top-down/front; these implement Projection Method/Ceiling Projection.
- APO 0 Off, 1=5 min, 2=10 min, 3=15 min, 4=20 min, 5=30 min.
- STS queries error status: 0 normal, 1 fan, 2 temperature, 7 light, 16 other; these are serial query values, not display codes.
- IDS 0 All, 1–4 corresponding projector ID.
仕様
Instructions from the manualVerified specifications and environment7 steps
- XJ-UT351W: 1-chip DLP, 0.65-inch WXGA 1280×800, 16:10; fixed zoom/manual focus F 2.3/f 4.2; laser/LED; 50–110 inch images; 3500 lm, 20000:1 under Light Control Off Bright/JISX 6911:2015 conditions, not a guarantee of every unit.
- Native 1280×800; maximum compressed RGB/HDMI 1920×1200, component 1920×1080.
- Horizontal 15–91 kHz, vertical 50–85 Hz; 16 W mono speaker.
- Operate 5–35°C, 20–80 percent humidity without condensation, altitude 0–3000 m with High Altitude On at 1500–3000 m.
- Japan 100 V AC 50/60 Hz.
- Light Control On output 7=185 W, output 1=105 W; Off Bright 225 W, Off Normal 200 W; standby 0.12 W.
- Approx 338 mm width×333 mm depth×153 mm thickness including protrusions, 5.7 kg; dimensions/weight exclude cable cover.
はじめに
Instructions from the manualCheck firmware version and update requirements6 steps
- Check the official CASIO support page for firmware for this exact projector and note its version.
- While projecting, press MENU, select Information with Up/Down and read Version.
- Update is possible only if the published version is newer.
- The guide lists Windows 8, Windows 7 SP1, Vista SP2 and XP SP3 (32-bit), on a compatible PC with its preinstalled listed OS, Pentium M 1.6 GHz or higher plus OS-recommended CPU/memory, full-colour display at least 1024 × 768, keyboard and pointing device.
- It does not establish support for newer operating systems.
- Obtain a suitable USB cable, USB DRIVER for CASIO Projector, CASIO Projector Flash Loader and the exact model’s .cpr firmware from official support.
Prepare user-logo transfer software and image6 steps
- The generic guide lists possible startup/blank/no-signal uses; this model’s operation guide confirms blank/no-signal Logo settings.
- Obtain USB DRIVER for CASIO Projector, CASIO Projector LOGO Loader, model-specific .cph header and the image from the official support service.
- Use a USB cable matching the LOGO MicroUSB TypeB port.
- Published environment: Windows 8 / 7 SP1 / Vista SP2/XP SP3 (32-bit), preinstalled IBM PC/AT-compatible computer, Pentium M 1.6 GHz or higher and the OS-recommended CPU, OS-recommended memory, full-colour 1024×768 or higher display, keyboard and pointer.
- These are historic guide requirements, not a claim of current support.
- Use RGB 24-bit full-colour BMP, 640×480 through 1280×800; 1280×800 matches this model’s native resolution.
Usbドライバーをインストールするには
Instructions from the manualInstall the firmware USB driver6 steps
- Install the driver before USB-connecting the projector.
- Otherwise the PC cannot recognise it or transfer data.
- If connected prematurely, unplug the PC USB cable, install the driver and reconnect.
- Download USB DRIVER for CASIO Projector from official support and double-click PjUsbDriverSetup_EN.exe.
- Follow its dialogs.
- For User Account Control choose Yes on Windows 7/8 or Allow on Vista; on the illustrated XP prompt choose Continue.
Install the user-logo USB driver before connection4 steps
- Before USB connection download USB DRIVER for CASIO Projector.
- Run PjUsbDriverSetup_EN.exe and follow dialogs.
- Windows 7/8: choose Yes at UAC; Vista: Allow; XP: Continue at its warning.
- If USB was connected first, unplug USB, install the driver, then reconnect; without the driver transfer cannot work.
プロジェクターのファームウェアを更新するには
Instructions from the manualUpdate the projector firmware14 steps
- On the update PC, download the Flash Loader and exact-model firmware ZIPs from official support.
- Extract both into the same folder.
- Unplug the projector power cord from the outlet.
- Connect the computer USB port to the projector’s firmware/ROM-update USB port with a suitable cable; for XJ-UT351W this is the Micro-USB LOGO terminal documented in the operation guide.
- Connect the projector power cord to the outlet and turn on.
- POWER flashes orange in the guide’s one-second-on/one-second-off pattern.
- Close all running PC applications.
- Double-click PjFlashLoader_EN.exe.
- Click Choose, select the exact .cpr firmware in the Open dialog, then Open.
- Click Upload.
- During transfer the projector POWER indicator goes out and the PC progress bar shows progress; on completion a dialog appears and POWER flashes orange.
- Never turn off the projector or PC, or disconnect USB, during data transfer.
- After completion click OK, then the window’s upper-right X to close the Flash Loader.
- Remove the USB cable from both projector and PC, then unplug the projector power cord from the outlet.
プロジェクターにユーザーロゴを転送するには
Instructions from the manualTransfer the user-logo image18 steps
- Transfer erases the previously stored logo.
- Download LOGO Loader and exact-model header ZIP files; extract both to the same computer folder.
- Put the chosen BMP there.
- Unplug projector mains if connected.
- Connect computer USB to the LOGO firmware/ROM-update port.
- Plug mains in and power on; POWER flashes orange 1 second on / 1 second off.
- Close all computer applications.
- Run PjLogoLoader_EN.exe.
- Click upper Choose, select exact-model .cph and Open.
- Check LOGO Header File Format: OK.
- If absent, obtain an uncorrupted exact-model header and repeat from upper Choose.
- Click lower Choose, select image and Open.
- Check Image File Format: OK.
- If absent use a BMP meeting the complete requirements and repeat from lower Choose.
- Click Upload.
- During transfer POWER goes off and progress appears; completion shows a dialog and POWER resumes orange flashing.
- Never interrupt either power supply or unplug USB during transfer.
- Click OK, close LOGO Loader with its top-right close control, remove USB from both devices, then unplug projector mains.
Xj-ut331x/xj-ut311wn/xj-ut351w/xj-ut351wn
Instructions from the manualSupported source timings6 steps
- RGB (VESA): 640×480 at 60/72/75/85 Hz; 800×600 at 56/60/72/75/85 Hz; 1024×768 at 60/70/75/85 Hz; 1152×864/75; 1280×720/60; 1280×768/60; 1280×800/60; 1280×960/60; 1280×1024 at 60/75/85; 1366×768/60; 1400×1050/60; 1440×900/60; 1600×1200/60; 1680×1050/60; 1920×1080/60; 1920×1200 RB/60.
- Component HDTV: 1080 p 50/60,720 p 50/60, 1080 i 50/60.
- Component SDTV: 576 p 50,576 i 50,480 p 60,480 i 60.
- HDMI: 640×480/60,800×600/60, 1024×768/60, 1280×720/60, 1280×768/60, 1280×800/60, 1280×960/60, 1280×1024/60, 1400×1050/60, 1920×1080/60, 1920×1200 RB/60; SDTV 480 p, 576 p; HDTV 720 p 50/60, 1080 i 50/60, 1080 p 50/60.
- Video: NTSC, NTSC 4.43, PAL, PAL-M, PAL-N, PAL 60, SECAM.
- Native XJ-UT351W projection remains 1280×800.
Model details
Model and compatibility
- Native resolution
- WXGA 1280 × 800, 16:10, 0.65-inch DLP; fixed zoom, manual focus.
- Power supply
- 100 V AC, 50/60 Hz; Japan only.
- Operating environment
- 5–35°C, 20–80% humidity without condensation; altitude 0–3000 m.
- Size and mass
- 338 × 333 × 153 mm (W × D × H), including protrusions; approximately 5.7 kg. Both exclude the cable cover.