MODEL REFERENCE
Brother PT-1005
10 errors · 10 troubleshooting topics · 32 guides
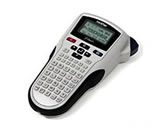
The checks and guides below come from the official manuals for this model.
No matches for this wording. Try a light name, error code or a shorter phrase.
Errors and messages
Messages and indicator states from the manual Batterybatteries are weak
Replace all six batteries together with new AAA LR03 alkaline batteries.
BATTERY!batteries are about to run out
Replace all six batteries together with new AAA LR03 alkaline batteries.
Invalidnumbering or length selection is invalid3 checks
No Textno text is available3 checks
Line Lmttwo-line limit or tape-width restriction2 checks
No Cassettetape cassette is missing
Switch off before installing a Brother TZ tape cassette. Check that it slots into place and close the cover securely.
Cutter Errorcutter used during printing
Do not touch the cutter lever during printing. Do not cut while Print or Feed is displayed.
Full80-character limit reached
The guide identifies the 80-character limit. Use Backspace to delete characters one at a time, or Clear and Text Only to clear text while retaining formatting.
Text Lmttext exceeds the selected label length2 checks
No Frame OK?frame cannot print on 3.5 mm tape
Press Enter to print without a frame, or Backspace/Cancel to cancel.
Troubleshooting
Find the problem you are experiencingDisplay stays blank3 checks
- Batteries may be incorrectly inserted
- Check battery orientation.
- Batteries are weak
- Replace weak batteries.
- Adapter may be incorrectly connected
- Check the AD-24ES connection.
Printed label has too much marginView
Select Half or Narrow under Margin to reduce margins on both sides.
Label does not print or characters are malformed3 checks
- Cassette may be incorrectly inserted
- Check cassette installation.
- Cassette is empty
- Replace the cassette.
- Cover may be open
- Close the tape compartment cover properly.
Settings clear on their ownView
Replace weak batteries. Disconnecting power for more than two minutes clears display text and formats and the Language, Unit and Time/Date settings.
A blank horizontal line crosses the labelView
Switch off before removing the tape cassette. Gently wipe the print head up and down with a dry cotton swab. Do not touch the print head with your fingers.
Label maker stops respondingView
Switch off. Hold Function and R, press Power to switch on while holding both, then release Function and R. Display text, formats, Language, Unit and Time/Date settings are erased.
Power turns off when printing starts2 checks
- Batteries may be weak
- Replace weak batteries.
- Batteries may be incorrectly inserted
- Check battery orientation.
Tape will not feed or gets stuck2 checks
- Tape end may be outside guides
- Check that the tape end feeds under the tape guides.
- Cutter lever used during printing
- Do not touch the cutter lever during printing.
Clear text and formatting for a new labelView
Press Clear, select Txt&Format with the cursor keys and press Enter.
Change the display languageView
Press Function, select Language with the cursor keys, press Enter, select a language with the cursor keys and press Enter.
Guides
Power supply & tape cassettes
Instructions from the manualInstall batteries and tape11 steps
- Switch off before replacing batteries or the tape cassette.
- Open the cover by pressing its rough area at the top end.
- Remove an existing cassette straight upward and remove installed batteries.
- Insert six new AAA LR03 alkaline batteries with all poles facing their marked directions.
- Always replace all six together with new batteries.
- Insert a Brother TZ cassette so it slots into place.
- Check that the tape end feeds under the tape guides; if the ribbon is loose, wind the toothed wheel in the direction of the cassette arrow.
- Close the back cover securely so it slots into place.
- Press Function, select Feed with the cursor keys and press Enter to feed once.
- After feeding, push in the tape cutter lever to cut.
- Never cut while Print or Feed is displayed.
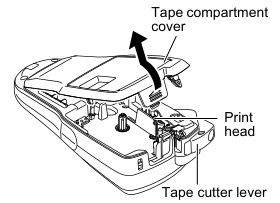
Diagram key
- Tape compartment cover: Open the cover by pressing the rough area at the top end.
- Print head: Do not touch it with your fingers; use a soft wipe for cleaning.
- Tape cutter lever: Cut only after printing or feeding finishes.
- Opening arrow: Open the tape compartment cover; switch off before replacing batteries or tape.
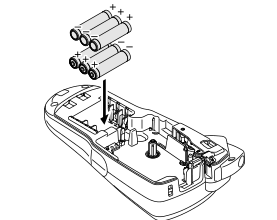
Diagram key
- Insertion arrow: Insert six new AAA LR03 alkaline batteries into the compartment with correct polarity.
- Positive marks: Match the positive pole of each of the six batteries to its printed positive mark.
- Negative marks: Match the negative pole of each of the six batteries to its printed negative mark.
- Six battery positions: Replace all six batteries together with brand-new cells.
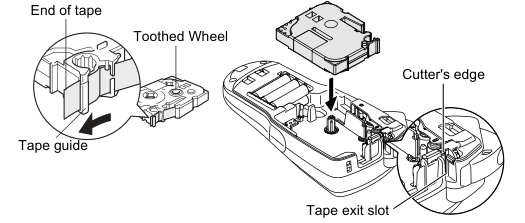
Diagram key
- End of tape: Ensure the tape end feeds under the tape guides.
- Tape guide: Route the tape beneath the guides.
- Toothed Wheel: If the ribbon is loose, wind this wheel in the direction of the cassette arrow.
- Cutter’s edge: Do not touch the cutter blade.
- Tape exit slot: Keep foreign objects out of this slot.
- Tape path arrow: Ensure the end of tape feeds beneath the guides.
- Cassette insertion arrow: Insert a Brother TZ cassette so it slots into place.
- Magnified cutter inset: The leader circle enlarges the cutter edge; avoid touching the blade.
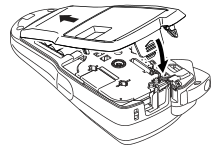
Diagram key
- Cover sliding arrow: Close the back cover securely so it slots into place.
- Cover pressing arrow: Securely close the back cover so it slots into place.
Connect the AD-24ES adapter3 steps
- Insert the adapter-cord plug into the jack at the bottom end of the machine, then insert the mains plug into the nearest standard outlet.
- Brother recommends using AAA LR03 alkaline batteries together with the adapter for memory backup.
- Use the specified voltage and suggested AD-24ES adapter; keep the equipment and plug dry and hold the plug when disconnecting.
Initial settings
Instructions from the manualSet language, units, date and time9 steps
- Supply power with six AAA alkaline batteries or the AD-24ES adapter and press Power.
- Press Function, select Language with the cursor keys and press Enter.
- Select a language with the cursor keys and press Enter; English is the default.
- Press Function, select Unit with the cursor keys and press Enter.
- Select mm or inch with the cursor keys and press Enter; mm is the default.
- Press Function, select TimeDate and press Enter, then select Clock and press Enter.
- Enter day, month and two-digit year in DD/MM/YY order, confirming each with Enter.
- Enter hour and minute in hh:mm order, confirming with Enter.
- The right cursor key can also confirm a figure and move to the next setting.
Reset the label maker5 steps
- Switch off.
- Hold Function and R, press Power to switch on while holding both keys, then release Function and R.
- This resets the machine to defaults and clears display text, formats, Language, Unit and Time/Date settings.
- Press Backspace/Cancel to cancel an operation.
- The machine automatically switches off after five minutes without a keypress.
Accessories
Instructions from the manualReplace a worn cutter4 steps
- If repeated use blunts the blade or wears the cutter stopper so tape no longer cuts cleanly, obtain a new TC-5 cutter unit from an authorised Brother reseller.
- The guide supplies no replacement sequence.
- Do not touch the cutter blade or metal parts near the print head.
- Supplies may differ by distribution; refer to the included Tape Catalog.
Making text
Instructions from the manualSwitch upper and lower caseView
Press Caps to switch between upper case on and lower case off.
Create two-line textView
Move the cursor to where the second line begins and press Enter. Use 9 mm or 12 mm tape for two-line text. Do not enter a third line.
Enter symbols3 steps
- Press Symbol, choose a symbol with the cursor keys and press Enter.
- Press Symbol to move to the next group; press Backspace/Cancel to cancel.
- The complete printed inventory has thirteen groups; symbol meanings are not assigned by the guide.
Enter accented characters3 steps
- Enter the base letter, press Accent, choose the accented character with Accent or the cursor keys and press Enter.
- Press Backspace/Cancel to cancel.
- Character order differs with the selected LCD language.
Clear text with or without formatting3 steps
- Backspace deletes characters one at a time.
- To clear text and settings, press Clear, choose Txt&Format with the cursor keys and press Enter.
- To clear only text, choose Text Only instead and press Enter.
Designing labels
Instructions from the manualSet character sizeView
Press Function, choose Size with the cursor keys and press Enter. Choose Large, Medium or Small and press Enter. Text size also adjusts automatically to tape width.
Set character widthView
Press Function, choose Width with the cursor keys and press Enter. Choose Normal, ×2 or ×1/2 and press Enter.
Set print styleView
Press Function, choose Style with the cursor keys and press Enter. Choose Normal, Bold, Outline, Shadow, Italic, I+Bold, I+Outl, I+Shadow or Vertical and press Enter.
Set underline or frameView
Press Function, choose Undl/Frm with the cursor keys and press Enter. Choose Off, Undl, Round, Candy, Callout, Banner or Wooden and press Enter. Frames cannot print on 3.5 mm tape.
Insert a text tabView
Place the cursor at the desired tab position. Press Function, select Tab with the cursor keys and press Enter to align the text.
Set tab lengthView
Press Function, choose Tab Length with the cursor keys and press Enter. Select Auto or 0–100 mm with the cursor or Number keys and press Enter. Press Space to return to Auto.
Set label lengthView
Press Function, choose Length with the cursor keys and press Enter. Select Auto or 30–300 mm with the cursor or Number keys and press Enter. Press Space to return to Auto.
Choose an Auto Format length2 steps
- Press Function, choose A/F with the cursor keys and press Enter.
- Choose a preset and press Enter: VCR VHS 140 mm, Mini DV 42 mm, Audio 89 mm, CD Spine 113 mm, File Tab 82 mm or Divider 42 mm.
Use function shortcuts2 steps
- Press Function together with the shortcut key printed beside the menu title, then Enter to confirm.
- The reviewed shortcuts are 1 Size, 2 Width, 3 Style, 4 Underline/Frame, 5 Tab, 6 Tab Length, 7 Label Length, 8 Auto Format, 9 File, 0 Print Option, period Preview, comma Margin, Space Feed and Time/Date TimeDate.
Printing labels
Instructions from the manualPreview label text3 steps
- Press Function, select Preview with the cursor keys and press Enter.
- The LCD shows all text and label length in inch/mm, then returns to the original text.
- Preview shows text only; it does not show font, style, size, underline/frame or other features.
Feed tapeView
Press Function, select Feed with the cursor keys and press Enter. Do not cut while Feed is displayed.
Print and cut a label4 steps
- Press Print.
- After printing or feeding finishes, push in the tape cutter lever at the upper-right corner to cut.
- Do not cut while Print or Feed is displayed.
- With Chain Print, OK to Feed? appears after printing: follow the chain-print feed decision before cutting.
Set margins and chain-print labels10 steps
- Press Function, select Margin with the cursor keys and press Enter.
- Select Full, Half, Narrow or Chain Prt and press Enter.
- Full leaves 25 mm on each side, Half 12 mm and Narrow 4 mm.
- For Full, Half or Narrow, cut along the printed dots with scissors to centre the text.
- For Chain Prt, enter the first text and press Print.
- At OK to Feed?, press Backspace/Cancel to cancel feeding before entering the next text in another style.
- Repeat for further labels.
- After the final print, press Enter at OK to Feed? to feed the tape, then cut.
- Feed before using the cutter or part of the text may be cut off.
- Never pull the tape; this can damage the cassette.

Diagram key
- Full left arrow: 25 mm margin to the left of the text.
- Full right arrow: 25 mm margin to the right of the text.
- Half left arrow: 12 mm margin to the left of the text.
- Half right arrow: 12 mm margin to the right of the text.
- Narrow left arrow: 4 mm margin to the left of the text.
- Narrow right arrow: 4 mm margin to the right of the text.
- Half printed dots: Cut along the printed dots with scissors to centre the text.
- Narrow printed dots: Cut along the printed dots with scissors to centre the text.
Print up to nine copiesView
Press Function, choose Print Option with the cursor keys and press Enter. Choose Copies and press Enter; select a count from 1 to 9 with cursor or Number keys and press Enter.
Print sequential numbers5 steps
- Position the cursor under the number to increase.
- Press Function, select Print Option with the cursor keys and press Enter.
- Select Numbering and press Enter, select the highest number to print and press Enter.
- Each label increases the selected number by one.
- Check the Invalid error conditions if no text is above the cursor or an invalid character is selected.
Print mirror text3 steps
- Press Function, select Print Option with the cursor keys and press Enter.
- Select Mirror, press Enter and confirm Mirror Prt? with Enter.
- Use clear tape so text is readable from the opposite side of glass, windows or other transparent surfaces.
Completed labels
Instructions from the manualApply a printed label2 steps
- Peel the printed label from its backing and apply it.
- First check the material and environmental conditions: labels may detach, become irremovable, change colour or transfer colour.
Useful functions
Instructions from the manualSave, open and print stored labels5 steps
- Enter the label text.
- Press Function, select File with the cursor keys and press Enter.
- Select Save, Print or Open and press Enter; choose a file number with the cursor keys and press Enter.
- Up to nine labels can be saved, recalled, edited and overwritten.
- If Overwrite? appears for an occupied save number, press Enter to save the new label or Backspace/Cancel to cancel.
Insert and format time and date5 steps
- Position the cursor where the time/date should appear and press Time/Date.
- To choose a format, press Function, select TimeDate and press Enter, then choose Format and press Enter.
- Select a format and press Enter.
- The eight formats are D/M/Y, D/M/Y hm, D.M.Y, D.M.Y hm, Y-M-D, Y-M-D hm, M/D/Y and M/D/Y hm.
- Change the clock through Initial Settings step 4.
General precautions
Instructions from the manualClean and store the label maker7 steps
- Clean the machine only with a soft dry cloth; do not use alcohol or other organic solvents.
- Do not touch the print head with your fingers; clean it with a soft wipe such as a cotton swab.
- Keep foreign objects out of the tape exit and adapter connector.
- Keep the machine away from direct sun, rain, heaters, hot appliances, cars, extreme temperatures, humidity and dust.
- The operating range is 10–35°C.
- Do not print with an empty cassette or pull feeding tape.
- Use only Brother TZ tape bearing its mark and use the machine only as described in the guide.
Caution
Instructions from the manualObserve cutter, storage and label precautions7 steps
- Do not touch the cutter blade or metal parts near the print head, or apply excessive pressure to the cutter lever.
- For extended non-use, remove batteries and disconnect the adapter.
- More than two minutes without power clears display text/formats and Language, Unit and Time/Date settings.
- Insert batteries correctly to prevent leakage or damage.
- Do not drop or hit the equipment or press on the LCD.
- Check label material and environmental conditions before application; labels may detach, become irremovable, change colour or transfer colour.
- Stored data may be lost through failure, repair or expired batteries.
Warning
Instructions from the manualStop use when power or equipment is abnormal7 steps
- Use the specified voltage and suggested AD-24ES adapter.
- Immediately unplug and stop using the machine during an electrical storm.
- Do not use the adapter in high humidity, overload or damage the cord/plug, put heavy objects on the cord, forcibly bend or pull it, or use a loose outlet.
- Fully insert the plug and hold it when disconnecting.
- Keep machine, adapter and plug dry.
- Do not disassemble or modify the equipment or batteries, or use metallic objects to change batteries.
- If unusual odour, heat, discoloration, deformation or anything unusual occurs during use or storage, disconnect the adapter, remove batteries and stop use immediately.
Controls and parts
See the manual diagrams 1 diagram
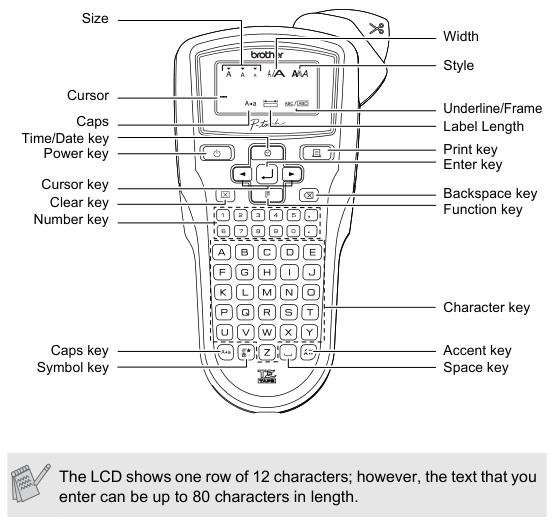
Diagram key
- Size: LCD text-size indicator.
- Width: LCD text-width indicator.
- Style: LCD print-style indicator.
- Cursor: LCD text cursor.
- Caps: LCD upper-case indicator.
- Underline/Frame: LCD underline/frame indicator.
- Label Length: LCD label-length indicator.
- Time/Date key: Inserts time and date at the cursor.
- Power key: Turns the machine on.
- Print key: Prints the label.
- Enter key: Confirms the selected setting.
- Cursor key: Moves the cursor or selects a setting.
- Backspace key: Deletes letters one at a time and cancels operations.
- Clear key: Opens the text/format clearing selection.
- Function key: Opens the function menu.
- Number key: Enters numbers.
- Character key: Enters label text.
- Caps key: Switches upper/lower case.
- Accent key: Opens accented-character selection.
- Symbol key: Opens symbol selection.
- Space key: Returns Tab Length or Label Length to Auto.
- LCD note panel: The LCD shows one row of twelve characters; entered text can be up to eighty characters.
Model details
Model and compatibility
- Tape
- Use Brother TZ tape in 3.5, 6, 9 or 12 mm widths. Two-line text requires 9 or 12 mm tape.
- Power
- Use six AAA LR03 alkaline batteries or AD-24ES adapter.
- Display
- The LCD shows one row of 12 characters; entered text can be up to 80 characters.
- Cutter
- TC-5 is the listed replacement cutter unit; supplies may differ by distribution.