MODEL REFERENCE
Philips NeoPix 150 NPX150/INT
18 troubleshooting topics · 53 guides

The checks and guides below come from the official manuals for this model.
No matches for this wording. Try a light name, error code or a shorter phrase.
Troubleshooting
Find the problem you are experiencingGeneral problem: power cycling1 check
Manual section: Troubleshooting (PDF page 21).
- Problem not resolved by the manual instructions
- Turn off with Power. Wait at least 10 seconds. Turn on with Power. If the problem persists, contact a customer service centre or dealer.
The projector cannot be turned on1 check
Manual section: Troubleshooting (PDF page 21).
- Power connection check
- Disconnect and reconnect the power cable, then try switching on again.
The projector cannot be turned off1 check
Manual section: Troubleshooting (PDF page 21).
- Power button does not shut down
- Hold Power longer than ten seconds. If ineffective, disconnect the power cable.
No image from an external HDMI device1 check
Manual section: Troubleshooting (PDF page 21).
- HDMI input and signal reconnection
- Check that HDMI is the selected input. Disconnect HDMI or turn off the HDMI device. Wait three seconds. Reconnect HDMI or turn the device on again.
No sound from the connected external device3 checks
Manual section: Troubleshooting (PDF page 21).
- External cables
- Check the cables to the external device.
- External sound activation
- Check that sound is activated on the external device.
- Cable compatibility
- Only the original cables from the device manufacturer may function.
No sound from an external HDMI output device1 check
Manual section: Troubleshooting (PDF page 21).
- HDMI device audio setting
- On the HDMI output device, set audio to Multichannel (Raw data) & Stereo (PCM).
No computer sound through HDMI1 check
Manual section: Troubleshooting (PDF page 21).
- Computer audio activation
- Check that sound is activated on the computer.
The projector turns itself off2 checks
Manual section: Troubleshooting (PDF page 21).
- Prolonged operation
- The surface becomes hot during prolonged operation.
- Power cable
- Check that the power cable connects correctly.
USB storage cannot be read1 check
Manual section: Troubleshooting (PDF page 21).
- Unsupported exFAT formatting
- The projector does not support exFAT. Format storage as FAT32 or NTFS and then use it.
No response to remote commands1 check
Manual section: Troubleshooting (PDF page 21).
- Remote batteries
- Check the remote-control batteries.
Warm projector surface1 check
Manual section: Troubleshooting (PDF page 21).
- Normal moderate heat
- Moderate heat during operation is normal for this projector.
Projector does not work with a laptop2 checks
Manual section: Troubleshooting (PDF page 21).
- HDMI cable connection
- Check HDMI is plugged in correctly.
- Laptop display mode
- Make sure the laptop is switched to projector display.
Cannot pair a Bluetooth device5 checks
Manual section: Troubleshooting (PDF page 21).
- Device pairing mode
- Turn on the Bluetooth device and ensure pairing mode.
- Distance
- Keep the Bluetooth device less than 10 m (33 feet) away.
- Pairing procedure
- Follow the reviewed Connect to a Bluetooth device instructions.
- Existing Bluetooth connection
- Disconnect another Bluetooth device already connected to the projector.
- Radio interference
- Move farther from microwave ovens, wireless routers or other radio-frequency emitters.
No sound after Bluetooth connection5 checks
Manual section: Troubleshooting (PDF page 21).
- Bluetooth volume
- Check whether Bluetooth-device volume is at minimum.
- Projector volume
- Check whether projector volume is at minimum.
- Playback state
- Check that playback has started.
- Media file
- Try another video/audio file.
- Connection
- Try reconnecting the two devices.
Black or white pixels1 check
Manual section: Troubleshooting (PDF page 21).
- LCD pixel policy
- Some LCD pixels may not function normally.
- The manual says up to five dead/black dots meet factory specifications and are not considered a warranty defect; they do not affect operation/use under the stated manufacturer policy.
Dust deposit and image quality2 checks
Manual section: Troubleshooting (PDF page 21).
- Dust deposit warranty exclusion
- Dust may accumulate and affect image quality or operation; the manual excludes this from defect warranty coverage.
- Source-backed cleaning options
- Regularly clean the lens with a soft cloth suitable for glass cleaning.
- Dry air may also be pushed through air vents to remove internal optical-engine dust.
- No disassembly or extra cleaning steps are supplied.
Guides
Setting up the product
Instructions from the manualSet up and handle the projector safely17 steps
- Use indoors on a secure, stable, flat surface.
- Route cables so nobody trips.
- Do not use in damp rooms or touch mains connections with wet hands.
- Provide ventilation; do not cover or operate inside closed cabinets or boxes.
- Protect from direct sunlight, heat, intense temperature changes and moisture; keep away from heaters and air conditioners.
- Do not use or store in dusty environments: dust or foreign objects may damage the device and void the warranty.
- Avoid extreme vibrations.
- Keep children supervised and packaging away from them.
- Do not use during lightning storms.
- Handle carefully; avoid touching the lens.
- Do not put heavy or sharp objects on the product or cable.
- Keep away from open flames.
- If liquid or foreign matter enters, turn off, disconnect mains and have an authorised service centre inspect it.
- If excessively hot or emitting smoke, shut down immediately, unplug and have an authorised service centre check it.
- Overheating makes the product switch automatically to standby.
- Use the specified 5–35°C operating range.
- Wrong battery types risk explosion; do not expose batteries to excessive heat, sunlight or open fire.
Prevent condensation when moving between rooms4 steps
- Do not operate immediately after moving from cold to warm conditions.
- Condensation may occur after a cold room is heated or in a damp room.
- Seal the product in a plastic bag before moving to another room so it can adapt to the room conditions.
- Wait one to two hours before removing it from the plastic bag.
Repairs
Instructions from the manualPower supply
Instructions from the manualPower-supply and cleaning precautions7 steps
- Follow the product voltage marking and use only an adapter certified for this product.
- The nearby outlet must remain accessible.
- Always use the power button to turn off.
- Turn off and unplug before cleaning surfaces.
- Use a soft, lint-free cloth.
- Never use liquid, gaseous or easily flammable cleaners, including sprays, abrasives, polishes or alcohol; prevent moisture entering.
- Do not look directly into the operating projection lens: its high-power LED can irritate or damage eyes.
Rear view
Instructions from the manualIdentify ports and normal power states3 steps
- Rear callouts: USB for storage or a dongle; HDMI for a playback-device HDMI output; 3.5 mm audio output for speakers/headphones; rear IR sensor; AC jack for a supplied cable; ceiling hanging system; air vent; power button.
- The power button switches on or to standby.
- Its LED is white when on and red in standby; these are normal states, not fault codes.
Overview
Instructions from the manualIdentify lens, focus, stand and mounting parts5 steps
- Front: projection lens.
- Top: focus adjustment knob for image sharpness.
- Side: speaker, rotating stand and air filter.
- Bottom: ceiling-mount screw hole and foot pad.
- The manual does not supply a filter-removal/cleaning procedure or mounting-screw dimensions.
Remote control
Instructions from the manualInstall the projector
Instructions from the manualInstall for front-table projection3 steps
- Disconnect every device from its power supply before establishing or changing connections.
- Place on a flat table in front of the projection surface.
- If direction is wrong, open settings on the remote, select Option > Flip, then use OK to choose Front Table.
Install for front-ceiling projection5 steps
- Disconnect every device from its power supply before establishing or changing connections.
- Use a professionally recommended ceiling mount and its instructions; confirm the ceiling supports projector and mount weight and attach securely.
- Improper installation risks accidents, injury or damage.
- Mount with the projector upright in front of the screen.
- If direction is wrong, open settings > Option > Flip and use OK to choose Front Ceiling.
Install for rear-table projection3 steps
- Disconnect every device from its power supply before establishing or changing connections.
- Place on a table behind a special rear-projection screen.
- If direction is wrong, open settings > Option > Flip and use OK to choose Back Table.
Install for rear-ceiling projection5 steps
- Disconnect every device from its power supply before establishing or changing connections.
- Use a projector mount and special rear-projection screen.
- Follow professional mount instructions, verify ceiling load capacity and secure attachment.
- Mount upright behind the screen.
- If direction is wrong, open settings > Option > Flip and use OK to choose Back Ceiling.
Connect to power supply
Instructions from the manualConnect the supplied mains cable4 steps
- Always use the power button for on/off.
- Select the supplied cable with the appropriate AUS/EU/UK/US plug.
- Connect the cable to the rear power jack.
- Connect to an electrical socket; the projector power LED turns red.
Prepare the remote control
Instructions from the manualPrepare and maintain the remote batteries8 steps
- Improper battery use risks heat, explosion, fire, injury and remote damage.
- Do not expose the remote to direct sun.
- Do not deform, dismantle or charge batteries; keep away from open fire and water.
- Replace empty batteries immediately and remove them during long non-use.
- Open the battery compartment.
- Insert the two supplied AAA batteries with the indicated +/− polarity.
- Close the compartment.
- Aim the infrared remote at the projector IR sensor with no obstruction.
Power on/off the projector
Instructions from the manualSwitch on, standby and fully disconnect4 steps
- Remove the lens cover before switching on.
- Press Power on the projector or remote; the LED changes from red to white.
- Press Power on projector or remote to enter standby; the LED changes from white to red.
- To shut down completely, disconnect the cable from the socket.
Image focus adjustment
Instructions from the manualFocus the pictureView
Screen size adjustment
Instructions from the manualChoose projection distance and screen size3 steps
- Image size depends on lens-to-surface distance.
- The recommended 213 cm (83.9 inches) distance produces the maximum 80-inch (203 cm) screen.
- The minimum projection distance is 85 cm (33.5 inches).
Projection direction adjustment
Instructions from the manualRotate the projection directionView
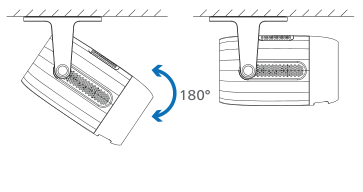
Diagram key
- 180° and curved arrow: Maximum body rotation around the stand pivot for projection direction adjustment.
Image shape adjustment
Instructions from the manualAutomatically correct image shape4 steps
- Open remote settings > Keystone > Keystone Model, then use OK to select Auto.
- Correction appears.
- Highlight Correction and press OK to start.
- Adjustment finishes when the number beside Correction stops changing.
Manually correct or reset image shape4 steps
- Open remote settings > Keystone > Keystone Model and use OK to select Manual.
- The +, Reset and − options appear.
- Highlight + or − and press OK to adjust.
- Highlight Reset and press OK to reset the shape.
Connect to a playback device through hdmi™
Instructions from the manualConnect HDMI playback equipment4 steps
- Disconnect equipment from power before changing connections.
- Use an HDMI cable between the projector HDMI input and the playback-device HDMI output (for example a Blu-ray player, game console, camcorder, camera or PC).
- Images and sound play through the projector.
- If input does not switch automatically, select HDMI on Home.
Connect to a dongle
Instructions from the manualConnect a streaming dongle4 steps
- Disconnect equipment from power before changing connections.
- Connect the dongle, such as Fire Stick, Roku or Chromecast, to projector HDMI directly or with an HDMI cable.
- Connect dongle power to the projector USB port with a USB cable; maximum supply is 5 V/1 A.
- If input does not switch automatically, select HDMI on Home.
Enable/disable bluetooth on the projector
Instructions from the manualEnable or disable Bluetooth6 steps
- Bluetooth is enabled by default.
- Select BT on Home to open its settings.
- Highlight BT Model and press OK to enable or disable it.
- Keep the Bluetooth device no farther than 10 m (33 feet).
- Connections can still be lost within that distance depending on signal conditions.
- Multiple devices can be paired, but only one can be connected at a time.
Pair a bluetooth device
Instructions from the manualPair a Bluetooth device6 steps
- Turn on the Bluetooth device and put it in pairing mode; press its pairing button if needed and follow its own documentation.
- Select BT on Home.
- If Bluetooth is disabled, highlight BT Model and press OK to enable it.
- Highlight Search Bluetooth and press OK to scan; available devices appear under Other device.
- After scanning stops, select the device and press OK.
- When paired, it moves to My device with Connected status; a white Bluetooth icon appears near Home’s upper-right corner.
Disconnect a bluetooth device
Instructions from the manualDisconnect a paired Bluetooth device2 steps
- To disconnect while keeping pairing, either select the device in Bluetooth settings, press OK and choose Disconnect; terminate the connection or turn off the external device; disable projector Bluetooth; or turn off the projector.
- These are alternatives, not a required sequence.
Reconnect a bluetooth device
Instructions from the manualReconnect a Bluetooth device2 steps
- After pairing and connection, the projector automatically tries to reconnect unless the device is unpaired or its Bluetooth is off.
- To reconnect manually, highlight the paired device in Bluetooth settings, press OK and select Connect.
Delete a bluetooth device
Instructions from the manualDelete Bluetooth pairingView
Tips for connecting audio output devices
Instructions from the manualUnderstand Bluetooth audio routing3 steps
- Connecting a Bluetooth audio device automatically selects it for audio output.
- Disconnecting restores the internal speaker.
- Several audio devices can be paired, but only one connected at a time.
Connect to wired speakers or headphones
Instructions from the manualConnect wired speakers or headphones5 steps
- Disconnect equipment from power before changing connections.
- Before attaching headphones turn down projector volume; avoid prolonged high-volume listening because of hearing damage.
- Use a 3.5 mm cable from projector audio output to external analogue audio input (3.5 mm or red/white jacks), or connect headphones directly.
- Internal speakers deactivate automatically.
- Use remote volume +/− to set the desired level.
Connect a usb storage device
Instructions from the manualAttach USB media storage5 steps
- Check that the storage contains supported media or text files.
- Setup guidance names FAT16 or FAT32 formatting.
- Troubleshooting separately directs FAT32 or NTFS formatting if storage cannot be read and explicitly excludes exFAT; no exclusive format list is inferred.
- Connect the USB storage device to projector USB.
- Supported video: MP4, RMVB, AVI, RM, MKV; audio: MP3, WMA, OGG, FLAC, WAV; images: BMP, PNG, JPEG.
Play videos
Instructions from the manualPlay video files from USB11 steps
- Select Movie on Home.
- Press OK to open storage.
- Only supported video files appear; folders/files are alphabetically ordered.
- Use navigation to choose a file/folder.
- OK opens a folder; Back or the onscreen Back option returns to its parent.
- Press OK to play the chosen video.
- During playback, OK or any navigation key shows the control bar.
- It disappears after five seconds; Back hides it immediately.
- With the bar visible, Up selects the progress bar, then Left/Right rewinds/fast-forwards.
- Left/Right selects a control option; OK confirms or changes its value; Back closes its dialog.
- Press Back to stop playback and return to the current folder’s file list.
Play audios
Instructions from the manualPlay audio files from USBView
View images
Instructions from the manualView USB image slideshows3 steps
- Follow the reviewed USB-video selection sequence, choosing Photo instead of Movie.
- When OK is pressed on a selected image, a slideshow starts from that image and includes every supported image in the current folder.
- Slideshow speed cannot be changed.
View text files
Instructions from the manualRead text files from USB4 steps
- Follow the reviewed image-file selection sequence, choosing Ebook instead of Photo.
- OK opens the selected text file at its first page; it does not automatically scroll or open the next file.
- OK or Left/Right shows the control bar.
- Up/Down moves to the previous/next text page.
Wireless projection with android devices/windows computers
Instructions from the manualMirror Android or Windows screens15 steps
- Use a Miracast-capable Android device or Windows computer.
- Names may include Screen Cast, Screen Sharing, Wireless Display, Wireless projection or Smart View; not every device supports it.
- Check its manual.
- A 5 GHz network improves streaming.
- Copyright-protected Netflix, Prime Video, Hulu and similar content cannot be streamed.
- Steps vary with OS/device version.
- Turn on projector Wi-Fi; connecting to a network is not necessary for mirroring.
- Turn on device Wi-Fi.
- Network connection is unnecessary for mirroring, but permits internet access during mirroring.
- On projector Home choose Wireless screen mirroring > ANDROID.
- Its name and connection status appear.
- On Android, open Settings and wireless display/projection.
- On Windows 10, open the lower-right action centre and choose Connect; available displays are scanned.
- Choose the projector to connect and start mirroring.
- Allow a few seconds.
Wireless projection with ios devices/mac computers
Instructions from the manualMirror iOS or Mac through projector hotspot11 steps
- Method 1: the iOS device cannot access internet through Wi-Fi during this direct-hotspot mirroring method.
- Turn projector Wi-Fi on and disconnect it from Wi-Fi networks.
- On Home select Wireless screen mirroring > IOS.
- Note the displayed hotspot name/password and status.
- On iOS open Settings > Wi-Fi, or use the Mac menu-bar Wi-Fi icon.
- Turn Wi-Fi on.
- Select projector hotspot, enter its displayed password and choose Join.
- Open iOS Control Center: swipe down from upper right for iPhone X or later/iPadOS 13 or later; swipe up from the bottom on iPhone 8 or earlier/iOS 11 or earlier.
- On Mac choose the menu-bar AirPlay icon.
- On iOS tap Screen Mirroring and select the projector; on Mac select the projector.
- Allow a few seconds for mirroring.
Stream media using dlna
Instructions from the manualStream media with DLNA7 steps
- Use a smart device with a DLNA-supported media app.
- Connect it and the projector to the same Wi-Fi network.
- On projector Home select DLNA; its name and Wi-Fi status appear.
- In the device app, play a video/audio or view a picture.
- Tap/click to display controls if hidden.
- Select the TV icon.
- Select the projector to stream; allow a few seconds.
Connect to a wi-fi network
Instructions from the manualConnect to a Wi-Fi network11 steps
- Use an internet-connected wireless router; the manual recommends 802.11n (Wi-Fi 4) for performance/coverage.
- Shared Wi-Fi supports iOS internet access while mirroring and online software updates.
- Android can use Wi-Fi internet while mirroring even without projector network connection.
- Select Wi-Fi on Home.
- Available networks are scanned and listed strongest first.
- If Wi-Fi is off, highlight the left-side toggle and press OK.
- Use navigation to highlight a network, then OK.
- Enter the correct password with navigation and OK on the onscreen keyboard.
- Highlight the keyboard check mark and press OK.
- Wait a few seconds.
- The connected network appears at the top with Connected status; a white Wi-Fi icon appears near Home’s upper right.
Disconnect from a wi-fi network
Instructions from the manualDisconnect Wi-Fi without forgetting it5 steps
- Select Wi-Fi on Home.
- Highlight the connected network with navigation and press OK.
- Highlight Disconnect and press OK.
- The dialog closes and the network moves to Saved WI-FI.
- Its password is remembered until factory reset.
Reconnect to a wi-fi network
Instructions from the manualReconnect saved Wi-Fi7 steps
- At next startup, the projector tries to reconnect to the last network unless factory-reset.
- To connect another saved network, select Wi-Fi on Home.
- Highlight a network under Saved WI-FI and press OK.
- Highlight Connect and press OK.
- To retain its saved password select No and OK.
- To enter a new password choose Yes and OK, enter it with navigation/OK and confirm the keyboard check mark.
- Wait a few seconds for connection.
Turn wi-fi on or off
Instructions from the manualToggle Wi-FiView
Change projector settings
Instructions from the manualPicture settings
Instructions from the manualAdjust picture settingsView
Sound settings
Instructions from the manualAdjust sound settings3 steps
- Sound Mode offers Standard for general bass/treble, Music, Movie, Sports, and User custom bass/treble.
- Treble and Bass are enabled only in User mode.
- Balance compensates left/right speaker volume at the listening position.
Bluetooth settings
Instructions from the manualInspect Bluetooth and keystone settings3 steps
- BT Model toggles Bluetooth.
- Search Bluetooth scans; My device lists paired devices and Other device lists available scanned devices.
- Keystone Model toggles automatic/manual corrections under Keystone settings.
Other settings
Instructions from the manualChange language, timers and reset settings8 steps
- OSD Language selects display language.
- Flip changes projection direction.
- Factory Reset restores defaults and shuts down the projector.
- Software Upgrade updates software (firmware) offline; Net Upgrade updates software (firmware) online.
- Auto Sleep selects automatic shutoff time (default Off).
- OSD Timer closes menus automatically (default 15 seconds).
- Video Delay default is 500; the manual does not state its unit.
- Version Info shows software version.
Cleaning
Instructions from the manualClean the case and lens7 steps
- Turn off and unplug before cleaning.
- Use a soft lint-free cloth, wipe gently and avoid scratches.
- Never use liquid or easily flammable cleansers such as sprays, abrasives, polishes or alcohol.
- Do not spray with cleaning fluids or let moisture enter.
- For the lens, use a soft brush or lens-cleaning paper.
- Never use liquid lens cleaners, which may damage the coating.
- The troubleshooting dust row separately recommends a soft cloth suitable for glass cleaning and dry air through vents; those source instructions are retained in troubleshooting.
Update software online
Instructions from the manualUpdate software online (firmware)5 steps
- Do not turn off or remove USB storage during a software update.
- Ensure internet access via Wi-Fi.
- Open remote Settings > Option > Net Upgrade.
- The projector checks for a new version and prompts if one is found.
- If a new version is found, follow its onscreen instructions.
Update software offline
Instructions from the manualUpdate software offline (firmware)7 steps
- Do not turn off or remove the USB flash drive during an update.
- Visit philips.com/support, locate NPX150/INT, open support and find Software & drivers.
- Download the installation file to a USB flash drive.
- Unzip it and put the resulting file in the drive’s root directory.
- Connect the USB drive to the projector.
- Open remote Settings > Option > Software Upgrade.
- Follow the onscreen instructions.
Technical data
Instructions from the manualUse within the verified operating limits6 steps
- Native LCD1920×1080, LED, manual focus, automatic keystone,16:9;40–80-inch diagonal.
- Operating temperature5–35°C; storage below60°C.
- Mains100–240V AC50/60Hz,1.0A maximum; operating52W and standby0.5W.
- Speakers2×3W stereo.
- USB5V/1A.
- Dimensions126×208×144mm (W×D×H); net0.85kg/1.87lb.
Ce statement
Instructions from the manualFollow USB, power and radio-compliance limits5 steps
- Connect only to a USB interface of version 2.0 or higher.
- Install the adapter near the equipment and keep it readily accessible; its plug is the disconnect device.
- Operate between 5°C and 35°C.
- The 5150–5250 MHz UNII band is for indoor use only.
- Keep the device at least 20 cm from your body.
Fcc statement
Instructions from the manualRespect wireless placement and interference precautions4 steps
- Unapproved changes or modifications may void authority to operate.
- Under FCC Part 15, the device may not cause harmful interference and must accept received interference, including interference causing undesired operation.
- Keep at least 20 cm between the device antenna and your body during operation.
- If radio/TV interference is confirmed by switching the projector off/on, try reorienting or relocating the receiving antenna, increasing separation, using a different mains circuit, or consulting a dealer or experienced radio/TV technician.
Other notice
Instructions from the manualDispose and recycle appropriately4 steps
- Take batteries to an appropriate collection point.
- Dispose of electrical equipment separately at a sales point when purchasing similar equipment or local collection facilities.
- Recycle paper/cardboard.
- Recycle plastic wrapping or dispose in nonrecyclable waste according to local requirements.
Controls and parts
See the manual diagrams 2 diagrams
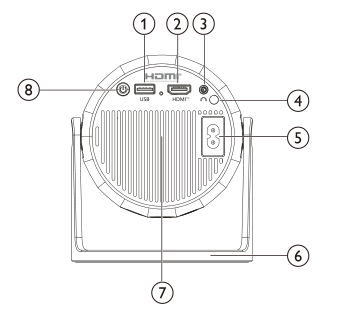
Diagram key
- 1 USB: Connect a USB storage device or dongle.
- 2 HDMI: Connect an HDMI output from playback equipment.
- 3 Headphones symbol: 3.5 mm audio output for external speakers or headphones.
- 4 Rear IR sensor: Receives infrared remote-control signals.
- 5 AC power jack: Connect a supplied power cable.
- 6 Ceiling hanging system: Rear mounting feature; use professional mount instructions.
- 7 Air vent: Ventilation opening; keep ventilation unobstructed.
- 8 Power symbol: Switch on or to standby. The LED is white when on and red in standby.
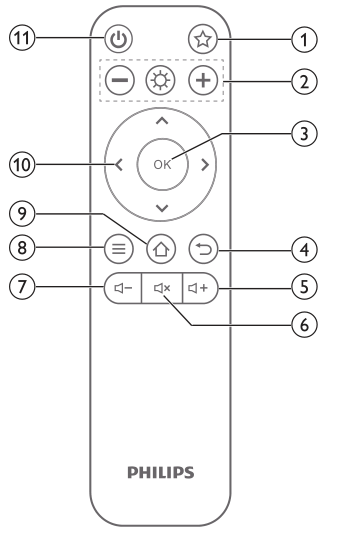
Diagram key
- 1 Star symbol: Display the star-sky effect.
- 2 Minus, brightness and plus symbols: Adjust screen brightness.
- 3 OK: Confirm a selection or change the current setting.
- 4 Back arrow: Return to the previous screen.
- 5 Speaker plus: Increase volume.
- 6 Muted speaker: Mute or unmute the speaker.
- 7 Speaker minus: Decrease volume.
- 8 Three horizontal lines: Open or close projector settings.
- 9 Home symbol: Access Home.
- 10 Four navigation arrows: Navigate screen items; Up/Down or Left/Right changes setting values.
- 11 Power symbol: Switch on or to standby.
Model details
Model and compatibility
- Native resolution
- LCD 1920×1080; 16:9; manual focus. [1]
- Operating environment
- 5–35°C; storage below 60°C. [1]
- Power and sound
- AC 100–240 V, 50/60 Hz, 1.0 A maximum; 52 W operating / 0.5 W standby; 2×3 W stereo. [1]
- Size and mass
- 126×208×144 mm (W×D×H); net 0.85 kg (1.87 lb). [1]
- Projection
- 250 ANSI lumens; contrast 1000:1; throw ratio 1.2:1; 40–80-inch diagonal. Listed LED lifetime: over 30,000 hours. [1]