The checks and guides below come from the official manuals for this model.
No matches for this wording. Try a light name, error code or a shorter phrase.
Errors and messages
Messages and indicator states from the manual
Message or indicatorWhat it meansCheck or action
Low Battery!battery voltage is low
3 checks
Battery voltage has dropped.
The batteries are not depleted, but voltage has dropped and print quality is reduced without replacement.
Replace weak batteries with new ones.
Do not use rechargeable batteries with PT-45M.
Old batteries are in use.
Replace with new batteries; do not use rechargeable batteries.
The label maker has been stored in cold temperatures.
Replace with new batteries; do not use rechargeable batteries.
Full!text buffer is full
The maximum has been entered: 80 characters for regular text or 50 for DECO MODE. This message row provides no separate corrective sequence.
No Text!no text for the selected operation
5 checks
Printing a file when no data is stored.
This row supplies no separate remedy; use the relevant text-entry or file instructions.
Pressing Print without text.
This row supplies no separate remedy; use the relevant text-entry or file instructions.
Pressing Preview without text.
This row supplies no separate remedy; use the relevant text-entry or file instructions.
Selecting Copies without text.
This row supplies no separate remedy; use the relevant text-entry or file instructions.
Pressing Enter without text in DECO MODE text entry.
This row supplies no separate remedy; use the relevant text-entry or file instructions.
Line Limit!a third line was entered
Entering a third line with Enter triggers this message; maximum printable lines is two. The row gives no separate correction. See the reviewed two-line label instructions.
Invalid!invalid label-length number
The selected Label Length number is invalid. This row supplies no separate corrective sequence; see the reviewed label-length instructions.
Text Limit!text exceeds the label length
3 checks
Text exceeds the selected label length.
This row supplies no separate corrective sequence.
In DECO MODE with Auto length, text exceeds 7.8 inches(200 mm).
This row supplies no separate corrective sequence.
At the minimum 1.2-inch(30 mm)length, some frames(Leaf or Star)do not allow additional text.
This row supplies no separate corrective sequence.
Cooling XXXprint head is cooling
Printing stops automatically if the print head becomes too hot.
The displayed number gives cooling time.
Printing resumes automatically once cool.
Do not touch the labeler while cooling.
Troubleshooting
Find the problem you are experiencing
Display stays blank after power on2 checks
Battery insertion
Check that batteries are correctly inserted.
Weak batteries
Replace weak batteries.
Printing fails or characters are malformed3 checks
Cassette insertion
Check correct tape cassette insertion.
Empty cassette
Replace an empty cassette.
Cassette cover
Check that the cassette cover is properly closed.
Settings clear themselves2 checks
Weak batteries
Replace weak batteries.
Power disconnected beyond three minutes
Text and formats in the display are lost; Language and Unit settings also clear. The row gives no separate remedy for this condition.
Blank horizontal line through a label1 check
Dust on the print head
Remove the cassette and gently wipe the print head up and down with a dry cotton swab.
Machine locks up1 check
Unresponsive while powered on
Refer to Resetting the P-touch; its procedure clears all text, settings and stored files.
Power turns off when printing2 checks
Weak batteries
Replace weak batteries.
Battery insertion
Check that batteries are correctly inserted.
Tape does not feed or gets stuck2 checks
Tape path
Check that the tape end feeds under the guides.
Cutter used during printing
Do not touch the cutter lever during printing.
Clear text and formats for a new label1 check
Existing text and formats
Hold Shift and press Backspace, or enter Function mode and select Y(6).
Change display language1 check
Language setting
Refer to Initial Settings.
Guides
Power supply and tape cassette
Instructions from the manual
Install batteries and a tape cassette9 steps
Turn power off before replacing batteries or tape.
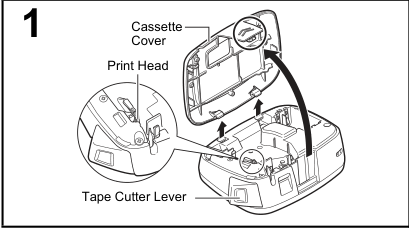
Press the indicated area to remove the cassette cover.
Pull an installed cassette straight up and remove installed batteries.
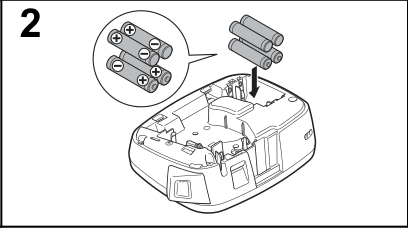
Insert four new AAA alkaline LR03 batteries, matching every polarity; always replace all four together with brand new ones.
Remove batteries for long non-use.
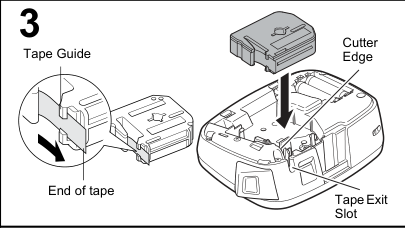
Insert a Brother Genuine M cassette until it locks, with the tape end under the guides.
Clear the media path before printing and make sure the cutter is sharp; it dulls with use.
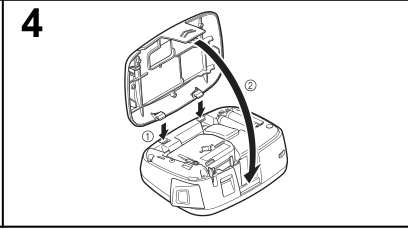
Insert both bottom cover hooks into their slots (1), then close securely until locked (2).
Feed once using the reviewed Feeding instructions, then push in the cutter lever to cut.
Step 1: cover opening with complete head and cutter callouts.
Diagram key
1: First setup panel; power must be off before replacing batteries or tape.
Cassette Cover: Press the indicated area to remove the cover.
Print Head: Do not touch; clean gently with a dry swab as the troubleshooting row instructs.
Tape Cutter Lever: Do not apply excessive pressure or touch during printing/feeding.
Opening and upward arrows: Show cover opening and removal; pull an installed cassette straight up.
Print-head enlargement and pointer: Shows the head position in relation to the open compartment.
Step 2: all four AAA battery positions and polarities.
Diagram key
2: Insert four new AAA alkaline LR03 batteries; replace all four together.
Four battery cells: Use brand-new batteries and remove them for long non-use; rechargeable batteries are not supported.
Repeated + and − signs: Match every cell to its shown polarity.
Downward arrow: Shows insertion into the compartment.
Polarity enlargement and pointer: Shows the complete four-cell orientation in the battery compartment.
Step 3: complete cassette insertion and enlarged tape-guide path.
Diagram key
3: Insert a Brother Genuine M cassette until it locks into place.
Tape Guide: The tape end must feed under the guides.
End of tape: The complete enlargement shows the tape path under the guide.
Cutter Edge: Do not touch the cutter edge near the print head.
Tape Exit Slot: Keep foreign objects out of the exit.
Insertion and tape-path arrows: Show cassette insertion and the tape path; clear the media path before printing and make sure the cutter is sharp.
Guide enlargement and pointer: Relates the complete enlarged guide to its position by the cassette.
Step 4: insert both cover hooks before closing the cover.
Diagram key
4: Final setup panel; close the cassette cover securely until locked.
1 and downward hook arrows: Insert the two bottom hooks into the machine slots first.
2 and curved closing arrow: Then close the cover securely; after cassette installation, feed once and cut using the lever.
Lcd display & keyboard
Instructions from the manual
Read display and keyboard controlsView
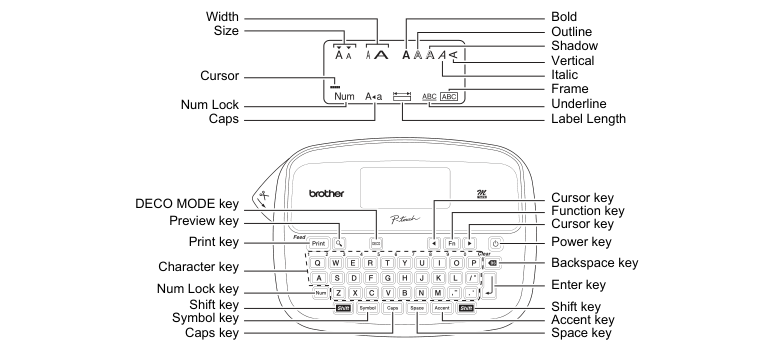
The complete reviewed figure identifies all display indicators and keyboard controls. The LCD displays one row of 12 characters; entered text may reach 80 characters.
Initial settings
Instructions from the manual
Set power language and units7 steps
Supply four AAA batteries and press Power.
Press Fn, select Language with Left/Right and Enter, select the language and press Enter; English is default.
Fn+Space also opens Language.
Press Fn, select Unit with Left/Right and Enter, choose inch or mm and Enter; inch is default.
Fn+I also opens Unit.
The machine switches off after five minutes without key presses.
Backspace cancels operations.
Entering text and symbols
Instructions from the manual
Switch upper and lower caseView
Press Caps to switch between uppercase (Caps on) and lowercase (Caps off).
Enter numbersView
Press Num to enable Num Lock, then use the numbered Q–P keys to enter digits. With Num Lock off, the keys enter letters; the printed example shows Q, W, E as 123 or qwe.
Make a two-line label4 steps
Enter the first line and press Enter.
Enter the second line and press Print.
Do not press Enter after the second line or Line Limit! appears.
Both 9 mm (0.35-inch) and 12 mm (0.47-inch) tapes support two-line text.
Enter symbols and pictographs7 steps
Press Symbol, choose the symbol category with Left/Right and Enter, then choose the symbol and Enter.
The printed example selects Pictograph then A 7 for a telephone.
Pictographs display their table letter and number on the LCD.
Symbol advances groups and Backspace cancels.
Pictograph rows A–L can also be selected with their corresponding character keys.
The complete Basic and Pictograph tables are in the manual; only boxed Basic symbols are available in DECO MODE.
Images are illustrative.
Enter accented characters3 steps
Enter a base letter A–Z, press Accent, choose the accented character with Accent or Left/Right and press Enter.
Backspace cancels.
Accent order depends on LCD language; the complete upper/lowercase table is in the manual.
Delete letters or clear text and formats3 steps
Backspace deletes letters one at a time.
Hold Shift and press Backspace, select Txt&Format with Left/Right and press Enter to clear text and settings, or choose Text Only and Enter to preserve settings.
Fn+Y also opens To Clear.
Designing labels
Instructions from the manual
Set text sizeView
Press Fn, select Size with Left/Right and Enter, select the setting with Left/Right and Enter. Choose Large (default) or Small. Fn+Q is the shortcut. Space returns to the default.
Set character widthView
Press Fn, select Width with Left/Right and Enter, select the setting with Left/Right and Enter.
Choose Normal (default), ×2 or×1/2.
Fn+W is the shortcut.
Space returns to default.
Set character style4 steps
Press Fn, select Style with Left/Right and Enter, select the setting with Left/Right and Enter.
Choose Normal (default), Bold, Outline, Shadow, Italic, Italic Bold, Italic Outline, Italic Shadow or Vertical.
Fn+E is the shortcut.
Space returns to default.
Select underline or frame4 steps
Press Fn, select Undl/Frame with Left/Right and Enter, select the setting with Left/Right and Enter.
Choose Off (default), Underline, Round, Leaf, Tile, Star, Heart, Square, Bubble, Flower or Candy.
Fn+R is the shortcut.
Space returns to default.
Set label length5 steps
Press Fn, select Length with Left/Right and Enter, select the setting with Left/Right and Enter.
Choose Auto (default) or 1.2–12.0 inches (30–300 mm).
Fn+T is the shortcut.
You can enter length with the numbered Q–P keys; Space returns to Auto.
The label prints at the specified length.
Printing labels
Instructions from the manual
Preview text3 steps
Press the magnifying-glass Preview key.
The LCD scrolls the complete text and label length in inches/mm, then returns to the original text.
Preview shows text only, excluding style, size, underline/frame and other features.
Feed tapeView
Hold Shift and press Print to feed 1.0 inch of tape; this may be needed after cassette installation.
Print cut and apply labels4 steps
Press Print.
Do not touch the cutter lever while Printing… or Feeding… is displayed, to avoid tape damage.
Push in the upper-left cutter lever to cut.
Peel the printed label from its backing and apply it.
Print multiple copies3 steps
Press Fn+Print, choose Copies with Left/Right and Enter, choose 1–9 copies and press Enter.
The numbered Q–O keys can also select the count.
Up to nine copies of each label are supported.
Remove label backing with the peelerView
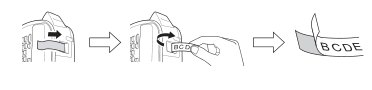
Insert the label printed-side down as far as possible into the built-in peeler. Fold the label back to the right and quickly pull it out; the backing end separates from the label.
Use the built-in peeler with the printed surface facing down.
Diagram key
First panel and insertion arrow: Insert the label printed-side down as far as possible into the built-in peeler.
Middle panel and fold/pull arrow: Fold the label back to the right and quickly pull it out.
Final label and backing: The end of the backing separates from the printed label.
Connecting arrows: The sequence runs left to right, insertion then folding/pulling then separated backing.
Resetting the p-touch
Instructions from the manual
Reset the label maker4 steps
Press Power to turn off.
Hold Shift and R and press Power to turn on.
Release Power first, then release Shift and R.
The internal memory resets; all text, settings and stored files are cleared.
Deco mode
Instructions from the manual
Create a DECO MODE label8 steps
Press DECO, select one of eight designs with Left/Right and Enter, choose the label length (Auto or 1.2–7.8 inches/30–200 mm) and Enter, enter text, then select Print and Enter.
Only one line and up to 50 characters can be entered.
Depending on format, not all text may print; template formats cannot be changed.
Only boxed Basic symbols are available.
Twelve-millimetre (0.47-inch) tape is recommended; maximum length is 7.8 inches (200 mm).
Auto adjusts to print the text once; Space returns length to Auto.
Designs 6, 7 and 8 are marked for possible cooling; printing stops while hot, shows cooling time and resumes automatically.
Do not touch the labeler while cooling.
Clear or exit DECO MODE5 steps
Hold Shift and press Backspace to clear entered DECO text.
At Clear?, press Enter to clear or Backspace to cancel.
Entry into DECO recalls the most recently printed DECO text and length.
Backspace returns to the previous step; press it until the text-entry screen to exit.
Alternatively, while Print is displayed, use Left/Right and choose Quit.
Saving label files
Instructions from the manual
Save a label file4 steps
Enter the label, press Fn, choose File with Left/Right and Enter, choose Save and Enter, select a file number and Enter.
Fn+U also opens File.
Up to three original labels can be saved, recalled, edited and overwritten.
If Overwrite?appears, Enter saves the new label and Backspace cancels.
Print a saved fileView
Press Fn, select File with Left/Right and Enter, select Print and Enter, choose the saved file number and press Enter. Fn+U also opens File.
Open a saved fileView
Press Fn, select File with Left/Right and Enter, select Open and Enter, choose the file number and Enter. The stored label can be edited. Fn+U also opens File.
Symbols
Instructions from the manual
Print the pictograph listView
Press Symbol, select Print List with Left/Right and press Enter. Symbol advances groups and Backspace cancels operations; the complete pictograph catalog contains rows A–L.
General precautions
Instructions from the manual
Clean handle and store the label maker8 steps
Use a soft, dry cloth on the labeler; never alcohol or organic solvents.
Clean the head with a soft wipe and never touch it; the troubleshooting cleaning procedure specifies a dry cotton swab.
Keep foreign objects out of the exit slot.
Avoid sunlight, rain, heaters, hot appliances, extreme temperatures, high humidity and dust.
Do not use excessive cutter pressure, print with an empty cassette or pull tape while printing/feeding.
Use only marked Brother M tape and documented purposes.
Check label material and environment first: labels may peel, become irremovable, change colour or transfer colour.
Stored data can be lost after failure, repair or battery expiry.
Safety precautions
Instructions from the manual
Follow battery cutter and cover precautions5 steps
Do not touch the cutter edge near the print head.
Remove batteries for extended non-use.
Power disconnection beyond three minutes clears text, format settings and saved files.
Never mix old/new batteries or alkaline with other battery types, or reverse polarity.
Do not drop or hit the labeler, press hard on the LCD or trap fingers when closing the back cover.
Stop use for heat leakage or abnormalities4 steps
Avoid humid locations and keep the labeler dry; do not handle with wet hands or spill beverages.
Do not swallow the cutter stopper.
Never disassemble or modify the labeler/batteries, use metallic objects to change batteries, throw batteries into fire or expose them to heat.
Remove batteries immediately and stop use if unusual odour, heat, discolouration, deformation or anything abnormal occurs during use or storage.
Federal communications commission (fcc) compliance notice (for usa only)
Instructions from the manual
Respond to radio or television interference2 steps
If switching the labeler off/on shows that it causes interference, reorient or relocate the receiving antenna, increase separation between equipment and receiver, or consult the dealer or an experienced radio/TV technician.
Changes not expressly approved by Brother may void authority to operate the equipment.
Controls and parts
See the manual diagrams 1 diagram
PT-45M display indicators and complete QWERTY keyboard controls.
Diagram key
Width: Selected character width.
Size: Selected text size.
Cursor: Current position within the entered text.
Num Lock: Number-entry mode; Num toggles numbered Q–P keys.
Caps: Uppercase mode, switched with Caps.
Bold: Bold text style indicator.
Outline: Outline text style indicator.
Shadow: Shadow text style indicator.
Vertical: Vertical style indicator.
Italic: Italic style indicator.
Frame: Frame selection indicator.
Underline: Underline selection indicator.
Label Length: Label-length setting indicator.
DECO MODE key: Opens the eight built-in DECO designs.
Preview key: Shows text and label length without style, size or frame preview.
Print key: Prints; Shift+Print feeds tape and Fn+Print opens Copies.
Character key: Enters characters; numbered Q–P keys enter digits with Num Lock.
Num Lock key: Switches numeric entry on or off.
Shift keys: Both repeated Shift controls are shown; used with Print or Backspace and in the reset sequence.
Symbol key: Opens symbols and advances groups.
Caps key: Switches uppercase/lowercase.
Cursor keys: Both Left and Right controls move through text and setting choices.
Function key: Fn opens functions and the documented shortcuts.
Power key: Turns power on/off; automatic off follows five idle minutes.
Backspace key: Deletes one character and cancels operations.
Enter key: Confirms selections or starts a second line; do not enter a third line.
Accent key: Selects accented characters after entering a base letter.
Space key: Enters spaces and returns design settings to default; Fn+Space opens Language.
Model details
Model and compatibility
Power supply
Four AAA alkaline LR03 batteries; do not use rechargeable batteries.
Tape
Brother M tape in 9 mm or 12 mm widths; both support two-line text.
Memory
Up to three labels can be stored, recalled, edited and overwritten.