MODEL REFERENCE
CZUR ET25 Pro
4 errors · 6 troubleshooting topics · 32 guides

The checks and guides below come from the official manuals for this model.
No matches for this wording. Try a light name, error code or a shorter phrase.
Software error messages
Messages shown by the scanning software —SN errors
Check the scanner serial number underneath its base. The serial number contains no digit 1.
—Mac: Looking for device
- If Scan cannot detect the device and shows Looking for device, try another USB port, reboot the device and restart the computer.
- If it still cannot be detected, contact customer service.
—Mac: Serial number verification fails
Reenter the correct serial number and confirm again. You cannot continue until verification succeeds.
—Mac: Batch operation requests target files
Select the target files on the right list before clicking a batch function and try again.
Troubleshooting
Find the problem you are experiencingScanner will not turn on; LCD and power indicator are dark2 checks
- Power connection
- Check that the outlet has power, the adapter is properly connected and the power switch is On.
- Sticky switch
- Turn the on/off switch on and off a few times.
CZUR software cannot be installed3 checks
- Compatible software and serial number
- Use a software release compatible with Windows XP, 7, 8, 10 or 11, or the supported macOS version. Check the serial number under the base; it contains no digit 1.
- Security software interference
- The guide offers lowering antivirus/firewall security or temporarily disengaging it during installation; reengage it after installation.
- Incomplete download
- Download the official software again and ensure it completes before installing.
First software use has no preview and cannot scan4 checks
- USB connections
- Make all USB connections firm, particularly between scanner and computer.
- Device recognition
- In Device Manager check whether the scanner is recognized.
- If a yellow exclamation mark and Unknown Device appear, right-click to update the driver, or disable then re-enable the device and retry the software.
- Other imaging drivers
- In Device Manager disable other scanner or camera drivers.
- Computer
- Restart the computer or try another computer.
Scanned image is distorted or its font is twisted3 checks
- Misaligned pad
- Position the black document pad correctly under the scanner head; scans must fit inside its boundaries.
- Oversized material
- Make sure the object to be scanned fits within the matte black pad.
- Interfering objects
- Remove unrelated hands, the hand-button cord, phone, pen or other objects from the preview. Only the document should be in the scanning preview so the algorithms work properly.
HDMI display has no image or Presenter mode will not start4 checks
- Computer USB cable connected
- Unplug the USB cable from the computer. If USB and HDMI are connected together, the scanner defaults to USB-PC mode.
- Display source
- Select HDMI input on the projector or TV.
- HDMI cable or display
- Try a replacement HDMI cable or a different display.
- Zoom controls
- Zoom-in and zoom-out buttons operate only in HDMI Presenter mode.
HDMI content has the wrong direction or is incomplete after zooming1 check
- Physical object position
- Rotate or move the physical object to adjust the image. HDMI video presenter mode cannot rotate or move the displayed content electronically.
Guides
3 product appearance
Instructions from the manualRecognize the controls, ports and indicators11 steps
- The LED brightness control selects high or low brightness; Scan starts the next scan.
- The power switch turns device power on or off.
- The LCD shows whether images are uploading to the connected computer.
- Blinking green video-record lights mean recording is in progress; green off means video recording has stopped.
- The power indicator is white.
- A separate scan indicator is labelled in the guide; the hand-button light means scanning is in progress.
- Connect the computer cable to its USB connection and the hand button or foot pedal to the accessory USB port.
- The new and old pedal designs have the same function; the supplied design may differ.
- Press the hand button to start the next scan.
- The side-light port and touch button belong to the side-light unit.
- ET25 Pro supports the shared-guide HDMI port and zoom-in/zoom-out controls; use them only in HDMI presenter mode.
1 scanning preparation
Instructions from the manualPrepare the scanner and black document pad7 steps
- Place the scanner on a table, desk or counter large enough for the pages to be scanned or displayed.
- Plug either the hand button or foot pedal into the USB accessory port at the back of the base.
- Spread the black document pad under the scanner head and align its notch with the device.
- Check the head LCD: the black pad must cover the whole screen with no desk surface or stray edges in the scan.
- Correct full-pad coverage is essential to image-processing calculations.
- For books or multiple documents, use Computer Mode (USB-PC) and the foot pedal for efficient scanning; computer editing provides additional image adjustments.
- Avoid nearby windows and strong ambient light: excessive brightness interferes with the laser lines and scan results.
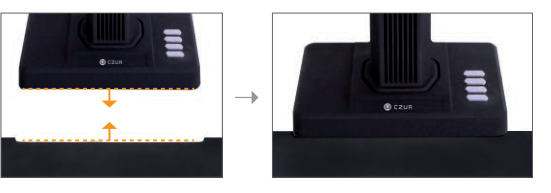
Diagram key
- Upper orange arrow: Align the device edge with the notch of the black document pad.
- Upper orange dashed line: The device edge used for alignment.
- Lower orange arrow: Align the black document-pad notch with the device.
- Lower orange dashed line: The document-pad notch boundary used for alignment.
- Grey right arrow: The right-hand image shows the resulting pad and base alignment.
Position books and choose a processing mode6 steps
- For books, place all three laser lines on the curved pages; otherwise scan results suffer.
- Wear the supplied specialized finger cots when holding pages down so finger removal can work properly.
- Choose Flat Single Page for single sheets or Facing Pages for bound pages, according to the material.
- The illustrations show automatic edge recognition, cropping and tilt correction for single sheets, and curvature recognition, flattening and finger removal with finger cots for books.
- For magazines, coated paper, ID documents, glossy paper or glossy books, switch the side lights on and the top/main light off to reduce reflections; the manual limits this to variants supplied with side fill lighting.
- Use the device fill light to avoid a shadow from the crossbar casing.
2.1 computer mode (usb-pc)
Instructions from the manualInstall software and connect Computer Mode (USB-PC)5 steps
- Install CZUR software on the computer using the supplied CD or the matching official Support → ET Series download. macOS requires the website download.
- Attach the USB cable from the scanner base to the computer.
- Turn on the equipment to control scanning from the computer and save scans on its disk.
- The separately linked Windows and Mac software guides describe their illustrated application editions.
- Follow the matching platform; software updates can change dialogs.
1 after sale service and guarantee
Instructions from the manual2 contact information
Instructions from the manualContact CZUR technical supportView
For technical assistance, use support@czur.com or the official CZUR website.
2.2 presenter mode (hdmi;optional)
Instructions from the manualUse HDMI presenter mode6 steps
- Connect the adapter to power and connect an HDMI cable to a projector, TV or electronic whiteboard.
- Do not connect the computer USB cable for this mode.
- Switch on device power; it enters Presenter mode.
- If the display has no signal, select its HDMI signal source.
- The base zoom-in and zoom-out buttons provide six levels up to 12 times.
- If the paper position or text direction is wrong, move the paper.
Fcc statement
Instructions from the manualObserve radio-interference and recycling precautions7 steps
- Use the device subject to FCC Part 15 conditions: it may not cause harmful interference and must accept received interference, including that causing undesired operation.
- Unapproved changes can void operating authority.
- If it interferes with radio or TV reception, determine this by switching it off and on.
- Reorient or relocate the receiving antenna, increase separation, use an outlet on a different circuit, or consult the dealer or an experienced radio/TV technician.
- The guide requires at least 20 cm between the radiator and the body.
- Its DC symbol indicates direct-current voltage.
- Separate WEEE-marked equipment for recycling or dismantling under applicable local arrangements.
Software startup
Instructions from the manualWindows: Software StartupView
After installation, start CZUR Scanner; wait for the startup animation to finish to enter the scanner interface.
Mac: Software StartupView
Start CZUR Scanner and choose Scanner from the startup window to open its main interface.
Batch
Instructions from the manualWindows: Batch20 steps
- Select the target images for batch processing.
- Color mode offers Auto Enhance, Color, B&W, Grayscale, Stamps, Patterns, Antiquarian and Non-filter.
- Rotate selected images left 90°, right 90°, vertically, horizontally or 180°; the default choice is left 90°.
- Quality adjusts contrast, sharpness and thickness in the preview; completion is reported after processing.
- For facing-page images, Overlapping Edge Cropping offers page-width cropping, hinge-line cropping and upper/lower edge clearing.
- Larger page-width values crop less width; larger hinge or upper/lower values crop more.
- A baseline dragged outside the preview applies to all selected images; inside applies only to the current image.
- Crop supports single or facing pages.
- Larger Crop N Pixels values remove more pixels; larger Keep N Pixels values preserve more pixels.
- Top, bottom, left and right edges may be cleared white or cut.
- Baseline scope follows the same inside/outside rule.
- Standardize configures background size, orientation, DPI, color, horizontal/vertical alignment and Match with BG: Unchanged, Maximize or Overspread.
- Rename selected files by rules and save copies in another folder.
- Blank page detection identifies suspected blank pages for selection and deletion.
- Holes filling previews repairs and accepts minimum/maximum radii from 20 to 80 pixels, default 20 minimum and 80 maximum.
- Confirm saves settings.
- Handwritten erase removes handwritten text, answers and ticks; Background color purification refines the result.
- Watermark defaults to Confidential; confirm it or customize a text/image watermark.
- Set file size in KB or MB, then choose image-clarity or image-size compression.
- Print previews images and allows paper size, orientation, landscape/portrait layout, ratio and copy count.
Mac: Batch28 steps
- Select target files on the right before batch operations; an unselected-file prompt requires selecting files and trying again.
- Color mode offers Auto Enhance, Color, B&W, Grayscale, Stamps, Patterns, Antiquarian and Non-filter.
- Preview updates immediately; some modes provide a gradient-intensity slider.
- Confirm processes all selected files and reports completion.
- Rotate left 90° (default), right 90°, flip vertically/horizontally or rotate 180°; Confirm applies batch rotation and completion is reported.
- Quality uses plus/minus controls for contrast, sharpness and thickness; preview, and Confirm.
- Select book-page images for Overlapping Edge Cropping.
- Larger page-width values crop less; larger hinge or upper/lower values crop more.
- A baseline outside preview applies to all selected images; inside applies only to the current image.
- Completion is reported.
- Crop uses Crop N Pixels or Keep N Pixels; larger values respectively remove or preserve more pixels.
- Edges can be cleared white or cut.
- Baseline scope follows the same inside/outside rule; Confirm processes, and Video guideline supplies more instructions.
- Standardize sets background size (A3/A4 portrait/landscape), orientation, DPI and color; preview updates live.
- Horizontal alignment is left/center/right and vertical alignment is top/center/bottom.
- Match with BG offers Unchanged, Maximize and Overspread; the manual describes keeping content page ratio.
- Confirm applies the batch.
- Rename selected files by rules and save copies in another folder.
- Detect suspected blank pages and delete as needed.
- Holes filling previews results with adjustable minimum/maximum hole radii.
- Watermark defaults to Confidential.
- Use the + icon to customize text or image.
- Text allows font, size, color, layout, horizontal/vertical alignment and opacity; image watermarks allow position and opacity.
- Set file size in KB/MB and choose Compress or Image Size Compression.
- Print uses the system print interface.
- Handwritten erase removes handwriting, answers and ticks; optionally purify the background.
- The batch Delete control asks whether to permanently delete files.
- Confirm removes selected files from the list and their folder; Cancel returns to the main interface.
Export
Instructions from the manualWindows: Export10 steps
- Word OCR recognizes image text for a Word file and supports background recognition.
- The default language is the installation language or the last manually chosen OCR language; choose other languages if needed.
- Word page sizes are Auto, A3, A4, A5, B3, B4 and B5.
- Excel OCR uses the same language-selection process to create an Excel file.
- PDF exports selected images together or one file per image, with High, Medium or Low quality and customizable settings.
- Use default size or standardized A3, A4, A5, B3, B4, B5, portrait or landscape.
- Searchable PDF recognizes text for searchable PDF output using the Word OCR language-selection process.
- TIFF supports Color/Grayscale and No compression, LZW, JPEG or Group 4.
- Combine output or create files individually; confirm parameters, choose a path and filename, and export.
- TXT recognizes image text and uses the Word OCR language-selection process to create a text document.
Mac: Export14 steps
- Word OCR converts image text to a Word document.
- Select current or other languages using keyword search and ticks.
- Choose Auto, A3, A4, A5, B3, B4 or B5 paper size and No Processing or Auto Adjustment.
- Show Sort window lets you reorder images.
- Confirm the language, size, processing and sort; name the document, choose a path, and Save to start OCR.
- Move to background displays recognition progress.
- Excel OCR uses Word OCR language selection.
- Searchable PDF recognizes text with Low, Medium or High quality and the same language selection.
- PDF exports selected images combined or one by one.
- Quality options are 50%, 75% and 100% with respectively smallest, medium and largest storage space.
- Use original size or standardized A3/A4 portrait/landscape; PDF/A is available.
- TIFF supports Color/Grayscale, No compression/LZW/JPEG/Group 4, and combined or individual output.
- Confirm, select a saving path and filename, and export.
- TXT uses Word OCR language selection to create a text file.
Edit bar
Instructions from the manualWindows: Edit Bar15 steps
- Use Fit Height to switch display modes.
- Manual Select lets you drag a selected image area or copy it with Ctrl + C; dragging leaves the original area blank.
- Delete clears the selection white; Save commits the result.
- Crop uses a mouse-drag selection and defaults to Clear: whiteout preserves page size and whitens the unselected background; Cut retains only the selection.
- Rotate left/right 90°, flip horizontally/vertically or rotate 180°.
- Custom rotation is limited to ±15°.
- Quality adjusts contrast, sharpness and thickness within ±5 with live preview.
- Color mode offers Auto Enhance, Color, B&W, Grayscale, Stamps, Patterns, Antiquarian and Non-filter.
- Undo is available in the illustrated edit interface.
- Print previews and configures paper size, orientation, landscape/portrait layout, ratio and copies.
- One-key OCR operates only on the current image, not a batch; select Auto, A3, A4, A5, B3, B4 or B5 for Word, confirm and choose a path for PDF, Word or Excel.
- QR Code/Barcode recognizes ISBNs and QR codes; copy results to the clipboard.
- Auxiliary Correction applies to Flat Single Page or Facing Pages.
- Drag border points to correct cropping, preview, and cancel or save.
- Facing-page correction adjusts the central seam or the laser line.
Mac: Edit Bar13 steps
- Fit switches the display options; 1:1 Display shows the current image at actual scale.
- Box Select uses mouse-drag; move or drag selection, copy with Command + C, and Delete clears it white.
- Dragging leaves original area blank; Save commits the result.
- Crop uses Clear (whiteout, default) or Cut: Clear preserves original page size and whitens unselected areas; Cut retains only selection.
- Rotating offers left/right 90°, horizontal/vertical flip, 180° and Custom Rotation.
- Quality adjusts contrast, sharpness and thickness within ±5 with live preview.
- Choose Auto Enhance, Color, B&W, Grayscale, Stamps, Patterns, Antiquarian or Non-filter.
- Undo applies only to the current file; it is invalid after batch operations.
- Print uses the system to print the current image.
- OCR accepts recognition language, PDF/Word/Excel format and saving path.
- Scan QR Code recognizes QR codes/barcodes; copy one or selected results, then click again to close recognition.
- Auxiliary Correction for Flat Single Page uses dragged border points; Preview, readjust if unsatisfactory, Confirm to save or Cancel to exit.
- Facing Pages (laser) corrects central seams or laser lines with the same preview/confirm/cancel process.
File list
Instructions from the manualWindows: File List7 steps
- Import JPG files with the upper-right + icon; the adjacent folder icon opens the location of the current image or video.
- Select All selects the file list; click again to deselect.
- List Mode displays names; Thumbnail Mode displays thumbnails.
- Delete moves or removes only the current image, not a batch.
- Reproduce rescans and replaces the current image.
- Insert scans a new image before the current one.
- Details shows width, height, modification time and file size.
Mac: File List8 steps
- Import JPG files with the upper-right + icon; select a folder from ~/CZURImages to import its JPGs.
- The folder icon opens the current file location.
- Select All selects all listed files; click again to deselect.
- List Mode shows names and Thumbnail Mode shows images.
- Delete affects one current image, not a batch.
- Reproduce returns to scan preview; a rescan replaces the original, and Back returns to the list.
- Insert adds a new scan before the current image; Add adds one after it.
- Details provides size, dimensions, creation and last-modification time.
Scan
Instructions from the manualWindows: Scan10 steps
- Click the lower-right Scan icon.
- Choose an appropriate color mode: Auto Enhance strengthens color and black/white; Color preserves color without special enhancement; Patterns preserves watermarks/background patterns; Stamps whitens the background and enhances stamps; Grayscale retains grayscale while reducing space; B&W reduces space for black-on-white text; Antiquarian preserves ancient-book colors; Picture favors image reproduction with less noise; Non-filter leaves color unchanged.
- Flat Single Page crops and corrects tilt; rounded ID corners can be preserved via Settings.
- Facing Pages flattens curves, removes finger cots, corrects tilt and crops edges; configure with/without finger-cot removal and page order.
- Combine Sides places both document sides together horizontally or vertically; configure rounded-corner blanks if needed.
- Manual Selection saves only the mouse-selected area; No Processing preserves the original.
- Enable Auto Scan to detect page turns and scan automatically.
- With the device connected, use Photo to take a scan and set manual or automatic exposure.
- The left side shows scanned and processed counts and real-time images; double-click a processed image to open it.
- Set the saving path, open the containing folder and preset image naming rules.
System settings
Instructions from the manualWindows: System Settings and firmware version2 steps
- Open Settings at the top right.
- Change and save the Serial No. to restart the software; view software version and current-device firmware version, switch language, and set hotkeys with Alt + number.
Mac: System Settings and firmware version5 steps
- View Software version and download updates from the official site; change Serial No. if needed.
- Connected devices show Firmware version.
- Language offers 12 languages including Simplified Chinese, Traditional Chinese and English.
- Help opens the official support page.
- Privacy displays the software statement; disable Send network request to close all software network requests.
Scanner settings
Instructions from the manualWindows: Scanner Settings6 steps
- Choose 50 Hz or 60 Hz.
- Select the device default resolution, a lower standard resolution or a custom value.
- The manual displays the device default DPI and lists 96, 320 (default) and 350 DPI, with custom DPI from 72 to 1000.
- These are software-version choices, not a replacement for the device-specific product DPI.
- Use JPG output at Low, Medium or Best quality.
- Configure automatic facing-page splitting and which page comes first.
Mac: Scanner Settings4 steps
- Frequency switches 50 Hz/60 Hz.
- Resolution changes photo dimensions; DPI sets scanned image DPI.
- Image format sets quality.
- Paging settings enables/disables automatic separate pages after Facing Pages correction and selects Left to right or Right to left.
Visual presenter
Instructions from the manualWindows: Visual Presenter3 steps
- After startup loads, choose Visual Presenter.
- Click Display for live view; use markup, brush, rectangle and text tools.
- Screenshot and video recording controls are illustrated in this guide.
Mac: Visual Presenter5 steps
- In Visual Presenter, view saved screenshots or play recorded video; live view supports recording, comments, freeze and screenshots.
- Display opens the live interface.
- The recording icon shows the recording bar; the red button records video and right-side drawing tools mark content.
- For a video file, use play, pause or stop at bottom.
- For an image, choose Fit Width (as printed Fit With), Fit Height or 1:1; tick the image and use the upper-right PDF icon to convert it.
Mac: Visual Presenter saving settingsView
Format and Path set the saving path for videos and images.
Part ii software installation
Instructions from the manualMac: Part II Software Installation4 steps
- This linked Mac guide requires macOS 13+ on Apple Silicon or macOS 12+ on Intel.
- Open the .dmg and drag the installer icon to Applications.
- At first startup, enter and confirm the correct serial number.
- If verification fails, reenter it; software use cannot continue until validation succeeds.
Go to scan preview
Instructions from the manualMac: Go to Scan PreviewView
Click the lower-right Scan icon. With the device connected, preview shows live video; Color and Flat Single Page are the defaults.
File saving
Instructions from the manualMac: File Saving4 steps
- Use Browse for Folder to set the image saving path; default is ~/CZURImages on the system disk.
- Open Containing Folder shows the current image folder, ~/CZURImages/XXXX.
- Preset naming rules include a prefix and serial number.
- Back exits preview and returns to the main interface.
Color mode
Instructions from the manualMac: Color Mode6 steps
- Preset a color mode in the preview; Back and reopening preview retains the last choice.
- Auto Enhance strengthens colors and black/white; Color preserves rich color and slightly increases brightness; B&W reduces storage for black-on-white text; Grayscale keeps richer grayscale and reduces space.
- Stamps whitens background and enhances stamp colors.
- Patterns purifies background while preserving watermarks and patterns.
- Antiquarian retains ancient-book colors and mends missing parts.
- Non-filter leaves the image unchanged.
Processing method
Instructions from the manualMac: Processing Method14 steps
- Flat Single Page automatically crops paper edges; place the document on a black soft pad.
- In its Settings, cropping adjustment positive values remove more pixels and negative values preserve more.
- Smart black edge optimization identifies/enhances borders and removes black edges.
- White space for round corners of ID preserves rounded corners with white background.
- Multi-target paging recognizes multiple objects and creates separate pages.
- Auto page mending restores missing parts as far as possible.
- Click Scan; a processing thumbnail appears on the left.
- Facing Pages flattens curved books, removes fingers/cots, corrects tilt and crops edges.
- Configure with or without finger-cots; keep both pages (select order) or save only left/right.
- Auto page mending and positive/negative cropping adjustment work as described.
- Scans show dynamic thumbnails.
- Combine Sides merges front/back document images into one; enable rounded-corner whitespace where appropriate.
- Manual Selection saves only the selected preview area.
- No Processing leaves images unflattened and uncropped.
Auto scan
Instructions from the manualMac: Auto ScanView
Tick Auto Scan to automatically detect page-turning and take pictures.
Controls and parts
See the manual diagrams 1 diagram
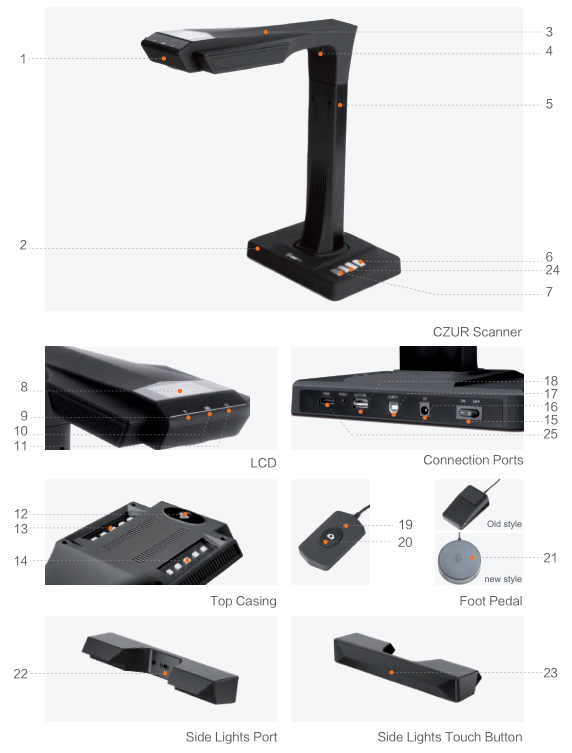
Diagram key
- 1: Microphone.
- 2: Base.
- 3: Top casing.
- 4: Laser light.
- 5: Vertical bar.
- 6: LED brightness control: high or low.
- 7: Scan: start the next scan.
- 8: LCD: when connected to a computer, shows whether images are uploading.
- 9: Video-record indicator: blinking green means recording; green off means recording stopped.
- 10: Scan indicator light.
- 11: White power indicator light.
- 12: HD CMOS camera.
- 13: Bank of LED lights.
- 14: Second bank of LED lights.
- 15: Power on/off switch.
- 16: Power connection: DC9V/1.5A; adapter input AC100–240V,50/60Hz.
- 17: Computer USB cable connection.
- 18: USB accessory port for the foot pedal or hand button.
- 19: Hand-button light: scan in progress.
- 20: Hand button: start the next scan.
- 21 (old-style pedal): Foot pedal; the old and new designs have the same function. The supplied design depends on what is received.
- 21 (new-style pedal): Foot pedal; the new and old designs have the same function. The supplied design depends on what is received.
- 22: Side-light port.
- 23: Side-light touch button.
- 24: Zoom-in and zoom-out buttons, for HDMI presenter mode only.
- 25: HDMI port, optional in the shared family guide; some models do not have HDMI.