MODEL REFERENCE
Bernette b05 CRAFTER
8 troubleshooting topics · 112 guides

The checks and guides below come from the official manuals for this model.
No matches for this wording. Try a light name, error code or a shorter phrase.
Troubleshooting
Find the problem you are experiencingUneven Stitch Formation8 checks
- Upper thread too tight or too loose.
- Adjust the upper thread tension.
- Needle blunt or bent.
- Replace the needle, make sure that a new BERNINA quality needle is used.
- Poor quality needle.
- Use a new BERNINA quality needle.
- Poor quality thread.
- Use quality thread.
- Incorrect needle/thread combination.
- Match the needle with the thread size.
- Incorrectly threaded.
- Rethread the thread.
- Fabric has been pulled.
- Feed the fabric evenly.
- Dust or thread remnants under the tension spring of the bobbin case.
- Cleaning the Bobbin Case (see page 67).
Skipped Stitches5 checks
- Incorrect needle.
- Use the needle system 130/705H.
- Needle blunt or bent.
- Replace the needle.
- Poor quality needle.
- Use a new BERNINA quality needle.
- The needle is incorrectly inserted.
- Insert the needle with the flat side to the back as far up as it will go into the needle holder and tighten the screw.
- Incorrect needle point.
- Match the needle point to the texture of the material.
Faulty Stitching4 checks
- Thread remnants between the thread tension discs.
- Fold a piece of thin material and slide the folded edge (not the raw edges) between the thread tension discs.
- Incorrectly threaded.
- Rethread.
- Thread is caught in the hook.
- Remove the upper thread and the bobbin case, turn the handwheel backwards and forwards by hand and remove the thread remnants.
- Incorrect needle/thread combination.
- Check the needle/thread combination.
Upper Thread Breaks5 checks
- Incorrect needle/thread combination.
- Match the needle with the thread size.
- Upper thread is too tight.
- Reduce the upper thread tension.
- Incorrectly threaded.
- Rethread.
- Poor quality thread.
- Use quality thread.
- The stitch plate or the hook tip is damaged.
- Contact your bernette dealer to have the damages repaired. Replace the stitch plate.
Lower Thread Breaks4 checks
- The bobbin is not inserted correctly.
- Remove and reinsert the bobbin and pull on the thread. – The thread should run easily.
- The bobbin is wound incorrectly.
- Check bobbin and thread correctly.
- The stitch hole in the stitch plate is damaged.
- Contact your bernette dealer to have the damages repaired. Replace the stitch plate.
- Needle blunt or bent.
- Replace the needle.
Needle Breaks4 checks
- The needle is incorrectly inserted.
- Insert the needle with the flat side to the back as far up as it will go into the needle holder and tighten the screw.
- Fabric has been pulled.
- Feed the fabric evenly.
- Thick fabric has been pushed.
- Use a presser foot that is suitable for thick fabric. Use the height compensation tool when sewing over a thick seam.
- The thread is knotted.
- Use quality thread.
The Machine doesn't Start5 checks
- The machine is switched off.
- Switch the machine on.
- The machine is not connected to the power supply.
- Connect the power plug to the supply.
- The machine is defective.
- Contact your bernette dealer.
- Unfavorable room temperature.
- Place the machine in a warm room one hour before use. Connect the machine and switch it on.
- The presser foot is raised.
- Lower the presser foot.
Neither the sewing light nor the light on the free arm lights up1 check
- The sewing light is defective.
- Contact your bernette dealer.
Guides
Connecting the machine and foot control
Instructions from the manualConnecting the Machine and Foot Control7 steps
- Insert the device plug (1) of the foot control/power cable into the connection for the foot control/power cable.
- Insert the power plug (2) of the foot control/power cable into the socket.
- Use of the Power Cable (only USA/Canada) The machine has a polarized plug (one contact is wider than the other).
- To reduce the risk of electric shock, the plug can only be plugged into the socket in one way.
- If the plug does not fit into the socket, turn the plug.
- If it still does not fit, an electrician needs to be called to install an appropriate outlet.
- Do not modify the plug in any way.
Switching the machine on
Instructions from the manualSwitching the Machine OnView
Prerequisite: • The power plug is connected. Set the power switch to «I».
Regulating the speed via the foot control
Instructions from the manualRegulating the Speed via the Foot Control4 steps
- The sewing speed can be continuously varied up to the maximum possible speed via the foot control.
- Press the foot control down carefully to start the machine.
- To sew more quickly, press the foot control further down.
- Release the foot control to stop the machine.
Placing the thread spool and the spool cap
Instructions from the manualPlacing the Thread Spool and the Spool Cap3 steps
- Spool discs hold the thread spool in place for proper release of thread from the spool.
- Place the thread spool on the spool pin.
- Position the appropriate spool cap on the spool pin so that there is no space between the spool cap and the thread spool.
Using the spool net
Instructions from the manualUsing the Spool Net4 steps
- The spool net holds the thread on the thread spool and prevents the thread from knotting and breaking.
- The spool net is only used with the horizontal spool holder.
- Pull the spool net over the thread spool.
- Ensure when doing so that the spool net does not slip off the thread spool, e.g. double-insert the net over the thread spools or insert a part of the net into the thread spool at the rear.
Second spool pin
Instructions from the manualSecond Spool Pin4 steps
- Inserting the second spool pin The second spool pin is required when sewing with multiple threads or for winding the bobbin thread.
- Insert the second spool pin in the accessories opening on the machine cover.
- Inserting thread spool Place the felt disc on the spool pin. – The felt disc prevents the thread from sticking to the spool pin.
- Place the thread spool on the second spool pin.
Freearm
Instructions from the manualFreearm3 steps
- The bernette 05 has a sturdily constructed freearm.
- The freearm is ideal when working with tubular, closed projects such as cuffs, trouser hems or sleeve ends.
- More space to the right of the needles offers more comfort and flexibility when stitching large and small projects.
Sewing table with accessory box
Instructions from the manualSewing Table with Accessory Box4 steps
- The sewing table has an integrated accessory box.
- To remove the sewing table, hold the sewing table by the handle (1) and pull it away to the left.
- To open the accessory box, tilt the cover towards you.
- To close the accessory box, fold the lid downwards at an angle.
Raising or lowering the feed dog
Instructions from the manualRaising or Lowering the Feed Dog2 steps
- To raise the feed dog, push the feed dog lever to the right. – The feed dog is raised when the first stitch is sewn.
- Slide the «Feed Dog Lever» left to lower the feed dog. – The feed dog is lowered.
Attaching the slide-on table
Instructions from the manualAttaching the Slide-on Table11 steps
- This technique uses an accessory that may need to be purchased separately; confirm the supplied accessories with your bernette dealer.
- Raise the needle.
- Raise the presser foot.
- Release the adjustable legs on the slide-on table.
- Make sure that the adjusting screws are not turned out too far.
- Slide the table over the freearm under the needle and foot to the right until it engages on the right side.
- Fully extend the legs of the table.
- Adjust the height by turning the screw at the feet.
- Ensure the table is flat and supported on the surface below without raising it above the freearm.
- To remove the slide-on table, pull the slide-on table away to the left beneath the presser foot and the needle.
- Lock the legs into place for storage.
Raising and lowering the needle
Instructions from the manualRaising and Lowering the Needle2 steps
- To raise the needle, turn the handwheel counterclockwise until the needle is in the highest position.
- To lower the needle, continue turning the handwheel counterclockwise until the needle pierces the fabric.
Changing the needle
Instructions from the manualChanging the Needle11 steps
- Switch off before working in the needle area.
- Switch off and disconnect the power plug before removing covers, oiling, cleaning or other maintenance.
- Close all covers before starting.
- Raise the presser foot.
- Raise the needle.
- Switch the machine off and disconnect it from the power supply system.
- Loosen the fixing screw (1) with the screwdriver.
- Pull the needle down to remove.
- Hold the new needle (2) with the flat side to the rear.
- Push the needle upwards into the needle holder as far as it will go (3).
- Tighten the fixing screw by hand.
Adjusting the needle position
Instructions from the manualAdjusting the Needle PositionView
Raise the needle. Use a recommended presser foot. Set the required needle position using the needle position dial.
Raising and lowering the presser foot
Instructions from the manualRaising and Lowering the Presser FootView
To raise the presser foot, press the presser foot lever upwards. To lower the presser foot, press the presser foot lever downwards.
Changing the presser foot
Instructions from the manualChanging the Presser Foot13 steps
- Switch off before working in the needle area.
- Switch off and disconnect the power plug before removing covers, oiling, cleaning or other maintenance.
- Close all covers before starting.
- Removing the presser foot sole Switch off the machine and disconnect it from the power supply.
- Raise the presser foot.
- Raise the needle.
- To remove the presser foot sole, push the lever on the rear of the presser foot holder upwards.
- Fitting the presser foot sole Prerequisite: • The presser foot sole is removed.
- Raise the presser foot.
- NOTICE Needle breakage caused by incorrect presser foot If the presser foot is not suitable for the selected stitch, the needle may collide with the presser foot and break.
- Always use a presser foot that is suitable for the stitch.
- Position the new presser foot sole under the notch in the shaft (1) so that the notch in the shaft is positioned above the presser foot sole pin (2).
- Carefully lower the presser foot lifter until the notch in the shaft engages with the presser foot sole pin.
Removing and inserting the presser foot holder
Instructions from the manualRemoving and Inserting the Presser Foot Holder8 steps
- Switch off before working in the needle area.
- Switch off and disconnect the power plug before removing covers, oiling, cleaning or other maintenance.
- Close all covers before starting.
- Prerequisite: • The presser foot sole is removed.
- Raise the presser foot.
- Align the presser foot holder (1) with the presser foot bar (2) underneath and to the left.
- Hold the presser foot holder firmly and screw in the screw by hand.
- Tighten the screw using the screwdriver.
Attaching the seam guide
Instructions from the manualAttaching the Seam GuideView
The seam guide is suitable for sewing parallel lines. Insert the seam guide (1) into the hole in the presser foot holder (2). Set the required distance to the adjacent seam.
Setting the presser foot pressure
Instructions from the manualSetting the Presser Foot Pressure4 steps
- The presser foot pressure can be set via the adjusting dial «Presser Foot Pressure».
- To increase the presser foot pressure, turn the adjusting dial «Presser Foot Pressure» clockwise.
- To reduce the presser foot pressure, turn the adjusting dial «Presser Foot Pressure» counterclockwise.
- Note: Do not reduce the presser foot pressure below «0», otherwise the fabric will not be fed.
Threading preparation
Instructions from the manualThreading Preparation6 steps
- Switch off before working in the needle area.
- Switch off and disconnect the power plug before removing covers, oiling, cleaning or other maintenance.
- Close all covers before starting.
- Switch the machine off.
- Raise the needle.
- Raise the presser foot.
Threading the upper thread
Instructions from the manualThreading the Upper Thread18 steps
- Switch off before working in the needle area.
- Switch off and disconnect the power plug before removing covers, oiling, cleaning or other maintenance.
- Close all covers before starting.
- Place the thread spool on the spool pin so that the thread unwinds clockwise.
- Fit the spool cap suitable for the spool.
- Feed the thread through the thread guide.
- Guide the thread through the thread pretension.
- Place the end of the thread down along the duct.
- Guide the thread downwards around the thread take-up lever cover.
- Guide the thread at the top from right to the left through the thread take-up lever and then down again.
- Guide the thread through the guides above the needle.
- Lower the presser foot.
- Press the needle-threading lever downwards slightly and guide the thread around the thread guide.
- Push the needle-threading lever down as far as it will go and hold it down. – The wire hook goes through the eye of the needle.
- Guide the thread in front of the needle and underneath the wire hook and hold it.
- To thread the needle, lift the needle-threading lever.
- Keep the thread loose when doing so. – The wire hook moves backwards and pulls the thread through the needle eye into a loop.
- Pull the thread completely through the eye of the needle.
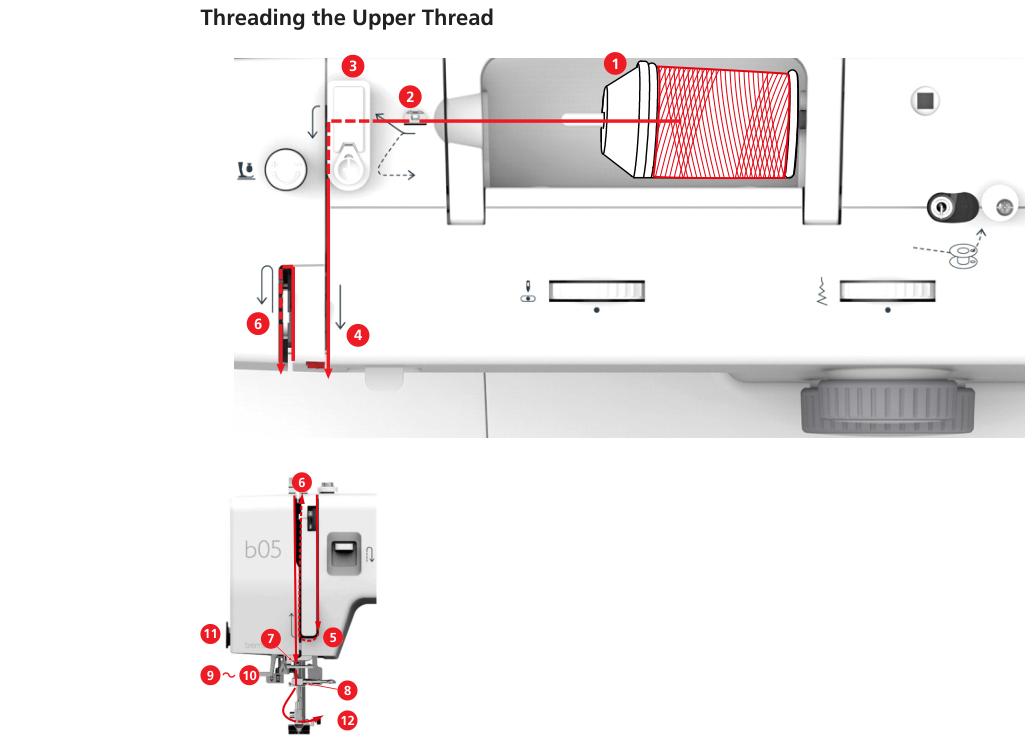
Diagram key
- 1: Spool cap
- 2: Thread guide
- 3: Thread pretension
- 4: Thread tension discs
- 5: Thread take-up lever cover
- 6 (top): Thread take-up lever, shown from above
- 6 (front): Thread take-up lever, shown from the front
- 7: Guide
- 8: Guide
- 9: Thread lever
- 10: Wire hook
- 11: Thread cutter
- 12: Thread
Threading the twin needle
Instructions from the manualThreading the Twin Needle14 steps
- Switch off before working in the needle area.
- Switch off and disconnect the power plug before removing covers, oiling, cleaning or other maintenance.
- Close all covers before starting.
- Prerequisite: • The zigzag foot is fitted. • The twin needle is inserted. • The second spool pin, felt disc and second spool are fitted.
- Guide the thread from the horizontal spool pin (red) in the direction of the arrow to the left side of the thread tension disc (1).
- Guide the thread to the thread guide above the needle.
- Thread the thread into the left needle manually.
- Guide the thread from the vertical spool pin (blue) in the direction of the arrow to the right side of the thread tension disc (1).
- Guide the thread to the thread guide above the needle.
- Thread the thread into the right needle manually.
- NOTICE Needle Breakage Caused by Incorrect Presser Foot, Stitch or Needle Position If the presser foot, stitch or needle position is incorrect, the needle can collide with the presser foot or stitch plate and break.
- Fit the zigzag foot.
- Set a straight stitch.
- Set the needle to the center position.
Threading the triple needle
Instructions from the manualThreading the Triple Needle21 steps
- Switch off before working in the needle area.
- Switch off and disconnect the power plug before removing covers, oiling, cleaning or other maintenance.
- Close all covers before starting.
- An external spool stand is required for the third spool when working with the triple needle.
- Prerequisite: • The zigzag foot is fitted. • The triple needle is inserted.
- Place a spool with a felt disc and suitable spool disc on the horizontal spool pin.
- Place the second spool with a felt disc on the vertical spool pin.
- Place the third spool with a felt disc on the external spool stand.
- Guide the thread from the horizontal spool pin (red) in the direction of the arrow to the left side of the thread tension disc (1).
- Guide the thread to the thread guide above the needle.
- Thread the thread into the left needle manually.
- Guide the thread from the external spool pin (orange) in the direction of the arrow to the left side of the thread tension disc (1).
- Guide the thread to the thread guide above the needle.
- Thread the thread into the center needle manually.
- Guide the thread from the vertical spool pin (blue) in the direction of the arrow to the right side of the thread tension disc (1).
- Guide the thread to the thread guide above the needle.
- Thread the thread into the right needle manually.
- NOTICE Needle Breakage Caused by Incorrect Presser Foot, Stitch or Needle Position If the presser foot, stitch or needle position is incorrect, the needle can collide with the presser foot or stitch plate and break.
- Fit the zigzag foot.
- Set a straight stitch.
- Set the needle to the center position.
Winding the bobbin thread
Instructions from the manualWinding the Bobbin Thread15 steps
- To prevent slippery threads from catching or breaking, pull the spool net over the spool.
- Place the thread spool and the appropriate spool cap on the spool holder.
- Use the small spool cap on the spool holder.
- Feed the thread through the thread guide.
- Guide the thread around the bobbin winder pre-tension in the direction of the arrow.
- Pull the end of the thread through one of the inner holes on the bobbin and place the empty bobbin on the bobbin winding unit.
- Push the bobbin to the right-hand position. – The machine switches to bobbin winding mode.
- Sewing is not possible.
- Hold the end of the thread tightly with one hand.
- To start the winding process for a few rotations and then stop it again, press the foot control briefly so that the thread is firmly attached to the bobbin.
- Cut the end of the thread above the inner hole.
- To continue the winding process, press the foot control.
- Release the foot control to stop the winding process.
- Push the bobbin winding unit to the left into the starting position. – The machine switches to sewing mode.
- Remove the bobbin and cut the thread.
Threading the bobbin thread
Instructions from the manualThreading the Bobbin Thread12 steps
- Switch off before working in the needle area.
- Switch off and disconnect the power plug before removing covers, oiling, cleaning or other maintenance.
- Close all covers before starting.
- NOTICE Needle Breakage Caused by Unevenly Wound Bobbins Unevenly wound bobbins can lead to incorrect thread tension or cause needles to break.
- Only use evenly wound bobbins.
- Prerequisite: • The needle is raised. • The presser foot is raised. • The machine is switched off.
- To open the bobbin cover, push the handle to the right and remove the bobbin cover.
- Insert a new bobbin so that the thread is wound counterclockwise.
- Press gently on the bobbin.
- Follow the arrow markings to bring the thread into the bobbin thread guide.
- To cut off excess thread, take the end of the thread and pull it over the thread cutter (1).
- Attach the bobbin cover.
Bringing up the bobbin thread
Instructions from the manualBringing up the Bobbin Thread8 steps
- Raise the needle.
- Raise the presser foot and hold the needle thread lightly with your left hand.
- Turn the handwheel slowly with your right hand counterclockwise until the needle is lowered.
- Continue turning the handwheel until the thread take-up lever is at its highest point.
- Pull the upper thread upwards until the bobbin thread forms a loop.
- Pull the bobbin thread all the way up.
- Pull both threads approx.
- 4 in (10 cm) to the back and place them under the presser foot.
Selecting a stitch pattern
Instructions from the manualSelecting a Stitch Pattern6 steps
- Raise the needle to its topmost position before turning the stitch pattern selector knob, to avoid needle and fabric damage.
- Patterns are in categories A–L with black, red and gray settings.
- For a black pattern, set stitch length between 0 and 4.
- For a red pattern, select S1.
- For a gray pattern, select S2.
- Turn the stitch pattern selector knob left or right until the desired category engages in the center beneath the setting mark.
Setting the stitch width
Instructions from the manualSetting the Stitch Width5 steps
- The stitch width can be varied from 0–6 mm for each stitch using the stitch width dial.
- NOTICE Incorrect needle position when selecting a stitch width Damage to needle and fabric.
- Before turning the stitch width dial, move the needle to the topmost position.
- Raise the needle.
- Turn the stitch width dial until the required stitch width is shown above setting position «•».
Adjusting the stitch length
Instructions from the manualAdjusting the Stitch Length5 steps
- The stitch length can be adjusted using the stitch length knob.
- For black stitch patterns, the stitch length can be set to 0–4 mm.
- For buttonholes, the stitch length can be set within the range of the buttonhole symbol on the dial.
- For red and gray stitch patterns, the stitch length is predefined and cannot be changed.
- Turn the stitch length knob until the required stitch length is shown underneath setting position «•».
Adjusting the upper thread tension
Instructions from the manualAdjusting the Upper Thread Tension7 steps
- The upper thread tension must be adjusted depending on the sewing materials, the fabric layers and the sewing process using the «Upper thread tension» dial.
- The base value for the upper thread tension is 4.
- With an optimal straight stitch, the bobbin thread is not visible on the right side of the fabric.
- To increase the upper thread tension, set the «Upper thread tension» dial to a higher value.
- To decrease the upper thread tension, set the «Upper thread tension» dial to a lower value.
- If the bobbin thread is visible on the right side of the fabric, set the upper thread tension to a lower value.
- If the upper thread is visible on the wrong side of the fabric, set the upper thread tension to a higher value.
Adjusting the balance
Instructions from the manualAdjusting the Balance10 steps
- Different fabrics, threads and linings can affect stretch stitch patterns or buttonholes, causing them to be sewn incorrectly.
- Mechanical balance adjustment enables these deviations to be corrected and the stitch pattern to be optimally adjusted for the fabric to be worked with.
- Select a stretch stitch pattern or buttonhole.
- Set the stitch length.
- Adjust the stitch width.
- Correct the balance by using a coin to turn it.
- To increase the stitch density of the left satin stitch for the buttonhole, turn the balance adjustment knob clockwise.
- To decrease the stitch density of the left satin stitch for the buttonhole, turn the balance adjustment knob anti-clockwise.
- To increase the stitch density of the stretch stitches, turn the balance adjustment knob clockwise.
- To decrease the stitch density of the stretch stitches, turn the balance adjustment knob anti-clockwise.
Quick reverse
Instructions from the manualQuick Reverse3 steps
- Sewing in reverse is used at the beginning and end of the seam to secure the seam.
- Press the lever «Quick Reverse» and keep it pressed.
- Press the foot control. – The machine sews in reverse until the lever «Quick Reverse» is released.
Securing
Instructions from the manualSecuring10 steps
- Secure Seam at Seam Beginning Select the stitch pattern.
- Sew the seam a few stitches forward.
- Push and hold the Quick Reverse Lever.
- Sew the seam backwards to the beginning of the seam.
- Release the Quick Reverse Lever so that the machine sews forwards again. – Seam beginning is now secured.
- Secure Seam at Seam End Sew the selected stitch pattern forwards to the end.
- Push and hold the Quick Reverse Lever.
- Sew the seam a few stitches backwards.
- Release the Quick Reverse Lever.
- Sew the seam again up to the seam end. – The seam end is secured.
Sew thick areas
Instructions from the manualSew Thick Areas5 steps
- Fit the zigzag foot. – The black knob on the right-hand side of the presser foot locks the presser foot in a horizontal position if it is pressed in before lowering the presser foot (1).
- This ensures even feeding at the beginning of a seam and helps when sewing multiple layers of fabric such as sewing over seams when hemming jeans.
- Once the highest point has been reached, lower the needle and raise the presser foot.
- Press the foot tip and the black knob, lower the presser foot and continue sewing. – The black button releases automatically after sewing few stitches.
- To support the presser foot when manually guiding the fabric and sewing from the folded side, place one, two or three small plates from the height compensation tool (1) behind the needle under the presser foot.
Sewing corners
Instructions from the manualSewing Corners5 steps
- Stop the machine when the corner is reached.
- Pierce the needle into the fabric.
- Raise the presser foot.
- Use the needle as a pivot and turn the fabric.
- Lower the presser foot and continue sewing.
Sewing very slippery fabrics
Instructions from the manualSewing Very Slippery Fabrics8 steps
- This technique uses an accessory that may need to be purchased separately; confirm the supplied accessories with your bernette dealer.
- Very slippery materials such as leather, imitation leather, plastic or vinyl can easily be sewn using the zigzag foot with sliding sole.
- Fit the zigzag foot with sliding sole.
- Select the required stitch pattern.
- Select the required stitch length.
- Select the required stitch width.
- Set the required needle position.
- Sew at a slow, even speed.
Sewing straight stitch
Instructions from the manualSewing Straight Stitch10 steps
- Adjust the stitch length for the sewing project, e.g. a long stitch for denim (approx.
- 3 – 4 mm) and a short stitch for delicate fabric (approx.
- 2 – 2.5 mm).
- Adjust the stitch length depending on the thread thickness, e.g. a long stitch (approx.
- 3 – 4 mm) for top-stitching with gimp.
- Fit the zigzag foot.
- Set the stitch pattern selector knob to position «A».
- Set the required stitch length.
- Set the stitch width to «0».
- Adjust the needle position.
Sewing in the zipper
Instructions from the manualSewing in the Zipper26 steps
- As the fabric feed can be difficult when starting to sew, it is recommended to hold the threads firmly or to pull the fabric slightly to the back for a few stitches or to sew 0.5 - 1 in (1 – 2 cm) reverse first.
- Finish the seam allowances individually.
- Fit the zigzag foot.
- Set the stitch pattern selector knob to position «A».
- Set the required stitch length.
- Set the stitch width to «0».
- Set the needle position to «Center».
- Close and sew the seam up to where the zipper starts.
- Set the stitch length to 4.
- Tack the zipper length with long stitches.
- Iron the seam apart.
- Unpick the tacking stitches.
- Tack the zipper under the fabric so that the fabric edges meet over the center of the zipper.
- Fit the zipper foot.
- When sewing the left-hand side of the zipper, secure the right-hand side of the presser foot pin using the holder.
- When sewing the right-hand side of the zipper, secure the left-hand side of the presser foot pin using the holder.
- Sew the left-hand side of the open zipper from top to bottom.
- Close the zipper up to approx.
- 5 cm from the end.
- Sew over the lower end and the right-hand side of the zipper.
- Stop before the zipper slider.
- Move the needle into the lower position.
- Raise the presser foot.
- Open the zipper.
- Finish sewing the right side.
- Remove the tacked seam.
Stitching in a concealed zipper
Instructions from the manualStitching in a Concealed Zipper27 steps
- Concealed zippers are a particularly elegant solution for clothing and are very practical when used on bags and home furnishings.
- As these special zippers are hidden by the seam after being sewn in, they form an almost invisible closure.
- As the fabric feed can be difficult when starting to sew, it is recommended to hold the threads firmly or to pull the fabric slightly to the back for a few stitches or to sew 0.5 - 1 in (1 – 2 cm) reverse first.
- Open zipper all the way.
- Pin the right half of the zipper right side on right side on the fabric.
- The spiral points away from the edge of the fabric.
- Fit the invisible zipper foot.
- Set the stitch pattern selector knob to position «A».
- Set the required stitch length.
- Set the stitch width to «0».
- Set the needle position to «Center».
- Lower the presser foot at the start of the zipper so that the spiral is guided through the right presser foot groove.
- Sew and close the right-hand half of the zipper from top to bottom up to the slider.
- Close the zip.
- Pin the left-hand half of the zipper with its right side against the right side of the left-hand fabric.
- The spiral points away from the edge of the fabric.
- Open zipper all the way.
- Lower the presser foot at the start of the zipper so that the spiral is guided through the left presser foot groove.
- Sew and close the left-hand half of the zipper from top to bottom up to the slider.
- Remove the sewing material from the machine.
- Close the zip.
- Place the two right sides of the fabric against each other.
- Fold the ends of the zipper outwards as far as it would go.
- Pin the ends of the zipper seams precisely on top of one another.
- Pin the seam together from the bottom to the zipper.
- Fit the zigzag foot.
- Close and sew the seam from the bottom to the zipper.
Sewing triple straight stitch
Instructions from the manualSewing Triple Straight Stitch4 steps
- The triple straight stitch is especially suitable for durable seams and for firm, densely woven fabrics such as denim and corduroy.
- Fit the zigzag foot.
- Set the stitch length knob to «S1».
- Set the stitch pattern selector knob to «A».
Sewing triple zigzag
Instructions from the manualSewing Triple Zigzag6 steps
- The triple zigzag is particularly suitable for firm fabrics, especially denim, deckchair fabric and awnings, and for hems on fabrics that are washed often.
- Prerequisite: • Finish the seam edges first.
- Fit the zigzag foot.
- Set the stitch length selector knob to «S1».
- Turn the stitch selector knob to category «B».
- Set the required stitch width.
Super-stretch
Instructions from the manualSuper-Stretch5 steps
- The super-stretch stitch is a narrow stretch stitch designed to eliminate puckering on knit fabrics and bias seams, while permitting the seam to be pressed completely open flat.
- Fit the zigzag foot.
- Set the stitch pattern selector knob to «L».
- Set the stitch length and stitch width according to the stitch table.
- Sew the seam at the required distance from the fabric edge without stretching the fabric.
Sewn-out zigzag
Instructions from the manualSewn-Out Zigzag12 steps
- The sewn zigzag is used to finish seams on synthetics and other fabrics that tend to pucker.
- The stitch is also excellent for darning and mending tears, as well as for attaching elastic tape.
- Fit the zigzag foot.
- Set the stitch pattern selector knob to «C».
- Set the stitch length and stitch width according to the stitch table.
- For Finishing: Position the fabric so that the stitch is sewn at a distance of 1.5 cm from the edge of the fabric.
- Sew the seam.
- Trim the seam allowance after sewing.
- Be careful not to cut the stitches.
- For Sewing on Elastic Tape: Pin the elastic tape to the left-hand side of the fabric.
- When doing so, stretch the tape and ensure that it is positioned evenly on the fabric.
- To attach the elastic tape, pull it apart along the length of the gathered fabric.
Manual darning
Instructions from the manualManual Darning21 steps
- This technique uses an accessory that may need to be purchased separately; confirm the supplied accessories with your bernette dealer.
- Switch off before working in the needle area.
- Switch off and disconnect the power plug before removing covers, oiling, cleaning or other maintenance.
- Close all covers before starting.
- Used for darning holes or worn areas in all fabric types.
- Remove the presser foot holder and fit the darning/embroidery foot on the presser foot bar. – The lever (1) must rest on the top of the needle clamping screw (2).
- Press the darning/embroidery foot from underneath with your finger and tighten the screw (3).
- Turn the stitch pattern selector knob to «A».
- Set the stitch length to «0».
- Lower the feed dog.
- Attach the Slide-on Freearm Extension Table.
- Lower the feed dog.
- Tension the sewing project in a darning hoop. – The darning area remains evenly stretched and cannot be deformed.
- Turn the handwheel anti-clockwise to bring up the bobbin thread.
- Sew a few stitches at the start of the seam.
- Sew from the left to the right, guide the fabric evenly by hand without using pressure.
- If the thread is lying on the top, continue sewing at a slower pace.
- If knots form on the wrong side of the fabric, sew faster.
- If the thread breaks, continue sewing at a more even pace.
- Move in curves when changing the direction to avoid holes and thread breakage.
- After you have finished darning, raise the presser foot and restart the feed dog.
Finishing edges
Instructions from the manualFinishing Edges9 steps
- The zigzag stitch is suitable for finishing all types of fabric.
- Use darning thread for fine materials.
- Prerequisite: • The edge of the fabric should lie flat and not roll.
- Fit the zigzag foot or overlock foot.
- Do not set the stitch length too long.
- Set the stitch pattern selector knob to «B».
- Do not set the stitch width too wide.
- Guide the edge of the fabric into the center of the zigzag foot so that the needle goes into the fabric on one side and over the edge into the air on the other side.
- Guide the edge of the fabric along the guide plate on the overlock foot (1) so that the needle goes into the fabric on one side and over the edge into the air on the other side.
Sewing double overlock
Instructions from the manualSewing Double Overlock10 steps
- A double overlock seam is suitable for looser knit fabric and for cross seams in woven fabric.
- A new jersey or stretch needle must be used for knit fabrics so that the delicate knit is not damaged.
- Fit the zigzag foot or overlock foot.
- Set the stitch pattern selector knob to «F».
- Set the stitch length knob to «S1».
- Set the stitch width according to the stitch table.
- For finishing the edge of the fabric with the zigzag foot: Position the edge of the fabric under the presser foot so that the right-hand straight stitch is sewn close to the edge of the fabric.
- For sewing and hemming elastic fabrics and for sewing belt loops: Fold the edge of the fabric backwards with the left-hand sides together.
- Sew the seam on the right-hand side of the fabric.
- Cut off any excess fabric from the edge of the fabric up to the seam.
Sewing vari overlock
Instructions from the manualSewing Vari Overlock4 steps
- Fit the overlock foot.
- Set the stitch pattern selector knob to «D».
- Set the stitch length and stitch width according to the stitch table.
- Sew the fabric with the edge of the fabric against the overlock foot guide.
Narrow edgestitching
Instructions from the manualNarrow Edgestitching8 steps
- Fit the blind stitch foot, edge stitch foot or zigzag foot.
- Set the stitch pattern selector knob to «A».
- Set the required stitch length.
- Set the stitch width to «0».
- Using the blind stitch foot or edge stitch foot: Place the left-hand edge of the fabric against the guide of the blind stitch foot or edge stitch foot.
- Set the left-hand needle position.
- Using the zigzag foot: Guide the edge of the fabric along the right-hand edge of the presser foot or the markings on the stitch plate.
- Adjust the needle position to the right.
Wide edgestitching
Instructions from the manualWide Edgestitching8 steps
- Fit the blind stitch foot, edge stitch foot or zigzag foot.
- Set the stitch pattern selector knob to «A».
- Set the required stitch length.
- Set the stitch width to «0».
- Using the Zigzag Foot Guide the edge of the fabric along either the right-hand edge of the presser foot or the markings on the stitch plate.
- The markings on the stitch plate indicate the distance between the center needle position and the guideline.
- Using the Blind Stitch Foot or Edge Stitch Foot Place the left-hand edge of the fabric against the guide of the blind stitch foot or edge stitch foot.
- Select the left-hand needle position at the desired distance to the edge.
Edgestitching using the seam guide
Instructions from the manualEdgestitching Using the Seam Guide9 steps
- When sewing parallel wide top-stitching lines, we recommend guiding the seam guide along a sewn line.
- Attach the seam guide to the zigzag foot.
- Fit the zigzag foot.
- Set the stitch pattern selector knob to «A».
- Set the required stitch length.
- Set the stitch width to «0».
- To adjust the distance, move the seam guide to the left or right.
- Sew the first row.
- Sew the following rows while guiding the seam guide along the previous seam.
Sewing hem edges
Instructions from the manualSewing Hem Edges8 steps
- When using the blind stitch foot, we recommend setting the needle position all the way to the left or right.
- When using the zigzag foot or edge stitch foot, all needle positions are possible.
- Fit the blind stitch foot, edge stitch foot or zigzag foot.
- Set the stitch pattern selector knob to «A».
- Set the required stitch length.
- Set the stitch width to «0».
- To sew on the top edge of the seam, select the right-hand needle position.
- Place the inside upper edge of the seam on the right-hand side against the guide on the blind stitch foot or edge stitch foot.
Sewing a narrow hem
Instructions from the manualSewing a Narrow Hem19 steps
- This technique uses an accessory that may need to be purchased separately; confirm the supplied accessories with your bernette dealer.
- Fit the hemmer foot.
- Turn the stitch pattern selector knob to «A».
- Set the required stitch length.
- Set the stitch width to «0».
- Fold the edge of the fabric by approx.
- 3 mm and fold it over again.
- Fold the first 5 cm of the fabric edge to be sewn.
- Place the edge of the fabric with the left-hand side of the fabric facing up under the presser foot.
- The fabric under the presser foot should be just less than the width of the presser foot.
- Sew 4 – 5 stitches.
- Raise the needle and presser foot.
- Pull the fabric backwards by about 10 – 15 cm.
- Do not cut the thread.
- Hold the 4 threads in your left hand.
- Pull the edge of the fabric into the spiral guide on the hemmer foot using your right hand.
- Lower the presser foot.
- Continue sewing slowly while slightly folding the cut edge of the fabric in front of the hemmer foot and holding it to the left.
- Guide the edge of the fabric evenly into the spiral guide on the hemmer foot and sew.
Sewing blind hems
Instructions from the manualSewing Blind Hems16 steps
- For invisible hems in medium to heavy weight cotton, wool and blended materials.
- A blind stitch «J» is suitable for sewing firm fabrics.
- The elastic blind stitch «E» is suitable for elastic fabrics.
- Prerequisite: • The edges of heavy and medium-weight fabrics are finished.
- Fit the blind stitch foot.
- Set the stitch pattern selector knob to «E» or «J».
- Set the required stitch length.
- Set the required stitch width.
- Fold the fabric as illustrated with the wrong side up.
- Place the fabric beneath the presser foot.
- Turn the handwheel counterclockwise until the needle is all the way to the left.
- The needle should just pierce the fold in the fabric (3).
- If it does not, adjust the stitch width accordingly.
- Adjust the guide (2) by turning the dial (1) so that the guide is positioned directly against the fold.
- Sew slowly while guiding the fabric carefully along the edge of the guide.
- Turn over the fabric.
Sewing visible hems
Instructions from the manualSewing Visible Hems10 steps
- The visible hem is especially suitable for elastic hems in tricot fabric made of cotton, wool, synthetics and blended fibers.
- We recommend using the Lycra stitch or triple zigzag as a visible hem stitch for elastic fabrics.
- We recommend using the universal stitch or triple straight stitch as a visible hem for non-elastic fabrics.
- Fit the zigzag foot or upper feed foot.
- Set the stitch pattern selector knob to the required stitch.
- Adjust the stitch length according to the stitch table.
- If required, adjust the presser foot pressure.
- Iron the hem and baste if necessary.
- Sew the hem at the required depth on the right side.
- Cut off the remaining fabric on the wrong side.
Sewing flat joining seams
Instructions from the manualSewing Flat Joining Seams9 steps
- The flat joining seam is particularly suitable for fleecy or thick fabrics such as terry, felt or leather.
- Suitable stitches are the reinforced overlock stitch, the universal stitch, the Lycra stitch and the stretch overlock stitch.
- Fit the zigzag foot.
- Set the stitch pattern selector knob to «H».
- Set the stitch length knob to «S1».
- Set the required stitch width.
- Overlap the fabric edges.
- Sew along the fabric edge.
- The needle stitches over the edge of the top layer on the right side into the bottom layer to get a very flat durable seam.
Sewing basting stitches
Instructions from the manualSewing Basting Stitches9 steps
- When sewing basting stitches, it is recommended to use a fine darning thread.
- This is easier to remove.
- The recommended stitch length is 3.5–4 mm.
- The tacking stitch is suitable for tacking multiple layers of fabric.
- Fit the zigzag foot.
- Set the stitch pattern selector knob to «A».
- Set the stitch length to «4».
- Set the stitch width to «0».
- Pin the fabric layers at a right angle to basting direction to prevent the layers from slipping.
Altering the stitch density
Instructions from the manualAltering the Stitch Density6 steps
- When using the satin stitch, the stitch density can be adjusted by changing the stitch length.
- A short stitch length means that the distance between stitches is shorter and the stitch is denser.
- A longer stitch length means that the distance between stitches is greater and the stitch is less dense.
- Set the stitch selector to «K».
- Adjust the stitch length.
- Adjusting the stitch length changes the stitch density.
Gathering
Instructions from the manualGathering17 steps
- Ideal for delicate and medium-weight fabrics.
- For decorating clothing or decorative items.
- Fit the zigzag foot.
- Set the stitch pattern selector knob to position «A».
- Set the stitch width to «0».
- Set the stitch length to «4».
- Set the needle position to «Center».
- Set the thread tension to «2» or less.
- Pull out around 5 cm of the upper thread and bobbin thread.
- Sew along the fabric edge at a distance the same as the width of the foot.
- At the start, make a few reverse stitches to sew it up.
- Leave the protruding ends of the thread around 10–12 cm long.
- Sew additional lines at a distance of approx.
- 5 mm.
- At the start, make a few reverse stitches to sew it up.
- Leave the protruding ends of the thread around 10–12 cm long.
- Pull the bobbin threads and distribute the folds evenly.
Smocking
Instructions from the manualSmocking16 steps
- Decorative stitches that are sewn over ruffles are referred to as smocking.
- This technique is used to decorate blouses or cuffs, among other purposes.
- Smocking gives fabric texture and elasticity.
- The following stitches are suitable for smocking: • Honeycomb stitch (S1, C) • Faggot stitch (S1, G) Fit the zigzag foot.
- Set the stitch pattern selector knob to position «A».
- Set the stitch length to «4».
- Set the thread tension to «2» or less.
- Sew a tacking stitch 1 cm away.
- Tie the threads in a knot on one side.
- On the other side, pull the bobbin threads and distribute the folds evenly.
- Secure the threads.
- Select the honeycomb stitch or faggot stitch.
- Set the stitch width to «6».
- Set the thread tension to «4».
- Sew decorative stitches between the gathering seams.
- Remove the tacking threads.
Joining seam with faggot stitch
Instructions from the manualJoining Seam with Faggot Stitch10 steps
- The faggot stitch can be used to sew two fabric edges together at a distance.
- This stitch pattern is used to decorate blouses and children's clothing.
- The decorative effect of this stitch pattern is more striking if thicker thread is used.
- 4 mm gap Fit the zigzag foot.
- Set the stitch pattern selector knob to position «G».
- Set the stitch length knob to «S1».
- Set the stitch width to «6».
- Tack the folded edges of two pieces of fabric to a piece of washable lining with a gap of 4 mm.
- Lower the presser foot centrally between the edges of the fabric and sew.
- After sewing, remove the lining and tacking thread.
Joining seam with double overlock stitch
Instructions from the manualJoining Seam with Double Overlock Stitch10 steps
- The double overlock stitch can be used to sew two fabric edges together at a distance.
- This stitch pattern is used to decorate blouses and children's clothing.
- The decorative effect of this stitch pattern is more striking if thicker thread is used.
- Fit the zigzag foot.
- Set the stitch pattern selector knob to position «F».
- Set the stitch length knob to «S1».
- Set the stitch width to «6».
- Tack the folded edges of two pieces of fabric to a piece of washable lining with a gap of 4 mm.
- Lower the presser foot centrally between the edges of the fabric and sew.
- After sewing, remove the lining and tacking thread.
Shell edging with vari-overlock stitch
Instructions from the manualShell Edging with Vari-Overlock Stitch7 steps
- The Vari-overlock stitch can be used to create a shell edging effect on soft jerseys and fine fabric.
- Fit the zigzag foot.
- Set the stitch pattern selector knob to «H».
- Set the required stitch length.
- Set the required stitch width.
- Fold the edge of the fabric in by about 5 mm.
- Position the fabric under the presser foot so that the needle goes into the air just past the edge of the fabric on the right-hand side.
Shell edging with satin stitch
Instructions from the manualShell Edging with Satin Stitch9 steps
- A wavy hem with satin stitches can be used to decorate blouse necklines and the edges of knitted fabrics.
- Fit the zigzag foot.
- Turn the stitch pattern selector knob to position «K».
- Select the required stitch length.
- Set the required stitch width.
- Set the needle position to «Center».
- Sew along the edge of the fabric at a distance of approx.
- 1 cm.
- Use scissors to cut the fabric carefully along the seam.
Sewing a test sample
Instructions from the manualSewing a Test Sample6 steps
- Always sew a test sample of the buttonhole on the same fabric: It is recommended to use the same stabilizer and to select the same buttonhole.
- The test sample should also be sewn in the respective direction.
- Preparing a sewing sample allows you to adjust the settings until the sewing result is as required.
- Sew a sample buttonhole.
- Check whether the settings are correct.
- If required, adjust the buttonhole length, stitch length and stitch width.
Appliqués
Instructions from the manualAppliqués9 steps
- Appliqués attached using the blanket stitch look as if they have been sewn by hand.
- Place an appliqué on the fabric and baste or pin it in place, or iron it on using double-sided adhesive non- woven material.
- Fit the zigzag foot or open embroidery foot.
- Set the stitch pattern selector knob to position «D».
- Set the stitch length knob to «S2».
- Set the required stitch width.
- Sew while guiding the fabric so the needle falls along the outer edge of the appliqué.
- When sewing around a corner, stop the machine with the needle in the lower position at the outer edge of the appliqué.
- Raise the presser foot and pivot the fabric around the needle to change the sewing direction.
Free-motion quilting
Instructions from the manualFree-Motion Quilting20 steps
- This technique uses an accessory that may need to be purchased separately; confirm the supplied accessories with your bernette dealer.
- Switch off before working in the needle area.
- Switch off and disconnect the power plug before removing covers, oiling, cleaning or other maintenance.
- Close all covers before starting.
- The quilting stitch plate (optional accessory) and the free-motion quilting foot (optional accessory) are used for quilting work.
- It is recommended to use the slide-on table.
- With free motion quilting, it is of advantage to quilt from the center outwards and to guide the fabric using smooth, round movements to form the design of your choice.
- With stipple quilting, entire surfaces of the fabric are filled with quilt stitches.
- The single lines of stitching are rounded and never cross one another.
- Quilting gloves with rubber nubs make it easier to guide the fabric.
- Prerequisite: • The top layer, the batting and the backing are pinned together or basted.
- Fit the quilting stitch plate.
- Remove the presser foot and fit the free-motion quilting foot to the presser foot bar.
- Tighten the free-motion quilting foot with the screw.
- Set the stitch length «0».
- If required, adjust the upper thread tension.
- Press the foot control.
- Hold both hands close to the presser foot like an embroidery hoop to guide the fabric.
- If the thread is lying on top of the fabric, slow down the movement of the sewing project.
- If there are knots on the wrong side of the fabric, move the sewing project faster.
Sewing patchwork
Instructions from the manualSewing Patchwork14 steps
- Piecing Fit the zigzag foot or patchwork foot.
- Set the stitch pattern selector knob to «A».
- Set the stitch length knob to the required stitch length of 1–3.
- Set the needle position to «Center».
- Place 2 pieces right sides together.
- Sew the pieces together with a seam allowance of 5 mm or guide them along the guide of the patchwork foot.
- Press the seam allowances open.
- Embellishing Seams Fit the zigzag foot.
- Set the decorative stitch you have chosen.
- Set the required stitch width.
- Set the needle position to «Center».
- Continue to work on the right side of the fabric.
- Place the joining seam under the center of the presser foot.
- Sew over the seam using a decorative stitch.
Cleaning the feed dog
Instructions from the manualCleaning the Feed Dog20 steps
- Switch off before working in the needle area.
- Switch off and disconnect the power plug before removing covers, oiling, cleaning or other maintenance.
- Close all covers before starting.
- Remaining threads under the stitch plate must occasionally be removed.
- CAUTION Electronically Driven Components Risk of injury near the needle and the hook.
- Raise the presser foot.
- Switch the machine off and disconnect it from the power supply.
- Switch the machine off and disconnect it from the power supply.
- Remove the presser foot and the needle.
- Lower the feed dog.
- Push the unlocking lever (1) to the right and remove the bobbin cover (2).
- Loosen both screws and remove the stitch plate.
- Clean the feed dog with the brush.
- Refit the stitch plate.
- Insert both screws and tighten them.
- Insert the bobbin cover.
- Raise the feed dog.
- Insert a needle.
- Attach the presser foot.
- Connect the machine to the mains power and switch it on.
Cleaning the bobbin case
Instructions from the manualCleaning the Bobbin Case16 steps
- Switch off before working in the needle area.
- Switch off and disconnect the power plug before removing covers, oiling, cleaning or other maintenance.
- Close all covers before starting.
- CAUTION Electronically Driven Components Risk of injury near the needle and the hook.
- Switch the machine off and disconnect it from the power supply.
- Remove the presser foot and the needle.
- Open the bobbin cover and remove the top bobbin cover.
- Remove the stitch plate.
- Remove the bobbin from the bobbin case.
- Clean the bobbin case with the brush.
- Set needle to topmost position.
- Clean the shuttle race with the brush.
- Insert the bobbin into the bobbin case.
- Fit the stitch plate.
- Attach the top bobbin cover and close the bobbin cover.
- Fit the needle and presser foot.
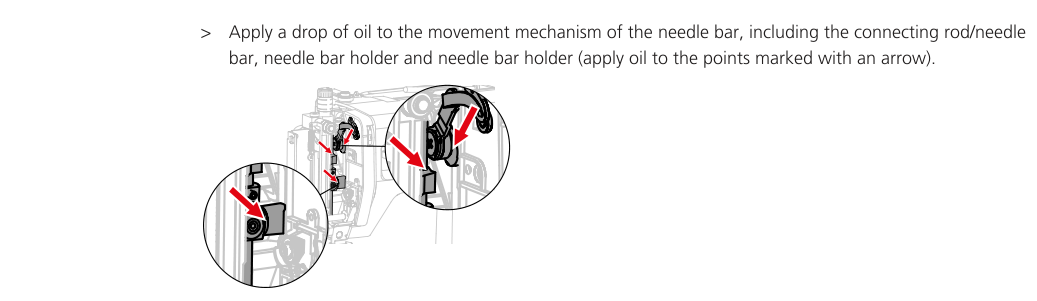
Oiling the needle bar
Instructions from the manualOiling the Needle Bar11 steps
- Switch off before working in the needle area.
- Switch off and disconnect the power plug before removing covers, oiling, cleaning or other maintenance.
- Close all covers before starting.
- With frequent use, oil the needle bar every 6 months to prevent blocking.
- Use only oil recommended by bernette.
- Remove the protective cap (1) and screw (2), then remove the headframe cover (3).
- Be aware of moving parts exposed by removing the cover.
- Apply a drop of oil to the needle-bar movement mechanism at all the arrowed points in the reviewed illustration.
- Remove the presser foot.
- Turn the handwheel a few times and wipe away excess oil with a cloth.
- Refit the headframe cover.
Important safety instructions
Instructions from the manualSafety, stopping and servicing53 steps
- IMPORTANT SAFETY INSTRUCTIONS Please be aware of the following basic safety instructions when using your machine.
- Before using this machine, read instruction manual carefully.
- DANGER To protect against electric shock, the following instructions must be observed: Never leave the machine unattended when it is connected to the power supply.
- Immediately after use and before cleaning, switch off the machine and disconnect the power cable from the outlet.
- In order to protect against injury, the following instructions must be adhered to: Do not look directly into the LED lamp with optical instruments (e.g. magnifying glass).
- If the LED lamp is damaged or defective, have the LED lamp checked or repaired at your local bernette dealer.
- Switch off the machine before working in the needle area.
- Before starting the machine, close all covers.
- WARNING To reduce the risk of burns, fire, electric shock or personal injury, the following instructions must be observed.
- General Facts This machine may only be used for the purpose described in this instruction manual.
- Working Environment Do not use the machine outdoors.
- Only use the machine in dry rooms.
- Do not use the machine in a humid area.
- Do not use the machine in rooms where aerosol products (sprays) are being used.
- Do not use the machine in rooms where oxygen is dispensed.
- Technical Condition Never use the machine when it is damp.
- Do not use the machine if it is not working properly.
- Do not use the machine if a cable or the plug is damaged.
- Do not use the machine if it has been dropped, damaged or has fallen into water.
- If the machine is damaged or does not work properly, have the machine checked or repaired by your local bernette dealer.
- Keep all ventilation openings of the machine and the foot control free of lint, dust and loose cloth.
- Do not use the machine if the ventilation openings are blocked.
- Accessories and Supplies Only use the accessories recommended by the manufacturer.
- Always use an original bernette Stitch Plate.
- An incorrect stitch plate can result in needle breakage.
- Always use plastic bobbins of class 15.
- If other bobbins are used, proper functioning of the machine cannot be guaranteed.
- Use only straight needles of good quality.
- Bent or damaged needles can cause needle breakage.
- The machine is double-insulated.
- Only use original spare parts.
- See instructions for servicing of double- insulated products.
- To lubricate the machine, only use oil recommended by bernette.
- Appropriate Use The machine can be used by children aged 8 years and over or by persons with reduced physical, sensory or mental capabilities or lack of experience and knowledge if they are supervised or have been given instructions on how to use the machine safely and understand the hazards involved.
- Children are not allowed to play with the machine.
- Cleaning and maintenance work may only be carried out by children under supervision.
- Only use the machine with the supplied power cable.
- USA and Canada only: Do not connect power plug NEMA 1-15 to circuits exceeding 150 volt-to-ground.
- If the machine is to be used in a country other than the country of origin, obtain a power cable suitable for this country from a bernette dealer.
- Only use this machine with the supplied foot control of type FC-2902D/ FC-1902A.
- Do not insert any objects into the openings of the machine.
- Do not place any objects on the foot control.
- While sewing, guide the fabric gently.
- Pulling and pushing the fabric can cause needle breakage.
- Keep fingers away from all moving parts.
- Special care is required in the needle area.
- Only lift the machine by the handle.
- For activities in the needle area – such as threading the needle, changing the needle, threading the looper or changing the presser foot – switch off the machine.
- To switch off, set the power switch to «0».
- When protective covers are removed, when the machine is oiled or when other cleaning and maintenance operations mentioned in this instruction manual are carried out, switch off the machine and disconnect the power plug from the outlet.
- Pull the plug out of the outlet by pulling on the plug.
- Do not pull on the cable.
- SAVE THESE INSTRUCTIONS
Needle, thread, fabric
Instructions from the manualNeedle, Thread, Fabric10 steps
- Replace worn needles regularly; a perfect point is needed for good stitching.
- In general, use finer needles for thinner fabric: sizes 70/75 for lightweight, 80/90 for medium and 100/110 for heavy fabrics.
- Needles illustrated in the manual can be standard or optional accessories.
- The thread should fit the needle’s long groove and pass easily through its eye.
- Too much play can cause breaks or skipped stitches; fraying against the groove edges or poor eye guidance can cause breaks and jams.
- In the manual’s 130/705 H-S/70 example, 130 identifies shank length, 705 the flat shank, H the scarf, S the medium ball point and 70 the 0.7 mm needle size.
- Use quality thread and fabric.
- Cotton thread suits cotton fabric; mercerized cotton has a sheen that remains after washing.
- Polyester has high tensile strength and colorfastness and is flexible for strong elastic seams.
- Rayon is made from natural fibers, has a brilliant sheen and suits decorative stitches.
Overview presser feet
Instructions from the manualOverview Presser Feet6 steps
- Zigzag foot: practical and decorative stitches and hems.
- Zipper foot: sewing in zippers.
- Buttonhole foot with slide: buttonholes with or without filler cord.
- Blindstitch foot: blind-stitch hems.
- Overlock foot: overlock-type stitches and finishing fabric edges.
- Zipper foot for concealed zippers: sewing in concealed zippers.
Overview practical stitches
Instructions from the manualPractical stitch settings: Straight StitchView
For sewing material together and top-stitching. Use Zigzag foot. Category A; stitch length 0.5–4.0; stitch width 0.
Practical stitch settings: ZigzagView
For reinforcing seams, finishing edges, sewing elastic seams and attaching lace inserts. Use Zigzag foot. Category B; stitch length 0.5–4.0; stitch width 2.0–6.0.
Practical stitch settings: Stitched ZigzagView
For finishing and reinforcing fabric edges, attaching rubber tape and decorative seams. Use Zigzag foot. Category C; stitch length 2.0–3.0; stitch width 2.5–5.0.
Practical stitch settings: Vari-Overlock stitchView
For simultaneously sewing together and finishing elastic fabrics. Use Zigzag foot. Category D; stitch length 2.0–3.0; stitch width 6.0.
Practical stitch settings: Elastic blindstitchView
For blind hems and decorative seams. Use Blindstitch foot. Category E; stitch length 1.0–2.0; stitch width 3.0–5.0.
Practical stitch settings: Universal Stitch3 steps
- For firm fabrics such as felt and leather, flat joining seams, visible hems, decorative seams and attaching rubber tape.
- Use Zigzag foot.
- Category F; stitch length 1.5–3.0; stitch width 3.0–5.0.
Practical stitch settings: Lycra StitchView
For flat joining seams or visible hems on Lycra fabric and stitching over corsetry seams. Use Zigzag foot. Category G; stitch length 1.5–3.0; stitch width 6.0.
Practical stitch settings: Shell edging stitchView
For blind hems, shell edging on soft jerseys and fine fabric, and decorative seams. Use Zigzag foot. Category H; stitch length 1.0–2.5; stitch width 3.0–6.0.
Practical stitch settings: Gathering StitchView
For most fabrics: gathering rubber threads, joining meeting fabric edges and decorative seams. Use Zigzag foot. Category I; stitch length 2.0–3.0; stitch width 3.0–5.0.
Practical stitch settings: Blind StitchView
For blind hems and decorative seams. Use Blindstitch foot. Category J; stitch length 1.0–2.0; stitch width 1.0–2.5.
Practical stitch settings: Super-stretch stitchView
For very stretchy open seams in clothing. Use Zigzag foot. Category L; stitch length 1–2.5; stitch width 3.0–4.0.
Practical stitch settings: Triple Straight StitchView
For durable seams in strong fabrics, visible hems and seams. Use Zigzag foot. Category A; stitch length S1; stitch width 0.
Practical stitch settings: Triple ZigzagView
For durable seams in strong fabrics, visible hems and seams. Use Zigzag foot. Category B; stitch length S1; stitch width 2.0–6.0.
Practical stitch settings: Honeycomb StitchView
For elastic fabrics and hems, including with rubber bobbin threads. Use Zigzag foot or open embroidery foot. Category C; stitch length S1; stitch width 6.0.
Practical stitch settings: Knit OverlockView
For sewing together and finishing hand- and machine-knitted fabrics in one step. Use Zigzag foot. Category D; stitch length S1; stitch width 6.0.
Practical stitch settings: Double OverlockView
For simultaneously sewing together and finishing elastic fabrics. Use Zigzag foot. Category F; stitch length S1; stitch width 6.0.
Practical stitch settings: Stretch OverlockView
For sewing together and finishing elastic fabrics, and flat joining seams. Use Zigzag foot. Category H; stitch length S1; stitch width 6.0.
Practical stitch settings: Reinforced OverlockView
For medium-weight knits and toweling, overlock seams or flat joining seams. Use Zigzag foot or overlock foot. Category J; stitch length S1; stitch width 6.0.
Overview decorative stitches
Instructions from the manualDecorative stitch settings: Satin stitch4 steps
- Decorating medium-weight to heavy fabrics.
- Zigzag foot; category K; stitch length 0.5–1.0; stitch width 6.0.
- For good stitch formation, use matching upper and bobbin thread colors and a stabilizer.
- On pile or longfiber fabric, add water-soluble stabilizer to the right side and remove it after sewing.
Decorative stitch settings: Vari overlock stitch4 steps
- Shell edging on soft jerseys and fine fabric.
- Zigzag foot; category D; stitch length 2.0–3.0; stitch width 6.0.
- For good stitch formation, use matching upper and bobbin thread colors and a stabilizer.
- On pile or longfiber fabric, add water-soluble stabilizer to the right side and remove it after sewing.
Decorative stitch settings: Honeycomb Stitch4 steps
- Decorative effects and smocking.
- Zigzag foot; category C; stitch length S1; stitch width 3.0–6.0.
- For good stitch formation, use matching upper and bobbin thread colors and a stabilizer.
- On pile or longfiber fabric, add water-soluble stabilizer to the right side and remove it after sewing.
Decorative stitch settings: Florentine stitch4 steps
- Decorative elastic stitch for knitted or woven fabrics and crazy quilting.
- Zigzag foot; category E; stitch length S1; stitch width 6.0.
- For good stitch formation, use matching upper and bobbin thread colors and a stabilizer.
- On pile or longfiber fabric, add water-soluble stabilizer to the right side and remove it after sewing.
Decorative stitch settings: Double Overlock4 steps
- Stitching two fabrics together for a breakthrough look.
- Zigzag foot; category F; stitch length S1; stitch width 6.0.
- For good stitch formation, use matching upper and bobbin thread colors and a stabilizer.
- On pile or longfiber fabric, add water-soluble stabilizer to the right side and remove it after sewing.
Decorative stitch settings: Faggot stitch4 steps
- Stitching two fabrics together for a breakthrough look and smocking.
- Zigzag foot; category G; stitch length S1; stitch width 3.0–6.0.
- For good stitch formation, use matching upper and bobbin thread colors and a stabilizer.
- On pile or longfiber fabric, add water-soluble stabilizer to the right side and remove it after sewing.
Decorative stitch settings: Decorative Stitch K S14 steps
- Decorative effects.
- Zigzag foot; category K; stitch length S1; stitch width 6.0.
- For good stitch formation, use matching upper and bobbin thread colors and a stabilizer.
- On pile or longfiber fabric, add water-soluble stabilizer to the right side and remove it after sewing.
Decorative stitch settings: Decorative Stitch B S24 steps
- Decorative effects.
- Zigzag foot; category B; stitch length S2; stitch width 6.0.
- For good stitch formation, use matching upper and bobbin thread colors and a stabilizer.
- On pile or longfiber fabric, add water-soluble stabilizer to the right side and remove it after sewing.
Decorative stitch settings: Decorative Stitch C S24 steps
- White embroidery and decorative effects.
- Zigzag foot; category C; stitch length S2; stitch width 6.0.
- For good stitch formation, use matching upper and bobbin thread colors and a stabilizer.
- On pile or longfiber fabric, add water-soluble stabilizer to the right side and remove it after sewing.
Decorative stitch settings: Decorative Stitch E S24 steps
- Decorative effects.
- Zigzag foot; category E; stitch length S2; stitch width 6.0.
- For good stitch formation, use matching upper and bobbin thread colors and a stabilizer.
- On pile or longfiber fabric, add water-soluble stabilizer to the right side and remove it after sewing.
Decorative stitch settings: Decorative Stitch G S24 steps
- Decorative effects.
- Zigzag foot; category G; stitch length S2; stitch width 6.0.
- For good stitch formation, use matching upper and bobbin thread colors and a stabilizer.
- On pile or longfiber fabric, add water-soluble stabilizer to the right side and remove it after sewing.
Decorative stitch settings: Decorative Stitch K S24 steps
- Decorative effects.
- Zigzag foot; category K; stitch length S2; stitch width 6.0.
- For good stitch formation, use matching upper and bobbin thread colors and a stabilizer.
- On pile or longfiber fabric, add water-soluble stabilizer to the right side and remove it after sewing.
Overview quilt stitches
Instructions from the manualQuilt stitch settings: Faggot stitchView
Joining two fabrics for a breakthrough look, quilting, crazy patchwork, decorating and embellishing. Zigzag foot; category G; stitch length S1; stitch width 6.0.
Quilt stitch settings: Feather stitchView
Crazy patchwork and embellishing. Zigzag foot; category I; stitch length S1; stitch width 6.0.
Quilt stitch settings: Blanket stitchView
Appliqué, embellishing, finishing and sewing on ribbons. Zigzag foot; category D; stitch length S2; stitch width 6.0.
Controls and parts
See the manual diagrams 3 diagrams
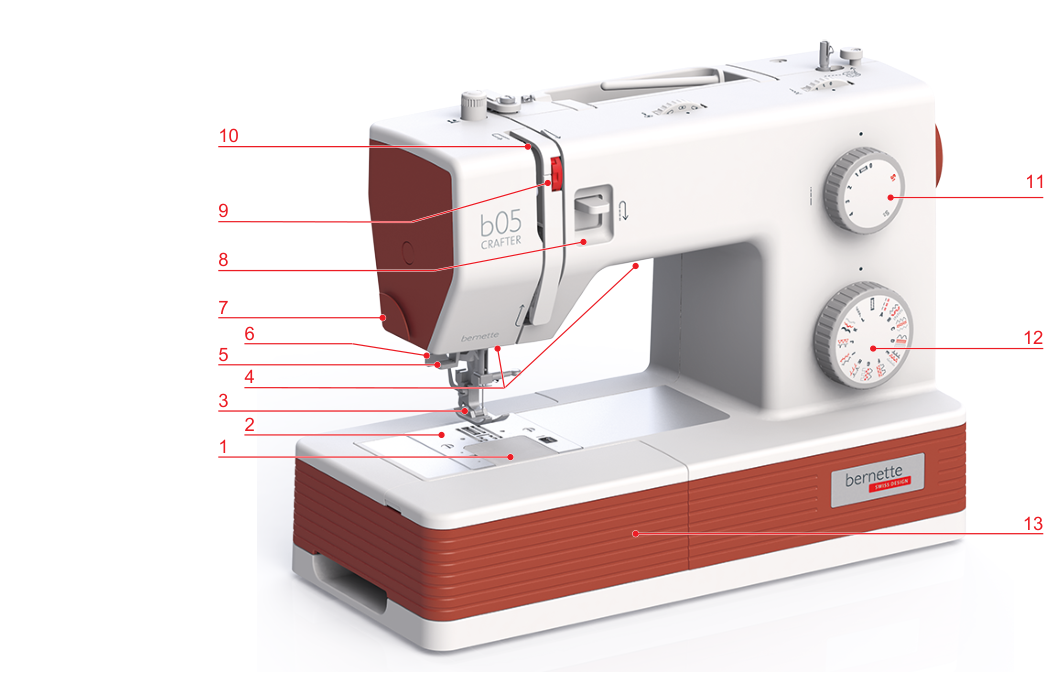
Diagram key
- 1: Bobbin cover
- 2: Stitch plate
- 3: Presser foot
- 4: Sewing light
- 5: Needle threader
- 6: Buttonhole lever
- 7: Thread cutter
- 8: Quick reverse lever
- 9: Thread tension dial
- 10: Thread take-up lever
- 11: Stitch length knob
- 12: Stitch pattern selector knob
- 13: Sewing table and accessory box
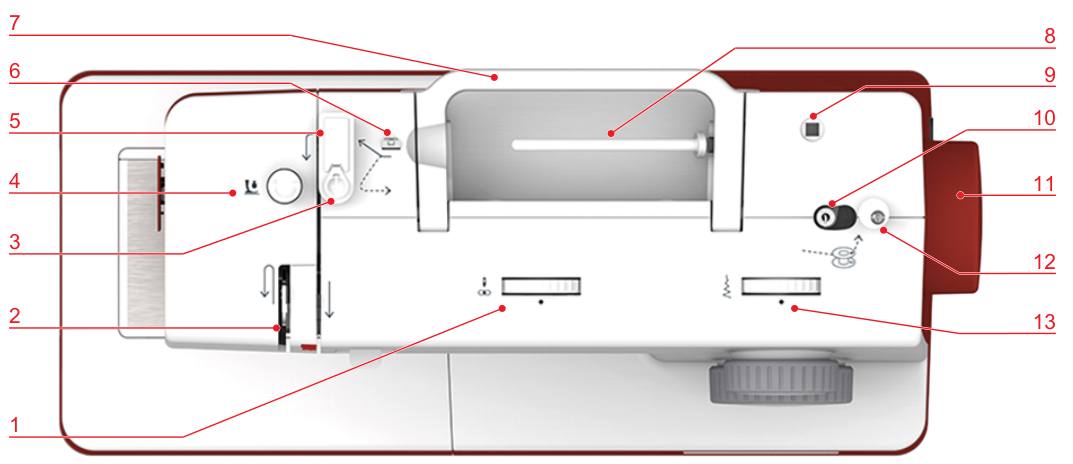
Diagram key
- 1: Needle position dial
- 2: Thread take-up lever
- 3: Bobbin winder pretension
- 4: Presser foot pressure adjustment knob
- 5: Thread pretension
- 6: Thread guide
- 7: Carry handle
- 8: Spool pin
- 9: Opening for an additional spool pin
- 10: Bobbin winder unit
- 11: Handwheel
- 12: Stopper for bobbin winder unit
- 13: Stitch width dial
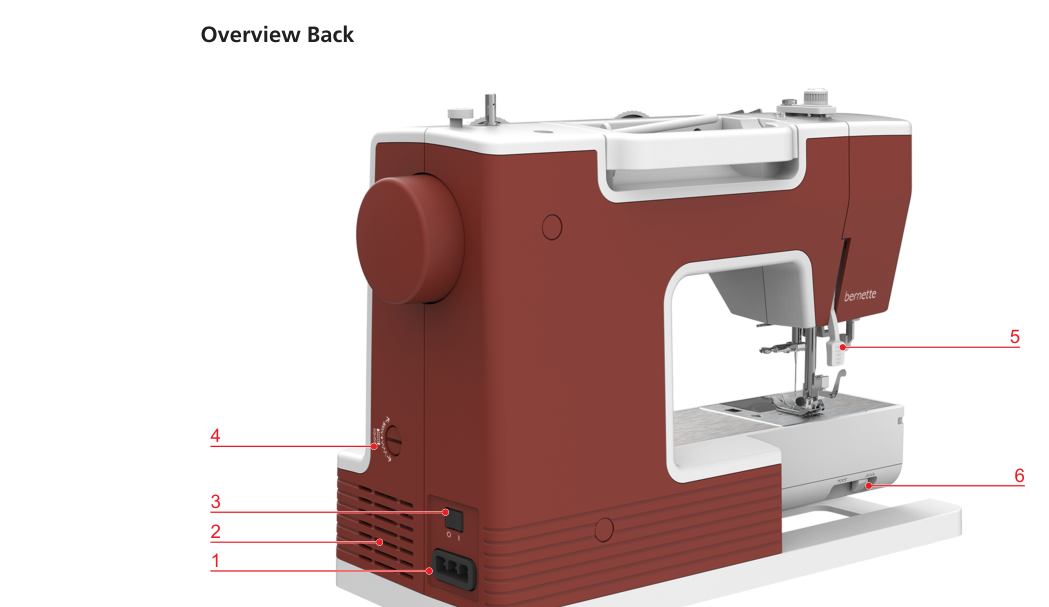
Diagram key
- 1: Power cable/foot control connection
- 2: Air vents
- 3: Power switch
- 4: Balance dial
- 5: Presser foot lifter
- 6: Feed dog lever