MODEL REFERENCE
Brother PT-900
5 errors · 7 troubleshooting topics · 28 guides
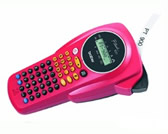
The checks and guides below come from the official manuals for this model.
No matches for this wording. Try a light name, error code or a shorter phrase.
Errors and messages
Messages and indicator states from the manual ERRORan error occurred
- An error occurred.
- The error table gives no general repair.
- For numbering, the guide specifically requires the last number to exceed the selected number; see Print incrementing numbers.
BATTERYbatteries are weak
The batteries are weak. Replace weak batteries, following Install batteries and tape; replace all six together with new AAA alkaline LR03 cells.
B A T T E R Ybatteries are empty
The manual underlines this spaced message to distinguish empty batteries from the unspaced weak-battery BATTERY message.The batteries are empty. See the reviewed battery replacement instructions; this table does not supply another remedy.
FULLtext or memory is full
- The maximum 55 entered characters have already been entered, or memory is full.
- The Memory instructions say to delete one or more stored files before storing a new one when memory is full.
- No separate repair is supplied for reaching the text limit.
LONG TXTtext exceeds the selected label length
The text length exceeds the selected label length. This row gives no remedy. The reviewed label-length instructions explain the supported AUTO or 40–300 mm settings.
Troubleshooting
Find the problem you are experiencingDisplay stays blank after power on2 checks
- Battery insertion
- Check that the batteries are correctly inserted.
- Weak batteries
- Replace weak batteries.
Printing fails or printed characters are blurred3 checks
- Cassette insertion
- Check that the tape cassette is correctly inserted.
- Empty cassette
- Replace an empty cassette.
- Character size
- Check that the character size is appropriate for the tape width.
Printed characters are not formed properly1 check
- Weak batteries
- Replace weak batteries.
Striped tape appears1 check
- Empty cassette
- Replace the empty tape cassette.
Memory cleared itself1 check
- Weak batteries
- The batteries may be weak; replace them.
Blank horizontal line through printed label2 checks
- Dust on the print head
- Remove the tape cassette. Gently wipe the print head up and down with a dry cotton swab.
- Optional cleaning cassette
- The optional TZ-CL3 print head cleaning cassette can clean the head more easily.
Machine locks up1 check
- No response to a key while powered on
- Turn off the machine.
- Hold Function and Backspace, press Power to turn on, then release Function and Backspace.
- Displayed text and formats, all stored text files, language and unit settings are erased.
Guides
Power supply & tape cassettes
Instructions from the manualInstall batteries and tape9 steps
- Press the rough area at the top end and remove the back cover.
- Pull an installed tape cassette straight up; remove installed batteries.
- Insert six new AAA alkaline LR03 batteries with correct polarity; always replace all six together with brand-new cells.
- Insert a Brother TZ cassette until it snaps into place, with its tape end under the guides.
- Remove the paper tab from a new cassette.
- If the ink ribbon is loose, wind the toothed wheel with a finger in the cassette arrow direction.
- Insert the two bottom cover hooks into their slots and push the cover down firmly until it snaps into place.
- After installing tape, feed once using the reviewed Feeding instructions, then press the tape cutter lever to cut.
- Power disconnected for more than three minutes clears displayed text, stored files, language and unit settings.
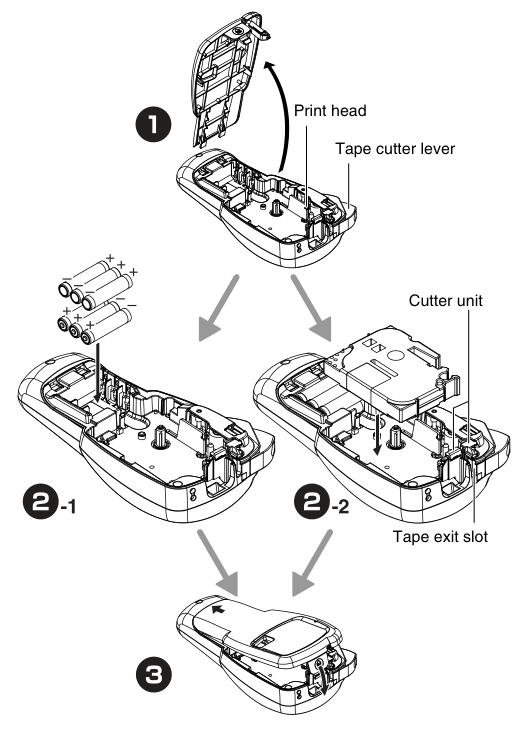
Diagram key
- 1 — cover and curved opening arrow: Press the rough top area and remove the cover. Pull an installed cassette straight up and remove old batteries.
- Print head — leader: Do not touch its mechanism; if touched, clean immediately with a soft wipe such as a cotton swab.
- Tape cutter lever — leader: After installing tape, feed once, then push the lever to cut. Never cut during printing or feeding.
- 2-1 — six batteries, repeated +/− signs and downward insertion arrow: Insert six new AAA alkaline LR03 batteries with poles oriented as shown. Replace all six together with new batteries.
- 2-2 — cassette and downward insertion arrow: Insert a Brother TZ cassette until it snaps into place. Its tape end must feed under the guides; remove a new cassette paper tab and tension loose ribbon in the shown cassette arrow direction.
- Cutter unit — leader: TC-5 is the replacement unit. Contact an authorized Brother dealer for replacement; do not touch the cutter edge.
- Tape exit slot — leader: The diagram identifies the tape exit slot. Never pull tape being fed from the machine.
- Grey sequence arrows — four arrows: The printed sequence proceeds from opening through battery/cassette insertion to reattaching the cover.
- 3 — cover, two hooks and closing arrow: Insert the bottom hooks into their slots and press the cover firmly until it snaps into place. Feed once and cut after cassette installation.
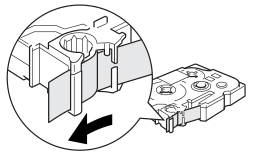
Diagram key
- Toothed wheel and winding arrow: If ink ribbon is loose, use a finger to wind the toothed wheel in the direction of the cassette arrow.
- Magnified tape-guide detail: Make sure the end of the tape feeds under the tape guides before insertion.
Cutter unit (replacement)
Instructions from the manualArrange cutter replacement4 steps
- If repeated use makes the cutter blunt and tape no longer cuts cleanly, obtain replacement TC-5 from an authorized Brother dealer.
- The German branch directs the Brother dealer to replace it; contact the dealer for replacement.
- This guide supplies no cutter-removal sequence.
- Do not touch the cutter edge.
Keyboard & lcd
Instructions from the manualRead the display and controls5 steps
- The LCD shows one row of eight characters while entered text can contain up to 55 characters.
- Its labelled indicators are Size, Upper case/Lower case, Cursor, Function, Style and Underline/Frame.
- The labelled keys are Power, Cursor, numeric/function shortcuts, character, Accent, Symbol, Print, Function, Enter, Backspace, Caps and Space.
- Press Power to switch on or off.
- The machine turns off automatically after five minutes without a key press.
Getting started
Instructions from the manualSet initial language and units9 steps
- Supply power with six AAA batteries and press Power.
- Select English, French or German with the Cursor key and press Enter.
- Check the display and press Enter again; Backspace cancels.
- Select mm or inch with Cursor, press Enter, check the display and press Enter again; Backspace cancels.
- The corresponding numeric keys 1–3 can also display languages and units.
- Backspace cancels an operation or deletes backward.
- To initialize settings, switch off.
- Hold Function and Backspace, press Power to switch on, then release Function and Backspace.
- See Machine locks up for the full erasure warning.
Making text
Instructions from the manualSwitch uppercase and lowercaseView
Press Caps to switch between uppercase and lowercase.
Create two-line textView
Move the cursor to the position where the second line should start, then press Enter. Use 9 mm or 12 mm tape for two-line text.
Enter symbols4 steps
- Press Symbol, choose the symbol group, choose a symbol with Cursor and press Enter.
- Symbol or Cursor can display symbols; Symbol advances to the next group.
- A group letter key jumps to that group; repeatedly pressing its letter scrolls through its symbols.
- The printed table supplies groups A through I.
Enter accented characters4 steps
- Press Accent, select a letter group, choose an accented character with Cursor and press Enter.
- Accent or Cursor can display the characters; Accent advances to the next letter group.
- A letter key jumps to its group; repeatedly pressing that key scrolls through its accented characters.
- The table supplies uppercase and lowercase groups A, C, D, E, I, L, N, O, R, S, T, U, Y and Z.
Designing labels
Instructions from the manualChoose a fontView
Press Function, then 1, or use Function or Cursor to display FONT. Press Enter to open the setting. Use Function or Cursor to choose HELSINKI or OKLAHOMA. Press Enter to confirm.
Choose character size7 steps
- Press Function, then 2, or use Function or Cursor to display SIZE.
- Press Enter to open the setting.
- Use Function or Cursor to choose AUTO or SIZE1, SIZE2, SIZE3, SIZE4 or SIZE5.
- Press Enter to confirm.
- AUTO adjusts size for tape width.
- Two-line text always prints SIZE1.
- Only AUTO, SIZE1 and SIZE2 can be used on 6 mm tape.
Choose a print style6 steps
- Press Function, then 3, or use Function or Cursor to display STYLE.
- Press Enter to open the setting.
- Use Function or Cursor to choose NORMAL, BOLD, OUTLINE, SHADOW, ITALIC, I+BOLD, I+OUTL, I+SHADOW, VERTICAL or MIRROR.
- Press Enter to confirm.
- Two-line text always prints NORMAL.
- Use clear tape for MIRROR so text reads through glass, a window or another transparent surface.
Underline or frame text5 steps
- Press Function, then 4, or use Function or Cursor to display UNDL/FRM.
- Press Enter to open the setting.
- Use Function or Cursor to choose OFF, UNDL, ROUND, BANNER, WOODEN or VINE.
- Press Enter to confirm.
- VERTICAL text has no underline or frame.
Insert an alignment tab4 steps
- Position Cursor where the tab should go.
- Press Function, then 5, or use Function or Cursor to display TAB.
- Press Enter to insert the tab.
- The printed example inserts a tab between abc and d.
Set tab length3 steps
- Press Function, then 6, or use Function or Cursor to display TAB LEN.
- Press Enter to open the setting.
- Choose a tab length from 0 to 100 mm with Cursor or enter it with numeric keys, then press Enter.
Set label length4 steps
- Press Function, then 7, or use Function or Cursor to display LENGTH with Function or Cursor.
- Press Enter to open the setting.
- Choose AUTO or 40–300 mm with Cursor, or enter a length with numeric keys, then press Enter.
- To return to AUTO, press any alphabet key or Space.
Use preset label formats4 steps
- Press Function, then 8, or use Function or Cursor to display A/F.
- Press Enter to open the setting.
- Use Function or Cursor to choose VCR VHS 140 mm, FD 3.5-inch 68 mm, CD CASE 100 mm, FILE TAB 70 mm, AUDIO 89 mm or VIDEO 8 92 mm.
- Press Enter to confirm.
Clear text and settingsView
Press Function, then 0, or use Function or Cursor to display CLEAR. Press Enter. All text and settings are cleared.
Printing
Instructions from the manualPreview text4 steps
- Press Function, then Print, or use Function or Cursor to display PREVIEW.
- Press Enter to preview.
- The LCD shows the whole text and label length in mm or inches, then returns to the original text.
- Preview shows text only, not font, style, size, underline/frame or other added features.
Feed tapeView
Press Function, then Space, or use Function or Cursor to display FEED. Press Enter to feed. Feed before cutting a CHAIN label.
Print and cut a label4 steps
- Press Print.
- To cut off the label, push the tape cutter lever at the upper-right corner.
- Do not cut while PRINT or FEED is displayed; this can damage tape.
- Never pull tape being fed from the machine.
Set tape margins or chain printing8 steps
- Press Function, then the period key, or use Function or Cursor to display MARGIN.
- Press Enter to open the setting.
- Choose FULL, HALF, NARROW or CHAIN with Function or Cursor and confirm with Enter.
- FULL leaves 25 mm on each side, HALF 12 mm and NARROW 4 mm.
- Cut along the printed colon dots with scissors to centre the text.
- CHAIN prints more than one copy with minimal margin, or combines text in different styles: print the first text, then enter and print the second before feeding.
- Feed tape before using the cutter or part of the text may be cut off.
- Never pull tape; the cassette may be damaged.
Print repeated copies6 steps
- Press Function, then comma, or use Function or Cursor to display PRINT OP.
- Press Enter to open the setting.
- Choose REPEAT with Function or Cursor and press Enter.
- Choose a copy count from 1 to 9 with Function or Cursor, then press Enter.
- When margins are CHAIN, feed before cutting or text may be cut off; never pull tape.
- For FULL, HALF or NARROW margins, separate the labels with scissors along the printed colon dots.
Print incrementing numbers9 steps
- Position Cursor under the number to increase.
- Press Function, then comma, or use Function or Cursor to display PRINT OP.
- Press Enter to open the setting.
- Select NUMBER with Function or Cursor and press Enter.
- Select the last number from 1 to 9 with Function or Cursor and press Enter.
- Each printed label increases the selected number by one, as in 0123, 0124, 0125.
- The last number must exceed the selected starting number or ERROR appears.
- With CHAIN margins, feed before cutting or text may be cut off; never pull tape.
- With FULL, HALF or NARROW margins, separate labels with scissors at the printed colon dots.
Memory (f+9)
Instructions from the manualStore a text file6 steps
- Press Function, then 9, or use Function or Cursor to display MEMORY.
- Press Enter to open it.
- Select STORE with Function or Cursor and press Enter.
- Choose file 1–9 with Cursor or its numeric key and press Enter.
- Up to nine frequently used files can be stored.
- If memory is full, delete one or more stored files before storing the new one.
Recall a text file4 steps
- Press Function, then 9, or use Function or Cursor to display MEMORY.
- Press Enter to open it.
- Select RECALL with Function or Cursor and press Enter.
- Choose file 1–9 with Cursor or its numeric key and press Enter to recall it.
Delete a stored text file4 steps
- Press Function, then 9, or use Function or Cursor to display MEMORY.
- Press Enter to open it.
- Select DELETE with Function or Cursor and press Enter.
- Choose file 1–9 with Cursor or its numeric key and press Enter to delete it.
Function shortcuts (f+...)
Instructions from the manualUse function shortcuts5 steps
- Press Function followed by the shortcut key: 1 FONT, 2 SIZE, 3 STYLE, 4 UNDL/FRM, 5 TAB, 6 TAB LEN, 7 LENGTH, 8 A/F, 9 MEMORY, 0 CLEAR, period MARGIN, comma PRINT OP, Print PREVIEW, or Space FEED.
- Press Enter or the shortcut again to confirm.
- PRINT OP contains REPEAT PRINTING and NUMBERING.
- PREVIEW and FEED require Enter after the LCD message appears.
- A shortcut chart is also on the back of the machine.
General precautions
Instructions from the manualClean handle and store the machine9 steps
- Use only Brother TZ tape.
- Never pull tape being fed or cut during printing or feeding.
- Clean the machine only with a soft dry cloth; do not use alcohol or other organic solvents.
- Remove batteries for extended storage; more than three minutes without power clears displayed text, stored files, language and units.
- Keep foreign objects and heavy objects off the machine.
- Avoid extreme heat, high humidity, car dashboards and rear shelves, dust, direct sunlight and rain.
- Do not leave rubber or vinyl on it for long periods.
- Do not touch the print-head mechanism; if touched, clean it immediately with a soft wipe such as a cotton swab to avoid permanent damage.
- Do not touch the cutter edge; contact your Brother dealer for details.
Controls and parts
See the manual diagrams 1 diagram
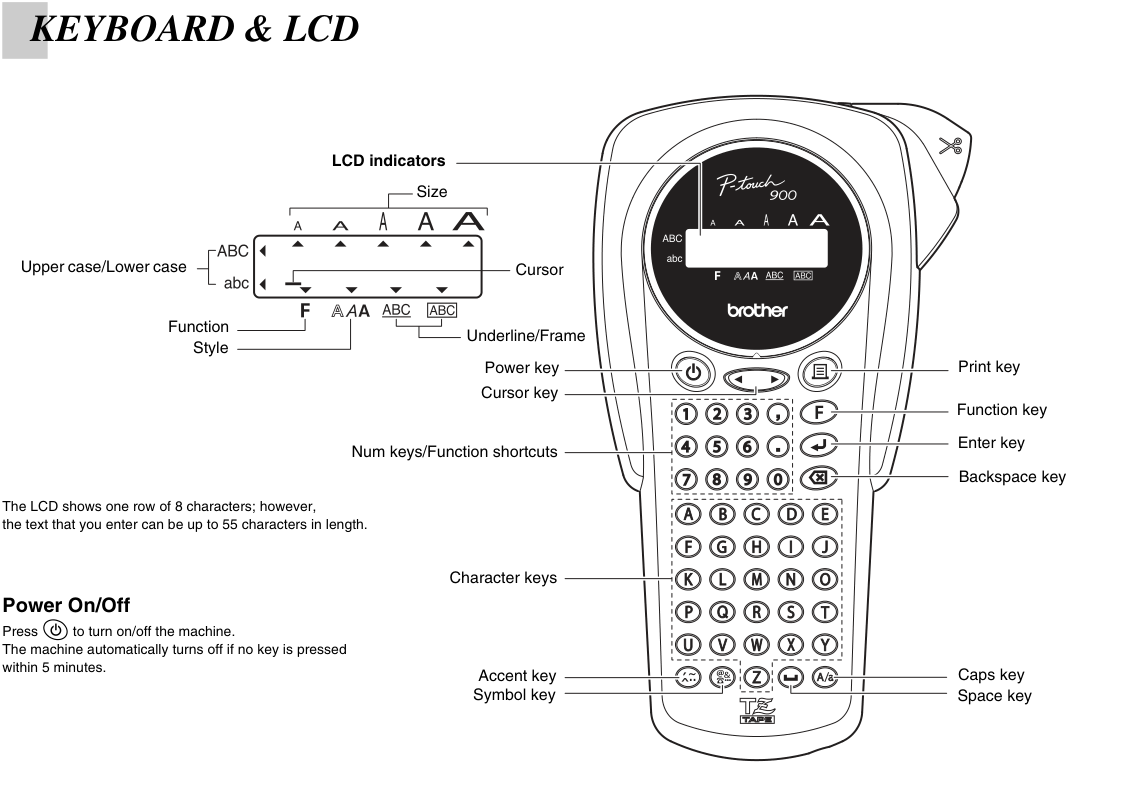
Diagram key
- LCD indicators: The display shows one row of eight characters while entered text can contain up to 55 characters.
- Size — five A examples and five upper selection triangles: The diagram labels this indicator group Size. Choose AUTO or SIZE1–SIZE5; two-line text uses SIZE1, and 6 mm tape supports only AUTO,SIZE1,SIZE2.
- Upper case/Lower case — ABC,abc and left triangles: Caps switches uppercase and lowercase; the LCD marks these cases.
- Cursor — position mark: The diagram identifies the displayed editing position as Cursor.
- Function — F and lower triangle: The diagram labels this LCD field Function; Function selects settings and shortcuts.
- Style — three A examples with lower triangle: The Style field accompanies print-style selection; two-line text prints NORMAL.
- Underline/Frame — underlined ABC,framed ABC and lower triangles: The diagram labels the underline/frame indicators; these decorations are not set for VERTICAL text.
- Power key — power symbol: Switches the machine on or off; automatic off follows five minutes with no key press.
- Cursor key — left and right triangles: Moves the cursor or chooses displayed options as shown in the instructions.
- Num keys/Function shortcuts — dotted number-key group: Numeric keys 1–9 and 0 also provide Function shortcuts; period and comma select margins and print options.
- Print key — page symbol: Prints a label; Function then Print accesses preview.
- Function key — F: Press Function followed by the shortcut key, or use Function/Cursor to select the menu.
- Enter key — return arrow: Confirms a setting; in text it begins a second line, which requires 9 or 12 mm tape.
- Backspace key — deletion symbol: Deletes backward or cancels an operation; held with Function at power-on initializes settings, erasing text and stored files.
- Character keys — dotted alphabet group: Enter letters; letter keys also select symbol or accent groups.
- Accent key — accented-letter symbol: Selects accented characters; repeated Accent advances letter groups.
- Symbol key — symbol cluster: Selects symbols; repeated Symbol advances groups.
- Caps key — A/a: Switches uppercase and lowercase text.
- Space key — space symbol: Function then Space accesses tape feed.
- Cutter scissors symbol: Marks the cutter lever at the upper-right; do not cut during PRINT or FEED and do not touch the blade edge.
Model details
Model and compatibility
- Tape
- Brother TZ tape in 6,9 or 12 mm widths; two-line text requires 9 or 12 mm.
- Power
- Six AAA alkaline LR03 batteries.
- Dimensions and weight
- 108×196×55 mm (W×D×H);335 g without batteries or tape cassette.
- Replacement cutter
- TC-5; contact an authorized Brother dealer for replacement.