MODEL REFERENCE
XGIMI MoGo Pro
5 troubleshooting topics · 16 guides

The checks and guides below come from the official manuals for this model.
No matches for this wording. Try a light name, error code or a shorter phrase.
Troubleshooting
Find the problem you are experiencingRemote control pairing fails1 check
- Pairing did not succeed
- Wait 30 seconds before repeating pairing.
- Place the remote within 10 cm of the projector, press Return and Home simultaneously, and release them when the indicator starts flashing.
- A “Ding” confirms connection.
Charging indicator blinks red1 check
- Blinking red with the adapter connected and projector off
- With the projector off and the adapter connected, a blinking red indicator denotes charging. Use the official standardized adapter. Charging takes longer when the projector is on.
Charging indicator turns green then goes out1 check
- Green charging indication followed by the light extinguishing after 10 seconds
- Green denotes a fully charged battery. The manual says this green indication extinguishes after 10 seconds; it does not define a separate fault meaning for that normal timeout.
Device or component does not operate normally1 check
- Normal operation of the device or a component fails
- Do not repair the device yourself.
- For failure of normal operation of the device or a component, consult XGIMI after-sales service promptly or return it to the factory for repair.
- Do not disassemble or reassemble it yourself.
Radio or television reception interference4 checks
- Antenna orientation
- Reorient the receiving antenna.
- Insufficient separation
- Increase distance between the device and receiver.
- Shared electrical circuit
- Use an outlet on a circuit different from the receiver’s circuit.
- Further interference help needed
- Consult the distributor or an experienced radio/TV technician.
Guides
Device on / off
Instructions from the manualTurn the projector on and offView
When the device is off, hold its POWER key for 2 seconds to turn it on. When the device is on, hold its POWER key for 5 seconds to turn it off.
Remote control pairing
Instructions from the manualPair the remote control5 steps
- Place the remote within 10 cm of the device.
- Press Return and Home together; the indicator starts flashing as pairing begins.
- Release both buttons as soon as flashing starts.
- A “Ding” sound confirms a successful connection.
- If pairing fails, wait 30 seconds and repeat the same steps.
Function description of remote control
Instructions from the manualSwitch the remote between focus and volume3 steps
- Move the switch at the bottom of the remote to the right, Focus, to activate automatic focus.
- Then use VOL +/− to adjust focus.
- Move the switch to the left, VOL, to stop focus adjustment and restore VOL +/− to volume control.
Open the shortcut functionView
Briefly press the remote Shortcut key to access its shortcut function.
Automatic focus adjustment/ focus adjustment through remote control
Instructions from the manualAdjust focus automatically or with the remote3 steps
- When automatic focus adjustment is on, the image is focused automatically at startup or after moving the device to another location.
- To activate automatic focus from the remote, move the bottom switch to the right, Focus.
- VOL +/− then adjusts the image focus; move the switch back to VOL to restore volume control.
The google assistant
Instructions from the manualUse Google Assistant3 steps
- Press the dedicated Google Assistant button on the remote.
- Use your voice to access entertainment, control smart devices or obtain onscreen answers.
- Google Assistant is not available in certain languages and countries.
Bluetooth speaker mode
Instructions from the manualUse Bluetooth speaker mode3 steps
- Select Bluetooth speaker mode to use the device as a portable Bluetooth speaker.
- In system settings select “remote control and accessory” and “add new device”.
- In the mobile device’s Bluetooth settings, search for “XGIMI MoGo”, connect and play songs.
Setting
Instructions from the manualOpen device and picture settings4 steps
- Use the remote Shortcut key (gear symbol) from any interface to set the device and image.
- The manual gives these settings: 3D setting for the video/signal source; Image mode for image parameters; Frame ratio for source proportions; Voice output for the audio output channel; HDMI version; and All settings for other items.
- 3D setting and Image mode are available only during video playback or on a signal-source channel.
- Frame ratio and HDMI version are available only on the HDMI channel.
Chromecast built-in
Instructions from the manualCast with Chromecast built-in8 steps
- Use Chromecast-enabled entertainment apps on an Android or iOS device, Mac or Windows computer, or Chromebook.
- The manual links g.co/castapps for supported apps.
- Cast supported video/audio through the app.
- The full Android phone screen or a Chrome browser on a PC can also be cast.
- Casting is not interrupted by calls or messages and minimizes phone battery use.
- The manual’s historical minimums are Android 2.3 Gingerbread, iOS 7, Windows 7, Mac OS 10.7, or Chrome OS 38.
- Casting is optimized for selected services; quality for other content may vary.
- These are the original manual’s compatibility statements, not a claim that current apps still support those systems.
Charging instructions
Instructions from the manualCharge the projector5 steps
- Charge with the official standardized adapter.
- Charging takes longer while the projector is on.
- With the projector off, connect the adapter.
- A blinking red indicator means charging; a green indicator means fully charged.
- The green light extinguishes after 10 seconds.
Prepare for long storage and battery protection6 steps
- Before long-term non-use, fully charge the device.
- Without the power cable connected, hold the device Power key for 5 seconds to enter battery protection mode.
- The remote cannot start the device in battery protection mode.
- Charge the device once every 3 months to avoid irreversible capacity loss or damage from self-discharge during long storage.
- Keep storage and use within 0–40 °C.
- Do not store in excessively hot or cold places.
System upgrade
Instructions from the manualUpdate the system onlineView
The manual permits system upgrades with at least 50% battery level or a power connection. Perform the online upgrade through system settings.
Important precautions
Instructions from the manualClean and handle the projector safely12 steps
- Keep the lens away from eyes: the strong projected light can injure them.
- Keep air inlets and outlets unobstructed to prevent internal damage from inadequate heat dissipation.
- Do not wipe the lens directly with paper, cloth or other cleaning tools.
- Remove lens-surface dust using clean air blowing.
- Do not wash the device with chemicals, detergents or any liquid.
- Keep it dry and ventilated; keep it, its components and accessories out of children’s reach.
- Use and store it at 0–40 °C.
- Do not dry it in a dryer, microwave or other heating equipment.
- Do not squeeze it, place obstructions on it or its back, throw it, strike it or expose it to sharp vibration.
- Do not disassemble, reassemble or repair it yourself.
- Contact XGIMI after-sales service for problems; for device/component operation failure, consult that service promptly or return it to the factory for repair.
- Incorrect battery replacement risks explosion; follow the separate disposal cautions.
Disposal of your old product and battery
Instructions from the manualDispose of the projector and built-in battery6 steps
- Follow local separate-collection rules for electrical/electronic equipment and rechargeable batteries; never discard the device or battery with ordinary household waste.
- Take the product to an official collection point or XGIMI service centre so a professional removes the rechargeable battery.
- Battery removal invalidates the warranty and may destroy the product; always use a professional.
- Use only manufacturer-specified/provided accessories, including the adapter and battery.
- Incorrect battery type can defeat safeguards and cause explosion; use only the same or an equivalent type through professional service.
- Do not put a battery into fire or a hot oven, mechanically crush or cut it, or expose it to extremely high temperature or extremely low air pressure: explosion or leakage of flammable liquid/gas can result.
Radiation exposure statement
Instructions from the manualObserve radio-exposure and indoor-band restrictions3 steps
- For the LED projector, keep at least 20 cm between the radiator and the body during installation and operation.
- The remote transmitter must not operate or be placed with another antenna or transmitter.
- The manual restricts 5150–5250 MHz operation to indoors and identifies BE, HR, AT, BG, IT, PL, CZ, CY, PT, DK, LV, RO, DE, LT, SI, EE, LU, SK, IE, HU, FI, EL, MT, SE, ES, NL, UK and FR in its printed restriction table.
Firmware installation guide
Instructions from the manualInstall applicable firmware from a USB disk8 steps
- Charge the projector to over 50% and keep it plugged in.
- On a PC, download the applicable firmware using the manufacturer-provided link and copy it to a USB disk formatted as FAT32.
- Put the firmware in the disk’s root directory, not in any folder.
- Insert the USB disk into the projector.
- Keep the projector off; do not turn it on.
- Hold the projector’s − and + buttons together for 5–7 seconds.
- Release them when the fan starts operating strongly.
- An Android robot and progress bar appear; the system then updates automatically.
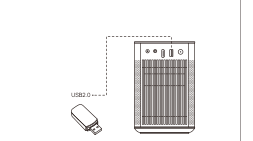
Diagram key
- USB2.0 and dashed connection: The illustration identifies the USB disk connection; insert the prepared FAT32 disk containing the applicable firmware in its root directory.
Controls and parts
See the manual diagrams 1 diagram
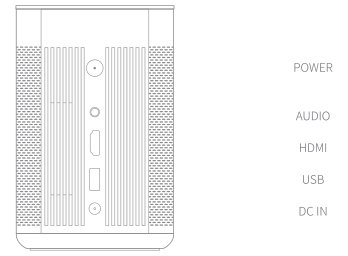
Diagram key
- POWER: Device Power key; hold for 2 seconds to turn on from off, or 5 seconds to turn off from on.
- AUDIO: Rear connection labelled AUDIO.
- HDMI: Rear connection labelled HDMI.
- USB: Rear connection labelled USB.
- DC IN: Rear power connection labelled DC IN.
Model details
Model and compatibility
- Reference scope
- MoGo Pro (XK03S), English operation manual V1.0 and the exact support-linked portable firmware guide.
- Controls and ports
- Rear POWER, AUDIO, HDMI, USB and DC IN; remote Power, Menu, Google Assistant, Input source, Shortcut, Arrow, Return, Home, VOL +/− and VOL/Focus switch.
- Storage and use
- Use and store at 0–40 °C, in a dry ventilated environment; keep air inlets and outlets clear.
- Lens care
- Remove lens dust with clean air blowing; do not wipe with paper or cloth and do not wash the device with liquids.
- Battery storage
- Fully charge before long storage, enter battery protection with the device Power key for 5 seconds without the power cable, and charge every 3 months.
- Native resolution
- 1920 × 1080 pixels.
- Display technique
- DLP.