MODEL REFERENCE
Brother PJ-622
20 errors · 16 troubleshooting topics · 75 guides
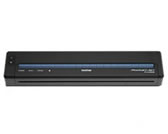
The checks and guides below come from the official manuals for this model.
No matches for this wording. Try a light name, error code or a shorter phrase.
Errors and indicators
Light patterns and messages documented in the manualFind the indicator lights
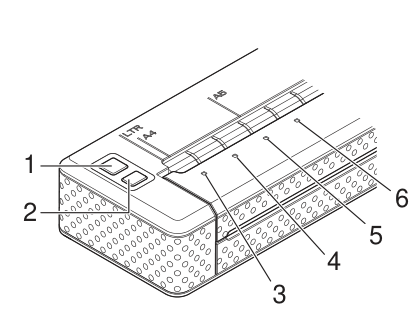
Diagram key
- 1: Power button.
- 2: Feed button.
- 3: POWER indicator.
- 4: DATA indicator.
- 5: STATUS indicator.
- 6: Bluetooth indicator is PJ-662/663 only; it is not a PJ-622 feature.
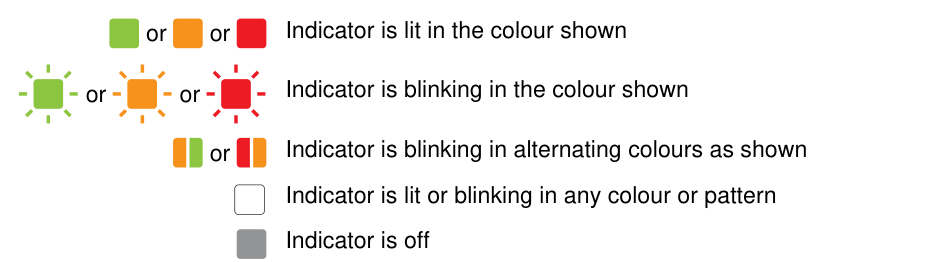
Diagram key
- Steady green symbol: Indicator stays lit green.
- Steady orange symbol: Indicator stays lit orange.
- Steady red symbol: Indicator stays lit red.
- Blinking green symbol: Indicator blinks green.
- Blinking orange symbol: Indicator blinks orange.
- Blinking red symbol: Indicator blinks red.
- Orange/green symbol: Indicator alternates orange and green.
- Red/orange symbol: Indicator alternates red and orange.
- Unfilled square: Indicator can be lit or blinking in any colour or pattern.
- Grey square: Indicator is off.
POWER steady green; DATA off; STATUS offExternal or Li-ion power
The printer is using the AC adapter, DC cable or optional rechargeable Li-ion battery.
POWER steady orange; DATA off; STATUS anyNi-MH power
The optional rechargeable Ni-MH battery is powering the printer.
POWER steady green or orange; DATA off; STATUS offBattery full
The rechargeable battery is in use or is fully charged.
POWER steady green or orange; DATA any; STATUS orange flash once per 4 secondsBattery half-full
The rechargeable battery is in use or its charge is about half-full.
POWER steady green or orange; DATA any; STATUS orange flashes twice per 4 secondsBattery low
The rechargeable battery is in use or has a low charge.
POWER steady green or orange; DATA any; STATUS orange flash once per secondBattery needs charging
Charge the applicable rechargeable battery using its reviewed Ni-MH or Li-ion charging instructions.
POWER alternating orange and green; DATA off; STATUS offNi-MH battery discharging
The Ni-MH battery is being refreshed. After refreshing, charging starts automatically. To skip refreshing and start charging, hold the Power button.
POWER blinking green; DATA off; STATUS offNi-MH battery charging
The Ni-MH battery is charging. Its POWER light goes out when charging finishes.
POWER steady green or orange; DATA blinking green; STATUS anyPrinting or receiving data
The printer is printing or receiving data.
POWER steady green or orange; DATA steady green; STATUS anyUnprinted data in buffer
There is unprinted data in the buffer. If loaded paper remains and there is not enough data for a complete page, hold Feed to print and eject it.
POWER steady green or orange; DATA blinking red; STATUS anyReceiving flash upgrade
The printer is receiving a flash upgrade.
POWER steady green or orange; DATA steady orange; STATUS anyReceiving upgrade
The printer is receiving an upgrade.
POWER steady green or orange; DATA steady red; STATUS anyService mode
The printer is in service mode for printing its settings report.
POWER blinking red; DATA blinking red; STATUS blinking redSystem error
Arrange service, as instructed by the manual for this system-error pattern.
POWER blinking red; DATA off; STATUS blinking orangeNo Ni-MH battery found when charging2 checks
POWER blinking red; DATA off; STATUS blinking greenNi-MH charge timeout
The normal full-charge time is up to 120 minutes. If charging times out, replace the Ni-MH battery.
POWER steady green or orange; DATA off; STATUS alternating red and orangeHead or motor cooling2 checks
POWER steady green or orange; DATA blinking orange; STATUS blinking orangeData reception error
A poor IrDA connection is the likely reason data is not arriving correctly. Reposition the printer or the computer infrared port and retry.
POWER steady green or orange; DATA steady orange; STATUS steady orangeBuffer full or format error
This light pattern identifies a full buffer or a format error. The indicator table supplies no separate corrective procedure for this state.
POWER steady green or orange; DATA blinking red; STATUS blinking redBoot mode
If the AC adapter was unplugged during a firmware update, the next startup can enter boot mode. Ask the reseller or Brother Customer Service for help.
Troubleshooting
Find the problem you are experiencingPOWER indicator does not light2 checks
- Printer is not receiving power
- Check that the AC adapter or DC cable is correctly connected and that its outlet is on.
- Vehicle DC supply
- If using DC power, check the fuse.
Paper jam1 check
- Paper removal
- Follow Clearing a Paper Jam.
Paper feeds but nothing prints2 checks
- Paper and orientation
- Check that genuine Brother thermal paper is loaded with its smooth coated side down.
- Print density
- Check the driver print-density setting.
Motor runs but paper will not feed3 checks
- Release cover
- Close the release cover completely.
- Paper
- Use genuine Brother thermal paper; heavy paper may not pass through.
- Persistent fault
- If feeding still fails, contact the reseller or Brother Customer Service about possible printer damage.
Printed image out of alignment2 checks
- Paper loading
- Check that genuine Brother thermal paper is loaded correctly.
- Platen roller
- Inspect the platen roller and clean it if dirty using the reviewed cleaning-sheet procedure.
Image too light or too dark2 checks
- Density
- Adjust the print density in the driver.
- Paper
- Use genuine Brother thermal paper.
Image compressed or stretched3 checks
- Cover
- Close the release cover fully.
- Slipping paper
- If the paper slips, check that the platen roller is clean.
- Paper condition
- Use genuine Brother thermal paper without wrinkles.
Incorrect top margin2 checks
- Margins
- Check the Utility and application margins, adjusting top and bottom margins as needed.
- Loading
- Gently insert paper; do not force it into the input slot.
Unexpected number of sheets per page1 check
- Page-size settings
- Match paper-size settings in the application, printer and driver to the loaded paper.
- Legal-size content on Letter paper can require two sheets: adjust the settings or reduce the image to fit Letter.
- A green DATA light after the page prints means data remains in the printer.
Incorrect side margins2 checks
- Margin settings
- Check the Utility and application margins and adjust the left margin if needed.
- Page width
- Match the paper-size settings in the application, printer and driver to the loaded paper. A different configured paper width gives an incorrect horizontal print position.
Incorrect printed characters2 checks
- Character set
- Verify and, if necessary, change the application character set.
- Font
- Try a different font in the document.
Random printed dots2 checks
- Driver
- Check the printer driver settings.
- USB cable
- Check that USB is firmly and correctly connected; try another cable.
DATA green but no printing3 checks
- Paper
- The printer has not printed all received data. Insert a new sheet, or remove and reinsert the sheet already loaded.
- Retry
- If printing does not start, turn the printer off and on and print the document again.
- ASCII text
- For simple ASCII text without a final CR/LF or form-feed, try another page or press Feed for a manual form feed.
Application sends data but DATA stays green1 check
- USB connection
- Check both USB connections and try another USB cable.
DATA off with a page still inside3 checks
- Incomplete data
- The application may not have sent a complete page. Try printing the document again.
- Paper size
- The application may have sent the wrong page size, or the loaded paper may be the wrong size. Match the application and driver page-size settings to the loaded sheet.
- Form feed
- Do not leave driver Form Feed Mode on No Feed; try pressing Feed for a manual form feed.
Partly printed page ejected with DATA green1 check
- Application paper size
- Check the application paper-size setting.
Guides
Connecting to an ac power outlet (optional)
Instructions from the manualConnecting to an AC Power Outlet (Optional)2 steps
- Use the region-appropriate optional AC adapter and power cord.
- Connect the adapter to the printer, connect the cord to the adapter, then plug the cord into a nearby 100–240 V AC, 50–60 Hz outlet.
Connecting to a dc power outlet (optional)
Instructions from the manualConnecting to a DC Power Outlet (Optional)4 steps
- Use the optional DC cable with the vehicle’s 12 V DC outlet.
- Connect the cable to the vehicle outlet, then to the printer.
- Turn on vehicle power before turning on the printer.
- Vehicle voltage changes can change print speed.
Installing the rechargeable ni-mh battery
Instructions from the manualInstalling the Rechargeable Ni-MH Battery7 steps
- Press the latch to open and remove the battery cover.
- Gently connect the battery plug to the terminal inside the compartment.
- Hold the removal ribbon with enough exposed to remove the battery later; tilt the battery forward into the compartment and press it fully home after it passes the outer edges.
- The Ni-MH marking must face away from the compartment.
- Attach the cover at the end opposite the AC/DC connector and latch it; gently move the latch toward that connector if needed.
- Do not pinch the connector wire.
- The battery has an overheat sensor, and its varying voltage can change print speed.
Removing the rechargeable ni-mh battery
Instructions from the manualRemoving the Rechargeable Ni-MH Battery3 steps
- Release the cover latch, open and remove the cover, then gently pull the removal ribbon until the battery tilts out.
- If the ribbon is trapped behind the battery, carefully tilt the battery out with a thin metal object such as a flat-blade screwdriver at the end away from the AC/DC connector.
- Remove the battery and gently unplug its connector from the internal terminal.
Charging the rechargeable ni-mh battery
Instructions from the manualCharging the Rechargeable Ni-MH Battery6 steps
- Charge the battery before first use; a new fully charged battery can print about 70 pages, with up to 120 minutes needed for a full charge.
- Install it, connect the printer to an AC outlet using the specified adapter and cord or to a DC outlet using the DC cable, and leave the printer off.
- Hold Power for a few seconds until POWER flashes green and orange.
- That pattern means refreshing; the Utility setting or remaining charge can allow charging without a refresh.
- Holding Power during refresh skips to charging.
- After refresh, charging starts automatically, POWER flashes green, and the light goes out at completion.
Stopping the rechargeable ni-mh battery charging
Instructions from the manualStopping the Rechargeable Ni-MH Battery ChargingView
Press Power twice in quick succession to stop Ni-MH charging.
Tips on using the rechargeable ni-mh battery
Instructions from the manualTips on Using the Rechargeable Ni-MH Battery7 steps
- Charge before first use and before later use because stored batteries gradually discharge.
- While AC or DC is connected, trickle charging offsets that loss; Brother recommends keeping that connection even with a Ni-MH battery fitted.
- Charge at 5–40°C.
- Darker printing uses more charge, so adjust density in the driver or Utility.
- Try refreshing a troublesome battery before replacing it.
- For long disuse, remove it and store it somewhere cool without direct sun; refresh and recharge every three to six months.
- Also follow the battery’s own instruction manual.
Explaining battery terms
Instructions from the manualExplaining Battery Terms5 steps
- Ni-MH discharge is normal depletion, including during storage.
- Refresh fully discharges it so it can recharge to full capacity: hold Power until green and orange flash, or use the Utility refresh options.
- Avoid over-discharge by periodic charging.
- Refreshing once or twice can restore capacity after inactivity, but the guide says a battery unused for more than a year will not regain its earlier capacity.
- Trickle charging while AC or DC is connected offsets slow self-discharge.
Installing the rechargeable li-ion battery
Instructions from the manualInstalling the Rechargeable Li-ion Battery5 steps
- Release and remove the cover.
- Put the removal ribbon inside the compartment, move the Li-ion battery’s slide switches inward and insert it.
- Move the switches outward to secure it.
- The ribbon is unnecessary for Li-ion removal.
- Battery voltage can vary and affect printing speed.
Removing the rechargeable li-ion battery
Instructions from the manualRemoving the Rechargeable Li-ion BatteryView
Move the Li-ion battery slide switches inward, then remove the battery from the printer.
Charging the rechargeable li-ion battery
Instructions from the manualCharging the Rechargeable Li-ion Battery5 steps
- Charge before first use.
- A new fully charged battery can print about 300 pages, and a full charge can take up to 180 minutes.
- For in-printer charging, turn the printer off and confirm the Li-ion battery is fitted, then connect the specified AC adapter and cord or DC cable to the battery’s AC/DC connector.
- The battery light is orange while charging and goes out when fully charged.
- The User’s Guide also explicitly allows charging the battery removed from the printer: connect that same specified power source to the battery; the orange and off indications are the same.
Stopping the rechargeable li-ion battery charging
Instructions from the manualStopping the Rechargeable Li-ion Battery ChargingView
Disconnect the AC power cord or DC cable from the battery AC/DC connector to stop Li-ion charging.
Tips on using the rechargeable li-ion battery
Instructions from the manualTips on Using the Rechargeable Li-ion Battery5 steps
- Charge before first use at 0–40°C; outside that range charging does not occur and the battery light stays on.
- Darker printing drains more charge.
- Li-ion batteries do not need refreshing or trickle charging.
- When the printer is used with battery and AC/DC connected, the auto-off timer can switch the printer off and allow charging, but charging can stop without a full charge.
- Charging stops after a maximum of 180 minutes; a vehicle outlet may not supply enough voltage to reach full charge in that time.
Rechargeable li-ion battery characteristics
Instructions from the manualRechargeable Li-ion Battery Characteristics5 steps
- Avoid hot or cold storage and use; high temperature with at least 90% charge accelerates deterioration.
- To reduce deterioration during printing, disconnect AC/DC while using the fitted Li-ion battery.
- The guide recommends trying to discharge it fully before recharging.
- For long disuse, remove it at 50% charge or less and store it cool without direct sun.
- Recharge every six months and observe its own manual.
Rechargeable battery overview
Instructions from the manualRechargeable Battery Overview3 steps
- The Ni-MH option mounts inside the printer and charges there, supports printing while charging, trickle charging and refresh, takes about 120 minutes to charge, and yields about 70 pages per charge.
- The Li-ion option mounts externally, has its own charger circuitry, supports printing while charging and charging removed from the printer, does not use trickle charge or refresh, takes about 180 minutes, and yields about 300 pages.
- These are the manual’s approximate new-battery figures.
Install the printer driver
Instructions from the manualInstall the Printer Driver8 steps
- Do not attach USB before installing the driver.
- If connected early, cancel New Hardware Wizard, disconnect the printer and install the driver.
- On Windows, insert the CD-ROM, select PC (Windows) software, then Standard Installation or the desired item, choose PJ-622, follow the installer and finish.
- Standard Installation installs the driver and PJ-600 Series Utility for PJ-622.
- On Mac, open Mac OS X on the CD-ROM and run Brother PJ-XXX Driver.pkg; follow the installer and click Close for PJ-622.
- Turn the printer on.
- In OS X 10.4.11 use Applications → Utilities → Printer Setup Utility; in 10.5.x–10.6 use System Preferences → Print & Fax.
- Click Add or +, choose PJ-XXX or Brother PJ-XXX and add it.
Uninstall the printer driver
Instructions from the manualUninstall the Printer Driver — Windows XP5 steps
- Turn the printer off.
- Open Start → Control Panel → Printers and Other Hardware → Printers and Faxes.
- Select Brother PJ-XXX and delete it through File → Delete or the context menu.
- Open File → Server Properties, then Drivers; select Brother PJ-XXX and Remove.
- Close Print Server Properties.
Uninstall the Printer Driver — Windows Vista6 steps
- Turn the printer off.
- Open Start → Control Panel → Hardware and Sound → Printers and delete Brother PJ-XXX.
- Right-click the Printers window and choose Run as administrator → Server Properties.
- Confirm Continue or supply the requested password and OK.
- In Drivers select Brother PJ-XXX, click Remove, choose Remove driver and driver package, confirm OK and follow the prompts.
- Close Print Server Properties.
Uninstall the Printer Driver — Windows 75 steps
- Turn the printer off.
- Open Start → Devices and Printers, select Brother PJ-XXX and Remove device; supply the administrator password and Yes if requested.
- Select Fax or Microsoft XPS Document Writer, then Print server properties.
- In Drivers click Change Driver Settings, authorize if prompted, select Brother PJ-XXX and Remove.
- Choose Remove driver and driver package, confirm OK and follow the instructions, then close Print Server Properties.
Uninstall the Printer Driver — Mac3 steps
- Turn the printer off.
- In OS X 10.4.11 open Applications → Utilities → Printer Setup Utility, choose PJ-XXX and Delete, then close Printer List.
- In OS X 10.5.x–10.6 open System Preferences → Print & Fax, choose Brother PJ-XXX and click minus, then close that window.
Usb connection
Instructions from the manualUSB ConnectionView
Install the driver first. With the printer turned off, connect the printer end of the USB cable to the USB port on its side, then attach the other end to the computer USB port.
Printing
Instructions from the manualPrinting10 steps
- Open the document.
- Provide a charged battery or AC/DC power and turn the printer on, checking POWER.
- Connect the computer by USB or the applicable IrDA connection; PJ-622 has no Bluetooth.
- Hold genuine Brother thermal paper straight with both hands and gently insert it until the roller takes it to the starting position.
- Keep its bottom edge parallel to the roller, with the smooth coated print side down.
- Adjust driver or Utility settings if needed and select Print in the application.
- DATA flashes green during receipt and printing.
- After use, press Power twice quickly to turn off.
- If DATA remains steady green with paper loaded, insufficient data may remain for a page; hold Feed to print and eject it.
- To correct a skewed sheet before printing, fully open the release cover, remove it, close the cover and reload.
Brother MPrint legacy Windows Mobile scope5 steps
- This is the supplied PocketJet operation-check sample for Windows Mobile 5.0, 6 Professional/Classic and 6 Standard.
- Open Brother MPrint from the Program screen and verify the printing functions.
- Note Print, Clipboard Print and Screen Capture Print are unavailable in Windows Mobile 6 Standard; Schedule, E-mail, Task, Contact and Image File printing remain listed.
- MPrint Utility is expressly unsupported for PocketJet.
- These are the documented legacy software versions, not a claim of current mobile-app compatibility.
Making prints lighter or darker
Instructions from the manualMaking Prints Lighter or DarkerView
Change print density in the driver dialog or PJ-600 Series Utility. A density change while battery-powered can slightly alter speed and pages per charge.
Setting printer driver options
Instructions from the manualSetting Printer Driver Options11 steps
- Select driver options from the application print dialog.
- Match Paper Type to the loaded media: Cut Sheet is the default; Roll, Perforated Roll and Perforated Roll Retract are also offered.
- Density is 0–10 or Printer Default; lower values are lighter and conserve battery, while darker print can improve thin-line legibility.
- Printer Default uses factory or Utility settings.
- Enable 2-ply Mode only for 2-ply paper; it prints darker and slower than density 10.
- Form Feed Mode defaults to Fixed Page: No Feed leaves paper at job end for non-perforated rolls; Fixed Page feeds the selected page length for cut sheets; End of Page feeds to the paper end or 355.6 mm for perforated paper; End of Page Retract stops at a preprinted end mark or sheet end and requires Perforated Roll Retract.
- For No Feed, select a final feed margin of None, 12.7, 25.4, 38.1 or 50.8 mm; 25.4 mm is default.
- It affects only the last page; the application bottom margin is ignored and its top margin sets total separation between pages.
- Windows Roll Paper Pause defaults off and can confirm each roll-paper page.
- Dash Line Print defaults off; enabling it requires Fixed Page and prints rather than punches the lines.
- Windows Automatically Switch Command Mode defaults enabled and controls sending the switching command.
Setting paper size
Instructions from the manualSetting Paper Size — Windows XP4 steps
- For a standard size, choose it in the application page setup.
- To add a custom size on XP, open Control Panel → Printers and Other Hardware → Printers and Faxes.
- With no item selected, right-click and choose Server Properties.
- In Forms configure and add the desired size.
Setting Paper Size — Windows Vista4 steps
- Open Control Panel → Hardware and Sound → Printers.
- With no item selected, right-click and choose Run as administrator → Server Properties.
- Confirm Continue or enter the requested password and OK.
- In Forms configure and add the desired size.
Setting Paper Size — Windows 73 steps
- Open Start → Devices and Printers, select Brother PJ-XXX and Print server properties.
- In Forms click Change Form Settings and provide the administrator password and Yes if requested.
- Configure and add the desired paper size.
Setting Paper Size — MacView
For a size not yet defined, open Page Setup → Paper size → Manage Custom Sizes, configure the size and add it.
Cut sheet paper
Instructions from the manualCut Sheet PaperView
Select Letter, A4 or Legal as appropriate. On Windows set Paper Type to Cut Sheet. Set Form Feed Mode to Fixed Page.
Variable-length pages (saves paper)
Instructions from the manualVariable-Length Pages (Saves Paper)4 steps
- Select the appropriate size: Letter, A4 or Legal on Windows; US Letter (Roll), A4 (Roll) or US Legal (Roll) on Mac.
- Windows Paper Type must be Roll.
- Set Form Feed Mode to No Feed, then choose Feed Margin for No Feed option for the ejection after the last page.
- The selected size determines the maximum text lines on a page.
Infinite length pages (such as geological recordings or polygraph charts)
Instructions from the manualInfinite Length Pages (Such as Geological Recordings or Polygraph Charts)4 steps
- Set Paper Size to Infinite.
- On Windows set Paper Type to Roll.
- Set Form Feed Mode to No Feed and choose the final Feed Margin for No Feed option.
- Set the application top and bottom margins to zero.
Perforated roll paper
Instructions from the manualPerforated Roll Paper5 steps
- Choose the appropriate size: Letter, A4 or Legal on Windows, or an appropriate Mac Perforated Roll or Perforated Roll Retract size.
- On Windows choose Perforated Roll or Perforated Roll Retract for Paper Type.
- Set Form Feed Mode to the corresponding End of Page or End of Page Retract.
- Perforated Roll does not feed between pages and reduces printable area even for custom sizes.
- Retract feeds between pages and has cut-sheet printable area.
Usage and handling instructions
Instructions from the manualUsage and Handling Instructions5 steps
- Load the smooth coated side toward the back of the printer as shown in the manual; the main Printing instructions describe this print side as facing down.
- Keep paper in its box or bag until use, without folding, creasing or wrinkling it.
- Store away from heat, humidity and prolonged strong UV.
- Keep it away from Diazo blueprint, carbonless or cast-coated paper, vinyl or acetate covers, organic solvents, oils and ammonia.
- Use water-based coloured markers; solvent-based ink can darken thermal paper.
Clearing a paper jam
Instructions from the manualClearing a Paper Jam3 steps
- Hold Feed: the motor runs slowly for a few seconds, then faster while held; repeat as needed.
- If the paper still does not eject, gently open the release cover fully.
- Carefully pull the paper out in either direction, close the release cover, then load a fresh sheet and retry printing.
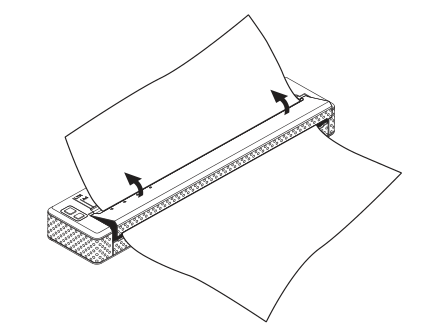
Diagram key
- Lower-left curved arrow: Open the release cover completely.
- Middle curved arrow: Open the release cover completely.
- Upper-right curved arrow: Open the release cover completely.
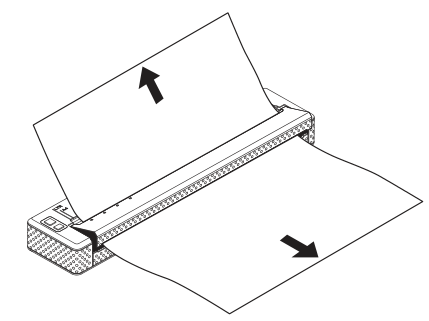
Diagram key
- Upper withdrawal arrow: Gently pull the paper out in this direction.
- Lower withdrawal arrow: Gently pull the paper out in the other direction.
Cutting roll paper
Instructions from the manualCutting Roll PaperView
Use the tear bar by lifting one edge of the ejected paper diagonally toward its other edge. The tear bar is sharp; do not touch it.
Installing pj-600 series utility
Instructions from the manualInstalling PJ-600 Series Utility3 steps
- Configure only while the printer is idle, because changing settings during a job can cause malfunction.
- On Windows, insert the CD-ROM, choose PC (Windows) software and PJ-600 Series Utility; Standard Installation can install it with the driver.
- On Mac it is installed automatically with the driver and is located at Macintosh HD → Library → Printers → Brother → PocketJet Utilities → Brother PJ-600 Series Utility.app.
Uninstalling pj-600 series utility
Instructions from the manualUninstalling PJ-600 Series Utility5 steps
- On XP open Control Panel → Add or Remove Programs; on Vista or Windows 7 use Control Panel → Programs → Programs and Features.
- Choose Brother PJ-600 Series Utility and Remove on XP or Uninstall on Vista/7.
- Confirm Yes, authorize Allow if requested, and enter a requested password followed by Yes.
- After removal close the window.
- On Mac, open Macintosh HD → Library → Printers → Brother → PocketJet Utilities and drag Brother PJ-600 Series Utility.app to Trash.
Using pj-600 series utility
Instructions from the manualUsing PJ-600 Series Utility5 steps
- Provide AC/DC power or a full battery, install a functioning printer driver and connect PJ-622 by USB.
- Start the Utility from Start → All Programs → Brother PocketJet on Windows, or from Macintosh HD → Library → Printers → Brother → PocketJet Utilities on Mac.
- Select the checkboxes for settings to change, choose or enter values, then click Send Settings.
- The appearance varies by OS and defaults can vary by country or customer.
- Driver Paper Size, Density, Form Feed Mode and Dash Line Print override Utility values during printing and until power-off; after restart Utility settings are the defaults.
Changing parameter settings
Instructions from the manualChanging Parameter Settings5 steps
- Choose the connected target printer in Printer.
- On Windows, Update List refreshes devices connected or powered on after the Utility started.
- Import loads a saved configuration; click Send Settings to apply it to the printer.
- Export saves the current settings to a configuration file.
- Most advanced parameters concern simple text printing without the printer driver; Auto Power On, Auto Power Off and Pre-feed are common across operating systems.
Defining paper size
Instructions from the manualDefining Paper Size10 steps
- Paper Size defaults to Letter and also offers A4, Legal and Custom.
- Standard Letter is 11 × 8.5 inches (279 × 216 mm), A4 11.69 × 8.27 inches (297 × 210 mm), and Legal 14 × 8.5 inches (356 × 216 mm); the diagram gives top margin C as 0.10 inch/2.5 mm, bottom margin D as 0.23 inch/5.8 mm for Letter/Legal or 0.59 inch/15 mm for A4, and both E side margins as 0.17 inch/4.3 mm for Letter/Legal or 0.13 inch/3.3 mm for A4.
- With Custom, Form Length, Bottom Margin, Left Margin and Right Margin define the page.
- Form Length defaults to 6 lines and accepts 6–127 lines or 1.00–21.16 inches with 6 lines/inch, and 8–127 lines or 1.00–15.87 inches with either 8-lines/inch option; switching units recalculates it.
- Bottom Margin defaults to 3 lines; its range is 3–126 lines at 6 lines/inch or 4–126 at 8 lines/inch, at least 0.5 inch/12.7 mm, with maximum Form Length minus one line.
- Text Line Spacing defaults to 6 lines/inch; 8 lines/inch at 0.125 or 0.12 inch is also available, and 0.12 inch is recommended for Graphics characters, which are 0.12 inch/3.1 mm tall.
- Left and Right Margin default to Use Paper Size, which gives 8 inches/203.2 mm printable width; Columns calculates a margin from the number of columns and Default Pitch, using 10 characters/inch if pitch is Proportional.
- The left margin maximum is 4.5 inches/114.3 mm; the right-margin limit must leave 0.2 inch/5.08 mm printable width.
- Default Pitch offers 10, 12 (default), 15 characters/inch and Proportional; proportional character widths vary.
- Driver Paper Size overrides the Utility.
Defining power and roll paper options
Instructions from the manualDefining Power and Roll Paper Options9 steps
- Auto Power On defaults to Disable, which enters low-power sleep until Power is pressed.
- Enable turns on when AC/DC is connected.
- Enable (No Main Button) also prevents Power from switching it off, so disconnect AC/DC to turn off in that mode.
- The separate AC/DC/Li-ion and Ni-MH Auto Power Off defaults are 10 minutes without data; each offers None or 10–60 minutes in ten-minute steps.
- AC/DC/Li-ion takes priority when AC/DC and Ni-MH are both connected.
- Refresh Ni-MH Battery defaults to Do Not Refresh and offers Each Time, Every 5 Times or Every 10 Times.
- Skip Perforation defaults off; enabling it leaves one-inch/25.4 mm top and bottom margins to avoid perforations.
- Dash Line Print defaults off; enable with Fixed Page to print, rather than punch, page-separation lines.
- Driver Dash Line Print takes priority.
Defining print density and other options
Instructions from the manualDefining Print Density and Other Options8 steps
- Print Density offers 0–10 and defaults to 6; lower is lighter and saves battery, higher is darker and can improve thin lines.
- Driver density takes priority.
- Form Feed Mode defaults to Fixed Page and offers No Feed, End of Page and End of Page Retract with the same ejection rules as the driver; the driver setting takes priority.
- Pre-Feed defaults off; enabling it ejects a short length at startup, but Brother recommends Disable for perforated or preprinted rolls.
- CR-LF Mode defaults to separate LF and CR handling: LF advances a line and CR returns to the left margin.
- If the sending device uses only one at line ends, choose LF=CR+LF CR=CR+LF.
- Paper Sensor Threshold accepts 0–255 and defaults to 128.
- The Wireless I/O and Wireless Switching Mode parameters in the shared guide are PJ-662/663-only and do not apply to PJ-622.
Defining internal font settings
Instructions from the manualDefining Internal Font Settings5 steps
- Extended Characters defaults to Graphics for ASCII 128–255; Italic instead uses italic versions of ASCII 32–127.
- Character Set Map defaults to USA and offers France, Germany, United Kingdom, Denmark I, Sweden, Italy, Spain I, Japan, Norway, Denmark II, Spain II, Latin America, Korea and Legal.
- Default Font is Serif, with Sans Serif also available.
- Reduce Character Size defaults off; enabling it changes 10 characters/inch to 16.67, 12 to 20, and proportional width to half, with 15 unchanged.
- Character Attribute offers Bold, Double Width and Underline.
Jpeg printing
Instructions from the manualJPEG Printing7 steps
- With IrDA using IrOBEX, send a JPEG without the driver; PJ-622 does not support the Bluetooth alternative.
- Only .jpg files up to 5 MB are accepted.
- PJ-622 at 200 dpi accepts up to 2200 dots high × 1600 dots wide; larger files or dimensions are discarded without printing.
- Each pixel prints as one dot from the upper-left corner, retaining the received aspect ratio.
- Colour is dithered to black and white, while already monochrome JPEGs can become fuzzy after dithering.
- Try disabling JPEG preprocessing to improve quality.
- The printer also performs simple binary processing.
Cleaning the platen roller
Instructions from the manualCleaning the Platen Roller7 steps
- Follow the safety guide by disconnecting AC/DC from the outlet before maintenance.
- With the printer powered on and no paper loaded, insert the cleaning sheet with CLEANING SHEET upright toward the front; the roller draws it to the starting position.
- Paper left inside would instead be ejected by a form feed.
- Remove only the upper-half backing, leaving the lower-half backing attached.
- Hold Feed for more than two seconds to feed and eject the sheet.
- Use only the cleaning sheet on the platen; never use it on other printer parts.
- Ask Brother or the reseller for replacement sheets.
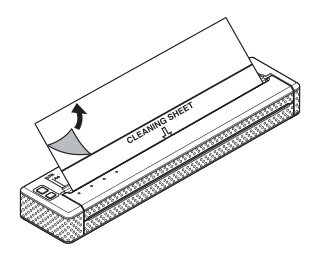
Diagram key
- Peeling arrow: Remove backing paper from the upper half only; do not remove the lower-half backing.
- CLEANING SHEET marking: The sheet text must be upright and face the front of the printer.
- Printed sheet arrow: Keep the cleaning sheet oriented as shown when inserting it into the paper input slot.
Cleaning the printer’s exterior
Instructions from the manualCleaning the Printer’s Exterior4 steps
- Disconnect AC/DC from the electrical outlet before maintenance, as directed in the safety guide.
- Wipe the case with a dry cloth.
- Do not wet the cloth or let water enter the printer.
- Do not use benzene, alcohol, thinner, abrasive cleaners, or acidic or alkaline cleaners because they can harm the case.
Printing a printer report
Instructions from the manualPrinting a Printer Report4 steps
- For a Letter-size settings report without a computer, turn the printer on with no paper loaded.
- Hold Feed for at least two seconds until DATA turns red.
- Insert genuine Brother thermal paper; the firmware, image-quality and configuration report prints automatically and the printer returns to idle.
- Utility Print Unit Settings provides the same function.
Important safety instructions
Instructions from the manualNi-MH battery safety8 steps
- Use the optional Ni-MH battery only with PJ-622/PJ-623/PJ-662/PJ-663, installing it in the printer and charging with the specifically designed AC adapter or DC cable.
- Never connect the battery directly to mains, a power supply or a vehicle lighter socket.
- Keep it and a printer containing it away from pressure, heat, ovens, microwaves, dryers, high-voltage equipment, induction cooking, flames, sunlight and hot cars.
- Keep it dry and away from fresh or salt water; do not immerse it.
- Do not short terminals with metal, pierce it, hammer it, step on it, throw or drop it, or subject it to strong impact.
- Do not dismantle or modify it, use it damaged or deformed, or expose it to salty air or acidic, alkaline or corrosive gas.
- Do not place it or the printer in a microwave or high-pressure container.
- These precautions prevent heat, cracks, damage, explosion, smoke, fire and electric shock.
Li-ion battery safety10 steps
- Use only approved devices and the specifically designed adapter/DC cable or specified charging parameters.
- The safety guide describes charging while installed; the operation guide explicitly also supplies removed-battery charging instructions.
- Do not dismantle or modify the battery, short its contacts with wire or jewellery, discard it in fire, deliberately overheat it, or leave it near fire, heaters or temperatures above 80°C.
- Keep it away from fresh or salt water and do not immerse it.
- Do not charge by a fire or in direct sun, above recommended temperature or current/voltage, or with a modified adapter.
- Do not pierce, hammer, step on, throw or severely shock it, use it badly damaged/deformed, or solder connections to it.
- Observe polarity and orientation and never force it into the compartment.
- Never connect the battery directly to mains or a vehicle lighter socket.
- Do not put it or the printer in a microwave or high-pressure container.
- Ignoring the precautions risks protection-circuit failure, abnormal current, chemical reaction, overheating, fire or explosion.
Leaking rechargeable battery4 steps
- Keep a leaking battery or printer away from flames immediately and avoid touching electrolyte.
- If it enters the eyes, do not rub; rinse immediately with plentiful tap or other clean water and seek medical advice, because untreated exposure can damage the eyes.
- Rinse affected skin or clothing immediately with water.
- Place the printer in a bag to isolate it.
Printer location and handling safety6 steps
- Do not use where prohibited, including aircraft, or in special environments near medical equipment: interference can cause malfunction or accidents.
- Keep foreign objects out of ports and connectors.
- Do not operate, charge or store the printer near water, in bathrooms or extreme humidity, rain/moisture, heavy dust, extreme heat, naked flames, heaters, direct sun, a closed hot car or where condensation can form.
- If lightning is nearby, disconnect the external supply from the outlet; do not touch the printer if lightning strikes nearby.
- Do not dismantle or modify it; use the seller for service, adjustment or repair.
- Unauthorized alteration damage is outside the stated repair warranty.
AC adapter and DC cable safety9 steps
- Use only the specified AC adapter/DC cable.
- The AC supply must be a household 100–240 V, 50/60 Hz outlet.
- Never handle the plug or adapter/cable with wet hands, or dismantle, modify or repair the power equipment; request seller service.
- Keep it away from spilled water/drinks and wet locations, children especially infants, microwave ovens, flames and heaters.
- Do not put foreign objects into terminals.
- Never damage, twist, sharply bend, pull, bind, heat, pinch or place objects on the cable.
- Replace damaged equipment through the seller.
- Do not pull the cord to unplug it, or wind it around the adapter.
- Keep printer/cables away from chemicals and possible spills, especially organic solvents that can melt the case or insulation and cause fire or shock.
Clean a dirty power plugView
Unplug a dirty or dusty power plug from the outlet before wiping it with a dry cloth. Do not continue using it dirty, because that can cause fire.
Charging does not finish in the specified timeView
If full charging is not completed within the specified time, stop charging; continuing can cause damage, fire or electric shock. Use only the specified adapter or DC cable.
Disconnect external power for maintenance or storage3 steps
- Before maintenance such as cleaning, disconnect AC/DC from the electrical outlet to avoid electric shock.
- For a long period without use, disconnect it from both printer and outlet.
- Do not wrap the cable around the adapter or bend it.
To use the machine safely
Instructions from the manualWhen to stop and arrange service4 steps
- Stop using a malfunctioning printer and contact the seller.
- If foreign objects enter, the printer is damaged, or it produces smoke, unusual smell or noise, immediately turn it off, disconnect AC/DC from the electrical outlet and contact the seller for repair.
- Continuing risks fire, electric shock or further damage.
- Also stop operation if it leaks or is discoloured, deformed or otherwise defective.
Printer
Instructions from the manualProtect children and support the printer safely2 steps
- Keep the printer, battery, consumables, plastic bags and labels away from children, particularly infants, to prevent injury or swallowing.
- Do not carry or operate the printer holding only the release cover: it can detach and the falling printer can injure someone.
General precautions
Instructions from the manualStore or replace the rechargeable battery safely6 steps
- The factory partial charge is only for checking operation; fully charge with the specified AC/DC supply before use.
- For long storage, remove the battery and keep it away from static, high humidity and heat; the guide recommends 15–25°C and 40–60% humidity.
- Recharge at least every six months.
- If operating time stays short despite a full charge, replace the battery because it may be worn out.
- Tape the old battery terminals to prevent shorting.
- An incorrect replacement type can explode; dispose of used batteries according to their instructions.
Note print
Instructions from the manualNote Print7 steps
- With the printer on, choose Note Print in Brother MPrint, select the single memo to print and choose Printer → Preview.
- Folders can filter previously categorized memos.
- With PJ-622, face the device and printer IrDA ports toward each other less than 20 cm (7.9 inches) apart; the PocketJet infrared port is beside USB.
- Select Print; printing starts after detection.
- Choosing Print without Preview skips the preview.
- Preview shows the resulting layout, but its text may be hard to read, and layout can vary with the selected paper size.
- This function is unavailable on Windows Mobile 6 Standard.
Advanced settings
Instructions from the manualMPrint printer settings4 steps
- From Print preview choose Printer setting.
- Select the printer model and a supported paper size, Portrait or Landscape orientation, Normal or Global print mode, and 1–50 copies with Collate if desired.
- Confirm with the OK button.
- The Bluetooth COM-port setting and paper-cassette note in this shared program guide do not establish Bluetooth or a cassette for PJ-622; its exact operation guide establishes IrDA/USB and sheet/roll paper handling.
MPrint graphics processingView
In Print preview choose Graphics. Select Dithering, Error Diffusion or None for half-toning, and Full-size printing or Fit to paper for image processing. Confirm with OK.
Text format settings
Instructions from the manualMPrint text format5 steps
- In Note Print use Settings → Font.
- Choose among fonts offered by the device; the guide lists Tahoma, Courier New, Frutiger Linotype and Bookdings.
- Size choices are Largest, Larger, Standard, Smaller and Smallest; styles include Bold, Underline, Italic and Strikethrough.
- Confirm with OK.
- Available fonts depend on the device.
Schedule print
Instructions from the manualSchedule Print4 steps
- Choose Schedule Print in Brother MPrint.
- Check the schedules to print; multiple schedules are allowed.
- Use Printer → Preview, then the Note Print preview/IrDA/Print workflow.
- Use the category Filter to narrow the list or set a date period as described under Printing a specified date.
Template setting
Instructions from the manualMPrint template setting3 steps
- In Schedule Print select Settings → Template, choose the layout and confirm OK.
- The sample illustrates A6 portrait and notes that A7 templates are available in the shared software; this does not establish A6/A7 as PJ-622 hardware paper specifications.
- Task, Contact and E-mail printing can use the same template-setting workflow.
Printing a specified date
Instructions from the manualPrinting a specified date3 steps
- In Schedule Print select Settings → Date, set the start/end date or In progress/date options and confirm OK.
- The resulting Schedule Print list contains the chosen period.
- Task Print also supports the specified-period workflow.
Task print
Instructions from the manualTask Print3 steps
- Choose Task Print in Brother MPrint and check each desired task or appointment; multiple items can be selected.
- Continue with the Note Print preview/IrDA/Print workflow.
- The documented date filter and template setting can select the period and layout.
Contact print
Instructions from the manualContact Print3 steps
- Choose Contact Print in Brother MPrint and check the required names; multiple contacts can be selected.
- Continue with the Note Print preview/IrDA/Print workflow to print stored names, addresses and telephone numbers.
- Template setting can change the layout.
Clipboard print
Instructions from the manualClipboard Print2 steps
- Choose Clipboard Print to display the text and images held in the clipboard, then use the Note Print preview/IrDA/Print workflow.
- This function is unavailable in Windows Mobile 6 Standard.
Screen capture print
Instructions from the manualScreen Capture Print4 steps
- Choose Screen Capture Print in Brother MPrint to show the toolbar at the upper right.
- Display the screen to capture and select the capture icon; the capture appears in Print preview.
- Continue with the Note Print IrDA/Print workflow.
- This function is unavailable in Windows Mobile 6 Standard.
Screen capture print settings
Instructions from the manualScreen capture print settings4 steps
- Select the settings icon on the capture toolbar.
- Set Capture delay time from 0 to 10 seconds; it delays importing the image after capture is selected.
- Choose Selection range (use the stylus to mark the area), Client (the indicated application area), or Desktop (the whole screen).
- Confirm with OK.
Image file print
Instructions from the manualImage File Print3 steps
- Choose Image File Print in Brother MPrint and tap a single saved BMP, JPEG or PNG image.
- Confirm OK to preview, then follow the Note Print IrDA/Print workflow.
- These are the sample application formats; the separate driverless JPEG hardware function retains its own .jpg and size limits.
E-mail print
Instructions from the manualE-mail PrintView
Choose E-mail Print in Brother MPrint and select one saved email. Continue with the Note Print preview/IrDA/Print workflow. Use Template setting if a different layout is needed.
Controls and parts
See the manual diagrams 1 diagram
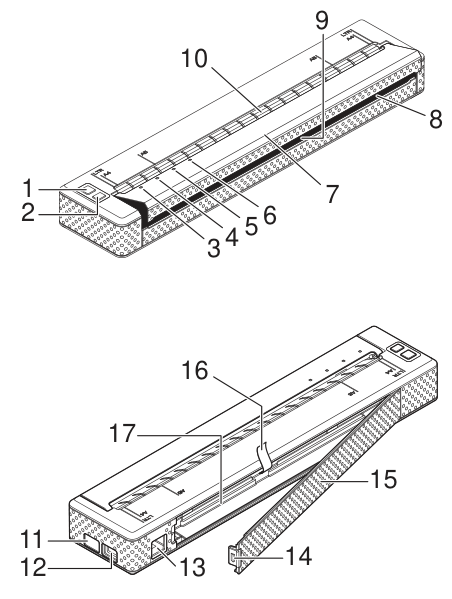
Diagram key
- 1: Power button.
- 2: Feed button.
- 3: POWER indicator.
- 4: DATA indicator.
- 5: STATUS indicator.
- 6: Bluetooth indicator is PJ-662/663 only; it is not a PJ-622 feature.
- 7: Release cover.
- 8: Paper outlet slot.
- 9: Tear bar.
- 10: Paper input slot.
- 11: IrDA port.
- 12: USB port.
- 13: AC/DC connector.
- 14: Battery cover latch.
- 15: Battery cover.
- 16: Battery removal ribbon.
- 17: Battery compartment.
Model details
Model and compatibility
- Printing method
- Direct thermal printing on genuine Brother thermal paper, without toner, ribbon or ink.
- Resolution
- PJ-622: 203 × 200 dpi.
- Connections
- USB 2.0 Full Speed mini-B peripheral and IrDA 1.2 (IrCOMM and IrOBEX). No Bluetooth on PJ-622.
- Paper sizes
- A4 (210 × 297 mm), Letter (216 × 279 mm) and Legal (216 × 356 mm).
- Dimensions and weight
- 255 mm wide × 55 mm deep × 30 mm high; about 470 g without battery or paper.
- Historical driver versions
- The reviewed guide documents Windows XP, Vista and 7 USB drivers and Mac OS X 10.4.11–10.6 USB drivers. These instructions retain their original OS scope.
Indicator Warnings
Paper Problems
Printed Image Problems
- Printed image out of alignment
- Image too light or too dark
- Image compressed or stretched
- Incorrect top margin
- Unexpected number of sheets per page
- Incorrect side margins
- Incorrect printed characters
- Random printed dots
Pages Don’t Print
Pages Are Partially Printed
Related reviewed instructions
- Clearing a Paper Jam
- Cleaning the Platen Roller
- Cleaning the Printer’s Exterior
- Printing a Printer Report
- Installing the Rechargeable Ni-MH Battery
- Charging the Rechargeable Ni-MH Battery
- Charging the Rechargeable Li-ion Battery
- Disconnect external power for maintenance or storage
- When to stop and arrange service
Manuals and sources
- Brother operation manual
- Brother model support and details
- Brother manual download listing
- Brother operation manual
- Brother operation manual
- Brother PJ-622/PJ-623 declaration of conformity (serial-number applicability)
- Brother PA-AD-600 adapter declaration of conformity
- Brother PJ-622/PJ-623 ErP power-consumption information
- Brother PJ-622 exact UK specifications