MODEL REFERENCE
Russell Hobbs 21701
1 troubleshooting topic · 12 guides

The checks and guides below come from the official manuals for this model.
No matches for this wording. Try a light name, error code or a shorter phrase.
Troubleshooting
Find the problem you are experiencingCoffee maker is not working1 check
- The product is not working; this service passage does not identify a specific cause.
- Read the instructions and check the plug fuse and main fuse/circuit breaker.
- If still not working, consult the retailer.
- If unresolved, call Customer Service for possible technical advice.
- The product is not user-serviceable.
Guides
Important safeguards
Instructions from the manualSafe use and when to stop15 steps
- Read and retain the instructions and pass them on with the appliance.
- Remove all packaging before use.
- Misuse can cause injury, electric shock or other hazards; use only as instructed.
- Children aged eight or above and people with reduced physical, sensory or mental capabilities or limited experience or knowledge may use the appliance only with supervision or instruction and understanding of the hazards.
- Children must not play with it.
- Children may clean or maintain it only if older than eight and supervised.
- Keep the appliance and cable out of reach of children under eight.
- Surfaces become hot and remain hot after use; the heating element also retains heat.
- Do not use near bathtubs, showers, basins or other vessels containing water.
- A damaged cable must be replaced by the manufacturer, its service agent or a similarly qualified person to avoid hazards.
- Use in households or similar settings: staff kitchens in shops, offices or other workplaces; hotel or motel guests and other residential settings; bed-and-breakfast establishments; farmhouses.
- Place on a stable, level, heat-resistant surface.
- Keep the appliance and cable away from worktop edges.
- Use only supplied accessories or attachments and only for the purposes described.
- Do not use if damaged or malfunctioning.
Parts
Instructions from the manualIdentify all ten partsView
The parts are: 1 lid; 2 water reservoir; 3 permanent filter; 4 filter holder; 5 water gauge; 6 hot plate; 7 on/off switch; 8 carafe; 9 brewing status gauge; 10 scoop.
Before using for the first time
Instructions from the manualRun water before first useView
Fill the reservoir to the max mark and run the appliance without coffee.
Filling
Instructions from the manualFill water and ground coffee7 steps
- Remove the carafe from the rest.
- Open the lid.
- Fill with at least two cups of water, without exceeding the max mark (figure A).
- Fit the permanent filter into the filter holder (figure B).
- Put one scoop of filter-ground coffee into the filter for each cup.
- Close the lid.
- Replace the carafe on the rest.
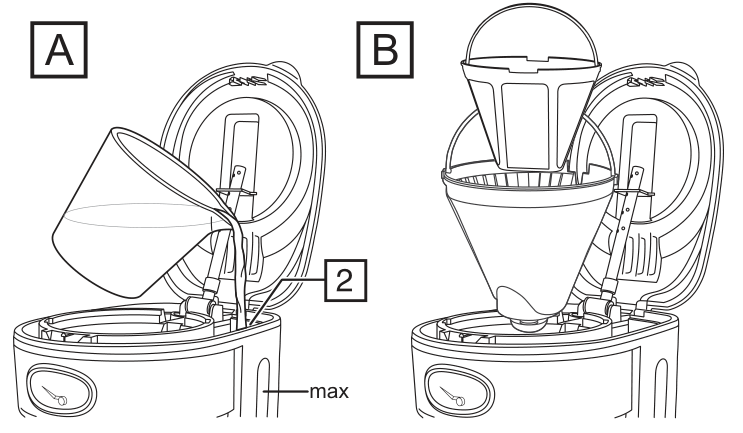
Diagram key
- A: Open the lid and fill with at least two cups of water, without exceeding max.
- 2: Water reservoir.
- max: Maximum water level; do not fill above this mark.
- B: Fit the permanent filter into the filter holder. For cleaning reassembly, lower the holder in the orientation shown; the lid will not close unless correctly fitted.
Making coffee
Instructions from the manualBrew, shut down and cool before refilling10 steps
- Do not open the lid during brewing: there is a risk of scalding.
- Plug into the power socket.
- Move the switch to I; the light comes on.
- Coffee starts dripping into the carafe shortly afterwards.
- When brewing is finished, the hotplate keeps the carafe warm.
- After forty minutes, the hotplate and appliance shut down.
- Move the switch to O.
- Unplug.
- Let the appliance and carafe cool fully before cleaning, or for about ten minutes before refilling.
- For the best flavour, drink the coffee within forty minutes of brewing.
Brewing status gauge
Instructions from the manualRead the brewing status gauge5 steps
- During brewing the pointer moves slowly clockwise through the first, long segment.
- When brewing finishes, the pointer moves to 0.
- It then shows how many minutes coffee has been kept warm by the hotplate, from zero to forty minutes.
- After about forty minutes, chemical changes affect the taste.
- When the appliance shuts down, the pointer moves to the rest position.
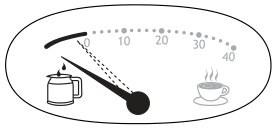
Diagram key
- Pointer, dashed pointer positions, curved direction arrow and long segment: Brewing in progress; the pointer moves slowly clockwise.
- Carafe symbol: Brewing-stage end of the gauge.
- 0,10,20,30,40, intervening dots and cup symbol: After brewing finishes, the pointer moves to0 and shows minutes kept warm, from0to40. After about40minutes chemical changes affect coffee taste.
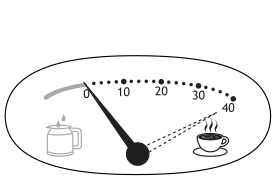
Diagram key
- Pointer, dashed pointer positions and curved direction arrow: Illustrate elapsed keep-warm time after brewing.
- Carafe symbol and long segment: Brewing stage, which precedes the timed keep-warm stage.
- 0,10,20,30,40, intervening dots and cup symbol: Minutes kept warm, zero to forty. At shutdown the pointer moves to its rest position.
A quick cup
Instructions from the manualPour a quick cupView
You may remove the carafe at any time. To prevent filter-holder overflow, return the carafe to the hotplate within about twenty seconds.
Care and maintenance
Instructions from the manualClean and refit the filter holder7 steps
- Unplug the appliance and let it cool.
- Tip the filter-holder contents into the bin.
- Clean the outside surfaces with a damp cloth.
- Hand wash the carafe, permanent filter and filter holder.
- Orient the filter holder as shown in figure B and lower it into the coffee maker.
- The lid cannot close unless the holder is correctly fitted.
- Close the lid and press down to lock it.
Descale at least monthly3 steps
- Descale regularly, at least monthly, using a proprietary descaler.
- Follow the descaler package instructions.
- Products returned under guarantee with faults due to scale are subject to a repair charge.
Service
Instructions from the manualContact service and return the product5 steps
- Have the model number ready when calling; it is on the rating plate, usually underneath the product.
- If Customer Service advises a return, pack carefully and include your name, address, daytime phone number and a description of the problem.
- For a guarantee claim, state where and when purchased and include proof of purchase such as the till receipt.
- The supplied UK manual lists Customer Service, Spectrum Brands (UK) Ltd, Fir Street, Failsworth, Manchester M35 0HS; support@russellhobbs.com; telephone 0345 658 9700, local rate.
- If purchased within the last six months, contact the retailer first about warranty matters.
Guarantee
Instructions from the manualUK guarantee terms in the supplied manual7 steps
- The supplied UK guide states a two-year guarantee from first retail purchase.
- For an extra year, register online within twenty-eight days using the product-registration address printed in that guide.
- Functional defects appearing within the guarantee period are corrected by replacement or repair at the manufacturer’s option, provided use and maintenance follow the instructions.
- Statutory rights are unaffected.
- Consumables are covered only for their recommended lifecycle.
- Replacement and spare parts are excluded from that guarantee and covered only by a one-year warranty; examples in the guide include filters, removable grill plates and drip or crumb trays.
- These general examples do not establish that this model has grill plates or crumb trays.
Recycling
Instructions from the manualUse an official recycling collection point3 steps
- Electrical and electronic products, and rechargeable or non-rechargeable batteries where applicable, marked with the printed recycling symbols must not go into unsorted municipal waste.
- Use an appropriate official recycling or collection point to avoid environmental and health problems.
- No battery inside this coffee maker is asserted.
Controls and parts
See the manual diagrams 1 diagram
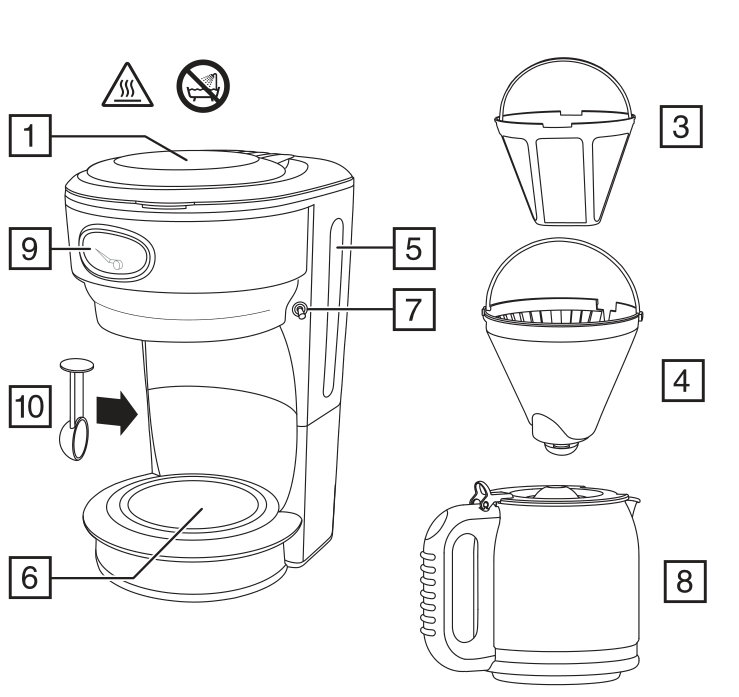
Diagram key
- Hot-surface triangle: Surfaces become hot and retain heat after use.
- Crossed water symbol: Do not use near bathtubs, showers, basins or other vessels containing water.
- 1: Lid.
- 9: Brewing status gauge.
- 5: Water gauge.
- 7: On/off switch.
- 10 and right-pointing arrow: Scoop, shown alongside the machine body.
- 6: Hot plate.
- 3: Permanent filter.
- 4: Filter holder.
- 8: Carafe.