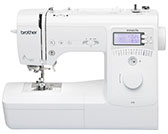
The checks and guides below come from the official manuals for this model.
No matches for this wording. Try a light name, error code or a shorter phrase.
Errors and messages
Shown on the machine display
CodeWhat it meansCheck or action
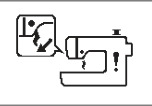
—Presser foot is raised
Lower the presser-foot lever before starting.
Actual 16-stitch-model warning graphic. Follow the condition and action above.
Diagram key
Machine outline and exclamation mark: Warning display for the condition named above
Foot inset and downward arrow: Lower the presser-foot lever before starting
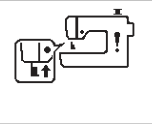
—Buttonhole lever is down for another stitch
Raise the buttonhole lever before sewing the selected non-buttonhole stitch.
Actual 16-stitch-model warning graphic. Follow the condition and action above.
Diagram key
Machine outline and exclamation mark: Warning display for the condition named above
Lever inset and upward arrow: Raise the buttonhole lever before sewing a stitch other than a buttonhole
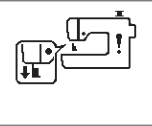
—Buttonhole lever is up for a buttonhole
Lower the buttonhole lever before sewing the buttonhole.
Actual 16-stitch-model warning graphic. Follow the condition and action above.
Diagram key
Machine outline and exclamation mark: Warning display for the condition named above
Lever inset and downward arrow: Lower the buttonhole lever before starting the buttonhole
—Bobbin winder remains in winding position
Move the bobbin-winder shaft left before sewing.
Actual 16-stitch-model warning graphic. Follow the condition and action above.
Diagram key
Machine outline and exclamation mark: Warning display for the condition named above
Bobbin-winder inset and left arrow: Move the bobbin-winder shaft left before sewing
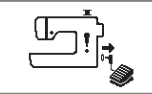
—Start/Stop was pressed with the controller connected
Disconnect the controller to use Start/Stop, or sew with the controller.
Actual 16-stitch-model warning graphic. Follow the condition and action above.
Diagram key
Machine outline and exclamation mark: Warning display for the condition named above
Controller plug and right arrow: Disconnect the foot controller before using Start/Stop
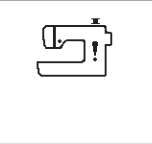
—Tangled thread locked the motor
Switch off and clean tangled thread from the race. Reinstall the bobbin case, replace a bent or broken needle, and rethread both upper and bobbin paths.
Actual 16-stitch-model warning graphic. This general pictogram is shared by more than one condition; use the circumstances and checks above.
Diagram key
Machine outline and exclamation mark: Warning display for the condition named above
—Needle-plate cover was removed while powered on
Switch the machine off and refit the needle-plate cover before continuing.
Actual 16-stitch-model warning graphic. This general pictogram is shared by more than one condition; use the circumstances and checks above.
Diagram key
Machine outline and exclamation mark: Warning display for the condition named above
F*machine reports a malfunction
Contact a Brother authorized service center and report the F code; the star represents the displayed number.
Troubleshooting
Find the problem you are experiencing
Cannot thread the needle7 checks
Needle is not in the correct position
Raise the needle with the Needle position button.
Needle is installed incorrectly
Turn the machine off and install the needle correctly.
Needle is turned, bent or the point is dull
Replace the damaged or dull needle with a straight one.
Upper threading is incorrect. The needle threader lever is not lowered until it clicks
Rethread the upper thread and lower the needle-threader lever until it clicks.
The needle threader hook is bent and does not pass through the eye of the needle
Contact a Brother authorized service center about the bent threader hook.
The needle threader lever cannot be moved or returned to its original position
Contact a Brother authorized service center if the threader lever is stuck.
A size 65/9 needle is being used
Thread a size 65/9 needle by hand; it cannot use the needle threader.
Bobbin thread does not wind neatly on the bobbin3 checks
The thread is not passed through the bobbin winding thread guide correctly
Route the thread through the bobbin-winding guide correctly.
The thread that was pulled out from the bobbin- winding thread guide was incorrectly wound onto the bobbin
Route the thread correctly and wind it onto the bobbin as instructed.
The empty bobbin was not set on the pin properly
Seat the empty bobbin correctly on the winding pin.
While winding the bobbin, the bobbin thread was wound below the bobbin winder seat1 check
The thread was incorrectly passed under the pretension disk on the bobbin-winding thread guide
Stop winding and cut the thread with scissors beside the bobbin-winding thread guide.
Slide the bobbin winder shaft left, remove the bobbin and cut the thread leading to it so that it can be removed completely.
Hold the thread end with the left hand and unwind it clockwise from beneath the seat with the right hand.
Do not remove the winder seat or its guide-post screw: removal can damage the cutter or machine and removing the screw will not release the thread.
Correct the pretension-disk thread route before winding again.
The bobbin thread cannot be pulled up2 checks
Needle is turned, bent or the point is dull
Replace the damaged or dull needle with a straight one.
Bobbin is set incorrectly
Install the bobbin correctly and guide its thread through the bobbin-case slot.
Nothing appears in the LCD2 checks
Main power switch is not turned on
Switch on the main power.
The plug of the power cord is not inserted into an electrical outlet
Connect the power cord to the outlet.
The sewing lamp does not come on1 check
The sewing light is damaged
Contact a Brother authorized service center about the damaged sewing light.
The LCD screen is fogged up1 check
Condensation has formed on the LCD screen
Allow the LCD condensation to clear.
Machine does not operate5 checks
“Start/Stop” button was not pressed
Press Start/Stop to begin sewing.
The bobbin winder shaft is pushed to the right
Move the bobbin-winder shaft left to the sewing position.
There is no stitch selected
Choose a stitch before starting.
Presser foot is not lowered
Lower the presser foot before starting.
“Start/Stop” button was pressed with the foot controller attached
Disconnect the foot controller to use Start/Stop, or sew using the controller.
Needle breaks20 checks
Needle is installed incorrectly
Turn the machine off and install the needle correctly.
Needle clamp screw is not tightened
Turn the machine off and tighten the needle-clamp screw.
Needle is turned or bent
Replace the damaged or dull needle with a straight one.
Using improper needle or thread for the selected fabric
Match the needle and thread to the fabric using the manual’s combination chart.
Wrong presser foot was used
Fit the presser foot specified for the stitch.
Upper thread tension is too tight
Reduce the upper-thread tension.
Fabric is pulled during sewing
Guide the fabric without pulling it.
Spool of thread is set incorrectly
Fit the spool and the correct spool cap securely.
There are scratches around the opening in the needle plate
Contact a Brother authorized service center about scratches on the needle plate or foot. The notch on the left of the needle-plate opening is intentional.
There are scratches around the opening in the presser foot
Contact a Brother authorized service center about scratches on the presser foot.
There are scratches on the bobbin case
Contact a Brother authorized service center about the scratched bobbin case.
A bobbin designed specifically for this machine is not used
Use a bobbin designed for this model.
Upper threading is incorrect
Rethread the upper thread correctly.
Bobbin is set incorrectly
Install the bobbin correctly and guide its thread through the bobbin-case slot.
Presser foot is attached incorrectly
Refit the presser foot correctly.
Screw of the presser foot holder is loose
Turn the machine off and tighten the presser-foot holder screw.
Fabric is too thick
Use fabric within the recommended thickness and the correct needle.
Fabric is fed forcefully when sewing thick fabric or thick seams
Let the feed mechanism advance thick seams without forcing the fabric.
Stitch length is too short
Increase the stitch length.
Bobbin thread is incorrectly wound
Rewind the bobbin correctly.
Upper thread breaks12 checks
Machine is not threaded correctly (used the wrong spool cap, spool cap is loose, the thread did not catch the needle bar threader, etc.)
Rethread the machine, fit the correct spool cap securely, and route thread through the needle-bar guide.
Knotted or tangled thread is being used
This row identifies knotted or tangled thread but gives no separate remedy. If the problem persists, contact a Brother dealer or authorized service center.
The selected needle is not appropriate for the thread being used
Choose a needle matched to the thread.
Upper thread tension is too tight
Reduce the upper-thread tension.
Thread is tangled
Switch off, remove the trapped thread, and clean the race before rethreading.
Needle is turned, bent or the point is dull
Replace the damaged or dull needle with a straight one.
Needle is installed incorrectly
Turn the machine off and install the needle correctly.
There are scratches around the opening of the needle plate
Contact a Brother authorized service center about scratches on the needle plate or foot. The notch on the left of the needle-plate opening is intentional.
There are scratches around the opening in the presser foot
Contact a Brother authorized service center about scratches on the presser foot.
There are scratches on the bobbin case
Contact a Brother authorized service center about the scratched bobbin case.
Using improper needle or thread for the selected fabric
Match the needle and thread to the fabric using the manual’s combination chart.
A bobbin designed specifically for this machine is not used
Use a bobbin designed for this model.
The thread is tangled on the wrong side of the fabric2 checks
Upper threading is incorrect
Incorrect upper threading can leave tangled thread beneath the fabric or in the bobbin case, with rattling and sewing unable to continue.
Switch off and unplug before cleaning.
Remove tangled thread; cut it with scissors if it cannot be removed, following Cleaning the race.
Remove the upper thread and rethread it using Upper Threading.
If the bobbin was removed, reinstall and thread it correctly.
Using improper needle or thread for the selected fabric
Match the needle and thread to the fabric using the manual’s combination chart.
The upper thread is too tight1 check
The bobbin thread is incorrectly installed
Incorrect bobbin threading can pull the bobbin thread onto the right side, leave the top thread as a continuous line, tighten it when pulled or wrinkle the fabric even after tension adjustment.
Correctly install the bobbin using the reviewed bobbin-installation instructions.
Bobbin thread breaks5 checks
Bobbin is set incorrectly
Install the bobbin correctly and guide its thread through the bobbin-case slot.
Bobbin thread is incorrectly wound
Rewind the bobbin correctly.
A scratched bobbin is being used
Replace the scratched bobbin.
Thread is tangled
Switch off, remove the trapped thread, and clean the race before rethreading.
A bobbin designed specifically for this machine is not used
Use a bobbin designed for this model.
Fabric puckers7 checks
There is a mistake in the upper or bobbin threading
Rethread the upper thread and reinstall the bobbin correctly.
Spool of thread is set incorrectly
Fit the spool and the correct spool cap securely.
Using improper needle or thread for the selected fabric
Match the needle and thread to the fabric using the manual’s combination chart.
Needle is turned, bent or the point is dull
Replace the damaged or dull needle with a straight one.
Stitches are too long when sewing thin fabrics
Shorten the stitch length when sewing thin fabric.
Thread tension is set incorrectly
Check both thread paths, then adjust thread tension on a scrap of the project fabric.
Wrong presser foot was used
Fit the presser foot specified for the stitch.
The stitch is not sewn correctly4 checks
The presser foot that is used is not appropriate for the type of stitch that you wish to sew
Choose the presser foot specified for the selected stitch.
The thread tension is incorrect
Check threading and set the appropriate thread tension.
The thread is tangled, for example, in the bobbin case
Switch off, remove the trapped thread, and clean the race before rethreading.
Feed dogs are set in the down position
Move the feed-dog position switch to the right to raise the feed dogs.
Skipped stitches6 checks
Machine is threaded incorrectly
Correct the upper and bobbin threading.
Using improper needle or thread for the selected fabric
Match the needle and thread to the fabric using the manual’s combination chart.
Needle is turned, bent or the point is dull
Replace the damaged or dull needle with a straight one.
Needle is installed incorrectly
Turn the machine off and install the needle correctly.
Dust or lint has collected under the needle plate
Switch off and clean beneath the needle plate.
Thin or stretch fabrics are being sewn
Sew with non-woven water-soluble stabilizer beneath the fabric.
Not stitching3 checks
Needle is turned, bent or the point is dull
Replace the damaged or dull needle with a straight one.
Bobbin is set incorrectly
Install the bobbin correctly and guide its thread through the bobbin-case slot.
Upper threading is incorrect
Rethread the upper thread correctly.
High-pitched sound while sewing5 checks
Dust or lint is caught in the feed dogs
Switch off and clean lint from the feed dogs.
Pieces of thread are caught in the race
Switch off and clear loose thread from the race.
Upper threading is incorrect
Rethread the upper thread correctly.
A bobbin designed specifically for this machine is not used
Use a bobbin designed for this model.
There are needle holes or friction scratches in the bobbin case
Contact a Brother authorized service center about damage to the bobbin case.
Fabric does not feed through the machine6 checks
Feed dogs are set in the down position
Move the feed-dog position switch to the right to raise the feed dogs.
Stitches are too close together
Increase stitch length so the fabric can advance.
Wrong presser foot was used
Fit the presser foot specified for the stitch.
Needle is turned, bent or the point is dull
Replace the damaged or dull needle with a straight one.
Thread is entangled
Stop sewing, switch off, and clear the tangled thread.
Zigzag foot “J” is slanted on a thick seam at the beginning of stitching
Keep zigzag foot Jlevel at the start of the thick seam using the manual’s thick-fabric procedure.
The fabric feeds in the opposite direction1 check
The feed mechanism is damaged
Contact a Brother authorized service center about the damaged feed mechanism.
The needle contacts the needle plate2 checks
The needle clamp screw is loose
Turn the machine off and tighten the needle-clamp screw.
Needle is turned, bent or the point is dull
Replace the damaged or dull needle with a straight one.
Fabric being sewn with the machine cannot be removed1 check
Thread is tangled below the needle plate
Stop immediately and switch off.
Remove the needle; if it is down in the trapped fabric, turn the handwheel away from you (clockwise) to raise it before removal.
Unplug before opening or servicing.
Remove the presser foot and holder.
If thread is tangled around the foot, remove that thread before raising the foot lever to avoid damaging the foot.
Lift the fabric and cut the threads beneath it.
Remove the fabric if it comes free, then clean the race.
Remove the needle-plate cover, cut tangled threads, remove the bobbin and bobbin case, and remove any remaining thread from the case.
Brush or vacuum lint from the race and surroundings.
Compressed can air is not recommended.
If the fabric came free, skip needle-plate removal and proceed to reinstalling the bobbin case.
If not, use the disc-shaped screwdriver to loosen both needle-plate screws; do not drop them into the machine.
Lift the plate slightly, cut the tangled threads, remove the plate, fabric and threads.
If the fabric still cannot be freed, stop and contact a Brother authorized service center; do not force it.
After plate removal, remove thread around the race and feed dogs.
Turn the handwheel to raise the feed dogs and align the plate screw holes with the mounting base.
Finger-tighten the right screw, firmly tighten the left with the disc screwdriver, then firmly tighten the right.
Turn the handwheel to check smooth feed-dog movement without contact with the slots.
Install the bobbin case with its triangle aligned to the machine circle, then refit the needle-plate cover.
Check and install a straight, undamaged needle; a new needle is recommended after a jam.
If the needle plate was removed, check the machine before sewing.
Leave the foot and thread uninstalled, switch on and select center straight stitch 02.
Slowly turn the handwheel toward you and check from all sides that the needle enters the center of the plate opening.
If it touches, switch off and reinstall the plate starting from raising the feed dogs.
Select zigzag 04 and set width and length to their maximum values.
Slowly turn the handwheel toward you and check the needle bar and feed dogs.
If either touches the plate, stop and contact a Brother authorized service center.
Switch off, install the bobbin and an undamaged presser foot, correctly thread the machine, and trial sew cotton.
If the result is poor, check upper threading and fabric type.
A broken needle has fallen into the machine1 check
Turn off the machine, and remove the needle plate. If the needle that fell into the machine can be seen, use tweezers to remove it. After removing the needle, return the needle plate to its original position and insert a new needle. Before turning on the machine, slowly turn the handwheel toward you to check that it turns smoothly and that the new needle enters through the center of the needle plate opening. If the handwheel does not turn smoothly or the needle that fell into the machine cannot be removed, consult your authorized Brother dealer or the nearest Brother authorized service center
Switch off and remove the needle plate.
Retrieve a visible needle fragment with tweezers, reinstall the plate, and fit a new needle.
Before powering on, turn the handwheel slowly toward you and check needle clearance.
Seek Brother service if the fragment cannot be recovered or the wheel does not turn smoothly.
The handwheel does not turn smoothly1 check
Thread is tangled in the bobbin case
Switch off, remove the trapped thread, and clean the race before rethreading.
Thread tension is incorrect8 checks
Upper threading is incorrect
Check both thread paths before adjusting tension.
For bobbin thread visible on the right side or top thread forming a straight line there, return the tension dial to 4 and correct bobbin threading.
For top thread visible underneath or loose stitching underneath, return the dial to 4 and correct upper threading.
Match the needle and thread to the fabric using Fabric/Thread/Needle Combinations.
An unsuitable combination can cause wrinkles or skipped stitches that tension adjustment will not correct.
Test on scrap of the project fabric.
Loosen upper tension counterclockwise if bobbin thread shows on top; tighten clockwise if upper thread shows underneath.
Bobbin is set incorrectly
Install the bobbin correctly and guide its thread through the bobbin-case slot.
Using improper needle or thread for the selected fabric
Match the needle and thread to the fabric using the manual’s combination chart.
Presser foot holder is not attached correctly
Attach the presser-foot holder correctly.
Thread tension is set incorrectly
Check both thread paths, then adjust thread tension on a scrap of the project fabric.
Bobbin thread is incorrectly wound
Rewind the bobbin correctly.
Needle is turned, bent or the point is dull
Replace the damaged or dull needle with a straight one.
A bobbin designed specifically for this machine is not used
Use a bobbin designed for this model.
Stitch pattern is irregular5 checks
Wrong presser foot was used
Fit the presser foot specified for the stitch.
Thin or stretch fabrics are being sewn
Place stabilizer beneath thin or stretch fabric.
Thread tension is set incorrectly
Check both thread paths, then adjust thread tension on a scrap of the project fabric.
Fabric was pulled, pushed or fed at an angle while it was being sewn
Guide the fabric straight with your hands without pulling or pushing it sideways.
The thread is tangled, for example, in the bobbin case
Switch off, remove the trapped thread, and clean the race before rethreading.
Operation beeps3 steps
One beep means a correct operation; an incorrect operation produces two or four beeps.
If the machine locks, for example because of tangled thread, it beeps for 7 seconds and stops automatically.
Find and correct the cause before resuming.
Guides
Important safety instructions
Instructions from the manual
Safety, stopping and service17 steps
Use this household machine only as described, with Brother-recommended accessories and a sound needle and correct needle plate.
Keep fingers away from moving parts; do not force the fabric or allow the needle to hit pins.
Use AC power within the rating-label range and only in the country of purchase.
Plug directly into the wall, without an extension cord.
Unplug for power failure, after use, before cleaning or servicing and when leaving the machine unattended.
Switch to O before unplugging; pull the plug rather than the cord.
Stop and unplug immediately for unusual smell, heat, discoloration or deformation.
Do not use a damaged cord or plug, a machine that is malfunctioning, has been dropped or damaged, or has had water spilled on it; take it to an authorized Brother dealer.
Carry by the handle without sudden movements.
Use a stable, clear work surface; keep ventilation openings free of lint, dust and fabric and keep objects off the foot controller.
Do not insert foreign objects, use outdoors, near heat, aerosols or administered oxygen.
Keep the plastic bag away from children or dispose of it.
In CENELEC countries, use by children 8 or older and by people with reduced capabilities requires supervision or safe-use instruction and understanding of the hazards; children must not play with the machine or clean/service it unsupervised.
For UK, Eire, Malta and Cyprus, any replacement plug fuse must be ASTA-approved to BS1362 with the rating marked on the plug.
Replace the fuse cover; never use a plug without it.
Ask an authorized Brother dealer for the correct lead if the outlet is unsuitable.
A damaged light unit must be replaced by an authorized Brother dealer.
Turning the machine on/off
Instructions from the manual
Turning the Machine On/Off8 steps
Use only the supplied cord and suitable household AC power.
Keep hands dry, plugs firmly seated and cords undamaged; do not use extension cords, multi-plug adapters with other appliances or a poor outlet.
With the switch at O, connect the cord to the jack on the right side and plug into the wall.
Press the right side of the switch to I.
The light and LCD illuminate; needle and feed-dog movement sounds at startup are normal.
Press the left side to O to switch off.
Switch off and unplug when away, after use, during electrical storms, power failures, poor connections or long storage.
Stop using a damaged cord or plug and have an authorized Brother dealer repair it.
Lcd operation
Instructions from the manual
LCD Operation5 steps
On the 16-stitch A16, read the stitch number and required foot in the separate stitch-pattern display window, not on the LCD.
Fit the indicated foot; certain feet, including zipper foot I and the quilting foot, may not be shown.
The LCD shows the needle stop position, stitch length, stitch width and whether automatic reverse/reinforcement stitching is on.
The twin-needle mode indicator belongs only to models with a needle-mode key and does not apply to A16.
Use the stitch-pattern selection dial and operation keys to change the displayed settings.
Changing the needle stop position
Instructions from the manual
Changing the needle stop position4 steps
Hold the needle-position button for about 3 seconds.
Two beeps confirm the stop position changes from down to up.
Repeat to return to down; one beep confirms it.
This setting beeps even when the buzzer is disabled.
Turning on/off the buzzer
Instructions from the manual
Turning on/off the buzzer4 steps
Hold the minus stitch-width key while switching on.
Startup is silent and the buzzer is off.
Repeat to restore the buzzer; the machine beeps once.
Needle-stop setting changes still beep.
Winding the bobbin
Instructions from the manual
Winding the bobbin18 steps
Use only the supplied plastic bobbin or the same SA156/SFB:XA5539-151/SFB type, 11.5 mm high.
SA156 is Class 15; older same-type bobbins without the b mark remain compatible.
Other bobbins may damage the machine.
Align the bobbin notch with the shaft spring and push the shaft right until it snaps in place.
Remove the spool cap and place the spool so thread unwinds forward from underneath.
Choose a cap that fits the spool and slide it fully right, rounded side left.
An undersized or incorrectly installed cap can trap thread and break the needle.
For the illustrated cross-wound spool, use the small cap with a small gap; for quick-unwinding metallic or transparent nylon thread, put the spool net over the spool and fold an overlong net to fit.
Pass thread under the thread guide and guide cover to the front, then under the bobbin-winding guide hook and counterclockwise under the pretension disk, pulling fully in.
Wind clockwise around the bobbin 5 or 6 times, pass through the guide slit in the winder seat and pull against its built-in cutter.
Do not omit this cut; tangling or needle breakage can result.
Set winding speed with the slider (right faster, left slower).
Use low speed for stretch thread such as transparent nylon.
Turn on and press Start/Stop, or use the foot controller when connected.
Stop with Start/Stop or by releasing the controller as soon as winding slows; continuing can damage the machine.
With transparent nylon, stop when the bobbin is only 1/2 to 2/3 full to avoid poor winding, damage or a stuck/broken bobbin.
Cut the thread, slide the shaft fully left until it snaps, and remove the bobbin.
Restore the desired sewing-speed position and remove the bobbin-thread spool.
Installing the bobbin
Instructions from the manual
Installing the bobbin11 steps
Use a correctly wound same-type bobbin.
Switch on, press Needle position once or twice to raise the needle, then switch off before changing the bobbin.
Raise the presser-foot lever.
Slide the cover latch right and remove the bobbin cover.
Insert the bobbin with thread unwinding to the left; the winding orientation and b mark can help check direction.
Hold the bobbin gently down with the right hand.
With the left, guide thread around the needle-plate-cover tab and through the slit, lightly pulling so it enters the bobbin-case tension spring.
Simply laying thread in the slit is insufficient.
Continue through the slit and cut with its cutter, then insert the cover tab into the notch and gently press the cover right side down.
Sewing can begin without pulling up bobbin thread.
For gathering or free-motion starting-thread finishing, use Pulling up the bobbin thread first.
Threading the upper thread
Instructions from the manual
Threading the upper thread20 steps
Use compatible needle/thread combinations; never use thread weight 20 or lower.
Raise the presser-foot lever to release tension.
Switch on and press Needle position until the needle is highest and the handwheel mark is at the top, then switch off before threading.
Set the spool so thread unwinds forward from underneath.
Fit the correct-size cap fully right, rounded side left.
Incorrect spool/cap installation can tangle thread and break the needle.
With the right hand keeping thread taut, pass thread under the guide and guide cover using the left hand.
Follow the threading channel and ensure thread enters the take-up lever.
Slide thread behind the needle-bar guide and to the left of its tab.
The threader accepts 75/11–100/16 needles; it cannot be used with wing or twin needles, and is not recommended for transparent nylon monofilament or specialty threads.
If incompatible, keep switched off and thread the needle front to back by hand.
For the threader, pull thread left under the notch and firmly front to back into the slit of guide disk 7.
Cut with the left-side cutter.
If thread cannot be cut, lower the foot so it is held, cut and continue with lowering the threader lever.
With quick-unwinding metallic thread, leave about 8 cm instead of using the cutter.
Lower the presser foot, then lower the threader lever fully so the hook turns through the eye.
Slowly raise the lever and gently pull the thread end or loop through the eye.
If the threader cannot reach the eye, check the needle is highest and the handwheel mark is at the top.
Raise the presser foot, pass the end under it and draw about 5 cm toward the rear.
Turn on the machine only after threading is complete.
Pulling up the bobbin thread
Instructions from the manual
Pulling up the bobbin thread7 steps
For gathering or finishing starting thread in free-motion quilting, thread the upper thread first, then install the bobbin with the machine off following the installation instructions through placing it in the case.
Pass bobbin thread through its slot without cutting it.
Switch on.
Hold the upper thread lightly in the left hand and press Needle position twice to lower and raise the needle.
Gently pull the upper thread to bring up the bobbin loop.
Pass bobbin thread under the foot and draw it about 10 cm to the back, even with the upper thread.
Refit the bobbin cover.
Fabric/thread/needle combinations
Instructions from the manual
Fabric/Thread/Needle Combinations14 steps
Use household machine needles 65/9–100/16 and thread weights 30–90; never use 20 weight or lower.
Larger needle numbers mean larger needles; smaller thread numbers mean heavier thread.
Trial sew the actual fabric type and number of layers.
Use fine needles/thread and shorter stitches for light fabric, larger needles/heavier thread and longer stitches for heavy fabric.
Light fabrics: polyester 60–90 or cotton/silk 50–80, needle 65/9–75/11, length 1.8–2.5 mm.
Medium: polyester 60–90 or cotton/silk 50–60, needle 75/11–90/14, length 2–3 mm.
For denim 12 oz or more or canvas with 30 weight polyester/cotton, use 100/16; heavy-fabric length 2.5–4 mm.
Other listed heavyweight combinations use polyester 60 or cotton/silk 30–50 with 90/14–100/16.
Stretch jersey, tricot, T-shirt, fleece or interlock:50 weight polyester/cotton/silk and 75/11–90/14 ballpoint needle.
Set length for fabric thickness.
For topstitching, use 30 weight polyester/cotton with 90/14–100/16, or 50–60 weight with 75/11–90/14.
For transparent nylon, use a household topstitching needle regardless of fabric.
For decorative patterns, use #50–60 thread and 90/14 gold ballpoint on light, medium or stretch fabrics, or 90/14 household needle on heavy fabrics.
Wrong combinations can cause needle bending/breakage, uneven or puckered stitches and skipped stitches.
Checking the needle
Instructions from the manual
Checking the needle3 steps
Rest the flat side on a flat surface and check that the gap is even.
Use only straight, recommended household needles; never use a bent needle.
Replace for unusual sound entering fabric, a possibly dull or broken tip, skipped stitches or a possibly bent needle, and generally after completing a project such as a garment.
Replacing the needle
Instructions from the manual
Replacing the needle9 steps
Press Needle position once or twice to raise the needle.
Cover the plate opening with fabric or paper so a dropped needle cannot fall into the machine.
Switch off.
Hold the needle with the left hand and loosen its clamp screw toward you, counterclockwise, with the screwdriver.
Do not use excessive force.
Remove the needle.
Insert a straight new needle fully against the stopper with its flat side rearward.
Tighten clockwise with the screwdriver without excessive force; insecure insertion or tightening can break the needle.
Turn on only after replacement.
Replacing the presser foot
Instructions from the manual
Replacing the presser foot6 steps
Press Needle position once or twice to raise the needle, then switch off and raise the foot lever.
Press the black button behind the holder to release the foot.
Choose the machine-specific foot required by the stitch/display window; a wrong foot can break the needle.
Place its pin under the holder notch and lower the lever slowly until it snaps in.
Raise the lever and verify the foot is securely attached, then switch on.
Zipper and quilting-foot symbols may not appear in the display; use the stitch chart.
Removing and attaching the presser foot holder
Instructions from the manual
Removing and attaching the presser foot holder5 steps
Switch off and remove the presser foot.
Loosen the holder screw toward the back, counterclockwise, with the screwdriver; the disc screwdriver can also be used.
To refit, keep switched off, raise the foot lever and align the holder notch with the screw.
Hold it in place with the right hand and tighten toward you, clockwise, with the left-hand screwdriver.
Secure tightening prevents the holder falling and the needle striking it.
Basic sewing
Instructions from the manual
Basic sewing13 steps
Prepare needle/thread for the fabric, replace the needle if needed, wind/install the bobbin and thread the upper thread using the reviewed instructions.
Trial sew with matching scrap fabric and thread.
Turn the selection dial to the desired A16 stitch 01–16.
Check the required foot in its stitch-pattern window and attach it with the machine off.
Adjust width/length if needed and use foot J for this basic procedure.
Place fabric under the foot, hold fabric/thread in the left hand and turn the handwheel toward you or press Needle position to lower the needle at the starting point.
Lower the foot lever.
Set speed with the slider and press Start/Stop, or slowly depress the connected foot controller.
Guide fabric gently; keep hands clear of moving parts and do not force it or stitch over pins.
Press Start/Stop again, or release the controller, to stop.
Raise the needle with Needle position, raise the foot and remove fabric.
Pull left and cut with the thread cutter.
Inspect the finish and adjust tension if needed.
Using the foot controller
Instructions from the manual
Using the foot controller4 steps
Switch off before inserting the controller plug into its jack.
Switch on, slowly depress the controller to sew, and release it to stop.
The speed slider sets the controller maximum.
With the controller connected, Start/Stop cannot be used; it can also start/stop bobbin winding.
Sewing reverse/reinforcement stitches
Instructions from the manual
Sewing reverse/reinforcement stitches4 steps
Reverse stitches run backward; reinforcement stitches repeat 3–5 times in one place.
On A16 stitches 01, 02, 04 and 09, holding Reverse sews backward; on other stitches it reinforces in place.
Holding Reinforcement sews 3–5 stitches in place with any stitch.
The table distinguishes finishing a complete decorative pattern on larger models; A16 has no separate decorative-pattern bank.
Automatic reverse/reinforcement stitching
Instructions from the manual
Automatic reverse/reinforcement stitching11 steps
Select the stitch, then press Automatic reverse/reinforcement before sewing.
Its indicator appears.
Position fabric and press Start/Stop; reverse or reinforcement stitches are sewn automatically at the beginning, then normal sewing continues.
At the end, press Reverse or Reinforcement.
With a reverse-stitch pattern, Reverse reverses and stops, while Reinforcement reinforces and stops; beginning stitches are reverse in both cases.
With a reinforcement-stitch pattern, the beginning reinforces.
Reverse reverses and stops unless reinforcement priority is on; Reinforcement reinforces and stops.
With other stitch types, both buttons reinforce and stop.
Some stitches, such as buttonholes and bar tacks, automatically enable this function because their beginning requires reinforcement.
Switching off disables the manually selected automatic setting.
Do not use automatic reverse/reinforcement with A16 patchwork, piecing, walking-foot or free-motion-quilting alternatives where the manual expressly prohibits it.
Reinforcement priority
Instructions from the manual
Reinforcement priority5 steps
Switch off.
Hold Reinforcement while switching on, then press minus or plus to change the displayed setting from OFF to ON.
Switch off and back on.
Reinforcement replaces reverse stitches at the beginning and/or end of a reinforcement-stitch pattern even when Reverse is used.
Repeat the operation to disable it.
Setting the stitch width/stitch length
Instructions from the manual
Setting the stitch width/stitch length6 steps
Use minus/plus stitch-width keys to narrow/widen and stitch-length keys to shorten/lengthen.
Each stitch has preset defaults; a changed setting loses the surrounding default mark, which returns when reset.
Switch off or select another stitch to restore defaults.
For straight and triple-stretch stitches, width changes the needle position: left for smaller, right for larger settings.
After width adjustment, slowly turn the handwheel toward you and check needle clearance from the foot.
Increase length if stitches bunch; continuing can bend or break the needle.
Adjusting the thread tension
Instructions from the manual
Adjusting the thread tension8 steps
Correct upper and bobbin threading first.
Test on scrap matching the project fabric; tension depends on fabric and thread.
Correct ordinary tension locks threads near the fabric center, with only top thread visible above and bobbin thread below.
If bobbin thread appears on top, loosen upper tension by turning the dial counterclockwise.
Incorrect bobbin threading can cause the same symptom: reinstall it correctly.
If top thread appears underneath, tighten by turning clockwise.
Incorrect upper threading can cause looseness: rethread it.
If correct tension cannot be achieved, rethread both paths before readjusting.
Trial sewing
Instructions from the manual
Trial sewing3 steps
Trial sew with scrap fabric and thread matching the project and the same number of layers.
Adjust tension, width and length while checking the result.
Fabric thickness and stabilizer also affect stitching; use stabilizer where satin stitches shrink or bunch.
Changing the sewing direction
Instructions from the manual
Changing the sewing direction2 steps
Stop at the corner with the needle down in the fabric; if it stopped up, press Needle position to lower it.
Raise the foot, pivot fabric around the needle, lower the foot and continue.
Sewing curves
Instructions from the manual
Sewing curvesView
Sew slowly, changing direction gradually. For zigzag along a curve, use a shorter stitch for a finer result.
Sewing cylindrical pieces
Instructions from the manual
Sewing cylindrical piecesView
Pull the flat bed attachment left to expose the free arm. Slide the sleeve cuff or pant leg onto it and sew from the top. Refit the attachment after finishing.
Sewing an even seam allowance
Instructions from the manual
Sewing an even seam allowance7 steps
Keep the seam allowance to the right of the foot and align the fabric edge with the foot edge or needle-plate guide.
With left straight stitch and width 0, the needle-to-right-foot-edge distance is 12 mm.
Width 2.0 gives 10 mm, width 5.5 gives 6.5 mm, and width 7.0 gives 5 mm.
Changing width changes the straight-stitch needle position.
Needle-plate markings measure from the left-needle straight-stitch position, width 0.
The upper scale intervals are 1/8 inch (3 mm); grid intervals are 5 mm.
To use the marking on foot J for an approximately 5 mm seam allowance, select straight stitch and width 2.0 mm.
Sewing thick fabrics
Instructions from the manual
Sewing thick fabrics5 steps
Raise the foot lever to its highest position to insert thick layers.
Do not sew material thicker than 6 mm or force thick fabric; the needle may bend or break.
If foot J is slanted and will not feed at the start, raise the lever, position fabric, hold the foot level and press its black locking pin on the left while lowering the lever.
Release the pin; the foot stays level and returns to its original angle after the seam.
For large misalignment, place paper or fabric of the same thickness under the foot heel before starting.
Sewing thin fabrics
Instructions from the manual
Sewing thin fabrics2 steps
For thin fabric such as chiffon, use a fine needle and move it to the furthest left or right position to prevent fabric entering the feed-dog area.
If fabric still feeds poorly, stitches misalign or shrink, sew with non-woven water-soluble stabilizer underneath.
Sewing stretch fabrics
Instructions from the manual
Sewing stretch fabrics4 steps
Baste pieces together and sew without stretching them.
If stitches misalign, use non-woven water-soluble stabilizer underneath, following its manufacturer instructions because it may not suit every fabric.
Use a gold ballpoint needle for knits.
The A16 recommended stitch numbers are 10, 03 and 09.
Sewing leathers or vinyl fabrics
Instructions from the manual
Sewing leathers or vinyl fabrics4 steps
If fabric sticks to the foot, use the separately sold walking foot or non-stick foot.
If it sticks to the flat bed attachment, put copy or tracing paper over the attachment without covering the needle plate so the paper is not sewn into the work.
Use the walking foot only with straight or zigzag patterns, never reverse stitching, and sew at slow to medium speed.
Test scrap leather/vinyl first to check for foot marks.
Sewing hook-and-loop fastener tape
Instructions from the manual
Sewing hook-and-loop fastener tape5 steps
Use only adhesive-free tape intended for sewing;baste it and fabric together.
Glue sticking to the needle or bobbin case can cause malfunction.
Turn the handwheel to check penetration and lower the needle into the tape before sewing its edge slowly.
If it will not penetrate, fit the needle appropriate for thicker material.
A 65/9–75/11 fine needle can bend or break.
Using overcasting foot “g”
Instructions from the manual
Using overcasting foot G6 steps
Switch off before fitting overcasting foot G.
For A16 select 05(light/medium fabric) or 06(heavy fabric); other models’ additional patterns do not apply.
Place the fabric edge against the guide and lower the foot.
Turn the handwheel toward you to ensure the needle clears the foot center bar, then sew with the edge against the guide.
Stop, raise foot and needle, and remove fabric toward the back, never sideways or forward.
If thread is tangled on the foot, remove it before raising the lever and removing the foot to avoid damage.
Using zigzag foot “j”
Instructions from the manual
Using zigzag foot J for overcastingView
Fit foot J with power off, then select A16 stitch 04 or 09. Sew along the cut edge with the needle falling just outside the fabric on the right.
Blind hem stitching
Instructions from the manual
Blind Hem Stitching13 steps
Turn the garment inside out, fold the hem to its desired length and press.
Mark about 5 mm from the edge with tailor’s chalk and baste.
Fold inward along the basting, unfold the edge and place wrong side up as illustrated.
Fit foot R with power off and select 07 for woven fabric or 08 for stretch.
Remove the flat bed attachment and slide the garment onto the free arm; confirm it can feed.
Very small or short cylinders may not feed satisfactorily.
Put the folded hem edge against the foot guide and lower the lever.
Raise the needle before adjusting width so it only slightly catches the fold; the blind-hem width setting is neither millimeters nor inches.
Sew slowly with the fold against the guide.
A left needle drop that misses the fold cannot hem; catching too much leaves a large visible seam and prevents unfolding.
Trial sew first.
Stop, raise foot and needle, and pull fabric toward the back to avoid foot damage.
Remove the basting and turn right side out.
Buttonhole sewing
Instructions from the manual
Buttonhole sewing18 steps
Trial sew on matching scrap and check width, length and the intended button.
Maximum buttonhole length is about 28 mm, including button diameter plus thickness.
Mark the buttonhole position and length with chalk.
Pull out foot A’s guide plate and insert the button.
If it does not fit, set the plate to diameter plus thickness using the 5 mm-scale intervals;15 mm diameter plus 10 mm thickness gives 25 mm.
Fit foot A with power off, passing the upper thread through its hole and underneath before attachment.
Select A16 stitch 14 for narrow squared, 15 for narrow rounded, or 16 for keyhole buttonholes.
Align the front fabric mark with the red foot-side marks and lower the foot.
Do not push its front or the bar tack may be wrongly sized.
If alignment is difficult, turn the handwheel slowly to check the needle drop and align the mark there.
Lower the buttonhole lever fully behind the foot bracket.
Hold the upper-thread end gently in the left hand and start.
Sewing runs front to back, finishes with reinforcement and stops automatically.
Raise the needle with Needle position, raise the foot, remove the work and cut the threads.
Return the buttonhole lever to its original raised position.
Place a pin inside one end bar tack as a cutting stop.
Cut toward it with the seam ripper, keeping hands out of the cutting direction and using the tool only as intended.
For a keyhole, use an eyelet punch with thick protective paper under the fabric before opening the rest with the ripper.
Button sewing
Instructions from the manual
Button sewing11 steps
Measure the button-hole spacing.
Raise the foot lever and slide the rear feed-dog switch left as viewed from the rear to lower the feed dogs.
Fit foot M with power off and select A16 zigzag 04.
Set width to the hole spacing.
Position the button and lower the foot.
Turn the handwheel toward you to confirm the needle enters both holes without touching the button; remeasure and adjust width if needed.
Sew about 10 stitches slowly with the speed slider left.
For 4-hole buttons, sew the nearest pair first, then slide the work and sew the rear pair.
Cut the starting top/bobbin threads.
Pull the finishing top thread to the wrong side and tie it to the bobbin thread.
Return the rear feed switch right and turn the handwheel to raise the feed dogs; they also come up when sewing resumes.
Attaching a shank to a button
Instructions from the manual
Attaching a shank to a button4 steps
Put the button into foot M and pull its shank lever toward you.
Sew with space between the button and fabric.
Leave a generous top-thread tail, wrap it around the threads between button and fabric and tie it to the starting top thread.
Tie the finishing and starting bobbin threads together underneath, and trim excess.
Inserting a centered zipper
Instructions from the manual
Inserting a centered zipper11 steps
Fit foot J with power off.
With fabric right sides together, sew straight stitches to the zipper opening and reverse to secure there.
Continue to the fabric edge with basting, and press the seam allowances open on the wrong side.
Align the zipper center to the seam and baste it to the allowance.
Remove about 5 cm of the outer basting end.
Fit foot Ito its right pin with power off.
Select A16 center straight stitch 02; never use a different stitch with this foot.
Turn the handwheel toward you to check the needle clears both foot and zipper.
Topstitch around the zipper.
If the foot meets the slider, stop needle-down, raise the foot, move the slider clear, lower the foot and continue.
Remove the basting.
Appliqué stitching
Instructions from the manual
Appliqué stitching7 steps
Baste or glue the appliqué to the base.
Keep glue out of the stitching path; glue on the needle or bobbin case can damage the machine.
Fit foot J with power off.
Use A16 blanket 11 or zigzag 04.
With 04, use Reinforcement rather than Reverse.
Turn the handwheel toward you and sew around the edge, placing the needle just outside the appliqué.
At corners, stop with the needle down just outside the edge, raise the foot, pivot and continue.
Patchwork (crazy quilt) stitching
Instructions from the manual
Patchwork (crazy quilt) stitching5 steps
Fold the top fabric edge and place it over the lower piece.
Fit foot J with power off.
For A16 use 04 and the Reinforcement button; do not use Reverse or automatic reverse/reinforcement.
Sew so the pattern spans both pieces.
Pin if needed, but never stitch over pins.
Piecing
Instructions from the manual
Piecing6 steps
Cut pieces with 6.5 mm seam allowances and baste or pin along the intended seam.
Fit foot J with power off.
For A16 select 02 and use Reinforcement; do not use Reverse or automatic reverse/reinforcement.
For a 6.5 mm allowance on the right, align the fabric with the right foot edge and set width 5.5 mm.
For the left, align the left foot edge and set width 1.5 mm.
Adjust width to change needle position and seam allowance.
Quilting
Instructions from the manual
Quilting11 steps
Baste the fabric layers with batting between.
The walking foot and quilting guide are separate purchases.
Use a 90/14 household needle.
Thread the needle manually with the walking foot attached, or thread it before fitting that foot.
Switch off before removing the foot and holder.
Hook the walking-foot fork onto the needle-clamp screw, lower the foot lever and tighten the holder screw securely with the screwdriver.
For A16 select 02 straight or 04 zigzag and use Reinforcement only; do not use Reverse or automatic reverse/reinforcement.
Turn the handwheel toward you to check needle clearance before sewing.
Test matching scrap first.
Sew at slow to medium speed, one hand either side of the foot, guiding evenly.
For parallel rows, insert the separately sold guide into the hole at the back of the walking foot or holder and align it with the previous seam.
Free motion quilting
Instructions from the manual
Free motion quilting10 steps
Use the separately sold quilting foot.
The foot controller is recommended for a consistent speed, with the speed slider limiting it.
Match fabric movement to sewing speed; moving fabric too fast can break the needle.
Slide the rear feed-dog switch left as viewed from behind.
For A16 select 02 or 04 and use Reinforcement; do not use Reverse or automatic reverse/reinforcement.
Switch off before removing the holder and fitting the quilting foot.
Place its pin above the needle-clamp screw and align its lower-left to the presser bar.
Keep the foot straight, hold it with the right hand and tighten the holder screw securely with the screwdriver in the left.
Use both hands to stretch fabric taut and move it steadily for roughly 2–2.5 mm stitches.
After sewing, slide the rear feed switch right and turn the handwheel to raise the feed dogs.
Elastic attaching
Instructions from the manual
Elastic attaching5 steps
Choose an appropriate elastic length; the finished cuff/waist dimensions equal its stretched length.
Pin the tape at several positions on the fabric wrong side for uniform distribution.
Fit foot J with power off and select A16 stitch 09.
Stretch the tape to the fabric length while sewing, holding the fabric behind the foot with the left hand and near the next front pin with the right.
Keep the needle clear of all pins.
Bar tack stitching
Instructions from the manual
Bar tack stitching8 steps
Set foot A’s button guide plate to the desired bar-tack length using its 5 mm scale intervals.
Maximum length is about 28 mm.
Pass the upper thread through the foot hole and under it before fitting foot A with power off.
Select A16 stitch 13.
Position the pocket opening toward you and lower the foot so the needle enters 2 mm in front of it.
Lower the buttonhole lever fully, hold the top-thread end gently and start sewing.
When finished, raise the foot, remove fabric and cut thread.
Return the buttonhole lever fully up.
Fagoting
Instructions from the manual
Fagoting5 steps
Iron the seam folds of both fabric pieces.
Baste them about 4 mm apart onto thin paper or water-soluble stabilizer; a drawn centerline makes guiding easier.
Fit foot J with power off, select A16 stitch 12 and width 7 mm.
Sew with the foot center over the gap so stitching catches both folds.
Remove the paper after sewing.
Smocking
Instructions from the manual
Smocking5 steps
Fit foot J with power off.
Select straight stitch, length 4 mm, and loosen tension.
Sew parallel basting rows 1 cm apart, pull bobbin threads to gather and press the gathers smooth.
Select A16 feather 12 and stitch between the straight rows.
Pull out the basting threads after the decorative stitching.
Using the twin needle
Instructions from the manual
Using the twin needle13 steps
Use only the specified 2/11 twin needle, X59296-121, and equal-thickness, equal-quality top threads.
Never use the automatic threader with it.
Switch off for needle/threading/foot changes and follow the reviewed needle-replacement sequence.
Route the first upper thread behind the needle-bar guide and thread the left needle front to back by hand.
Put the extra spool pin into its top hole and add the second spool.
Route the second thread normally but omit the needle-bar guide, and thread the right needle front to back by hand.
Attach foot J, then turn on.
A16 has no needle-mode selection key.
Its permitted twin-needle stitches are 02 at width 1–6 mm, and 03, 04, 09, 11 or 12 at width 5 mm or less.
Do not use other stitches.
After setting width, turn the handwheel toward you and ensure the needle clears the foot before starting.
Do not turn the fabric while both needles are down.
If stitching bunches, attach stabilizer; foot N is a larger-model alternative and is not the A16 foot.
Care and maintenance
Instructions from the manual
Cleaning the machine surface and LCD4 steps
Unplug before cleaning.
For the case, lightly dampen a cloth with neutral detergent, wring firmly and wipe, then wipe again with a dry cloth.
Clean the LCD only with a soft dry cloth.
Do not use damp cloths, organic solvents or detergents on the LCD.
Restrictions on oiling
Instructions from the manual
Restrictions on oiling3 steps
Do not oil the machine or bobbin case.
Factory-applied oil is sufficient and periodic user oiling is unnecessary.
For difficulty turning the handwheel or unusual noise, stop immediately and contact an authorized Brother dealer or service center.
Precautions on storing the machine
Instructions from the manual
Precautions on storing the machine3 steps
Avoid very high or low temperatures, rapid temperature changes, humidity/steam, flames, heaters, air conditioners, outdoors/direct sun, and very dusty or oily locations.
Condensation can cause rust or other damage.
Periodically turn on and use the machine during storage; extended disuse can reduce its efficiency.
Cleaning the race
Instructions from the manual
Cleaning the race13 steps
Raise the needle with Needle position, switch off and unplug the cord from the right-side power jack.
Raise the foot lever and remove needle, foot and holder using their reviewed instructions.
Remove the flat bed attachment if fitted, and the bobbin cover.
Place the right index finger at the lower latch area and left index finger in the rear cover notch, with the left thumb at the cover front.
Slide the needle-plate cover toward you to remove it.
Lift out the bobbin case.
Brush or vacuum lint/dust from the race and surrounding area; do not oil the case.
Reinsert the case with its triangle mark aligned to the machine circle.
Confirm alignment before seating.
Never use a scratched case; obtain a replacement through an authorized service center.
Insert the needle-plate-cover tabs into the plate and slide the cover back on.
Refit the bobbin cover.
An incorrectly seated case can break the needle.
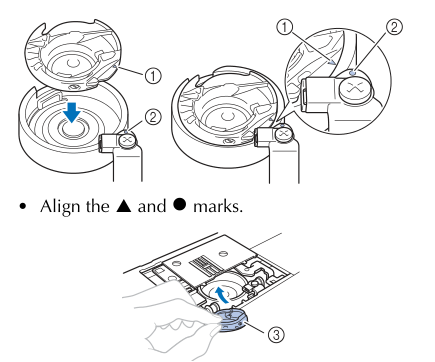
Bobbin-case removal and reinstallation: align the triangle and circle marks. Switch off and unplug before cleaning.
Diagram key
1: Triangle mark on the bobbin case
2: Circle mark on the machine; repeated in the alignment close-up
3: Bobbin case
Downward arrow: Insert the bobbin case with its triangle aligned with the machine circle
Curved arrow: Lift out the bobbin case as shown before cleaning
Controls and parts
See the manual diagrams 1 diagram
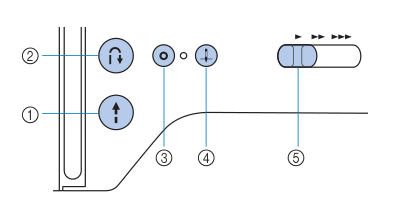
Operation buttons — shared manual diagram; the reinforcement LED applies only to models equipped with that LED.
Diagram key
1: Start/Stop button
2: Reverse stitch button
3: Reinforcement stitch button
4: Needle position button
5: Sewing speed controller
Speed marks: Move the controller right to sew faster or left to sew slower
Small circle: Shared diagram shows the reinforcement LED fitted only on models equipped with it; it lights while reinforcement stitches are sewn
Model details
Model and compatibility
Bobbin
Plastic SA156/SFB:XA5539-151/SFB type,11.5 mm high; SA156 is Class 15.
User oiling
Do not oil this machine; factory-applied oil makes periodic user oiling unnecessary.
Fabric thickness warning
Fabric thicker than 6 mm or forceful feeding can bend or break the needle.