MODEL REFERENCE
CASIO XJ-UT310WN
28 errors · 35 troubleshooting topics · 103 guides

The checks and guides below come from the official manuals for this model.
No matches for this wording. Try a light name, error code or a shorter phrase.
Errors and indicators
Light patterns and messages documented in the manualFind the indicator lights
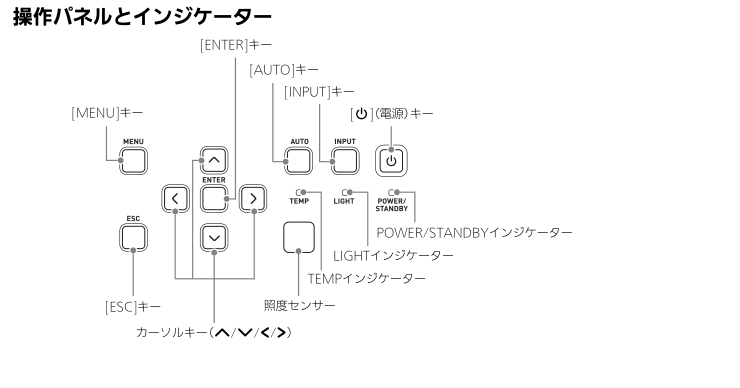
Diagram key
- [ENTER]キー: ENTER key.
- [AUTO]キー: AUTO key.
- [INPUT]キー: INPUT key.
- [P](電源)キー: Device Power key.
- [MENU]キー: MENU key.
- カーソルキー: Four cursor direction keys: Up, Down, Left and Right.
- [ESC]キー: ESC key.
- POWER/STANDBYインジケーター: POWER/STANDBY indicator.
- LIGHTインジケーター: LIGHT indicator.
- TEMPインジケーター: TEMP indicator.
- 照度センサー: Illumination sensor.
—No files to display
Folder has no displayable file: The selected folder contains no displayable file or folder. Check its contents on a computer and use the complete supported-format requirements.
—This ECA or PtG file cannot be played
Possibly damaged presentation file: Check playback in EZ-Converter FA on a computer.
—This image file cannot be displayed2 checks
—This movie file cannot be played2 checks
—This PDF file cannot be displayed
Unsupported PDF version: Use PDF 1.4.
—Internal memory cannot be accessed2 checks
—Internal memory is full
Insufficient free space: Delete unneeded files.
—This file format is not supported
Unsupported format: Use a supported file format.
—File not found
File or file-system problem: Internal memory or USB memory may contain no files, or its file system may be abnormal. Check the storage contents and file system on a computer.
—High internal temperature warning2 checks
—Overheating shuts the projector down2 checks
—Fan error shuts the projector down
POWER red, LIGHT red and TEMP red. Before disconnecting power after an error, wait until the fan stops. Press ESC to dismiss a warning message.Documented indicator/message state: Wait for POWER/STANDBY to become steady red and for the fan to stop. Unplug the cord, wait until the indicators go out and a little longer, reconnect and turn power on again. If the error repeats, contact the dealer or repair service.
—System error shuts the projector down
POWER red, TEMP red; LIGHT unspecified. Before disconnecting power after an error, wait until the fan stops. Press ESC to dismiss a warning message.Documented indicator/message state: Wait for POWER/STANDBY to become steady red and for the fan to stop. Unplug the cord, wait until the indicators go out and a little longer, reconnect and turn power on again. If the error repeats, contact the dealer or repair service.
—System error may disable some functions
POWER is green; LIGHT and TEMP are unspecified. The warning says a system error may prevent the audio function from operating normally. Turn power off. Wait for the fan to stop, unplug, wait until the indicators go out and a little longer, then reconnect and turn on. If the error repeats, contact the dealer or repair service.Documented indicator/message state: Turn power off. Wait for the fan to stop, unplug, wait until the indicators go out and a little longer, then reconnect and turn on. If the error repeats, contact the dealer or repair service.
—USB or LAN port error
POWER green; LIGHT and TEMP unspecified. The affected connection is disconnected. Before disconnecting power after an error, wait until the fan stops. Press ESC to dismiss a warning message.Documented indicator/message state: Turn the projector off and on again. If the error repeats, contact the dealer or repair service.
—Shutdown may be caused by external electrical noise
POWER red, TEMP red; LIGHT unspecified. No warning message is specified. Before disconnecting power after an error, wait until the fan stops. Press ESC to dismiss a warning message.Documented indicator/message state: Wait for POWER/STANDBY to become steady red and for the fan to stop. Unplug the cord, wait until the indicators go out and a little longer, reconnect and turn power on again. If the error repeats, contact the dealer or repair service.
—Light-source unit fails to light or goes out
POWER red; LIGHT and TEMP flash red at about 0.5-second intervals. Before disconnecting power after an error, wait until the fan stops. Press ESC to dismiss a warning message.Documented indicator/message state: Wait for POWER/STANDBY to become steady red and for the fan to stop. Unplug the cord, wait until the indicators go out and a little longer, reconnect and turn power on again. If the error repeats, contact the dealer or repair service.
—Internal memory error shuts the projector down
POWER red; LIGHT off or flashing red; TEMP flashes red at about 2-second intervals. Before disconnecting power after an error, wait until the fan stops. Press ESC to dismiss a warning message.Documented indicator/message state: Wait for POWER/STANDBY to become steady red and for the fan to stop. Unplug the cord, wait until the indicators go out and a little longer, reconnect and turn power on again. If the error repeats, contact the dealer or repair service.
—Light-source unit cover detected open
POWER red; TEMP flashes orange at about 1-second intervals; LIGHT unspecified. Before disconnecting power after an error, wait until the fan stops. Press ESC to dismiss a warning message.Documented indicator/message state: Wait for POWER/STANDBY to become steady red and the fan to stop, then unplug. Check that the light-source unit cover is closed. Reconnect and turn on; if the error repeats, contact the dealer or repair service. The guide does not authorize opening the case or internal repair.
ID-01Firmware file format problem
Firmware data may be damaged: Download the correct exact-model firmware again and repeat the full reviewed firmware procedure.
ID-02Flash Loader cannot communicate with the projector3 checks
ID-03Firmware is not a newer ROM version
Same or older firmware selected: Use a newer applicable firmware version, after checking the projector version.
ID-04Firmware ROM belongs to another model
Wrong model firmware: Use the correct exact-model firmware and repeat the reviewed installation procedure.
ID-01Logo header file format problem
Header data may be damaged: Download the correct exact-model logo header again and repeat the reviewed logo transfer.
ID-02LOGO Loader cannot communicate with the projector3 checks
ID-04Logo header belongs to another model
Wrong model header: Download the header for the exact projector and repeat the reviewed logo-transfer procedure.
ID-05Logo image is too large
Image exceeds the supported pixel dimensions: Use a supported RGB 24-bit BMP from 640 × 480 up to 1280 × 800 pixels and retry.
ID-06Logo image file type is unsupported
Wrong image format: Use a supported RGB 24-bit BMP and retry.
Troubleshooting
Find the problem you are experiencingUSB memory does not start File Viewer2 checks
- Storage format
- Use FAT or FAT32 formatted storage.
- Plug and Play is Off
- Set Plug and Play to On if automatic File Viewer startup is required.
Some folders or files are not listed1 check
- Too many entries in one folder
- Reduce the number of files or folders; folders containing 1000 or more entries are not displayed completely.
A drive in a hub or card reader is not shown1 check
- More than four drives are attached
- The projector recognises a maximum of four drives; reduce the connected drives.
Digital-camera files cannot be projected2 checks
- Camera USB mode
- Set the camera to USB mass-storage mode using its own instructions.
- Camera lacks mass-storage mode
- A camera without USB mass-storage support cannot be used for this connection.
A question-mark thumbnail appears1 check
- Unsupported image
- Use an image format supported by File Viewer.
Indicators during AC connection1 check
- Documented normal indicator combination
- POWER is red, and LIGHT and TEMP are orange while preparing standby.
Red POWER with LIGHT and TEMP off1 check
- Documented normal indicator combination
- The projector is in standby.
Flashing green POWER with LIGHT and TEMP orange1 check
- Documented normal indicator combination
- The projector is warming up.
Green POWER with LIGHT and TEMP off1 check
- Documented normal indicator combination
- The projector is ready with Eco mode Off.
Green POWER and LIGHT with TEMP off1 check
- Documented normal indicator combination
- The projector is ready with Eco mode On.
Flashing red POWER with LIGHT and TEMP off1 check
- Documented normal indicator combination
- The projector is processing shutdown.
Power will not turn on2 checks
- POWER/STANDBY does not light
- Check that the power cord is correctly connected.
- TEMP or LIGHT stays lit or flashing
- Use the reviewed error-indicator table. If it still indicates an error, consult the dealer or repair service.
No image or incorrect projection3 checks
- Computer or video source is not running
- Turn on and operate the connected source normally.
- Wrong projector input
- Choose the input matching the actual connection.
- Component output is not supported by this projector
- Use the source Video or S-video connection instead.
Picture color or display is abnormal1 check
- RGB/component auto-identification failed
- Set the corresponding COMPUTER1 or COMPUTER2 input explicitly to RGB or Component to match the source.
There is no sound4 checks
- Projector volume is too low or muted
- Use VOLUME +/− and the reviewed volume/mute dialogue to raise or restore sound.
- Source volume is too low or absent
- Check volume and audio output on the source device.
- Audio cable is not correctly connected
- Check the corresponding AUDIO IN connection.
- HDMI, Viewer, Network or USB Display output is set to Line
- Set Device settings 2, Audio output to Speaker to use the built-in speaker.
Projected colors do not look right3 checks
- Brightness needs adjustment
- Use FUNC, Brightness, ENTER, Left/Right and ESC.
- Color mode needs adjustment
- Use FUNC, Color mode, ENTER, Up/Down, ENTER and ESC. Color-mode adjustment requires Eco On and normal rather than 3D input mode.
- Color balance needs adjustment
- Use MENU, Image adjustment 1, Color balance to adjust the image.
Text or image is blurred3 checks
- Focus is incorrect
- Adjust focus.
- RGB frequency or phase is unsuitable
- With RGB input selected, press AUTO to adjust automatically.
- Automatic adjustment is insufficient
- Adjust Image adjustment 2 frequency and phase for RGB input.
A password is requested1 check
- Password protection is enabled
- Enter the correct projector password; use the documented service route if it is lost.
Remote does not operate2 checks
- Remote batteries are exhausted
- Replace them with new alkaline batteries with correct polarity.
- Remote is outside range
- Point at the receiver from within about 5 m.
TEMP or LIGHT is lit or flashing1 check
- An error indicator is active
- Use the complete reviewed error-indicator table.
The light source does not light1 check
- Light-source unit has failed or reached replacement condition
- Arrange service through the dealer or repair service; do not replace the unit yourself.
The projector unexpectedly restarts1 check
- Rare automatic restart
- An occasional restart may occur during internal processing and is not necessarily a fault. If it happens repeatedly, contact the dealer or repair service.
Problem remains after the troubleshooting checks1 check
- Applicable checks did not restore operation
- If the problem remains after the applicable checks, disconnect the power cord and leave the projector for at least 10 minutes, then reconnect and turn on.
- For an error condition, wait until the fan has stopped before unplugging, as the error table requires.
- If operation is still abnormal, contact the dealer or repair service.
Computer cannot connect wirelessly6 checks
- Another wireless utility is running
- Close the other wireless connection utility before Network Connection.
- Distance or obstructions
- Move the computer and projector closer and remove obstructions.
- Radio interference
- Move away from interfering radio equipment or change the wireless environment.
- Projector is not ready
- Confirm projector power is on.
- Adapter is not connected
- Confirm the supplied wireless adapter is correctly connected.
- Computer wireless is disabled
- Enable the computer wireless function.
Wireless connection is interrupted3 checks
- Wireless connection utility conflicts
- Close other wireless utilities.
- Distance or obstructions
- Reduce separation and remove obstructions.
- Other wireless equipment interferes
- Move away from sources of interference.
Connected computer image is not projected3 checks
- Wrong projector input
- Select Network input.
- Network Connection is not projecting
- Click its single-screen projection button.
- Image is frozen or blanked
- Press ESC to release freeze or blank.
Network image updates slowly3 checks
- Quality priority reduces speed
- Choose High speed in Network Connection.
- Other applications use resources
- Close unnecessary applications.
- Windows desktop effects
- For Windows Vista, 7, 8 or 8.1, the guide directs disabling Windows Aero. This is the edition’s wording; it gives no separate Windows 8 interface sequence.
Multiple projectors are difficult to distinguish1 check
- Projectors use the same SSID
- Assign distinct SSIDs to the projectors.
Administration page does not open1 check
- Browser proxy is enabled
- Disable the browser proxy setting using the browser help, then retry the projector page.
Administrator password is forgotten1 check
- Password cannot be recovered
- Reset projector network settings using the documented menu procedure; network configuration is reset too.
Uploaded filename is shortened1 check
- Filename is longer than 38 ASCII characters
- Use a filename of 38 or fewer ASCII characters.
An upload is interrupted1 check
- A partial file remains after interruption
- Delete the partial file and upload it again.
Browser file list becomes empty after disconnection1 check
- Network session was interrupted
- Close the browser, reconnect and log into File transfer again.
Files seem missing after transfer disconnection1 check
- Viewer did not refresh after interrupted transfer
- Exit File Viewer, turn the projector off and on again, then reopen the internal-memory viewer.
Guides
設置する
Instructions from the manualInstall with ventilation space5 steps
- Use a firm level desk or stand with enough surrounding space.
- Face the projection surface squarely and centre the projector on it.
- Keep at least 6 cm between the front projection side and the wall or screen, and at least 30 cm on the other sides.
- Do not obstruct intake or exhaust vents.
- Hot air from air conditioning or other equipment can cause a wavering picture; move the projector or change the airflow.
配線する
Instructions from the manualConnect power and source equipment6 steps
- Use the supplied power cord and RGB cable as appropriate.
- Connect a computer RGB output to COMPUTER IN 1 or 2, and its audio to the matching AUDIO IN 1 or 2.
- Connect HDMI video/audio to HDMI; composite video to VIDEO, or S-video to S-VIDEO, with the corresponding AUDIO IN R/L connections.
- USB-B connects a computer for USB display or internal storage.
- USB-A connects a supported memory device, calculator or supplied wireless adapter.
- Do not confuse these with the separate LOGO update connection.
リモコンに電池を入れるには
Instructions from the manualInstall or replace remote batteries6 steps
- Use alkaline batteries only.
- Open the battery cover on the back of the remote.
- Fit new batteries with the illustrated positive and negative polarity, then close the cover.
- Keep the remote within about 5 m of the projector receiver and point its emitter at the receiver.
- Prevent keys being held down in storage, which drains the batteries.
- Replace depleted batteries with new ones promptly.
入力ソースを切り替えるには
Instructions from the manualChoose an input source7 steps
- Press INPUT.
- Select Computer 1, Computer 2, Video, S-video, HDMI, Network or USB Display with Up/Down and ENTER for the corresponding input.
- For File Viewer, choose Viewer and ENTER, confirm File Viewer and ENTER.
- For the calculator tool, choose Viewer and ENTER, press Down to CASIO USB Tool and ENTER.
- The selected input name appears briefly.
- Without a signal, the no-input-signal message appears.
- The native image is 1280 × 800; use the documented resolution and aspect instructions for the source.
3d入力モードに切り替えるには
Instructions from the manualProject supported 3D input10 steps
- Use optional YA-G30 glasses.
- Computer analog RGB 3D requires CASIO 3D Converter playing converted 2D-to-3D or side-by-side material at 60/120 Hz.
- Composite/S-video requires field-sequential 3D material at 60 Hz.
- HDMI and component 3D are not supported.
- Press INPUT and change to Computer 1 RGB, Computer 2 RGB, Video or S-video.
- Use Up/Down to select Switch to 3D input mode and ENTER.
- In 3D mode HDMI, File Viewer, CASIO USB Tool, Network and USB Display cannot be selected; component signals at the computer inputs are wrongly interpreted as RGB.
- Use normal input mode whenever not projecting 3D.
- To return, press INPUT, select Switch to normal input mode with Up/Down and ENTER.
- If left/right 3D images are reversed, press ENTER in 3D input mode to swap them.
パソコンから内蔵メモリーにファイルをコピーするには
Instructions from the manualCopy files into internal memory15 steps
- The edition supports administrator login on Windows XP/Vista/7/8/8.1, or administrator/general-user login on Mac OS 10.6–10.9.
- Press MENU, select Multimedia settings with Down and ENTER, then Internal storage function with Down and ENTER.
- If its password is enabled, enter it and ENTER.
- At the message saying power will turn off to enter storage, press ENTER.
- Power goes off with POWER/STANDBY orange and TEMP red.
- Press device Power: POWER/STANDBY becomes green and TEMP stays red, with no projection.
- Remove all other removable media from the computer.
- Connect projector USB-B to computer USB.
- Open InternalMem: on Windows use AutoPlay, Open folder to view files, or Start, Computer and double-click InternalMem; on Mac double-click its desktop icon.
- Copy the required files.
- After all copying, use Windows Safely remove hardware and choose USB Flash Drive; wait for the safe-removal message.
- On Mac drag InternalMem to eject/trash and wait until its icon disappears.
- Disconnect USB at both ends.
- Restart the projector to leave storage mode and resume normal projection.
- Computer screens can vary with the operating system and settings.
内蔵メモリー上のファイルの投映を開始するには
Instructions from the manualProject internal-memory files4 steps
- Remove memory devices from projector USB-A.
- Press INPUT, select Viewer and ENTER, choose File Viewer and ENTER.
- Choose Presentation, PDF Viewer, Slide or Movie and press ENTER.
- Select the required file and use the corresponding reviewed file-playback instructions.
内蔵メモリーをフォーマットするには(windowsをご使用の場合
Instructions from the manualFormat internal memory on Windows6 steps
- Formatting deletes every file and folder in internal memory.
- Never format this memory with a Mac.
- Use Windows only.
- Follow the reviewed internal-memory copying procedure through connecting USB-B and opening InternalMem.
- Right-click the InternalMem drive, select Format, leave FAT32 and the other default settings, click Start and confirm OK.
- After formatting completes, close the dialogue, safely eject the drive, disconnect USB from both devices and restart the projector as in the copying procedure.
Usb接続したメモリーデバイス上のファイルを投映する
Instructions from the manualConnect supported external memory or a camera6 steps
- Use FAT or FAT32 storage.
- Insert a USB memory device into USB-A.
- For a memory card, insert the card into its USB card reader first, then connect the reader to USB-A.
- For a digital camera, set its USB mode to mass storage using its own instructions.
- Turn the camera off, connect it by USB to USB-A, then turn it on.
- A camera without USB mass-storage support cannot be used this way.
Usb接続したメモリーデバイス上のファイルの投映を開始するには
Instructions from the manualSelect an external drive and file8 steps
- Connect the memory device containing the files to USB-A.
- If the main File Viewer screen opens automatically, continue there.
- Otherwise press INPUT, select Viewer and ENTER, then File Viewer and ENTER.
- Select Presentation, PDF Viewer, Slide or Movie and press ENTER.
- Where a drive list appears, select the required drive and press ENTER, then choose the file and the appropriate reviewed playback procedure.
- Up to four drives are recognised when using a hub or multi-card reader.
- To change drives, press FUNC, choose Drive change and ENTER.
- If no connected drive is listed, NOUSB appears; repeat Drive change after connecting valid storage to return to the drive list.
プレゼンテーションファイルを投映するには
Instructions from the manualPlay a presentation file7 steps
- In File Viewer select Presentation and ENTER.
- Choose the ECA or PtG file with Up/Down and press ENTER or Play/Pause.
- Use Left or Previous for the previous page and Right or Next for the next page.
- Play/Pause pauses and resumes playback.
- Up or Rewind goes to the preceding animation break; Down or Fast-forward goes to the next animation break.
- For page thumbnails, press FUNC, select Page selection and ENTER, choose the thumbnail with the cursor keys and press ENTER.
- Press ESC to return to the file list; FUNC then ENTER returns to the main screen.
Pdfファイルを投映するには
Instructions from the manualView a PDF file6 steps
- In File Viewer select PDF Viewer and ENTER.
- Select the PDF with Up/Down and press ENTER or Play/Pause.
- Use Left or Previous for the previous page and Right or Next for the next.
- Press FUNC and choose the fit-to-screen-width item, then ENTER, to fit the width; choose the whole-page item and ENTER to show the whole page.
- For thumbnails, press FUNC, choose Page selection and ENTER, then select a thumbnail with the cursor keys and press ENTER.
- ESC returns to the file list; FUNC then ENTER returns to the main screen.
画像ファイルを投映するには
Instructions from the manualShow images and a slideshow7 steps
- In File Viewer select Slide and ENTER.
- Select an image with Up/Down and press ENTER to show it, or Play/Pause to start a slideshow from that image.
- Left or Previous shows the preceding image; Right or Next shows the following image.
- Rewind rotates a JPEG 90° left; Fast-forward rotates a JPEG 90° right.
- Rotation is available only for JPEG files.
- Play/Pause starts or pauses the slideshow.
- ESC returns to the file list; FUNC then ENTER returns to the main screen.
動画ファイルを投映するには
Instructions from the manualPlay a movie file10 steps
- In File Viewer select Movie and ENTER.
- Select the movie with Up/Down and press ENTER or Play/Pause.
- ENTER or Play/Pause pauses or resumes playback.
- To restart from the beginning, press FUNC, select Play from beginning and ENTER.
- FUNC and the time-display on/off item toggles elapsed and total time.
- Right or Fast-forward cycles forward speed through 2×, 8× and 32×; Left or Rewind cycles reverse speed through those speeds.
- Press ENTER or Play/Pause twice to return to normal playback from fast forward or reverse: the first press pauses.
- FUNC, the move-to-end item and ENTER moves to the final frame.
- ESC stops and returns to the file list; FUNC then ENTER returns to the main screen.
- High-bitrate files may not support every fast speed.
ファイル一覧表示中の各種操作
Instructions from the manualファイルビューアーの設定を行うには
Instructions from the manualChange File Viewer settings8 steps
- From the File Viewer main screen choose Viewer settings and ENTER.
- Select a setting with Up/Down and ENTER, change it with Left/Right, and press ESC when finished.
- File order may be ascending name (default), descending name, extension, newest date or oldest date.
- Startup view is list (default) or icons; thumbnail display defaults to On.
- Slide change is Manual (default) or Auto.
- Automatic interval choices are 5 seconds (default), 10 or 30 seconds, or 1 or 5 minutes.
- Slideshow and movie repeat defaults to No; movie sound defaults to On.
- Use the viewer reset item to restore its settings.
オートラン機能
Instructions from the manualAutorun images or a movie from external storage7 steps
- Enable Multimedia settings, Autorun, and set Plug and Play to On for external storage.
- Create a root folder named AUTORUNC, in uppercase, on the storage device.
- Put supported images or one supported movie in AUTORUNC.
- Multiple images run as a slideshow.
- If images and a movie are mixed, images take priority; do not put multiple movies there.
- Turn the projector on and connect the storage device to USB-A.
- Its AUTORUNC content is projected automatically.
内蔵メモリー上の画像ファイルまたは動画ファイルを自動投映する
Instructions from the manualAutorun internal-memory images or a movie6 steps
- Follow the reviewed internal-memory copying procedure through opening the drive.
- Create a root folder named AUTORUNC and copy the supported images or single movie into it.
- Images take priority over a movie if mixed.
- Safely eject, disconnect USB from both devices and restart as in the copying procedure.
- Enable Multimedia settings, Autorun.
- Turn the projector off, remove devices from USB-A, then turn it on to start internal autorun.
Powerpointファイルをeca(またはptg)ファイルに変換するには
Instructions from the manualConvert PowerPoint to ECA or PtG17 steps
- Prepare a PowerPoint 2003, 2007 or 2010 file.
- Start Windows and connect output USB storage if required.
- Start EZ-Converter FA; answer Yes to Windows 7 UAC, or Allow on Vista.
- Set output resolution and maximum animation duration as in the reviewed converter settings.
- Click Convert, select the PowerPoint file and Open.
- Choose the output drive and ECA or PtG format; ECA is the default.
- Files are saved in the ECA or PtG folder on the selected drive, or locally when no external drive is selected.
- With no removable drive, the default destination is the source PowerPoint folder; Browse changes that location.
- Input filename and output filename cannot be edited here, and output keeps the original base name.
- Click OK.
- The slideshow runs in real time during conversion; wait for completion, then close the completion dialogue or check the output with the converter player.
- To convert another file repeat the selection/settings steps; use the top-right exit button when finished.
- OLE objects and VBA are not converted.
- Timer and repeating animations are not reproduced.
- An animation exceeding the selected maximum is cut off; pauses become animation breaks.
- Effects with no change for three seconds form a break.
- Display resolution changes temporarily and is restored afterwards; Windows Vista/7 Aero is temporarily disabled.
Ecaファイル(またはptgファイル)の表示解像度を設定するには
Instructions from the manualSet converter resolution and animation duration4 steps
- Right-click the left side of the EZ-Converter FA window, choose Resolution and select 800 × 600, 1024 × 768, 1280 × 768 or 1280 × 800.
- Normally choose 1280 × 800 or 1280 × 768; use 1024 × 768 if conversion cannot use those resolutions.
- PtG output is limited to 1024 × 768 or 800 × 600.
- For maximum animation duration, right-click the left side, choose the animation-duration item, then 10, 20, 30 or 60 seconds.
Ecaファイル(またはptgファイル)をパソコン上で再生するには
Instructions from the manualCheck a converted presentation on the computer5 steps
- Click the EZ-Converter FA player button, then the open-folder button.
- Select the ECA or PtG file and Open to play it.
- Use the previous/next buttons for pages.
- Open the player menu, choose Slide list, select the thumbnail and OK to jump.
- The same menu supplies Help and Exit; the close/exit control or keyboard Escape also ends playback.
Usb接続でwindowsパソコンの画面をはじめて投映するには
Instructions from the manualStart USB Display on Windows for the first time7 steps
- The guide supports Windows XP SP3, Vista SP1 32-bit, Windows 7 SP1 32/64-bit, and Windows 8/8.1 64-bit, with USB 2.0 and administrator login; these are historical requirements.
- Press INPUT, choose USB Display with Up/Down and ENTER.
- Connect projector USB-B to the computer USB port.
- Run the application from the USB_DISPLAY virtual CD if it does not start automatically, using Windows AutoPlay as directed.
- Follow the installation prompts and start CASIO USB Display.
- Additional VAC is needed for XP audio if the computer lacks the volume mixer; VDD is needed for XP/Vista extended-screen display.
- Obtain the applicable drivers through official support.
Usb接続でmac osパソコンの画面をはじめて投映するには
Instructions from the manualStart USB Display on Mac for the first time6 steps
- The guide supports Mac OS 10.6–10.9 and USB 2.0; these are historical requirements.
- Press INPUT, choose USB Display and ENTER, then connect computer USB to projector USB-B.
- Open the USB_DISPLAY virtual CD, run MAC_USB_Display_V2.pkg, follow installation and restart the Mac.
- Start CASIO USB Display from the Dock.
- Soundflower supplies audio transfer and Syphon supplies the virtual extended-screen function; install the applicable supplementary software as directed.
- Extended-screen display is not supported on Mac OS 10.6.
Usb接続による投映中の各種操作
Instructions from the manualControl USB Display projection5 steps
- Use the CASIO USB Display window to start, pause or stop projection.
- Its function menu switches Audio on/off, Main or Extended screen, version information and exit.
- Minimize hides the window; close exits after confirmation.
- Audio transfer needs the additional drivers on the systems specified in the first-time procedures.
- The guide’s virtual extended-screen option is unavailable on Mac OS 10.6.
Usb接続でパソコンの画面を投映するには(2回目以降の操作)
Instructions from the manualUse USB Display again4 steps
- Turn on and start both projector and computer.
- Press INPUT, select USB Display and ENTER.
- Connect computer USB to projector USB-B.
- Allow the display application to start; if it does not, use Windows AutoPlay or the Mac CASIO USB Display Dock icon as directed.
関数電卓の画面を投映する
Instructions from the manualProject a supported calculator screen6 steps
- The guide lists fx-CG20, fx-9860G and fx-9860GII.
- Connect a supported calculator by USB to projector USB-A.
- Press INPUT, select Viewer and ENTER, then CASIO USB Tool and ENTER.
- Start projection from the calculator using its own manual.
- If projection is incorrect, unplug and reconnect the calculator USB cable.
- If that does not help, disconnect both devices, restart the projector, reconnect and try again.
手動で台形補正するには(keystone)
Instructions from the manualCorrect keystone manuallyView
Press KEYSTONE + or KEYSTONE − to correct trapezoidal distortion manually.
投映中の映像の一部を拡大するには
Instructions from the manualEnlarge and pan the projected image4 steps
- Press D-ZOOM to enlarge the centre one step.
- Press it again to increase magnification, or hold it to change magnification continuously.
- Use Up, Down, Left and Right to pan the enlarged image.
- Press ESC to leave enlargement.
音量を調整するには(volume)
Instructions from the manualAdjust or mute volume5 steps
- Press VOLUME + or VOLUME − to open the volume dialogue.
- VOLUME + increases and VOLUME − decreases volume.
- Press ESC when finished.
- To mute, open that volume dialogue and press ENTER.
- To restore sound, press VOLUME + or VOLUME −.
入力ソースからの映像と音声を一時的に遮断するには(blank)
Instructions from the manualBlank, freeze or automatically adjust the image4 steps
- Press BLANK to temporarily hide the image and mute sound; press BLANK again or ESC to restore them.
- Press FREEZE to hold the image; FREEZE again or ESC resumes normal projection.
- For RGB input only, press AUTO to adjust frequency and phase automatically.
- This automatic adjustment is not an HDMI or video-input operation.
投映画面の縦横比(アスペクト比)を切り替えるには(aspect)
Instructions from the manualChoose the image aspect ratio6 steps
- Press ASPECT to cycle the aspect modes for the selected source.
- Video, component and HDMI DTV use Standard, 16:9, 4:3 and Letterbox.
- RGB and HDMI PC use Standard, Full, 16:9, 4:3 and Real.
- Standard retains source proportions at maximum fit; Full fills the screen; 16:9 or 4:3 uses that ratio; Letterbox enlarges letterboxed material.
- Real displays source pixels directly, except sources below SVGA are enlarged to SVGA.
- Consider copyright restrictions when changing the proportions of copyrighted material.
映像の明るさを調節するには(func)
Instructions from the manualAdjust brightness through FUNCView
Press FUNC, select Brightness and ENTER. Use Left/Right to adjust brightness, then ESC to close.
映像に適した色調(カラーモード)を選ぶには(func)
Instructions from the manualChoose color mode through FUNC4 steps
- Press FUNC, choose Color mode and ENTER.
- Use Up/Down to choose a mode and press ENTER, then ESC to close.
- Color mode cannot be changed while Eco mode is Off.
- The exact-model support page also specifies normal input mode rather than 3D input mode for color-mode changes.
エコモード(eco)
Instructions from the manualChoose Eco and light-output priority9 steps
- Press ECO.
- Use Left/Right to choose On (Auto), On (Manual) or Off.
- On (Auto) uses the top illumination sensor to adjust brightness/color; do not cover it.
- Response varies with surroundings and installation.
- For On (Manual), press Down to the Eco level row, then Left/Right to adjust the balance.
- Fewer leaves prioritizes brightness; more leaves prioritizes lower power and quietness.
- Press ESC to close.
- Off prioritizes projection brightness; Bright/Normal is selected in Image adjustment 1.
- In 3D input mode the Eco level is fixed and Eco cannot be changed.
タイマーを表示するには
Instructions from the manualSet and run the presentation timer7 steps
- Press TIMER to display the timer.
- With Continuous display Off, it disappears after five seconds.
- Press TIMER twice if hidden, or once when visible, to open timer functions.
- Set position to one of the four corners (default bottom right), continuous display On/Off (default Off), and countdown duration from 5 to 60 minutes in five-minute increments (default 20).
- Choose Start to count down, Pause to pause, Resume to continue, or Reset to reset.
- ESC saves and closes the menu; Start can be selected before closing.
- At zero the timer turns red and counts elapsed time up to 60 minutes.
設定メニューを使う
Instructions from the manual設定メニュー項目一覧
Instructions from the manualAdjust image brightness, color and signal position9 steps
- In Image adjustment 1 set brightness and contrast.
- Video input also permits sharpness, saturation and tint; tint is for NTSC/NTSC4.43.
- Color modes are Standard (default), Graphics, Theater, Blackboard and Natural.
- Color balance permits Warm, Normal (default), Cool and individual RGB adjustment.
- With Eco Off, choose Bright or Normal (default).
- Reset Image adjustment 1 restores that section.
- Image adjustment 2 sets horizontal/vertical position for its indicated sources, RGB frequency and phase, and overscan from 0 to 5 (default 5) for component/video/HDMI DTV.
- If frequency adjustment loses the image, use AUTO for RGB.
- Reset that section with its own reset item.
Set signal identification and automatic operation6 steps
- For COMPUTER 1 or COMPUTER 2 choose Auto (default), RGB or Component according to the actual connected output.
- Video and S-video support Auto and the listed NTSC/PAL/SECAM systems.
- Signal-name display defaults to On.
- Device settings 1 includes automatic RGB adjustment (On by default), Eco mode, auto power-off at 5, 10 (default), 15, 20 or 30 minutes, or Off; password protection; and Direct power on (Off by default).
- Language offers the manual’s 24 choices.
- Use the relevant section reset.
画面設定→投映方法
Instructions from the manualSet projection, startup and blank screens7 steps
- In Screen settings choose Front (default) or Rear projection, and Ceiling On for inverted mounting or Off (default) for normal orientation.
- Startup screen may be Logo or None (default).
- No-signal screen may be Blue (default), Black or Logo.
- Blank screen may be Blue, Black (default) or Logo.
- A user logo requires the separately reviewed official logo-transfer procedure.
- Screen settings also contain keystone, aspect and digital screen shift.
- Use the section reset to reset screen settings.
機器設定2→プラグアンドプレイ
Instructions from the manualSet audio routing, altitude, standby outputs and captions8 steps
- Plug and Play defaults to On, except it does not apply in 3D input mode.
- For HDMI, Viewer, Network and USB Display audio choose Speaker (default) or Line.
- Set High altitude On at 1500–3000 m, Off below 1500 m; do not use above 3000 m.
- Panel lock is a separate reviewed procedure.
- Standby RGB/audio output uses COMPUTER IN 1, AUDIO IN 1 and MIC; it does not output COMPUTER IN 2 or AUDIO IN 2 in standby.
- Closed captions for video are Off (default) or CC1–CC4 and are not geometrically corrected by keystone correction.
- Microphone input level is 0 (mute) to 3.
- Multimedia settings include Autorun, Viewer function and Internal storage; Network settings are detailed in the separate network guide.
情報
Instructions from the manualRead projector information or reset settings4 steps
- Use Information to read input signal, resolution, horizontal/vertical frequency, scanning method, light-source usage and firmware version.
- Unit usage time cannot be reset.
- All reset restores settings except language, password, light-source usage, version and unit usage time.
- Use the specified reset item and confirmation.
デジタルスクリーンシフトで投映サイズや投映位置を調整するには
Instructions from the manualReduce and reposition the whole screen5 steps
- Press MENU and choose Screen settings, Digital screen shift, Change.
- Use D-ZOOM +/− as identified in this screen to set proportional size from 84% to 100%.
- At a size below 100%, use Up/Down/Left/Right to move the image.
- Press ESC and then MENU to finish.
- To reset, open Screen settings, Digital screen shift, Reset digital shift, press ENTER and confirm Yes.
パスワードを変更するには
Instructions from the manualChange the projector password13 steps
- One projector password protects power-on and internal-storage functions.
- Open MENU, Device settings 1, Password, and ENTER.
- Enter the current password using the remote keys and ENTER.
- The initial sequence is Up, Down, Left, Right, Up, Down, Left, Right.
- Choose Change password and ENTER.
- Enter up to eight key presses from INPUT, MENU, BLANK, FREEZE, ECO, VOLUME +/−, D-ZOOM +/−, KEYSTONE +/−, the four arrows, TIMER, AUTO, ASPECT or FUNC.
- Press ENTER, enter the same sequence again and ENTER.
- At the registered-success message press ESC.
- If it does not match, press ESC and retry from new-password entry.
- Keep a secure record.
- A lost password requires the authorized service or dealer, proof of identity and the projector; charges apply.
- Service resets settings except light-source usage.
- No user bypass is specified.
電源を入れた直後のパスワード保護設定を切り替えるには
Instructions from the manualEnable power-on or internal-storage password protection5 steps
- Open the password menu and authenticate using the reviewed password procedure.
- Choose Power-on password, or Internal storage password for that function, and set On or Off.
- Confirm the requested setting and close MENU.
- Both functions share the same projector password.
- If it is lost, use the authorized service route.
操作パネルロック
Instructions from the manualLock or unlock the projector control panel6 steps
- Press MENU, choose Device settings 2, Panel lock, and On.
- Confirm the lock prompt and close MENU.
- The device Power key remains usable; other device keys are locked.
- The remote remains usable, and ESC can dismiss a warning.
- To unlock without the remote, hold the device Down key until the unlock message appears.
- Alternatively use the remote menu to set Panel lock Off.
クリーニングについて
Instructions from the manualClean the case, lens and vents6 steps
- Unplug the power cord and wait until the projector has cooled before cleaning.
- Clean the exterior with a soft cloth; for heavy dirt, use a cloth wrung out after dampening with diluted mild detergent.
- Do not use benzine, alcohol, thinner or similar solvents.
- Clean the lens gently with a lens/glasses cleaning cloth or paper.
- Vacuum intake and exhaust openings when dirty; inspect and clean them regularly.
- Do not open the case for internal cleaning.
コンポーネントビデオ出力との接続
Instructions from the manualConnect component, composite and S-video equipment6 steps
- For analog component video connect Y to green, Cb/Pb to blue and Cr/Pr to red through the appropriate COMPUTER IN adapter cable.
- Use AUDIO IN 1 or 2 matching that COMPUTER input.
- Select the corresponding Component input.
- For composite video use the yellow VIDEO connection; for S-video use S-VIDEO.
- Connect the common red R/white L audio leads to AUDIO IN R/L.
- Select the connected video input.
Monitor out端子の利用について
Instructions from the manualUse MONITOR OUT and standby passthrough3 steps
- MONITOR OUT passes the selected COMPUTER 1 or COMPUTER 2 RGB input.
- With another input selected, it passes the most recently selected RGB source.
- When standby output is enabled, only COMPUTER IN 1, AUDIO IN 1 and MIC are passed; COMPUTER IN 2/AUDIO IN 2 are not standby outputs.
本機を天井から吊して設置する
Instructions from the manualPlan professional ceiling installation4 steps
- Ceiling installation must use the dedicated optional mount and be performed by an authorized specialist.
- Set ceiling projection for upside-down installation.
- Keep at least 1 m from fire alarms and observe the manual ventilation clearances.
- Check remote operation from the intended position before installation.
投映距離と投映サイズについて
Instructions from the manualCheck projection distance and supported signals4 steps
- Use the table as an approximate installation guide and check the actual image.
- For 50, 60, 80, 100 and 110-inch images, the front projection-side distances are approximately 6, 13, 27, 40 and 47 cm; corresponding screen-bottom heights are 24, 27, 32, 38 and 40 cm.
- Check the source against the guide’s RGB, HDMI, component, video and 3D signal tables.
- Even a listed signal may not display correctly on every source device.
本機とコンピューターをシリアル接続するには
Instructions from the manualControl through RS-232C11 steps
- Connect the computer to the projector RS-232C D-sub 9-pin female port with a crossover cable.
- Configure 19200 bit/s, 8 data bits, no parity, 1 stop bit and no flow control.
- Commands use ASCII parentheses.
- For example, read volume with (VOL?) and write it with (VOL0); a response such as (0-30,15) gives its range and current value.
- Wait for the projector to finish one command before sending the next.
- Invalid or out-of-range commands are ignored.
- When power is off, only power-state read, power-on write and light-source-hours read are supported.
- Blank and aspect commands need a valid input signal.
- Consult the complete command table for PWR, SRC, BLK, VOL, PST, ARZ, LMP, PMD, FRZ, KST, KSP/KSM, KEY, POS, APO, STS, VLP/VLM, MUT and MIC.
- KST numeric menu units are not physical degrees.
- STS values are serial status responses, not displayed error codes.
再生可能ファイル一覧
Instructions from the manualPrepare supported File Viewer formats8 steps
- Choose a supported file before starting File Viewer: baseline JPEG up to about 15 megapixels, progressive JPEG up to about 8 megapixels; PNG/GIF under 6 MB and about 8 megapixels; or 24-bit BMP under 6 MB and about 8 megapixels.
- Baseline JPEG can project at 1280 × 800; other image formats are limited to 1024 × 768.
- Transparent PNG/GIF regions appear black, and animated GIF appears as a still image.
- Movies: AVI up to 20 Mbps, 720/30p with MJPEG video and ADPCM audio; MOV up to 20 Mbps, 1080/30p with H.264 video and ADPCM or AAC audio; MP4 up to 20 Mbps, 1080/30p with H.264 and AAC.
- High-bitrate fast forward/reverse can be slower or interrupted; maximum-bitrate movies play normally but do not support fast forward/reverse.
- Presentations must be ECA or PtG made with EZ-Converter FA.
- PDF must be version 1.4.
- Copy files to internal memory by the reviewed USB procedure or the separate network file-transfer procedure.
安全上のご注意
Instructions from the manualStop for smoke, heat, odor or malfunction5 steps
- For smoke, unusual smell or abnormal heat, immediately unplug the power plug and contact the dealer or repair enquiry service.
- Do not continue using it.
- For a malfunction, liquid or foreign-object entry, or dropping/damage, turn power off, unplug and contact the dealer or repair service.
- Do not disassemble, modify or open the case: internal high voltage can cause shock, burns or injury.
- Supervise children who may approach or touch it.
Use the Japanese power supply and safe grounding10 steps
- This is the Japan-only domestic reference.
- Use the supplied cord with AC 100 V, 50/60 Hz.
- Do not substitute the international variant voltage.
- Connect grounding before plugging into the outlet; after unplugging, disconnect grounding.
- Do not overload outlets, use a damaged cord, pull or twist the cord, bundle it in use, trap it under a wall or furniture, or cover it with rugs.
- Do not heat or modify it, place heavy objects on it or use it with heating equipment.
- Keep the plug accessible for emergency disconnection.
- Do not touch the plug with wet hands.
- Keep liquids away.
- Contact service for a damaged cord; use the supplied cord only with this projector.
Protect eyes and keep ventilation unobstructed9 steps
- Never look into the lens or ventilation openings while the source is on.
- Do not touch the projection lens, obstruct the beam with an object or place a lens-like object such as an aquarium in front.
- Keep the front projection side at least 6 cm from the screen/wall and other sides at least 30 cm clear.
- Do not cover vents, put the projector in an enclosed space, or use it on bedding, towels, carpets or soft seating.
- Use a firm flat stable surface.
- Do not touch hot exhaust areas or put heat-sensitive objects beside or beneath them.
- Avoid damp, dusty, oily, steamy or vibrating places and extremes outside 5–35 °C.
- Do not put it on an unstable stand or high shelf.
- Do not expose it to fire.
Disconnect safely before moving or cleaning8 steps
- Do not touch a power plug during thunder.
- Before moving, turn power off and disconnect the cord and all cables.
- Before cleaning, unplug.
- Hold the plug rather than pulling the cord.
- At least once a year unplug and clean dust from around the plug with a dry cloth or vacuum.
- Do not clean a power cord or plug with detergent.
- For long non-use, unplug.
- Do not place heavy objects or stand on the projector.
Handle batteries and wireless accessories safely10 steps
- Do not dismantle or modify the remote, and keep it away from water.
- Do not short-circuit, heat, burn, disassemble or recharge dry batteries; do not mix old/new batteries or types, and fit the specified batteries with correct polarity.
- Remove exhausted batteries promptly and remove batteries before long non-use.
- Dispose of them under local rules.
- If leaked alkaline fluid reaches the eyes, do not rub: rinse with clean water and seek medical treatment immediately.
- Keep the detached wireless adapter away from infants.
- Do not use its radio in prohibited locations such as aircraft or hospitals, or near precision/weak-signal equipment.
- Consult a doctor or medical-equipment maker if using a pacemaker or other medical device.
- Arrange paid internal cleaning through the dealer or repair service once a year.
- Do not dismantle the projector for disposal; follow local rules.
3d映像の鑑賞について
Instructions from the manualWatch 3D only within the stated safety limits8 steps
- People with heart disease, a history of photosensitivity or a possibility of epilepsy must not watch 3D.
- Do not watch when unwell.
- Stop if fatigue, worsening health, abnormal sensation, double images or loss of depth perception occurs.
- Avoid prolonged uninterrupted viewing.
- Be careful of nearby people and objects: do not reach out or move suddenly in response to apparent 3D distances.
- Wear the specified 3D glasses and use normal prescription glasses/contact lenses underneath when required.
- The guide gives age six and over as the general viewing guideline.
- For a child, a guardian must monitor condition, decide whether viewing is suitable and limit viewing time.
使用上のご注意
Instructions from the manualArrange light-source service rather than user replacement4 steps
- The laser/LED unit has an approximate 20000-hour life, varying with the unit, conditions and settings.
- Its warranty ends at the product warranty period or 6000 hours, whichever comes first.
- If it no longer lights or becomes markedly dim, ask the dealer or repair service to replace it.
- Do not dismantle or modify the projector; doing so excludes warranty and repair coverage.
Observe wireless interference and Japan-only restrictions5 steps
- The supplied 2.4 GHz wireless adapter is certified for use in Japan only.
- Do not disassemble it or remove its certification label.
- Its DS/OF interference-range marking corresponds to 40 m.
- Before use check for other radio systems using the band.
- If interference affects an existing system, change channel or location, stop transmission, and contact the stated enquiry service as directed.
Store and transport the projector carefully10 steps
- Avoid hot, cold, humid, dusty or direct-sunlight storage, strong shocks and vibration.
- When moving, support the projector with both hands without covering the vents.
- Keep liquid, metal and other foreign objects out.
- Use a soft dry cloth on the case, or a well-wrung cloth dampened with diluted mild detergent for dirt.
- Never use benzine, thinner or similar solvents.
- Lens and vent cleaning are detailed in the operation guide.
- Replace remote batteries once a year regardless of use frequency to avoid leakage damage.
- If an impact temporarily changes colors, reselect the input; if necessary turn power off and on.
- Some permanently lit or unlit pixels can occur in the high-precision display and do not by themselves establish a fault.
- Keystone correction compresses the image and can reduce quality; improve physical alignment where possible.
クイックガイド
Instructions from the manualStart and stop projection11 steps
- Install the remote batteries.
- Place the projector on a firm desk/stand with the stated clearances and read the safety/use precautions.
- Ceiling or wall installation requires the dedicated bracket and advice from the dealer.
- Before connecting power, adjust the one front adjustable foot to change elevation and the two rear feet to level the image left/right.
- Connect the supplied power cord to the outlet.
- Connect the video source and turn that source on.
- Press projector Power.
- On first startup, select the language in the initial-language screen.
- Press INPUT and choose the source.
- Adjust focus with the focus lever.
- To finish projection, press Power, then press Power again to confirm shutdown.
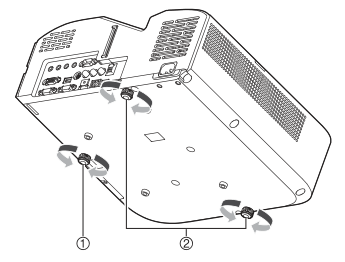
Diagram key
- ① and its rotation arrows: Turn the single front adjustable foot to fine-adjust projector elevation.
- ② and both rotation arrows: Turn the two rear adjustable feet to fine-adjust left/right tilt.
ケーブルカバーを取り付けるには
Instructions from the manualAttach or remove the cable cover8 steps
- If power is on, turn it off and wait for the projector to cool.
- Unplug the power cord.
- Turn the projector upside down and insert the cover hook into its matching hole.
- Rotate the cover in the illustrated direction into position, aligning its screw with the screw-receiving recess.
- Tighten the screw with a Phillips screwdriver.
- For removal, turn off if on, wait until cool and unplug.
- Loosen the cover screw with a Phillips screwdriver until it is free of the projector.
- Lift the screw side away, then withdraw the cover hook.
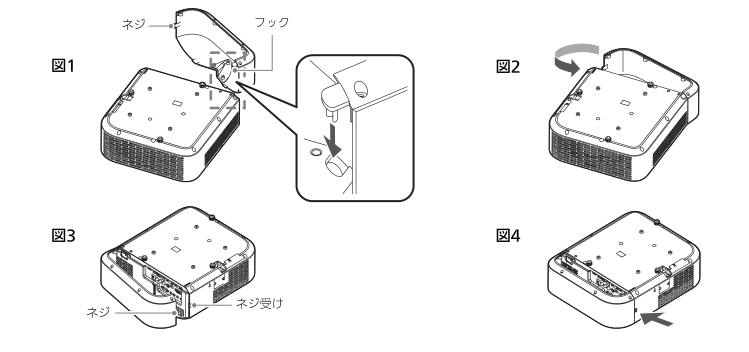
Diagram key
- 図1: With the projector upside down, insert the cover hook into its hole, following the insertion arrow and enlarged inset.
- ネジ (figure1): Cover screw, shown again in figure3.
- フック: Cover hook that enters the projector hook hole.
- 図2: Rotate the cover toward the projector in the curved-arrow direction.
- 図3: Align the cover screw with the receiving recess.
- ネジ (figure3): The same cover screw aligned for fastening.
- ネジ受け: Screw-receiving recess on the projector.
- 図4 and fastening arrow: Tighten the screw with a Phillips screwdriver.
プロジェクターに無線アダプターを接続する
Instructions from the manualConnect the supplied wireless adapter6 steps
- Insert the supplied YW-40 adapter into projector USB-A in the illustrated orientation.
- Do not use it with another device.
- Keep the removed adapter away from infants.
- With Plug and Play On, connecting the adapter while the projector is on selects Network and shows the LAN standby screen.
- With the adapter already connected, startup selects Network automatically.
- Otherwise choose Network with INPUT.
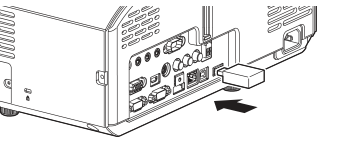
Diagram key
- USB-A connection and insertion arrow: Insert the supplied YW-40 into projector USB-A in this orientation. Do not connect the adapter to another device; keep it away from infants.
プロジェクターの簡単接続ssidを使って無線lan接続し投映する には
Instructions from the manualConnect using an easy SSID10 steps
- Use MENU, Network settings, Wireless LAN settings to select one of the easy SSIDs ending 0001–0004.
- Press ESC twice, select Update network settings, ENTER, Yes and ENTER.
- Different nearby projectors should use different SSIDs.
- Start Network Connection on the computer.
- Cancel the Windows network-location dialogue if it appears.
- If several projectors are found, select the intended SSID and OK.
- Enter a user name of up to 20 characters and the four-digit login code shown on the projector standby screen, then OK to project.
- The code changes at startup.
- Closing Network Connection disconnects.
- If no projector is found, check adapter, power and SSID before trying again.
プロジェクターの汎用ssidを使って無線lan接続し投映するには
Instructions from the manualConnect using a general SSID9 steps
- Use the projector network menu to choose a general SSID ending 0101–0104 and apply the network settings.
- The default is 0101, so changing it is unnecessary if already correct.
- Start Network Connection, choose the intended SSID when more than one is found, enter a user name up to 20 characters and the corresponding manual passphrase casiolpj01, casiolpj02, casiolpj03 or casiolpj04.
- Click OK.
- Enter the four-digit projected login code when prompted and click OK to project.
- The application remembers the passphrase for an unchanged SSID.
- Login-code prompting can be configured in the admin control panel.
- Close Network Connection to disconnect.
- These are the original manual’s defaults, not a recommendation to retain default credentials.
ユーザーssidを作成するには
Instructions from the manualCreate a user SSID8 steps
- While connected to the projector, open the Network Connection function menu, choose Admin page, then Projector administration.
- Log in with the current administrator password; the original default is admin.
- Open Network settings.
- Create a user SSID using the casiolpj0 prefix and up to 23 permitted ASCII letters/digits, excluding the reserved endings 001–004 and 101–104.
- Choose WPA-PSK AES, WPA2-PSK AES or Disabled as available in this edition.
- For encryption, enter 8–63 ASCII letters/digits or 64 hexadecimal characters as the passphrase; Disabled uses none.
- Apply the settings.
- The wireless connection disconnects, and only one user SSID is retained: a new one replaces the old one.
ユーザーssidを使って無線lan接続し投映するには
Instructions from the manualConnect using the user SSID6 steps
- If necessary use the projector wireless network menu to select the created user SSID and apply it.
- Start Network Connection and choose that SSID when multiple projectors appear.
- Enter a user name and the user passphrase when encryption is enabled, then OK.
- Enter the projected four-digit login code when prompted and OK to project.
- Cached passphrases apply only while the SSID is unchanged.
- Close Network Connection to disconnect.
プロジェクターとパソコンを直接無線lan接続したままプロジェ クターを無線lanアクセスポイントに接続するには
Instructions from the manualBridge a direct wireless connection to an external access point11 steps
- The external network must have an operating DHCP server.
- Connect the computer directly to the projector first, log into its administration page, and open Network settings.
- Set automatic IP acquisition and automatic DHCP as directed.
- Enable External access point, scan for and select the intended SSID, or use Key input for a manually entered SSID.
- Enter its required password.
- The show-password option can be cleared to hide entry.
- Click Apply and allow one to several minutes for connection.
- In projector Wireless LAN information check External access point status is Connected; if not, check settings and repeat.
- DHCP may change the projector IP address.
- It reconnects automatically when Network is selected and that access point is in range.
- For the guide’s wired-router bridge alternative, complete the stated initial administration settings, log out, then connect projector LAN to the router.
無線lanアクセスポイントにプロジェクターを接続するには
Instructions from the manualSet up projection through an existing wireless access point7 steps
- Use an external network with DHCP.
- Initially connect directly to the projector and open its administration Network settings.
- Enable automatic IP acquisition, disable the projector’s internal access point and enable the external access point.
- Scan/select the access-point SSID or enter it manually, enter the required password and Apply.
- The direct wireless connection disconnects.
- Wait and confirm Connected in the projector Wireless LAN information.
- The configuration is retained for later automatic connection.
無線lanアクセスポイント経由でプロジェクターとパソコンを接
Instructions from the manualプロジェクターとパソコンを直接lanケーブルで接続し投映する
Instructions from the manualProject through a direct wired LAN connection8 steps
- Connect projector LAN directly to computer LAN.
- Turn on the projector and select Network.
- Read the standby screen label Server IP; its default is 192.168.100.10.
- Use the label rather than the inconsistent left/right references in the text.
- Set the computer to an address with the same first three octets and a different final octet: for the default, 192.168.100.1–9 or 192.168.100.11–254.
- Start Network Connection.
- Choose the intended projector IP if prompted, enter the four-digit projected login code and OK.
- Close Network Connection to disconnect.
ルーターを介してプロジェクターとパソコンを有線lan接続し投
Instructions from the manualProject through a wired router network4 steps
- The router network must provide DHCP, and the computer must already be connected.
- Connect projector LAN to the router.
- On the projector set Network settings, IP settings, automatic IP acquisition, then apply Update network settings and confirm Yes.
- Start Network Connection on the computer, choose the intended projector if prompted, enter its projected four-digit login code and OK.
Network connectionのボタン操作
Instructions from the manualChoose single-screen, split-screen and pause controls5 steps
- In Network Connection use the single-screen button for the computer’s full image.
- The four split buttons place it at top left (1), top right (2), bottom left (3) or bottom right (4).
- Pause holds the current image; projection restarts with the projection button.
- Stop ends the computer image, video streaming opens movie projection, and close disconnects.
- The guide permits up to eight connected computers, with up to four images projected at once.
Network connectionのファンクションメニュー操作
Instructions from the manualConfigure Network Connection quality and sound6 steps
- Open the function menu and choose High speed for faster image updates or High quality for greater detail.
- Choose the main or extended screen where supported.
- Check Audio to transfer computer audio to the projector; clear it to retain computer audio output.
- Windows XP may require VAC if a volume mixer is absent, and XP/Vista extended-screen projection requires VDD.
- The guide identifies these as supplementary drivers from official support.
- The menu also provides admin page, server search, USB-token wizard, reset, information/about and exit; use their separate reviewed procedures.
ビデオストリーミング投映を行うには
Instructions from the manualStream a supported movie over the network5 steps
- Click the Network Connection video-streaming button, click File select, choose a supported movie and Open.
- Streaming uses the whole projection screen and outputs its audio through the projector.
- Use playback controls to play or stop.
- Stop returns to the computer screen; Play restarts the chosen movie.
- Supported AVI, MOV and MP4 codec/bitrate/resolution conditions are those in this guide’s streaming format table.
スマートデバイスからパソコンをリモート操作する(pcリモート)
Instructions from the manualUse the edition’s PC Remote function6 steps
- This is the original guide’s historical PC Remote procedure, not a promise of current app availability.
- Install the applicable C-Assist app and project the computer through Network Connection.
- On the smart device use C-Assist to connect to the projector and enter PC Remote standby.
- In the computer Network Connection function menu check PC Remote.
- Use the smart-device touch/mouse and keyboard controls.
- Clear PC Remote in the menu to stop remote operation.
その他のnetwork connection操作
Instructions from the manualSearch again or reset remembered connections3 steps
- Choose Server search in the Network Connection function menu to disconnect the current wireless connection and search again; the projector returns to LAN standby.
- Connect using the appropriate reviewed SSID procedure.
- Choose Reset to clear saved passphrases and application settings, confirming OK or choosing Cancel to retain them.
有線lan情報を表示するには
Instructions from the manualRead wired and wireless network information4 steps
- Open MENU, Network settings, and Wired LAN information or Wireless LAN information, then ENTER.
- Read the appropriate IP address, subnet mask, gateway and MAC information.
- Wireless information also identifies SSID, security, DHCP and external access-point connection status.
- ESC closes the information display; do not treat a wireless IP as the wired IP.
Ssidを変更するには
Instructions from the manualChange the projector SSID4 steps
- Open MENU, Network settings, Wireless LAN settings and SSID.
- Select the intended easy, general or created user SSID.
- Press ESC twice, choose Update network settings and ENTER.
- Select Yes and ENTER to apply.
Ip設定を変更するには
Instructions from the manualChange projector IP settings8 steps
- Open MENU, Network settings and the applicable wired or wireless IP settings.
- Choose Auto to obtain an IP automatically, or Manual and enter the IP, subnet mask and gateway.
- For the manual IP octets, the guide allows first octet 1–223, middle octets 0–255 and last octet 1–254.
- Invalid entries revert.
- Use the cursor and ENTER operations in the displayed IP dialogue.
- For wireless settings press ESC twice, or once for wired settings, then choose Update network settings and ENTER.
- Select Yes and ENTER to apply.
- Automatic DHCP allocation normally starts with the next address through .254; if the projector ends in .253 or .254, the guide specifies .254 as the allocation endpoint.
ネットワーク設定を初期化するには
Instructions from the manualReset projector network settings4 steps
- Open MENU, Network settings and Network settings reset.
- Press ENTER, select Yes and ENTER to confirm.
- Network settings return to defaults.
- Use this documented reset if the administrator password is forgotten; it also resets network configuration.
無線lan接続でプロジェクター管理ページにログインするには
Instructions from the manualLog into administration over wireless LAN6 steps
- Connect to the projector with Network Connection.
- Open its function menu and choose Admin page.
- In the browser choose Projector administration.
- Enter the administrator password and Log in; the original default is admin.
- Use System status to read firmware, IP, subnet mask, gateway, MAC, projection state and user information.
- Click Logout when finished.
有線lan接続でプロジェクター管理ページにログインするには
Instructions from the manualLog into administration over wired LAN4 steps
- Connect computer and projector by the appropriate direct or router wired LAN procedure.
- Select Network and read the standby screen Server IP label.
- Open a browser at that projector IP address, choose Projector administration, enter the administrator password (original default admin) and Log in.
- Click Logout when finished.
プロジェクターのipアドレスを基準にパソコンのipアドレスを変更
Instructions from the manualMatch computer IP to the projector for direct administration4 steps
- Connect computer and projector LAN directly.
- Select Network and read Server IP on the standby screen.
- Set the computer IP with the same first three octets and a different last octet from 1–254.
- Open the projector IP in a browser and use the reviewed wired administration login.
パソコンのipアドレスを基準にプロジェクターのipアドレスを変更
Instructions from the manualMatch projector IP to the computer for direct administration6 steps
- Use this method only when the computer IP is known.
- Connect the LAN cable directly.
- In projector Network settings choose wired IP settings and Manual.
- Enter the same first three IP octets as the computer and a different final octet from 1–254, with the corresponding subnet settings.
- Apply Update network settings and confirm Yes.
- Open that projector IP in a browser and use the wired administration login.
ルーターを介してプロジェクターとパソコンを有線lan接続する
Instructions from the manualConnect administration through a router4 steps
- Use a router network with DHCP and an already connected computer.
- Connect projector LAN to the router, set wired IP acquisition to Auto, then apply Update network settings and confirm Yes.
- Read the assigned Server IP and open it in the computer browser.
- Use the reviewed wired administration login and Logout when finished.
コントロールパネルページのネットワーク関連設定を変更するには
Instructions from the manualChange control-panel network options8 steps
- Log into Projector administration and open Control panel.
- Change only one of the guide’s two setting groups at a time.
- Group1 contains projector name (up to 16 permitted letters/digits, no symbols) and login-code requirement; use Apply1.
- Group2 contains user-name display, IEEE802.11n and channel-width 20 MHz/Auto; use Apply2.
- After the corresponding Apply button, confirm OK to restart and apply; Cancel retains the prior settings.
- Restart disconnects the current network session.
- The same table names Remote On and PJLink authentication, but does not assign them to an Apply1/Apply2 group.
- The guide supplies no browser Apply-group assignment for those two fields; their projector-menu meanings are described separately.
ネットワーク設定ページのネットワーク関連設定を変更するには
Instructions from the manualChange detailed network settings in the browser9 steps
- Log into Projector administration and choose Network settings.
- Set automatic IP acquisition or a manual IP, subnet mask and gateway.
- Original defaults are 192.168.100.10, 255.255.255.0 and 192.168.100.10 respectively.
- DHCP may use the automatic range .11–.254 or be disabled.
- Internal access-point settings include enabled/disabled, the user SSID and security, SSID broadcast, and channel 1–11 or Auto.
- External access-point settings select the network and its credentials.
- Use only the applicable reviewed direct/AP connection procedure.
- Click Apply.
- Confirm OK to reboot and apply, disconnecting the session; Cancel leaves settings unchanged.
プロジェクター管理ページへのログインパスワードを変更するには
Instructions from the manualChange the administration or file-transfer password5 steps
- Log into Projector administration and choose Change password.
- Under Projector administration enter the new password, up to eight ASCII letters/digits, into New password and Re-enter password, then Apply.
- If also changing File transfer, enter its new password in the separate File transfer fields and click its Apply.
- Click Logout.
- These two browser passwords are distinct from the projector’s remote-key password.
プロジェクター管理ページに含まれるすべての設定を初期化するには
Instructions from the manualReset browser administration settings3 steps
- Log into Projector administration and select Initialize settings.
- Click Apply and confirm OK to restart and reset the administration settings; Cancel does not apply the reset.
- The network connection disconnects on restart.
Crestronコントローラーと接続するための情報を入力するには
Instructions from the manualSet Crestron connection parameters4 steps
- Log into Projector administration, choose Crestron Control and set the control-system IP address, IP ID and port as supplied for that installation.
- The guide’s default port is 41794.
- Click Apply and log out.
- The projector supports the edition’s Crestron RoomView, PJLink Class1 version1 and AMX device discovery functions.
プロジェクターの設定メニューを使う
Instructions from the manualEnable network power-on and PJLink authentication2 steps
- The projector Network settings menu includes Remote On, which determines whether LAN can turn it on from powered standby, and PJLink authentication, which enables/disables PJLink connection authentication.
- The guide identifies these options but supplies no separate complete save sequence or Apply1/Apply2 assignment for the two browser fields.
Lan接続したパソコンからプロジェクターをリモート操作するには
Instructions from the manualOperate the projector from its browser control panel8 steps
- Connect by LAN, log into Projector administration and open Control panel.
- Read status before operating.
- Power On requires Remote On enabled; Power Off shuts down projection.
- Use the labelled controls for input, 3D mode, color mode, blank, aspect, Eco mode, mute and Speaker/Line audio output.
- Brightness, contrast and volume changes use their associated Apply control.
- Reset restores controllable settings, not the status display.
- Status distinguishes no error, temperature, fan, light-source and other error.
- Use the reviewed error-indicator instructions for recovery.
無線lan接続でファイル転送ページにログインするには
Instructions from the manualLog into file transfer over wireless or wired LAN5 steps
- With Network Connection connected, choose Admin page in its function menu, then File transfer in the browser.
- Enter the file-transfer password and Log in; its original default is admin.
- For wired access, open the projector Server IP in a browser and choose File transfer instead of Projector administration.
- Enter its password and Log in.
- Click Logout when finished.
ファイル転送ページを使った操作
Instructions from the manualUpload, delete or create internal-storage files through the browser9 steps
- Log into File transfer.
- To upload one supported file, click Browse, select the file and Open, then Upload.
- Wait until Upload completes is displayed.
- Supported types are JPEG, PNG, GIF, BMP, AVI, MOV, MP4, ECA, PtG and PDF.
- File timestamps become the upload time.
- To delete, tick up to ten files, click Delete and confirm OK, or Cancel to retain them.
- To create a folder, use the new-folder icon, enter its name and confirm OK.
- Do not interrupt the connection during transfer.
- If it is interrupted, use the complete reviewed file-transfer troubleshooting rows rather than assuming success.
Viewer controlページを表示する
Instructions from the manualOpen and operate Viewer Control6 steps
- Through wireless Network Connection choose Admin page and Viewer Control; no password is required for this page.
- For wired LAN open the projector IP and choose Viewer Control instead of Projector administration.
- Click Start Viewer.
- Use the browser buttons corresponding to the reviewed File Viewer remote operations while File Viewer is projecting.
- EXIT returns to the website but does not stop File Viewer.
- The CASIO Projector label returns to the website top page.
Usbメモリーにnetwork connectionをインストールするには
Instructions from the manualCreate and use a USB Network Connection token8 steps
- From an installed Network Connection open its function menu and Token wizard.
- Click Next, select the target USB memory device and Next; if none appears, connect it and wait for detection.
- Wait for completion, then Finish.
- The wizard copies Network Connection to the USB device.
- It creates autorun.inf, renaming an existing file with .bak or a numbered suffix, changes the drive name to USBToken and sets its icon.
- Preserve existing files before modifying the device.
- Connect the token to another computer and run its Network Connection to use the reviewed connection procedures.
- A copy running from a USB token cannot create another token.
各種機器からの無線lan接続による投映について
Instructions from the manualConnect a Mac or mobile device using the edition tools5 steps
- The edition’s Mac Network Connection supports Mac OS 10.6–10.9 and general or user SSIDs; use the applicable official software instructions.
- These historical requirements do not establish current software availability.
- For a supported Android or iOS C-Assist installation, connect the smart device to the same projector SSID and follow the app’s projector connection procedure.
- The edition also describes AWIND MobiShow: check OS support, install it, connect using a general or user SSID, and enter the projected login code when requested.
- MobiShow supports JPEG and PtG2 in this guide; do not substitute ECA or other formats.
Usbドライバーをインストールするには
Instructions from the manualInstall the USB update driver6 steps
- The linked edition requires Windows 8, Windows 7 SP1, Vista SP2 or XP SP3 32-bit, a Pentium M 1.6 GHz or better, operating-system-recommended memory and 1024 × 768 full-color display, keyboard, mouse and USB.
- These are historical requirements.
- Install the USB driver before connecting projector USB to the computer.
- Run PjUsbDriverSetup_EN.exe and follow the installer.
- Answer Yes to Windows 7/8 UAC, Allow on Vista or Continue on XP as requested.
- If USB was connected before installing, disconnect it, install the driver, then reconnect only at the step specified in the update or logo procedure.
プロジェクターのファームウェアを更新する
Instructions from the manualUpdate the projector firmware with Flash Loader14 steps
- Check MENU, Information, Version and compare it with the official firmware for the exact projector.
- Use only a newer applicable version, never another model’s firmware.
- Download Flash Loader and the exact-model .cpr firmware, unzip them and keep the loader and firmware in the same folder.
- Install the USB driver first.
- Unplug projector power.
- Connect the computer USB port to the projector LOGO micro-USB port with the appropriate cable.
- Reconnect projector power and turn it on: POWER flashes orange, one second on and one second off.
- Close all computer applications.
- Run PjFlashLoader_EN.exe, click Choose, select the correct .cpr file and Open, then Upload.
- During transfer the POWER indicator goes out and a progress bar is displayed.
- Never disconnect USB or turn power off while transfer is in progress.
- Wait for the completion dialogue and orange flashing POWER.
- Click OK, close Flash Loader with its upper-right close button, disconnect USB from both devices and unplug projector power.
- The guide supplies this complete disconnect sequence; do not substitute a USB-stick updater.
ユーザーロゴ用の画像ファイルについて
Instructions from the manualPrepare a supported user-logo image6 steps
- Use RGB 24-bit BMP from 640 × 480 up to 1280 × 800 pixels.
- For this WXGA projector the recommended native size is 1280 × 800.
- Use the official USB driver, LOGO Loader and exact-model .cph header file.
- The original edition supports Windows 8, Windows 7 SP1, Vista SP2 or XP SP3 32-bit, with a Pentium M 1.6 GHz or better, operating-system-recommended memory, 1024 × 768 full-color display, keyboard, mouse and USB.
- These are historical requirements.
- Install the driver before USB connection; if connected prematurely, unplug, install the driver, then reconnect at the specified step.
プロジェクターにユーザーロゴを転送するには
Instructions from the manualTransfer a user logo with LOGO Loader18 steps
- The transfer erases the previous projector logo.
- Download LOGO Loader and the exact-model .cph header file; unzip into the same folder and put the prepared supported BMP there.
- Install the USB driver before connecting.
- Unplug projector power.
- Connect the computer USB port to projector LOGO micro-USB.
- Reconnect power and turn it on: POWER flashes orange one second on and one second off.
- Close all computer applications.
- Run PjLogoLoader_EN.exe.
- Use the upper Choose control to select the correct .cph file and Open.
- Confirm Format OK next to LOGO Header File; otherwise download the correct header again and repeat this selection.
- Use the lower Choose control to select the BMP and Open.
- Confirm Format OK next to LOGO File; otherwise use an image meeting the reviewed size and format requirements and select it again.
- Click Upload.
- Do not disconnect USB or turn power off during transfer; POWER goes out while the progress bar runs.
- Wait for the completion dialogue and orange flashing POWER.
- Click OK, close LOGO Loader, disconnect USB at both ends and unplug projector power.
- The logo can then be selected in the projector startup, blank and no-signal screen settings.
- The transfer does not authorize use of an incompatible header or image.
Controls and parts
See the manual diagrams 1 diagram
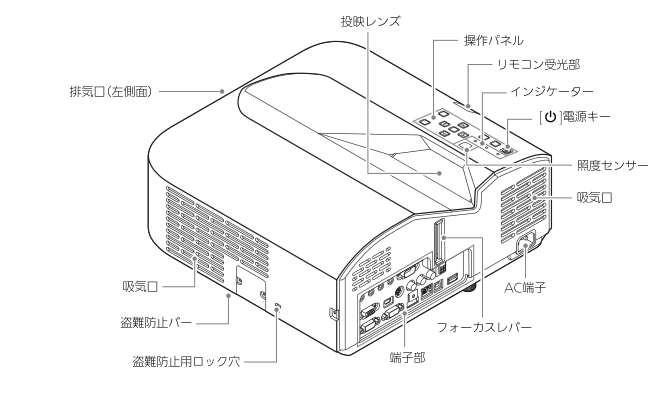
Diagram key
- 投映レンズ: Projection lens.
- 操作パネル: Projector control panel.
- リモコン受光部: Remote-control receiver.
- インジケーター: Status-indicator group.
- [P]電源キー: Device Power key.
- 排気口(左側面): Exhaust opening on the left side.
- 照度センサー: Illumination sensor.
- 吸気口 (right in drawing): Intake opening shown on the right of this drawing.
- 吸気口 (left in drawing): Separate intake opening shown on the left of this drawing.
- AC端子: AC power connection.
- 盗難防止バー: Security bar.
- フォーカスレバー: Focus lever.
- 盗難防止用ロック穴: Security-lock opening.
- 端子部: Connection panel.
Model details
Model and compatibility
- Native image
- WXGA 1280 × 800, 16:10.
- Supported 3D input
- Analog RGB and composite/S-video only, with the specified glasses and source preparation; HDMI and component 3D are unsupported.
- Cleaning
- Unplug and cool before cleaning; soft case cloth, gentle lens cleaning and vacuuming of dirty vents. Internal service is not a user procedure.
- Regional electrical scope
- Japanese domestic model: AC100V, 50/60Hz.
- Operating environment
- Use at 5–35 °C, 20–80% humidity without condensation, and 0–3000 m altitude.
- Light source
- Laser/LED unit, approximate 20000-hour life; ask service to replace a failed or markedly dim unit. Warranty is the product warranty period or 6000 hours, whichever comes first.
Related reviewed instructions
Manuals and sources
- Official Japanese Operation guide
- CASIO model support and details
- CASIO manual download listing
- Official Japanese Setup and safety guide
- Official Japanese Network function guide
- Official Japanese Firmware update guide
- Official Japanese User-logo transfer guide
- CASIO exact-model color support Q7
- CASIO exact-model color support Q8