MODEL REFERENCE
Roborock S7 Max Ultra
23 troubleshooting topics · 50 guides
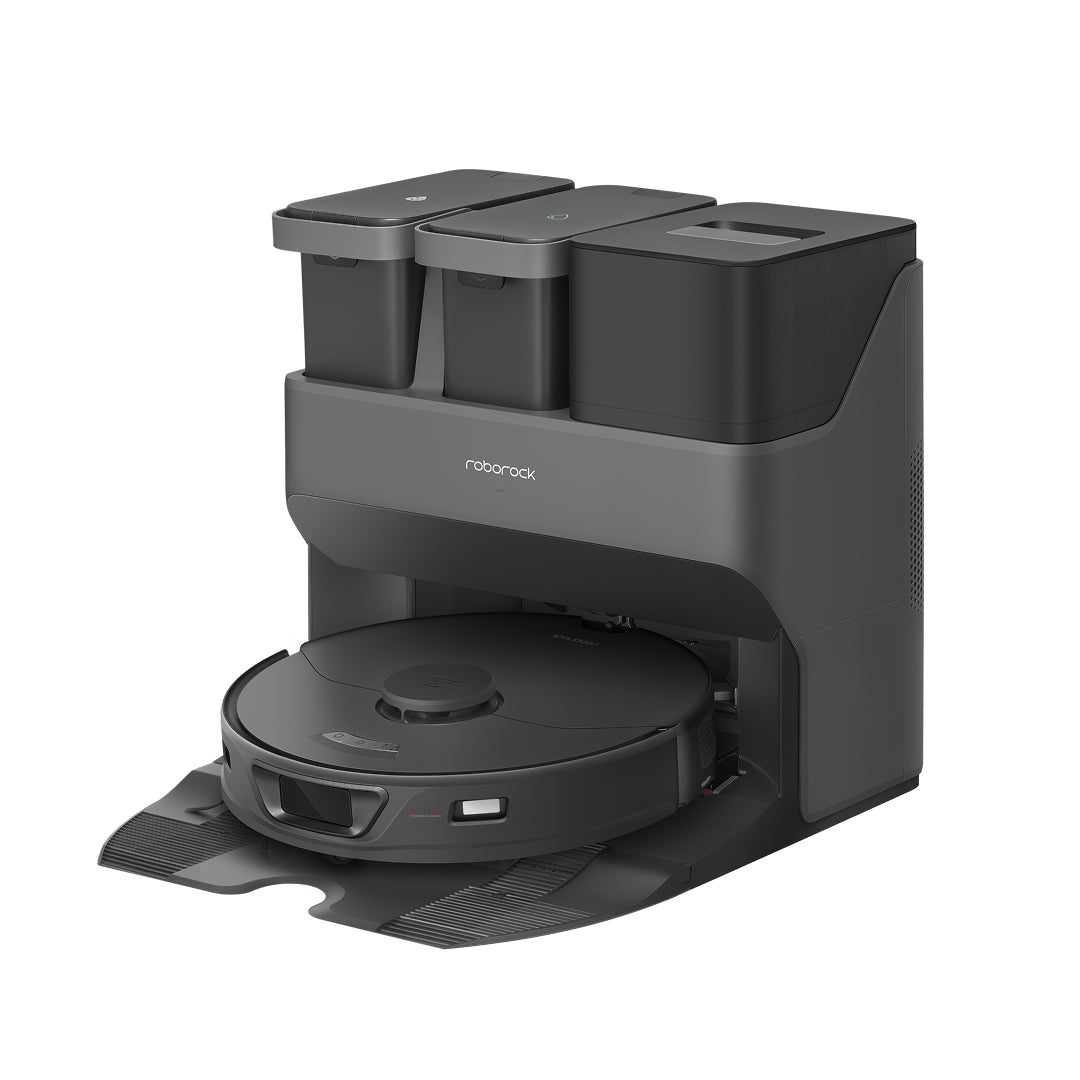
The checks and guides below come from the official manuals for this model.
No matches for this wording. Try a light name, error code or a shorter phrase.
Troubleshooting
Find the problem you are experiencingUnable to power on2 checks
- The battery level is low.
- The battery level is low. Put the robot on the charging dock and charge it before use.
- The battery temperature is too low or too high.
- The battery temperature is too low or too high. Only use the robot within the range of 4-40°C (39-104°F).
Unable to charge2 checks
- Check the power indicator light turns on and both ends of the power cabel are properly connected.
- Check the power indicator light turns on and both ends of the power cabel are properly connected.
- If contact is poor, clean the contact areas on the charging dock and the robot.
- If contact is poor, clean the contact areas on the charging dock and the robot.
Slow charging2 checks
- When used at high or low temperatures, the robot will automatically reduce its charging speed to extend battery life.
- When used at high or low temperatures, the robot will automatically reduce its charging speed to extend battery life.
- The charging contacts may be dirty.
- The charging contacts may be dirty. Wipe them with a dry cloth.
Unable to dock2 checks
- There are too many obstacles near the charging dock.
- There are too many obstacles near the charging dock. Move it to an open area.
- The robot is too far from the charging dock.
- The robot is too far from the charging dock. Place it closer and retry.
Abnormal behavior1 check
- Restart the robot.
- Restart the robot.
Noise during cleaning2 checks
- The main brush, side brush, main wheels, or omni-directional wheel may be jammed.
- The main brush, side brush, main wheels, or omni-directional wheel may be jammed. Turn off the robot and clean them.
- VibraRise system abnormal.
- VibraRise system abnormal. Check for jammed objects.
Unable to connect to WiFi5 checks
- WiFi is disabled.
- WiFi is disabled. Reset the WiFi and try again.
- The WiFi signal is poor.
- The WiFi signal is poor. Move the robot to an area with good WiFi reception.
- Abnormal WiFi connection.
- Abnormal WiFi connection. Reset the WiFi, download the latest mobile app, and retry.
- The current Roborock robot is not supported.
- The current Roborock robot is not supported. You can find supported models in the app.
- Unable to connect to WiFi abruptly.
- Unable to connect to WiFi abruptly. There may be an error with your router settings. Contact Roborock customer service for additional support.
Poor cleaning ability or dust falling out3 checks
- The dustbin is full and needs emptying.
- The dustbin is full and needs emptying.
- The filter is blocked and needs cleaning.
- The filter is blocked and needs cleaning.
- The main brush is jammed and needs cleaning.
- The main brush is jammed and needs cleaning.
Scheduled cleaning is not working1 check
- Keep the robot charged.
- Keep the robot charged. Scheduled cleaning can only begin when the battery level is above 20%.
Is power always being drawn when the robot is on the charging dock?1 check
- The robot will draw power while it is docked to maintain battery performance, but power consumption is minimal.
- The robot will draw power while it is docked to maintain battery performance, but power consumption is minimal.
Does the robot need to be charged for at least 16 hours the first three times it is used?1 check
- No.
- No. The robot can be used any time after it has been fully charged.
No or little water during mopping1 check
- Check whether there is water in the water tank and use the mobile app to set the scrub intensity or check the manual for full instructions on how to correctly install the mop cloth and mop mount.
- Check whether there is water in the water tank and use the mobile app to set the scrub intensity or check the manual for full instructions on how to correctly install the mop cloth and mop mount.
Cleaning does not resume after recharging1 check
- Make sure that the robot is not in DND mode.
- Make sure that the robot is not in DND mode.
- DND mode will prevent cleanup.
- When cleaning a space requiring a top-up charge, if the robot was placed manually on the charging dock before it returned to the dock automatically, it will not be able to continue cleanup.
The robot cannot return to the charging dock after Spot cleaning or when it has been moved manually1 check
- After spot cleaning or a significant position change, the robot will re-generate the map.
- After spot cleaning or a significant position change, the robot will re-generate the map.
- If the charging dock is too far away, it may not be able to return to recharge and must be placed on the charging dock manually.
The robot has begun to miss certain spots1 check
- The wall sensor or cliff sensors may be dirty.
- The wall sensor or cliff sensors may be dirty. Wipe them with a soft dry cloth.
It takes a long time to fill the water tank1 check
- The filter may be blocked and need cleaning.
- The filter may be blocked and need cleaning.
The LED status indicator light on the dock is steady red5 checks
- The dustbin or dust bag is not in place.
- The dustbin or dust bag is not in place. Check and correct installation.
- Voltage error.
- Voltage error. Check that local voltage meets the requirements listed on the dock.
- Check clean water tank placement or refill as required.
- Check clean water tank placement or refill as required.
- Check dirty water tank placement or empty as required.
- Check dirty water tank placement or empty as required.
- Check that the water filter has been correctly installed.
- Check that the water filter has been correctly installed.
Reduced emptying performance or unusual noise when emptying2 checks
- The main brush or main brush cover is not properly installed.
- The main brush or main brush cover is not properly installed. Check and correct installation.
- The filter, air duct, suction inlet, air inlet, or dustbin is blocked.
- The filter, air duct, suction inlet, air inlet, or dustbin is blocked. Clean to remove blockages.
Robot voice alert: Error 42. Maintenance brush jammed. Clean it and remove blockages2 checks
- If the brush stops at the left side, it may be jammed.
- If the brush stops at the left side, it may be jammed. Remove any items jamming it.
- If the brush stops at the right side, the filter may be blocked or is not installed in place.
- If the brush stops at the right side, the filter may be blocked or is not installed in place. Clean and correct installation.
Reduced mop washing performance2 checks
- The mop is not attached properly.
- The mop is not attached properly. Reinstall.
- The floor is dirty.
- The floor is dirty. Change the mop washing mode to “Deep” in the app for better cleaning.
Auto Drying is not working2 checks
- Auto Drying is disabled.
- Auto Drying is disabled. Check in-app settings.
- Auto drying starts only after mopping or mop washing.
- Auto drying starts only after mopping or mop washing.
Auto-emptying is not working4 checks
- Auto-emptying is disabled.
- Auto-emptying is disabled. Check in-app settings.
- Dock dustbin is not installed.
- Dock dustbin is not installed. Check and install.
- Auto-emptying will not be triggered if the robot returns to the dock without cleaning.
- Auto-emptying will not be triggered if the robot returns to the dock without cleaning.
- The robot will not auto-empty after returning to the dock in Do Not Disturb (DND) mode.
- The robot will not auto-empty after returning to the dock in Do Not Disturb (DND) mode. Adjust cleaning or DND duration, or start emptying manually.
The mop is not washed4 checks
- The mop will not be washed if not used.
- The mop will not be washed if not used.
- The robot will not return to the dock for mop washing if it does not start from the dock or no dock is found on the app map.
- The robot will not return to the dock for mop washing if it does not start from the dock or no dock is found on the app map.
- Check tank placement and refill or empty as required.
- Check tank placement and refill or empty as required.
- Check that the water filter has been correctly installed.
- Check that the water filter has been correctly installed.
Guides
Safety information
Instructions from the manualSafety precautions17 steps
- WARNING: For use only with roborock EWFD04LRR or EWFD05LRR charger.
- WARNING: Place the cords from other appliances out of the area to be cleaned.
- WARNING: Do not operate the vacuum in a room where an infant or child is sleeping.
- WARNING: Do not operate the vacuum in an area where there are lit candles or fragile objects on the floor to be cleaned.
- WARNING: Do not operate the vacuum in a room that has lit candles on furniture that the vacuum may accidentally hit or bump into.
- WARNING: Do not allow children to sit on the vacuum.
- WARNING: Do not carry the product using dock base or dustbin.
- WARNING: Place the dock on a flat floor away from fire, heat, and water.
- Avoid narrow spaces or locations where the robot may be suspended in the air.
- WARNING: The product must be switched off and the plug must be removed from socket outlet when not in use, before cleaning or maintaining the product.
- WARNING: This product can be used by children aged from 8 years and above and persons with reduced physical, sensory or mental capabilities or lack of experience and knowledge if they have been given supervision or instruction concerning use of the product in a safe way and understand the hazards involved.
- Children shall not play with the product.
- Cleaning and user maintenance shall not be made by children without supervision.
- WARNING: Do not dismantle, repair or modify the battery or charging dock.
- WARNING: If the dock is placed in an area susceptible to thunderstorms or with unstable voltage, take protection measures.
- WARNING: Connect to a properly grounded outlet only.
- See Grounding Instructions.
Ground the dock safely7 steps
- Use a properly installed grounded outlet that meets local codes and ordinances.
- Grounding reduces electric shock risk if the appliance malfunctions.
- Incorrect grounding-conductor connection risks electric shock.
- If uncertain, ask a qualified electrician or service person.
- Never modify the plug; if it does not fit, have a qualified electrician install the proper outlet.
- This nominal 120 V appliance must connect to an outlet matching its grounding plug.
- No adaptor may be used.
Battery and charging
Instructions from the manualBattery, storage and transport6 steps
- Keep the charging dock away from heat (such as radiators).
- Do not wipe the charging contacts with wet cloth or wet hands.
- Turn the robot off and use original packaging for shipment.
- If placing the robot into storage, charge it fully and turn it off before placing it in a cool dry place.
- Recharge it at least every three months to prevent the battery over discharging.
- Do not use the product when the temperature is higher than 40°C (104°F) or lower than 4°C (39°F), or there is any liquid or sticky substance on the floor.
Battery charging and storage temperaturesView
Charge and use the battery at 4–40°C (39–104°F). For three-month storage, the range is−20–45°C (−4–113°F); for six-month storage, −20–20°C (−4–68°F).
International symbols explanation
Instructions from the manualInternational power symbolsView
AC: alternating current, IEC 60417-5032 (2009-02). DC: direct current, IEC 60417-5031 (2009-02). Protective earth: protective ground, IEC 60417-5019 (2009-02).
Product overview
Instructions from the manualRobot controls and indicators6 steps
- Hold Power/Clean to turn the robot on or off; press it to start cleaning.
- Press Spot Clean/Child Lock for spot cleaning, or hold for 3 seconds to toggle child lock.
- Press Dock to return to dock or start emptying; hold Dock to wash the mop.
- Any button stops the robot during cleaning or docking.
- Power indicator:white at 20% or more battery, red below 20%, breathing while charging or starting up, and flashing red for an error.
- WiFi indicator under the top cover:off means disabled; slow flashing means waiting for connection; fast flashing means connecting; steady means connected.
Dock indicatorsView
Dock status light:breathing while emptying or washing the mop; red for a dock error; off when powered off, charging or drying.
Identify robot and dock parts53 steps
- US Q100TSC robot with EWFD04LRR or EWFD05LRR dock.
- A1-1: Dock Locator.
- A1-2: Reactive Tech Obstacle Avoidance Sensor.
- A2-1: Wall Sensor.
- A2-2: Charging Contacts.
- A2-3: Omnidirectional Wheel.
- A2-4: Carpet Sensor.
- A2-5: Side Brush.
- A2-6: Main Wheel.
- A2-7: Main Brush.
- A2-8: Main Brush Cover Latches.
- A2-9: Cliff Sensors.
- A3-1: Vertical Bumper.
- A3-2: LiDAR Sensor.
- A3-3: WiFi Indicator.
- A3-4: Reset Button.
- A3-5: Dustbin.
- A3-6: Mop Wash Sensor.
- A3-7: Self-Filling Port.
- A3-8: Positioning Button.
- A3-9: VibraRise Module.
- A3-10: Air Outlet.
- A3-11: Bumper.
- A4-1: Mop Cloth Attachment Slot.
- A4-2: Vibration Module.
- A5-1: Hook and Loop Pads.
- A6-1: Cover Latch.
- A6-2: Filter Cover.
- A6-3: Dustbin Latch.
- A6-4: Air Inlet.
- A6-5: Washable Filter.
- A10-1: Water Tank Handle.
- A10-2: Dirty Water Tank.
- A10-3: Self-Filling Port.
- A10-4: Dock Location Beacon.
- A10-5: Air Inlet.
- A10-6: Charging Contacts.
- A10-7: Washing Strip.
- A10-8: Maintenance Brush Latch.
- A10-9: High-Speed Maintenance Brush.
- A10-10: Dustbin.
- A10-11: Water Tank Lid.
- A10-12: Clean Water Tank.
- A10-13: Water Tank Latch.
- A10-15: Water Filter.
- A10-16: Dock Base.
- A10-17: Hot Air Outlet.
- A11-1: Cable Outlets.
- A11-2: Power Port.
- A11-3: Cable Slot.
- A10-14: Status Indicator Light.
- A4 is the non-detachable VibraRise mop mount; A5 is the VibraRise mop; A7 is the dock base; A8 is the power cable; A9 is the disposable dust bag.
- Power cable may exit either side.
Installation
Instructions from the manualPrepare the cleaning area3 steps
- Tidy cables and loose items from the floor, and move unstable, fragile, precious or dangerous items so the robot cannot pull, hit or overturn them.
- Always use a secure physical barrier in raised areas to prevent accidental falls and injury or damage.
- Follow the robot for its entire first cleaning route and watch for problems.
Assemble the dock4 steps
- Place the dock on a hard, flat floor.
- Press both sides of its base firmly, then the middle connecting part until it clicks.
- Connect the power cable at the back and store excess cable in its slot.
- Remove the water tanks and dock dustbin before moving the dock.
Position the dock11 steps
- Place the dock on hard, flat wood, tile or concrete, flat against a wall.
- Keep at least 1 m (3.3 ft) clearance in front and above; the diagram labels say more than 1 m.
- Keep the air inlet clear.
- Choose good WiFi reception and plug in.
- A hanging power cable can be caught, moving or disconnecting the dock.
- The indicator is on when powered, off when charging, and red on error.
- Keep away from fire, heat, water, narrow or suspended locations, direct sunlight and obstructions to the dock beacon.
- Do not place on carpet or mats, which can tilt it and disrupt docking/departure.
- Do not use without clean and dirty water tanks, high-speed maintenance brush, dock dustbin, dust bag or water filter.
- Maintain as instructed; do not clean the dock with wet cloth or tissue.
- Small water residues from factory tests are normal.
Power on and charge5 steps
- Hold Power/Clean to turn on.
- Wait for a steady power light, then place on the dock to charge.
- Keep the built-in rechargeable battery charged during normal use.
- A low battery may prevent startup; connect to the dock.
- During charging, the dock status light is off and the robot power indicator breathes.
Connecting to the app
Instructions from the manualConnect the app and reset WiFi9 steps
- Install either Roborock or Mi Home from App Store or Google Play, or the official manual QR code.
- Open the robot top cover to find its WiFi indicator.
- Hold Spot Clean/Child Lock and Dock together until the Resetting WiFi voice alert.
- A slowly flashing WiFi light confirms reset and waiting for connection.
- If router settings, a forgotten password or another cause prevents connection, reset WiFi and add the robot as a new device.
- Open the chosen app, tap + and follow its instructions.
- Updates may change the process.
- Only 2.4 GHz Wi-Fi is supported.
- WiFi disables after waiting more than 30 minutes; reset WiFi before reconnecting.
Instructions for use
Instructions from the manualTurn on and offView
Hold Power/Clean to turn on; the power indicator comes on and the robot enters standby. Hold Power/Clean to turn off and end the cleaning cycle. It cannot turn off while charging.
Fill the water tank5 steps
- Open the clean water tank and fill with water.
- Close its lid, lock the latch and reinstall.
- Use only Roborock-branded floor cleaner; too much can cause slipping and improper operation.
- Do not use hot water, which can deform the tank.
- Wipe any water marks clean before reinstalling.
Start cleaning8 steps
- Press Power/Clean.
- The robot scans and divides the room into zones, cleans their edges, then fills each in a zigzag pattern.
- Start from the dock and do not move it during cleaning for automatic return.
- Charge first if the battery is too low.
- If the task takes less than 10 minutes, the area is cleaned twice.
- A low battery sends the robot back to recharge and then resume.
- The mop mount retracts on carpet; you may also mark carpets as no-go zones in the app.
- Fit the VibraRise mop properly before every mopping task.
Spot cleaningView
Press Spot Clean/Child Lock to clean a 1.5 m (4.9 ft) by 1.5 m (4.9 ft) square centered on the robot. It then returns to its starting point and enters standby.
Pause and resumeView
Press any button to pause a running robot. Press Power/Clean to resume or Dock to return to dock. Manually placing a paused robot on the dock ends the current cleanup.
Sleep and wake3 steps
- After more than 10 minutes paused, the robot sleeps and its power indicator flashes every few seconds.
- Any button wakes it.
- It does not sleep while charging; more than 12 hours in sleep causes automatic shutdown.
Do Not Disturb mode3 steps
- The default DND period is 22:00–08:00.
- Disable or change it in the app.
- During DND, the robot will not resume cleanup automatically, the power indicator dims and voice prompts become quieter.
Child lock4 steps
- Hold Spot Clean/Child Lock to toggle child lock, or set it in the app.
- The control overview specifies a 3 second hold.
- When locked and stationary, buttons do not respond.
- During cleaning or docking, any button stops the robot.
Return and charge4 steps
- After cleaning, the robot returns to the dock to charge and determines whether mop washing, drying and emptying are needed from its cleaning history.
- In pause mode, press Dock to return; the power light pulses while charging.
- If it cannot find the dock, it returns to its starting location.
- Place it on the dock manually to recharge.
Error notifications4 steps
- A robot error flashes its power light red; dock errors show steady red.
- The app receives a pop-up and a voice alert may sound.
- After more than 10 minutes in a malfunctioning state, the robot sleeps.
- Manually placing a malfunctioning robot on the dock ends the current cleanup.
Reset the systemView
If buttons do not respond or it cannot turn off, press Reset. The robot resets automatically; scheduled cleaning, WiFi and other settings return to factory settings.
Restore factory settings3 steps
- If a system reset does not restore proper function, switch on.
- Hold Dock and simultaneously press Reset until the Restoring factory settings voice prompt.
- Factory settings are restored.
Wash the mop5 steps
- During cleaning, the robot determines when to return for mop washing and water refilling.
- For manual washing, tap Wash in the app or hold Dock on the robot to send it back.
- Any button stops washing.
- For automatic washing, start from the dock and do not move the dock during cleaning.
- The default mop washing duration is 20 minutes; change the duration or mode in the app.
Empty the dustbin5 steps
- Auto-emptying begins on return after cleaning.
- To empty manually, press Dock on the docked robot or tap Empty in the app.
- Any button stops it.
- After a long time without auto-emptying, empty the robot dustbin manually and check that its air inlet is clear.
- Disable auto-emptying in the app if desired; avoid frequent manual emptying.
Dry the mopView
Drying starts automatically after washing or cleaning. Tap Drying in the app to start or stop manually, change its duration or disable automatic drying.
Routine maintenance
Instructions from the manualClean the main brush8 steps
- Switch off the product and unplug before cleaning or maintenance.
- Clean every 2 weeks; replace every 6–12 months.
- Turn over the robot and press the latches to remove the main-brush cover.
- Pull out the brush and remove its bearing.
- Turn the cap in the unlock direction to remove it; after cleaning, turn it in the lock direction to reattach.
- Remove hair and dirt from both ends, reinstall the brush and press the cover to lock it.
- Wipe the main brush with a wet cloth and dry away from direct sunlight.
- Do not use corrosive cleaning fluids or disinfectants.
Clean the side brush3 steps
- Switch off the product and unplug before cleaning or maintenance.
- Clean monthly; replace every 3–6 months.
- Unscrew the side-brush screw, remove and clean the brush, then reinstall and tighten its screw.
Clean the omnidirectional wheel5 steps
- Switch off the product and unplug before cleaning or maintenance.
- Clean as required.
- Pry out the axle with a tool such as a small screwdriver and remove the wheel.
- The bracket is not removable.
- Rinse wheel and axle with water to remove hair and dirt, dry and reattach the wheel, pressing firmly into place.
Clean the main wheelView
Switch off the product and unplug before cleaning or maintenance. Clean monthly using a soft, dry cloth.
Clean the dustbin7 steps
- Switch off the product and unplug before cleaning or maintenance.
- Clean as required.
- Open the top cover, press the dustbin latch and remove the bin.
- Press its cover latch, open the cover, remove the washable filter and empty the bin.
- Fill with clean water, close the cover, shake gently and pour out dirty water.
- Leave bin and filter to dry.
- Use only clean water without cleaning liquid to avoid blockage.
Clean the washable filter6 steps
- Switch off the product and unplug before cleaning or maintenance.
- Clean weekly; replace every 6–12 months.
- Open the filter cover and remove the filter.
- Rinse repeatedly and tap to remove dirt.
- Allow 24 hours to dry thoroughly before reinstalling.
- Do not touch the filter surface with hands, a brush or hard objects.
Clean and refit the VibraRise mop5 steps
- Switch off the product and unplug before cleaning or maintenance.
- Clean after each use; replace every 3–6 months.
- Remove the cloth from the non-detachable mount, clean and air-dry it.
- Slide it through the attachment-slot opening and stick it flat in place.
- Clean a dirty mop before use because it affects performance.
Clean robot sensors3 steps
- Switch off the product and unplug before cleaning or maintenance.
- Clean monthly.
- Wipe with a soft, dry cloth:Dock Locator, Reactive Tech Obstacle Avoidance Sensor, Wall Sensor, Mop Wash Sensor, Carpet Sensor and Cliff Sensors.
Move the dock4 steps
- Switch off the product and unplug before cleaning or maintenance.
- Remove both water tanks and the dock dustbin first.
- Grip the rear handle with one hand and inner front side with the other.
- Never grip the base; it is not designed for lifting.
Clean the dirty water tank4 steps
- Switch off the product and unplug before cleaning or maintenance.
- Clean as required.
- Open the lid, pour out dirty water, fill with clean water, close and lock the lid, and shake.
- Pour out the dirty water, close the lid and reinstall.
Clean charging contactsView
Switch off the product and unplug before cleaning or maintenance. Clean monthly with a soft, dry cloth on both robot and dock.
Clean the high-speed maintenance brush4 steps
- Switch off the product and unplug before cleaning or maintenance.
- Clean as required; replace every 6–12 months.
- Lift its latch and remove the brush.
- Clear entangled objects, rinse clean, reinstall and latch securely.
Clean the water filter5 steps
- Switch off the product and unplug before cleaning or maintenance.
- Clean as required.
- Unlock and remove the water filter from the dock.
- Unlock its latch and rinse clean.
- Wipe the cleaning tank with a soft, dry cloth, reinstall the filter and press down until it clicks.
Clean the base5 steps
- Switch off the product and unplug before cleaning or maintenance.
- Clean as required.
- Wipe the base and air inlet with a soft, dry cloth.
- If the outlet is blocked, clean with a cotton swab.
- If debris falls into the dryer base, remove the base and shake it out.
Replace the disposable dust bag6 steps
- Switch off the product and unplug before cleaning or maintenance.
- Replace when full.
- Lift the dock dustbin and remove the bag vertically; pulling its handle seals it to prevent leakage.
- Discard it and clean around the filter with a dry cloth.
- Insert a new disposable bag fully to the bottom of its slot and reinstall the dock dustbin securely.
- Always fit a bag before replacing the dustbin top lid to prevent bagless auto-emptying; you may disable auto-emptying in the app.
Clean the air duct7 steps
- Switch off the product and unplug before cleaning or maintenance.
- Clean as required.
- Remove clean and dirty water tanks and dock dustbin.
- Remove the water filter and wipe off water marks with a cloth.
- Carefully invert the dock on a hard floor covered with a soft towel.
- Remove its eight screws and cover.
- Wipe the duct and cover with a dry cloth, reinstall the cover and screw it into place.
Environment protection information
Instructions from the manualBattery removal for disposal only8 steps
- Only when disposing of the robot, remove the battery and deliver it to a professional recycling facility.
- This is not a daily-use procedure.
- Run off the dock until the battery is exhausted, then turn off.
- Unscrew and remove the battery cover.
- Press the connector latch, pull out the connector and remove the battery.
- The battery must be fully drained; never remove while connected to the dock.
- Remove the whole pack without damaging its casing to avoid short circuit or hazardous leakage.
- If battery fluid contacts you, rinse thoroughly with water and seek immediate medical care.
Important safety instructions
Instructions from the manualImportant safety instructions27 steps
- WARNING: Do not use outdoors or on wet surfaces.
- WARNING: User must read instruction manual.
- WARNING: Risk of Injury.
- Brush May Start Unexpectedly.Disconnect the main Brush Before Cleaning or Servicing.
- WARNING: Do not allow to be used as a toy.
- Close attention is necessary when used by or near children, pets or plants.
- WARNING: Use only as described in this manual.
- Use only manufacturer’s recommended attachments.
- WARNING: Do not use with damaged cord or plug.
- If appliance is not working as it should, has been dropped, damaged, left outdoors, or dropped into water, return it to a service center.
- WARNING: Do not pull or carry by cord, use cord as a handle, close a door on cord, or pull cord around sharp edges or corners.
- WARNING: Do not run appliance over cord.
- Keep cord away from heated surfaces.
- WARNING: Do not unplug by pulling on cord.
- To unplug, grasp the plug, not the cord.
- WARNING: Do not handle charger, including charger plug, and charger terminals with wet hands.
- WARNING: Do not put any object into openings.
- Do not use with any opening blocked; keep free of dust, lint, hair, and anything that may reduce air flow.
- WARNING: Keep hair, loose clothing, fingers, and all parts of body away from openings and moving parts.
- WARNING: Do not use to pick up flammable or combustible liquids, such as gasoline, or use in areas where they may be present.
- WARNING: Do not pick up anything that is burning or smoking, such as cigarettes, matches, or hot ashes.
- WARNING: Do not use without dust bag.
- WARNING: Prevent unintentional starting.
- Ensure the switch is in the off-position before connecting to battery pack, picking up or carrying the appliance.
- Carrying the appliance with your finger on the switch or energizing appliance that have the switch on invites accidents.
- WARNING: Recharge only with the charger specified by the manufacturer.
- A charger that is suitable for one type of battery pack may create a risk of fire when used with another battery pack.
Warning
Instructions from the manualBattery and appliance safety warnings21 steps
- WARNING: Use appliances only with specifically designated battery packs.
- Use of any other battery packs may create a risk of injury and fire.
- WARNING: Turn off the appliance before making any adjustments, changing accessories, or storing appliance.
- Such preventive safety measures reduce the risk of starting the appliance accidentally.
- WARNING: When battery pack is not in use, keep it away from other metal objects, like paper clips, coins, keys, nails, screws or other small metal objects, that can make a connection from one terminal to another.
- Shorting the battery terminals together may cause burns or a fire.
- WARNING: Under abusive conditions, liquid may be ejected from the battery; avoid contact.
- If contact accidentally occurs, flush with water.
- If liquid contacts eyes, additionally seek medical help.
- Liquid ejected from the battery may cause irritation or burns.
- WARNING: Do not use a battery pack or appliance that is damaged or modified.
- Damaged or modified batteries may exhibit unpredictable behavior resulting in fire, explosion or risk of injury.
- WARNING: Do not expose a battery pack or appliance to fire or excessive temperature.
- Exposure to fire or temperature above 130°C (266°F) may cause explosion.
- WARNING: Follow all charging instructions and do not charge the battery pack or appliance outside of the temperature range specified in the instructions.
- Charging improperly or at temperatures outside of the specified range may damage the battery and increase the risk of fire.
- WARNING: Have servicing performed by a qualified repair person using only identical replacement parts.This will ensure that the safety of the product is maintained.
- WARNING: Do not modify or attempt to repair the appliance or the battery pack except as indicated in the instructions for use and care.
- WARNING: Do not use the product when the temperature is higher than 40°C (104°F) or lower than 4°C (39°F), or there is any liquid or sticky substance on the floor.
- Save these instructions.
- Household use only.
Fcc/ic statement
Instructions from the manualRadio or television interference7 steps
- Unapproved changes may void authority to operate.
- This is a Class 1 laser product.
- If harmful radio or television interference is confirmed by switching the equipment off and on, try these measures.
- Reorient or relocate the receiving antenna.
- Increase separation between equipment and receiver.
- Connect the equipment to an outlet on a different circuit from the receiver.
- Consult the dealer or an experienced radio/TV technician.
Mpe requirements
Instructions from the manualRF separationView
Maintain at least 20 cm between the device antenna and people during operation for FCC/IC RF exposure requirements. Operation closer is not recommended.
Holiday energy saving function
Instructions from the manualHoliday energy saving mode3 steps
- With the robot docked, hold Dock for 10 seconds or until an alert sounds to activate Holiday mode.
- The robot enters low-power mode, dims its LED and stops non-charging functions including cleaning and WiFi remote control.
- Hold Dock for 10 seconds until the LED brightens to deactivate Holiday mode.
Controls and parts
See the manual diagrams 3 diagrams
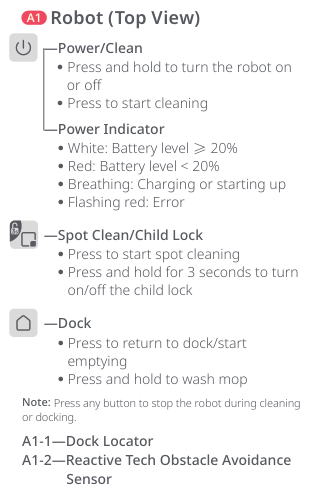
Diagram key
- A1: Robot top-view controls.
- Power/Clean: Hold to turn on or off; press to start cleaning.
- Power Indicator: Battery, charging, startup and error status.
- White: Battery at least 20%.
- Red: Battery below 20%.
- Breathing: Charging or starting up.
- Flashing red: Error.
- Spot Clean/Child Lock: Press for spot cleaning; hold 3 seconds to toggle child lock.
- Dock: Press to return to dock or start emptying; hold to wash the mop.
- Any button: Stops the robot during cleaning or docking.
- A1-1: Dock Locator.
- A1-2: Reactive Tech Obstacle Avoidance Sensor.
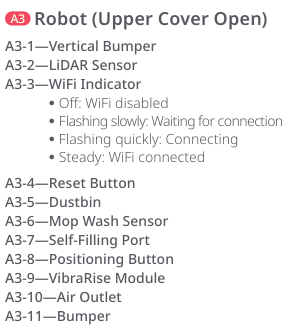
Diagram key
- A3: Robot with upper cover open.
- A3-1: Vertical Bumper.
- A3-2: LiDAR Sensor.
- A3-3: WiFi Indicator.
- Off: WiFi disabled.
- Flashing slowly: Waiting for connection.
- Flashing quickly: Connecting.
- Steady: WiFi connected.
- A3-4: Reset Button.
- A3-5: Dustbin.
- A3-6: Mop Wash Sensor.
- A3-7: Self-Filling Port.
- A3-8: Positioning Button.
- A3-9: VibraRise Module.
- A3-10: Air Outlet.
- A3-11: Bumper.

Diagram key
- Alternating current: AC, IEC 60417-5032 (2009-02).
- Direct current: DC, IEC 60417-5031 (2009-02).
- Protective earth: Protective ground, IEC 60417-5019 (2009-02).
Model details
Model and compatibility
- Battery and charging
- 14.4 V / 5200 mAh lithium-ion battery; 20 V DC, 1.5 A robot input; approximately 4 hours charging.
- Dock power
- 120 V AC, 60 Hz; 9.5 A dust collection, 1.2 A non-dust collection; 20 V DC, 1.5 A output.