MODEL REFERENCE
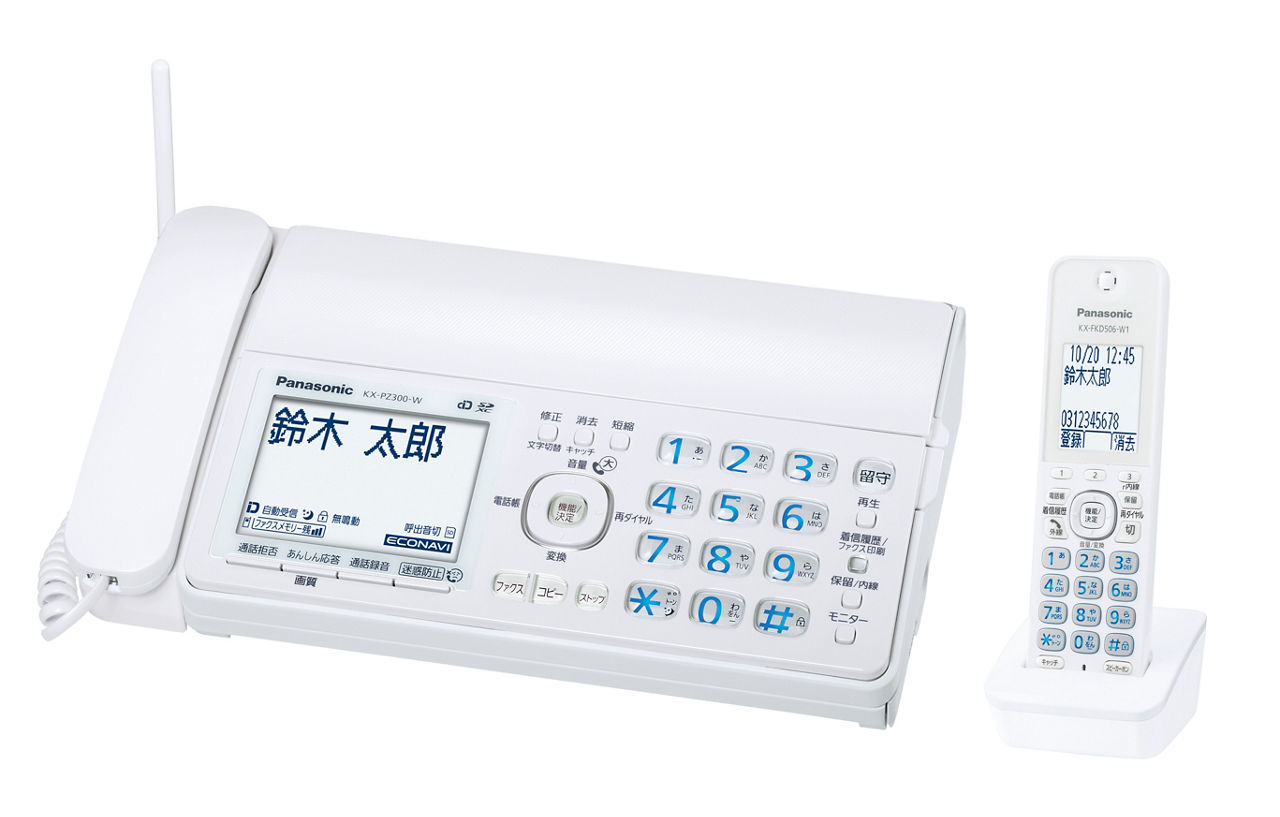
Panasonic KX-PZ300DL
29 errors · 67 troubleshooting topics · 168 guides
The checks and guides below come from the official manuals for this model.
No matches for this wording. Try a light name, error code or a shorter phrase.
Errors and messages
Shown on the machine display SD recording format invalidsD recording format invalid — SDカード内のデータが 正しくありません
SD recording format invalid: The WAVE recording format on the SD card differs and cannot be played.
U41u41 — 相手が U41 話し中でした ↓ しばらく待って 送信してください
The recipient was busy: The recipient was busy. Wait a while, then send again.
U42u42 — 相手のファクスが U42 応答しません でした ↓ 相手に 確認してください
The recipient fax did not answer: The recipient fax did not answer. Check with the recipient.
U23u23 — インクフィルムの交換が 必要です U23 ↓ 販売店にてお買い 求めください 品番:KX-FAN1902 checks
U31u31 — 印刷できません! しばらく U31 お待ちください
The base has excess heat and cannot print: The base has excess heat and cannot print. Wait until the message disappears.
U20u20 — 記録紙が U20 ありません 入れてください
Recording paper is absent and copying or printing is canceled: Recording paper is absent and copying or printing is canceled. Load paper and repeat the operation. If an original remains, open the operation panel and remove it. If the message appears with paper loaded, remove jammed paper, clean the feed roller and load correctly. Normally keep paper unloaded and the tray closed to prevent dust-related jams.
U12u12 — 記録紙づまり U12 カバーを開けて紙を 取ってください
Remove jammed recording paper, clean the feed roller and reload correctly: Remove jammed recording paper, clean the feed roller and reload correctly. Normally keep paper unloaded and close the tray to prevent dust-related jams.
U14u14 — 原稿残り U14 [ストップ]を 押してください
An original remains in its slot: An original remains in its slot. Press Stop to eject it.
U13u13 — 原稿づまり U13 パネルを開けて紙を 取ってください2 checks
U15u15 — 原稿づまり U15 パネルを開けて紙を 取ってください
Use originals no longer than 500 mm.: Use originals no longer than 500 mm.
H82h82 — 子機初期化エラー H82 ↓ お買い上げの 販売店へご相談 ください
Registered handset information was erased from the base: Registered handset information was erased from the base. Consult the selling dealer.
H40h40 — 送信 H40 できません でした ↓ お買い上げの 販売店へご相談 ください
A communication error prevented transmission. Consult the selling dealer.
U40u40 — 送信 U40 できません でした2 checks
U72u72 — 登録できません U72
The same modem dial-in number was entered again. Enter a different number through the modem dial-in setting.
H33h33 — ハードウェアエラー H33 電話機コードを 外してください ↓ お買い上げの 販売店へご相談 ください
A hardware error prevents telephone-line use: A hardware error prevents telephone-line use. Disconnect the telephone cord from the base and consult the selling dealer.
U10u10 — バックカバーを U10 閉めてください
Close the back cover securely.: Close the back cover securely.
U24u24 — フィルム残り少し U24 準備してください 品番:KX-FAN190
With film-warning enabled, this appears when approximately 6 sheets or fewer remain: With film-warning enabled, this appears when approximately 6 sheets or fewer remain. Prepare new ink film and replace it soon.
H30h30 — プリンターエラー H30 ↓ お買い上げの 販売店へご相談 ください
A printer error prevented printing: A printer error prevented printing. Consult the selling dealer.
Registration protocol errorregistration protocol error — プロトコル エラー
Registration protocol error: Registration of a doorphone, handset, repeater or window/door sensor did not finish within its specified time. Repeat registration from the beginning.
U81u81 — メモリーいっぱい U81 受信できません ↓ 不要なファクスを 消去してください
Internal fax memory is full. Print the stored faxes and check their contents, then delete unnecessary faxes.
U82u82 — メモリーいっぱい U82 本体に 録音できません ↓ 不要な用件を消去 してください
Answering-message and call-recording memory is full. Play the recordings, then delete unnecessary items.
H32h32 — モーターエラー H32 ↓ お買い上げの 販売店へご相談 ください
A motor error occurred. Consult the selling dealer.
H36h36 — 読み取りエラー H36 ↓ お買い上げの 販売店へご相談 ください
The original could not be scanned: The original could not be scanned. Consult the selling dealer.
U83u83 — 録音中停電 U83
Power failed during message or other recording and recording stopped: Power failed during message or other recording and recording stopped. If it failed while saving nuisance-prevention recording, repeat saving. Press Stop to dismiss the display.
Handset cannot connecthandset cannot connect — 親機に接続 できません2 checks
Handset out of rangehandset out of range — 圏外2 checks
Wrong registration buttonwrong registration button — これは 親機では ありません
Wrong registration button: During handset registration, press the base Internal button for at least five seconds rather than handset Internal.
Handset search stoppedhandset search stopped — サーチ停止中 再開は[サーチ]
Handset search stopped: About three hours out of range has stopped searching and made the handset unavailable. Press サーチ to resume use.
Unit in useunit in use — 使用中 今できません2 checks
Troubleshooting
Find the problem you are experiencingCannot place calls — 電話をかけられない3 checks
- Cannot place calls
- Check the contracted telephone-line type and set it manually again.
- Cannot place calls
- Check the telephone-cord connection.
- Cannot place calls
- Release key lock.
No receiver dial tone — 受話器から「ツー」音が聞こえない1 check
- No receiver dial tone
- Push the receiver cord fully into both the receiver and base connectors.
Cannot call a mobile — 携帯電話にかけられない1 check
- Cannot call a mobile
- If Chosen Mobile Carrier is configured, register the correct fixed-carrier identifier.
- Try a base Auto Answer pause after that identifier.
- Disable the feature for hikari service; for IP service register the correct IP-bypass number.
- If calls still fail, consult the fixed-line or IP-service provider.
Use 184 or 186 prefix — 184や186を付けてかけたい1 check
- Use 184 or 186 prefix
- Dial 184 or 186, then base Auto Answer or handset Pause, then the telephone number. If you press handset Talk before dialing, use Right for the pause.
Toll-free, weather or prefix call fails — フリーダイヤル、天気予報、184や186を付け てかけられない2 checks
- Toll-free, weather or prefix call fails
- On IP service, a pause after the prefix can prevent connection: omit it in that case.
- Toll-free, weather or prefix call fails
- Manually select the telephone line type matching your NTT contract. If calls still fail, ask the IP-service provider.
Spoken dialing unavailable — 読み上げダイヤルが働かない1 check
- Spoken dialing unavailable
- Spoken dialing does not work during call recording, previous-audio recording, full recording or nuisance-prevention recording and saving.
Cannot receive a call — 電話を受けられない3 checks
- Cannot receive a call
- For a PBX, enable PBX Connection.
- Cannot receive a call
- With Caller ID service, use base Function #133, Set, select 自動, Set, Stop.
- Cannot receive a call
- Change a PB-signal dial-in contract to modem dial-in; the change is chargeable.
Call waiting cuts off or will not switch — キャッチホンの操作をすると、元の相手との通 話が切れたり、切り替わらないことがある1 check
- Call waiting may fail or disconnect the original party depending on the telephone-line types at each end.
- Call waiting may fail or disconnect the original party depending on the telephone-line types at each end. Consult the line provider.
Base beeps off hook — 親機から「ピーピー」と音がする1 check
- Base beeps off hook
- Replace the receiver if it has been left off the hook.
Holding or transferring a call disconnects it — 電話を保留したら、電話が切れた1 check
- Perform the transfer after elapsed call time is displayed.
- Perform the transfer after elapsed call time is displayed. Operating within 10 seconds of answering can disconnect the call.
Other party cannot hear you — 通話中、自分の声が相手に聞こえない2 checks
- Other party cannot hear you
- Do not cover the receiver or handset microphone with a finger or your face.
- Other party cannot hear you
- If the handset displays ミュート, cancel mute.
Interrupted or noisy voice — 相手の声が途切れたり、雑音が入る4 checks
- Interrupted or noisy voice
- For handset calls, move nearer the base.
- Interrupted or noisy voice
- Move away from metal or concrete barriers; if relocation is impossible, consider the specified optional repeater.
- Interrupted or noisy voice
- Keep fingers and hands away from the handset antenna area.
- Interrupted or noisy voice
- For low caller volume or high background noise on either unit, use base Function #031, Set, 弱い, Set, Stop; if ineffective try オフ.
- Default 標準 may automatically change to 弱い on some lines.
Incoming voice gradually fades — しばらく話していると、だんだん相手の声が聞 こえにくくなる2 checks
- Incoming voice gradually fades
- Align the receiver or handset earpiece with your ear again.
- Incoming voice gradually fades
- On the base use Function #031, Set, select 弱い, Set, Stop; if ineffective, try オフ. The default is 標準; some telephone lines automatically select 弱い.
Echo of your own voice — 自分の声が反響する、エコーがする2 checks
- Echo of your own voice
- Set TA/Splitter Connection to あり(2); if ineffective try あり(3), then あり(4). If already at あり(4), use base Function #031, Set, 強い, Set, Stop.
- Echo of your own voice
- During receiver calls, lower receiver volume.
Handset beeps after removal — 子機を充電台から取り、しばらくすると「ピピッ」 と鳴り始める1 check
- Handset beeps after removal
- Quick Talk is enabled. Press handset Off or replace it on the charger.
Receiver voice too loud — 受話器で相手の声が大きすぎる2 checks
- Receiver voice too loud
- Lower receiver volume.
- Receiver voice too loud
- To limit unusually loud incoming sound, use base Function #070, Set, あり, Set, Stop.
Charging indication absent — 充電台に置いても、「充電中」と表示されない2 checks
- Charging indication absent
- A new or nearly empty battery may delay the indication. Leave the handset on its charger for several minutes.
- Charging indication absent
- Check and firmly connect charger power.
Low-battery icon flashes after a few minutes despite full charge — 充電完了まで充電しても、通話数分後に が点 滅する1 check
- The battery has reached the end of its life.
- The battery has reached the end of its life. Replace the battery pack using the reviewed battery procedure.
Charging takes longer — 充電時間が長い(約10時間充電しても、「充電 完了」と表示されない)3 checks
- Charging takes longer
- Using the handset during charging lengthens the charge time.
- Charging takes longer
- Low ambient temperature or low supply voltage lengthens charging.
- Charging takes longer
- Charging takes longer without base power or while out of range. Connect base power and move the handset nearer until 圏外 disappears, then charge.
Cannot send a fax — ファクスを送信できない4 checks
- Cannot send a fax
- If the recipient rejects withheld-number calls, prefix186 to notify your number.
- Cannot send a fax
- For hikari or ADSL, follow the reviewed provider connection checks.
- Cannot send a fax
- Some recipient machines require Your Telephone Number to be registered; set it.
- Cannot send a fax
- Release key lock.
Cannot receive a fax — ファクスを受信できない5 checks
- Cannot receive a fax
- Load recording paper or ink film if exhausted.
- Cannot receive a fax
- For hikari or ADSL, follow the reviewed provider connection checks.
- Cannot receive a fax
- Start fax reception before hanging up when fax tones are heard.
- Cannot receive a fax
- Even with paper/film or SD available, full internal fax memory prevents reception. Delete unnecessary faxes.
- Cannot receive a fax
- If only part of a fax is received because of original/quality data, ask the sender to lower the quality setting.
Cannot send fax with 184 or 186 — 184や186を付けてファクスを送信できない1 check
- On ADSL, manually set line type to match the NTT contract.
- On ADSL, manually set line type to match the NTT contract. If still unable to send, check the applicable connection guidance.
Cannot send overseas — ファクスを海外へ送信できない1 check
- Cannot send overseas
- Set Overseas Transmission to 1回 before sending.
Cannot receive F-Net fax — Fネットからのファクスを受信できない1 check
- Cannot receive F-Net fax
- If F-Net uses 16 Hz or you have no F-Net subscription, registering 161 in nuisance-call blocking prevents reception.
Erase memory-received fax — メモリー代行受信されている内容を消去したい1 check
- Delete individually or all together.
- Delete individually or all together. Deleted content cannot subsequently be printed.
Receiving a B4 or A3 fax — B4サイズやA3サイズのファクスを受信すると どうなる?1 check
- Most sending fax machines reduce it to approximately A4 under the fax communication rules; some machines are exceptions.
- Most sending fax machines reduce it to approximately A4 under the fax communication rules; some machines are exceptions.
Displayed destination differs — ファクスを送る際、ダイヤルした番号と違う番 号が表示される1 check
- Displayed destination differs
- The displayed number is the number registered at the destination fax. If you dialed correctly, this is not a problem.
Film wraps around a roller — インクフィルムがローラーに巻きつく1 check
- Loose film or incorrect winding direction can wrap around the roller.
- Loose film or incorrect winding direction can wrap around the roller. Install the film correctly and turn the orange gear toward the back to remove slack.
Fax repeats from first page — 同じ内容が何度も印刷される2 checks
- Fax repeats from first page
- Running out of paper restarts printing from the first page after replenishment. Load enough paper, up to fifteen sheets, before printing.
- Fax repeats from first page
- If paper runs out, use individual fax printing with the desired starting page to print the continuation.
Recording sheets overlap or skew — 記録紙が重なって(ずれて)印刷される2 checks
- Fan and load paper correctly, preferably 15 sheets.
- Fan and load paper correctly, preferably 15 sheets. When adding paper, remove the remaining stack and reload it together with the new sheets.
- Clean a dirty internal feed roller.
- Clean a dirty internal feed roller.
Stored fax does not print after paper or film is installed — メモリー代行受信時、記録紙やインクフィルム を入れても印刷しない1 check
- Unplug power, wait at least 10 seconds, reconnect and try the operation again.
- Unplug power, wait at least 10 seconds, reconnect and try the operation again.
Received fax reduced — 受けたファクスが縮小される1 check
- Received fax reduced
- The default reduces A4 vertically to about 92 percent. Sender size or orientation, such as landscape B5, can cause further reduction.
Received fax faint — 受けたファクスがかすれている4 steps
- Small, fine or pale characters in the original can appear faint.
- Try smooth recording paper.
- Change 受信印字濃度 to 濃く; try エコノミー受信あり(2) or なし.
- Ask the sender to change the quality setting.
Lines, dots or crushed text on received fax or copy — 受けたファクスやコピーに白や黒い線・黒い点 が入ったり、文字がつぶれたりする3 checks
- Clean dirty recording-paper transport rollers or the paper guide.
- Clean dirty recording-paper transport rollers or the paper guide.
- If call-waiting signaling interrupted reception, ask for retransmission.
- If call-waiting signaling interrupted reception, ask for retransmission.
- Do not use a parallel telephone during fax transmission or reception.
- Do not use a parallel telephone during fax transmission or reception.
Lines or crushed text on a sent fax — 相手に送ったファクスに白や黒い線が入ったり、 文字がつぶれたりする3 checks
- Clean the scanning glass and white flat surface.
- Clean the scanning glass and white flat surface.
- If call-waiting signaling interrupted sending, resend.
- If call-waiting signaling interrupted sending, resend.
- Do not use a parallel telephone during fax transmission or reception.
- Do not use a parallel telephone during fax transmission or reception.
Recording paper jams — 記録紙が詰まる1 check
- Clean a dirty internal feed roller.
- Clean a dirty internal feed roller. Dust can cause jams; normally leave no paper loaded and close the recording-paper tray.
Answering greeting is silent — 留守番電話の応答メッセージが流れない1 check
- A custom greeting may have been recorded silently.
- A custom greeting may have been recorded silently. Record it again or select a fixed greeting.
Auto Answer button cannot set, cancel or play messages — 【留守】を押しても、留守セット/留守解除/ 用件再生ができない1 check
- Replace the off-hook receiver, then operate Auto Answer.
- Replace the off-hook receiver, then operate Auto Answer.
Cannot operate answering machine remotely — 外出先から留守番電話を操作できない1 check
- Source condition: Cannot operate answering machine remotely
- Call from a telephone that sends touch-tone signals and register the remote-control PIN.
Answering indicator flashes — 留守ランプが点滅している1 check
- Answering indicator flashes
- New messages recorded while answering is enabled make the indicator flash; play the messages.
Message recording stops early — 用件が録音の途中で切れている1 check
- Message recording stops early
- Six seconds or more of silence or a quiet voice can cut recording off. Ask the caller to speak continuously or louder.
Answering memory full — 留守セットすると留守番電話に録音できない メッセージが聞こえる1 check
- Answering memory full
- Memory may be full. Play answering messages and call recordings, then erase unwanted recordings.
Recording time shows January 1 at 00:00 — 録音した日付・時刻が「1月1日 0:00」や 「1/1 0:00」と表示される1 check
- The date/time remains at its initial setting or returned there after a power outage.
- The date/time remains at its initial setting or returned there after a power outage. Set the date and time.
Recording saved internally instead of SD — 本体メモリーに保存され、SDカードに保存でき ないView
The unit records in internal memory when the SD card has no free capacity, is absent, is unformatted, or is write-protected.
Multimedia card compatibility — マルチメディアカードは使えますか?View
Multimedia cards cannot be used.
Printed fax not saved on SD — 「印刷してもSD保存」を「する」に設定しても、受信 したときに印刷されたファクスがSDカードに保存 されていない2 steps
- If the base receiver is lifted, Monitor is pressed, or a call arrives while a received fax is being printed, it is not saved to SD.
- A completely printed fax is then also absent from internal fax memory.
Ringer silent — 呼出音が鳴らない4 checks
- Ringer silent
- If ringing volume is Off, adjust it.
- Ringer silent
- Cancel Sleep Mode by holding base star at least three seconds.
- Ringer silent
- If only the handset is silent, charge an empty battery.
- Ringer silent
- Set the ringing destinations in modem dial-in settings.
Ringer starts late — 呼出音が鳴り出すのが遅い1 check
- Silent fax reception waits to distinguish a voice call from a fax, so ringing begins slightly later.
- Silent fax reception waits to distinguish a voice call from a fax, so ringing begins slightly later.
Keep ringing until answered at home — 在宅時、電話に出るまで呼出音を鳴り続けるよ うにしたい1 check
- Keep ringing until answered at home
- Set 在宅呼出回数 to 自動応答しない.
Silent reception still rings — 無鳴動受信に設定しても呼出音が鳴る1 check
- Silent reception still rings
- Silent fax reception still rings for voice calls, while answering is enabled, when internal fax memory is full, or when the sender lifts the receiver and sends manually after connecting.
- Some caller lines or connection equipment also cause ringing.
Doorphone does not ring — ドアホンの呼出音が鳴らない3 checks
- Doorphone does not ring
- Cancel Sleep Mode by holding base star at least three seconds.
- Doorphone does not ring
- VE-DA10/VE-DA10-H adapters cannot connect a doorphone to this fax.
- Doorphone does not ring
- Reconnect power to both this unit and the wireless-adapter television-doorphone base.
Caller number not displayed — かけてきた相手の電話番号を表示しない7 checks
- Caller number not displayed
- Confirm the Caller ID subscription and completed installation with NTT or the appropriate other provider.
- Caller number not displayed
- Caller ID cannot display through PBX or home-telephone connections.
- Caller number not displayed
- Parallel connection to another telephone may prevent number display.
- Caller number not displayed
- With Caller ID, use base Function #133, Set, 自動, Set, Stop.
- Caller number not displayed
- If subscribed to Call Waiting Display, enable that setting.
- Caller number not displayed
- For ISDN check the terminal-adapter settings; if unresolved ask its manufacturer.
- Caller number not displayed
- If either party uses IP service, number display may fail; consult that provider.
Caller information cannot display — 「表示できません」 (子機は「外線着信中」)と表示 されるView
Noise or poor telephone-line conditions during an incoming call can cause 表示できません on the base or 外線着信中 on the handset.
Incoming-call time shows January 1 at 00:00 — 着信した日付・時刻が「1月 1日 0:00」や 「1/1 0:00」と表示される1 check
- The initial date/time or a power-outage reset is being shown.
- The initial date/time or a power-outage reset is being shown. Set the date and time.
Incorrect or unresponsive operation — 正しく操作しても動かない、動作がおかしい2 checks
- Incorrect or unresponsive operation
- Hold base Stop for at least five seconds.
- When リセットしますか? appears, press star.
- If the prompt never appears or operation remains wrong, unplug power, wait at least ten seconds and reconnect.
- Incorrect or unresponsive operation
- Remove the handset battery, wait at least ten seconds, then reinstall it.
Call history and fax indicator lights — 着信履歴/ファクス印刷ランプが点灯している2 checks
- Call history and fax indicator lights
- With subscribed Caller ID, a missed call lights this indicator. Inspect call history.
- Call history and fax indicator lights
- Memory-received faxes also light it. Print the stored faxes.
Demonstration mode — 次々に画面が切り替わり、操作案内が流れる1 check
- Demonstration mode
- After about twenty minutes without a telephone cord, demonstration screens or voice guidance begin.
- Connect the cord to end demonstration mode and start automatic line-type setting.
Equipment warm — 親機、子機、充電台が温かい1 check
- Equipment warm
- Warm equipment is not abnormal and can feel warmer in summer. If unusually hot, unplug power and ask the selling dealer.
Standby sound — 親機から音が聞こえる1 check
- Standby sound
- A small standby sound is not abnormal.
Ink film has run out — インクフィルムがなくなったときは2 checks
- Source condition: Ink film has run out
- Faxes will not print without ink film. Obtain the specified replacement ink film.
- Source condition: Ink film has run out
- Replace the film through the reviewed ink-film replacement procedure.
Back cover will not close — バックカバーが閉まらない1 check
- During film replacement, remove the used white axle before installing new film.
- During film replacement, remove the used white axle before installing new film. Leaving the old white axle in place prevents closing.
Disable spoken dialing and character entry — 親機でダイヤルしたときや、文字を入力した ときに、番号や文字を読み上げる2 steps
- Spoken dialing is enabled initially.
- To stop spoken dialed numbers and hiragana/halfwidth-katakana entered during phonebook registration/search, use base Function #130, Set, choose なし, Set, Stop.
Telephone number changed — 転居などで電話番号が変わったときは?1 check
- Telephone number changed
- Register the new telephone number.
Power outage — 停電のとき使えますか?3 steps
- Neither the base nor handset can be used during an outage.
- Registered contents, greetings, recordings and memory-received faxes remain.
- Date/time can return to initial values; reset it if necessary.
Directly forward incoming calls — かかってきた電話を直接転送したい1 check
- Directly forward incoming calls
- Ask NTT on 116 about Voice Warp. It forwards both telephone calls and faxes without distinguishing them.
CS broadcast interference — CSデジタル放送(特定チャンネル)の画像が乱 れる1 check
- CS broadcast interference
- Radio signals entering CS antenna distribution can disturb reception.
- Use CS/BS-compatible mixers, splitters and separators, CS/BS cable such as S-4C-FB whose designation begins S, and F-type connectors suitable for that cable.
- The radio source includes optional 1.9 GHz repeaters.
Wi-Fi interference — 無線LAN経由で、パソコンやスマートフォンな どがインターネットに接続できない。接続が不 安定である1 check
- Wi-Fi interference
- Nearby base equipment and a Wi-Fi router can interfere. Place this equipment, including optional 1.9 GHz repeaters, about three metres or more from the wireless router.
Guides
安全上のご注意
Instructions from the manualSafety and when to stop16 steps
- Use AC100 V and only the specified battery in its specified charger.
- Do not disassemble, modify, short, heat or burn batteries, carry them with metal objects or use the supplied battery in other equipment.
- For battery liquid in eyes, do not rub: rinse with clean water and obtain immediate medical care.
- Do not repair or modify equipment, handle power plugs with wet hands, touch the unit or its cables during lightning, put metal objects inside, damage cords, overload outlets, wet equipment or put liquid on telephone connectors.
- Disconnect a wet telephone cord at the wall and do not reuse it.
- Do not put the unit in a microwave or on electromagnetic cooking equipment.
- Insert power plugs fully and do not use damaged plugs or loose outlets.
- Unplug and dry-wipe plug dust periodically.
- Stop use and unplug for smoke, unusual smell or noise, a fall or damaged housing; ask the dealer.
- Hold the nonmetal plug body when unplugging.
- Avoid medical and automatic-control equipment; keep at least 15 cm from implanted pacemakers.
- Do not connect unspecified home/business telephone systems.
- Keep SD cards from infants; seek immediate medical attention if swallowed.
- Avoid humidity, steam, oil smoke, dust, unstable or vibrating locations.
- Keep metal and magnetically sensitive objects away from the charger.
- Do not pull the receiver forcibly.
使用上のお願い
Instructions from the manualPlacement, radio range and protected data13 steps
- Keep the tray and stand clear of walls.
- Avoid pianos, carpets, heat, closed hot vehicles, direct sunlight, heating/cooling outlets, direct light at the document outlet, rapid temperature changes, OA equipment and CS receivers.
- Keep power plugs near and easy to unplug.
- Keep the charger away from AM radios and electromagnetic or magnetic sources.
- Unobstructed handset range is within 100 m; metal doors, foil insulation, concrete, metal walls, multiple walls, other floors/buildings or double glazing can shorten it.
- Consider the specified repeater when relocation is insufficient.
- Use the base if a hearing aid introduces noise and for important calls: radio conversations are not immune from interception.
- Print important stored faxes, phonebooks, speed dials and block lists; misuse, static, interference or power loss can change or erase data.
- The 1.9 GHz J-DECT mark does not establish cross-device compatibility.
- For harmful interference unplug and contact Panasonic.
- On repair, copy important data to SD, remove the card, initialize protected data when appropriate and protect ink-film print traces.
- Before disposal or transfer, remove and protect SD data, erase internal data, and cut used film; ordinary SD formatting does not completely erase data.
- Use appropriate secure data erasure before transfer or destroy/dispose of the card under local rules.
インクフィルムを取り付ける・交換する
Instructions from the manualInstall or replace ink film11 steps
- Open the operation panel.
- Lift the green lever and open the back cover.
- For replacement remove the used orange-shaft film and white shaft.
- Cut used film to protect its printing traces and dispose as plastic under local rules.
- Use only specified KX-FAN190/190W/190V/191/191W film.
- Install the new film with the orange gear at front left, its root in the front-left U recess and the white gear tip in its U recess; preserve the source winding direction.
- Turn the orange gear backward to remove slack.
- Press both marked ends until the back cover clicks, then close the operation panel.
- Do not touch the thermal head.
- Trial film is about 5 m/15 A4 sheets; even a few printed lines consume about 32 cm per sheet.
- For specified 15 m film, after replacement and before use enable Film Warning to show U24 at about six sheets remaining.
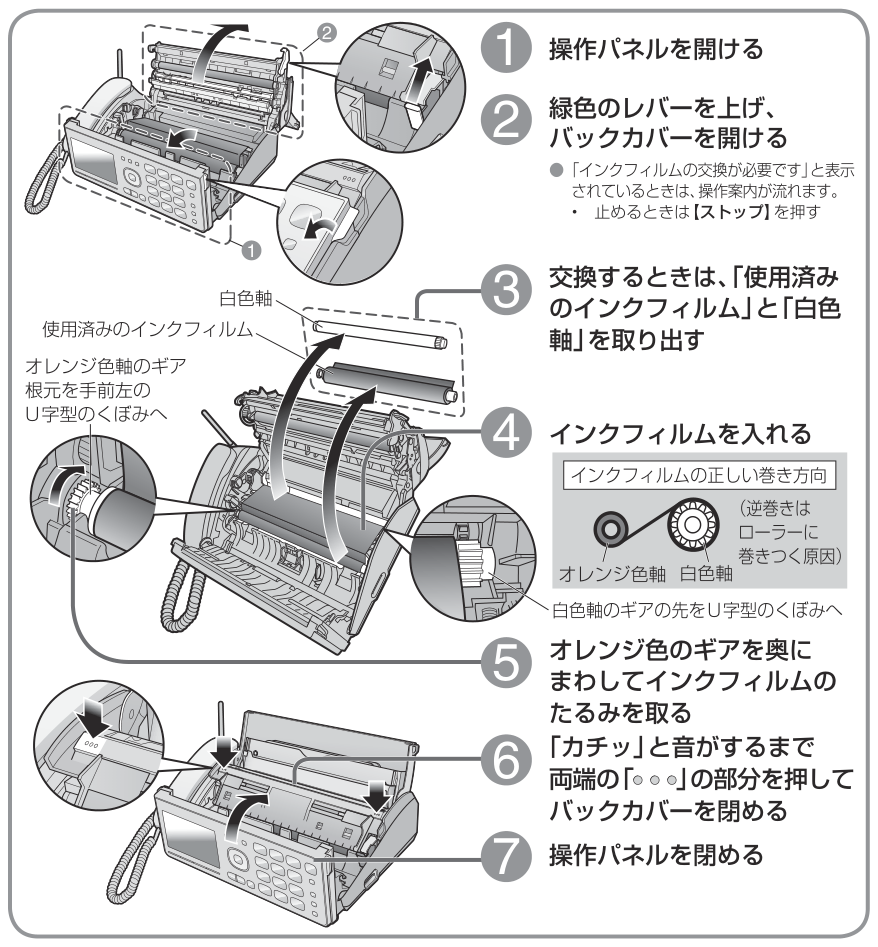
Diagram key
- 1: Open the operation panel.
- 2: Raise the green lever and open the back cover.
- Green-lever inset: The complete inset arrow shows the same lever-lifting direction.
- 3: When replacing film, remove the used orange-axle ink film and the old white axle.
- Used ink film: Remove the exhausted film assembly.
- White axle: Remove the old separate white axle before fitting new film.
- Orange-gear root: Fit it into the front-left U-shaped recess.
- 4: Insert the new film.
- White-gear tip: Fit its tip into the U-shaped recess.
- Winding-direction inset: The orange and white axles must follow the complete printed winding-direction diagram; reversing the winding can wrap film around a roller.
- 5: Turn the orange gear toward the back to remove slack.
- 6: Press both marked back-cover ends until they click closed.
- Repeated ••• closure marks: Both illustrated marked ends must be pressed; the inset enlarges the same closing action.
- 7: Close the operation panel.
- Thermal-head warning: Do not touch the thermal head; this can cause white or black print lines.
- Replacement guidance: When the film-replacement message is present, spoken guidance plays; Stop ends it.
親機の接続・設定
Instructions from the manualConnect the base and perform initial setup11 steps
- Raise the antenna.
- Push both receiver-cord connectors fully in until they click, respecting the shown lever orientations.
- Connect AC100 V power, then connect the supplied six-position two-conductor telephone cord until it clicks.
- A four-conductor cord may cause noise.
- Do not operate during automatic line-type checking.
- At the date/time prompt press Function, enter year, month, day and 24-hour time and Set; Left/Right corrects entries.
- Choose spoken dialing with star for yes or hash for no; Stop or about two minutes without operation chooses yes.
- Verify the manual-listed 177 weather-service test, which incurs charges; after hikari/ADSL connection verify the listed free/service/emergency numbers can connect.
- Without a telephone cord, demonstration starts after about twenty minutes; connecting it cancels demonstration and starts line checking.
- Ask the telephone provider about three-pin or directly wired sockets.
- Do not connect unspecified business/home telephone systems.
電話の回線種別を手動で
Instructions from the manualSet telephone line type manually4 steps
- Use base Function #079, Set, Up/Down to choose 自動, プッシュ, 20 or 10, Set.
- For manual choices press Stop.
- If automatic detection fails, try プッシュ, 20, then 10 in that order.
- If none permits calls, ask NTT on 116.
いろいろな接続
Instructions from the manualConnect hikari, ADSL, ISDN or PBX service11 steps
- For hikari, ADSL or IP service ask the provider about connection to the adapter telephone port and consult its manual.
- Some environments do not work properly.
- For ISDN use a terminal-adapter analog port and set tone dialing; follow its manual for additional-number, Caller ID, call waiting or answer difficulties and polarity/DSU settings.
- For specified discontinued Panasonic home systems108/208/System Home Telephone use the discontinued VJ-6651M fax adapter, enable PBX Connection and F-Net.
- Other unspecified systems must not connect.
- For a PBX enable PBX Connection; Caller ID, Call Waiting Display and modem dial-in are unavailable, and modem dial-in must be disabled.
- For voice echo or varying level adjust TA/Splitter Connection.
- Do not parallel-connect when using Caller ID, Call Waiting Display, modem dial-in or additional-number service; cordless parallel phones can prevent handset use.
- Never lift a parallel phone during fax communication.
- Transfer calls only after the call-time display appears; operation within the first ten seconds may disconnect.
- On a parallel phone switch a pulse line to tone as necessary, press star9 and replace the receiver gently for remote fax reception.
子機の電池パックを入れる・交換する・10時間充電する
Instructions from the manualInstall, replace and charge the handset battery10 steps
- Open the battery cover by pressing its mark and drawing it forward.
- For replacement disconnect and remove the old pack.
- Connect the specified KX-FAN57 pack and place it inside; retain the covering and the cover cushion.
- Close the cover.
- Connect the charger to AC100 V and charge about ten hours.
- KX-FAN57 is NiMH, DC2.4 V, 630 mAh.
- Replace a pack when its level flashes after only a few minutes despite a full charge.
- Remove it for more than one week off the charger or with charger power disconnected; recharge before next use.
- Tape the terminals or place the old pack in a plastic bag for a participating battery collection point.
- Do not short, strip its covering or disassemble it.
電話をかける
Instructions from the manualMake and answer voice calls7 steps
- On the base lift the receiver, confirm dial tone and dial; replace it to finish.
- For incoming calls lift it to answer.
- On the handset take it off the charger and press Talk, confirm dial tone and dial; press Off or return it to finish.
- Answer incoming handset calls with Talk.
- If a slow fax calling tone or silence is heard, press base Fax and replace the receiver, or handset Function, select ファクス受信, Set, Yes.
- If no recording paper was loaded, load it and print the stored fax.
- Automatic reception is off by default and has a separately reviewed setting.
ファクスを送る
Instructions from the manualSend a fax and load originals9 steps
- Press Fax.
- Open the recording-paper tray.
- Match the document guides to the original width and insert up to five originals face up.
- Raise the recording-paper stands before insertion.
- Choose ふつう字, 小さい字 or 写真 with Up/Down; if the quality prompt is absent press Secure/Resolution first.
- Verify the destination number, dial and press Fax.
- If the destination does not answer, automatic redial repeats at one-minute intervals up to three times.
- Automatic redial does not work when sending after lifting the receiver or pressing Monitor.
- Use the permitted original sizes and thicknesses.
Send using redial, phonebook or speed dial4 steps
- Press Fax and load permitted originals.
- Adjust quality for photos or small text.
- Select the recipient through base redial, phonebook or speed-dial operation, without lifting the receiver.
- Press Fax.
ファクスを電話に出て
Instructions from the manualReceive and print an incoming fax13 steps
- When automatic reception is enabled, the unit answers after three rings even with answering off; five rings can be selected through Home Ring Count.
- The caller incurs charges after this answer even if you do not answer.
- A fax is received automatically.
- A voice call rings again nine times, then plays the call-later/fax message and disconnects if unanswered.
- Nuisance prevention changes this behavior; answering-on uses the answering response.
- For memory reception the Call History/Fax Print indicator lights.
- To print all new faxes, load paper, press Fax Print, then Copy.
- Press star to erase printed faxes or hash to retain them; only actually printed faxes are erased.
- If paper runs out use individual printing with a starting page.
- When a slow fax calling tone is heard after you answer, friendly reception starts automatically and the base receiver can be replaced.
- Otherwise press base Fax and replace the receiver, or handset Function, select ファクス受信 with Up/Down, Set, Yes.
- Answering after seven or eight or more rings can prevent reception.
- Press base Stop to cancel reception.
記録紙をセットする
Instructions from the manualLoad recording paper8 steps
- Open the recording-paper tray.
- Raise the front paper stand first, then the rear stand.
- Fan and align up to fifteen A4 sheets, printing side at the back, and insert slowly without pushing or dropping them.
- Before adding paper remove the remaining sheets and reload together.
- Do not add while printing.
- After use remove remaining paper, fold either side of the stands and close the tray to prevent dusty-paper jams.
- Keep the machine out of drafts that can tip paper forward.
- If paper must remain loaded, use the separately sold KX-FAN600 cover.
留守セットする
Instructions from the manualEnable answering and play new messages12 steps
- Press Auto Answer to light the indicator; the default answering delay is four rings.
- During greeting playback hash cycles 固定1, 固定2, 自作1 and 自作2; custom choices require a recording.
- Use #121 to change answering rings to2,4,6,9 or toll saver.
- Nine rings can outlast the sender fax tone.
- Without SD, answering and call recording share about twelve minutes and fifty items; each message is two minutes by default, or the available maximum when configured.
- SD changes the documented capacity.
- Handset Function, 留守電操作, Set, 設定 also enables answering.
- To cancel use base Auto Answer with receiver on hook, or handset Function, 留守電操作, Set, 解除.
- New messages play.
- At the erase prompt base star twice or handset Yes twice erases played new items; hash or No retains them.
- Nuisance prevention changes answering behavior.
- Voice messages can cut off after six seconds of silence or very quiet speech.
文字入力のしかた
Instructions from the manualEnter and edit names and characters10 steps
- Use the printed dial-key character table.
- Base Character changes 漢/カナ/英/数 modes; on the handset repeatedly press the displayed 漢/カナ/英/数 soft key.
- Clear removes one character.
- Left/Right moves the cursor.
- Base Block or handset Hold inserts a space.
- Holding Clear at least two seconds erases from the cursor onward.
- Before kanji conversion input up to six hiragana characters; choose a candidate with Up/Down and press Set.
- To retain hiragana press Set without conversion.
- To change the conversion boundary press Clear to return to hiragana, move Left/Right to the last character to convert and press Down.
- Complex kanji may display with modified or omitted strokes and the desired conversion may be unavailable.
親機で電話帳を使う
Instructions from the manualRegister, edit or delete base phonebook entries10 steps
- Registration or correction is unavailable during a call.
- Base phonebook holds 150 entries.
- Press Left/Phonebook, Set, enter a name up to ten fullwidth/twenty halfwidth characters, Set, check or correct its phonetic reading up to twelve halfwidth characters, Set, enter up to twenty-four telephone digits including area code, Set, enter a group number 1–9 and Set.
- Repeat name through group for more entries, then Stop.
- Four preset service numbers count within capacity and can be changed or removed.
- Use the phonebook, select an entry and Edit to revise name, reading, number and group in order, confirming each with Set.
- To erase an entry select it, Clear, star, Stop; full erasure has its own function setting.
- For spoken-name accents select the entry, Playback, when the さん suffix prompt appears press star to enter accent editing, use 1–8 for accent position, star to switch surname/given name, 0 for flat or 9 for the new-registration accent; wait about ten seconds or press Set, repeat for more entries and finish with Stop.
- Hash toggles the さん suffix when editing that suffix; wait about ten seconds or Set to save.
- To suppress spoken phonebook names disable the corresponding setting.
子機で電話帳を使う
Instructions from the manualRegister, edit or delete handset phonebook entries8 steps
- Registration or correction is unavailable during a call.
- Press Phonebook, Register, enter a name up to ten fullwidth/twenty halfwidth characters and Set; verify/correct up to twelve halfwidth phonetic characters and Set; enter up to twenty-four telephone digits with area code and Set; choose group 1–9 and Set.
- Repeat for more entries, then Off.
- Capacity is 150 entries including four preset service numbers, which can be changed or removed.
- To edit, select an entry and Edit, revise name, reading, number and group in order, confirming each with Set.
- Select an entry, Clear and Yes to erase it, then Off.
- Full phonebook erasure has its own setting.
- A redial record can be selected and registered through the same name/reading/number/group sequence.
電話帳を転送する
Instructions from the manualTransfer phonebooks between units7 steps
- Operate the source unit with a handset near the base and charged.
- From the base press Phonebook, Flash, choose the destination and Set.
- Select 個別 for one entry, choose it and Set; repeat as needed.
- For the whole phonebook choose 一斉, Set and Set again; Stop when finished.
- From a handset press Phonebook, Transfer, choose the destination and Set.
- Select 個別, Set, entry and Transfer, repeating as needed; for all entries choose 一斉, Set and Set again, then Off.
- Verify the destination phonebook afterward.
子機でワンタッチダイヤル
Instructions from the manualRegister handset one-touch dial3 steps
- Handset one-touch dial uses an existing handset phonebook entry and stores three assignments.
- Press Function, the desired 1–3 One-touch button, Register, select the entry and Register.
- For reassignment use Change then select/Register; for removal use Clear and Yes.
親機で短縮ダイヤルを使う
Instructions from the manualRegister or delete base speed dial7 steps
- Press Speed Dial.
- For a new assignment choose an unregistered slot; for correction choose the existing slot.
- Press Edit, select a phonebook entry with Up/Down and Set.
- Repeat as needed and Stop.
- Base stores nine assignments.
- Confirm by selecting an assignment; Right reveals its number.
- Erasing an assignment does not erase the phonebook entry: Speed Dial, select slot, Clear, star, Stop.
親機で電話をかける
Instructions from the manualBase redial, phonebook, speed dial and monitor6 steps
- For redial choose Right/Redial then Up/Down and lift the receiver; the ten newest calls are retained.
- To erase a redial record select it, Clear, star, Stop.
- For phonebook dialing press Left/Phonebook and search all entries, phonetic digits 0–9 or hash then group 1–9; select the entry and lift the receiver.
- Right shows its telephone number; Left returns.
- For speed dial press Speed Dial, the slot 1–9 or select with Up/Down, then lift the receiver.
- To listen before lifting press Monitor, dial and lift the receiver when the recipient answers; the monitor microphone does not support two-way conversation.
子機で電話をかける
Instructions from the manualHandset redial, phonebook and speakerphone6 steps
- For redial press Right/Redial, select among the ten newest calls and press Talk; use Clear and Yes to erase a selected record.
- For phonebook press Phonebook, search all, phonetic digits 0–9 or group by hash then Up/Down and Set; select and press Talk.
- Detail then Right shows the number; Back returns.
- For one-touch press Talk then the assigned 1–3 button; using only the assigned button is also allowed.
- For speakerphone press Speakerphone, dial and speak clearly within about 50 cm of the microphone, taking turns.
- Press Off to finish.
通話中にできること
Instructions from the manualHold, call waiting and handset voice controls13 steps
- Press Hold during a call.
- The caller hears the selected hold melody.
- Press Hold again to retrieve on the base; if the receiver was replaced lift it.
- On the handset press Talk to retrieve; the hold reminder sounds every four seconds and can be disabled.
- Press Flash for subscribed call waiting and press it again to return.
- Call rejection, nuisance prevention, differentiated ringing, spoken Caller ID, call blocking and modem dial-in do not work for call-waiting calls.
- During an external handset call use Function, select 受話音質, Set, select the quality with Up/Down and Set.
- Options are 標準, ノイズカット弱, ノイズカット強, 高音強調, 低音強調.
- It does not work during speakerphone, intercom or doorphone use and remains set until changed.
- For voice changing during a handset incoming telephone or doorphone call use Function, ボイスチェンジ, Set, Yes; repeat to cancel.
- It is unavailable for outgoing telephone calls, call-waiting calls during an outgoing call and call recording, and ends when the call ends.
- It also cannot be used during intercom or a call first answered on a parallel telephone.
- For mute use Function, ミュート, Set; cancel with Function, ミュート解除, Set.
通話を録音する
Instructions from the manualRecord external calls and previous audio14 steps
- Manual call recording shares about twelve minutes of internal memory; SD changes the documented capacity.
- On the base during a call press Call Record then star; press star again for a warning to the other party or hash to omit it.
- For the preceding approximately one minute press Call Record then hash before ending your call, even if the remote party already hung up.
- On the handset use Function, 通話録音, Set, choose する and Set for the warning or しない and Set to omit it.
- For the previous minute choose 前から録音, Set, Yes.
- Stop base recording with Stop or handset Function, 録音中止, Set.
- Internal and doorphone calls cannot be recorded.
- Putting a call on hold prevents saving audio from before that hold.
- Saving previous audio temporarily permits only calling, answering and doorphone response.
- Full SD recording is off by default: configure #193 and insert SD before the call; it automatically records the configured incoming/outgoing calls, up to about120minutes per item excluding hold time, without a start warning.
- No SD free space, intercom, doorphone or insertion during a call prevents full recording.
- Rejection stops it; hold, transfer and doorphone response pause it until the external call resumes.
- Call waiting continues the recording.
- Spoken dialing is unavailable during full recording.
子機にかける(内線電話)
Instructions from the manualMake and receive intercom calls6 steps
- The base Intercom Call setting can enable spoken intercom calling.
- From base press Internal; with multiple handsets or a doorphone select the destination and Set, enter 1–6, or star to call all.
- From a handset press Internal; with multiple handsets or doorphone choose the destination and Set, 0 for the base, 1–6 for a handset or star for all.
- When a called handset answers the base, lift the base receiver and speak; replace it to end.
- Answer a handset with Internal and end with Off; answer base by lifting and replace it to end.
- If an external call rings during intercom, first replace the base receiver or press handset Off to end intercom; then answer the external ringing call by lifting the base receiver or pressing handset Talk.
迷惑な電話をお断りする
Instructions from the manualReject an unwanted caller6 steps
- On the base during ringing press Block.
- During a call press Block then star for the rejection message; the message plays twice and the call disconnects.
- For a chime while talking press Block then hash; tell the caller a visitor has arrived and hang up, since the chime alone does not disconnect.
- On the handset during ringing choose Reject then Yes; during a call use Function, 通話拒否, Set and choose the voice or chime method with Set.
- With Caller ID this can register the caller in nuisance blocking; withheld/public/out-of-area categories can be blocked.
- To remove an unintended new block follow its confirmation or the reviewed blocking setting.
電話に出る前に相手の声
Instructions from the manualScreen a caller before answering6 steps
- During ringing press Secure on the base, or the displayed secure-screening handset button.
- The unit asks the caller's name; listen through the speaker.
- Lift the base receiver or press handset Talk to answer.
- Star plays the rejection message and automatically disconnects; hash repeats the request for a name.
- Stop on base or Off on handset ends the call.
- Two greeting variants are available through Secure Response Message.
自動的に電話に応答し、迷
Instructions from the manualNuisance prevention and saved prevention audio13 steps
- With Caller ID, registered base-phonebook callers and the documented Panasonic support numbers bypass nuisance prevention.
- Hold base Nuisance Prevention at least three seconds to enable or disable it; press briefly under two seconds to check its state.
- A caller hears a recording warning before local ringing and incurs call charges when answered by the device.
- Without SD each answered call overwrites the single nuisance-prevention memory, up to about ten minutes, starting about two seconds after speaking begins.
- With SD the recordings are saved there; a full card or1000items falls back to nuisance-prevention memory.
- It does not operate during intercom, doorphone or copying.
- Toll saver, automatic home answering and spoken Caller ID do not operate normally while it is active.
- To retain internal nuisance audio, disable prevention first, use Function, 迷惑防止メニュー, Set, 録音(本体)を保存, Set, select internal or SD destination if SD is present, Set, star, Stop, then re-enable prevention.
- To listen to the temporary nuisance memory first disable prevention, use the same menu and 録音(本体)を再生, Set, listen, Stop and re-enable.
- This temporary memory cannot be saved or played from the handset.
- Playback uses Up/Down volume, Playback restart,2pause/resume,7back10seconds,8forward30seconds,Stop.
- Saved nuisance recordings use normal message playback/erasure; the base marks them(迷惑防止).
- With SD, the nuisance menu also offers 録音(SD)を再生 and an item list.
ファクスを自動で受ける
Instructions from the manualAutomatic fax reception11 steps
- Automatic reception is off by default.
- Enable base #116する while answering is off.
- It answers after three rings, or five through #112; choosing other home counts disables automatic reception, and disabling it restores fifteen rings.
- After the device answers, the caller incurs charges.
- A fax receives automatically; a voice call rings again nine times and then the call-later/fax message plays and disconnects.
- Nuisance prevention changes the behavior.
- For silent reception select #114常にする orタイマー with start/end24-hour times while answering is off.
- It answers without ringing; a fax receives, while a voice call starts ringing after about seven seconds, then nine rings and disconnection.
- Answering enabled, full internal fax memory, manual fax dialing after connection, some IP lines/equipment or parallel telephones can still ring.
- For answering reception press Auto Answer to enable.
- For fax-only select #115する and enable Auto Answer; it answers after one ring unless ringing volume is Off, receives fax only and cannot take voice calls.
ファクスを印刷する
Instructions from the manualPrint and erase stored faxes9 steps
- To print all new internal/SD faxes load up to fifteen recording sheets, press Fax Print then Copy; star erases printed faxes, hash retains.
- If paper runs out printing stops; use individual printing with a starting page to resume.
- To print one load paper, Fax Print, Down only when subscribed Caller ID is used, Set, select with Up/Down.
- Copy prints all pages; Fax, starting-page number, Set prints from a specified page.
- Printing from page2onward has no following erasure prompt; otherwise star erases or hash retains.
- The list marks new/unprinted, SD-stored and high-capacity photo/newspaper faxes; scanned originals are(読込原稿).
- For one deletion use Fax Print, Down only with Caller ID, Set, select, Clear, star. #088 erases all with an internal/SD/both choice when SD is inserted.
- For all internal faxes to SD use Function, SDカードメニュー, Set, すべてのファクスをSDへ保存する, Set, star; after saving star removes the internal originals if desired.
- A standard A4 roughly700-character page takes about ten seconds; complex/multiple pages take longer.
コピーする
Instructions from the manualCopy an original4 steps
- Load recording paper, then permitted originals.
- For photos or small text adjust the quality.
- Press Copy for one copy; multiple copies cannot be selected. ふつう字 changes automatically to 小さい字 when copying.
- A document longer than A4 prints only its A4 portion; use 分割コピー for the remainder on subsequent pages.
親機で用件を再生・消去する
Instructions from the manualPlay and erase recordings on base or handset13 steps
- Audio plays from SD before internal memory.
- New messages play with base Playback.
- When no new messages exist, Playback, chooseすべて再生,Set plays all, or個別で再生,Set,select,Set plays one; Stop ends.
- At an erase prompt star twice erases played new messages, hash retains.
- Up/Down changes volume,Left repeats/current-or-previous,Right advances,Playback returns to the first item,Clear then star erases the current item,2pauses/resumes,7rewinds10seconds,8advances30seconds,Set then star saves to SD,Stop ends.
- SD marks card audio,未保存internal audio not yet copied and no label internal audio already copied.
- With no new messages, individual list,select,Clear,star,Stop erases one. #163 erases all, selecting internal,SDorboth if SD is present.
- To save all internal audio use SDカードメニュー,すべての用件をSDへ保存する,Set,star; after saving star can erase internal originals.
- Saving may take the recording duration.
- On the handset Function,留守電操作,Set,再生,choose新規のみ再生orすべて再生,Set;Yes twice erases at the prompt,No retains.
- Handset playback usesUp/Downvolume,Left/1previous/current,Right/3next,最初へfirst,4new-first,5all-first,star4thenYeserasecurrent,star5thenYeseraseall,2pause/resume,7back10seconds,8forward30seconds,9stop.
- While cancelling answering or playing only new messages,eraseall removes only the new ones.
- For complete handset erasure use Function,留守電操作,Set,再生,全消去,Yes.
外出先から留守番電話を
Instructions from the manualRemote answering playback and forwarding15 steps
- Use a touch-tone phone; fax-only mode prevents remote message playback.
- Register a four-digit answering PIN with base #006 and enable answering before leaving.
- Avoid0000orparts of a telephone number and change the PIN periodically.
- Call home,enter the PIN during the greeting;4orwaiting about four seconds plays new messages,5plays all.
- Before/after playback0cancels answering,1enables preconfigured forwarding,2disables it,4new,5all,star55erases all internal messages.
- During playback1previous/current,2pause/resume,3next,7back10seconds,8forward30seconds,9stop,star44erasecurrent,star55eraseallinternal.
- Hang up to finish.
- For forwarding configure #142する,destination up to24digits,Set;register a PIN if absent and enable answering.
- A new message makes the unit call the destination;answer,enter the PIN when instructed,4orwait about four seconds for new,5all,then hang up.
- Unanswered calls end after about50seconds and retry three times about one minute apart,then three times about thirty minutes apart.
- Automatic destination answering or some home/PBX/terminal-adapter connections may prevent forwarding;caller charges start when the destination answers.
- Toll saver via #121 uses three-or-fewer rings for new messages,four-or-more for none;hang up before answer to avoid charges.
- Modem dial-in can prevent correct toll-saver behavior.
- To enable answering remotely call home,wait until ringing becomes quieter,enter PIN,8,wait for completion,hang up.
- It is unavailable with home ringing自動応答しない;留守automatically enables answering after fifteen rings.
Sdカードを使う
Instructions from the manualHandle SD cards and preserve recordings17 steps
- Use SD8MB–2GB, SDHC4–32GB or SDXC48–64GB; small-card variants need their dedicated adapter.
- Some cards may not work.
- Format new cards or cards formatted elsewhere in this unit after backing up important data.
- SD is not supplied.
- Insert label up with its cut corner facing inward, straight until accepted; do not touch contacts.
- The SD symbol flashes during checking/read/write and becomes steady at standby.
- Never remove SD or power while it flashes.
- To remove, confirm it is not flashing, push the centre, then pull straight out.
- LOCK prevents recording, fax/phonebook saving, erasure, formatting and organization.
- Back up important data; faults, static and interference may destroy it.
- Unsupported old-format data can be left unchanged by hash and removing the card, or converted with star twice; converted data cannot be read by the earlier model.
- Audio capacity is about2000hours on64GB,1101hours on32GB,272hours on8GB or68hours on2GB, limited to1000items.
- Image capacity is about50000pages on64/32GB,27276on8GB or6829on2GB, limited to1000items and50pages per item.
- These image counts use A4 roughly700-character standard-quality faxes; dense text/photos reduce them.
- Phonebooks use up to10files.
- Fax reception and original scanning still use internal fax memory, so available SD space alone does not guarantee acceptance.
- A full card falls back to internal memory.
Sdカードの残量
Instructions from the manualSD copy, import, management and format operations22 steps
- Use Function, SDカードメニュー, Set, choose the exact operation with Up/Down and Set.
- For SDの残量表示, choose free capacity, remaining recording items/time, fax/original/PC-data items/pages or phonebook files; Stop afterward. 原稿をSDへ保存する: load originals, select Photo for tonal originals, Set to scan, then star; stored originals are monochrome and marked(読込原稿), and use internal fax memory.
- Print/erase them through the fax list; original-size printing needs エコノミー受信あり(2).
- SDを整理する, then star, cleans up unusable leftover data after PC deletion or renaming.
- SDをフォーマットする, then star, irreversibly erases every card item; back up important data first.
- SDファクスの新規を解除する, star, Stop removes all current new-fax marks; viewing/printing on a PC does not remove them.
- For all internal messages use すべての用件をSDへ保存する, star, then star after saving to erase originals if desired; copying can take the recording duration.
- For all internal faxes use すべてのファクスをSDへ保存する, star, then star after saving to erase originals if desired; about ten seconds per A4 roughly700-character page, longer for complex/multiple pages.
- For phonebooks use 電話帳をSDへ保存する, star, Stop; all entries form one file.
- To import choose SDの電話帳を読み込む, file, Set, hash to append or star to replace, then star, Stop.
- Append ignores exact duplicate entries but same-name different-number/group entries can be added, until capacity is reached.
- Replace also removes speed dials and sleep-specific callers and disables unregistered-number blocking.
- Imported spoken-name settings reset.
- To delete a phonebook file select that import submenu, file, Clear, star, Stop; PC read-only status does not protect it.
- SD data uses JPEG/TIFF image pairs, WAVE audio split every twenty minutes and TEXT metadata.
- Do not rename or delete folders/files in other equipment.
- SDXC requires SDXC-compatible readers.
- View supported images/audio using the documented compatible software or a verified Viera; compatibility lists retain the manual edition scope.
- PC-created data must first use the manufacturer fax conversion software with a card recognized by this unit.
- In SDのパソコンデータを送信する, select an item, Fax, dial, Fax to send; for printing load paper and Copy, then star to erase or hash to retain.
- Printed PC data can reduce; use エコノミー受信あり(2) for original size.
- Select an item, Clear, star to erase one, or SDのパソコンデータをすべて消去する, star for all; large deletions take time and PC read-only attributes do not protect data.
ナンバー・ディスプレイ
Instructions from the manualCaller ID and call-waiting display service7 steps
- Arrange the chargeable Caller ID contract and completed installation; basic model configuration is normally automatic.
- For NTT Call Waiting Display enable its setting through Function #137.
- If numbers fail to display, use the source troubleshooting checks, including Function #133 set to 自動.
- Caller ID is unavailable through home-telephone/PBX connections and ISDN needs correct terminal-adapter settings.
- Base and handset can announce registered phonetic names; differentiate ring groups through the corresponding settings.
- Withheld, public and out-of-area callers show those categories; a bad-line signal can show unable-to-display or external incoming rather than a number.
- Call-waiting caller numbers display about30seconds and are saved in arrival history.
迷惑電話を受けないようにできます(着信拒否)
Instructions from the manualBlock selected calls5 steps
- Blocking needs Caller ID.
- Configure withheld, public, out-of-area, 0120/0800, unregistered-number or individual number blocking through their respective settings.
- Refused calls get the selected rejection message and disconnect.
- Normal call-waiting/doorphone/intercom use can bypass blocking as specified; Phonebook contacts and Panasonic consultation numbers bypass 0120/0800 blocking.
- The busy-message individual blocking exception still operates during intercom/doorphone calls.
子機で着信履歴を使う
Instructions from the manualUse handset call history10 steps
- Press Left/Caller ID, repeatedly Down to inspect entries, then Off.
- Base and handsets share thirty arrival records.
- This procedure requires Caller ID service.
- For a stored number select it and Talk to call.
- Clear, Yes erases one; Off finishes.
- Left/Caller ID, Full Erasure, Yes erases all.
- To block select the entry, Register, use Up/Down for 迷惑設定 when a number is available or 拒否設定 for withheld/public/out-of-area, Set, Yes, Off.
- To add a number choose Register, 電話帳登録, Set, then the normal handset phonebook steps.
- Right reveals undisplayed number digits.
- Blocked calls are saved by default; #185保存しない omits them.
モデムダイヤルインサービス
Instructions from the manualConfigure modem dial-in numbers16 steps
- Contract modem dial-in or eligible hikari additional numbers, not PB-signal dial-in.
- Configure this feature after the service starts.
- Base Function #131, Set, choose あり or なし and Set.
- For あり select an unused slot with Up/Down, enter the contracted number with four to twenty digits and Set.
- Choose ファクス専用する or しない and Set.
- For telephone use select base 呼び出す or 呼び出さない and Set, then choose each handset ringing role and Set, continuing for any added handsets.
- For fax-only use select する.
- Finish with Stop.
- Only configured units can answer while ringing; to use answering or automatic reception include the base.
- Fax-only numbers receive without ringing and cannot carry voice calls or answering messages.
- Only one simultaneous call/communication is possible.
- PBX/home-telephone connections cannot use this service; ISDN needs the terminal-adapter settings.
- Call waiting, intercom and doorphone use bypass modem-dial-in ringing; end intercom/doorphone before answering an external call.
- Outgoing caller identification is the primary number.
- Handset-only ringing bypasses nuisance prevention, answering and 0120/0800/unregistered-number blocking.
- Some connection delay is normal.
「選んでケータイ」を使う
Instructions from the manualChosen Mobile Carrier and IP bypass11 steps
- Register a correct fixed-carrier identification number to prefix eligible mobile calls; consult the carrier about current services, identifiers, charges and prefixes.
- Do not enable 選んでケータイ for NTT hikari; other optical or cable IP services may also reject carrier prefixes.
- For 050 IP service configure the IP bypass number after the carrier feature; ask the provider about this number.
- Function #198 selects あり or なし and Set; for あり enter the carrier identifier up to ten digits, Set, Stop.
- Function #199 selects the bypass setting; enter up to eight digits, Set, Stop.
- Function #197 selects a prefix slot and accepts four or five mobile-prefix digits; to erase hold Clear at least two seconds with the cursor at the beginning, then Set and Stop.
- Preset prefixes are 0901–0909, 0801–0809 and 0701–0709.
- Charges and prefix-dependent rates come from the selected carrier.
- Using an eastern carrier identifier in the western region or vice versa can prevent calling.
- The feature symbol lights when enabled and flashes about five seconds when used.
- To bypass the identifier temporarily dial 1111 before the mobile number.
キーロックを使う
Instructions from the manualUse key lockView
Hold hash at least three seconds until a beep to lock either unit; repeat to release.
親機で日付・時刻を
Instructions from the manualSet date and time6 steps
- Base Function #001, Set, enter year, month, day and time with the dial keys, Set, Stop.
- Use twenty-four-hour time, midnight 00:00.
- Under continuous power the displayed clock can drift about sixty seconds per month.
- Power failure or disconnection can reset or shift date/time; stored message and call-history timestamps remain.
- A wrong clock can disrupt timers, so correct it.
- Handsets display the base date/time; it is unavailable while out of range.
ワイヤレスアダプター機能を
Instructions from the manualRegister or remove a wireless-adapter doorphone12 steps
- Only one Panasonic 1.9GHz wireless-adapter television doorphone base can connect for audio; 2.4GHz doorphones and VE-DA10/VE-DA10-H adapters cannot.
- The June2016 supported list is VL-SWD701KL/SVD701KL/SWD701KS/SVD701KS/SWD501KL/SVD501KL/SWD501KS/SVD501KS/SWD303KL/SVD303KL/SWD302KL/SVD302KL/SWD210K.
- Follow the applicable doorphone manual too.
- Disconnect the telephone cord during registration.
- Base Function #164, Set, 2.
- Within two minutes on the illustrated VL-SWD701KL: Settings/Information, Change Settings, Register/Remove, Register, Wireless Adapter Function; completion displays registration complete, then Finish.
- Check reception at the installation location.
- Press each doorphone call button once to verify ringing; otherwise outgoing calls to that doorphone are unavailable.
- No repeater can relay the fax-to-doorphone link.
- Across fax and doorphone only two repeaters are permitted and their registration numbers must differ.
- Removal: base Function #164, Set, 1, star, Stop.
- On the VL-SWD701KL use Settings/Information, Change Settings, Register/Remove, Remove, Wireless Adapter Function, Yes, then Finish.
ドアホンに出る
Instructions from the manualAnswer a doorphone and use remote doorphone forwarding15 steps
- For a visitor lift the base receiver and replace it to finish; on a handset press Internal and Off to finish.
- Take turns speaking.
- During a telephone call either end it first, or press Hold, Internal to talk to the visitor, then base Internal or handset Talk to resume the telephone call.
- A telephone call during doorphone use needs ending the doorphone call before answering.
- Doorphone calls cannot be transferred, recorded, handled by handset speakerphone or answered during fax communication; the base still rings during fax communication.
- Doorphone slots 1–3 use internal numbers 7–9 and the intercom calling operation.
- Configure Doorphone Warp for a tone-capable destination.
- For an answering-only rule choose 留守 and enable answering; for all calls choose あり.
- When the forwarded call arrives answer within approximately fifty seconds.
- Follow its message and press hash twice within thirty seconds, then speak.
- If someone answers the home doorphone the forwarded call plays a message and disconnects.
- To end press star then hash, then hang up; these tones are heard by the visitor.
- Each forward incurs call charges.
- On a tone line the forward begins about fifteen seconds after the doorphone call; pulse lines take longer and are not recommended.
- Toll-free destinations cannot be used and home-telephone, PBX or terminal-adapter connections may prevent forwarding.
窓/ドアセンサーを
Instructions from the manualRegister, remove and use window or door sensors13 steps
- Use up to fourteen specified sensors, distributed among areas 1–3.
- Follow their manuals and verify radio placement; unobstructed range is within about 100 m.
- Disconnect telephone cord for registration.
- Function #084, Set, 2, choose sensor and Set, area and Set, name and Set.
- Within two minutes set sensor Mode 1, insert its battery and hold Register at least three seconds within two minutes.
- Registration gives three short tones followed by a roughly one-second long tone.
- Initial warning level is low.
- Remove with #084, Set, 1, select sensor, Set, star, Stop; remove its unused battery.
- High mode sounds base/handset at maximum about three minutes and the sensor about thirty seconds.
- Door exit delay defaults to about three minutes; return prewarning repeats at about twenty-second intervals for about three minutes, then full alarm.
- Stop the prewarning and set low, or cancel answering-high, before full alarm when returning.
- Low mode displays the opening about ten seconds and rings base/handset about three seconds.
- Base Stop or handset Stop/Off stops high warning; low uses Off.
報知レベルを設定する
Instructions from the manualSensor level, state, history and remote notification11 steps
- On the base use Function, Sensor Menu, 窓/ドアセンサー:報知レベルの設定, Set, area, Set, high/low/answering-high/off, Set, Stop.
- Handset uses Function, window/door sensor, Set, 報知レベル設定, Set, area, Set, level, Set, Off.
- Answering-high follows answering enabled for high and disabled for low.
- Confirmation-required needs checking that area's sensor information.
- Sensor information menus show open/closed, any-open/all-closed, confirmation-required, out-of-range or battery empty; check the connection for out-of-range and replace an empty sensor battery.
- Base Sensor Menu shows the latest fifty openings or prints at most two pages.
- To hear status remotely use a touch-tone phone, configured answering PIN and answering enabled: call home, enter PIN during greeting, hash+2, then hang up.
- Hash+1/0 enable/disable configured notification; hash+4/5/6/7 set all areas high/low/off/answering-high.
- Notification requires a configured destination and high warning level.
- It calls after full door alarm, repeats the opened-sensor message five times, and cuts off unanswered calls after about fifty seconds, retrying ten times about thirty seconds apart then five times about thirty minutes apart.
- Automatic answering, toll-free destinations and some home/PBX/terminal-adapter lines prevent notification; each notification incurs charges.
中継アンテナを使用する
Instructions from the manualRegister or remove a repeater7 steps
- Use up to two specified 1.9 GHz repeaters; 2.4 GHz repeaters cannot register.
- Check placement and the repeater and television-doorphone manuals.
- Connect repeater power near the base and disconnect telephone cord while registering.
- Function #101, Set, 2, repeater number; first unit proceeds directly to repeater registration, while second unit uses 1 for independent or 2 for serial connection.
- Within two minutes hold repeater Register about three seconds; its radio/register light flashes green and becomes steady when registration succeeds.
- Remove via #101, Set, 1, number, star, Stop; remove the farther repeater first in a serial pair.
- No repeater-side removal step is required.
子機を増やす(増設・減設)
Instructions from the manualRegister or remove a handset11 steps
- The system supports six handsets total including the supplied KX-FKD506 handset; functions vary by handset.
- Keep the telephone cord disconnected during registration.
- Take the new handset off its charger, hold base Internal at least five seconds, then place the handset on its charger within two minutes; the lowest free internal number is assigned.
- For a chosen number use base Function #123, Set, enter the number, then complete the actual handset registration within two minutes.
- The printed KX-FKD506 example is Function #123, Register; other models require their own manual.
- Combined doorphone/telephone handsets need numbered registration.
- To remove a handset place it near the base fully charged and perform base Function #178, Set, choose the number, star.
- Remove the unused battery.
- The handset-side removal setting also clears its registration.
- Removal without the handset can take about ten seconds; if removed only on the base clear the handset registration separately.
- Do not operate without handset1 registered; it retains date/time during an outage until its battery empties.
人感センサー付子機を使う
Instructions from the manualOptional motion-sensor handset operations19 steps
- Requires the separately added KX-FKD603 and its own manual.
- Supplied KX-FKD506 does not have a motion sensor; this system is not a burglary-prevention device.
- Announcement mode informs you of new faxes, messages and missed calls.
- Safety mode prewarns every twenty seconds for about thirty seconds, then repeatedly announces the handset and sounds at maximum in eight cycles; supported reporting handsets are KX-FKD404/505/506/603.
- Base Stop or handset Stop/Off stops warning; turn off safety mode on the sensor handset to prevent another trigger.
- High window/door alarms can override it.
- Sensor Menu on the base displays the latest fifty events or prints at most two pages.
- Notification requires configured destination, verified sensor position and enabled sensor.
- Motion safety alerts cut off unanswered calls after about fifty seconds and retry ten times about thirty seconds apart, then five times about thirty minutes apart; their alert message repeats five times.
- Scheduled presence/absence alerts cut off after about fifty seconds, retry three times about one minute apart then six times about ten minutes apart, and repeat their notice three times.
- In response-present mode hash queries the reacting handset and count; in no-response mode the announcement says no response occurred.
- For scheduled presence/absence monitoring configure #118, choose the required condition, destination, 24-hour notification time and every-day or selected-weekday schedule; Stop to finish.
- Remote star+6/8 enables/disables safety notification, star+7 checks the scheduled response count and star+9 resets it; use touch-tone, answering PIN and enabled answering.
- Scheduled notification is unavailable during a power outage at its notification time.
- A configured no-notification weekday still resets the count at the appointed time.
- Counts reset after notification; Function then 0 resets locally and counting starts about ten minutes later.
- Remote count-check/reset requires scheduled notification configured for response-present or response-absent.
- Automatic destination answering and some home/PBX/terminal-adapter connections can prevent notification; each notification incurs charges.
- A response-present schedule does not notify without a response, and a response-absent schedule does not notify if there was a response.
お手入れ
Instructions from the manualClean base, handset and charger7 steps
- Unplug power before care.
- Key lock allows wiping the operation panel without unplugging, under the explicit source exception.
- Wipe the base with a soft water-moistened firmly wrung cloth.
- Wipe handset and charger with a dry cloth.
- Clean the internal paper feed roller and recording-paper transport roller about monthly through their reviewed jam/cleaning procedures.
- Do not use alcohol, scouring powder, powdered detergent, benzine, thinner, wax, petroleum or boiling water.
- Do not spray insecticide, glass cleaner or hairspray, which can change color or material.
子機を壁(柱)に掛ける
Instructions from the manualWall-mount the handset charger7 steps
- Use the separately sold KX-AN162 wood screws and washers to mount the charger.
- The source drawing specifies twenty-millimetre wood screws, 2.5–3 mm shaft diameter, approximately 9.3 mm head diameter and twenty-five-millimetre spacing.
- Hang the charger holes on the screws, then push the charger diagonally down to the right until secure.
- Secure against falling and injury.
- Avoid weak walls such as gypsum board, ALC, concrete block and plywood eighteen millimetres or less; use the specified attachment method for the material.
- Use the printed twenty-five-millimetre template only at its original scale.
- The base cannot be wall mounted.
原稿について
Instructions from the manualPermitted originals and recording paper12 steps
- Use originals from128×128mm to210×500mm.
- One sheet may be0.06–0.2mm thick; two to five same-size/same-thickness sheets may be0.06–0.13mm, aligned at the leading edge.
- Remove clips/staples and fully dry ink, glue and correction fluid.
- Copy on another copier or use the specified KX-A130 carrier for thinner-than0.06mm, too-small, torn/wrinkled/curled/folded, transparent/tracing, coated, chemically treated or perforated originals.
- Thicker-than0.2mm, cloth/metal, pasted/taped or stiff originals must be copied elsewhere; the carrier is not permitted for those rows.
- Put a permitted original against the closed carrier edge and feed that edge first, one at a time.
- Source scanning diagram excludes about5mm at every edge.
- Use smooth A4 copy paper64–75g/m²; do not use torn, folded, wrinkled, curled, previously printed, advertisement backs or moisture-exposed paper, mix thicknesses or add during printing.
- Do not write with this fax print side down against another surface, or use its printed sheets in other printers/copiers.
- Printing excludes about5mm at top/sides and8mm at bottom.
- Default fax vertical reduction is about92%; Economy Receptionあり(2)prints original size clipping overflow, whileなしprints overflow on another sheet.
- B4/A3 faxes are generally reduced by the sender to A4.
保証とアフターサービス
Instructions from the manualArrange service after reviewed checks6 steps
- Check the complete troubleshooting and display-message entries and the official support resources first.
- If unresolved unplug power and tell the selling dealer the purchase date, exact model and detailed symptoms.
- Read the private-data precautions before repair.
- Bring the warranty with the product for covered carry-in repair; the main unit has one-year coverage, while the battery is consumable and chargeable.
- After the warranty, diagnosis determines whether repair is possible.
- Stop use and unplug for unreliable power operation, burnt smell, abnormal sound/vibration, hot plug/cord, frequent paper/original jams, greatly incorrect clock or other defects, and ask the dealer for inspection.
白や黒の線などが入るとき
Instructions from the manualClean scanning surfaces and transport rollers8 steps
- Unplug power, remove remaining recording paper and fold the stands.
- Open the operation panel.
- Lift the green lever and open the back cover.
- Wipe the scanner glass, flat white surface, recording-paper transport roller and indicated paper-guide areas with a water-moistened firmly wrung cloth.
- Do not touch the glass with fingers or the other indicated internal parts.
- Press both marked back-cover ends until they click; close the operation panel, reconnect power and reload paper.
- Make a copy to verify the lines are gone.
- If dirty received pages persist ask the sender to check their original/scanner; if the sender is clear and cleaning does not help, ask the dealer.
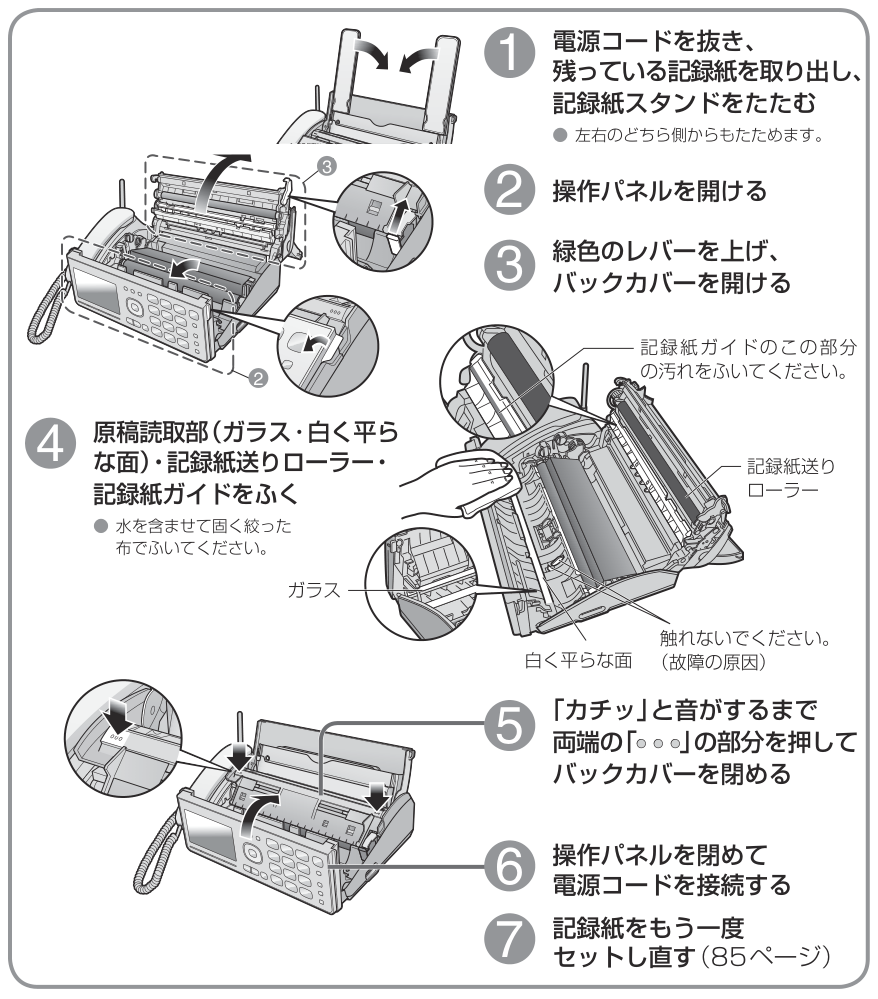
Diagram key
- 1: Unplug power, remove remaining recording paper and fold the stands; either side can fold first.
- 2: Open the operation panel.
- 3: Raise the green lever and open the back cover.
- 4: Wipe the glass, white flat surface, transport rollers and paper guide with a water-dampened, firmly wrung cloth.
- Glass: The document-scanning glass to wipe as instructed.
- White flat surface: The illustrated white document-reading surface.
- Paper transport rollers: The illustrated paper transport rollers require cleaning.
- Paper guide: Wipe the specific portion highlighted in the inset.
- Do-not-touch area: Do not touch the separate part indicated by the warning leader; doing so can cause failure.
- 5: Press both marked ends until they click and the back cover closes.
- ••• marks: Both repeated closure marks identify where to press; the inset enlarges the same action.
- 6: Close the operation panel and reconnect power.
- 7: Reload recording paper correctly using the paper-loading guide.
記録紙が詰まったとき
Instructions from the manualClear recording-paper jam and clean feed roller7 steps
- Unplug power, remove remaining recording paper and fold the stands.
- Open the operation panel and lift the green lever to open the back cover.
- Pull the recording-paper guide down using its finger recess.
- Remove jammed paper from inside.
- Wipe the feed roller with a water-moistened firmly wrung cloth.
- Press both marked back-cover ends until they click, close the operation panel, reconnect power and reload paper.
- Keep the tray closed without paper normally to reduce dusty-paper jams.
原稿が詰まったとき
Instructions from the manualClear original jam and clean document rollerView
Open the operation panel. Remove the jammed original. Wipe the document-feed roller with a water-moistened firmly wrung cloth. Close the operation panel.
親機で着信履歴を使う
Instructions from the manualUse base Caller ID history9 steps
- With subscribed Caller ID, press Caller ID, Up, Set, then Down repeatedly to inspect the shared thirty records; Stop afterward.
- Select an entry and lift the receiver to call, or load an original and press Fax to send.
- For184/186 dialing enter the prefix, Auto Answer pause, Caller ID, select the entry and lift the receiver.
- To erase one use Caller ID, Up, Set, select, Clear, star, Stop; to erase all use Caller ID, Up, Clear, star.
- Function #087, Set prints the history.
- To block select an entry, Block, star, Stop; undo through the relevant blocking setting.
- To add a number select the entry and Set, then complete name, reading, number and group registration.
- Rejected callers remain in history by default; #185保存しない omits them.
- Right reveals number/date details and Left returns.
親機への名前・電話番号の
Instructions from the manualRegister owner name and telephone number2 steps
- Base Function #002, Set accepts the printed sender name up to15fullwidth/30halfwidth characters, then Set, Stop. #003 accepts a displayed sender name up to16halfwidth katakana/Latin/symbol/digit characters, Set, Stop; this appears only on compatible Panasonic faxes during communication. #004 accepts up to20telephone digits, Set, Stop; Block inserts a space, star a plus, Clear corrects.
- Prefix184 suppresses this sender information.
親機でおやすみモードに設定する
Instructions from the manualUse Sleep Mode7 steps
- Hold base star at least three seconds to enable or cancel Sleep Mode.
- It sets answering mode, silent external/doorphone rings, silent answering monitor and memory fax reception; intercom still rings.
- Phonebook/Caller ID readout, base key tones, spoken guidance, motion notices, nuisance prevention, message forwarding, modem-dial-in handset ringing and Doorphone Warp do not operate.
- Window/door/motion alarms and parallel-phone ringing can still sound.
- Cancelling answering also cancels Sleep Mode; the sleep timer end also cancels it.
- A power recovery outside the scheduled sleep period cancels it.
- Set #117 to schedule start/end24-hour times; subscribed Caller ID can permit up to nine base-phonebook callers through #189.
外からかかってきた電話
Instructions from the manualChange an incoming ringtone3 steps
- Base Function #054, Set, choose a ring with Up/Down, Set, Stop.
- On the handset Function #054, Change, choose the ring with Up/Down, Set, Off.
- Eight bells and four melodies are listed.
音量を変える
Instructions from the manualAdjust volume7 steps
- During ringing, conversation or message playback use Up/Down.
- At base standby use Up/Down, choose the volume type, Set; for receiver choose external or intercom/doorphone, Set; adjust and Set or Stop.
- At handset standby use Up/Down, choose type, Change, adjust and Set or Off.
- Lowest ringing level then Down selects Off; Up restores it.
- Ringer has eight levels plus Off, receiver six levels except base intercom/doorphone three, base speaker eight and handset speaker six.
- Only while answering playback, Down at the lowest base speaker level silences monitoring; next use returns to level2.
- Intercom/doorphone and specified low/prewarning sensor sounds still ring at minimum when ringing is Off; high sensor alarms sound at maximum.
親機の機能一覧
Instructions from the manualBase setting 001 — 日付時刻View
Base setting #001. 日付時刻 現在の日時を設定します。 (お 買い上げ時:2016年1月1日 00:00) Function → #001→【決定】→ 年・月・日・ 時刻を入力 →【決定】 ● ●時刻は24時間方式(深夜12:00は「00:00」)で 入力。 Finish with base Stop.
Base setting 002 — 名前(印刷用)View
Base setting #002. 名前(印刷用) 相手が受けたファクスに名前が 印刷されます。 Function → #002→【決定】→ 名前を入力 (全角15文字/半角30文字まで) →【決定】 ● ●文字入力のしかた(22ページ) Finish with base Stop.
Base setting 003 — 名前(表示用)View
Base setting #003. 名前(表示用) 相手機が当社製ファクスの場合 のみ、通信中に相手のディスプ レイに名前が表示されます。 Function → #003→【決定】→ 名前を入力 (半角16文字まで) →【決定】 ● ●文字入力のしかた(22ページ) Finish with base Stop.
Base setting 004 — あなたの電話 番号View
Base setting #004. あなたの電話 番号 相手が受けたファクスに電話番 号が印刷されます。 Function → #004→【決定】→ 電話番号を 入力(20ケタまで) →【決定】 Finish with base Stop.
Base setting 079 — 回線種別View
Base setting #079. 回線種別 電話回線の種類を設定します。 (お買い上げ時の設定:自動) Function → #079→【決定】→【▼】 【▲】で 「自動」 「プッシュ」 「20」 「10」を選ぶ→【決定】 Finish with base Stop.
Base setting 000 — 登録リスト印刷. (4枚印刷)View
Base setting #000. 登録リスト印刷. (4枚印刷) 親機の機能登録の内容を印刷し ます。 Function → #000→【決定】 Finish with base Stop.
Base setting 054 — 呼出音View
Base setting #054. 呼出音 親機の呼出音を設定します。 (お 買い上げ時:ベル1) Function → #054→【決定】→【▼】 【▲】で 「ベル1」~「ベル8」 「JUPITER」 「ヴァルキュー レの騎行」 「CANTATA」 「くるみ割り人形」を選ぶ →【決定】 ● ●詳しくは(58ページ) Finish with base Stop.
Base setting 112 — 在宅呼出回数View
Base setting #112. 在宅呼出回数 在宅時、自動的に回線がつなが るまでの呼出音の回数を設定し ます。 (お買い上げ時:15) Function → #112→【決定】→【▼】 【▲】で 「3」 「5」 「10」 「15」 「20」 「留守」 「自動応答しな い」を選ぶ→【決定】 「3」 「5」:自動受信に設定される。自動受信を解除する ときは「3」 「5」以外にする。 「留守」:呼出音が15回鳴ったあと、留守セットされる。 「自動応答しない」:電話に出るまで鳴り続ける。 Finish with base Stop.
Base setting 121 — 留守呼出回数View
Base setting #121. 留守呼出回数 留守時、応答メッセージを流す までの呼出音の回数を設定しま す。 (お買い上げ時:4) Function → #121→【決定】→【▼】 【▲】で 「2」 「4」 「6」 「9」 「トールセーバー」を選ぶ→ 【決定】 「9」:応答するまでの時間が長いため、相手機のファクス 信号が終了しファクスを自動受信できないことがある。 「トールセーバー」:46ページ Finish with base Stop.
Base setting 117 — おやすみタイ マーView
Base setting #117. おやすみタイ マー 本機の音を鳴らさない時間帯を設 定します。 (お買い上げ時:なし) Function → #117→【決定】→【▼】 【▲】で 「あり」 「なし」を選ぶ→【決定】 「あり」:開始時刻と終了時刻を24時間方式(深夜12時 は「00:00」)で入力 →【決定】 Finish with base Stop.
Base setting 072 — 迷惑防止呼出 回数View
Base setting #072. 迷惑防止呼出 回数 迷惑防止で本機が応答したあと の呼出音とメッセージs(68 ページ)の回数を設定します。 (お買い上げ時:6) Function → #072→【決定】→【▼】 【▲】で 「3」 「6」 「9」 「12」 「15」を選ぶ→【決定】 ● ●詳しくは(30ページ) Finish with base Stop.
Base setting 020 — ファクス音声 案内View
Base setting #020. ファクス音声 案内 送受信結果の音声を流します。 (お買い上げ時:あり) Function → #020→【決定】→【▼】 【▲】で 「あり」 「なし」を選ぶ→【決定】 ● ●解除するときは「なし」にしてください。 Finish with base Stop.
Base setting 021 — 自動操作案内View
Base setting #021. 自動操作案内 ファクス送信時、コピー時に、音 声で操作を案内します。 (お買い 上げ時:あり) Function → #021→【決定】→【▼】 【▲】で 「あり」 「なし」を選ぶ→【決定】 ● ●解除するときは「なし」にしてください。 Finish with base Stop.
Base setting 130 — 読み上げダイ ヤルView
Base setting #130. 読み上げダイ ヤル ダイヤルした番号や、電話帳登録・ 検索時に入力した文字(ひらがな・ 半角カタカナ)を音声で読み上げ ます。 (お買い上げ時:あり) Function → #130→【決定】→【▼】 【▲】で 「あり」 「なし」を選ぶ→【決定】 ● ●解除するときは「なし」にしてください。 Finish with base Stop.
Base setting 132 — 電話帳読み上げView
Base setting #132. 電話帳読み上げ電話帳などを検索時に、登録さ れたフリガナを読み上げます。 (お買い上げ時:あり) Function → #132→【決定】→【▼】 【▲】で 「あり」 「なし」を選ぶ→【決定】 ● ●解除するときは「なし」にしてください。 Finish with base Stop.
Base setting 167 — 親切音声案内View
Base setting #167. 親切音声案内 電話帳・短縮ダイヤル登録時、電話 帳などを検索したあと電話をかける とき、メモリー代行受信したファク スの印刷時などに、音声で操作案内 をします。 (お買い上げ時:あり) Function → #167→【決定】→【▼】 【▲】で 「あり」 「なし」を選ぶ→【決定】 ● ●解除するときは「なし」にしてください。 Finish with base Stop.
Base setting 176 — 迷惑防止音声 案内View
Base setting #176. 迷惑防止音声 案内 迷惑防止設定時、呼出音のあとに メッセージs(68ページ)を 流します。 (お買い上げ時:あり) Function → #176→【決定】→【▼】 【▲】で 「あり」 「なし」を選ぶ→【決定】 ● ●解除するときは「なし」にしてください。 Finish with base Stop.
Base setting 200 — 電話帳登録View
Base setting #200. 電話帳登録 電話帳に登録します。 Function → #200→【決定】→32ページ 「電話帳に登録する」の手順3からの操作を行う Finish with base Stop.
Base setting 041 — 電話帳印刷View
Base setting #041. 電話帳印刷 電話帳・短縮ダイヤルの内容を印 刷します。 Function → #041→【決定】→【▼】 【▲】で 「親機(最大4枚)」 「子機(最大4枚)」を選ぶ→【決定】 「子機(最大4枚)」:子機で36ページ「子機の電話帳 を親機または別の子機へ転送する」の操作を行い、転送 先に「親機」を選んで一斉転送してください。 Finish with base Stop.
Base setting 143 — 電話帳転送View
Base setting #143. 電話帳転送 親機の電話帳の内容を子機に転 送します。 Function → #143→【決定】→ 36ページ 「親機の電話帳を子機へ転送する」の手順2からの 操作を行う Finish with base Stop.
Base setting 144 — 電話帳全消去View
Base setting #144. 電話帳全消去 親機の電話帳の内容をすべて消去 します。 Function → #144→【決定】→ star Finish with base Stop.
Base setting 029 — グループの名前View
Base setting #029. グループの名前電話帳のグループの名前を登 録・修正します。 Function → #029→【決定】→【▼】 【▲】で 登録・修正するグループを選ぶ→【決定】→ 名前 を入力(全角6文字/半角12文字まで) →【決定】 → フリガナを確認(半角12文字まで) →【決定】 ● ●文字入力のしかた(22ページ) Finish with base Stop.
Base setting 116 — 自動受信View
Base setting #116. 自動受信 ファクスを自動受信するように 設定します。 (お買い上げ時:し ない) Function → #116→【決定】→【▼】 【▲】で 「する」 「しない」を選ぶ→【決定】 「する」:呼出音が3回鳴ったあと、自動受信する。 「しない」:自動受信を解除する。 Finish with base Stop.
Base setting 114 — 無鳴動受信View
Base setting #114. 無鳴動受信 在宅時、呼出音を鳴らさずに ファクスを受信します。 (お買い 上げ時:しない) Function → #114→【決定】→【▼】 【▲】で 「しない」 「常にする」 「タイマー」を選ぶ→【決定】 「タイマー」:開始時刻と終了時刻を24時間方式(深夜 12時は「00:00」)で入力 →【決定】 Finish with base Stop.
Base setting 115 — ファクス専用View
Base setting #115. ファクス専用 留守時、ファクスのみ受信しま す。 (お買い上げ時:しない) Function → #115→【決定】→【▼】 【▲】で 「する」 「しない」を選ぶ→【決定】 (「する」を選んだ ときは star ) 「する」:呼出音が1回鳴ったあと、自動受信する。 (電話 は受けられません) 「しない」:ファクス専用を解除する。 Finish with base Stop.
Base setting 090 — エコノミー受信View
Base setting #090. エコノミー受信記録紙節約のため、縮小して印刷 します。 〔お買い上げ時:あり(1)〕 Function → #090→【決定】→【▼】 【▲】で 「あり(1)」 「あり(2)」 「なし」を選ぶ→【決定】 「あり(1)」:約92 %(縦方向)に縮小して印刷 「あり(2)」:原寸で印刷(収まらない部分は印刷しない) 「なし」:原寸で印刷(収まらない部分は2枚目に印刷) Finish with base Stop.
Base setting 089 — 印刷してもSD 保存View
Base setting #089. 印刷してもSD 保存 ファクス受信したときに印刷し ても、SDカードに保存します。 (お買い上げ時:する) Function → #089→【決定】→【▼】 【▲】で 「する」 「しない」を選ぶ→【決定】 Finish with base Stop.
Base setting 023 — 海外送信View
Base setting #023. 海外送信 海外へうまく送れないときに設 定します。 (お買い上げ時:なし) Function → #023→【決定】→【▼】 【▲】で「1 回」 「なし」を選ぶ→【決定】 Finish with base Stop.
Base setting 105 — Fネット2 steps
- Base setting #105.
- Fネット NTTのFネットサービスを契約 しているときに設定します。 (お 買い上げ時:なし) Function → #105→【決定】→【▼】 【▲】で 「あり」 「なし」を選ぶ→【決定】 ● ●NTTのFネットサービスを契約しているときや、ホー ムテレホンに接続するときは、 「あり」に設定してく ださい。 Finish with base Stop.
Base setting 040 — 通信レポート 印刷View
Base setting #040. 通信レポート 印刷 ファクス送受信のレポートを印 刷します。 Function → #040→【決定】 ● ●最新の25件が印刷されます。 Finish with base Stop.
Base setting 099 — 受信印字濃度View
Base setting #099. 受信印字濃度 ファクスの印刷濃度を設定しま す。 (お買い上げ時:ふつう) Function → #099→【決定】→【▼】 【▲】で 「濃く」 「ふつう」 「薄く」を選ぶ→【決定】 Finish with base Stop.
Base setting 051 — 読取濃度View
Base setting #051. 読取濃度 原稿の読み取り濃度を設定しま す。 (お買い上げ時:ふつう) Function → #051→【決定】→【▼】 【▲】で 「濃く」 「ふつう」を選ぶ→【決定】 ● ●ファクスやコピーなどの原稿が薄いときに「濃く」を 選んでください。 ● ●画質が「写真」のときは、 「濃く」に設定しても「ふつ う」で読み取ります。 Finish with base Stop.
Base setting 088 — ファクス全消去View
Base setting #088. ファクス全消去ファクスをすべて消去します。 Function → #088→【決定】 (→ SDカード が入っているときは【▼】 【▲】で「本体メモリー +SDカード」 「本体メモリー」 「SDカード」を選 ぶ →【決定】)→ star Finish with base Stop.
Base setting 006 — 留守電暗証番号View
Base setting #006. 留守電暗証番号外出先から操作するときの暗証 番号を設定します。 Function → #006→【決定】→ 4ケタの数字 を入力 → 【決定】 ● ●暗証番号は、 「0000」や電話番号の一部など推測さ れやすい番号は登録しないでください。また、定期的 に変更することをお勧めします。 Finish with base Stop.
Base setting 030 — 用件録音時間View
Base setting #030. 用件録音時間 用件1件あたりの録音時間を設 定します。 (お買い上げ時:2分) Function → #030→【決定】→【▼】 【▲】で 「2分」 「最大」を選ぶ→【決定】 Finish with base Stop.
Base setting 142 — 用件転送View
Base setting #142. 用件転送 用件を外出先に転送します。 (お 買い上げ時:しない) Function → #142→【決定】→【▼】 【▲】で 「する」 「しない」を選ぶ→【決定】 「する」:転送先の電話番号を入力する(24ケタまで)→ 【決定】 (→ 暗証番号を登録していないときは暗証番号 を4ケタで入力 →【決定】) Finish with base Stop.
Base setting 147 — 自作応答録音View
Base setting #147. 自作応答録音 自分の声で応答メッセージを2種 類(自作1、自作2)録音できます。 Function → #147→【決定】→ 1(自作1) または2(自作2)→ 受話器を取る→【決定】→ 「ピー」音のあと、受話器に向かって録音する(20 秒以内) →【ストップ】→ 受話器を戻す Finish with base Stop.
Base setting 148 — 自作応答消去View
Base setting #148. 自作応答消去 自作応答メッセージを消去します。 Function → #148→【決定】→ 消去するメッ セージの番号 1または2→ star Finish with base Stop.
Base setting 128 — 留守応答メッ セージView
Base setting #128. 留守応答メッ セージ 応答メッセージを選びます。 (お 買い上げ時:固定1) Function → #128→【決定】→【▼】 【▲】で 「固定1」 「固定2」 「自作1」 「自作2」を選ぶ→【決 定】 ● ●「固定1」はメッセージ2(67ページ)、 「固定2」は メッセージ6(67ページ)が流れます。 「自作応答 録音」を録音していないときは、 「自作1」 「自作2」は選 べません。 Finish with base Stop.
Base setting 163 — 用件全消去View
Base setting #163. 用件全消去 用件をすべて消去します。 Function → #163→【決定】 (→ SDカード が入っているときは【▼】 【▲】で「本体メモリー +SDカード」 「本体メモリー」 「SDカード」を選 ぶ →【決定】)→ star Finish with base Stop.
Base setting 074 — 音声モニターView
Base setting #074. 音声モニター 留守応答中に応答メッセージや 相手の声がスピーカーで聞こえ るように設定します。 (お買い上 げ時:あり) Function → #074→【決定】→【▼】 【▲】で 「あり」 「なし」を選ぶ→【決定】 Finish with base Stop.
Base setting 193 — SDへのフル録音2 steps
- Base setting #193.
- SDへのフル録音外線電話をSDカードに自動的 に録音するように設定します。 (お買い上げ時:なし) Function → #193→【決定】→【▼】 【▲】で 「なし」 「発着信時」 「着信時」 「発信時」を選ぶ→【決 定】 (→ 「なし」以外を選んだときは star ) 「発着信時」※:すべての通話を録音 「着信時」:かかってきた電話を録音 「発信時」※:かけた電話を録音 ※ 発信時に、親機の受話器を取った時点、子機の【外線】 を押した時点から何秒後に録音開始するかを、 【▼】 【▲】で「2秒後」 「5秒後」 「10秒後」から選び、 【決定】 を押します。 Finish with base Stop.
Base setting 137 — キャッチホン・ ディスプレイView
Base setting #137. キャッチホン・ ディスプレイ キャッチホン・ディスプレイ サービスを利用するときに設定 します。 (お買い上げ時:なし) Function → #137→【決定】→【▼】 【▲】で 「あり」 「なし」を選ぶ→【決定】 Finish with base Stop.
Base setting 135 — 着信鳴り分けView
Base setting #135. 着信鳴り分け 電話帳のグループ、非通知、公衆 電話、表示圏外ごとに呼出音を 変えることができます。 Function → #135→【決定】→【▼】 【▲】で グループ(1~9)・非通知・公衆電話・表示圏外を 選ぶ →【決定】→【▼】 【▲】で「登録する」を選ぶ →【決定】→ 【▼】 【▲】で呼出音を選ぶ →【決定】 ● ●解除するときは「登録しない」にしてください。 ● ●電話帳のグループを登録してください。 (32ペー ジ) ● ●電話帳に登録していない電話番号からかかってくる と、 「親機で呼出音を変える」 (58ページ)で設定 した呼出音が鳴ります。 Finish with base Stop.
Base setting 182 — 着信読み上げView
Base setting #182. 着信読み上げ 誰からかかってきたかを音声で お知らせします。 (お買い上げ 時:電話帳登録) Function → #182→【決定】→【▼】 【▲】で 「あり」 「電話帳登録」 「なし」を選ぶ→【決定】 「あり」:親機の電話帳のフリガナ、電話帳に登録されて いない場合は電話番号を読み上げ。 「電話帳登録」:親機の電話帳のフリガナのみ読み上げ。 ● ●解除するときは「なし」にしてください。 ● ●詳しくは(53ページ) Finish with base Stop.
Base setting 184 — 非通知着信View
Base setting #184. 非通知着信 非通知の電話に出ないよう設定 します。 (お買い上げ時:拒否し ない) Function → #184→【決定】→【▼】 【▲】で 「拒否しない」 「拒否する」を選ぶ→【決定】 「拒否する」:非通知の電話は、呼出音が鳴らずに相手に メッセージj(67ページ)が流れます。 Finish with base Stop.
Base setting 186 — 公衆電話着信View
Base setting #186. 公衆電話着信 公衆電話からの電話に出ないよ う設定します。 (お買い上げ時: 拒否しない) Function → #186→【決定】→【▼】 【▲】で 「拒否しない」 「拒否する」を選ぶ→【決定】 「拒否する」:公衆電話からの電話は、呼出音が鳴らずに 相手にメッセージk(68ページ)が流れます。 Finish with base Stop.
Base setting 187 — 表示圏外着信View
Base setting #187. 表示圏外着信 表示圏外の電話に出ないよう設 定します。 (お買い上げ時:拒否 しない) Function → #187→【決定】→【▼】 【▲】で 「拒否しない」 「拒否する」を選ぶ→【決定】 「拒否する」:表示圏外からの電話は、呼出音が鳴らずに 相手にメッセージl(68ページ)が流れます。 Finish with base Stop.
Base setting 190 — 「0120・ 0800」着信View
Base setting #190. 「0120・ 0800」着信 「0120」 「0800」で始まる番 号の電話に出ないよう設定しま す。 (お買い上げ時:拒否しない) Function → #190→【決定】→【▼】 【▲】で 「拒否しない」 「拒否する」を選ぶ→【決定】 「拒否する」:「0120」や「0800」で始まる番号から電 話がかかってくると、呼出音が鳴らずに、 「0120拒否 中」や「0800拒否中」と表示されます。相手にはメッ セージm(68ページ)が流れます。 Finish with base Stop.
Base setting 188 — 未登録番号着信View
Base setting #188. 未登録番号着信親機の電話帳に未登録の相手か らの電話を受けない時間帯を設 定します。 (お買い上げ時:拒否 しない) Function → #188→【決定】→【▼】 【▲】で 「拒否しない」 「拒否する」を選ぶ→【決定】 「拒否する」:開始時刻と終了時刻を24時間方式(深夜 12時は「00:00」)で入力 →【決定】→ star ● ●親機の電話帳に未登録の相手からの電話は、呼出音が鳴 らずに相手にメッセージm(68ページ)が流れます。 ● ●解除するときは「拒否しない」にしてください。 Finish with base Stop.
Base setting 136 — 迷惑電話着信 拒否 (300件まで)View
Base setting #136. 迷惑電話着信 拒否 (300件まで) 特定の相手からの電話に出ない よう設定します。 (お買い上げ 時:なし) Function → #136→【決定】→【▼】 【▲】で 「あり」 「なし」を選ぶ→【決定】 「あり」:【▼】 【▲】で登録・修正する番号を選ぶ※1 → 電 話番号を入力(5~20ケタまで) →【決定】 ● ●拒否した相手からの電話は、呼出音が鳴らずに相手 にメッセージn※2(68ページ)が流れます。光回 線などに接続する機器によっては、相手に呼出音(プ ルル・プルル…)が流れることがあります。 ● ●すべて解除するときは「なし」にしてください。 ● ●個別に解除するときは 【機能】→ 136→【決定】→【▼】 【▲】で「あり」 を選ぶ→【決定】→【▼】 【▲】で解除する番号を選ぶ →カーソルが先頭のときに【消去】を2秒以上押す→ 【決定】 ● ●Fネットの番号「161」も登録して拒否することがで きます。 ※1 修正する番号を選んだときは、 【再生】を押すと、 最終着信日を確認できます。 ※2 メッセージは「迷惑拒否メッセージ」 (下記)で変 更することができます。 Finish with base Stop.
Base setting 139 — 迷惑拒否メッ セージView
Base setting #139. 迷惑拒否メッ セージ 迷惑電話着信拒否で流すメッ セージを設定します。 (お買い上 げ時:メッセージ1) Function → #139→【決定】→【▼】 【▲】で 「メッセージ1」 「メッセージ2」 「話し中」を選ぶ → 【決定】 ● ●「メッセージ1」はメッセージn、 「メッセージ2」は メッセージ5が流れます。 (67ページ) ● ●「話し中」にすると、話し中の音(プープープープー) が相手に聞こえます。 Finish with base Stop.
Base setting 042 — 迷惑電話着信. 拒否リスト印刷 (最大4枚印刷)View
Base setting #042. 迷惑電話着信. 拒否リスト印刷 (最大4枚印刷) 迷惑電話着信拒否に登録された 電話番号を印刷します。 Function → #042→【決定】 Finish with base Stop.
Base setting 185 — 着信拒否の履歴 保存View
Base setting #185. 着信拒否の履歴 保存 着信拒否された相手の電話を履 歴に残さないよう設定します。 (お買い上げ時:保存する) Function → #185→【決定】→【▼】 【▲】で 「保存する」 「保存しない」を選ぶ →【決定】 Finish with base Stop.
Base setting 189 — おやすみ特定 着信 (9件まで)View
Base setting #189. おやすみ特定 着信 (9件まで) おやすみモードのとき、特定の 相手からの電話に、呼出音を鳴 らして受けるよう設定します。 (お買い上げ時:なし) Function → #189→【決定】→【▼】 【▲】で 「あり」 「なし」を選ぶ →【決定】 「あり」:【▼】 【▲】で空き番号を選ぶ →【修正】→【▼】 【▲】 で相手を選ぶ →【決定】 ● ●親機の電話帳に登録している相手のみ登録できます。 ● ●登録した相手からかかってくると、呼出音が鳴り、留 守番電話が応答します。ファクスは自動的に受信し ます。 ● ●すべて解除するときは「なし」にしてください。 ● ●個別に解除するときは 【機能】→ 189→【決定】→【▼】 【▲】で「あり」 を選ぶ →【決定】→【▼】 【▲】で解除する番号を選ぶ → 【消去】→ star Finish with base Stop.
Base setting 087 — 着信履歴印刷View
Base setting #087. 着信履歴印刷 着信履歴の内容を印刷します。 Function → #087→【決定】 Finish with base Stop.
Base setting 123 — 子機増設View
Base setting #123. 子機増設 子機を登録します。 Function → #123→【決定】→増設番号を 押す ● ●詳しくは(76ページ) Finish with base Stop.
Base setting 178 — 子機減設View
Base setting #178. 子機減設 子機の登録を解除します。 Function → #178→【決定】→減設番号を 押す ● ●詳しくは(77ページ) Finish with base Stop.
Base setting 101 — 中継アンテナ 設定View
Base setting #101. 中継アンテナ 設定 中継アンテナを登録します。 Function → #101→【決定】→ 1(減設)ま たは2(増設) ● ●詳しくは(76ページ) Finish with base Stop.
Base setting 164 — ワイヤレス. アダプター設定View
Base setting #164. ワイヤレス. アダプター設定 ワイヤレスアダプター機能付き テレビドアホンを登録します。 Function → #164→【決定】→ 1(減設)ま たは2(増設) ● ●詳しくは(70ページ) Finish with base Stop.
Base setting 086 — ドアホン名前View
Base setting #086. ドアホン名前 ドアホンの名前を登録します。 Function → #086→【決定】→【▼】 【▲】で 登録するドアホンを選ぶ →【決定】→ 名前を入力 (全角6文字/半角12文字まで)→【決定】→ フ リガナを確認(半角12文字まで)→【決定】 ● ●文字入力のしかた(22ページ) Finish with base Stop.
Base setting 162 — ドアホンワープView
Base setting #162. ドアホンワープ外出先でドアホンを受けます。 (お買い上げ時:なし) Function → #162→【決定】→【▼】 【▲】で 「なし」 「留守」 「あり」を選ぶ →【決定】 「留守」 「あり」:転送先の電話番号を入力(24ケタまで) → 【決定】 ● ●留守セット時のみ転送するときは「留守」、すべて転 送するときは「あり」にしてください。 ● ●解除するときは「なし」にしてください。 Finish with base Stop.
Base setting 084 — 窓/ドアセン サー設定View
Base setting #084. 窓/ドアセン サー設定 窓/ドアセンサーを登録します。 Function → #084→【決定】→ 1(減設)ま たは2(増設) ● ●詳しくは(72ページ) Finish with base Stop.
Base setting 026 — 窓/ドアセン サー名View
Base setting #026. 窓/ドアセン サー名 窓/ドアセンサーの名前を変更 します。 Function → #026→【決定】→【▼】 【▲】で 変更するセンサーを選ぶ →【決定】→【▼】 【▲】 で新しいセンサー名(25種類)を選ぶ→【決定】 ● ●センサー名は下記から選ぶことができます。 居間、洋室1、洋室2、洋室3、和室1、和室2、和室3、 寝室、キッチン、廊下、階段、1階、2階、倉庫、事務所、 玄関1、玄関2、勝手口、書斎、祖父母、パパ、ママ、 子供1、子供2、子供3 ● ●「登録しない」にすると、窓/ドアが開いたときにセ ンサー名が表示されません。 Finish with base Stop.
Base setting 025 — 窓/ドアセン サーエリア変更View
Base setting #025. 窓/ドアセン サーエリア変更 窓/ドアセンサーのエリアを変 更します。 Function → #025→【決定】→【▼】 【▲】で 変更するセンサーを選ぶ→【決定】→【▼】 【▲】 で新しいエリア(エリア1~3)を選ぶ→【決定】 Finish with base Stop.
Base setting 085 — 窓/ドアセン サー通知View
Base setting #085. 窓/ドアセン サー通知 報知レベルが「高い」に設定され たとき、外出先で窓/ドアセン サーの通知を受けます。 (お買い 上げ時:しない) Function → #085→【決定】→【▼】 【▲】で 「しない」 「留守」 「する」を選ぶ →【決定】 「留守」 「する」:通知先の電話番号を入力(24ケタまで) →【決定】 ● ●留守セット時のみ通知するときは「留守」、すべて通 知するときは「する」にしてください。 ● ●解除するときは「しない」にしてください。 Finish with base Stop.
Base setting 027 — ドア予備報知 時間(帰宅時)View
Base setting #027. ドア予備報知 時間(帰宅時) 報知レベルが「高い」に設定され たとき、帰宅時にドアを開けて から最大音量で報知音が鳴るま での時間を選びます。 (お買い上 げ時:3分) Function → #027→【決定】→【▼】 【▲】で 「1分」 「3分」 「5分」を選ぶ →【決定】 Finish with base Stop.
Base setting 082 — ドア報知遅延 時間(外出時)View
Base setting #082. ドア報知遅延 時間(外出時) 報知レベルが「高い」に設定され たとき、外出時にドアが開いて も、報知しない時間を選びます。 (お買い上げ時:3分) Function → #082→【決定】→【▼】 【▲】で 「1分」 「3分」 「5分」を選ぶ →【決定】 Finish with base Stop.
Base setting 098 — フィルム警告 表示View
Base setting #098. フィルム警告 表示 別売品のインクフィルムの残量 が残り6枚になったとき、警告 表示をします。 (お買い上げ時: なし) Function → #098→【決定】→【▼】 【▲】で 「あり」 「なし」を選ぶ →【決定】 ● ●インクフィルムを交換したあとに設定してくださ い。設定すると、バックカバーの開閉時に「インク フィルムを交換しましたか?」と表示します。交換し たときは star、交換していないときは hash を押してく ださい。 ● ●インクフィルムを使用したあとに設定すると正しく 表示されません。 Finish with base Stop.
Base setting 022 — 保留メロディ2 steps
- Base setting #022. 保留メロディ 保留メロディを設定します。 (お 買い上げ時:愛の挨拶) Function → #022→【決定】→【▼】 【▲】で 「愛の挨拶」 「JUPITER」 「ヴァルキューレの騎行」 「CANTATA」を選ぶ →【決定】 © 2006 Copyrights Vision Inc.
- Finish with base Stop.
Base setting 058 — キー確認音View
Base setting #058. キー確認音 ボタンを押すたびに「ピッ」と鳴 らします。 (お買い上げ時:あり) Function → #058→【決定】→【▼】 【▲】で 「あり」 「なし」を選ぶ →【決定】 Finish with base Stop.
Base setting 037 — 文字表示サイズ 切替View
Base setting #037. 文字表示サイズ 切替 電話帳検索・着信履歴検索・ダイ ヤル・外線着信・通話時・待機時 などの文字表示サイズを設定し ます。 (お買い上げ時:大) Function → #037→【決定】→【▼】 【▲】で 「大」 「ふつう」を選ぶ →【決定】 「大」:「ふつう」に比べて名前・電話番号などを縦・横約 1.5倍で表示。 Finish with base Stop.
Base setting 052 — LCDコントラ ストView
- Base setting #052.
- LCDコントラ スト 液晶ディスプレイのコントラス トを調整します。 (お買い上げ 時:ふつう) Function → #052→【決定】→【▼】 【▲】で「濃 く」 「やや濃く」 「ふつう」 「やや薄く」 「薄く」を選ぶ → 【決定】 Finish with base Stop.
Base setting 018 — ダイヤルキー 点灯View
Base setting #018. ダイヤルキー 点灯 親機のダイヤル中や着信中、窓/ ドア/人感センサーの報知中に ダイヤルキーのバックライトを 点灯・点滅させます。 (お買い上 げ時:あり) Function → #018→【決定】→【▼】 【▲】で 「あり」 「なし」を選ぶ →【決定】 ● ●点灯・点滅させないときは「なし」にしてください。 Finish with base Stop.
Base setting 165 — お知らせ時の バックライトView
Base setting #165. お知らせ時の バックライト お知らせがあるときに液晶ディ スプレイのバックライトを点灯 させます。 (お買い上げ時:あり) Function → #165→【決定】→【▼】 【▲】で 「あり」 「なし」を選ぶ →【決定】 ● ●「なし」に設定すると、お知らせがあってもバックラ イトが点灯しなくなります。 Finish with base Stop.
Base setting 131 — モデムダイヤル インView
Base setting #131. モデムダイヤル イン 複数の電話番号を利用するとき に設定します。 (お買い上げ時: なし) Function → #131→【決定】→【▼】 【▲】で 「あり」 「なし」を選ぶ→【決定】 「あり」:【▼】 【▲】で空き番号を選ぶ → 電話番号を入力 (4~20ケタまで)→【決定】→【▼】 【▲】でファクス専 用に「する」 「しない」を選ぶ→【決定】 ● ●電話の呼び出し先を登録するときは、ファクス専用に 「しない」を選んだあと、 【▼】 【▲】で親機の「呼び出す」 「呼び出さない」を選ぶ →【決定】→【▼】 【▲】で子機 の「呼び出す」 「呼び出さない」を選ぶ→【決定】※で設 定します。 ※ 2台以上子機があるときは続けて設定します。 ● ●ファクス専用番号を登録するときは、ファクス専用 に「する」を選んでください。 Finish with base Stop.
Base setting 172 — TA/スプリッタ 接続2 steps
- Base setting #172.
- TA/スプリッタ 接続 光回線(ひかり電話)、ADSLや ISDN回線に接続するときに設 定します。 (お買い上げ時:なし) Function → #172→【決定】→【▼】 【▲】で 「あり(1)」~「あり(4)」 「なし」を選ぶ →【決定】 ● ●「あり(1)」に設定すると、電話の声をやや小さくし て、声の反響、音の割れ、音が小さくなったり大きく なったりを抑えます。効果がない場合は、 「あり(2)」 →「あり(3)」→「あり(4)」の順番で設定を変えて 試してください。 ※ ご利用の回線によって、自動的に「あり(1)」、 「あ り(2)」または「あり(3)」に切り替わっている場 合があります。 Finish with base Stop.
Base setting 071 — 構内交換機接続View
Base setting #071. 構内交換機接続構内交換機に接続するときに設 定します。 (お買い上げ時:なし) Function → #071→【決定】→【▼】 【▲】で 「あり」 「なし」を選ぶ →【決定】 ● ●構内交換機やホームテレホンに接続するときは、 「あ り」に設定してください。 Finish with base Stop.
Base setting 091 — 分割コピーView
Base setting #091. 分割コピー A4サイズより長い原稿の下部 を次ページに印刷します。 (お買 い上げ時:なし) Function → #091→【決定】→【▼】 【▲】で 「あり」 「なし」を選ぶ→【決定】 ● ●「なし」:1ページで中断します。 Finish with base Stop.
Base setting 198 — 選んでケータイView
Base setting #198. 選んでケータイ携帯電話への通話料金を選ぶ サービスを利用するときに設定 します。 (お買い上げ時:なし) Function → #198→【決定】→【▼】 【▲】で 「あり」 「なし」を選ぶ→【決定】 「あり」:事業者識別番号を入力(10ケタまで)→【決定】 Finish with base Stop.
Base setting 199 — IP電話解除View
- Base setting #199.
- IP電話解除 IP電話解除番号を登録します。 (お買い上げ時:なし) Function → #199→【決定】→【▼】 【▲】で 「あり」 「なし」を選ぶ →【決定】 「あり」:IP電話解除番号を入力(8ケタまで)→【決定】 Finish with base Stop.
Base setting 197 — 携帯電話局番View
Base setting #197. 携帯電話局番 携帯電話局番を設定します。 Function → #197→【決定】→【▼】 【▲】で 登録するNo.を選ぶ → 4または5ケタの携帯電話 局番を入力(消去するときはカーソルが先頭のと きに【消去】を2秒以上押す)→【決定】 ● ●市外局番、事業者識別番号など携帯電話局番以外の 番号は設定しないでください。 Finish with base Stop.
Base setting 066 — 内線呼出View
Base setting #066. 内線呼出 内線電話を音声で呼び出しま す。 (お買い上げ時:ベル) Function → #066→【決定】→【▼】 【▲】で 「ベル」 「音声」を選ぶ →【決定】 Finish with base Stop.
Base setting 081 — あんしん応答 メッセージView
Base setting #081. あんしん応答 メッセージ あんしん応答の応答メッセージ を設定します。 (お買い上げ時: メッセージ1) Function → #081→【決定】→【▼】 【▲】で 「メッセージ1」 「メッセージ2」を選ぶ →【決定】 ● ●「メッセージ1」はメッセージo、 「メッセージ2」は メッセージpが流れます。 (68ページ) Finish with base Stop.
Base setting 159 — あんしんセン サー予備報知 時間View
Base setting #159. あんしんセン サー予備報知 時間 センサーオンに設定された人感 センサー付子機が反応してから 最大音量で報知音が鳴るまでの 時間を選びます。 (お買い上げ 時:30秒) Function → #159→【決定】→【▼】 【▲】で 「15秒」 「30秒」 「1分」 「3分」を選ぶ →【決定】 Finish with base Stop.
Base setting 119 — あんしんセン サー通知View
Base setting #119. あんしんセン サー通知 外出先などでセンサーオンに設 定された人感センサー付子機の 通知を受けます。 (お買い上げ 時:しない) Function → #119→【決定】→【▼】 【▲】で 「する」 「留守」 「しない」を選ぶ→【決定】 「する」 「留守」:通知先の電話番号を入力する(24ケタ まで)→【決定】 ● ●留守セット時のみ通知するときは、 「留守」にしてく ださい。 ● ●解除するときは「しない」にしてください。 Finish with base Stop.
Base setting 118 — みまもりセン サー通知View
Base setting #118. みまもりセン サー通知 外出先などで人感センサーの反 応の有無、反応した子機の番号・ 回数の通知を受けます。 (お買い 上げ時:しない) Function → #118→【決定】→【▼】 【▲】で 「する(反応時)」 「する(無反応時)」 「しない」を選ぶ →【決定】 「する(反応時)」 「する(無反応時)」:79ページ「親機 でみまもりセンサー通知を設定する」の手順3からの操 作を行う ● ●解除するときは「しない」にしてください。 Finish with base Stop.
Base setting 111 — 出荷時へ戻す2 steps
- Base setting #111. 出荷時へ戻す すべてお買い上げ時の設定に戻 します。 Function → #111→【決定】→ star …→【決定】 Finish with base Stop.
- The source prints an ellipsis; intermediate unprinted inputs are not inferred.
子機の機能一覧
Instructions from the manualHandset setting 002 — 子機の名前View
Handset setting #002. 子機の名前 子機に名前を付けます。 (内線呼 出時に相手側に表示) Function → #002→ 名前を入力(全角6文 字/半角12文字まで)→【決定】→ フリガナを 確認(半角12文字まで)→【決定】 ● ●文字入力のしかた(22ページ) Finish with handset Off.
Handset setting 054 — 呼出音設定View
Handset setting #054. 呼出音設定 子機の呼出音を設定します。 (お買い上げ時:ベル1) Function → #054→【変更】→【▼】 【▲】で 「ベル1」~「ベル8」、 「JUPITER」 「ヴァルキュー レ」 「CANTATA」 「クルミ割り人形」を選ぶ → 【決定】 ● ●詳しくは(58ページ) Finish with handset Off.
Handset setting 009 — オフフック応答View
Handset setting #009. オフフック応答充電台から取るだけで電話を受 けるよう設定します。 (お買い上 げ時:なし) Function → #009→【▼】 【▲】で「あり」 「な し」を選ぶ →【決定】 Finish with handset Off.
Handset setting 064 — エニーキーアン サーView
Handset setting #064. エニーキーアン サー どのキーを押しても電話を受け ます。 (【▼】 【▲】 【◀】 【▶】 【切】 【1】 【2】 【3】 【機能】以外) (お買い上げ 時:あり) Function → #064→【▼】 【▲】で「あり」 「な し」を選ぶ →【決定】 「なし」:【外線】、 【スピーカーホン】で電話を受けます。 Finish with handset Off.
Handset setting 058 — キー確認音View
Handset setting #058. キー確認音 ボタンを押すたびに「ピッ」と鳴 らします。 (お買い上げ時:あり) Function → #058→【▼】 【▲】で「あり」 「な し」を選ぶ →【決定】 Finish with handset Off.
Handset setting 069 — 保留通知音View
Handset setting #069. 保留通知音 保留中、4秒ごとに「ピーッ」と鳴 らします。 (お買い上げ時:あり) Function → #069→【▼】 【▲】で「あり」 「な し」を選ぶ →【決定】 Finish with handset Off.
Handset setting 008 — クイック通話View
Handset setting #008. クイック通話 充電台から取るだけで電話をか けるよう設定します。 (お買い上 げ時:なし) Function → #008→【▼】 【▲】で「あり」 「な し」を選ぶ →【決定】 Finish with handset Off.
Handset setting 135 — 着信鳴り分けView
Handset setting #135. 着信鳴り分け 電話帳のグループ、非通知、公衆 電話、表示圏外ごとに呼出音を 変えることができます。 Function → #135→【▼】 【▲】でグループ(1 ~9)・非通知・公衆電話・表示圏外を選ぶ →【決 定】→【▼】 【▲】で呼出音を選ぶ →【決定】 ● ●解除するときは「登録しない」にしてください。 ● ●電話帳のグループを登録してください。 (35ペー ジ) ● ●電話帳に登録していない電話番号からかかってくる と、 「子機で呼出音を変える」 (58ページ)で設定 した呼出音が鳴ります。 ● ●子機で着信鳴り分けを設定すると、子機の呼出音が遅 れて鳴り始めることがあります。 Finish with handset Off.
Handset setting 182 — 着信読み上げView
Handset setting #182. 着信読み上げ 誰からかかってきたかを音声で お知らせします。 (お買い上げ 時:あり) Function → #182→【▼】 【▲】で「あり」 「な し」を選ぶ →【決定】 「あり」:親機の「着信読み上げ」 (63ページ)の設定 に従います。 Finish with handset Off.
Handset setting 074 — 音声モニターView
Handset setting #074. 音声モニター 留守応答中に応答メッセージや 相手の声がスピーカーで聞こえ るように設定します。 (お買い上 げ時:あり) Function → #074→【▼】 【▲】で「あり」 「な し」を選ぶ →【決定】 Finish with handset Off.
Handset setting 200 — 電話帳登録View
Handset setting #200. 電話帳登録 電話帳に登録します。 Function → #200→ 35ページ「電話帳に 登録する」の手順3からの操作を行う Finish with handset Off.
Handset setting 143 — 電話帳転送View
Handset setting #143. 電話帳転送 子機の電話帳の内容を親機また は別の子機に転送します。 Function → #143→ 36ページ「子機の電 話帳を親機または別の子機へ転送する」の手順3か らの操作を行う Finish with handset Off.
Handset setting 144 — 電話帳全消去View
Handset setting #144. 電話帳全消去 子機の電話帳の内容をすべて消去 します。 Function → #144→【決定】→【はい】 Finish with handset Off.
Handset setting 029 — グループの名前View
Handset setting #029. グループの名前電話帳のグループの名前を登録・ 修正します。 Function → #029→【▼】 【▲】で登録・修正 するグループを選ぶ →【決定】→名前を入力(全 角6文字/半角12文字まで) →【決定】 ● ●文字入力のしかた(22ページ) Finish with handset Off.
Handset setting 123 — 子機増設View
Handset setting #123. 子機増設 子機を登録します。 (先に親機の 設定が必要です) Function → #123→【登録】 ● ●詳しくは(76ページ) Finish with handset Off.
Handset setting 178 — 子機減設View
Handset setting #178. 子機減設 子機の登録を解除します。 Function → #178→【決定】→【はい】 Finish with handset Off.
Handset setting 111 — 出荷時へ戻す2 steps
- Handset setting #111. 出荷時へ戻す すべてお買い上げ時の設定に戻 します。 Function → #111→【決定】→【はい】…→ 【決定】 Finish with handset Off.
- The source prints an ellipsis; intermediate unprinted inputs are not inferred.
液晶ディスプレイ
Instructions from the manualBase display and indicator meanings9 steps
- The manual shows all display marks together for explanation,not a normal simultaneous state.
- Marks identify subscribed Caller ID,automatic fax reception,Sleep Mode,key lock,silent fax reception,ringing Off,SD present,Chosen Mobile Carrier and ECONAVI.
- The SD mark flashes during reading/writing;do not remove SD or power then.
- The carrier mark lights when enabled and flashes about five seconds during an eligible call.
- Fax-memory markings are estimates of0,up to16,up to33orup to50pages.
- Auto Answer indicator lights when enabled and flashes for new messages.
- Call History/Fax Print indicator lights for missed subscribed Caller ID calls or memory-received faxes.
- Dial keys light while dialing and flash for incoming calls.
- ECONAVI automatically reduces consumption according to the local radio environment.
Handset display, battery and range6 steps
- The displayed antenna scale indicates approximate radio strength. 圏外 means the base signal is not reaching the handset;move nearer.
- The battery mark flashes when immediate charging is needed;during calls the warning repeats every four seconds,and standby displays10時間充電してください.
- At20Cafter full charge,continuous talk is about10hours and standby about150hours without use/off charger;poor radio conditions shorten talk and out-of-range shortens standby.
- The display also identifies speakerphone,extension/name,base date/time andringerOff.
- Date/time is unavailable out of range.
- Do not cover the microphone or antenna with fingers.
Parts descriptions
Instructions from the manualEnglish controls for the Japan-only bundle37 steps
- Japan-only KX-PZ300DL includes one KX-PZ300 base and one KX-FKD506 handset.
- 1: Liquid crystal display.
- 2: Edit/Character entry mode button.
- 3: Clear/Flash button.
- 4: Speed Dialer button.
- 5: Phonebook left, Redial right, Volume up/down button.
- 6: Auto Answer button and indicator.
- 7: Playback button.
- 8: Caller ID Log/Fax Print button and indicator.
- 9: Hold/Intercom button.
- 10: Monitor button.
- 11: Numeral/Character buttons.
- 12: Tone button: switch to tone dialing.
- 13: Stop button.
- 14: Copy button.
- 15: Fax button.
- 16: Function/Set button.
- 17: Nuisance Call Prevention button.
- 18: Call Record button.
- 19: Secure/Resolution button.
- 20: Block button.
- 21: Earpiece.
- 22: Liquid crystal display.
- 23: Multi-operation/One-touch Dial buttons.
- 24: Hold/Intercom button.
- 25: Caller ID left, Redial right, Volume up/down button.
- 26: Off button.
- 27: Numeral/Character buttons.
- 28: Speakerphone button.
- 29: Microphone.
- 30: Flash button.
- 31: Tone button: switch to tone dialing.
- 32: Function/Set button.
- 33: Talk button.
- 34: Phonebook button.
- 35: Speaker.
- 36: Battery cover.
Controls and parts
See the manual diagrams 2 diagrams
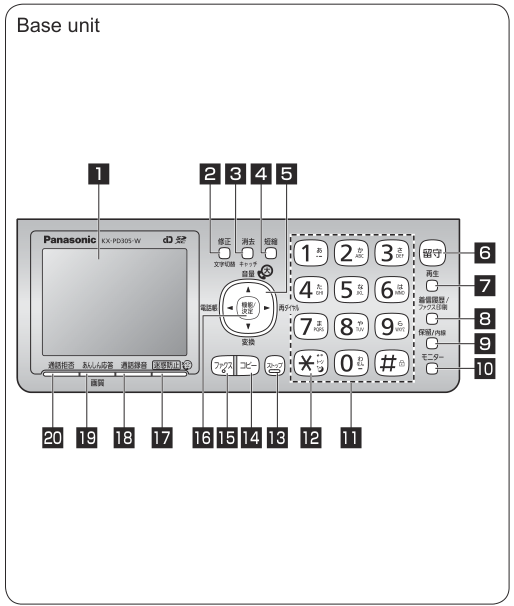
Diagram key
- 1: Liquid crystal display.
- 2: Edit/Character entry mode button.
- 3: Clear/Flash button.
- 4: Speed Dialer button.
- 5: Phonebook left, Redial right, Volume up/down button.
- 6: Auto Answer button and indicator.
- 7: Playback button.
- 8: Caller ID Log/Fax Print button and indicator.
- 9: Hold/Intercom button.
- 10: Monitor button.
- 11: Numeral/Character buttons.
- 12: Tone button: switch to tone dialing.
- 13: Stop button.
- 14: Copy button.
- 15: Fax button.
- 16: Function/Set button.
- 17: Nuisance Call Prevention button.
- 18: Call Record button.
- 19: Secure/Resolution button.
- 20: Block button.
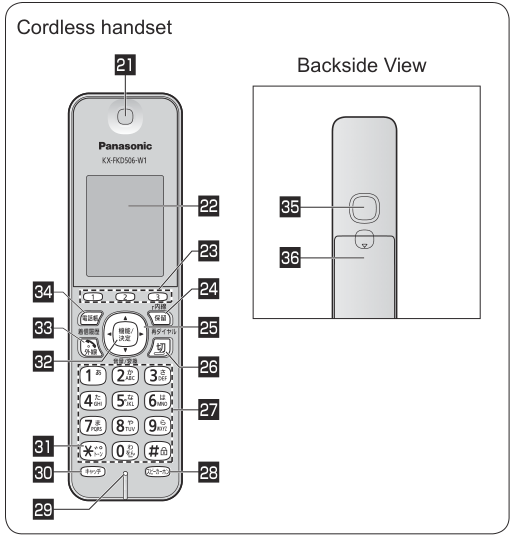
Diagram key
- 21: Earpiece.
- 22: Liquid crystal display.
- 23: Multi-operation/One-touch Dial buttons.
- 24: Hold/Intercom button.
- 25: Caller ID left, Redial right, Volume up/down button.
- 26: Off button.
- 27: Numeral/Character buttons.
- 28: Speakerphone button.
- 29: Microphone.
- 30: Flash button.
- 31: Tone button: switch to tone dialing.
- 32: Function/Set button.
- 33: Talk button.
- 34: Phonebook button.
- 35: Speaker.
- 36: Battery cover.
Model details
Model and compatibility
- Japan-only bundle
- Japan-only KX-PZ300DL-W package:one KX-PZ300-W base and one KX-FKD506 cordless handset. PNQX7870ZA operation manual and PNQP1265ZA English quick guide explicitly name this model. Optional multi-handset and sensor functions remain conditional;accessory lists retain June2016 scope.
- Power and environment
- Use AC100V50/60Hz,in5–35C and45–85%humidity. Match the Japan-only supply;do not infer overseas compatibility.
- Automatic reception defaults
- Automatic fax reception is initially off;answering and automatic/silent/fax-only modes follow separate reviewed instructions. Full SD call recording is also initially off.
Related reviewed instructions
- Install or replace ink film
- Install, replace and charge the handset battery
- Load recording paper
- Clean scanning surfaces and transport rollers
- Clear recording-paper jam and clean feed roller
- Clear original jam and clean document roller
- Set date and time
Manual table scope
- Troubleshooting boundaries
- 困ったとき, PDF89–94:電話;通話;子機の充電;ファクス送受信;印刷;留守番電話;SDカード;呼出音;ナンバー・ディスプレイ;こんなときは. All67rows remain troubleshooting,including procedure referrals.
- Display boundaries
- こんな表示が出たら(親機), PDF95–97;こんな表示が出たら(子機), PDF97. All29display bands retained,with exact current U/H codes and uncoded messages.