MODEL REFERENCE
Presto 0293905
4 troubleshooting topics · 9 guides
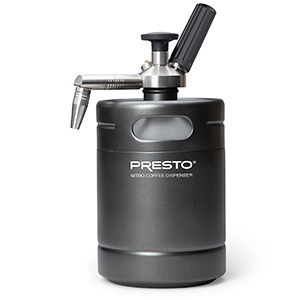
The checks and guides below come from the official manuals for this model.
No matches for this wording. Try a light name, error code or a shorter phrase.
Troubleshooting
Find the problem you are experiencingNo whoosh when attaching the cartridge holder3 checks
Manual section: Questions and Answers.
- The cartridge is not correctly positioned in its holder.
- Reposition the cartridge as shown in Fig. D and try again.
- The holder has not been screwed on far enough.
- Turn the holder until a whoosh is heard.
- The cartridge has already been used or is defective.
- Try again with a new cartridge.
Coffee sprays and excessive gas escapes during charging1 check
Manual section: Questions and Answers.
- More than 48 ounces overfilled the keg, leaving too little room for injected gas and briefly releasing excess gas and coffee.
- Remove the tap assembly and empty the coffee into a container. Measure the coffee again and repeat How to Use; do not use more than 48 ounces.
No foam or cascading in the coffee1 check
Manual section: Questions and Answers.
- Coffee may have lost gas during storage.
- Charge the dispenser with another cartridge.
Very little coffee comes out when dispensing2 checks
Manual section: Questions and Answers.
- Sediment from inadequately filtered homemade coffee may have blocked the tap head.
- Refilter the coffee and recharge the dispenser.
- Coffee may have lost gas during storage.
- Charge the dispenser with another cartridge.
Guides
Important safety information
Instructions from the manualSafe use, gas limits and when to stop13 steps
- Read all instructions before using the dispenser.
- When charging, do not exceed one 8 g nitrous oxide (N2O) cartridge or two 2 g pure nitrogen (N2) cartridges.
- Use nitrous oxide cartridges only to prepare coffee.
- Do not inhale their contents; misuse can be dangerous to health.
- Supervise closely when the appliance is used near children; children are not recommended to use it.
- Do not use a dented, bulging or damaged keg.
- A bulged bottom means pressure has exceeded safe limits and the dimple has inverted to reduce it; replace the unit.
- Do not operate a malfunctioning or damaged appliance.
- Return it to the Presto Factory Service Department for examination, repair or adjustment.
- Use only genuine Presto accessories and replacement parts; other attachments may cause injury.
- Do not put it on or near a hot gas or electric burner, in a heated oven, microwave oven or freezer.
- Do not use hot liquids, nonfood materials, or caustic or highly acidic materials.
- Use the appliance only for its intended purpose.
Choose the compatible gas cartridges3 steps
- The dispenser requires separately purchased non-threaded 8 g N2O whipped-cream chargers or 2 g pure N2 chargers, available online and at selected retailers.
- CO2 cartridges are not recommended for nitro cold brew coffee.
- Observe the charging limits in Important Safety Information.
Getting acquainted
Instructions from the manualIdentify parts and wash before first use5 steps
- Become familiar with the parts in Fig.
- A.
- Unscrew the tap head and remove it from the mini keg.
- Wash the tap head, mini keg, silicone tubes, dispensing spout and silicone funnel in warm soapy water.
- Rinse and dry thoroughly.
How to use
Instructions from the manualFill, assemble, charge and serve cold brew31 steps
- Remove the tap head from the mini keg.
- Fully extend the funnel and put it in the keg opening; it must be fully extended to work properly.
- Filter homemade cold brew before pouring it into the keg and infusing it with gas.
- Pour in no more than 48 ounces of store-bought or filtered homemade cold brew, then remove the funnel.
- Smaller amounts may be charged.
- Dilute concentrate to drinking strength.
- Do not overfill: leave room for injected gas.
- Do not add dairy or nondairy beverages, creamers, sugar or sweeteners to the keg because they may block the tap head; add them to the glass before dispensing.
- Attach the dispensing spout to the spout connector as shown in Fig.
- B.
- Running the connector under hot tap water before attachment makes insertion easier.
- Attach the flat end of one silicone tube to the barbed fitting as in Fig.
- C.
- Push and twist until it is past the second barb.
- Keep the other tube as a spare.
- Insert the tap assembly into the keg and screw it on tightly.
- Put one non-threaded 8 g N2O cartridge or one 2 g N2 cartridge into the holder, rounded end first, as in Fig.
- D.
- Screw the holder onto the cartridge valve until a whoosh indicates the cartridge has been pierced and gas injected, as in Fig.
- E.
- A slight gas escape and a few coffee drops by the pressure-release valve are normal.
- Unscrew the cartridge holder and discard the cartridge.
- Shake the keg from side to side and up and down for 15–20 seconds.
- If using pure N2, let it rest for 20 minutes, then charge with a second 2 g cartridge.
- Refrigerate the keg and let it rest for at least one hour.
- Remove it from the refrigerator and shake for 15–20 seconds.
- Put a glass under the spout and press the tap to dispense.
- Rotate the spout upwards for drip-free storage as in Fig.
- F.
- Store in the refrigerator for up to seven days.
- When the keg is empty, disassemble and clean it using Care and Cleaning.
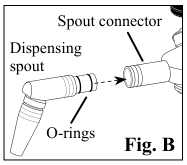
Diagram key
- Fig. B — spout connector: Attach the dispensing spout here; hot tap water over the connector can ease insertion.
- Fig. B — dispensing spout: Push onto its connector in the direction shown.
- Fig. B — O-rings: Spout-connector seals; replace worn O-rings as described in Care and Cleaning.
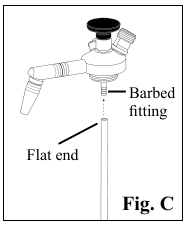
Diagram key
- Fig. C — barbed fitting: Push and twist the tube past the second barb.
- Fig. C — flat end: Flat end of the silicone tube goes onto the barbed fitting.
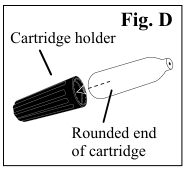
Diagram key
- Fig. D — cartridge holder: Insert one non-threaded 8 g N2O or one 2 g N2 cartridge.
- Fig. D — rounded end of cartridge: Insert this end first.
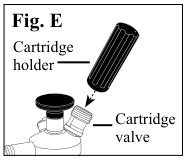
Diagram key
- Fig. E — cartridge holder: Screw onto the cartridge valve until a whoosh indicates gas injection.
- Fig. E — cartridge valve: Receives the holder as shown.
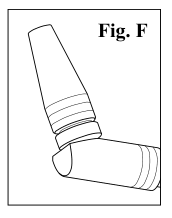
Diagram key
- Fig. F — upward spout: Rotate the spout up for drip-free storage; refrigerate for up to seven days.
Care and cleaning
Instructions from the manualRelease pressure, disassemble, clean and dry15 steps
- Pull up the pressure-release valve ring shown in Fig.
- A to release any gas remaining in the keg.
- Unscrew and remove the tap assembly.
- Pour out remaining coffee.
- Pull the silicone tube off the barbed fitting and the dispensing spout off its connector.
- While holding the tap down, run water through the spout connector to flush coffee from the barbed fitting.
- Wash the keg, silicone tube, tap head, dispensing spout and collapsible funnel in warm water.
- Use the small brush to clean inside both ends of the dispensing spout.
- Do not put any dispenser part in a dishwasher.
- Avoid harsh detergents, degreasers, abrasives and acidic cleaning agents.
- For more thorough cleaning, fill the keg with hot water and one tablespoon of baking soda, and soak for ten minutes.
- Use the large keg brush to reach the entire bottom and top inside rim.
- Rinse thoroughly.
- Let the keg dry upside down.
- Do not reattach the tap head or keg cap until it is completely dry.
Replace worn spout and tap-head O-rings4 steps
- Over time the spout and tap-head O-rings may tear or become damaged.
- One replacement set is included.
- Remove worn O-rings with a fingernail or the end of a paper clip, or carefully cut them with an X-acto knife.
- Discard them and fit new O-rings.
Consumer service information
Instructions from the manualContact consumer service and identify the unit6 steps
- For operation questions or parts, call 1-800-877-0441 on weekdays from 8:00 AM to 4:00 PM Central Time, use the contact form at GoPresto.com/contact, or write to National Presto Industries, Inc., Consumer Service Department, 3925 North Hastings Way, Eau Claire, WI 54703-3703.
- When writing, include a telephone number and, if possible, a weekday time to reach you.
- Give the model and series numbers found on the bottom of the keg, and record the purchase date.
- Use genuine Presto replacement parts, which are engineered for these appliances.
- Look for the Presto trademark; look-alike parts may not have the same quality or function.
- The factory service address given in the manual is Canton Sales and Storage Company, Presto Factory Service Department, 555 Matthews Dr., Canton, MS 39046-3251.
Product registration
Instructions from the manualRegister the product5 steps
- Register within ten days of purchase at GoPresto.com/registration or use the manual’s QR code.
- Without computer access, call 1-800-877-0441.
- Registration can serve as proof of purchase if the original receipt is lost, and may expedite warranty claims.
- It does not affect warranty coverage.
- Additional requested information helps product development.
Presto® limited warranty
Instructions from the manualReview the US limited warranty and service process9 steps
- The limited warranty applies only in the United States to the original owner under normal household use.
- During the first year after purchase, Presto will repair or replace, at its option, defects in material or workmanship.
- Shipping damage is excluded; this limited warranty does not apply outside the US.
- For warranty service, call 1-800-877-0441.
- If the issue cannot be resolved, the department will instruct you to send the appliance to factory service for inspection at your shipping expense.
- Include your name, address, phone number, purchase date and a description of the problem.
- Follow the supplied instructions.
- Damage from improper replacement parts, abuse, misuse, disassembly, alterations or neglect voids the pledge.
- Specific legal rights and other rights varying by state may apply; the pledge replaces other express warranties.
Controls and parts
See the manual diagrams 1 diagram
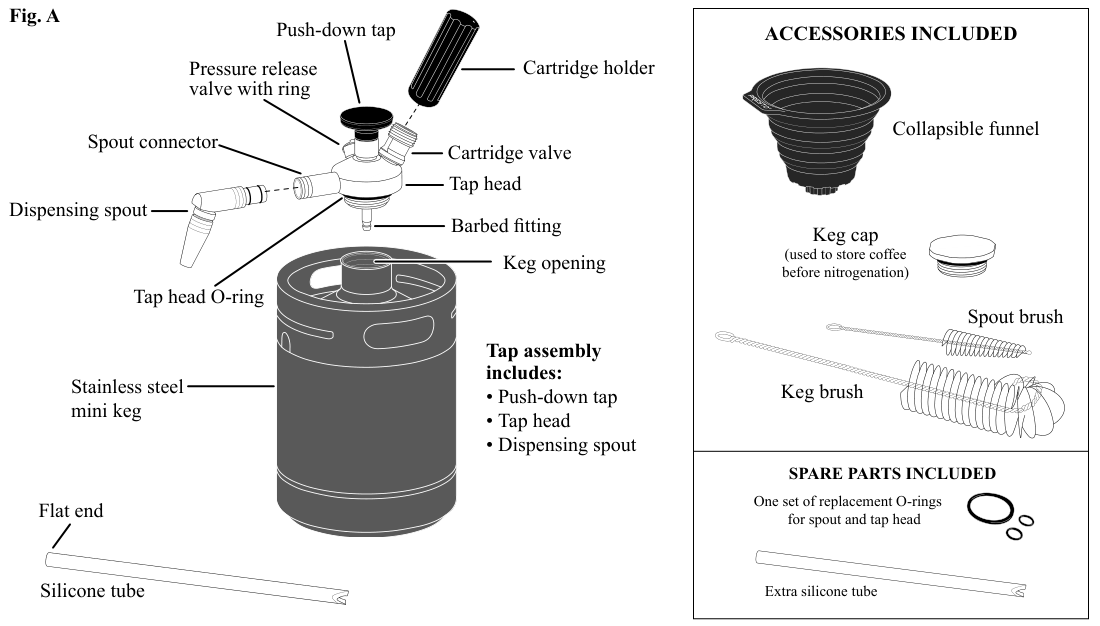
Diagram key
- Fig. A — push-down tap: Press to dispense coffee.
- Fig. A — cartridge holder: Holds the gas cartridge and screws onto its valve.
- Fig. A — pressure-release valve with ring: Pull the ring up to release remaining gas before care and cleaning.
- Fig. A — cartridge valve: Connection for the cartridge holder.
- Fig. A — spout connector: Connection for the dispensing spout.
- Fig. A — tap head: Upper part removed from the mini keg.
- Fig. A — dispensing spout: Coffee outlet; rotates upwards for drip-free storage.
- Fig. A — barbed fitting: Push and twist the silicone tube past its second barb.
- Fig. A — tap-head O-ring: Seal on the tap head; one replacement set is included.
- Fig. A — keg opening: Opening for the funnel and tap assembly.
- Fig. A — stainless-steel mini keg: Holds no more than 48 ounces of cold brew, leaving space for injected gas.
- Fig. A — tap assembly includes: Push-down tap, tap head and dispensing spout.
- Fig. A — flat end: Flat end of the silicone tube attaches to the barbed fitting.
- Fig. A — silicone tube: One tube is used; the second is kept as a spare.
- Accessories included — collapsible funnel: Fully extend before putting it in the keg opening.
- Accessories included — keg cap: Used to store coffee before nitrogenation.
- Accessories included — spout brush: Small brush cleans inside both ends of the dispensing spout.
- Accessories included — keg brush: Large brush reaches the entire bottom and top inside rim of the keg.
- Spare parts included — O-rings: One set of replacement O-rings for the spout and tap head.
- Spare parts included — extra silicone tube: Keep the second tube as a spare.