MODEL REFERENCE
KODAK REELS RODREELS
28 guides
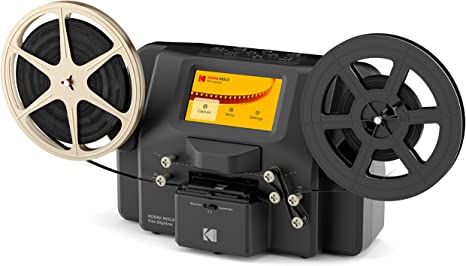
The checks and guides below come from the official manuals for this model.
No matches for this wording. Try a light name, error code or a shorter phrase.
Guides
Safety precautions
Instructions from the manualUse and clean the digitizer safely14 steps
- This device is for household use, not commercial use.
- Read all directions before use and retain the guide.
- It contains small parts and is unsuitable for children under three.
- Remove all packaging; keep it away from children and pets and dispose of it promptly because bags can cause choking or suffocation.
- Do not disassemble or modify the device.
- Do not use it if smoke or an unfamiliar smell appears.
- Do not use alcohol, gasoline, thinner or other organic solvents to clean it.
- Do not operate in dusty or wet areas.
- Make sure the device is clean before use.
- Keep the scanner out of children’s reach.
- Never handle it with damp or wet hands.
- Do not place, drop or immerse it in water or another liquid.
- If it falls into water, do not reach into the water: unplug it immediately, then retrieve it.
- Prevent objects and liquids from entering the scanner.
Product overview
Instructions from the manualIdentify the digitizer partsView
The source key identifies 1 control panel, 2 display screen, 3 reel shafts, 4 film type switch, 5 film spools, 6 film lid, 7 film lid tab and 8 empty reel.
Control panel overview
Instructions from the manualPort panel overview
Instructions from the manualIdentify the card, USB and power connectionsView
The rear-port key identifies 1 SD card slot, 2 Micro USB slot and 3 DC 12 V port.
Film installation
Instructions from the manualInstall and thread the film28 steps
- Unfold both reel shafts until they click into place.
- Carefully pull the film end from your 8 mm or Super 8 reel.
- Fold the end tightly and slowly insert it into the slot on the supplied empty reel.
- Turn the empty reel several times to secure the film.
- Place your film reel on the left shaft and the empty reel on the right.
- For a reel with a large mounting hole, use the supplied red adapter.
- Whenever adapters are needed, put the red adapter on the left shaft and the gray adapter on the right.
- Push the film lid tab left to lift the lid.
- Before placing film, gently wipe the film area with the supplied cleaning cloth.
- The lid must be open before inserting film.
- Hold the film between your thumb and forefinger.
- Slowly position it beneath the leftmost black tab A.
- Carefully twist the film beneath tab B, then twist it slightly beneath tab C.
- Press it down near tab D until it clicks into place.
- Film holes must run along the side nearest the scanner.
- Press the film once more to ensure it is beneath all four tabs.
- A click should be heard when it is properly under each tab.
- Alternatively, slide the film in from the left while pressing down from above so it passes beneath every black tab.
- Close the film lid.
- Correctly placed film lies above the light board and below the image sensor.
- The gray pin adjusts automatically when recording begins if the film is correctly seated.
- If a newly loaded film is out of frame, move the film type switch to the other film format and back once: for 8 mm, move to Super 8 and back to 8 mm; for Super 8, move to 8 mm and back to Super 8.
- This moves the reel and positions the film.
- Carefully thread the film between the reels around the scanner’s film spools.
- Follow the white solid line for capture.
- Follow the white dotted line for rewind or fast forward.
- Set the physical film type switch for your film: Standard 8 has a 4.5 × 3.3 mm frame; Super 8 has a 5.79 × 4.01 mm frame.
- If the picture is upside down, the guide identifies the film end and says to rewind onto another reel.
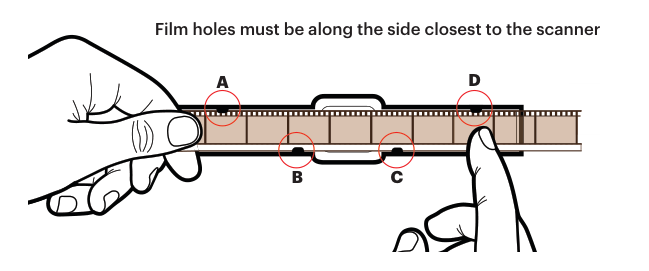
Diagram key
- A: First black tab, farthest left in the film area; place the film beneath it.
- B: Second black tab; carefully twist the film beneath it.
- C: Third tab; twist the film slightly beneath it.
- D: Fourth tab; press the film down near it until it clicks into place.
- Film holes: Keep the holes along the side closest to the scanner.
Film is out of frame after loading1 check
- Newly loaded film appears out of frame
- Move the physical film type switch to the other format and back once to reposition the film.
Film picture is upside down1 check
- Picture is upside down at the end of film
- Rewind onto another reel as directed in the film installation note.
Operating instructions
Instructions from the manualPower the digitizer and insert the SD card8 steps
- Connect the power adapter to the scanner, then plug its other end into a power outlet.
- Insert an SD card, not supplied, into the card slot facing up.
- Press Power.
- The white LED indicates power on; allow a few seconds for the main menu and screen to appear.
- The scanner automatically shuts down after 15 minutes without activity.
- Check that the film is in good condition and monitor scanning.
- Distorted, damaged, overlapping, torn, misaligned or crooked film can jam and cannot be processed normally.
- Do not repair film with tape: taped film will jam the scanner.
Digitizer switches off after inactivityView
The guide states that the scanner automatically shuts down after 15 minutes of inactivity. It supplies no separate disable setting for this behavior.
Power on/off function
Instructions from the manualSwitch the digitizer on or off4 steps
- Press Power to start the machine and display the main menu.
- Press Power again to shut it down.
- The light next to Power comes on before the screen; allow a few additional seconds.
- The scanner does not record sound.
Power light comes on before the screen1 check
- Screen has not yet appeared after powering on
- Wait a few extra seconds for the screen to turn on.
Recording function
Instructions from the manualRecord film and save a video9 steps
- Choose Record in Video Preview Mode; the record icon becomes white.
- Press OK/Enter to open the Super 8/8 mm selection prompt.
- Set the physical film type switch for your film, then press OK/Enter to record.
- The Set film type screen appears only once per device use.
- The scanner captures each film frame with light below the film and a camera above, combines the frames into a video and stores it on the inserted SD card.
- If film is damaged or stuck, lift the film lid, move the damaged area beyond the illuminated scanning area, ensure the film is firmly seated and close the lid again.
- Press OK/Enter during recording to stop and automatically save the MP4 file.
- Every stop and restart creates a new video file.
- There is no option to pause and continue within the same video file.
Film becomes damaged or stuck during recording1 check
- Film is damaged or stuck
- Lift the film lid, move the damaged area beyond the lit scanning area, seat the film firmly and close the lid.
Frame adjust function
Instructions from the manualAdjust the frame position and zoom4 steps
- In Video Preview Mode, use Up or Down to choose Frame Adjust, then press OK/Enter.
- Use the directional arrows to adjust the margin and Plus or Minus to zoom in or out.
- Press OK/Enter to confirm.
- Check the film framing before recording; move or zoom the image so the camera frames the film properly.
Picture function
Instructions from the manualAdjust exposure, sharpness and tint6 steps
- In Video Preview Mode, choose Picture with Up or Down and press OK/Enter.
- Choose Exposure, Sharpness, Tint or Reset to Default Values with Up or Down.
- Change the parameter using Plus or Minus.
- Press OK/Enter to confirm.
- Exposure changes brightness or darkness; sharpness changes clarity; tint changes color.
- Reset to Default Values restores the initial values.
My recordings function
Instructions from the manualPlay or delete a saved recordingView
Choose My Recordings and press OK/Enter. Select an MP4 file using the directional arrows. Press OK/Enter to play it, or Minus to delete it.
Rewind function
Instructions from the manualRewind film onto another reel4 steps
- Choose Rewind using Up or Down and press OK/Enter.
- Follow the on-screen directions.
- The machine moves film only from left to right, so swap the reels for rewind.
- Use the white dotted threading line and lift film out of the film slot so the gray pin does not slow it.
Fast forward function
Instructions from the manualFast forward to the desired film section5 steps
- Choose Fast Forward using Up or Down and press OK/Enter.
- Press OK/Enter as prompted.
- Use the dotted threading line and lift the film out of the film slot so the gray pin does not slow it.
- Fast forward winds the reel to a chosen recording position.
- Unlike rewind, it does not require swapping the reels.
Language section
Instructions from the manualUsb upload section
Instructions from the manualTransfer recordings to a computer by USB4 steps
- The MP4 videos are stored on the inserted SD card.
- Connect the supplied Micro USB cable between the digitizer and a computer.
- Connect the cable before opening USB Upload in Settings.
- Select USB Upload; when the connected screen appears, use the computer to access the SD card storage and transfer files.
Erase sd card section
Instructions from the manualErase all files on the SD card4 steps
- In Settings, choose Erase SD Card using Up or Down and press OK/Enter.
- Choose No and press OK/Enter to return without clearing the card.
- Choose Yes and press OK/Enter to clear the files.
- The confirmation screen warns that all data will be deleted.
Factory reset section
Instructions from the manualRestore factory settings2 steps
- In Settings, choose Factory Reset using Up or Down and press OK/Enter.
- Choose No and press OK/Enter to return without resetting, or Yes and press OK/Enter to restore the default settings.
About section
Instructions from the manualView version and support informationView
Choose About using Up or Down and press OK/Enter to view the website and version. Press OK/Enter or Back to leave this screen.
Customer service
Instructions from the manualObtain support before returning the product2 steps
- If you experience a problem, contact the product support service before returning the item to the retailer.
- The guide provides U.S. and international support contacts; KODAK Photo Plus/C&A Marketing supplies support, rather than Eastman Kodak.
Warranty
Instructions from the manualUnderstand the limited warranty and service requirements11 steps
- The guide states a one-year limited warranty for the original end-user purchaser, subject to exclusions.
- Contact C&A Marketing or its authorized service provider for problem determination and service instructions.
- Present a bill of sale or receipted invoice showing the product is within the warranty period.
- Service options, parts and response times can change; additional documents or registration may be required under applicable law.
- The consumer pays shipment to the return facility and bears the risk until delivery.
- For an accepted hardware claim, the company may repair with new or refurbished parts, exchange for a new or functionally equivalent product, or refund the purchase price.
- A replacement has the remaining original warranty or 90 days after replacement or repair, whichever is longer.
- A refund requires return of the original product.
- Exclusions include other products or use with them, accident, abuse, misuse, flood, fire, earthquake or other external causes, operation outside permitted uses, third-party services, unauthorized modifications, consumable parts, cosmetic damage and removed or defaced serial numbers.
- The warranty applies only in the country of purchase and to products bought and serviced there.
- Local rights and limitations may differ.
Controls and parts
See the manual diagrams 3 diagrams
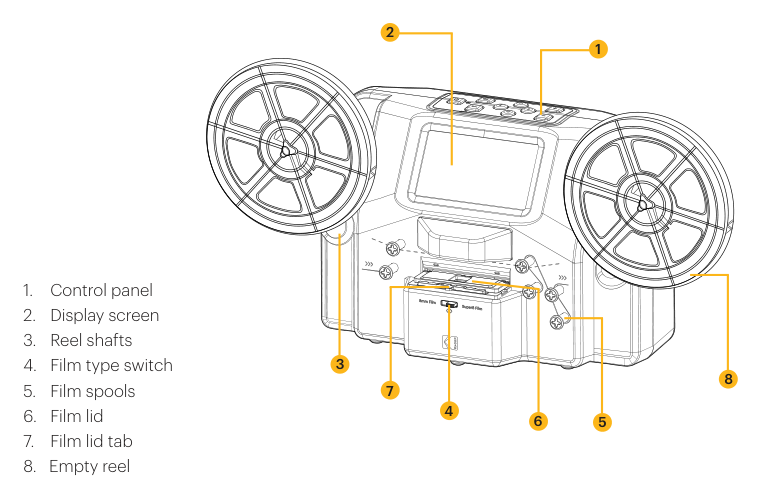
Diagram key
- 1: Control panel.
- 2: Display screen.
- 3: Reel shafts.
- 4: Film type switch; select 8 mm or Super 8 to match the film.
- 5: Film spools.
- 6: Film lid.
- 7: Film lid tab.
- 8: Empty reel.
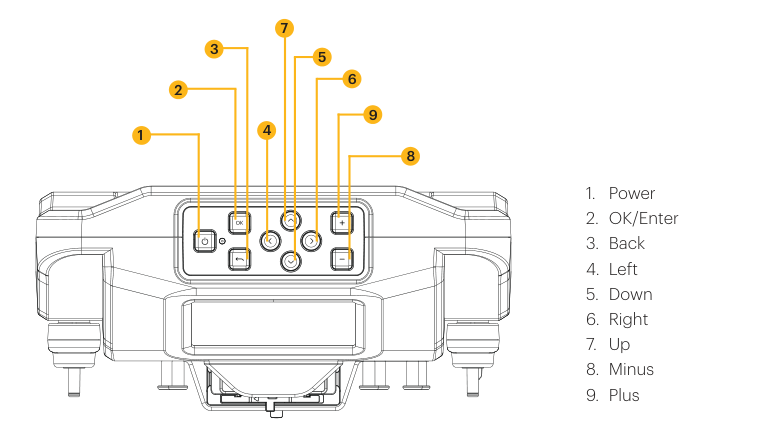
Diagram key
- 1: Power.
- 2: OK/Enter.
- 3: Back.
- 4: Left.
- 5: Down.
- 6: Right.
- 7: Up.
- 8: Minus.
- 9: Plus.
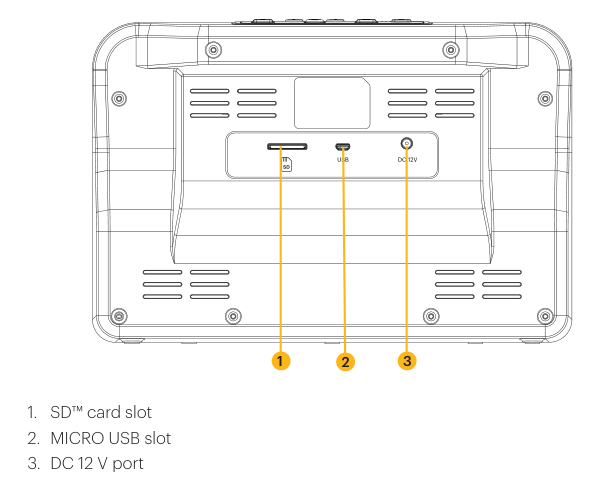
Diagram key
- 1: SD card slot.
- 2: Micro USB slot.
- 3: DC 12 V port.
Model details
Model and compatibility
- Film compatibility
- 8 mm and Super 8 motion-picture film on 3–9-inch reels; household use only. [1]
- Capture and playback
- The guide specifies capture at 2 frames per second and a video frame rate of 20 frames per second. [1]
- Storage and output
- Saves MPEG-4 videos to an SD card up to 128 GB; the card is not supplied. [1]
- Power
- DC 12 V power connection; use the supplied adapter. [1]