MODEL REFERENCE
Janome Epolku OVI
6 errors · 25 troubleshooting topics · 76 guides

The checks and guides below come from the official manuals for this model.
No matches for this wording. Try a light name, error code or a shorter phrase.
Errors and messages
Shown on the machine displayFind the indicator lights
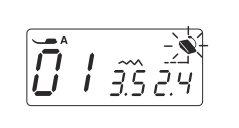
Diagram key
- A: Example recommended presser-foot letter
- 01: Example selected sewing pattern, not an error code
- 3.5: Example stitch-width value
- 2.4: Example stitch-length value
- Controller pictogram and flashing rays: If Start/Stop was pressed while connected, disconnect the controller to use that button; a faulty flashing controller requires the supplying dealer
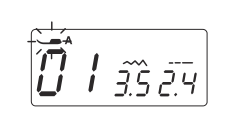
Diagram key
- A: Example recommended presser-foot letter
- 01: Example selected sewing pattern, not an error code
- 3.5: Example stitch-width value
- 2.4: Example stitch-length value
- Raised-foot pictogram and flashing rays: Sewing was started with the foot raised; lower the lifter and restart
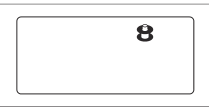
Diagram key
- Bobbin-winding pictogram: Spindle is in winding position; return it left after stopping to clear the indication
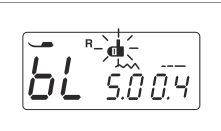
Diagram key
- R: Example buttonhole-foot letter
- bL: Buttonhole lever was not lowered before some buttonhole stitching
- Buttonhole-lever pictogram and flashing rays: Flashes for 2–3 seconds with bL; lower the lever and restart
- 5.0: Example buttonhole-width value
- 0.4: Example buttonhole stitch-length/density value
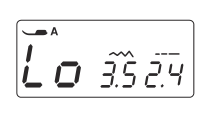
Diagram key
- A: Example recommended foot letter
- Lo: Motor emergency-stop indication from the safety device
- 3.5: Example stitch-width value
- 2.4: Example stitch-length value
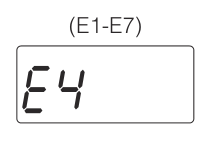
Diagram key
- E1–E7: Printed applicability range for the operation-fault indication
- E4: The manual illustrates this code as an example within E1–E7; switch off, check for tangled thread and contact the supplying dealer if unresolved
—Foot-controller indication: Start/Stop blocked or controller fault2 checks
—Raised-foot indication prevents starting
Sewing was started with the foot raised.: Lower the presser-foot lifter and restart.
—Bobbin-winding indication
The spindle is set to wind a bobbin.: After stopping the machine, return the spindle to the left sewing position; the indication disappears.
bLbuttonhole lever is not lowered
A little buttonhole sewing occurred with the lever up; bL and the lever indication flash for 2–3 seconds.: Lower the buttonhole lever and restart.
Lomotor safety stop
The safety device stopped the motor.: The machine will not run for 15 seconds after the emergency stop. If thread is tangled, switch off and remove it; use the reviewed cleaning precautions when opening the needle-plate area.
E1-E7machine operation fault
The machine did not operate correctly.: Switch off and check for tangled thread or similar obstruction. If the fault remains, contact the supplying dealer.
Troubleshooting
Find the problem you are experiencingUpper thread breaks8 checks
- Upper thread is misrouted or caught elsewhere.
- Switch off and rethread the upper path with the foot raised, correctly seating all guides and the take-up-lever hole; follow the reviewed upper-threading sequence.
- Upper tension is too high.
- Reduce upper tension by turning to a smaller number.
- The needle is bent or blunt.
- Switch off and unplug; inspect and refit the HAx1needle flat side backward, fully to the stop, and tighten securely. Replace bent or blunt needles.
- The needle is incorrectly fitted.
- Switch off and unplug; inspect and refit the HAx1needle flat side backward, fully to the stop, and tighten securely. Replace bent or blunt needles.
- The upper tail is not pulled out and held by the foot.
- At the start, pull upper thread under the foot toward the back and hold it with the foot; for longitudinally recessed feet F/R, pull it sideways so the foot holds it.
- Thread is tangled around the hook or nearby.
- Switch off and unplug, then remove tangled thread or lint using the reviewed hook, feed-dog and cutter cleaning sequence; refit all parts correctly.
- Thread is too thick or thin for the needle.
- Choose the needle and thread for the fabric from the reviewed fabric/needle/thread chart and trial sew.
- Thread catches on the spool.
- Fit the spool cap.
Bobbin thread breaks4 checks
- Bobbin threading is wrong.
- Switch off and reinstall the bobbin counterclockwise, routing thread through front groove(a), under the horn, up arrow 1 and through the complete reviewed path.
- Lint is in the bobbin holder.
- Switch off and unplug, then remove tangled thread or lint using the reviewed hook, feed-dog and cutter cleaning sequence; refit all parts correctly.
- The bobbin is scratched and does not turn smoothly.
- Replace the damaged bobbin.
- The bobbin winding is loose.
- Wind the bobbin with thread properly seated under the winding-guide disk, following the reviewed sequence.
Needle breaks5 checks
- Needle is incorrectly fitted or bent.
- Switch off and unplug; inspect and refit the HAx1needle flat side backward, fully to the stop, and tighten securely. Replace bent or blunt needles.
- The needle-clamp screw is loose.
- Switch off and unplug; inspect and refit the HAx1needle flat side backward, fully to the stop, and tighten securely. Replace bent or blunt needles.
- Fabric is pulled forward at the seam end.
- Remove the fabric toward the back.
- Needle is too fine for the fabric.
- Choose the needle and thread for the fabric from the reviewed fabric/needle/thread chart and trial sew.
- The foot does not match the pattern.
- Change to the specified foot for the pattern, with power off.
Stitches skip5 checks
- Needle is incorrectly fitted or bent.
- Switch off and unplug; inspect and refit the HAx1needle flat side backward, fully to the stop, and tighten securely. Replace bent or blunt needles.
- Needle and thread do not match the fabric.
- Choose the needle and thread for the fabric from the reviewed fabric/needle/thread chart and trial sew.
- A blue needle is not used on stretch or skip-prone fabric.
- Use a blue size 11 needle for stretch or skip-prone fabric as described in the chart.
- Upper threading is wrong.
- Switch off and rethread the upper path with the foot raised, correctly seating all guides and the take-up-lever hole; follow the reviewed upper-threading sequence.
- The needle is poor quality.
- Replace the needle.
Fabric puckers6 checks
- Upper tension is unbalanced.
- Adjust upper tension for balanced stitches: reduce the dial number when bobbin thread is pulled to the top, increase it when upper thread is too loose underneath; normally start at Auto.
- One or both paths are wrong or thread is caught elsewhere.
- Rethread both paths correctly, removing unintended tangles.
- The needle is too thick for the fabric.
- Choose the needle and thread for the fabric from the reviewed fabric/needle/thread chart and trial sew.
- Stitch length is too long for the fabric.
- Use a shorter stitch length.
- Thin fabric has no stabilizer.
- Apply stabilizer.
- Presser pressure is unsuitable.
- Adjust presser pressure to the fabric:1–3 thin, 3–6 medium, 5–6 heavy; reduce to 1–3 where stretching or layered curves creep.
Layers creep out of alignment1 check
- Presser pressure is unsuitable.
- Adjust presser pressure to suit the fabric; use 1–3 for stretch fabric or curved layered work prone to creep.
Fabric does not feed properly3 checks
- Lint is caught in the feed dogs.
- Switch off and unplug, then remove tangled thread or lint using the reviewed hook, feed-dog and cutter cleaning sequence; refit all parts correctly.
- Stitch length is too short.
- Increase stitch length.
- Feed dogs are lowered.
- Return the feed control to its raised position and turn the handwheel toward you to raise the feed dogs.
Loops form in the stitches2 checks
- Upper tension is too loose.
- Increase upper tension to the next larger number until balanced.
- Needle size is too large or small for the thread.
- Choose the needle and thread for the fabric from the reviewed fabric/needle/thread chart and trial sew.
Machine does not operate8 checks
- Power is connected incorrectly.
- Connect power using the correct Start/Stop or optional-controller sequence.
- Hook contains thread or lint.
- Switch off and unplug, then remove tangled thread or lint using the reviewed hook, feed-dog and cutter cleaning sequence; refit all parts correctly.
- Thread is tangled around the bobbin.
- Check the bobbin thread for tangles.
- Foot is not lowered.
- Lower the foot and restart.
- Winding spindle remains on the right.
- Stop the machine and return the winding spindle left to sewing position.
- Upper thread has slipped and tangled around the bobbin, producing clattering.
- Check and correct upper threading, including whether it slipped from the take-up lever.
- Thread has left the take-up lever and tangled on other parts.
- Switch off, open the face plate, remove trapped thread, rethread the upper path and close the face plate.
- Follow the general unplugging precaution before removing covers or servicing.
- Start/Stop is pressed while the controller is connected.
- Disconnect the controller to use Start/Stop.
Thin or stretch fabric sinks into the plate2 checks
- Needle and thread are unsuitable.
- Choose the needle and thread for the fabric from the reviewed fabric/needle/thread chart and trial sew.
- The left needle position is not being used.
- Sew at the left needle position.
Thread tangles underneath the fabric1 check
- Upper threading is wrong.
- Switch off and unplug for needle-plate removal.
- Raise the foot and needle; cut the underside threads with scissors.
- Remove the needle plate, bobbin and holder; cut away trapped thread.
- Refit holder, bobbin and plate correctly, then rethread the upper path with power off.
Automatic cutter does not cut correctly2 checks
- Thread is too thick.
- Use the face-plate cutter for size 30 and thicker or specialty thread.
- Thread is tangled.
- Switch off and unplug, then remove tangled thread or lint using the reviewed hook, feed-dog and cutter cleaning sequence; refit all parts correctly.
Upper thread slips out2 checks
- Upper threading is wrong.
- Switch off and rethread the upper path with the foot raised, correctly seating all guides and the take-up-lever hole; follow the reviewed upper-threading sequence.
- Starting upper tail is not held by the foot.
- At the start, pull upper thread under the foot toward the back and hold it with the foot; for longitudinally recessed feet F/R, pull it sideways so the foot holds it.
Thread tangles in the hook3 checks
- Upper threading is wrong.
- Switch off and rethread the upper path with the foot raised, correctly seating all guides and the take-up-lever hole; follow the reviewed upper-threading sequence.
- The hook is scratched.
- The table calls for hook replacement. It gives no user replacement sequence; seek the supplying dealer repair service described in the manual.
- The bobbin holder is fitted incorrectly.
- Refit the bobbin holder with matching triangles and its projection to the left of the stopper; confirm smooth hook rotation with the handwheel.
Clattering with tangled thread2 checks
- Thread is outside the take-up-lever eye.
- Switch off and rethread the upper path with the foot raised, correctly seating all guides and the take-up-lever hole; follow the reviewed upper-threading sequence.
- Upper threading is wrong.
- Switch off and rethread the upper path with the foot raised, correctly seating all guides and the take-up-lever hole; follow the reviewed upper-threading sequence.
Foot controller is depressed but machine stays stopped2 checks
- The controller was depressed before its indication appeared.
- Wait for the controller symbol to appear, then depress the controller.
- Controller plug is disconnected.
- Switch off and connect the controller plug, then power on by the reviewed sequence.
Needle threader does not work2 checks
- Needle is not fully raised.
- Raise the needle with Needle up/down, switch off and follow the needle-threader instructions; use HAx1sizes 11–16 and thread 50–90.
- Needle is fitted incorrectly or bent.
- Switch off and unplug; inspect and refit the HAx1needle flat side backward, fully to the stop, and tighten securely. Replace bent or blunt needles.
Machine sounds unusually loud3 checks
- Lint is trapped in the hook.
- Switch off and unplug, then remove tangled thread or lint using the reviewed hook, feed-dog and cutter cleaning sequence; refit all parts correctly.
- Feed dogs contain debris.
- Switch off and unplug, then remove tangled thread or lint using the reviewed hook, feed-dog and cutter cleaning sequence; refit all parts correctly.
- Slight control-motor resonance occurs at power-on.
- A slight control-motor resonance at power-on is normal.
Two bobbin tails appear at the seam end1 check
- Needle is not fully raised.
- Press Needle up/down to raise the needle.
Bobbin thread shows on the seam5 checks
- Bobbin setting is wrong.
- Switch off and reinstall the bobbin counterclockwise, routing thread through front groove(a), under the horn, up arrow 1 and through the complete reviewed path.
- Spool setting is wrong.
- Fit the spool in the proper direction and secure the appropriate cap.
- Upper threading is wrong.
- Switch off and rethread the upper path with the foot raised, correctly seating all guides and the take-up-lever hole; follow the reviewed upper-threading sequence.
- Upper tension is too high.
- Reduce upper tension by turning the dial to a smaller number.
- A prescribed Janome bobbin is not used.
- Use the prescribed Janome plastic bobbin 11.5 mmhigh; do not use metal bobbins.
Thread tangles at the start2 checks
- Upper threading is wrong.
- Switch off and rethread the upper path with the foot raised, correctly seating all guides and the take-up-lever hole; follow the reviewed upper-threading sequence.
- The starting upper tail is not held under the foot.
- At the start, pull upper thread under the foot toward the back and hold it with the foot; for longitudinally recessed feet F/R, pull it sideways so the foot holds it.
Bobbin winding is uneven2 checks
- Bobbin-thread routing is wrong.
- The table refers to printed 20(PDF 22), the bobbin-setting instructions; retain that reference.
- The winding-guide/threading sequence is separately documented on printed 19(PDF 21).
- Use the reviewed instructions without assuming an undocumented adjustment.
- Winding concentrates at the top or bottom.
- For winding concentrated at the top, turn the winding-guide adjustment screw right; for winding concentrated at the bottom, turn it left.
- Never adjust beyond one full turn because parts can detach.
Pattern does not sew neatly4 checks
- Bobbin direction or seating under its spring is wrong.
- Switch off and reinstall the bobbin counterclockwise, routing thread through front groove(a), under the horn, up arrow 1 and through the complete reviewed path.
- Spool setting is wrong.
- Fit the spool in the proper direction and firmly secure the appropriate cap.
- Upper threading is wrong.
- Switch off and rethread the upper path with the foot raised, correctly seating all guides and the take-up-lever hole; follow the reviewed upper-threading sequence.
- Upper tension is too high.
- Reduce upper tension by turning to a smaller number.
Quiet motor hum, warm controls or moulded surface lines3 checks
- A small control-motor whir is audible in a quiet room.
- A slight whir in a quiet room from the control motor does not indicate a sewing problem.
- Controls warm slightly after prolonged use.
- Slight screen/panel warming after prolonged use is due to the internal controls and is not a sewing problem.
- Fine lines are visible in the moulded body.
- Fine visible lines from resin moulding are weld lines and do not indicate a strength problem.
Guides
安全上のご注意
Instructions from the manualSafety, power and when to stop18 steps
- Use this household machine in Japan only, on household AC 100 V and at 5–35°C.
- Read and retain the safety instructions.
- Keep it away from heaters, irons, aerosol products and flammable materials.
- Do not damage, modify, trap, bundle, pull, forcefully bend or twist the power or controller cords; keep heavy objects and heat off them.
- Do not use damaged cords or plugs.
- Periodically wipe the power plug with a dry cloth.
- Keep lint and dust out of sockets and vents.
- Do not obstruct ventilation or put objects on the foot controller; keep its surroundings clear of lint and dust.
- Unplug by holding the plug, never pulling its cord.
- Switch off and unplug when leaving the machine, after use, during a power outage, before cleaning and before replacing the needle or needle plate.
- Switch off before changing feet or attachments and before setting upper or bobbin thread.
- Do not disassemble the machine.
- Watch the needle while operating; keep hands away from the needle, handwheel, take-up lever and all moving parts.
- Do not use bent or blunt needles, forcefully push or pull fabric, or use an unsuitable foot.
- Secure the needle and foot firmly.
- Take particular care when children use the machine or are nearby.
- Carry by the handle with one hand and support the machine with the other.
- Stop immediately, switch off, unplug and have the supplying dealer inspect, repair or adjust it if it malfunctions, gets wet, suffers drop damage, smells or sounds abnormal, or has damaged or deteriorated cords or plugs.
お取り扱いについてのお願い
Instructions from the manualBefore use, storage and handling5 steps
- Wipe oil, dust and dirt around the needle plate thoroughly with a soft dry cloth; trial sew and confirm that the fabric stays clean.
- Never use thinner, benzine or scouring powder.
- Avoid prolonged sunlight, damp or dusty locations and impacts from drops or knocks.
- Carry by the handle while supporting the machine with the other hand.
- For faulty operation, inspect and adjust using the complete troubleshooting instructions on printed 61–63(PDF 63–65).
各部のなまえ
Instructions from the manualIdentify the machine parts50 steps
- The model-specific diagram identifies: 1.
- Thread guide; 2.
- Bobbin-winding thread guide; 3.
- Large spool cap; 4.
- Spool pin; 5.
- Auxiliary spool-pin hole; 6.
- Bobbin-winding spindle; 7.
- Bobbin stopper; 8.
- Display; 9.
- Setting buttons; 10.
- Direct pattern buttons; 11.
- Slide-out quick-reference panel; 12.
- Speed-control slider; 13.
- Thread-cutter button; 14.
- Needle up/down button; 15.
- Lock-stitch button; 16.
- Reverse button; 17.
- Start/Stop button; 18.
- Extension table/accessory storage; 19.
- Thread cutter; 20.
- Face plate; 21.
- Thread-tension dial; 22.
- Presser-pressure dial; 23.
- Take-up lever; 24.
- Arm thread guide; 25.
- Needle-clamp screw; 26.
- Needle-bar thread guide; 27.
- Needle(size 14 illustrated); 28.
- Basic foot A; 29.
- Bobbin-cover release; 30.
- Bobbin cover; 31.
- Bobbin-thread cutter; 32.
- Needle plate; 33.
- Feed dogs; 34.
- Presser-foot holder; 35.
- Holder screw; 36.
- Holder release lever; 37.
- Buttonhole lever; 38.
- Needle-threader lever; 39.
- Carry handle; 40.
- Free arm; 41.
- Feed-dog drop control; 42.
- Presser-foot lifter; 43.
- Power plug; 44.
- Foot-controller socket; 45.
- Power switch; 46.
- Ventilation openings; 47.
- Handwheel; 48.
- Feed-adjustment screw.
- Carry by the handle while supporting the machine with the other hand; parts and specifications can change with product improvements.
標準付属品
Instructions from the manualStandard accessories and optional equipment6 steps
- Supplied feet are basic A(already fitted), zipper E, satin F, buttonhole R, blind-hem G, overcasting C and overedge M, with buttonhole stabilizer and stabilizer holder.
- There are two large spool caps(one fitted), two small caps, an auxiliary spool pin, four bobbins(one installed), a needle case, seam ripper, machine brush, screwdriver and instruction book.
- The HAx1 needle case contains two size 14, two size 11 and one blue size 11 needle.
- The shared manual marks the cover and foot controller as optional for some models.
- The exact OVI product page identifies the foot controller as an option; do not assume it is supplied.
- The manual also links the manufacturer instructional-video playlist.
標準付属品と収納場所
Instructions from the manualQuick-reference panel, storage table and free arm6 steps
- Pull the panel tab on the right to see patterns 21–25.
- The panels include Sewing guide illustrations with pattern numbers and appropriate foot letters.
- To remove the extension table, hold underneath and pull left.
- To refit, slide along the free arm and insert its pins into the machine holes.
- Open it to store feet and small accessories.
- Removing the table exposes the free arm for cuffs, hems and finishing bag openings.
スタート/ ストップボタンを使用する場合
Instructions from the manualConnect power for Start/Stop operation8 steps
- Switch OFF.
- Draw out the cord and insert the power plug into a household AC 100 V outlet.
- Never pull beyond the red mark; the yellow mark is approximately 30 cm before red.
- Switch ON.
- Initialization takes several seconds and moves the needle and other parts; do not touch the machine during it.
- Start/Stop is unavailable while a foot controller is connected.
- Switch off and unplug when unused; periodically clean plug dust with a dry cloth.
- To store the cord, pull slightly to start automatic rewind, holding the plug and guiding it to the cord opening.
フットコントローラーを使用する場合
Instructions from the manualConnect the optional foot controller4 steps
- Switch OFF.
- Insert the controller plug into its socket, draw out the mains cord and plug into the outlet, then switch ON.
- The controller indicator lights while connected.
- Start/Stop cannot operate while the controller is connected; this controller is optional for this model.
速さの調節
Instructions from the manualAdjust sewing speed5 steps
- Move the slider right for faster Start/Stop sewing.
- With a controller, the slider limits the speed reached at full pedal depression; speed also depends on the selected stitch and length.
- Deep pedal depression increases speed and shallow depression decreases it.
- Normally use the slider at maximum and control by foot; for detailed work choose a low maximum so full pedal depression stays slow.
- Keep objects off the controller and its surroundings free of lint and dust.
操作ボタン
Instructions from the manualNeedle position and automatic thread cutting10 steps
- While stopped, Needle up/down changes the needle from up to down or down to up.
- Normal stopping is needle down, with an optional needle-up setting.
- After sewing, press Thread-cutter to cut both threads.
- A lowered needle rises; sewing can resume without pulling the bobbin thread above the plate.
- Its indicator flashes while cutting.
- The cutter is unavailable immediately after power-on, with the foot raised, or after three consecutive cutter presses.
- Use the face-plate cutter for size 30 and thicker thread or specialty thread.
- Do not use almost-empty spools, which can cause tangles.
- Clean the cutting area periodically.
- If thread does not cut and tangles, switch off and unplug, remove the needle plate and clear it using the reviewed cleaning instructions.
表示画面の説明
Instructions from the manual模様の選び方
Instructions from the manualSelect a patternView
Choose with the left/right pattern-number buttons, or use a direct button for 01–20. See the slide-out panels or full pattern chart for all 25 patterns.
押さえ上げ
Instructions from the manualRaise and lower the foot2 steps
- The foot lifter has a lowered sewing position, a normal raised position for fabric, threading and foot changes, and an extra-high position for thick fabric which cannot stay locked.
- Starting with the foot raised activates the safety stop and flashes the foot symbol: lower it and restart.
押さえの外し方・付け方
Instructions from the manualChange the presser foot5 steps
- Switch off before either operation.
- Use the correct lettered foot for the pattern to avoid needle collision.
- Raise the lifter; push the holder release lever toward you from behind to detach the foot.
- Never press it from above.
- Put the new foot pin directly under the holder groove and slowly lower the lifter to attach.
押さえホルダーの外し方・付け方
Instructions from the manualRemove and fit the foot holder4 steps
- To remove the holder, turn the handwheel toward you to raise the needle, raise the foot and loosen its screw counterclockwise with the screwdriver.
- Refit the holder with a foot already attached; it cannot be fitted correctly without one.
- Raise the lifter, fit the holder on the bar and provisionally tighten its screw.
- Lower the lifter; loosen the screw slightly once, press the foot against the plate and securely tighten the screw with the screwdriver.
糸調子の合わせ方
Instructions from the manualBalance upper-thread tension7 steps
- Normally align the dial to Auto.
- Balanced straight stitches interlock approximately within the fabric; zigzag shows a little upper thread underneath.
- If fabric or thread prevents balance at Auto, adjust the dial manually: smaller numbers loosen upper tension and larger numbers tighten it.
- If bobbin thread is pulled to the top, reduce the number.
- If upper thread is pulled underneath, increase it.
- Poor adjustment can cause bad stitches, wrinkles or breaks.
- If the top looks normal but the underside resembles towelling, upper tension is weak or threading is wrong: adjust tension or rethread properly.
バランスのとれた糸調子(ジグザグ模様)
Instructions from the manualBalance zigzag tension2 steps
- For balanced zigzag, a small amount of upper thread appears underneath.
- If Auto does not balance the chosen fabric and thread, reduce the number when bobbin thread pulls up and increase it when upper thread pulls down.
押さえ圧調節ダイヤル
Instructions from the manualAdjust presser pressure3 steps
- Smaller pressure numbers mean less pressure.
- Use 1–3 for thin fabric, 3–6 for medium fabric and 5–6 for heavy fabric as guides.
- Use 1–3 where stretch fabrics or curved appliqué layers tend to creep.
送り歯ドロップつまみ
Instructions from the manualLower and restore the feed dogs2 steps
- For button sewing, set the drop control to its illustrated feed-dogs-down position.
- After finishing, return it to the up position and turn the handwheel toward you to verify that the feed dogs rise.
針の取りかえ方
Instructions from the manualReplace and inspect the needle8 steps
- Switch off and unplug.
- Turn the handwheel toward you to raise the needle and lower the foot.
- Loosen the needle-clamp screw toward you by one or two turns and remove the needle.
- Use household HAx1 needles.
- Insert the replacement with its flat side away from you until it touches the stop pin; tighten firmly with the screwdriver.
- Incorrect fitting can prevent threading and loosen or break the needle.
- Lay the needle flat side on a flat surface such as the plate; the gap must be even all the way to the tip.
- Never use a bent or blunt point.
布に適した糸や針を選ぶ目安
Instructions from the manualChoose fabric, thread and needle combinations7 steps
- Use household HAx1 needles and trial sew.
- Generally use fine thread and needles for thin fabric, and thicker thread and needles for heavy fabric.
- Normally use the same thread above and below.
- Blue size 11 needles help prevent skipped stitches on jersey, tricot and other stretch or skip-prone fabrics.
- For thin lawn, georgette or tricot: polyester 90 with needle 9–11 or blue.
- For medium sheeting, jersey or wool: cotton 60 or polyester/nylon 50–90 with needle 11–14 or blue; cotton 50 with needle 14.
- For denim, tweed or coat fabric: cotton/polyester 40–50 with needle 14–16; polyester 30 or cotton 30 with needle 16.
下糸の準備
Instructions from the manualRemove a bobbin and fit the thread spool9 steps
- With power off for thread setting, raise the foot, slide the bobbin-cover release right, remove the cover and bobbin.
- Use Janome-specific plastic bobbins 11.5 mmhigh; ask the supplying dealer.
- Never use metal bobbins because the hook magnet can cause tension or mechanical faults.
- Do not use transparent nylon or metallic bobbin thread.
- Raise the spool pin gently.
- Fit the spool so thread comes forward from underneath, against the spool seat, and firmly secure with the large cap; use the small cap for small spools.
- For winding from another spool without removing the sewing spool, insert the auxiliary pin into its hole with its tip toward the winding guide.
- It locks against rotation in the correct position.
- Fit the spool the same way; remove the auxiliary pin before putting the machine in its cover.
ボビンに下糸を巻く
Instructions from the manualWind the bobbin12 steps
- Set the speed slider fully right.
- Never use transparent nylon or metallic bobbin thread.
- Hold the spool-side thread, bring it from back to front around the winding guide and pull along the arrow, securely under its disk; otherwise winding will be uneven.
- Pass the end through the bobbin hole from inside.
- Align the bobbin groove with the spindle spring and fit it.
- Push toward the stopper; the winding indicator lights.
- Do not touch the bobbin-stopper screw, which can release parts.
- Hold the end and run for about 3 seconds, stop, then trim close to the hole.
- Restart to wind.
- When bobbin rotation stops, stop the machine.
- If left running it stops automatically about 90 seconds after starting for safety.
- Only after stopping, return the spindle left, remove the bobbin and cut the thread.
ボビンのセット
Instructions from the manualSet the bobbin and its thread path11 steps
- Switch off.
- Place the bobbin with its thread emerging from the back and running counterclockwise, as on the cover diagram.
- Keep the right hand lightly holding the bobbin against rotation through step 4.
- Hold the tail in the left hand; take it into front groove(a) and under the horn.
- Pull up along arrow 1 into groove(b) to the right of arrow 1.
- Confirm thread emerges from the left-side groove(c).
- Continue along the groove and arrow 2, pass over the lower cutter and pull horizontally right to cut.
- Refit the cover left edge first.
- Normally sew without pulling bobbin thread above the plate.
- If the thread missed front groove(a), it runs straight from the bobbin to the right groove without entering between the metal part and leaf spring(the wrong example B).
- Rethread from step 2 to match correct example A; incorrect threading causes faulty sewing.
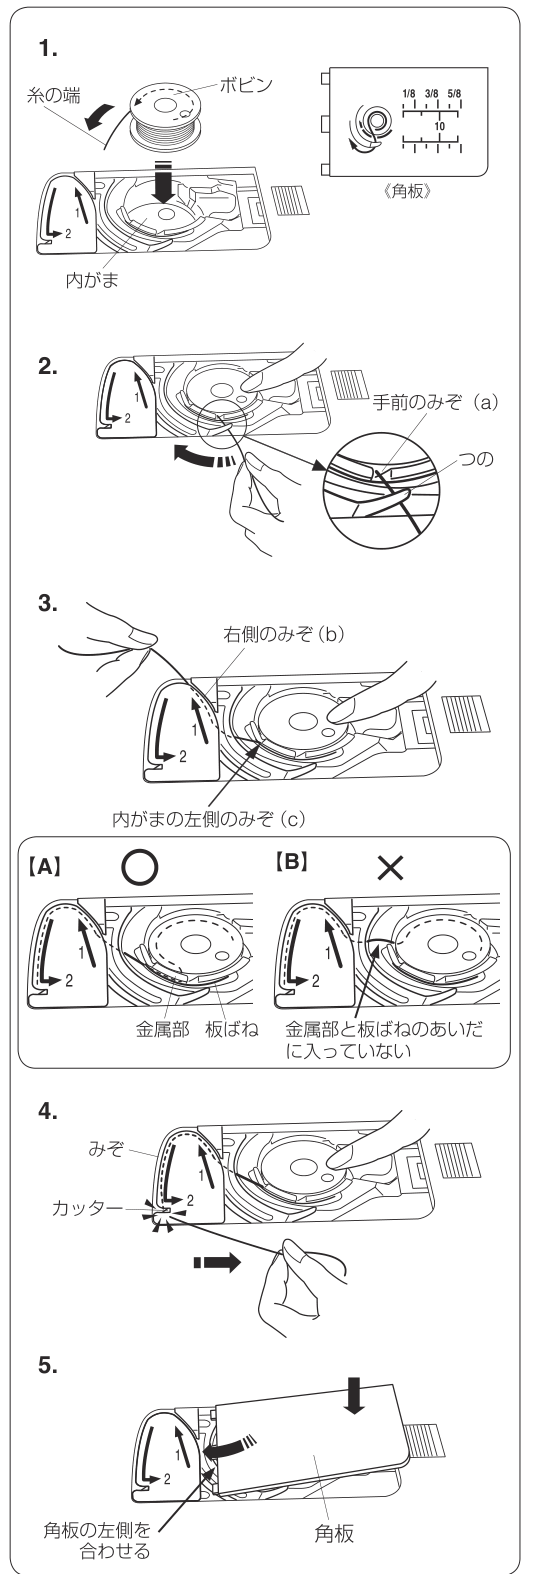
Diagram key
- Step 1: Insert the bobbin with thread emerging from the back and running counterclockwise; the cover shows the same threading direction
- Bobbin and thread tail: Keep the right hand lightly holding the bobbin to prevent turning through step 4
- Bobbin holder: Receives the bobbin in the shown direction
- Bobbin-cover inset: Shows the prescribed bobbin orientation
- Cover scale 1/8, 3/8, 5/8 and 10: Seam-guide marks in inches and millimeters measured from the center needle position; these are guide values, not threading steps
- Step 2: Lead the tail into front groove(a) and under the horn
- a: Front groove that must catch the thread before routing farther
- Horn: Lead the thread underneath this projection
- Step 3: Pull up along arrow 1 into groove(b), and confirm thread emerges from left groove(c)
- Arrow 1: First direction for raising the thread into its right-side groove
- b: Right-side groove beside arrow 1
- c: Left-side bobbin-holder groove where the thread must emerge
- A and circle: Correct path, thread seated between the metal part and leaf spring
- Metal part and leaf spring: Thread must pass between these parts; repeated comparison insets identify the same pair
- B and cross: Incorrect path, the thread skipped front groove(a) and never seated between metal part and spring; rethread from step 2
- Step 4: Follow the groove and arrow 2 to the lower cutter, then pull horizontally right to cut
- Arrow 2: Second threading direction along the groove toward the cutter
- Groove: Route thread along this path toward arrow 2 and the lower cutter
- Cutter: Lower bobbin-thread cutter used for the normal quick-set path
- Step 5: Fit the left side of the bobbin cover first and close it
- Bobbin cover: Match its left edge to the opening before fitting
上糸かけ
Instructions from the manualThread the upper path11 steps
- Raise the foot.
- Switch on, press Needle up/down to raise needle and take-up lever, then switch off before threading.
- Always thread with the foot raised.
- Hold the spool-side thread in the right hand while pulling firmly with the left to seat every guide.
- Fit the spool as reviewed.
- Draw thread under and around the first guide and forward along its groove.
- Pass under the guide plate and pull toward the upper left.
- Take thread from the right behind the take-up lever and forward, through its spring and into the thread hole, then straight down.
- Confirm it has passed the spring into the hole.
- Pass from the right into the arm guide and from the left into the needle-bar guide.
- Use the reviewed threader to thread the needle.
糸通しレバーの使い方
Instructions from the manualUse the needle-threader lever8 steps
- The threader accepts HAx1 needles 11–16 and thread 50–90.
- Press Needle up/down to raise the needle, then switch off and keep it off.
- Lower the foot and threader lever until it stops, placing its hook through the needle eye.
- Bring thread from the left under guide A, under guide B into its recess and up from below into the thread-holding plate, leaving it hanging in front.
- Thread passes under the hook.
- Gently return the lever to raise a loop.
- Release the loop from the hook and pull it backward through the eye to bring the end through.
- If no loop forms and thread catches on the hook, pull it directly backward.
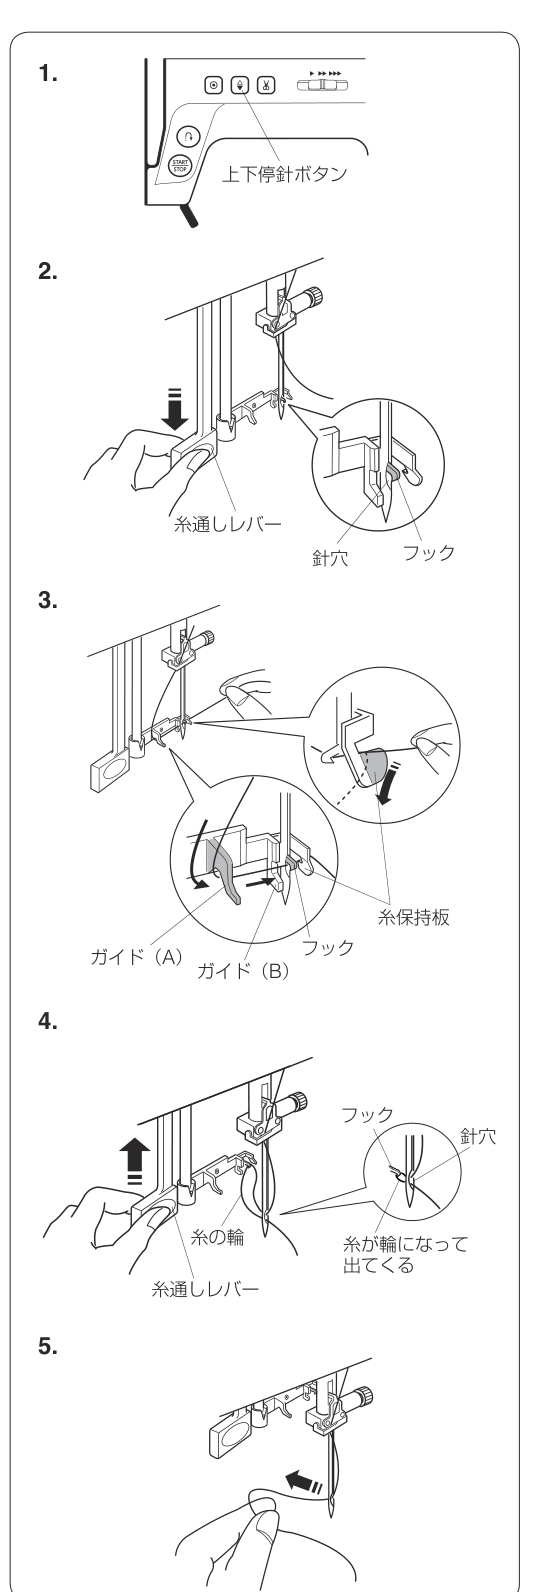
Diagram key
- Step 1: Raise the needle with Needle up/down, then switch off
- Needle up/down button: Raises the needle before power is switched off
- Other controls in step 1: Start/Stop, Reverse, Lock-stitch, Thread-cutter and the speed slider are included for orientation; step 1 operates only Needle up/down before switching off
- Step 2: Lower the foot and lower the threader lever until it stops
- Threader lever: Lowers the hook into the needle eye; repeated leaders identify the same lever
- Needle eye: Hook passes through this opening while the lever is fully down
- Hook: Catches thread passing underneath it; repeated close-ups show the same hook
- Step 3: Lead thread from the left under guide A, under guide B into its recess, then into the thread-holding plate from below, leaving the end in front
- Guide A: First guide, approached from its left and underneath
- Guide B: Second guide; follow its underside recess
- Thread-holding plate: Place thread here from below, after guides A and B
- Step 4: Return the lever gently to raise a thread loop
- Thread loop: Pull the loop off the hook toward the back to finish threading; repeated loops show the same operation
- Step 5: Pull the end through the needle eye; if no loop forms and thread catches on the hook, pull it straight backward
下糸を針板の上に引き出す場合
Instructions from the manualPull up a long bobbin-thread tail5 steps
- Normally no pull-up is needed after insertion or automatic cutting.
- For gathering or smocking, follow bobbin-setting steps 1–3, pull about 10 cmbackward without using the lower cutter and refit the cover.
- Thread the needle, raise the foot and hold the upper-thread tail.
- Switch on and press Needle up/down once to lower and again to raise the needle.
- Pull upper thread gently to lift the bobbin loop; place both threads under the foot about 10 cmto the back.
ブザー音の設定
Instructions from the manualSet confirmation beeps7 steps
- Switch off.
- Hold Needle up/down while switching on until the settings screen appears; if it does not appear, switch off and repeat.
- Settings are saved with Start/Stop; switching off without confirmation retains the old setting.
- The default confirmation sound is on, flashing on.
- Press Length + for flashing o F to disable normal confirmation beeps, or Width + for flashing onto enable them.
- Warning and prohibited-operation beeps still sound when confirmation is disabled.
- Press Start/Stop to save.
停針位置の設定
Instructions from the manualSet the needle stopping position4 steps
- Enter settings by holding Needle up/down during power-on as reviewed, then press the right pattern arrow for needle-stop settings.
- Default dnmeans needle-down stopping.
- Press Width + for flashing UP(needle up), or Length + for flashing dn(needle down).
- Press Start/Stop to save; switching off without pressing it keeps the previous setting.
直線ぬい
Instructions from the manualStart a straight seam and cross thick fabric edges9 steps
- For straight stitch 01 or 04, select Auto tension and basic foot A.
- Put the upper tail under the foot toward the back; hold fabric and tail with the left hand and turn the handwheel toward you to insert the needle at the start.
- No bobbin-tail pull-up is normally needed, but the upper tail must be held by the foot.
- Lower the lifter and start with Start/Stop or the controller.
- Use Reverse to secure the start, or the reviewed 02/03 automatic securing patterns.
- For feet F and R whose underside longitudinal recess cannot hold a backward tail, pull the tail sideways and hold it under the foot instead.
- At a thick edge or step, insert the needle at the starting position, press the black button on foot A and lower the foot while holding it.
- The foot locks level; release the button and sew.
- It releases automatically when sewing begins.
ぬい方向の変更
Instructions from the manualPivot the fabricView
Stop where direction changes. If the needle is not in the fabric, lower it with Needle up/down. Raise the foot, pivot around the embedded needle, lower the foot and resume.
ぬい終わり
Instructions from the manualFinish a seam3 steps
- At the seam end, hold Reverse for a few securing stitches and stop.
- Press Thread-cutter, raise the foot and gently remove fabric backward; the needle rises for cutting and no bobbin-thread pull-up is needed afterward.
- With 02 or 03, one Reverse press performs the appropriate securing action and stops.
面板の糸切りの使い方
Instructions from the manualUse the face-plate thread cutterView
For size 30 or thicker thread and specialty thread, use the face-plate cutter: raise needle and foot, draw fabric backward and bring it toward the front across the cutter.
糸切り記憶
Instructions from the manualRemember automatic thread cutting4 steps
- Press thread-cut memory so its indicator lights.
- Patterns with an end securing sequence cut when they finish and stop.
- Other patterns cut when Reverse or Lock-stitch secures and stops them.
- Press memory again to extinguish the indicator and cancel.
針板ガイドライン
Instructions from the manualUse seam guides and turn a corner6 steps
- Align the fabric edge to the plate or cover guide for an accurate seam.
- Numbers measure from the center needle-hole position in inches or millimeters.
- Front guides are 0.65 cm(1/4 inch), 0.95 cm(3/8 inch) and 1.6 cm(5/8 inch); angle markings support patchwork.
- To turn a right angle about 1.6 cmfrom the edge, stop when the edge reaches the cornering guide.
- With the needle embedded, raise the foot and rotate fabric 90 degrees so its edge meets the right-side 1.6 cmguide.
- Lower the foot and restart.
針位置をかえるとき(直線状模様)
Instructions from the manualSet straight-pattern needle position4 steps
- Patterns 01–05 allow needle-position changes.
- Defaults are 3.5 for 01, 02, 03 and 05, and 0.5 for 04.
- Width + increases the value and moves right; Width – moves left.
- The approximate millimeter distance from the leftmost position runs 0.0(left) to 7.0(right), center 3.5, in 0.5 steps.
ぬい目のあらさをかえるとき(直線状模様)
Instructions from the manualSet straight-pattern stitch length6 steps
- Length defaults are 2.4 for 01–04 and 2.5 for 05.
- Length + coarsens and Length – shortens.
- Pattern 01 or 04 allows 0.0–5.0;02 or 03 allows 1.0–5.0;05 allows 1.0–4.0.
- Available values begin 0.0(01/04 only), 1.0, 1.5, 1.8, then 0.2 increments to 3.0 and 0.5 increments to 5.0 where permitted.
- All displayed millimeters are guides; actual stitch length depends on fabric and thread.
- At forward length 4.5 or 5.0, reverse length is 4.0 as a guide, also depending on fabric and thread.
自動返しぬい
Instructions from the manualAutomatic reverse and lock securing4 steps
- Pattern 02 with Auto tension and foot Aautomatically reverse-secures at the start before straight sewing;03 with the same settings makes less visible locking stitches instead.
- At the end, press Reverse once while running or after stopping.
- With Start/Stop operation the selected securing sequence occurs and the machine stops.
- With the controller, a press while running performs it immediately; if pressed after stopping, depress the controller again to execute it and stop.
三重ぬい
Instructions from the manualTriple straight sewingView
Pattern 05, Auto tension and foot Agive a strong stretchable seam for reinforcement such as trouser crotches and sleeve attachments.
伸縮布地のぬい
Instructions from the manualSew stretch fabric2 steps
- For knit or tricot seams that stretch without thread breakage while allowing the allowance to be pressed open, use 06, Auto, foot A and pressure 3–4.
- Its Lmark fixes the left reference when changing width.
ジグザグぬい
Instructions from the manualSew and adjust zigzag stitches9 steps
- Use 07, Auto tension and foot A.
- Trial sew and adjust width and length to prevent puckering; thin-fabric starting guides are width 3.0 and length 2.0.
- Stabilize stretch knit, jersey or tricot for a better result.
- Zigzag also supports overcasting and button sewing with their specific reviewed settings.
- The normal width default is 3.0, adjustable 0.0–7.0 in 0.5 steps.
- Width + widens and Width – narrows symmetrically around the fixed middle needle position.
- Default length 1.5 changes over 0.2–5.0:0.1 steps from 0.2 to 1.0 and 0.5 steps from 1.0 to 5.0.
- Length + coarsens and Length – shortens; displayed millimeters are approximate.
- Pattern marks describe the width reference: Lfixes the left needle position and changes toward the right; Mfixes the center and changes both sides; Rfixes the right and changes toward the left.
ジグザグぬいのたち目かがり
Instructions from the manualZigzag overcasting with foot C4 steps
- Use 07, Auto tension, overcasting foot C and width 5.0–7.0, even though the screen normally recommends A for this pattern.
- Sew with the cut edge against the guide to prevent fraying.
- Its Mmark uses the middle width reference.
- Never use C with width 4.5 or below: the needle can hit its wire and cause injury.
トリコットぬいのたち目かがり
Instructions from the manualTricot overcastingView
For wrinkle-prone synthetic or stretch knit edges, use 08, Auto and foot A. Leave a little extra allowance, sew, then trim close to the stitching.
つくろいぬい
Instructions from the manualMend frayed edges3 steps
- To mend frayed edges, use 08, Auto, foot A and length 0.3–0.5.
- Butt the edges and sew them together, then sew along both sides of that first seam.
- Add backing fabric underneath if the degree of fraying requires it.
ふちかがり
Instructions from the manualOveredge sewingView
For two layers of medium plain-weave fabric, 09 with Auto, foot C and width 5.0–7.0 joins and overcasts in one seam. Keep the edge against the guide.
ニットかがり
Instructions from the manualKnit overcasting4 steps
- For jersey, knit or tricot, 10 with Auto and pressure 3–4 can use A or C.
- With C, use width 5.0–7.0 and keep the edge at the guide.
- With A, leave extra allowance and trim close afterward.
- Never use C with width 4.5 or below because the needle can strike its wire.
ふちかがり2
Instructions from the manualOveredge sewing with foot M3 steps
- For ordinary linen, lawn and easily frayed fabric, 11 with tension 6–8 and foot M gives an overlock-like edge.
- Keep the edge against its guide.
- Foot M is special and no foot letter is displayed.
ギャザー寄せ
Instructions from the manualGather fabric9 steps
- Use 01 and foot A.
- The setup guide lists tension 1–Auto and length 5.0.
- For the gathering stage, pull both thread tails about 10 cmbackward, set tension 1 and length 4.0–5.0, then baste two parallel rows 0.5–0.7 cmapart around the finished seam line.
- Raise the foot and remove the fabric, leaving about 5 cmtails.
- Use the face-plate cutter, never automatic cutting.
- Knot the starting tails; pull both finishing bobbin threads together to gather.
- Knot each finishing pair, distribute gathers and press.
- To attach the gathered fabric, restore Auto and length 2.4, sew the finished line and remove basting.
- If basting needle holes would show, put both basting rows above the finished line before gathering.
ファスナー付け
Instructions from the manualInsert a zipper18 steps
- Use 01, Auto, basic A for preparation and zipper E for the zipper.
- Fit Eby aligning its pin with the holder groove: use its right pin to sew left of the teeth and its left pin to sew right of them.
- Switch off for foot changes.
- The opening is zipper length plus 1 cm.
- Place fabric right sides together with 2 cmallowance, sew up to the opening stop using A, then baste the opening.
- Use length 5.0 and tension 1 for easy-to-remove basting; restore length and Auto afterward.
- Press allowances open.
- Fold the lower allowance to extend 0.3 cm, press, and place its fold beside the teeth.
- Fit Eon its right pin.
- Keep teeth beside the foot right edge and sew the left zipper side from the opening stop, reversing a few stitches to secure the start.
- Stop about 5 cmbefore the zipper end, leave the needle in fabric, lift the foot and move the slider backward past it.
- Lower the foot and finish, securing the end with a few reverse stitches.
- Close the zipper, lay the slider upward, cover it with the top fabric and baste this to the backing with Ausing length 5.0/tension 1.
- Restore sewing length and Auto.
- Fit Eon its left pin; reverse 0.7–1.0 cmacross the opening stop, then sew the right side with teeth beside the left foot edge.
- With about 5 cmremaining, stop needle-down, raise the foot, remove the opening basting from preparation and move the slider behind the foot.
- Lower and finish, then remove the covering basting.
- Throughout, ensure the needle does not strike the zipper or foot.
ボタン付け
Instructions from the manualゴムひも付け
Instructions from the manualAttach elastic4 steps
- Use 08, Auto and foot A.
- Pin elastic stretched at several evenly spaced points on the fabric underside.
- Stretch it with both hands to match the fabric length and sew over it.
- Stop before each pin, remove the pin and resume.
まつりぬい
Instructions from the manualBlind hemming8 steps
- Use 12, Auto, blind-hem G and thread matching the fabric.
- Overcast heavy fabric that frays.
- Fold the hem as illustrated with 0.4–0.7 cmshowing; the thin/medium arrangement also shows a 1 cmturn-under.
- Sew with the fold against the guide, catching the fold without missing or taking excessive fabric.
- Open the fabric after sewing.
- The default needle setting 0.6 is the approximate millimeter distance from guide to the left needle drop.
- Adjust 0.0–1.2 with Width+/–: plusmoves the pattern left to catch more fold, minusmoves right to catch less.
- Width itself stays the same.
ボタンホールの種類
Instructions from the manualスクエアボタンホールのぬい
Instructions from the manualキーホールボタンホールのぬい
Instructions from the manualボタンホール安定板セットを使用する場合
Instructions from the manual芯入りスクエアボタンホールのぬい
Instructions from the manualピンタック
Instructions from the manualPintucksView
Use 04, Auto and blind-hem Gthough the screen normally shows A. Sew with the fabric fold against its guide, then press the pintuck to one side.
ファゴティング
Instructions from the manualFagoting4 steps
- Use 07, Auto and satin F for visibility, despite the usual screen A.
- Turn both edges about 1.5 cmto the wrong side and press.
- Leave 0.3–0.4 cmbetween them over backing paper; sew from the right side centered over the gap, then remove the paper.
- The Mmark fixes width around the middle needle position.
パッチワーク
Instructions from the manualPatchwork and angle guides7 steps
- Use 01 and 07(08 is also supported), Auto, basic A for the joining seam and satin F for decoration.
- Put pieces right sides together; join with the edge at the front 0.65 cm(1/4 inch) guide.
- Press the allowance open or to one side.
- Fit F for clear seam visibility despite screen A, then sew 07 centered over the seam from the right side.
- Its Mmark uses a middle width reference.
- For unmarked 0.65 cmallowances on angled pieces, align the edge with the matching angle scale.
- For a Lemoyne-star example, crease the diagonal, position the edge at the 0.65 cmguide and 45 degrees, then sew to the diagonal.
アップリケ
Instructions from the manualAppliqué6 steps
- Use 13(08 is also supported), Auto, satin F and pressure 1–3.
- Glue or baste the appliqué in place.
- Sew so the right needle drop lands just outside its edge.
- At curves or turns, stop with needle just outside the appliqué, lift the foot, pivot around the needle and lower to continue.
- Default width 3.5 changes with Width+/–: pluswidens toward the left from the fixed right needle position; minusnarrows from that same fixed right position.
- The Rmark indicates this reference.
スモッキング
Instructions from the manualSmocking6 steps
- Use 14, Auto and satin F for the decorative stage.
- Choose soft thin fabric about three times the finished width.
- Pull both tails about 10 cmbackward; use the face-plate cutter rather than automatic cutting.
- Set tension 1 and straight-stitch length 5.0; sew several parallel rows 1 cmapart.
- Knot upper and bobbin threads on one side, pull bobbin threads from the other to gather and knot.
- Restore Auto and decorative length 2.5, sew the selected motif between straight rows, then remove the straight threads.
クロスステッチ
Instructions from the manualCross stitch3 steps
- Use 15, Auto and satin F.
- Work outward from the design center.
- To sew a single motif, press Lock-stitch before starting; the machine completes one motif, secures it and stops automatically.
飾りぬい
Instructions from the manualDecorative patterns3 steps
- Use 16 with Auto and satin F for decorative work such as tablecloths.
- Other illustrated options are 13, 23, 24 and 25.
- Fabric moves backward and forward during stitching; guide it so rows do not wander.
密着模様ぬい(サテンステッチ)
Instructions from the manualSatin stitching and elongation8 steps
- Use 17 with Auto and satin F;16 and 18 also support satin work.
- Very short length can jam feeding, so always trial sew and verify feeding.
- Stabilize underneath if fabric shrinks.
- Press Lock-stitch near the end to complete the motif, secure it and stop.
- Patterns 16, 17 and 18 can be lengthened without changing density.
- Select the pattern and cycle Pattern-length through L 1(original), L 2, L 3, L 4, L 5 and back to L 1.
- Width and length adjustments further change appearance.
- Start to sew; Lock-stitch completes the motif, secures it and stops.
スカラップ
Instructions from the manualScallop edges4 steps
- For scallops, use 18 with satin F, or 22 with basic A, and Auto tension.
- Sew from the right side about 1 cmfrom the edge.
- During the last motif, press Lock-stitch to finish it, secure and stop.
- Trim the outer fabric without cutting stitches.
シェルタック
Instructions from the manualShell tucks4 steps
- For shell tucks on thin fabric such as tricot, use 21, tension 6–8 and satin F.
- Fold on the bias and sew with the right needle drop just outside the fold.
- Open the fabric and press the ridges to one side.
- Trial sew and adjust tension for neat shells; leave at least 1.5 cmbetween rows.
ドロンワーク
Instructions from the manualDrawn-thread work4 steps
- Use 13, Auto, satin F and pressure 3–4 on firmly woven fabric such as linen whose threads pull out easily.
- Pull one or two fabric threads from both sides of the intended opening.
- Sew along both withdrawn-thread edges, then remove all threads between.
- The Rmark fixes the right needle position for width adjustment.
キャンドルウィック
Instructions from the manualCandlewick stitchingView
Use 23, tension 5–8 and satin F to sew candlewick motifs.
フリンジ
Instructions from the manualFringing4 steps
- Use 13, Auto, satin F and pressure 3–4 for fringes on table linen or shawls.
- Choose firmly woven linen-like fabric with easily removable threads.
- Withdraw one or two threads at the fringe boundary, sew over that line, then pull out all threads in the fringe area.
- Its Rmark fixes the right needle reference.
とじぬい
Instructions from the manualQuilt tacking3 steps
- Use 24, Auto and satin F to tack thick quilt batting.
- Select the pattern and press Lock-stitch before sewing; start and it sews one motif, secures and stops.
- Alternatively press Lock-stitch while sewing the first motif to complete that single motif, secure and stop.
模様の形の整え方(送り調節ねじ)
Instructions from the manualCorrect a distorted pattern3 steps
- Fabric type, thickness and conditions can distort a motif.
- Trial sew under the intended conditions; if distorted, remove the extension table to reach the feed-adjustment screw.
- For the illustrated 14 example, turn toward+for a compressed motif and toward–for an elongated motif.
かまと送り歯の掃除
Instructions from the manualClean the hook, feed dogs and cutter11 steps
- Switch on and press Needle up/down to raise the needle, then switch off and unplug.
- Never dismantle beyond the parts described.
- Remove needle, foot holder and bobbin cover, then the bobbin.
- Remove the two needle-plate screws with the screwdriver and lift the plate.
- Lift the front of the bobbin holder out.
- Brush the holder and wipe its entire surface lightly with a soft cloth.
- Brush lint from feed dogs and thread-cutter area toward the front, then clean the outer hook.
- Wipe the hook center lightly with a soft cloth.
- Vacuum dry lint or dust inaccessible to the brush.
- Frequent use can accumulate inaccessible lint and cause poor sewing; ask the supplying dealer about regular deeper cleaning.
- The machine is adequately lubricated at manufacture: do not oil it yourself.
内がまと針板の組み付け
Instructions from the manualRefit the bobbin holder and needle plate4 steps
- With power off and unplugged after cleaning, match the holder triangle to the stopper triangle, placing the holder projection to the left of the stopper.
- Turn the handwheel slowly toward you and verify smooth hook rotation.
- Refit the needle plate and securely tighten its two screws with the screwdriver.
- Remember to refit bobbin, cover, foot holder and needle before use.
ブザー音の種類
Instructions from the manualRecognize the four buzzer sounds2 steps
- A single short beep confirms correct operation; three short beeps reject an incorrect operation; one long beep warns of abnormal operation; two short followed by a long beep indicate completion such as a finished buttonhole.
- Confirmation beeps can be disabled in settings; warning/prohibition sounds remain.
修理サービスのご案内
Instructions from the manualRepair service and specifications10 steps
- Check and retain the dealer-issued warranty.
- Ask the supplying dealer for repairs during and after the free warranty term.
- Transmission and sewing-function service parts are generally retained for eight years after discontinuation.
- Properly used and maintained machines can receive paid service while parts remain available.
- Repair may be impossible after poor storage, misuse, floods, fire or other disasters, transport damage, unauthorized repair/disassembly/modification, or excessive professional use.
- Long-term accuracy deterioration may not be fully restorable.
- Paid charges include required parts, travel and the dealer labour fee.
- Have the product name from the front or warranty ready when seeking advice.
- This model uses 100 V 50/60 Hz, 43 W; body dimensions 406×177×302 mm, body mass 6.5 kg, HAx1household needles and maximum 820 stitches/minute both with and without the controller.
- Contact details in this Japanese edition are Janome customer consultation 0120-026-557 or 042-661-2600, weekdays 09:00–12:00 and 13:00–17:00 excluding weekends, holidays and year-end closures; an inquiry form is on the corporate website.
Controls and parts
See the manual diagrams 3 diagrams
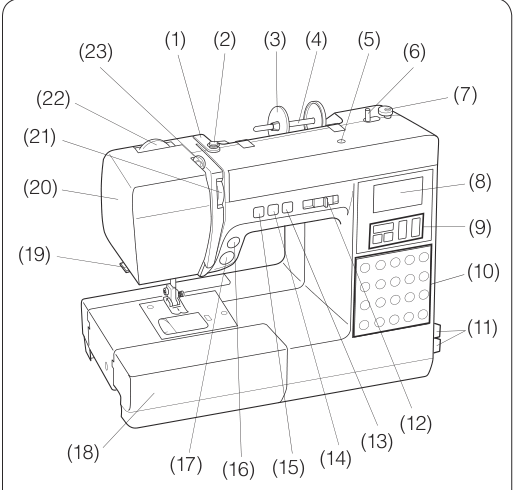
Diagram key
- 1: Thread guide
- 2: Bobbin-winding thread guide
- 3: Large spool cap
- 4: Spool pin
- 5: Auxiliary spool-pin hole
- 6: Bobbin-winding spindle
- 7: Bobbin stopper
- 8: Display
- 9: Setting buttons
- 10: Direct pattern buttons
- 11: Slide-out quick-reference panel
- 12: Speed-control slider
- 13: Thread-cutter button
- 14: Needle up/down button
- 15: Lock-stitch button
- 16: Reverse button
- 17: Start/Stop button
- 18: Extension table/accessory storage
- 19: Thread cutter
- 20: Face plate
- 21: Thread-tension dial
- 22: Presser-pressure dial
- 23: Take-up lever
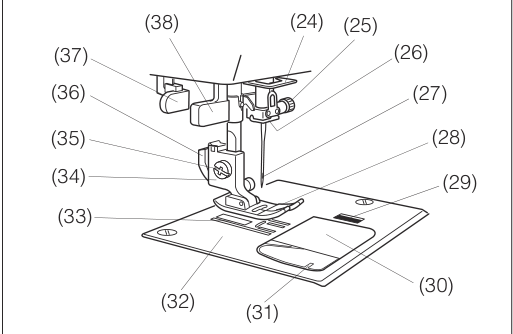
Diagram key
- 24: Arm thread guide
- 25: Needle-clamp screw
- 26: Needle-bar thread guide
- 27: Needle(size 14 illustrated)
- 28: Basic foot A
- 29: Bobbin-cover release
- 30: Bobbin cover
- 31: Bobbin-thread cutter
- 32: Needle plate
- 33: Feed dogs
- 34: Presser-foot holder
- 35: Holder screw
- 36: Holder release lever
- 37: Buttonhole lever
- 38: Needle-threader lever
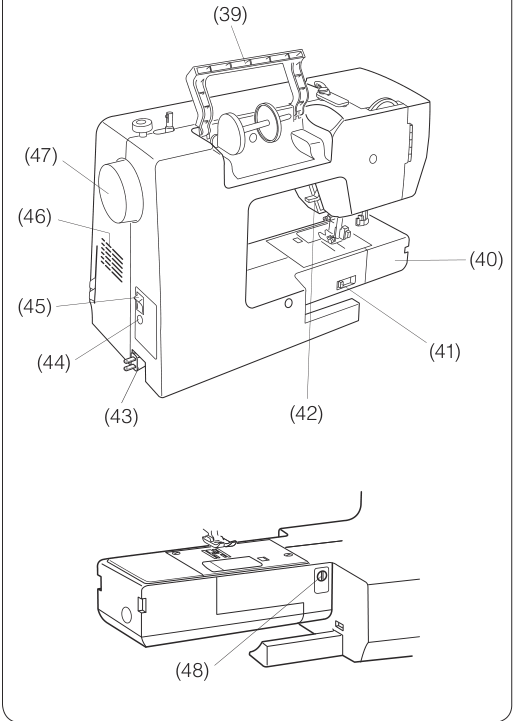
Diagram key
- 39: Carry handle
- 40: Free arm
- 41: Feed-dog drop control
- 42: Presser-foot lifter
- 43: Power plug
- 44: Foot-controller socket
- 45: Power switch
- 46: Ventilation openings
- 47: Handwheel
- 48: Feed-adjustment screw
Model details
Model and compatibility
- Power and region
- Japan household use only;100 V 50/60 Hz, 43 W.
- Dimensions and weight
- Body 406 mmwide×177 mmdeep×302 mmhigh;6.5 kg.
- Needles
- HouseholdHAx1 needles. Threader supports 11–16 needles and 50–90 thread.
- Bobbins
- Use the prescribed Janome 11.5 mmplastic bobbin; do not use metal, transparentnylon or metallic bobbinthread.