MODEL REFERENCE
Epson EX7220
43 errors · 133 guides
The checks and guides below come from the official manuals for this model.
No matches for this wording. Try a light name, error code or a shorter phrase.
Errors and indicators
Light patterns and messages documented in the manualFind the indicator lights
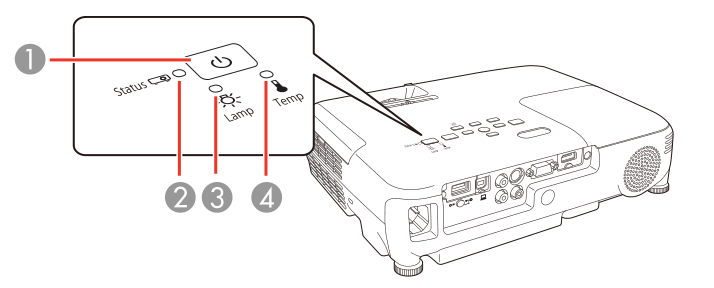
Diagram key
- 1: Power light
- 2: Status light
- 3: Lamp light
- 4: Temp (temperature) light
Power flashing blue; Status varies; Lamp varies; Temp flashing orangeprojector is too hot
- Check that vents and the air filter are clear of dust and nearby obstructions.
- Clean or replace the filter, and make sure the surrounding temperature is not too hot.
- Turn off and unplug before filter maintenance.
Power off; Status flashing blue; Lamp off; Temp orangeprojector has overheated and turned off
- Leave the projector off to cool.
- After about five minutes, once Temp and Status are off and Power is blue, check vents/filter for dust or obstruction, clean or replace the filter, and enable High Altitude Mode at high altitude.
- If the problem remains, unplug and contact Epson.
- Turn off and unplug before filter work.
Power off; Status flashing blue; Lamp orange; Temp offlamp has a problem
- Check for a burned-out, broken or incorrectly fitted lamp and reseat or replace it as needed.
- Clean or replace the air filter.
- Enable High Altitude Mode at high altitude.
- If the fault remains, unplug and contact Epson.
- Before lamp access, turn off, unplug and cool for at least one hour; follow the reviewed lamp-replacement warnings.
Power flashing blue; Status varies; Lamp flashing orange; Temp variesreplace the lamp soon
- Stop using the projector and replace the lamp soon to prevent damage.
- Follow the reviewed replacement procedure: turn off, unplug and cool the lamp for at least one hour before access.
Power off; Status flashing blue; Lamp off; Temp flashing orangea fan or sensor has a problem
Turn off the projector, unplug its power cord and contact Epson.
Power off; Status flashing blue; Lamp flashing orange; Temp offinternal projector error
Turn off the projector, unplug its power cord and contact Epson.
Power off; Status flashing blue; Lamp flashing orange; Temp flashing orangeauto iris error
Turn off the projector, unplug its power cord and contact Epson.
Power off; Status flashing blue; Lamp orange; Temp orangepower error
Turn off the projector, unplug its power cord and contact Epson.
0432easyMP Network Projection did not start
Turn the projector off, then turn it on again.
0435easyMP Network Projection did not start
Turn the projector off, then turn it on again.
0434unstable network communication
Check network communication, wait a few moments and try the network connection again.
0481unstable network communication
Check network communication, wait a few moments and try the network connection again.
0482unstable network communication
Check network communication, wait a few moments and try the network connection again.
0485unstable network communication
Check network communication, wait a few moments and try the network connection again.
0433transferred images cannot be displayed
Restart EasyMP Network Projection.
0484computer communication disconnected
Restart EasyMP Network Projection.
0483easyMP Network Projection quit unexpectedly
Check network communication, then turn the projector off and on again.
04FEeasyMP Network Projection quit unexpectedly
Check network communication, then turn the projector off and on again.
0479projector system error
Turn the projector off, then turn it on again.
04FFprojector system error
Turn the projector off, then turn it on again.
0891no access point with matching SSID
Use the same SSID on the computer, access point and projector.
0892wPA/WPA2 authentication type mismatch
Check that the wireless network security settings are correct.
0893wEP/TKIP/AES encryption type mismatch
Check that the wireless network security settings are correct.
0894unauthorized access-point communication disconnected
Contact the network administrator.
0898dHCP address acquisition failed
Check that the DHCP server is working correctly. If DHCP is not being used, turn DHCP off in the projector Network menus.
0899communication error
Restart EasyMP Network Projection and the projector. If that does not resolve the problem, contact Epson for help.
Cannot start this application while USB Display is running.easyMP: USB Display is already running
- Close USB Display before starting EasyMP.
- On Windows disconnect the projector USB cable.
- On OS X choose Disconnect from the USB Display menu-bar/Dock icon, then remove the USB cable.
Cannot start this application while Quick Wireless Connection is running.easyMP: Quick Wireless Connection is already running
Close Quick Wireless Connection before starting EasyMP. Use External Device Removal from the taskbar icon to remove its USB key from the computer.
EasyMP Network Projection initialization failed.easyMP: EasyMP initialization failed
Restart EasyMP; if the message remains, uninstall and reinstall it.
Network adapter information could not be obtained.easyMP: Network-adapter information is unavailable
- Check that a network adapter, its driver and its enabled setting are present.
- Restart the computer, then EasyMP.
- If still unable to connect, check computer and projector network settings.
Cannot be used with the current OS version. Reinstall EasyMP Network Projection.easyMP: Application OS-version message
Reinstall EasyMP Network Projection.
Cannot connect to the projector using this version of EasyMP Network Connection. Install the latest version of EasyMP Network Projection.easyMP: Application-version mismatch
Install the supplied projector-CD EasyMP version or download the latest version from Epson.
Connection to the projector failed.easyMP: Connection failed
Retry. If still unsuccessful, check computer and projector network settings.
The keyword does not match. Re-enter the keyword displayed on the projector screen.easyMP: Keyword does not match
Read Projector Keyword from LAN standby and enter that keyword.
Connection failed due to keyword mismatch.easyMP: Connection failed because of keyword mismatch
Read Projector Keyword from LAN standby and enter that keyword.
Enter the keyword displayed on the projector screen.easyMP: Keyword entry prompt
Read Projector Keyword from LAN standby and enter that keyword.
The selected projector is busy. Do you want to continue the connection process?easyMP: Selected projector is busy
Yes connects this computer and disconnects the other one. No leaves this computer disconnected and preserves the existing connection.
One or more connected projectors do not support resolutions greater than SXGA. Reduce the screen resolution and reconnect.easyMP: Connected projector has a resolution limit
Set the computer screen to SXGA (1280 × 1024) or lower and reconnect.
One or more projectors are not responding.easyMP: Projector is not responding
Check computer and projector network settings.
The wireless LAN is off. Turn on the wireless LAN, and then try searching again.easyMP: Computer wireless LAN is off
Turn computer wireless LAN on, then search again.
XXXXXX was disconnected.easyMP: Connected projector disconnected
Retry the connection. If still unsuccessful, check computer and projector network settings. XXXXXX is the placeholder printed in the manual.
To output audio from the projector, restart applications such as PowerPoint or Windows Media Player.easyMP: Application restart required for audio
Restart PowerPoint or Windows Media Player so audio is output through the projector.
You need to restart your computer to enable Audio Output. Select Yes to restart now or select No to restart later.easyMP: Computer restart required for audio
Choose Yes and restart the computer to transfer/play audio through the projector.
Guides
Setting up the projector
Instructions from the manualProjector Placement8 steps
- Use a sturdy, level surface or a compatible mount, with the projector square to the centre of the screen where possible.
- Keep its vents unobstructed, leave ventilation space around and underneath it, and keep it within reach of a grounded outlet or extension cord.
- For rear projection use a translucent screen; for rear or ceiling placement choose the matching Projection setting.
- A qualified technician must install a ceiling or wall mount designed for this projector.
- Do not use screw-locking adhesives, oils or lubricants on the mount.
- Do not use the projector on its side or tilted to one side, or tilt it more than 30 degrees forwards or backwards.
- Leave at least 20 cm (7.9 inches) between the exhaust vent and a wall.
- Above 1500 m (4921 feet), enable High Altitude Mode.
Projection Distance3 steps
- Choose distance for the intended image size, accounting for zoom, aspect ratio and other settings.
- The guide gives approximate distances and notes that conversion figures are rounded.
- For the EX7220 with a 16:10 image: 50 inches uses 139–168 cm (55–66 inches), 80 inches uses 225–270 cm (88–106 inches), 100 inches uses 281–338 cm (111–133 inches), and 150 inches uses 424–509 cm (167–200 inches), from wide to tele.
Connecting to a Computer for USB Video and Audio11 steps
- For computer images and audio through USB Display, set Extended > USB Type B to USB Display.
- An HDMI connection is recommended for high-quality computer images.
- Connect a USB cable between the projector USB-B port and an available computer USB port.
- On Windows 8.x, open EPSON_PJ_UD in the upper-right corner and run EMP_UDSE.EXE.
- On Windows 7/Vista use Run EMP_UDSE.EXE in AutoPlay.
- On Windows XP, wait for the installation messages or open My Computer > EPSON_PJ_UD > EMP_UDSE.EXE.
- On Windows 2000, open Computer > EPSON_PJ_UD > EMP_UDSE.EXE.
- On OS X, run USB Display Installer from the setup folder.
- Follow the installation prompts; install only on the first connection.
- If Windows XP or 2000 asks to restart, select No.
- The computer desktop is projected, with sound if the presentation contains audio.
Connecting to a Computer for VGA Video4 steps
- If necessary, disconnect the computer monitor cable.
- Connect a VGA computer cable to the computer monitor port and the projector Computer port, then tighten the connector screws.
- A Mac with only Mini DisplayPort, Thunderbolt or Mini-DVI video output needs a suitable VGA adapter; ask Apple about compatible options.
- Use the separate computer-audio instructions if sound is needed.
Connecting to a Computer for HDMI Video and Audio4 steps
- Connect an optional HDMI cable from the computer HDMI output to the projector HDMI port.
- Digital audio is converted to mono for the internal speaker.
- A Mac with only Mini DisplayPort, Thunderbolt or Mini-DVI needs an appropriate HDMI adapter; ask Apple about compatibility.
- Macs from 2009 or earlier may not carry audio through HDMI.
Connecting to a Computer for USB Mouse Control3 steps
- For a computer connected to Computer, USB-B or HDMI, connect a USB cable between projector USB-B and a computer USB port unless that connection already exists.
- If necessary, configure the computer for an external USB mouse, following its documentation.
- The projector remote can then control the presentation.
Connecting to a Computer for Sound2 steps
- If the presentation has audio and the computer is not connected through USB-B or HDMI, obtain a stereo mini-jack adapter cable with one 3.5 mm plug and two RCA plugs.
- Connect it from the laptop headphone/audio-out or desktop speaker/audio-out jack to the projector Audio ports.
Connecting to an HDMI Video Source3 steps
- For the best video connection described in the guide, connect an optional HDMI cable from the source HDMI output to the projector HDMI port.
- The internal speaker plays converted mono audio.
- If a game-console image takes a few seconds to appear after switching sources, set the console output to progressive 480p or 720p to reduce possible command-response delay, following the console documentation.
Connecting to a Component-to-VGA Video Source6 steps
- Obtain a component-to-VGA cable and any adapter needed by the source.
- Match its component connectors to the source Y/Pb/Pr or Y/Cb/Cr outputs; if using an adapter, join it to the component cable.
- Connect the VGA end to projector Computer and tighten the screws.
- If colours are wrong, adjust Input Signal in the Signal menu.
- For a game console with delayed image appearance, use its instructions to choose progressive 480p or 720p to reduce potential command-response delay.
- Connect audio separately if required.
Connecting to an S-Video Video Source3 steps
- Connect an optional S-Video cable from the source S-Video output to the projector S-Video port.
- For a game console with delayed image appearance, use its documentation to choose progressive 480p or 720p to reduce potential command-response delay.
- Connect sound separately when needed.
Connecting to a Composite Video Source3 steps
- Connect an optional RCA video or A/V cable with a yellow connector from the source yellow video output to projector Video.
- For a game console with delayed image appearance, use its documentation to choose progressive 480p or 720p to reduce potential command-response delay.
- Connect sound separately when needed.
Connecting to a Video Source for Sound2 steps
- If the source has audio outputs, connect an RCA audio cable between those outputs and the projector Audio port or ports.
- An HDMI connection already carries sound, so it does not need this additional audio cable.
USB Device Projection4 steps
- PC Free can use a USB flash drive, USB-mounted digital camera or smartphone, USB hard drive, multimedia storage viewer or USB memory-card reader.
- A camera or phone must be USB Mass Storage Class compliant rather than TWAIN compliant.
- A hard drive must be Mass Storage Class compliant, FAT/FAT32 formatted and powered by its own AC supply; not every compliant drive works.
- Bus-powered drives are not recommended; avoid multiple partitions.
Connecting a USB Device or Camera to the Projector3 steps
- If the USB device has an AC adapter, plug it into an outlet.
- Connect its USB cable, flash drive or memory-card reader to projector USB-A; connect the other cable end to the device if applicable.
- Do not use a USB hub or a USB cable over 3 m (10 feet), as operation may be unreliable.
Selecting the Connected USB SourceView
Turn on the connected USB source if necessary. Press USB on the remote; press it again to cycle other available USB sources.
Disconnecting a USB Device or Camera From the ProjectorView
When finished, turn off and unplug the device if it has a power button. Disconnect the USB device or camera from the projector.
Connecting to a Document Camera5 steps
- For an Epson DC-06, use its supplied USB cable between projector USB-A and camera USB Type B.
- For a DC-11, connect corresponding Computer or Video ports.
- For a DC-20, use corresponding HDMI, Computer or Video ports.
- Follow the camera manual for details.
- For additional software-based features, connect the document camera to the computer instead; consult the camera manual.
Installing Batteries in the Remote Control5 steps
- Use the two supplied AA batteries.
- Do not mix battery types or new and used batteries.
- Open the battery cover, insert both batteries in the illustrated +/− orientation, then press the cover closed until it clicks.
- Dispose of used cells under local rules.
- Keep batteries away from heat, flames and children: they are choking hazards and dangerous if swallowed.
Opening the Lens Cover3 steps
- Slide the A/V Mute lever fully open until it clicks to uncover the lens.
- Close the A/V Mute slide to cover the lens and temporarily stop the projected picture and sound.
- The guide notes that exterior appearance can differ while these instructions remain the same.
Using the projector on a network
Instructions from the manualInstalling the Wireless LAN Module5 steps
- Use only the Epson 802.11b/g/n wireless LAN module; do not install another module type.
- Remove the module-cover screw, insert the wireless module in USB-A, then refit the cover using that screw.
- The module light is on while installed and operating and flashes during network communication.
- EX7220 includes the module.
- Install the relevant Epson network software on the computer after setting up the projector.
Using Quick Wireless Connection (Windows Only)11 steps
- Install the wireless LAN module first; the Quick Wireless Connection USB key is an optional accessory.
- Turn on the projector and press LAN on the remote.
- Confirm that the screen shows SSID and IP address, then remove the wireless module and insert the USB key in the same port.
- Wait for the network-information-update completion message, remove the key and reinsert the wireless module.
- Insert the key in a computer USB port.
- On Vista, choose Run LaunchQWRD.exe and Allow if prompted.
- Follow the driver-installation prompts; if Windows Firewall asks, choose Yes to allow this application.
- After a few minutes the computer image should appear; otherwise press LAN on the projector remote or restart the computer.
- Run the presentation.
- When finished, use Windows Safely Remove Hardware before removing the key.
- A computer restart may be needed to reactivate its wireless LAN connection.
Selecting Wireless Network Settings Manually13 steps
- Turn on the projector, press Menu, choose Network > Network Configuration > Basic, using Enter to open each menu.
- Set Projector Name (up to 16 alphanumeric characters), Web Control Password (up to 8 alphanumeric characters; default user EPSONWEB and password admin), and Projector Keyword as needed.
- Keyword protection requires the displayed random keyword in EasyMP Network Projection.
- Use the displayed keyboard, arrow buttons and Enter.
- Open Wireless LAN and enable Wireless LAN Power.
- Choose Quick for a direct computer connection or Advanced for an access-point network.
- Quick mode permits channels 1, 6 or 11 and SSID Auto Setting; disable automatic SSID when connecting multiple projectors together.
- Select 802.11b/g or 802.11b/g/n to match the network.
- Enter its SSID, up to 32 alphanumeric characters.
- Enable DHCP for automatic addresses, or disable it and enter IP Address, Subnet Mask and Gateway Address.
- Choose whether SSID and IP address appear on standby screens.
- Choose Complete and follow the save/exit prompts.
- Then select the matching wireless network on the computer.
Selecting Wireless Network Settings in Windows3 steps
- Open the wireless utility by double-clicking the network icon in the Windows taskbar.
- For Advanced mode choose the existing network SSID; for Quick mode choose the projector SSID.
- Click Connect.
Selecting Wireless Network Settings in OS XView
Click AirPort in the menu bar and make sure it is on. For Advanced mode choose the existing network SSID; for Quick mode choose the projector SSID.
Setting Up Wireless Network Security9 steps
- Ask the network administrator about the correct security information.
- The guide documents WEP and WPA security settings.
- Open Menu > Network > Network Configuration > Security and select settings matching the network.
- For WEP choose 128Bit or 64Bit, ASCII or HEX, key ID 1–4 and Open or Shared authentication.
- A 128-bit ASCII key has 13 alphanumeric characters; 128-bit HEX has 26 digits/letters 0–9/A–F.
- A 64-bit ASCII key has 5 alphanumeric characters; 64-bit HEX has 10 digits/letters 0–9/A–F.
- Enter the selected key.
- For WPA-PSK/WPA2-PSK enter the network pre-shared passphrase; this guide specifies 8–32 characters.
- Choose Complete and follow the save/exit prompts.
Setting Up Projector Network E-Mail Alerts8 steps
- Open Menu > Network > Network Configuration > Mail and turn on Mail Notification.
- Enter the SMTP server IP address.
- For numeric remote entry, hold Num; do not use 127.x.x.x or addresses from 224.0.0.0 to 255.255.255.255.
- Choose SMTP Port Number from 1–65535 (default 25).
- Enter an address and choose its required alerts; repeat for up to three addresses, each up to 32 alphanumeric characters.
- Choose Complete and follow the save/exit prompts.
- A critical shutdown may prevent an alert.
- Alert mail includes Epson Projector in its subject, the projector name and IP address, and problem details.
Setting Up Monitoring Using SNMP7 steps
- For a network using SNMP monitoring software, open Menu > Network > Network Configuration > Others.
- Enter up to two notification IP addresses, with each address field 0–255.
- Hold Num for numeric remote entry.
- Do not use 127.x.x.x or addresses from 224.0.0.0 to 255.255.255.255.
- Enable Bonjour if the network uses it.
- Enable Message Broadcasting if the projector should receive broadcasts through the Windows EasyMP Monitor Message Broadcasting plug-in.
- Choose Complete and follow the save/exit prompts.
Controlling a Networked Projector Using a Web Browser7 steps
- Use a computer on the projector network and a supported non-proxy browser: the guide lists Internet Explorer 8 or later and Safari.
- Not every setting or function is available in web control.
- Turn on the projector, open the browser and enter its IP address.
- If asked, sign in with EPSONWEB and the configured password (default admin).
- Select a menu name to change settings or open Web Remote to control projection.
- Its controls cover power, Computer, Video/S-Video/HDMI, Freeze, A/V Mute, Page Up/Down, source search, network, USB Display/device, volume and closed captions.
- To retain network control in standby, set ECO > Standby Mode to Communication On.
Using basic projector features
Instructions from the manualTurning On the Projector7 steps
- Turn on the intended computer or video source before the projector.
- Open the lens cover, connect the power cord to the projector inlet and plug it into an outlet.
- With Direct Power On enabled, plugging in starts the projector automatically.
- The blue Power light indicates incoming power.
- Otherwise press Power on the projector or remote; it beeps and Status flashes blue while warming up, then becomes steady blue.
- Never look into the lit lens, particularly children.
- If no image appears, verify that the lens cover is fully open, turn on the source, start media playback if necessary, and use Source Search or the source button.
Turning Off the Projector8 steps
- Shut down a connected computer first while its display is still visible.
- Turn off the projector when it is not in use; lamp life depends on mode, environment and use and brightness decreases with time.
- Press Power once for the confirmation screen, then again to shut down; any other button cancels.
- The projector beeps twice and Status goes off.
- Instant Off permits packing immediately if necessary.
- Do not restart immediately or repeatedly cycle power, as this can shorten lamp life.
- For transport/storage, confirm Status is off before unplugging; never unplug while Status is on or flashing.
- Close the lens cover.
Adjusting the Image Height4 steps
- Turn on the projector and display an image on a table or another flat surface.
- Pull the foot-release lever, lift the front to extend its foot, then release the lever to lock it.
- If tilted, rotate the rear feet to level the image.
- Correct image shape separately if it is no longer evenly rectangular.
Correcting Image Shape with the Horizontal Keystone Slider3 steps
- Turn on the projector and display an image; a Settings-menu test pattern can help.
- Move the horizontal keystone slider until the image is evenly rectangular.
- This is useful when projecting from beside the screen; the corrected image becomes slightly smaller.
Correcting Image Shape with Quick Corner4 steps
- Turn on the projector and display an image; a Settings test pattern can help.
- Open Menu > Settings > Keystone > Quick Corner, pressing Enter for each selection and Enter again to open the correction screen.
- Use the arrows to select a corner, press Enter, and use the arrows to adjust its shape.
- When finished press Esc.
Resizing the Image2 steps
- For EX7220, rotate its optical zoom ring to enlarge or reduce the projected image; a Settings test pattern can help.
- The Wide/Tele-button method in this shared guide applies to EX3220/VS230 instead.
Focusing the Image Using the Focus Ring3 steps
- Turn on the projector and display an image; a Settings test pattern may help.
- Rotate the focus ring to sharpen the image.
- Use the EX5220 / EX5230 / EX6220 / EX7220 / VS330 / VS335W ring shown as variant 1 in the shared figure.
Remote Control Operation3 steps
- Aim the remote at the screen or at the projector front/rear receivers, within 6 m (19.7 feet), 30 degrees horizontally and 15 degrees vertically.
- Avoid bright fluorescent lighting or direct sunlight that may interfere with reception.
- Remove the batteries during a long period without use.
Using the Remote Control as a Wireless Mouse6 steps
- Connect the computer for video through USB-B, Computer or HDMI.
- If using Computer or HDMI, also connect USB between projector USB-B and the computer.
- Start the presentation.
- Page Up/Down changes slides or pages, arrows move the pointer, Enter left-clicks (twice for double-click) and Esc right-clicks.
- For drag-and-drop, hold Enter while moving with the arrows, then release at the destination.
- The Enter control was checked against the printed button graphic and the remote key.
Using the Remote Control as a PointerView
Press Pointer on the remote, then use its arrows to move the pointer. Press Esc to clear it. The Settings menu offers alternative pointer shapes; the default is an arrow.
Selecting an Image Source3 steps
- Turn on the connected source you want; for video media insert and play it if needed.
- Press Source Search on projector or remote until that image appears, or use the dedicated Computer, Video, USB or LAN source button.
- Repeated presses cycle multiple ports for the chosen source.
Changing the Projection Mode Using the Remote Control3 steps
- Turn on the projector and display an image.
- Hold A/V Mute on the remote for five seconds; the picture briefly disappears and returns flipped top-to-bottom.
- Hold it for five seconds again to restore the previous orientation.
Changing the Image Aspect Ratio9 steps
- Turn on the projector and select the intended source.
- Press Aspect on the remote.
- The image size/shape changes and its aspect-ratio name appears briefly; press repeatedly to cycle the source-supported choices.
- EX7220 offers Auto, Normal, 16:9, Zoom, Full and Native.
- Auto follows the input and is HDMI-only.
- Normal maintains the image proportions within the projection area; 16:9 converts to 16:9.
- Zoom fills the projection width while preserving proportions; Full fills that width without preserving proportions.
- Native keeps the original aspect ratio and resolution.
- Black bands or cropping can occur depending on source ratio/resolution.
Changing the Color Mode4 steps
- Turn on the projector and select the intended source.
- For DVD or other video, start the disc/media if necessary.
- Press Color Mode repeatedly to cycle modes available for that source; the current mode name appears briefly.
- Dynamic is for bright-room games; Presentation for bright-room colour presentations; Theatre for dark-room films; Photo for bright-room still images; Sports for bright-room television; sRGB for standard sRGB computer displays; Blackboard for green chalkboards; Whiteboard for whiteboards.
Turning On Auto Iris4 steps
- Turn on the projector and select the source, then open Menu > Image > Auto Iris.
- Choose High Speed for immediate response to scene changes or Normal for standard brightness adjustment.
- This is available only in supporting Color Modes and cannot be changed while a Closed Caption setting is used.
- Press Menu or Esc to exit.
Supported PC Free File Types5 steps
- Use FAT16/32 media for best PC Free results.
- If non-Windows media fails, try Windows formatting; some USB security features may not work with PC Free.
- JPEG must not be CMYK, progressive, highly compressed or above 8192 × 8192 pixels.
- BMP, PNG and GIF must not exceed 1280 × 800; GIF must not be animated.
- AVI movies must not exceed 1280 × 720 and must use linear PCM or ADPCM audio.
Starting a PC Free Slide Show8 steps
- Connect a supported USB device or camera and press USB on the remote.
- Option at the bottom opens PC Free options/effects.
- Use arrows and Enter to open subfolders; Back to Top moves up.
- Next page/Previous page or Page Up/Down displays more files.
- Highlight an image and press Enter for a single image (Esc returns), or choose Slideshow to display the folder images.
- Names longer than eight characters or with unsupported symbols may appear shortened or changed only on screen.
- During projection, up/down rotates the image and left/right changes to previous/next.
- Stop using on-screen instructions or Esc.
Starting a PC Free Movie Presentation7 steps
- Connect supported USB media or camera and press USB on the remote.
- Option opens PC Free settings.
- Use arrows and Enter to enter folders, Back to Top to move up and Next/Previous page or Page Up/Down to see additional files.
- Highlight a movie and press Enter.
- Long or unsupported names may appear shortened/changed only on screen.
- Slideshow at the bottom plays the folder movies in sequence.
- To stop, press Esc, highlight Exit and press Enter.
PC Free Display Options4 steps
- In PC Free options, choose Name Order or Date Order, then ascending or descending sorting.
- Set Continuous Play on to loop slides or off for one pass.
- Screen Switching Time No leaves advancement manual; 1–60 seconds advances automatically, though high-resolution images may take longer.
- Choose Wipe, Dissolve or Random transition effects.
Adjusting projector features
Instructions from the manualShutting Off the Picture and Sound Temporarily5 steps
- Press A/V Mute on the remote to hide picture and mute sound; press it again to restore them.
- The lens-cover slide can also mute projection.
- Media playback continues, so it does not resume from the moment it was hidden.
- You can configure the blank screen/logo.
- By default, remaining muted over 30 minutes turns power off; this timer is adjustable in the menus.
Stopping Video Action Temporarily2 steps
- Press Freeze on the remote to hold the current picture; press it again to return to the video in progress.
- Sound and the source video keep running, so this does not pause the source or resume at the frozen moment.
Zooming Into and Out of Images3 steps
- Press E-Zoom + to display a crosshair and use arrows to position the area of interest.
- Press E-Zoom + repeatedly, or hold it for faster enlargement.
- Use arrows to pan, E-Zoom − to shrink and Esc to restore the original size.
Setting a Password6 steps
- Hold Freeze on the remote for about ten seconds or until the Password Protection menu appears.
- Select Password, press Enter, choose Yes at the change-password prompt and press Enter.
- Hold Num and enter a four-digit password with numeric buttons, then enter it again to confirm.
- After Password accepted, press Esc.
- Record the password in a safe place.
- One password covers Power On Protection, User’s Logo Protection and Network Protection.
Selecting Password Security Types5 steps
- After setting a password, use the Password Protection menu.
- If absent, hold Freeze for five seconds until it appears.
- For each required protection—Power On Protection, User’s Logo Protection or Network Protection—select it, press Enter, select On, press Enter again, then Esc.
- Keep the remote safe: without it you cannot enter the startup password.
- Power On protects use, User’s Logo protects the logo/display settings, and Network protects network settings.
Entering a Password to Use the Projector4 steps
- At a Power On Protection password prompt, hold Num on the remote and type the correct password using numeric buttons.
- If a wrong-password prompt appears, retry the correct password.
- Repeated incorrect entries can display a request code and instruction to contact Epson.
- Give Epson the displayed request code and proof of ownership for unlocking assistance.
Saving a User's Logo Image to Display10 steps
- Display the desired photo/graphic/logo, then open Menu > Extended > User’s Logo.
- Choose Yes when asked to use the image.
- Use remote arrows to surround the required area and press Enter.
- Confirm Yes; to change it choose No and repeat the selection.
- Select a zoom percentage, press Enter and confirm Yes to save.
- Until saving finishes, do not operate the projector, remote or connected equipment.
- Press Esc after the completion message.
- Open Extended > Display.
- Choose Display Background > Logo for no-signal display, Startup Screen > On for startup, or A/V Mute > Logo for muting.
- To prevent changes, set a password and enable User’s Logo Protection.
Installing a Security Cable2 steps
- Use the projector security slot for an Epson-available Kensington Microsaver system, or secure a wire cable through the security-cable attachment point to a fixed room fitting or heavy furniture.
- Do not route drop-prevention cables through that attachment point for a wall or ceiling installation.
Maintaining and transporting the projector
Instructions from the manualCleaning the Lens6 steps
- Turn off the projector and unplug its power cord before cleaning; do not open covers except as the guide specifically permits.
- Remove dust or smudges gently with lens-cleaning paper.
- For stubborn smudges, moisten a soft lint-free cloth with lens cleaner and wipe gently; never spray liquid on the lens.
- Do not use a cleaner containing flammable gas, glass cleaner, harsh materials or canned air.
- Avoid impacts and bare-hand contact with the lens.
- Refer servicing beyond the guide’s specified tasks to qualified personnel.
Cleaning the Projector Case5 steps
- Turn off the projector and unplug its power cord.
- Use a soft dry lint-free cloth for ordinary dust/dirt.
- For stubborn dirt, use a soft cloth moistened with water and mild soap; never spray liquid on the projector.
- Do not use wax, alcohol, benzene, paint thinner, other case-cleaning chemicals or canned air.
- The case may be damaged, and canned air may leave flammable residue.
Cleaning the Air Filter and Vents9 steps
- Maintain the filter regularly according to its environment; do not wait for an overheating warning.
- Dust or a cleaning message means it needs attention.
- Neglected maintenance may reduce projector/lamp life and may affect warranty coverage.
- Turn off the projector and unplug it.
- Gently remove dust with a small computer vacuum or very soft brush, such as a paintbrush.
- The filter may be removed to clean both sides.
- Do not rinse it or use detergent/solvent.
- Do not use canned air: it may leave flammable residue or push dirt into sensitive parts.
- Replace the filter if it is damaged or difficult to clean.
Replacing the Air Filter7 steps
- Replace the filter if a clean/replace warning remains after cleaning or the filter is torn/damaged.
- It may be replaced on a table or while ceiling-mounted.
- Turn off the projector and unplug it, then carefully open the air-filter cover.
- Pull the old filter out.
- Its ABS resin and polyurethane foam must be disposed of under local rules.
- Insert the new filter as illustrated and gently push until it clicks.
- Close the filter cover.
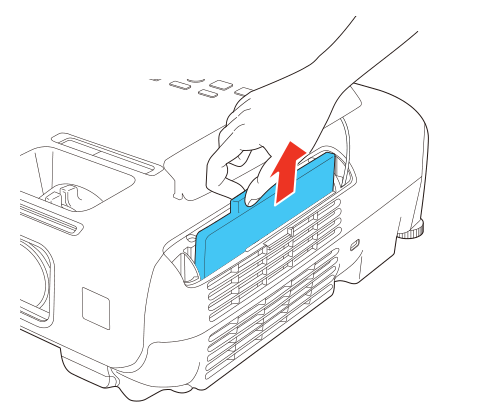
Diagram key
- Arrow: Pull the air filter out of the projector.
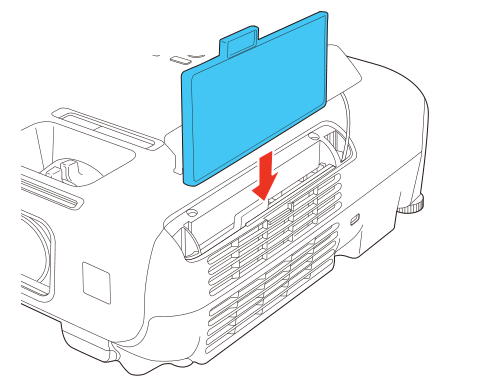
Diagram key
- Arrow: Place the new air filter in the projector and push gently until it clicks into place.
Replacing the Lamp16 steps
- Replace a darkening/deteriorating lamp, a lamp indicated by the startup replacement message, or one with flashing-orange Lamp and flashing-blue Power.
- Do not continue using a lamp flagged for replacement.
- Turn off the projector, unplug it and let the lamp cool for at least one hour to prevent burns.
- With the replacement-lamp screwdriver, loosen the lamp-cover screw, slide the cover out and lift it off.
- If glass is broken, remove it carefully; for ceiling installations stand beside the cover rather than underneath, as fragments may fall into eyes or mouth.
- Loosen the lamp-retaining screws; they remain captive.
- Hold the raised section and gently pull the lamp out.
- The lamp contains mercury: recycle/dispose under state/local rules, never in household trash.
- Insert the new lamp gently, checking its orientation if it does not fit.
- Do not touch its glass; use a cloth/glove when handling a new lamp.
- Push it fully in and tighten the screws without over-tightening.
- Refit the cover and tighten its screw securely; an unsecured cover can prevent lighting.
- Reset the lamp timer after replacement.
- If a lamp breaks, ventilate the room.
- Seek medical advice immediately after inhaling lamp gas or gas/glass entering eyes or mouth.
- Do not disassemble or strike the lamp.
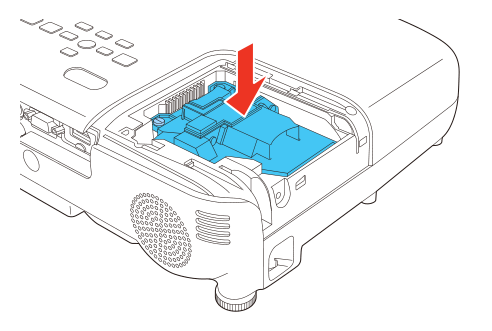
Diagram key
- Arrow: Gently insert the new lamp; if it does not fit easily, check its orientation.
Resetting the Lamp Timer3 steps
- Reset only after replacing the lamp; otherwise usage information becomes inaccurate.
- Turn on the projector, press Menu and open Reset > Reset Lamp Hours using Enter.
- Choose Yes and press Enter, then Menu or Esc to leave.
Replacing the Remote Control Batteries7 steps
- Use two AA manganese or alkaline batteries and replace them when depleted.
- Do not mix types or old and new batteries.
- Open the battery cover and remove the old batteries.
- If battery fluid leaked, wipe it away with a soft cloth without getting it on your hands; wash hands immediately if exposed.
- Insert both cells in the illustrated +/− orientation and press the cover closed until it clicks.
- Dispose of batteries under local rules.
- Keep them away from heat, flame and children because they are choking hazards and dangerous if swallowed.
Transporting the Projector5 steps
- Close the lens cover and disconnect all equipment.
- Use a carrying case for hand transport.
- For long journeys or checked luggage, put the case in a firm cushioned box marked Fragile.
- For repair shipment, use the original packaging if possible or equivalent cushioning, and mark the box Fragile.
- Epson notes it is not liable for transport damage.
Solving problems
Instructions from the manualUsing the Projector Help Displays3 steps
- Turn on the projector and press Help on it or the remote.
- Highlight a problem with up/down and press Enter to see solutions.
- Press Esc for another problem or Help to close the help system.
Projection Problem Tips3 steps
- If operation is abnormal, turn the projector off and unplug it, then reconnect and turn it on.
- If still unresolved, check the indicator lights, use the built-in Help display if operable, and work through the documented solutions.
- Contact Epson if none resolves it.
EasyMP: Solutions When You Cannot Connect Using Quick Connection Mode4 checks
- Network environment
- Secure the specified wireless module.
- Check obstacles between computer and projector and reposition them if needed; indoor conditions may prevent discovery.
- Set network-device radio strength to maximum.
- Projector wireless settings
- Set Connection Mode Quick, use an SSID different from the access point, set DHCP Off and Wireless LAN Power On.
- Match the security passphrase between computer/projector when enabled.
- Close network settings and return to LAN standby.
- Computer wireless settings
- Install a wireless adapter/card if missing and enable wireless LAN/AirPort.
- Application settings
- If another connection remains, interrupt it to connect; if its keyword is unknown, restart the projector and read LAN standby.
- To change a fixed mode, enable Display Connection Mode Selection window on startup in Set options > General settings and restart EasyMP.
EasyMP: Solutions When You Cannot Connect Using Advanced Connection Mode (Wireless)5 checks
- Network environment
- Secure the specified wireless module.
- Reposition access point, computer or projector to avoid obstacles; indoor conditions may prevent discovery.
- Use maximum network radio strength and correct access-point IP/subnet/gateway settings.
- Projector settings
- Use Advanced mode, match computer/access-point/projector SSID, set DHCP Off if needed (a missing DHCP server can delay standby), enter correct projector IP/subnet/gateway, enable wireless power and use an access-point-compatible wireless standard.
- Match security passphrases and close network settings to return to LAN standby.
- Computer settings
- Install/enable its wireless adapter/AirPort, connect to the access point used by the projector, and configure the firewall appropriately: the guide offers disabling it, an exception, or opening ports 3620, 3621 and 3629.
- Access-point permission
- Allow projector connections if MAC-address or port restrictions block them.
- Application settings
- Use the correct adapter in Set options > Switch LAN on a multi-adapter computer.
- If Automatic search misses the projector, use Manual search by IP.
- Interrupt an existing connection if needed; restart the projector to read an unknown keyword.
- Enable the startup mode-selection window in General settings and restart EasyMP if mode selection is unavailable.
EasyMP: Solutions When the Computer Screen is Not Displayed Properly4 checks
- Missing pointer
- Clear an unused virtual-display checkbox in Add-Remove Virtual Display if the pointer moved off the physical screen.
- Missing application
- Clear the virtual-display checkbox if an application window opened there.
- PowerPoint startup
- Close PowerPoint, then start EasyMP and the slide show.
- PowerPoint multi-screen location
- Use PowerPoint 2003 or later with two or more virtual displays, or restrict the display count to one before starting the slide show.
EasyMP: Solutions When the Screen is Not Projected Properly6 checks
- Movie transmission
- Use Advanced mode for movies; the generic alternative of 802.11a Quick mode is not an EX7220 ELPAP07 setting. Electromagnetic conditions may interrupt picture/sound.
- Office refresh
- Stop continuous pointer movement while projecting Microsoft Office.
- Flickering pointer
- Enable Make the movement of the mouse pointer smooth in General settings and clear Transfer layered window in Adjust performance.
- Media Player and screen savers
- Depending on the computer, Media Player playback or a screen-saver preview may not project correctly.
- Several projectors
- Multiple connected projectors can reduce screen-transfer speed.
- WEP
- WEP encryption can reduce screen-transfer speed.
EasyMP: Solutions When There is No Audio2 checks
- One audio destination
- Disconnect other projectors: audio transfers to only one projector at a time.
- Audio option
- Enable Output audio from the projector in Set options > Audio Output.
Projector light status
Instructions from the manualNormal operationView
Power blue; Status blue; Lamp off; Temp off. This light combination indicates normal operation.
Warming up or cooling downView
Power blue; Status flashing blue; Lamp off; Temp off. This light combination indicates warming up or cooling down.
Standby or sleep modeView
Power blue; Status off; Lamp off; Temp off. This light combination indicates standby or sleep mode.
Unlisted light patternView
If the lights show a combination absent from the table, turn off the projector, unplug it and contact Epson.
Solving image or sound problems
Instructions from the manualSolutions When No Image Appears11 checks
- Lens cover
- Open the lens cover fully or remove it.
- A/V Mute
- Press A/V Mute on the remote to restore an image hidden by that function.
- Cables and power
- Secure every necessary cable and turn on the projector and connected video sources.
- Standby or sleeping computer
- Press projector Power to wake standby/sleep; check whether the computer is asleep or showing a blank screensaver.
- Signal settings
- Check that Signal-menu settings match the current source.
- Brightness
- Adjust Brightness or select Normal Power Consumption.
- Messages setting
- Set Display > Messages to On.
- Locked panel
- Unlock projector buttons if panel presses do not respond.
- Remote receivers
- Enable the remote receivers if remote presses do not respond.
- Windows Media Center
- Reduce the Media Center screen from full-screen mode.
- DirectX application
- Turn off DirectX functions for images projected from such applications.
Solutions When Image is Incorrect Using the USB Display Function8 checks
- Source
- Press USB on the remote.
- USB Display installation
- Check USB Display installation and install it manually if required.
- USB Type B
- If available, set Extended > USB Type B to USB Display.
- OS X
- Select USB Display from the Dock or Applications folder.
- Windows Media Center
- Reduce Media Center from full-screen mode.
- DirectX
- Turn off DirectX functions in the relevant application.
- Flickering mouse pointer
- In Epson USB Display Settings select Make the movement of the mouse pointer smooth; this option is unavailable in Windows 2000.
- Layered windows
- Disable Transfer layered window in the computer Epson USB Display Settings.
Solutions When "No Signal" Message Appears5 checks
- Source search
- Press Source Search or Search and wait a few seconds.
- Source power/playback
- Turn on the connected computer/video source and start playback if needed.
- Connections
- Check the video-source connections.
- Laptop external display
- Configure the laptop to display on an external monitor.
- Restart
- If necessary, turn off the projector and source, then turn them on again.
Displaying From a PC Laptop3 checks
- External-monitor key
- Hold Fn and press the monitor-icon/CRT-LCD key specified by the laptop manual; wait a few seconds. Repeat the keys if needed to show both displays.
- Windows display configuration
- If laptop and projector differ, enable the external-monitor port and disable extended desktop in Windows Display settings, following the computer/Windows documentation.
- Video-card configuration
- If needed choose Mirror or Duplicate in the graphics-card multi-display settings.
Displaying From a Mac Laptop1 check
- Mirrored display
- Open System Preferences > Displays > Arrangement and select Mirror Displays; consult the laptop manual for details.
Solutions When "Not Supported" Message Appears2 checks
- Input signal
- Choose the correct Signal-menu input signal.
- Computer format
- Keep the computer resolution and refresh frequency within projector limits; select another supported resolution if necessary, using the computer manual.
Solutions When Only a Partial Image Appears6 checks
- Auto adjustment
- Press Auto on the remote to optimize the signal.
- Position
- Adjust Position.
- Aspect
- Try another aspect ratio with Aspect on the remote.
- E-Zoom
- Press Esc until the complete image is restored after E-Zoom use.
- Computer display
- Disable dual display and choose a resolution within projector limits, following computer documentation.
- Presentation resolution
- Check whether presentation files were created for a different resolution; consult the application help.
Solutions When the Image is Not Rectangular5 checks
- Placement
- Face the projector squarely towards the screen centre if possible.
- Height adjustment
- After changing foot height, correct the shape with projector keystone buttons.
- Automatic correction
- Enable automatic keystone correction in the menus.
- Horizontal correction
- Adjust the horizontal keystone slider.
- Corners
- Use Quick Corner to correct the image shape.
Solutions When the Image Contains Noise or Static7 checks
- Source cabling
- Separate source cables from the power cord, secure both ends, avoid extension cables, and keep VGA/computer cables at most 3 m (10 feet) and HDMI cables at most 7.3 m (24 feet).
- Signal settings
- Match Signal settings to the source and adjust Progressive/Noise Reduction if available.
- Display format
- Select a supported computer resolution and refresh rate.
- Tracking and sync
- For a computer source press Auto to adjust Tracking and Sync.
- Keystone processing
- If projector shape correction was used, try lowering Sharpness.
- Power extension
- Try projecting without an extension power cable to test whether it introduces interference.
- USB Display
- Disable Transfer layered window in Epson USB Display Settings.
Solutions When the Image is Fuzzy or Blurry8 checks
- Focus
- Adjust image focus.
- Lens
- Clean the lens using the reviewed cleaning procedure. After moving from a cold environment, let the projector reach room temperature before use to avoid condensation.
- Distance
- Place the projector close enough to the screen.
- Keystone angle
- Reduce excessive keystone angle that distorts the image.
- Automatic correction
- Enable automatic keystone adjustment.
- Sharpness
- Adjust Sharpness.
- Computer tracking/sync
- For a computer source press Auto. If bands or blur remain, display a uniform pattern and adjust Tracking/Sync manually.
- Computer resolution
- For computer projection try a lower resolution.
Solutions When the Image Brightness or Colors are Incorrect8 checks
- Color mode
- Cycle Color Mode for the image and viewing environment.
- Video source
- Check source-device settings.
- Image settings
- Adjust available Image-menu Brightness, Contrast, Tint, Color Adjustment and/or Color Saturation for the current input.
- Signal selection
- Choose the correct Input Signal/Video Signal if available.
- Cables
- Secure projector/source connections; try shorter cables if using long ones.
- Lamp mode
- If using ECO Power Consumption, try Normal. At high altitude or temperature the picture may darken and this control may be unavailable.
- Distance
- Place the projector close enough to the screen.
- Ageing lamp
- Progressive darkening can mean the lamp needs replacement soon; use the reviewed replacement instructions.
Solutions to Sound Problems10 checks
- Projector level
- Adjust projector volume.
- A/V Mute
- Press A/V Mute to restore temporarily muted video/audio.
- Source selection
- Use Source Search/Search for the correct source if needed.
- Source audio
- Turn up source volume and select the correct audio output.
- Audio cabling
- Check source/projector audio connections.
- HDMI output
- For silent HDMI sources select PCM output on the connected device.
- Cable type
- Use audio cables labelled No Resistance.
- USB Display audio
- Enable Output audio from the projector in Epson USB Display Settings.
- Mac HDMI
- Check that the Mac supports HDMI audio; otherwise connect a separate audio cable.
- Fan noise after restart
- Momentarily high-speed cooling-fan noise after an immediate restart is normal.
Solving projector or remote control operation problems
Instructions from the manualSolutions to Projector Power or Shut-Off Problems6 checks
- Power supply
- Secure the power cord at projector and a working outlet.
- Panel security
- Unlock panel buttons or turn on with the remote.
- Defective cord
- If the cord may be defective, disconnect it and contact Epson.
- Standby
- If inactivity put the lamp in standby, press Power to wake it.
- Overheating
- If the lamp shuts off with flashing-blue Status and orange Temp, follow the reviewed overheated-light checks.
- Remote power control
- Check remote batteries and enable Remote Receiver if that menu option is available.
Solutions to Problems with the Remote Control8 checks
- Batteries
- Check battery orientation and charge; replace if necessary.
- Range
- Stay within the specified remote distance/angles.
- Transition state
- Make sure the projector is not warming up or shutting down.
- Stuck button
- Release a stuck remote button to wake it from sleep.
- Interference
- Dim strong fluorescent light or move the projector away from direct sunlight or interfering infrared equipment.
- Receivers
- If available disable one receiver, or check whether all receivers were disabled.
- Remote ID
- If an ID was assigned for multiple projectors, check/change it; the guide notes this feature is not available on every model.
- Lost remote
- Order a replacement from Epson if the remote is lost.
Solutions to Password Problems3 checks
- Initial password
- If password protection was enabled before a password was set, try 0000 with the remote.
- Request code
- After too many incorrect entries, record the displayed request code and contact Epson with that code and proof of ownership.
- Missing remote
- A lost remote prevents password entry; order a new remote from Epson.
Solving network problems
Instructions from the manualSolutions When You Cannot Access the Projector Through the Web2 checks
- Login
- Use the case-sensitive user EPSONWEB (not changeable) and the Network-menu Web Control Password, default admin.
- Network reachability
- Check access to the network containing the projector.
Solutions When Network Alert E-Mails are Not Received3 checks
- Power and network
- Ensure the projector is on and connected correctly; an error shutdown can prevent mail.
- Mail setup
- Check alert settings in Network > Mail or the network software.
- Standby monitoring
- Set Standby Mode to Communication On for network monitoring during standby.
Notices
Instructions from the manualImportant Safety Information37 steps
- Never look into the lit lens or allow children to do so, and avoid standing in its beam.
- Keep packaging bags away from small children to prevent suffocation.
- Do not open covers other than lamp/filter covers or perform servicing beyond the specific guide instructions; dangerous voltage is present.
- Use qualified servicing for other work.
- Do not disassemble or modify the unit.
- Place it stably; do not operate it on its side, tilted to one side, or more than 30 degrees forwards/backwards.
- Have qualified technicians install approved ceiling/wall mounting hardware without screw adhesives, oils or lubricants.
- Use the labelled power supply and a nearby accessible outlet.
- Do not handle plugs with wet hands, use dusty sockets, pull on the cord, overload outlets or leave cords where they can be walked on.
- Insert plugs firmly; do not modify, excessively bend/twist/pull, heat or place heavy objects on the cord.
- Keep away from water, heat, high-voltage wiring and magnetic fields.
- Never insert objects or spill liquid into openings.
- Keep flammable objects/gases and open flames away.
- Keep vents unobstructed; avoid sofas, rugs, papers, blankets, curtains and unventilated cabinets.
- Leave at least 20 cm (7.9 inches) from exhaust to a wall and at least 60 cm (2 feet) between side-by-side projectors.
- Maintain the filter/vents without canned air.
- Before cleaning, switch off and unplug.
- Use a dry cloth or, for stubborn stains, one wrung dry after moistening; follow the separate lens/case instructions.
- Do not use liquid/aerosol cleaners, flammable sprays, alcohol, thinner or benzine.
- Unplug and obtain qualified service for abnormal operation, smoke/odour/noise, damaged cord/plug, liquid/foreign-object entry, rain/water exposure, dropping or housing damage.
- Do not touch the plug in an electrical storm.
- Unplug for long periods without use.
- Avoid rain, excessive moisture, smoke, steam, corrosive gas, dust, vibration/shock, direct sunlight, heaters or a closed hot vehicle.
- Do not store outdoors for long periods.
- Use the country-appropriate power cord when travelling.
- Do not stand on the unit or load it with heavy objects.
- Operate at 5–35°C (41–95°F) through 2286 m (7500 feet), or 5–30°C (41–86°F) above that; store at −10–60°C (14–140°F).
- Avoid sudden temperature changes.
- Disconnect power and all cables before moving.
- Keep heat-sensitive items, hands and face away from hot exhaust.
- Lower volume before shutdown to avoid excessive sound at next startup.
- Do not block the projecting beam with anything except the lens cover.
- Before lamp removal unplug and wait at least one hour; never strike or disassemble the lamp.
- For a broken lamp ventilate the room, avoid falling glass during overhead access, and seek immediate medical advice if gas is inhaled or gas/glass enters eyes or mouth.
- Recycle the mercury-containing lamp under local rules, never in household trash.
- Handle replacement lamps with a cloth/glove; bare-hand oils can shorten life.
- Wash hands after handling the supplied cords, as the guide’s California lead notice instructs.
Wireless LAN Module Safety Instructions11 steps
- Use the module only with an Epson projector.
- Do not use it near medical equipment/pacemakers or a microwave oven; interference can cause malfunction or interrupted communication.
- Do not disassemble/remodel it or remove its conformity label.
- Keep it dry, protected from sunlight, heat/humidity, drops, impacts and heavy objects.
- Do not use outdoors; check local permission before aircraft use.
- The operating safety instructions require at least 22 cm (8.7 inches) between its antenna and people.
- The regulatory notice separately states a 20 cm minimum; maintaining the operational 22 cm also meets that lower minimum.
- Do not co-locate or operate the transmitter with another antenna/transmitter.
- Before use check for nearby mobile-identification/RFID radio systems in its 2.4 GHz band.
- If interference affects a licensed identification radio station, immediately stop operation and transmission; contact Epson if it affects a specified low-power identification station or causes similar problems.
- The module follows the country-of-sale channel/frequency limits; consult a local dealer before overseas use.
Troubleshooting
Instructions from the manualBlank screen or No signal — Quick Setup checks4 checks
- Projector state
- Confirm steady-blue Status and fully open A/V Mute slide.
- Source
- Press Source Search on projector or remote to select the correct source.
- Windows laptop
- Use the laptop external-monitor key, with Fn if required (example Fn+F7), and wait for an image.
- Mac laptop
- Open System Preferences > Displays, choose Display/Color LCD if required, open Arrange/Arrangement and enable Mirror Displays.
Setting up easymp network projection for the first time
Instructions from the manualEasyMP: Installing the Software6 steps
- This linked guide documents the EasyMP version of its March 2013 edition, not compatibility with current operating systems.
- Uninstall an older EasyMP version before installing; select the OS language to avoid incorrect screens.
- For Windows installation use administrator authority, start the computer, close applications and insert the supplied EPSON Projector Software CD.
- If it does not start, open the CD in My Computer/Computer and run InstallNavi.exe or EMP_NSCInst.exe; follow prompts.
- For Mac OS X, start the computer, close applications, insert the CD, double-click EMP_NPInstaller.mpkg in the EPSON window and follow prompts.
- The guide also permits obtaining the application from the Epson website.
EasyMP: Setting Up a Projector to Connect in Quick Connection Mode5 steps
- Configure the computer wireless connection using its documentation and install the specified projector wireless module if necessary.
- Turn on the projector and open Menu > Network > Network Configuration > Wireless LAN.
- Set Wireless LAN Power On and Connection Mode Quick.
- Set the other wireless options and Security settings required by the network; ask the administrator about security.
- Choose Complete (called Setup Complete on some generic-guide models) and follow save/exit prompts.
EasyMP: Setting Up a Projector to Connect in Advanced Connection Mode (Wireless)4 steps
- Ask the administrator for access-point SSID/security information, connect the computer to that network, and install the specified wireless module if necessary.
- Turn on the projector, open Menu > Network > Network Configuration > Wireless LAN, turn Wireless LAN Power On and select Advanced.
- Set the remaining options and Security to match the network; choose Complete and follow save/exit prompts.
- The wired-projector setup elsewhere in this generic guide is not an EX7220 port instruction.
Connecting to the projector and projecting images
Instructions from the manualEasyMP: Connecting the Projector and a Computer Directly Using Wireless Communication12 steps
- Install the wireless module, select Quick on the projector and enable computer wireless.
- A direct connection disconnects the computer from its access point.
- Press LAN on the projector remote.
- Start EasyMP from Start > Programs/All Programs > EPSON Projector > EasyMP Network Projection on XP/Vista/7, from the Start screen on Windows 8, or Applications on OS X.
- Choose Quick Connection Mode and OK.
- If needed use Automatic search, Manual search by listed SSID, or a saved Profile.
- Select the projector and Connect.
- If keyword protection is on, type the keyword shown on LAN standby and click OK.
- On Vista/7/8 enter the projector passphrase in the following dialog and Connect; saving it stores the SSID/passphrase and avoids the dialog next time.
- If prompted that the passphrase is still default, change it in the projector Network menu.
- Once connected, the desktop and toolbar appear.
- LAN is selected automatically if no other signal is present; otherwise press LAN.
EasyMP: Connecting the Projector and a Computer over a Network System (Wireless)8 steps
- With the module installed and projector in Advanced mode, connect the computer to the same network and press LAN on the remote.
- Start EasyMP from the EPSON Projector program group on XP/Vista/7, the Windows 8 Start screen, or OS X Applications.
- Choose Advanced Connection Mode and OK.
- Select a discovered projector and Connect.
- If missing, use Automatic search, Manual search by IP address/name, or a saved Profile.
- If asked, enter the keyword displayed on LAN standby and click OK.
- The computer image and toolbar appear.
- Press LAN if another active input prevents automatic LAN source selection.
EasyMP: Searching for Network Projectors Automatically4 steps
- Click Automatic search; allow about 30 seconds.
- In Quick mode results identify available SSIDs.
- Advanced automatic search is limited to the current subnet.
- If the target is not found, use manual details or a saved profile; Advanced manual search can reach another subnet.
EasyMP: Searching for Network Projectors by Specifying an SSID, IP Address, or Projector NameView
Click Manual search. In Quick mode choose the target SSID from the list; in Advanced mode enter its IP address or projector name. Click OK to display results.
EasyMP: Performing a Profile SearchView
Click Profile, then choose the saved projector from the list to display search results. Profile is unavailable until a profile has been created.
EasyMP: Making a Profile5 steps
- After finding the projector, click Save in the profile.
- Enter a memorable Profile name and click Add.
- If asked to overwrite, use Save as for a different name.
- If profile folders exist, enter the name, choose Save in and click Add.
- The saved file retains projector name, IP address and SSID.
EasyMP: Managing a Profile5 steps
- Open Set options > Edit profile.
- Drag profiles/folders to reorganize them.
- Copy duplicates in the same folder/name; Delete removes a profile/folder; Rename accepts up to 32 characters; Export saves a backup for use elsewhere; Import loads one; Create folder adds a folder.
- In the projector-information panel, select a projector and Delete to remove it; deleting all projector information removes its profile.
- Click OK to save edits and close.
EasyMP: Hiding Computer Operations6 steps
- Set the toolbar to Full.
- For multiple connected projectors, use Select target projector to choose those to control.
- Stop projects a black screen; Pause holds the projected image.
- Projector control > A/V Mute hides picture and sound and displays the configured logo if available.
- To resume after Stop/Pause, click Show; to leave A/V Mute click that control again.
- Button names were checked against the complete printed toolbar key.
EasyMP: Switching the Input Source2 steps
- Use the Full toolbar and, for multiple projectors, Select target projector.
- Open Projector control, then choose Switch PC source for a computer/USB input or Switch video source for a video input.
EasyMP: Finishing Projecting ImagesView
Click Disconnect on the toolbar. The computer/projector connection ends, the projector returns to LAN standby and EasyMP shows its search/connect screen.
Using additional functions
Instructions from the manualEasyMP: Changing the Computer Projection Source3 steps
- Start EasyMP on the next presenter computer and connect by the usual procedure.
- It replaces the currently connected computer.
- This takeover does not occur if the existing connection has Disable interrupt connection selected.
EasyMP: Projecting Only a PowerPoint Slide Show4 steps
- Use the Full toolbar and Select target projector if several are connected.
- Enable Presentation Mode, then run the PowerPoint slide show; click Presentation Mode again to stop it.
- While the slide show is not playing, a black screen hides other computer content.
- The guide also supports Keynote on OS X.
EasyMP: Enabling the Virtual Display Driver (Windows)7 steps
- Windows virtual-display drivers are not available on Vista/7/8.
- OS X instead needs an external monitor.
- Skip virtual-driver setup if an additional monitor is already connected or the driver was enabled during installation.
- On a supported Windows system, open Start > Programs/All Programs > EPSON Projector > EasyMP Network Projection > Add-Remove Virtual Display.
- Select the needed virtual display(s), then OK.
- Brief flicker can occur; the dialog closes when finished.
- If the pointer disappears into an unused virtual screen, clear its checkbox to bring it back; select it again before later multi-screen use.
EasyMP: Arranging the Multi-Screen Display (Windows)8 steps
- Connect an external display if used; enable virtual displays first if required.
- For wireless multi-screen work match wireless standards across computer/projectors and, in Quick mode, match SSIDs.
- Start EasyMP, choose a mode and OK.
- For different images across multiple projectors use Advanced, then select Use multi-display > Display properties > Settings.
- Drag monitor icons into the desired arrangement.
- Physical outputs are numbered before virtual outputs; check the selected monitor type because a secondary physical screen may not be number 2.
- The guide notes that a Windows secondary external-monitor image cannot be projected by this method.
- Click OK to close Display Properties.
EasyMP: Arranging the Multi-Screen Display (Mac OS X)5 steps
- Connect an external monitor.
- Match wireless standards across devices and, for Quick mode, SSIDs.
- Start EasyMP from Applications, choose a mode and OK.
- Quick cannot project different images to multiple projectors.
- Choose Use multi-display > Display preferences > Arrangement, clear Mirror Displays, drag monitor icons into position and close the display settings.
EasyMP: Projecting Images to the Arranged Multi-Screen Display4 steps
- Open the file, drag its window to the intended display, and use Display in EasyMP to assign a screen number to each selected projector.
- Click Connect.
- A Windows virtual screen is not visible on the computer itself: check its projected image and move the pointer towards that screen for mouse operations.
- Click Disconnect to end multi-screen projection.
EasyMP: Projecting One Computer Screen from Multiple Projectors5 steps
- Start EasyMP from the Windows program group/Start screen or OS X Applications.
- Choose Quick or Advanced and OK.
- Select up to four projectors and click Connect.
- For Quick mode all selected projectors must share the same SSID.
- One projector cannot accept several networked computers simultaneously.
Screen summary
Instructions from the manualEasyMP: Set options12 steps
- Open Set options on the search/connect screen; toolbar access omits General settings.
- General settings > Encrypt communications encrypts traffic; always select it in Quick mode.
- Choose whether startup shows mode selection and whether startup searches automatically, asks for a method or uses the last network configuration.
- On XP/Vista/7, Make the movement of the mouse pointer smooth prevents layered-window pointer flicker and disables Aero where applicable.
- Quick passphrase files (not XP) can be edited/deleted; Delete all removes stored SSIDs/passphrases.
- Edit profile manages profiles; Windows Switch LAN selects search adapters.
- Restore Defaults resets options while allowing profile/adapter settings to remain.
- Adjust performance offers Fast, Normal and Fine; try Fast for interrupted movie projection.
- Transfer layered window is XP-only; use the smooth-pointer setting if it flickers.
- Model-dependent WUXGA/interactive/movie-sending options are not asserted for EX7220.
- Audio Output selects projector rather than computer audio, only when one projector is connected.
- The generic guide’s movie-sending override applies only to supporting models.
Appendix
Instructions from the manualEasyMP: Supported Resolutions and Colors6 steps
- This application guide lists VGA 640×480, SVGA 800×600, XGA 1024×768, SXGA 1280×960/1280×1024, SXGA+ 1400×1050, WXGA 1280×768/1280×800, WXGA+ 1440×900, UXGA 1600×1200 and WUXGA 1920×1200; it cannot connect above WUXGA.
- These application limits do not change the EX7220 native WXGA resolution or its device-specific input limits.
- Multi-screen supports the marked subset: SVGA, XGA, SXGA+, the two WXGA sizes and WXGA+.
- Unusual aspect ratios can be resized and show black margins.
- Windows supports 16-/32-bit colour; OS X approximately 32,000/16.7 million colours.
- Multi-screen operation is guaranteed for 16-/32-bit colour.
EasyMP: Limitations7 steps
- Low wireless speed may disconnect the network; some Windows DirectX applications may not display correctly; full-screen MS-DOS prompts cannot project.
- Computer/projected images may differ and movie playback may be less smooth.
- Windows Photo Gallery/Live Photo Gallery slideshows use simple mode with no toolbar or theme/effect changes, regardless of Experience Index.
- Restart that gallery to change out of simple mode even after EasyMP closes; gallery movies cannot play.
- With Windows Aero, layered-window behaviour differs from ordinary Transfer layered window control.
- If its performance warning appears after a few minutes, the guide recommends Keep the current color scheme, and don’t show this message again; this lasts until restart.
- Use window mode rather than full screen for Windows Media Center.
EasyMP: Updating and Uninstalling the Software8 steps
- For the latest application, visit Epson and select the location.
- The guide requires administrator authority for Windows uninstall.
- Start the computer and close applications.
- On XP use Control Panel > Add or Remove Programs > EasyMP > Change/Remove.
- On Vista/7 use Control Panel > Uninstall a program > EasyMP > Uninstall/Change.
- Follow prompts.
- On Windows 8, right-click/hold EasyMP on Start, choose Uninstall from the app bar, select EasyMP and Uninstall, then follow prompts.
- On OS X, open Applications > EasyMP Network Projection - Tools > EasyMP Network Projection Uninstaller.app and follow prompts.
Controls and parts
See the manual diagrams 2 diagrams
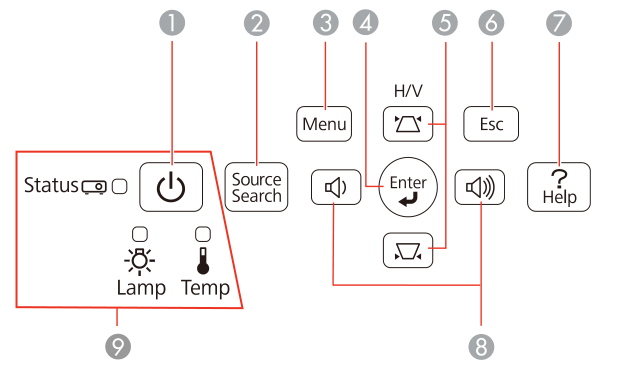
Diagram key
- 1: Power button/light
- 2: Source Search: searches for connected sources
- 3: Menu: opens the menu system
- 4: Enter: selects options
- 5: Vertical keystone and arrow buttons: adjust screen shape and navigate
- 6: Esc: cancels/exits functions
- 7: Help: opens projector help
- 8: Volume, horizontal keystone and arrow buttons: adjust speaker volume, image shape and navigation
- 9: Projector status lights: Status, Lamp (lamp symbol) and Temp (temperature/thermometer symbol).
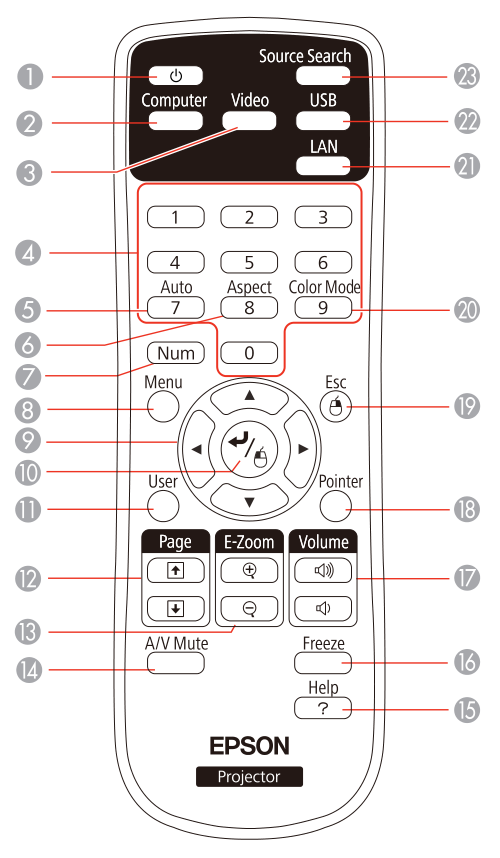
Diagram key
- 1: Power button
- 2: Computer: selects connected computer source
- 3: Video: cycles video sources
- 4: Numeric buttons: enter numbers
- 5: Auto: adjusts position, tracking and sync
- 6: Aspect: selects image ratio
- 7: Num: hold to enable numeric-button entry
- 8: Menu: opens projector menus
- 9: Arrows: navigate options and control wireless mouse
- 10: Enter: selects options; for wireless mouse use, left-clicks (twice for double-click) and holds a drag until released.
- 11: User: customizable function
- 12: Page up/down: presentation slides and document pages
- 13: E-Zoom +/−: zoom image detail
- 14: A/V Mute: hides picture and sound
- 15: Help: opens projector help
- 16: Freeze: holds video action
- 17: Volume up/down: adjusts speaker volume
- 18: Pointer: activates the onscreen pointer
- 19: Esc: cancels/exits functions; right-clicks when used as a wireless mouse.
- 20: Color Mode: selects display modes
- 21: LAN: chooses a network source
- 22: USB: cycles USB sources
- 23: Source Search: searches connected sources
Model details
Model and compatibility
- Applicable model
- This North American guide expressly names EX7220; its applicable instructions use WXGA resolution, 16:10 projection, optical zoom and the included wireless LAN module. [1]
- Resolution
- EX7220 native resolution is 1280 × 800 pixels (WXGA). [1]
- Optical zoom
- EX7220 uses manual optical zoom with a 1–1.2 zoom ratio. [1]
- Wireless module
- EX7220 includes the wireless LAN module listed in the box inventory. [1]
- Replacement lamp
- The guide lists ELPLP78 (V13H010L78) as the genuine replacement lamp. [1]
- Replacement filter
- The guide lists ELPAF32 (V13H134A32) as the replacement air filter. [1]