MODEL REFERENCE
Brother 4234DT
6 troubleshooting topics

The checks and guides below come from the official manuals for this model.
No matches for this wording. Try a light name, error code or a shorter phrase.
Troubleshooting
Find the problem you are experiencingDoes not feed1 check
- Presser foot pressure is too low.
- Increase presser foot pressure by turning the pressure adjustment screw clockwise.
Needles break3 checks
- Needles are bent or have blunt tips.
- Fit a new needle.
- Needles are fitted incorrectly.
- Refit the needles correctly.
- Fabric is being pulled too hard.
- Avoid pressing or pulling the fabric too hard while sewing.
Threads break6 checks
- Threading is incorrect.
- Rethread correctly.
- Thread is tangled.
- Inspect the spool pin, thread holders and other threading points, and remove tangled thread.
- Thread tension is too high.
- Reduce thread tension when sewing lightweight or fine fabric.
- Needles are fitted incorrectly.
- Refit the needles correctly.
- The needle type is incorrect.
- Use the correct needle type; the manual suggests Schmetz 130/705H.
- The thread change assembly tip is outside the upper looper eye.
- Place the thread change assembly tip in the upper looper eye.
Skipped stitches6 checks
- The needle is bent or has a blunt tip.
- Fit a new needle.
- The needle is fitted incorrectly.
- Refit the needle correctly.
- The needle type is incorrect.
- Use the correct needle type; the manual suggests Schmetz 130/705H.
- Threading is incorrect.
- Rethread correctly.
- Presser foot pressure is too low.
- Increase presser foot pressure by turning the pressure adjustment screw clockwise.
- The thread change assembly tip is outside the upper looper eye.
- Place the thread change assembly tip in the upper looper eye.
Stitches are not uniform1 check
- Thread tension settings are incorrect.
- Readjust the thread tension.
Fabric is puckered2 checks
- Thread tension is too high.
- Reduce thread tension when sewing lightweight or fine fabric.
- Threading is incorrect or the thread is tangled.
- Rethread correctly.
Controls and parts
See the manual diagrams 1 diagram
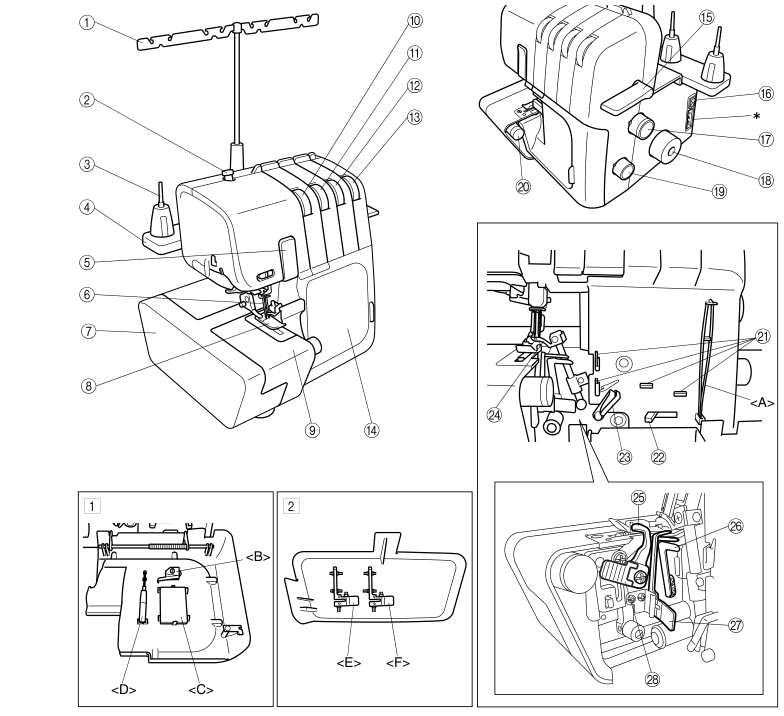
Diagram key
- 1: Thread tree
- 2: Presser foot pressure adjustment screw
- 3: Spool pin
- 4: Spool support
- 5: Thread take-up cover
- 6: Needles
- 7: Bed extension
- 8: Presser foot
- 9: Material plate cover
- 10: Left needle thread tension dial
- 11: Right needle thread tension dial
- 12: Upper looper thread tension dial
- 13: Lower looper thread tension dial
- 14: Front cover
- 15: Presser foot lifting lever
- 16: Main power and light switch
- 17: Stitch length adjustment dial
- 18: Hand wheel
- 19: Differential feed ratio adjustment dial
- 20: Stitch width dial
- 21: Thread guide
- 22: Lower looper threading lever
- 23: Thread take-up for loopers
- 24: Upper looper
- 25: Upper knife
- 26: Lower looper
- 27: Stitch finger
- 28: Knife lever
- A: Tweezers (accessory)
- B: Thread change assembly
- C: Needle set
- D: Hexagonal driver
- E: Stitch finger
- F: Stitch finger W
- Compartment 1: Front cover compartment, for storing accessories
- Compartment 2: Bed extension compartment, for storing removed stitch fingers
- *: Air openings on the back