MODEL REFERENCE
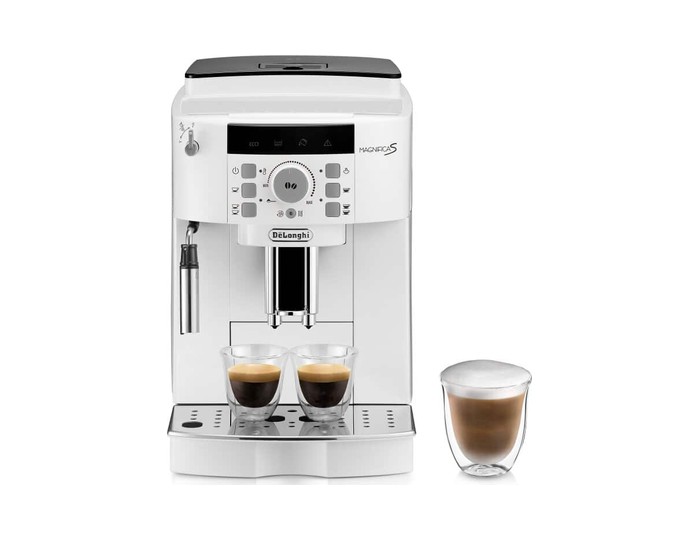
De’Longhi ECAM22.110.W
12 errors · 9 troubleshooting topics · 8 guides
The checks and guides below come from the official manuals for this model.
No matches for this wording. Try a light name, error code or a shorter phrase.
Errors and indicators
Light patterns and messages documented in the manualFind the indicator lights
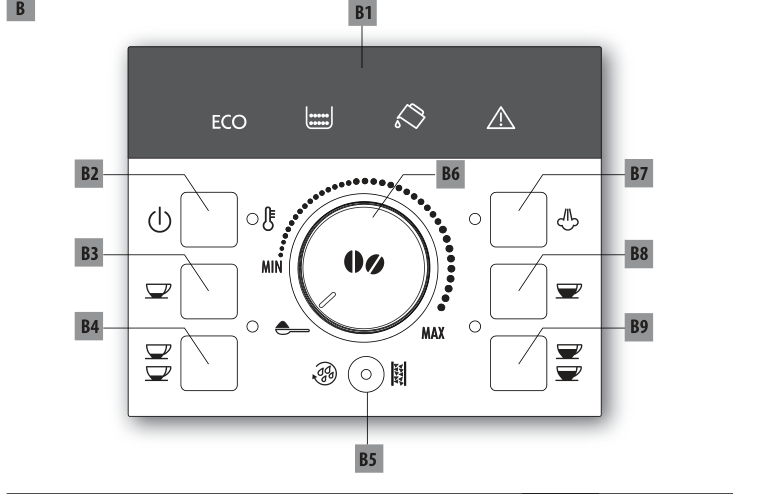
Diagram key
- B1: Lights
- B2: On/off
- B3: One short espresso
- B4: Two short espressos
- B5: Rinse or descale
- B6: Coffee quantity or pre-ground selection
- B7: Steam
- B8: One long espresso
- B9: Two long espressos
Steam light flashing steam dial needs turning
Turn the hot-water/steam dial as requested by the flashing steam light.
Water light flashing water tank needs filling
Fill the tank with fresh water, then slide it fully into place until it clicks.
Water light steady water tank is not seated
Push the water tank fully into its housing.
Grounds-container light flashing grounds container is full
- Remove the drip tray, empty and clean both the tray and grounds container, and refit them.
- Empty the grounds container every time the drip tray is removed, even when it contains only a little coffee.
Grounds-container light steady grounds container is missing
Remove the drip tray, install the grounds container, and refit the tray.
Grounds, water and alarm lights flashing water flow is restricted2 checks
Grounds light flashing, alarm light steady pre-ground coffee was not added
Add pre-ground coffee to the funnel, or turn off pre-ground mode. Use no more than one level measure and only add it while the machine is on.
Descale/rinse button flashing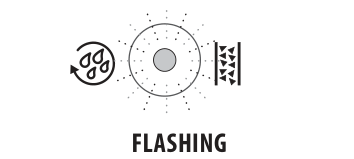 descaling is due
Run the complete descaling and two-rinse procedure described in the care guide below. Remove any water filter before descaling and keep clear of the hot acidic water.
Grounds and alarm lights flashing too much coffee was used
Choose a milder strength setting, or reduce the amount of pre-ground coffee, and make the coffee again.
Grounds light steady, alarm light flashing beans have run out or the funnel is blocked2 checks
Alarm light flashing infuser was not refitted
- Complete the normal shutdown first.
- Refit the cleaned infuser onto its support, press PUSH until it clicks, check that both colored buttons spring out, then close the door and replace the water tank.
Alarm light steady inside of the machine needs cleaning
- Turn the machine off using its normal shutdown and unplug it before cleaning inside.
- Remove coffee deposits from the area behind the drip tray with a sponge and vacuum residues.
- If the alarm stays on after cleaning, contact De’Longhi service.
Troubleshooting
Find the problem you are experiencingCoffee is not hot3 checks
- Cups are cold
- Warm the cups using hot water.
- Infuser has cooled between drinks
- Press the rinse button before brewing, keeping clear of hot water from the spouts.
- Temperature setting is low
- Choose a higher temperature using the procedure in the temperature guide.
Coffee is weak or lacks crema2 steps
- Use beans intended for espresso.
- If the grind is too coarse, turn the grind dial one click anticlockwise only while the grinder is running, then brew two coffees before judging the result.
Coffee comes out slowly or in dropsView
While the grinder is running, turn the grind dial one click clockwise. Brew at least two coffees before making another single-click adjustment.
One or both coffee spouts do not flowView
Remove coffee deposits blocking the spout holes with a toothpick.
Milk foam has large bubblesView
Use refrigerator-cold skimmed or semi-skimmed milk, about 5°C. Try another brand if the result remains poor.
Milk will not frothView
Clean the frother after use: flush briefly, stop the flow, let it cool, remove its outer sleeve and nozzle, clear the two holes, wash and refit the parts.
Steam stops after three minutesView
The steam safety cutoff operates after three minutes. Wait a few minutes before starting steam again.
Machine requests a third rinse after descalingView
Empty the drip tray before continuing the requested rinse. The manual links this to failing to fill the tank to MAX during the first two rinses.
Machine will not switch onView
Check the mains connection. If this version has a rear main switch, set it to I.
Guides
Making coffee
Instructions from the manualAdjust the coffee grinder3 steps
- Move the grind dial only while the grinder runs.
- For slow or absent flow, move one click clockwise; for a fuller crema, move one click anticlockwise.
- Make two coffees before assessing each adjustment, and never jump several clicks at once.
Set the coffee temperature3 steps
- With the machine connected and its main switch, if fitted, at I, use the standby/off state described in the manual.
- Hold the one-short-coffee button B3 until the panel lights come on, use it to select low or high, then confirm with the one-long-coffee button B8.
- The setting has most effect on longer drinks.
Making coffee using pre-ground coffee
Instructions from the manualUse pre-ground coffee3 steps
- Switch the machine on, turn the strength dial fully anticlockwise to pre-ground mode, check the funnel is clear, and add one level measure.
- Place one cup under the spouts and select a one-cup button.
- Never put beans in this funnel or add grounds when the machine is off.
Cleaning the cappuccino maker after use
Instructions from the manualClean the milk frother after use4 steps
- Put a container under the frother and briefly run water with the steam dial at I, then return it to 0.
- Let the frother cool for a few minutes.
- Hold its tube handle, rotate the outer sleeve anticlockwise and pull it down, then pull off the nozzle.
- Clear the two small holes with a toothpick if needed, wash the parts in warm water, and refit the nozzle and sleeve securely.
Cleaning
Instructions from the manualEmpty trays and clean the coffee circuit5 steps
- Empty the drip tray before its red level marker rises above the cup support, and empty the grounds container whenever the tray is removed.
- Clean the condensate tray too.
- After more than three or four unused days, run two or three rinses and dispense hot water.
- Clean the spouts and check the pre-ground funnel regularly.
- Use no solvents, abrasives, alcohol, metal scrapers, or dishwasher cleaning.
Clean and refit the infuser6 steps
- Run the normal shutdown; never remove the infuser while the machine is on.
- Remove the water tank, open the right-side infuser door, press both colored release buttons inward and pull the infuser out.
- Soak it in plain water for about five minutes, rinse, and clean its support.
- Use no detergent.
- Slide it back onto the support, press PUSH until it clicks, check both buttons spring outward, close the door, and replace the tank.
- If insertion is difficult, use the two sizing levers shown in figure 32.
Descale
Instructions from the manualDescale the machine15 steps
- Allow about 45 minutes and use De’Longhi descaler according to its pack instructions.
- Keep clear of hot acidic splashes and protect nearby surfaces.
- Turn the machine on and wait until ready.
- Empty and refit the drip tray and grounds container.
- Empty the tank and remove any water filter.
- Add 100 ml descaler to tank mark A, then one liter of water to mark B.
- Put a container holding at least two liters under both the frother and coffee spouts.
- Wait for steady coffee lights, hold the rinse/descale button B5 for at least five seconds, then turn the steam dial to I when prompted.
- After about 25 minutes, turn the dial to 0.
- Empty the collection container, rinse the tank, fill it with fresh water to MAX, replace the container under both outlets, and turn the dial to I for the first rinse.
- When empty, turn to 0.
- Empty the collection container again, refit the water filter if used, fill the tank to MAX with cold water, and place the container under the frother.
- Turn to I for the second rinse, then to 0 when it finishes.
- Top up to MAX.
- If an additional rinse is requested, empty the drip tray before continuing; repeat an interrupted descale cycle.
Water softener filter (*if present)
Instructions from the manualInstall or replace the optional water filter5 steps
- Rinse the filter with about half a liter of running water and set its date disc for the next two months.
- Fill the tank, immerse the filter at an angle to release air, press it into its holder, and refit the tank.
- Put a container holding at least 500 ml under the frother, turn the steam dial to I, dispense at least 500 ml, and return the dial to 0.
- Repeat that flow step if warning lights appear.
- Replace the filter after two months of normal use, or after three weeks unused, and always remove it before descaling.
Model details
Model and compatibility
- Water filter and descaler
- The guide allows an optional De’Longhi water-softener filter and specifies De’Longhi descaler. Remove the filter before descaling; replace it after two months of normal use or three weeks unused. [1]
- Coffee
- Use espresso coffee beans, without caramelized or candied coatings. Pre-ground mode accepts one level measure for one cup, never beans in the pre-ground funnel. [1]