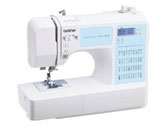
The checks and guides below come from the official manuals for this model.
No matches for this wording. Try a light name, error code or a shorter phrase.
Error codes
Shown on the machine display
CodeWhat it meansCheck or action
E1e1 — Presser foot raised during operation
Lower the presser foot lever, then continue.
E2e2 — Buttonhole lever lowered for another stitch
Raise the buttonhole lever, then continue.
E3e3 — Buttonhole lever raised for buttonhole or bar tack stitch
Lower the buttonhole lever, then continue.
E4e4 — Bobbin winder shaft moved to the right
Move the bobbin winder shaft left, then continue.
E5e5 — Start/stop button pressed with foot controller connected
On models fitted with Start/Stop: Disconnect the foot controller before using the start/stop button, or operate with the foot controller.
E6e6 — Motor locked by tangled thread
Turn off and unplug before race cleaning.
Clear tangled thread from the race and refit the bobbin case.
Replace a bent or broken needle, then thread the upper thread correctly before continuing.
F1-F9f1-F9 — Possible machine malfunction
Contact the nearest authorized service center.
Troubleshooting
Find the problem you are experiencing
Before sewing — The needle threader can not be used. (For models equipped with the needle threader lever.)2 checks
The needle holder is below its highest position.
For models fitted with the named needle-threader/control: Raise the needle by turning the handwheel toward you (counterclockwise) until its mark points up, or press the needle position button once or twice.
The needle is installed incorrectly.
For models fitted with the named needle-threader/control: Install the needle correctly.
Before sewing — The sewing light does not come on2 checks
The sewing lamp is damaged.
Contact the retailer or your nearest authorized service center.
The machine is switched off.
Switch the machine on.
Before sewing — Bobbin thread does not wind neatly on the bobbin3 checks
The thread runs incorrectly through the bobbin-winding thread guide.
Rethread the bobbin-winding thread guide correctly.
The bobbin turns slowly on a model with a sewing speed controller.
Slide the sewing speed controller right to increase the speed.
On models with fast bobbin winding, the pulled-out thread is wound incorrectly around the bobbin.
Wrap the pulled-out thread clockwise around the bobbin five or six times.
Before sewing — The thread does not pass through the eye of the needle. (For models equipped with the needle threader lever.)2 checks
The needle holder is below its highest position.
For models fitted with the named needle-threader/control: Raise the needle by turning the handwheel toward you (counterclockwise) until its mark points up, or press the needle position button once or twice.
The needle is installed incorrectly.
For models fitted with the named needle-threader/control: Install the needle correctly.
Before sewing — The needle threader lever does not lower to the correct position. (For models equipped with the needle threader lever.)1 check
The needle is below the required position.
For models fitted with the named needle-threader/control: Push the needle position button.
Before sewing — While winding the bobbin, the bobbin thread was wound below the bobbin winder seat1 check
The bobbin thread is wound incorrectly.
Remove the thread wrapped below the bobbin winder seat, then wind the bobbin correctly.
While sewing — The sewing machine does not work7 checks
The machine is unplugged.
Connect the machine to the power outlet.
The main power switch is off.
Switch on the main power.
The bobbin winder shaft is in the right-hand position.
Shift the bobbin winder shaft left.
The foot controller is being used incorrectly.
Use the foot controller correctly.
Neither the foot controller nor the start/stop button, on models with that button, has been pressed.
Depress the foot controller or push the start/stop button.
The presser foot lever is up.
Move the presser foot lever down.
On a model with a start/stop button, the button was pressed while the foot controller was connected.
Use the start/stop button only with the foot controller disconnected. Disconnect the foot controller to use this button.
While sewing — Fabric being sewn with the machine cannot be removed1 check
Thread is tangled beneath the needle plate.
Use the reviewed caught-fabric removal and unplugged race-cleaning instructions. Lift the fabric, cut the threads beneath it, and clean the race.
While sewing — The needle breaks13 checks
The spool or its cap is fitted incorrectly.
Refit the spool or spool cap correctly.
The upper thread is threaded incorrectly.
Rethread the upper thread correctly.
The needle is installed incorrectly.
Install the needle correctly.
The needle clamp screw is not tight.
Tighten the screw firmly with the disc-shaped screwdriver.
The needle is bent or dull.
Replace the needle.
The thread and needle do not suit the fabric.
Choose a thread and needle suited to the fabric.
The presser foot does not suit the selected stitch.
Attach the presser foot suited to the stitch.
The upper thread tension is too tight.
Reduce the upper thread tension.
The fabric is being pulled too hard.
Guide the fabric lightly.
There are scratches around the needle plate hole. The notch marked (a) on the opening's left side is not a scratch.
Fit a replacement needle plate. Contact the retailer or your nearest authorized service center.
There are scratches around the presser foot hole.
Fit a replacement presser foot. Contact the retailer or your nearest authorized service center.
The bobbin case is scratched.
Replace the bobbin case. Contact your retailer or nearest authorized service center.
The bobbin is not designed for this machine.
Use only a bobbin designed for this machine, as other bobbins will not work properly.
While sewing — The upper thread breaks11 checks
The upper thread is routed incorrectly, for example because the spool is fitted incorrectly, the spool cap is too large, or the thread has slipped out of the needle bar thread guide.
Rethread the upper thread correctly, using the spool cap that best matches the spool's size.
The thread has knots or tangles.
Remove the knots or tangles.
The needle does not suit the thread being used.
Choose a needle suited to the stitch type.
The upper thread tension is too tight.
Reduce the upper thread tension.
The thread is tangled, for example, in the race.
Use the reviewed caught-fabric removal and unplugged race-cleaning instructions. Remove the tangled thread. If it is tangled in the race, clean the race.
The needle is bent or dull.
Replace the needle.
The needle is installed incorrectly.
Install the needle correctly.
There are scratches around the needle plate hole. The notch marked (a) on the opening's left side is not a scratch.
Fit a replacement needle plate. Contact the retailer or your nearest authorized service center.
There are scratches around the presser foot hole.
Fit a replacement presser foot. Contact the retailer or your nearest authorized service center.
The bobbin case has scratches or a burr.
Fit a replacement bobbin case. Contact the retailer or your nearest authorized service center.
The bobbin is not designed for this machine.
Use only a bobbin designed for this machine, as other bobbins will not work properly.
While sewing — The lower thread is tangled or breaks5 checks
The bobbin thread is wound incorrectly.
Wind the bobbin thread correctly.
The bobbin is scratched or does not turn smoothly.
Replace the bobbin.
The thread is tangled.
Use the reviewed caught-fabric removal and unplugged race-cleaning instructions. Remove the tangled thread and clean the race.
The bobbin is not designed for this machine.
Use only a bobbin designed for this machine, as other bobbins will not work properly.
The bobbin is set incorrectly.
Reset the bobbin thread correctly.
While sewing — The fabric is wrinkled8 checks
The upper thread is threaded incorrectly or the bobbin is fitted incorrectly.
Thread the upper thread and wind the bobbin thread correctly.
The spool or its cap is fitted incorrectly.
Refit the spool or spool cap correctly.
The thread and needle do not suit the fabric.
Choose a thread and needle suited to the fabric.
The needle is bent or dull.
Replace the needle.
When sewing thin fabric, the stitch is too long or the fabric feeds incorrectly.
Place stabilizer material beneath the fabric while sewing.
The stitch is too coarse for the thin fabric being sewn.
Reduce the stitch length or place stabilizer material beneath the fabric while sewing.
The presser foot does not suit the selected stitch.
Attach the presser foot suited to the stitch.
The thread tension is set incorrectly.
Adjust the upper thread tension.
While sewing — Stitches are skipped5 checks
The upper thread is threaded incorrectly.
Rethread the upper thread correctly.
The thread and needle do not suit the fabric.
Choose a thread and needle suited to the fabric.
The needle is bent or dull.
Replace the needle.
The needle is installed incorrectly.
Install the needle correctly.
Dust has collected beneath the needle plate or inside the race.
Take off the needle plate cover, then clean the needle plate and race.
While sewing — There is a high-pitched noise while sewing4 checks
Dust has collected in the feed dogs or race.
Take off the needle plate cover, then clean the needle plate and race.
The upper thread is threaded incorrectly.
Rethread the upper thread correctly.
The bobbin case is scratched.
Replace the bobbin case. Contact your retailer or nearest authorized service center.
The bobbin is not designed for this machine.
Use only a bobbin designed for this machine, as other bobbins will not work properly.
While sewing — The fabric does not feed7 checks
The feed dogs are in the lowered position.
Move the rear feed-dog position lever right as seen from the rear and turn the handwheel to raise the feed dogs.
The stitch is too fine.
Increase the stitch length.
The thread and needle do not suit the fabric.
Choose a thread and needle suited to the fabric.
The thread is tangled, for example, in the race.
Use the reviewed caught-fabric removal and unplugged race-cleaning instructions. Remove the tangled thread. If it is tangled in the race, clean the race.
The presser foot does not suit the selected stitch.
Attach the presser foot suited to the stitch.
The needle is bent or dull.
Replace the needle.
Zigzag foot “J” tilts on a thick seam when stitching begins.
Keep zigzag foot “J” level while sewing by using its locking pin, the black button on the left side.
While sewing — The fabric feeds in the opposite direction1 check
The feed mechanism is damaged.
Contact the retailer or your nearest authorized service center.
After sewing — The upper thread has tightened up1 check
The bobbin thread is fitted incorrectly.
Refit the bobbin thread correctly.
After sewing — The thread tension is incorrect8 checks
The upper thread is threaded incorrectly.
Rethread the upper thread correctly.
The bobbin thread is wound incorrectly.
Wind the bobbin thread correctly.
The bobbin thread is fitted incorrectly.
Refit the bobbin thread correctly.
The thread and needle combination is unsuitable for the fabric.
Select a thread and needle combination suited to the fabric type.
The presser-foot holder is attached incorrectly.
Refit the presser-foot holder correctly.
The thread tension is set incorrectly.
Adjust the upper thread tension.
The bobbin is not designed for this machine.
Use only a bobbin designed for this machine, as other bobbins will not work properly.
The bobbin is set incorrectly.
Reset the bobbin thread correctly.
After sewing — The thread is tangled on the wrong side of the fabric1 check
The upper thread is threaded incorrectly.
Rethread the upper thread correctly.
After sewing — The stitch is not sewn correctly3 checks
The presser foot does not suit the selected stitch.
Attach the presser foot suited to the stitch.
The thread tension is set incorrectly.
Adjust the upper thread tension.
The thread is tangled, for example, in the race.
Use the reviewed caught-fabric removal and unplugged race-cleaning instructions. Remove the tangled thread. If it is tangled in the race, clean the race.
For bobbin thread visible on top or a straight upper thread on top, reset tension to 4 and correct lower threading.
For upper thread visible below, a straight bobbin thread below or loose/slack stitching below, reset to 4 and correct upper threading.
Check fabric/thread/needle suitability.
Once upper/lower threading is correct, test matching scrap while adjusting: counterclockwise when bobbin thread shows on top, clockwise when upper thread shows below.
Frequent troubleshooting topics — Fabric is caught in the machine and cannot be removed16 steps
Stop immediately and turn off.
Remove the needle; if down in the fabric, this removal sequence specifically turns the handwheel away from you clockwise to raise it.
Remove foot/holder, lift fabric, cut threads below and remove fabric if possible.
Remove plate cover, cut tangled thread, remove bobbin/case and its remaining thread; brush/vacuum the race.
If fabric was removable, go directly to case reinstallation.
If not, loosen the plate's two screws without dropping them, lift plate, cut tangles and remove plate/fabric/thread.
If still stuck, contact service rather than force it.
Clear thread around race/feed dogs and turn the handwheel to raise the dogs.
Align plate holes; finger-tighten right screw, tighten left securely with disc screwdriver, then right securely.
Turn the handwheel to confirm smooth feed-dog travel without slot contact.
Refit case and flush cover by Cleaning the race, inspect and install a straight needle; a new needle is recommended after a jam.
If plate was removed, check operation without foot or thread: turn on, select middle straight stitch 01 and slowly turn the handwheel toward you while looking from all sides for central plate-hole entry.
If the needle touches the plate, refit starting at the feed-dog raising/plate step.
Select zigzag 04 at maximum length/width and turn the handwheel toward you to check needle-bar/feed-dog operation.
If either contacts plate, stop and contact authorized service.
Switch off and fit bobbin/foot, rethread upper correctly and test normal fabric; if poor, check upper threading and fabric type.
Guides
Important safety
instructions
Instructions from the manual
IMPORTANT SAFETY INSTRUCTIONS24 steps
Unplug immediately after use, before cleaning, user servicing or leaving unattended.
Switch to O and grasp the plug, never the cord.
Use a direct AC outlet within the rating-label range; never an extension cord, DC source or inverter.
Ask a qualified electrician if uncertain; use only in the country of purchase.
Do not operate a damaged, dropped, wet or malfunctioning machine.
Stop and unplug for unusual odor, heat, discoloration or deformation; obtain authorized service.
Carry only by the handle without sudden movements.
Keep vents and controller clear of lint, dust and cloth; put nothing on the controller.
Do not insert objects, operate near aerosols, administered oxygen or heat, or place on an unstable surface.
Watch the needle and keep fingers away from moving parts.
Switch off for needle-area adjustments.
Never use bent needles or damaged/incorrect plates, or push/pull fabric excessively.
Keep the plastic bag from children and supervise children near the machine.
Do not use outdoors.
Avoid direct sun, humidity and hot objects during use/storage.
Clean the case only with neutral soap/detergent, never benzene, thinner or scouring powder.
Follow the manual when replacing components.
Have a damaged LED light replaced by an authorized dealer.
Follow troubleshooting before requesting service; if trouble persists, contact Brother.
Use only for household intended purposes and manufacturer-recommended accessories.
Outside CENELEC countries, persons with reduced capabilities or lacking experience, including children, need supervision/instruction from a responsible person.
In CENELEC countries, children aged eight or older and persons with reduced capabilities need safe-use supervision/instruction and understanding of hazards; children must not play with the machine or maintain/clean it unsupervised.
In UK/Eire/Malta/Cyprus, replace a plug fuse only with ASTA-approved BS1362 of the marked rating, replace the cover and never use a plug without it.
Ask Brother for the correct lead if the outlet is unsuitable.
Included accessories
Instructions from the manual
Included accessories8 steps
Check the listed accessories after unpacking; contact your dealer about missing/damaged items.
Contents vary by model.
The manual lists J, A, G, N, I, R and M feet, ripper, four bobbins (one fitted), needle set (75/11, 90/14 and 100/16, one each), twin needle, gold ball-point 90/14, brush, disc screwdriver, three spool-cap sizes, extra spool pin and controller.
It does not promise every item for every variant.
For this manual use the specified 131096-121 twin needle and SA156/SFB XA5539-151 bobbins.
The presser-foot holder screw 132730-122 is available through Brother.
EU controller code XD0501-121 and other-area XC8816-071 remain regional; the Model T statement is USA-only.
Optional walking foot, quilting foot, quarter-inch foot, quilting guide and eyelet punch may be separately purchased or included according to model.
Accessory compartment
Instructions from the manual
Accessory compartmentView
Slide the flat-bed attachment left to open its compartment. Put accessories in their bag before storing the bag so loose parts do not fall out or get lost/damaged.
The main parts
Instructions from the manual
The main parts7 steps
Use the reviewed shared-manual parts/control keys.
The illustrations may differ from the actual model.
Do not cover the motor air vent while sewing.
Carry by the handle.
The panel shows selected stitch number, required foot, length and width; use the matching selection/adjustment keys.
Reverse/Reinforcement sews backward while held for stitches supporting reverse; other patterns use reinforcement.
Start/Stop, needle-position button, slider, threader, quick-set bobbin and character keys in the family manual are conditional, and no character-stitch function is claimed for the FS-40.
Spool pin
Instructions from the manual
Spool pin4 steps
Press down on the spool-pin lever to raise the pin; do not pull its bar, which can bend/break.
Store the chosen spool cap on the pin as illustrated.
Push the pin down until it clicks before fitting the cover or when unused.
To reinstall a detached pin, insert its tab in the hole and push down until locked.
Power supply precautions
Instructions from the manual
Power supply precautions5 steps
Use regular household electricity and the supplied cord, with both plugs firmly seated in good sockets.
Switch off and unplug when unattended, after use, during a power failure or storm, or for a bad connection/disconnection.
Do not use extension cords/multiple adapters, handle the plug with wet hands, damage/modify/bend/pull/twist/bundle the cord, load it with heavy objects or expose it to heat.
Obtain Brother repair for a damaged cord/plug before use.
Unplug during long storage.
Power supply
Instructions from the manual
Power supply4 steps
Insert the supply plug and set the main switch to I; the sewing light turns on.
Set it to O to switch off and extinguish the light.
For a power outage, switch off and unplug, then follow normal startup on restoration.
The polarized-plug procedure is USA-only: reverse an unsuitable plug once, then ask an electrician for a suitable socket; never modify the plug.
Foot controller
Instructions from the manual
Foot controller5 steps
With power off, connect the controller to its jack.
Press to start and vary pressure for speed; release to stop.
Keep cloth/dust off it and put nothing on it when unused.
On models fitted with Start/Stop, that button cannot start sewing with the controller connected; use the controller or disconnect it.
A fitted speed slider limits the maximum controller speed.
Changing the needle stop position
Instructions from the manual
Changing the needle stop position4 steps
Turn off.
Hold the minus side of the left stitch-selection key (circled 1 in this setting diagram) while turning on; release after startup.
This changes normal needle-down stopping to needle-up.
Repeat to return to needle-down.
Changing the initial needle
position
Instructions from the manual
Changing the initial needle position4 steps
Turn off.
Hold the plus side of the left stitch-selection key (circled 2 in this setting diagram) while turning on; release after startup.
This changes initial straight stitch from left to center.
The setting survives power-off; repeat to return to left.
Cancelling the operation beep
(for models equipped with the
operation beep)
Instructions from the manual
Cancelling the operation beep (for models equipped with the operation beep)3 steps
For a model with operation beeps, turn off.
Hold stitch-width minus (c in the reviewed setting diagram) while turning on and release after startup to silence it.
Repeat to restore beeps.
Winding the bobbin
Instructions from the manual
Winding the bobbin17 steps
Use SA156/SFB XA5539-151 bobbins of the supplied type, 11.5 mm high; other types may malfunction or break the needle.
Raise the spool pin with its lever, remove its cap, fit the spool to unwind from bottom toward front and fit the appropriate cap.
Fine cross-wound thread uses the small cap with a little space; an unsuitable cap/incorrect spool position can tangle thread or damage the machine.
Route thread through the guide and guide cover and under the pretension disk, pulling it fully in.
Put the end through the bobbin hole and seat the bobbin on the winder; move shaft right and rotate the bobbin clockwise until the shaft spring engages its notch.
Leave 7–10 cm through the hole.
Connect the controller before switching on if using it.
Switch on, hold the end taut straight up and wind a few turns.
Stop and trim the excess to 1 cm before continuing; failure to trim can tangle thread and break the needle.
On models with a speed slider, move it right for fast winding.
Wind with the controller or fitted Start/Stop until the full bobbin slows.
Stop, cut thread, move shaft left and remove bobbin; restore slider speed if fitted.
A click after winding is normal; the needle bar does not move with the shaft right.
Wind evenly.
For a model with the fast-winding cutter, instead seat/engage the bobbin and move shaft right, route thread as above, wind five or six turns clockwise, then draw the end right through the seat's cutter slit.
Cut with that cutter before starting; otherwise thread can tangle and bend/break the needle.
Set the fitted slider fast, switch on and wind until it slows, then stop, cut, move shaft left, remove bobbin and restore slider speed.
Lower threading
Instructions from the manual
Lower threading8 steps
Raise needle highest by turning the handwheel toward you until its mark points up; the needle-position button is an alternative only if fitted.
Raise the foot, switch off and open the bobbin cover with its slide button.
Insert a correctly wound bobbin to unwind counterclockwise as indicated on the plate cover; a wrong direction or poor winding can upset tension or break the needle.
Hold the thread end and press the bobbin down while routing through the illustrated slit and under the case tension spring.
Replace the cover with thread coming out at its left side.
On a quick-set model, lightly hold the bobbin, route through slits a/b and pull toward you through cutter c, ensuring easy counterclockwise bobbin rotation and spring engagement.
Replace the cover.
Quick-set sewing may begin without drawing up thread; use Drawing up the lower thread when an exposed starting thread is needed.
Upper threading
Instructions from the manual
Upper threading8 steps
Use a suitable fabric/thread/needle combination; never thread weight 20 or lower.
Switch on to raise the foot and needle; turn the handwheel toward you until its mark points up, or use the needle-position button if fitted.
The take-up lever and foot must be raised before routing.
Raise the spool pin with its lever, fit the spool to unwind bottom-to-front and choose a matching cap; use the small cap with space for fine cross-wound thread.
Route through the guide and cover, follow the upper channel, engage the take-up lever from right to left and put thread behind the needle-bar guide.
Switch off.
Thread the needle front-to-back and draw about 5 cm; keep power off for hand threading.
A poorly positioned spool/cap can tangle thread and break the needle.
Using the needle threader (for models
equipped with the needle threader)
Instructions from the manual
Using the needle threader (for models equipped with the needle threader)7 steps
Only for a fitted threader: follow Upper threading through switching off, then lower the foot.
While lowering the threader lever hook thread onto its guide; lower fully so the hook passes through the eye and catches thread.
Release the lever slowly and pull the loop without force.
If thread misses the eye, repeat from the guide step.
Raise the foot and pass the end underneath as illustrated, leaving about 5 cm.
Use home needles 75/11–100/16; never 65/9, wing or twin needles.
Transparent nylon, metallic thread and thread thickness 130/120 or thicker cannot use this threader; thread those by hand with power off.
Drawing up the lower thread
Instructions from the manual
Drawing up the lower thread5 steps
Lightly hold the upper-thread end.
Turn the handwheel toward you until its mark points up, or press a fitted needle-position button once/twice, to raise the needle.
Pull the upper thread to draw up the lower thread.
Pull about 10 cm of both toward the back under the foot.
On a quick-set model needing exposed thread for gathers/darts, reinstall the bobbin, route along the slit without cutting, leave the cover off, draw up as above and replace the cover.
Needle types and their uses
Instructions from the manual
Needle types and their uses10 steps
Use only straight home-machine needles; never thread weight 20 or lower.
A smaller thread number means thicker thread; a larger needle number means thicker needle.
Choose combinations from the reviewed fabric/thread table: medium broadcloth/taffeta/flannel/gabardine uses cotton/synthetic 60–90 or silk 50 and 75/11–90/14; thin lawn/georgette/challis/satin uses cotton/synthetic 60–90 or silk 50 and 65/9–75/11.
For denim, cotton 30 uses 100/16 and cotton 50 uses 90/14–100/16; corduroy/tweed uses synthetic/silk 50–60 and 90/14–100/16.
Stretch jersey/tricot uses knit thread 50–60 with gold ball-point 75/11–90/14.
Easily frayed fabrics use cotton/synthetic 50–90 or silk 50 with 65/9–90/14.
Use a ball-point needle for stretch or easily skipped stitches and for best results with N-foot patterns.
Transparent nylon requires 90/14–100/16 regardless of fabric/thread.
Incorrect combinations, particularly thin needles on thick denim, can bend/break needles or cause uneven/puckered/skipped stitching.
Checking the needle
Instructions from the manual
Checking the needleView
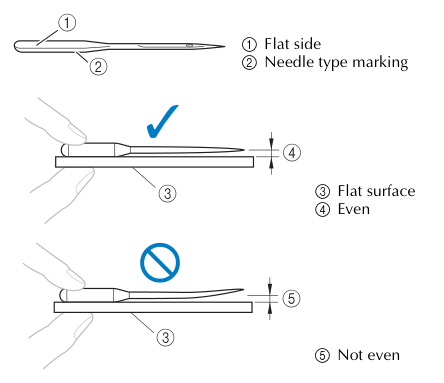
Place its flat side on a flat surface and check that the gap is even. Never use a bent needle; it can break during sewing and cause injury.
Check needle straightness with its flat side on a flat surface. An uneven gap means the needle must not be used.
Replacing the needle
Instructions from the manual
Replacing the needle7 steps
Raise the needle highest by turning the handwheel toward you with mark up, or use a fitted position button.
Switch off, lower the foot and put fabric/paper under it to prevent the needle falling into the plate hole.
Loosen the clamp screw counterclockwise with the disc screwdriver and remove the needle.
Do not loosen excessively, let the clamp fall off or force the screw.
Insert the new needle fully to the stopper with its flat side toward the rear.
Tighten the screw clockwise securely with the disc screwdriver; incomplete insertion or loose fastening can break the needle or damage the machine.
Install the twin needle by the same method.
Sewing with the twin needle
Instructions from the manual
Sewing with the twin needle10 steps
Use only the specified 131096-121 twin needle, never bent.
With power off, install it by the reviewed method, route the left upper thread normally and hand-thread the left eye front-to-back.
Fit the extra spool pin on the bobbin-winder shaft, fit the second spool to unwind from its front, route its thread normally except bypassing the needle-bar guide, and hand-thread the right eye front-to-back.
Never use the threader for twin needles.
Attach J foot with power off, then turn on.
Choose only a stitch approved for twin needles in the relevant model column, with width 5.0 mm or less.
Turn the handwheel slowly toward you after width changes to check clearance from the foot.
Start sewing; increase length if stitches bunch.
To change direction, raise the needle clear of the fabric, raise the foot and turn the fabric.
Never turn fabric with twin needles lowered.
Replacing the presser foot
Instructions from the manual
Replacing the presser foot6 steps
Always choose the correct foot for the pattern and a foot designed for this machine.
Raise needle highest, turn off and raise the foot lever.
Press the black holder button to release the current foot.
Position the replacement letter to be readable and align its pin with the holder shank.
Slowly lower the lever until the pin snaps in, then raise it to check secure attachment.
Power-on replacement or an incorrect foot can cause injury or needle breakage.
Removing the presser foot
holder
Instructions from the manual
Removing the presser foot holder3 steps
Remove the foot by the reviewed power-off method and loosen the holder screw with the disc screwdriver.
To refit, align the holder at the lower-left of the presser bar and hold it while tightening its screw securely.
A loose holder can fall off and strike/break the needle; an incorrectly fitted holder can cause incorrect tension.
Selecting a
stitch
Instructions from the manual
Selecting a stitch5 steps
Turn on and select the appropriate pattern using the tens/ones stitch-selection keys.
For example, 04 uses zero in the tens and four in the ones.
Attach the foot shown on the LCD using the power-off replacement method.
The initial pattern is left straight stitch unless the reviewed initial-position setting was changed.
Character-mode instructions in this family manual apply only to character-stitch models.
Adjusting the stitch length and
width
Instructions from the manual
Adjusting the stitch length and width4 steps
Use length/width plus or minus to increase or reduce within the relevant model's table limits.
The standard-setting circles disappear on the LCD when a value differs from standard.
After a width change, slowly turn the handwheel toward you to ensure needle/foot clearance.
Increase stitch length for bunched stitches; continued bunched sewing can bend/break the needle.
Starting to sew
Instructions from the manual
Starting to sew8 steps
Watch the needle, keep hands from moving parts, use no bent needle and do not push/pull fabric hard or let the needle strike basting pins.
Raise needle highest and foot; place fabric and pass about 5 cm of thread beneath the foot toward the rear.
Hold fabric/thread ends with your left hand and turn the handwheel toward you to lower the needle into the starting point.
Lower the foot.
Set a fitted speed slider as desired.
Press the controller slowly to start; on a model with Start/Stop, that button works only without the controller connected.
Stop by releasing the controller or pressing the button used to start.
Raise needle highest unless needle-up stopping is set, raise foot, pull fabric left and cut threads with the cutter.
Sewing reinforcement stitches
Instructions from the manual
Sewing reinforcement stitches2 steps
For straight/zigzag patterns with reverse, hold Reverse/Reinforcement to sew backward.
Other patterns sew three to five reinforcement stitches over one another; use the reviewed stitch-settings table to determine which operation is supported.
Thread tension
Instructions from the manual
Thread tension5 steps
Test the project fabric/thread first.
Excessive or insufficient tension weakens seams or puckers fabric.
For upper-side loops/tight upper tension, check and correct bobbin threading through its tension spring, then reduce the dial number.
For wrong-side loops/loose upper tension, check and correct upper threading, then increase the dial number.
Correct threading before attempting tension adjustment.
Trial sewing
Instructions from the manual
Trial sewingView
Trial-sew with the same fabric and thread as the project. Check tension and stitch length/width before sewing the project.
Changing the sewing direction
Instructions from the manual
Changing the sewing direction3 steps
At a corner stop with the single needle in the fabric; lower it with the handwheel or fitted position button if needed.
Raise the foot, pivot fabric around the needle, lower the foot and continue.
With twin needles instead raise them out of fabric before turning, or they may bend/break.
Sewing curves
Instructions from the manual
Sewing curvesView
Stop and change direction slightly as needed around the curve. For a finer zigzag curve, shorten the stitch length.
Sewing thick fabrics
Instructions from the manual
Sewing thick fabrics4 steps
If fabric does not fit, lift the foot lever higher to its highest position.
At a thick seam where J foot is not level and feeding will not start, raise the foot, align the starting point, hold J foot level and hold its left black locking pin pressed while lowering the foot.
Release the pin; the foot remains level and returns to its original angle after the seam.
Do not sew thickness over 6 mm or push forcefully; the needle can bend/break.
Sewing hook-and-loop fastener
Instructions from the manual
Sewing hook-and-loop fastener5 steps
Use only ungummed sew-on fastener.
Baste it to the fabric first.
Turn the handwheel to check needle penetration and lower into the fastener before sewing its edge slowly.
If it will not penetrate, select the reviewed thick-fabric needle.
Thin 65/9–75/11 needles can bend/break; glue on the needle/race can cause malfunction.
Sewing thin fabrics
Instructions from the manual
Sewing thin fabricsView
If thin fabric misaligns or will not feed, put thin paper/stabilizer beneath and sew it with the fabric. Tear off excess paper afterward.
Sewing stretch fabrics
Instructions from the manual
Sewing stretch fabricsView
Baste the fabric pieces together and sew without stretching the fabric.
Stitching cylindrical pieces
Instructions from the manual
Stitching cylindrical pieces3 steps
Slide the flat-bed attachment left to remove it and expose the free arm.
Slide the cylindrical piece onto the arm and sew from the top; short/small pieces may not feed correctly.
Reinstall the attachment in its original position afterward.
Using zigzag foot
Instructions from the manual
Using zigzag footView
With power off attach J foot. Select an applicable zigzag/three-point or J-foot overcasting pattern from the model's table and sew along the fabric edge.
Using overcasting foot
Instructions from the manual
Using overcasting foot3 steps
With power off attach G foot, select G-foot pattern 06 or 07 and align the fabric edge against its guide before lowering the foot.
Slowly turn the handwheel toward you to ensure the needle clears the foot, especially after width adjustment.
Sew keeping the edge against the guide.
Basic stitching
Instructions from the manual
Basic stitching4 steps
Baste or pin the pieces, fit J foot with power off, select a basic straight/triple-stretch pattern from the model's table and lower the needle at the first stitch point.
Start sewing by the reviewed method, reinforcing as the selected pattern permits.
Finish and cut thread.
For left straight/triple stretch, width plus moves the needle right and minus left; do not infer adjustment for a fixed-position center pattern.
Blind hem stitching
Instructions from the manual
BLIND HEM STITCHING9 steps
Reverse the garment, fold/press the desired hem, chalk about 5 mm from its edge and baste.
Fold back along that basting and present the wrong side up.
With power off attach R foot and select the applicable blind-hem stitch.
Remove the attachment if using the free arm, ensuring the piece can feed.
Align the folded hem with the foot guide and lower the foot.
Raise the needle before changing its drop position.
Adjust width so the needle barely catches the fold: plus if it catches too much, minus if it misses.
Here relative settings -3 to +3 change needle position, not a millimetre width.
Sew against the guide, remove basting and turn right-side-up.
Buttonhole sewing
Instructions from the manual
BUTTONHOLE SEWING13 steps
Trial-sew to check length/width.
Chalk the buttonhole position/length and set A-foot guide plate to button diameter plus thickness, up to about 28 mm.
Its scale marks are 5 mm apart; a 15 mm diameter/10 mm thick button needs 25 mm.
If the button fits the plate, insert it to set size.
Attach A foot with power off, choose an applicable buttonhole and pass upper thread down through its hole.
Align the front-end mark with the foot's red marks and lower the foot without pushing its front inward or reducing the gap.
Fully lower the buttonhole lever behind the bracket.
Hold the upper end gently and start; for a non-feeding thick seam increase length.
The machine reinforces and stops automatically.
Raise needle/foot, remove fabric, cut thread and restore lever up.
Pin inside the end reinforcement to protect stitches; cut the opening toward the pin with the ripper, keeping hands out of its path.
For a keyhole use an eyelet punch at the rounded end over thick paper/protective backing, then cut open.
Use the ripper only as intended.
Sewing buttonholes on stretch fabrics
Instructions from the manual
Sewing buttonholes on stretch fabrics6 steps
Hook gimp onto the illustrated rear part of A foot, seat it in the grooves and tie loosely.
With power off fit A foot and choose a supported stretch buttonhole.
Set width to gimp thickness, lower foot and lever, then sew.
Pull gimp gently to remove slack.
Hand-sew its end to the wrong side and tie.
Cut the middle gimp remaining at the upper end with the ripper and trim excess.
Button sewing
Instructions from the manual
Button sewing8 steps
Measure hole spacing, raise foot and lower feed dogs by moving the rear lever left as viewed from the rear.
With power off fit M foot and place button under it.
For four holes sew the front pair, reposition and sew the rear pair.
Use the model's supported button-sewing zigzag (04 on the 40-stitch column), set width to hole spacing and length to minimum.
Turn the handwheel toward you to ensure needle entry through both holes without striking the button.
Sew slowly for about ten seconds, then press Reverse/Reinforcement to reinforce.
Pull the ending upper thread to the wrong side and tie it to the bobbin thread; cut beginning threads with scissors.
Move the feed lever right as viewed from the rear and turn the handwheel to raise feed dogs afterward.
Zipper insertion
Instructions from the manual
ZIPPER INSERTION9 steps
With power off fit J foot, place fabrics right sides together, sew a plain seam to the opening end and reverse there.
Baste the opening.
Press seam allowance open from the wrong side, align zipper center with stitching and baste the zipper.
With power off fit I foot on its right pin and select center straight stitch 01.
Turn the handwheel to check that the needle clears the foot; another stitch can strike it.
With right side up and zipper right of the foot, sew in the illustrated a-to-c order around the zipper; do not hit it with the needle.
If the foot meets the slider, leave the needle down, lift foot, move slider, lower foot and continue.
For zipper left of the foot, use I foot's left pin.
Remove basting afterward.
Stretch stitching
Instructions from the manual
Stretch stitchingView
With power off fit J foot, select the supported stretch pattern and sew without stretching the fabric.
Elastic attaching
Instructions from the manual
Elastic attaching4 steps
Pin a suitable length of elastic at several evenly spaced points on the wrong side.
With power off fit J foot and choose a supported elastic-attaching pattern (three-point zigzag on the 40-stitch column).
Sew stretching the tape to the fabric length, pulling fabric behind the foot with the left hand and at its nearest front pin with the right.
Do not let the needle hit pins.
Appliqués
Instructions from the manual
Appliqués5 steps
Baste the cut shape, with no glue in the area to be stitched.
With power off fit J foot and select a supported appliqué pattern.
Sew along the edge so the needle drops off the right side, without hitting pins.
Reinforce with straight stitches at beginning/end; remove basting if needed.
Glue on the needle/race may damage the machine.
Patchwork (crazy quilt) stitching
Instructions from the manual
Patchwork (crazy quilt) stitchingView
Fold the top fabric edge over the lower piece and join them with a supported pattern spanning both pieces.
Quilting
Instructions from the manual
Quilting7 steps
Baste the sandwich.
Remove foot/holder by the power-off method.
For the optional walking foot, hook its fork onto the needle-clamp screw, lower the lever and fasten it to the bar with the holder screw; tighten securely with the disc screwdriver.
Turn the handwheel toward the front to check needle clearance.
Use only straight/zigzag patterns approved for the walking foot, without reverse stitching.
Keep speed slow to medium and guide evenly with one hand each side.
For the optional quilting guide, insert its stem into the rear hole of the walking foot or holder and adjust to track an existing seam for parallel spacing.
Free-motion quilting
Instructions from the manual
Free-motion quilting7 steps
Use the optional quilting foot.
With power off remove foot/holder, align the quilting foot at lower-left of the bar with its pin over the needle-clamp screw and tighten the holder screw securely using the disc screwdriver.
Lower feed dogs by moving the rear lever left as seen from rear.
Turn on and select a supported stitch.
Hold fabric taut with both hands and move it freely following the pattern; sew reinforcement at the beginning/end.
Afterward move the feed lever right as seen from rear and turn the handwheel to raise the dogs.
A loose foot screw can let the needle strike it and bend/break.
Triple stretch stitching
Instructions from the manual
Triple stretch stitchingView
With power off fit J foot, select triple-stretch pattern 02 and sew by the reviewed starting method to reinforce sleeve holes or inseams.
Bar tack stitching
Instructions from the manual
Bar tack stitching7 steps
Set A foot's guide plate to tack length, up to about 28 mm, using its 5 mm scale marks.
Attach A foot with power off, choose the bar-tack pattern (30 in the 40-stitch column), pass the upper thread through the foot hole and face the pocket opening toward you.
Lower the foot so the needle starts 2 mm before the opening; do not push the foot front in or reduce its gap.
Fully lower the buttonhole lever behind its bracket, hold the upper end gently and sew.
It reinforces/stops automatically.
Raise needle/foot, remove fabric, cut threads and restore lever up.
Increase length if thick fabric will not feed.
Fagoting
Instructions from the manual
Fagoting4 steps
Press the two seam edges, baste them about 4 mm apart over thin paper/water-soluble stabilizer, with a center line if helpful.
With power off fit J foot, choose a supported fagoting pattern and set width 7.0 mm.
Sew with foot center on the gap center and remove backing afterward.
Thicker thread is more decorative but still must satisfy needle/thread restrictions.
Scallop stitching
Instructions from the manual
Scallop stitching3 steps
With power off fit N foot and choose satin-scallop pattern 13 in the 40-stitch column.
Sew along the edge without stitching directly on it; spray starch and ironing before sewing can improve results.
Trim along stitches without cutting them.
Smocking
Instructions from the manual
Smocking5 steps
With power off fit J foot.
Choose straight stitch, length 4.0 mm and loosen tension.
Sew parallel rows 10 mm apart without reverse/reinforcement or cutting ends.
Pull bobbin threads into gathers and press.
Choose an applicable fagoting/smocking pattern (17 or 18 in the 40-stitch column), stitch between straight rows and pull out the straight-row threads.
Shell tuck stitching
Instructions from the manual
Shell tuck stitching3 steps
Fold fabric on the bias.
With power off fit J foot, choose shell-tuck pattern 12 in the 40-stitch column and increase tension.
Sew with the needle dropping just off the edge; unfold and press the tucks to one side.
Joining
Instructions from the manual
Joining3 steps
With power off fit J foot.
Join the two right sides, press seam allowances open, choose an applicable joining pattern (14, 15 or 16 in the 40-stitch column) and turn right side up.
Sew with foot center over the seam.
Heirloom stitching
Instructions from the manual
Heirloom stitching4 steps
With power off fit a 130/705H 100/16 wing needle and N foot.
Hand-thread front-to-back, never using the threader.
Choose an applicable N-foot heirloom pattern (22, 23 or 24 in the 40-stitch column), set width no greater than 6.0 mm and slowly turn the handwheel toward you to check needle/foot clearance.
Sew the decorative holes on thin/medium/plain-weave fabric; a greater width or needle strike can bend/break the needle.
Restrictions on oiling
Instructions from the manual
Restrictions on oiling2 steps
Do not oil the machine; the factory-applied amount makes periodic user oiling unnecessary.
Stop immediately for a hard-to-turn handwheel or unusual noise and contact an authorized dealer/service center.
Precautions on storing the machine
Instructions from the manual
Precautions on storing the machine2 steps
Avoid extreme high/low temperatures or changes, humidity/steam, flames/heaters/air conditioners, outdoor/direct-sun exposure and very dusty/oily environments.
Periodically switch on and use the machine; prolonged unused storage may reduce efficiency.
Cleaning the machine surface
Instructions from the manual
Cleaning the machine surface4 steps
Unplug before cleaning.
Lightly dampen a cloth with neutral detergent, squeeze firmly and wipe the surface.
Wipe again with a dry cloth.
Do not use benzene, thinner or scouring powder.
Cleaning the race
Instructions from the manual
Cleaning the race10 steps
Switch off and unplug.
Raise needle/foot; loosen the foot-holder and needle-clamp screws to remove holder/needle.
Pull the cover release toward you and remove the needle-plate cover.
Lift out the bobbin case.
Brush or vacuum dust from the race and surrounding area; do not oil the race.
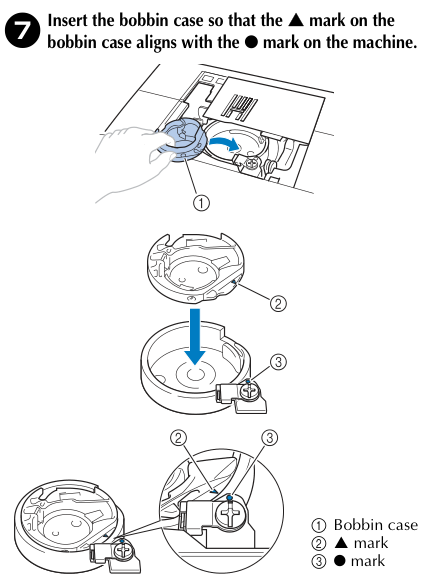
Fit the case with its triangular mark aligned to the machine's circular mark as in the reviewed figure.
Never use a scratched case; obtain XE7560-001 through authorized service.
Insert the cover tab in the plate hole, position it flush and slide it back from the front.
If not flush, remove/reinstall it; sewing with a raised cover risks it coming off and finger injury.
Incorrect case seating can break the needle.
Insert the bobbin case with its triangular mark aligned to the machine’s circular mark. The whole insertion arrow, enlarged alignment view and printed key are included.
Operation beep (for models equipped with the operation beep)
Instructions from the manual
Operation beep (for models equipped with the operation beep)3 steps
For a fitted beep function, correct key operations beep once; incorrect operations or inactive keys beep twice/four times.
If the machine locks from tangled thread it beeps for four seconds and stops automatically.
Quick reference guide 1 - preparing the bobbin thread -
Instructions from the manual
Quick guide: Preparing the bobbin thread2 steps
Read the IMPORTANT SAFETY INSTRUCTIONS in the operation manual first.
Use the complete reviewed Winding the bobbin and Lower threading instructions for the pictured route; the quick sheet explicitly refers to the operation manual for detailed instructions.
Quick reference guide 2 - upper threading -
Instructions from the manual
Quick guide: Upper threading2 steps
Read the IMPORTANT SAFETY INSTRUCTIONS in the operation manual first.
Use the complete reviewed Upper threading and Using the needle threader instructions for the pictured route; the quick sheet explicitly refers to the operation manual for detailed instructions.
Controls and parts
See the manual diagrams 3 diagrams
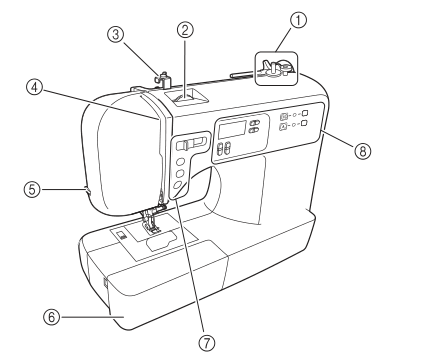
Front parts in the shared FS-40 operation manual. The manufacturer notes that illustrations may differ from the actual machine; optional buttons are not established by this drawing.
Diagram key
1: Bobbin winder.
2: Upper tension-control dial.
3: Bobbin-winding thread guide and pretension disc.
4: Thread take-up lever.
5: Thread cutter.
6: Flat-bed attachment with accessory compartment.
7: Operation buttons; fitted controls vary by model.
8: Operation panel.
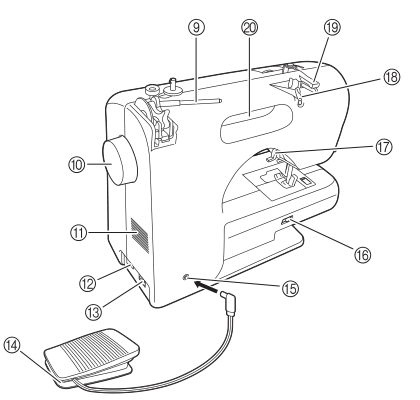
Rear parts and controller in the shared manual; keep the air vent uncovered and carry the machine by its handle.
Diagram key
9: Spool pin.
10: Handwheel, used to raise or lower the needle manually.
11: Air vent for motor circulation; do not cover it while sewing.
12: Main power and sewing-light switch.
13: Power jack/socket connector.
14: Foot controller.
15: Foot-controller jack/socket.
16: Feed-dog position lever.
17: Presser-foot lever.
18: Thread guide.
19: Thread-guide cover.
20: Handle; carry the machine by this handle.
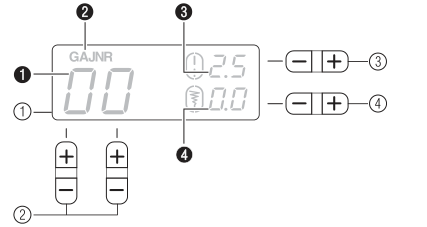
Shared-manual operation-panel example. Circled labels identify controls; filled labels identify LCD fields. Displayed numbers are examples, not error indications. Actual model layouts and optional controls may differ.
Diagram key
circled 1: LCD (liquid crystal display).
circled 2: Stitch-selection keys; the repeated labels identify the same control function.
circled 3: Stitch-length adjustment key; minus reduces and plus increases length.
circled 4: Stitch-width adjustment key; minus reduces and plus increases width.
filled 1: Selected stitch number.
filled 2: Required presser-foot type.
filled 3: Stitch length in millimetres.
filled 4: Stitch width in millimetres.
G: Overcasting foot.
A: Buttonhole foot.
J: Zigzag foot.
N: Monogramming foot.
R: Blind-stitch foot.
Model details
Model and compatibility
Bobbin type
SA156 / SFB XA5539-151, supplied type, 11.5 mm high. [1]
Twin needle
131096-121; use J foot and an approved pattern with width no greater than 5.0 mm. [1]