MODEL REFERENCE
Brother FS20s
8 errors · 82 guides
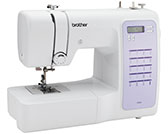
The checks and guides below come from the official manuals for this model.
No matches for this wording. Try a light name, error code or a shorter phrase.
Error codes
Shown on the machine display E1e1
Lower the presser-foot lever before continuing. Optional Start/Stop and Reverse/Reinforcement triggering conditions are as stated in the shared manual.
E2e2
Raise the buttonhole lever before continuing when a non-buttonhole/non-bar-tack stitch is selected.
E3e3
Lower the buttonhole lever before continuing a buttonhole or bar tack.
E4e4
Move the bobbin-winder shaft left before continuing.
E5e5
- Only on models fitted with Start/Stop: disconnect the foot controller or use it.
- The shared manual marks this row as model-dependent; it is not an assertion that this optional button is fitted on every FS20s.
E6e6
Remove tangled thread before continuing, using the reviewed caught-fabric/thread-removal instructions with power off for removal.
E7e7
Choose a twin-needle-approved stitch while twin-needle mode is active.
F1–F9f1–F9
Contact the nearest Brother authorized service center.
Guides
Important safety instructions
Instructions from the manualIMPORTANT SAFETY INSTRUCTIONS23 steps
- Unplug after use, before cleaning or user servicing, and when unattended.
- Switch to O before unplugging; grasp the plug, not the cord.
- Use a direct AC outlet within the rating-label range, without an extension cord, DC source or inverter; ask an electrician if unsure.
- Use only in the country of purchase.
- Do not clean with flammable substances, sprays, or organic liquids containing alcohol or ammonia.
- Do not use a damaged, dropped, wet or malfunctioning machine.
- For unusual odor, heat, discoloration or deformation, stop and unplug immediately; obtain authorized Brother service.
- Carry by the handle without sudden movements.
- Keep the work area stable and clear of explosive/conductive dust, blocked vents, heat, aerosols and administered oxygen.
- Keep lint, dust and fabric off vents and the foot controller, and place nothing on the controller.
- Do not insert objects.
- Keep fingers away from moving parts, especially the needle; switch off for needle-area adjustments.
- Do not use bent needles or damaged/incorrect needle plates, or push/pull sewing fabric.
- Keep small parts and bags away from children; supervise children, and do not use outdoors.
- Avoid sun, humidity and hot objects.
- Do not use cleansers, thinner, petroleum ether or alcohol.
- Follow the manual for replacing parts.
- An authorized dealer must replace a damaged light unit.
- Follow troubleshooting first, then contact Brother if trouble persists.
- Use the machine only as intended, with manufacturer-recommended accessories.
- In Europe, children aged eight or above and persons with reduced capabilities require safe-use supervision or instruction; children must not play with it or clean/maintain it unsupervised.
- Outside Europe, the manual requires supervision/instruction for persons with reduced capabilities and children.
- For UK/Eire/Malta/Cyprus plug-fuse replacement, use an ASTA-approved BS1362 fuse with the rating on the plug, replace its cover, and never use a plug without the cover; obtain a correct lead from Brother for an unsuitable outlet.
Using your machine
Instructions from the manualUsing Your Machine11 steps
- Use regular household electricity and the supplied power cord.
- Insert plugs firmly in the machine and outlet, then switch to I to turn on power, sewing light and LCD; O turns it off.
- A startup sound is normal.
- Turn off and unplug when unattended, after use, during a power failure or storm, or if operation is affected by a bad connection.
- Do not use extension cords or multiple adapters, touch the plug with wet hands, bend/twist/pull/modify the cord, put heavy objects on it or expose it to heat.
- Replace a damaged cord through Brother; unplug before long-term storage.
- The polarized-plug instruction is USA-only: reverse an unsuitable plug once, then ask an electrician; never modify it.
- With the machine off, insert the foot-controller plug.
- Press lightly to start and vary pressure for speed; release to stop.
- The manual's Start/Stop-button disabling note applies only to models fitted with that optional button; it does not establish that every FS20s has it.
- The USA-only Model T controller note is limited to its named product codes.
Operation panel
Instructions from the manualOperation panel2 steps
- The LCD shows selected stitch number, required presser foot, stitch length and width in millimetres, needle-stop position and single/twin-needle mode.
- Use the stitch-selection keys to change the pattern, length keys for length and width keys for width.
Settings/functions
Instructions from the manualSettings/Functions5 steps
- Settings survive power-off.
- To change a setting, first turn off, hold the specified key while turning on, then release after startup.
- Use the minus key for the stitch-number ones digit to toggle needle stop down/up (default down); the plus key for the stitch-number tens digit to toggle initial left/center straight stitch (default left); stitch-width minus for the operation beep on/off (default on, only models offering that feature); stitch-length minus for standard/slower maximum speed (default standard); stitch-length plus for automatic reverse/reinforcement off/on (default off); and stitch-number ones-digit plus for single/twin mode (default single).
- Slower mode also limits the speed slider on models fitted with one.
- Stitch-width plus starts stitch-adjustment mode only on models supporting adjustment; the separate adjustment procedure requires 25 or more stitches and is excluded from this 20-stitch reference.
Settings/Functions4 steps
- To change a setting, hold its specified key while switching on, then follow the full Operation Manual instructions.
- Functions are needle-stop up/down, initial left/center position, maximum speed standard/slower, automatic reverse/reinforcement off/on and single/twin mode.
- The operation-beep and stitch-adjustment entries are explicitly model-dependent; the adjustment procedure requires 25 or more stitches and is excluded on FS20s.
- Preparing bobbin thread and upper threading on this sheet are condensed illustrated sequences; use the full reviewed operation-manual methods and their safety conditions.
Winding/ installing the bobbin
Instructions from the manualWinding/ Installing the bobbin15 steps
- Turn off for threading.
- Use supplied SA156/SFB XA5539-151 bobbins or the same Class 15 type, 11.5 mm high.
- Fully raise the spool pin and fit the spool with the unwind direction shown.
- Pass thread around the pretension disk front-to-back.
- Put thread through the bobbin's hole from inside, seat its notch over the shaft projection, and move the shaft right.
- Turn on, hold the 7–8 cm end and wind a few turns; stop and trim the excess end before full winding.
- Set speed as appropriate, winding stretch nylon slowly.
- When the full bobbin slows, stop; cut thread, move the shaft left and remove it.
- Do not raise the bobbin-winding thread guide post.
- Raise the needle and foot, turn off, open the bobbin cover and insert the bobbin in the shown counterclockwise direction.
- Hold it while guiding the thread into the slit and under the tension spring; reinstall the cover.
- A bobbin wound improperly can break the needle.
- On models with the winding cutter, perform the alternative five-to-six-turn/slit-cut method before starting.
- On models with the quick-set cutter, guide and cut the bobbin thread through its slit as illustrated.
- These cutter paths are conditional; do not assume an unshown cutter is fitted.
Upper threading
Instructions from the manualUpper threading6 steps
- Raise the presser-foot lever and raise the needle to its highest position using the handwheel toward you; the needle-position-button alternative is only for models fitted with it.
- Turn off before threading.
- Fully raise the spool pin and fit the spool with the shown unwind direction.
- Follow the numbered thread channel, ensuring engagement with the take-up lever, then slide behind the needle-bar guide.
- Pass through the needle front-to-back, then under the foot, leaving 10 cm.
- Use thread heavier-numbered than 20; thread numbered 20 or lower must not be used.
Using the needle threader
Instructions from the manualUsing the needle threader7 steps
- Use the threader only with home needles 75/11–100/16.
- Thread decorative thread, twin needles and wing needles by hand with power off.
- Follow upper-threading steps 1–6 first.
- Match the threader type actually fitted: Type A passes behind the guide, firmly into the disk slit and through the cutter, then lowers the foot and threader fully and pushes it slowly back so the hook catches thread through the eye.
- Type B lowers the foot, lowers the threader fully, hooks thread onto the guide, pushes the lever back to its stop and passes thread in front of the needle beneath the hook through its eye.
- For either type, return the lever slowly forward and release slowly, raise the foot, pull the loop and pass the end through as shown, leaving 10 cm.
- The shared manual supplies both types; it does not authorize interchanging their paths.
Drawing up the bobbin thread
Instructions from the manualDrawing up the bobbin thread5 steps
- Thread the upper thread and needle first.
- Install the bobbin by the reviewed winding/installing instructions; guide its thread along the slit without cutting.
- Hold the upper end lightly and turn the handwheel toward you one full turn until the needle is highest; the two-press needle-button alternative applies only if fitted.
- Pull the upper thread to draw up the bobbin thread, then bring about 10 cm of both under the foot toward the back.
- Quick-set-bobbin models normally can begin without drawing it up, but draw it up for gathers or finishing the beginning threads.
Fabric/thread/needle combination
Instructions from the manualFabric/Thread/Needle Combination10 steps
- Select the needle/thread combination for the fabric before sewing; thicker fabric uses a larger needle.
- Use home needles 65/9–100/16; never thread numbered 20 or lower.
- For light fabrics, use polyester 60–90 or cotton/silk 50–80, needle 65/9–75/11 and length 1.8–2.5 mm.
- Medium fabric uses polyester 60–90 or cotton/silk 50–60, needle 75/11–90/14 and length 2–3 mm.
- Denim 12 oz or more uses polyester/cotton 30, needle 100/16 and length 2.5–4 mm; other heavy fabrics use polyester 60 or cotton/silk 30–50 with needle 90/14–100/16.
- Stretch fabrics use knit thread 50 and ball-point 75/11–90/14; choose an appropriate stitch.
- Topstitching uses thread 30 with needle 90/14–100/16, or thread 50–60 with needle 75/11–90/14; thicker thread should exceed 3 mm stitch length.
- Transparent nylon uses home topstitching needles irrespective of fabric.
- For applicable decorative patterns use thread 50–60, gold ball-point 90/14 on light/medium/stretch fabric and home 90/14 on heavy fabric.
- Wrong combinations, especially small 65/9–75/11 needles on thick denim/thread, can bend or break and cause uneven seams, wrinkles or skipped stitches.
Checking the needle
Instructions from the manualChecking the needle3 steps
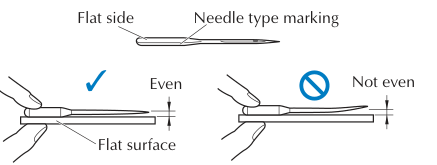
- Place the needle's flat side on a flat surface and check for an even gap.
- Never use a bent needle.
- Replace after unusual sound on penetration, skipped stitches or generally after completing a project.
Replacing the needle
Instructions from the manualReplacing the needle6 steps
- Raise the needle to its highest point.
- Remove the presser foot using the reviewed foot-removal method, which turns power off before removal; keep power off for needle replacement.
- Cover the plate hole with fabric or paper.
- Loosen the needle-clamp screw without excessive force and remove the needle.
- Insert the replacement fully with its flat side to the back, tighten the screw and attach the proper foot.
- Incorrect installation can break the needle or damage the machine.
Sewing with the twin needle
Instructions from the manualSewing with the twin needle9 steps
- Use only the specified X59296-121 twin needle, never bent.
- Thread its eyes by hand front-to-back, not with the needle threader.
- Attach J foot, fit the twin needle, and thread the first spool to the left needle following the normal guide path.
- Fit the second spool to the extra spool pin and thread the right needle by the normal path except bypassing the needle-bar guide.
- Set twin-needle mode and select only a chart-approved stitch; starred chart stitches require J foot.
- Set width 5 mm or less.
- Slowly turn the handwheel toward you to ensure the needle clears the foot before sewing.
- To change direction, raise the needle out of the fabric before raising the foot and turning fabric.
- Do not rotate fabric with the twin needle lowered.
Replacing the presser foot
Instructions from the manualReplacing the presser foot7 steps
- Select the foot specified for the stitch.
- Raise the needle highest, turn off and raise the foot lever.
- Release the current foot by its black button or by pulling vertically down, according to the fitted holder.
- Position the replacement so its pin aligns with the holder groove and lower the lever to attach it.
- Incorrect feet or replacement with power on can break the needle or cause injury.
- To remove the holder for cleaning or an optional foot, loosen its screw with the screwdriver.
- Refit it aligned with the presser bar and tighten firmly; do not use excessive force.
Selecting the stitch
Instructions from the manualSelecting the stitchView
Use the stitch-selection keys to change the tens and ones digits shown on the LCD, checking the model's stitch chart and required foot.
Setting the stitch length and stitch width
Instructions from the manualSetting the stitch length and stitch width6 steps
- Use the minus/plus length and width keys to reduce/increase the selected value.
- For straight or triple-stretch stitches, width changes needle position: plus moves right, minus left.
- The display flashes at the permitted minimum or maximum; a dash means width cannot be adjusted.
- Raise the needle before changing its position.
- Slowly turn the handwheel after width adjustment and ensure the needle clears the foot.
- If stitches bunch, increase stitch length.
Starting to sew
Instructions from the manualStarting to sew8 steps
- Keep watching the needle and keep fingers away.
- Do not pull or push fabric; avoid bent needles, pins and other objects under the needle.
- Baste fabric first.
- Raise needle highest and raise foot, hold fabric and thread ends in the left hand, then lower the needle into the first stitch point.
- Lower the foot.
- Begin with the foot controller; Start/Stop and speed-slider alternatives apply only if those controls are fitted.
- Guide fabric lightly, stop, raise needle and foot, draw fabric out and cut thread with the cutter.
- Before sewing, ensure the needle does not touch a zipper, foot or plate by slowly turning the handwheel.
Sewing reverse/reinforcement stitches
Instructions from the manualSewing reverse/reinforcement stitches5 steps
- Secure seam beginnings and ends.
- Press Reverse/Reinforcement for three to five reverse stitches on straight-left, straight-center or zigzag (20-stitch chart numbers 00, 01 and 04); for other patterns the button makes reinforcement stitches in the same place.
- With automatic reverse/reinforcement enabled, select the stitch, place fabric and start; automatic securing stitches precede normal sewing.
- At the end, press Reverse/Reinforcement once to secure and stop.
- Do not use reverse or automatic securing with the walking foot.
Thread tension
Instructions from the manualThread tension4 steps
- Test on the same scrap fabric and thread before adjusting.
- If bobbin thread shows on the right side, first correct the bobbin installation; if still tight, turn the tension dial counterclockwise to decrease upper tension.
- If upper thread shows on the wrong side, first correct upper threading; if still loose, turn the dial clockwise to increase upper tension.
- Incorrect threading cannot be corrected merely by changing tension.
Overcasting stitches
Instructions from the manualOvercasting stitches6 steps
- Attach G foot and select an available overcasting stitch.
- Align the edge with the foot guide and lower the foot.
- Turn the handwheel toward you to check that the needle does not hit the foot, then sew along its guide.
- Pull fabric backward when removing it; pulling forward or sideways can damage the foot.
- Remove tangled thread before raising the lever.
- The additional J-foot method is in the reviewed Sewing Guide.
Blind hem stitching
Instructions from the manualBlind hem stitching11 steps
- Turn the item inside out.
- Fold the lower edge to the desired hem and press.
- Chalk-mark about 5 mm from the fabric edge and baste.
- Fold back inside along the basting, then unfold the edge with wrong side facing up.
- Attach R foot and choose blind hem stitch 09 or stretch blind hem 10 from the 20-stitch chart.
- Remove the flatbed, place the cylinder over the free arm and check feeding.
- Align the folded edge with the foot guide and lower the foot.
- With needle slightly raised, adjust width/position so it only catches the fold; too far left shows a large seam on the right side.
- Sew along the guide.
- Raise foot and needle, pull fabric backward, then remove basting and turn right side out.
- Never pull forward or sideways under the foot.
Zipper insertion
Instructions from the manualZipper insertion8 steps
- For a centered zipper, attach J foot and sew straight up to the opening, reversing at the opening end.
- Baste the opening to the fabric edge.
- Press the seam allowance from the wrong side, align the center with the zipper, baste and remove about 5 cm of outside basting.
- Attach I foot on its right pin and select center straight stitch 01; another stitch can hit the foot.
- Turn the handwheel to verify clearance before topstitching around the zipper.
- The needle must not hit it.
- If the foot contacts the slider, leave the needle down, raise the foot, move the slider and resume.
- Remove basting afterward.
Bar tack stitching
Instructions from the manualBar tack stitching6 steps
- This procedure is supported on models with 20 or more stitches.
- Set A foot's guide plate to the required tack length; its marks are 5 mm apart and maximum is about 28 mm.
- Pass the upper thread through the foot hole before attaching it and select chart stitch 19.
- Face the pocket opening toward you and lower the foot so the needle is 2 mm in front of it.
- Fully lower the buttonhole lever, lightly hold the upper end and start.
- When finished, raise the foot, remove fabric, cut threads and return the lever up.
Restrictions on oiling
Instructions from the manualRestrictions on oiling2 steps
- Do not oil the machine yourself; its factory-applied oil makes periodic user oiling unnecessary.
- For a hard-to-turn handwheel or unusual noise, stop immediately and contact an authorized Brother dealer or service center.
Precautions on storing the machine
Instructions from the manualPrecautions on storing the machine2 steps
- Avoid extremely high/low temperatures or temperature changes, high humidity or steam, flames, heaters, air conditioners, outdoor/direct-sun exposure and dusty or oily environments.
- Periodically turn on and use the machine; extended storage without use can reduce efficiency.
Cleaning the machine surface
Instructions from the manualCleaning the machine surface3 steps
- Unplug before cleaning to avoid injury or electric shock.
- The current operation manual gives this warning without a separate surface-wiping method.
- Its safety instructions prohibit cleansers and organic solvents; no unlisted cleaning liquid is recommended here.
Cleaning the race
Instructions from the manualCleaning the race7 steps
- Turn off and unplug.
- Raise needle, remove the foot, needle and holder, then loosen the two plate screws and remove the needle plate, taking care not to drop screws into the machine.
- Lift out the bobbin case and brush dust from the race and surrounding area.
- Do not oil the case; canned compressed air is not recommended.
- Reinsert the case with its triangular/circular marks aligned as shown in the reviewed figure, then refit the plate and tighten screws.
- Never use a scratched case; obtain replacement through Brother.
- Incorrect seating can break the needle.
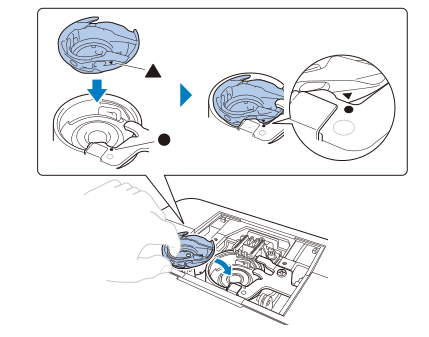
Diagram key
- ▲: Alignment mark; match it with the circular mark when refitting the bobbin case.
- ●: Matching alignment mark; align it with the triangular mark when refitting the bobbin case.
List of symptoms
Instructions from the manualThe machine does not work.4 checks
- The machine is not plugged in.
- Follow the reviewed power-supply and foot-controller instructions: connect correctly, switch on and operate the controller.
- The main power switch is turned off.
- Follow the reviewed power-supply and foot-controller instructions: connect correctly, switch on and operate the controller.
- The bobbin winder shaft is pushed to the right.
- Follow the reviewed bobbin-winding instructions, including correct pretension routing and returning the winder shaft left before sewing.
- The foot controller is not used properly.
- Follow the reviewed power-supply and foot-controller instructions: connect correctly, switch on and operate the controller.
The needle breaks.11 checks
- The needle is not fi tted properly.
- With power off, fit the needle fully flat-side-back and tighten the clamp screw. Replace a bent, dull or damaged needle.
- The needle clamp screw is loose.
- With power off, fit the needle fully flat-side-back and tighten the clamp screw. Replace a bent, dull or damaged needle.
- The needle is turned, bent or the point is dull.
- With power off, fit the needle fully flat-side-back and tighten the clamp screw. Replace a bent, dull or damaged needle.
- The needle or thread is improper for the fabric.
- Choose the fabric, thread and needle combination from the reviewed table.
- The presser foot is not appropriate for the selected stitch.
- Use the presser foot specified for the selected stitch and attach it using the power-off replacement instructions.
- The upper thread tension is too tight.
- Check correct threading first, then adjust upper tension by the reviewed method while test-sewing matching scrap fabric.
- The fabric is pulled, pushed, or fed at an angle.
- Lightly guide the fabric. Guide the fabric lightly; do not pull, push or feed it at an angle.
- The area around the opening in the needle plate is scratched.
- Contact your authorized Brother dealer or nearest authorized Brother service center.
- The area around the opening in the presser foot is scratched.
- Contact your authorized Brother dealer or nearest authorized Brother service center.
- The bobbin case is scratched.
- Contact your authorized Brother dealer or nearest authorized Brother service center.
- A bobbin designed for this machine is not used.
- Use the specified Class 15 bobbin and follow the reviewed spool positioning and bobbin winding instructions.
The upper thread breaks.11 checks
- Upper threading is incorrect. (For example, the spool is not fi tted properly, or the thread comes out of the thread channel.)
- Follow the reviewed upper-threading or bobbin-installation instructions, with correct guide and tension-spring routing.
- There are knots or tangles in the thread.
- Remove any knots or tangles.
- The needle is not appropriate for the thread you are using.
- Choose the fabric, thread and needle combination from the reviewed table.
- The upper thread tension is too tight.
- Check correct threading first, then adjust upper tension by the reviewed method while test-sewing matching scrap fabric.
- The thread is tangled, for example, in the bobbin case.
- Follow the complete reviewed caught-fabric removal and operation-check instructions. Do not force removal; contact Brother if they cannot be completed.
- The needle is turned, bent or the point is dull.
- With power off, fit the needle fully flat-side-back and tighten the clamp screw. Replace a bent, dull or damaged needle.
- The needle is not installed properly.
- With power off, fit the needle fully flat-side-back and tighten the clamp screw. Replace a bent, dull or damaged needle.
- The area around the opening in the needle plate is scratched.
- Contact your authorized Brother dealer or nearest authorized Brother service center.
- The area around the opening in the presser foot is scratched.
- Contact your authorized Brother dealer or nearest authorized Brother service center.
- The bobbin case is scratched, or has a burr on it.
- Contact your authorized Brother dealer or nearest authorized Brother service center.
- A bobbin designed for this machine is not used.
- Use the specified Class 15 bobbin and follow the reviewed spool positioning and bobbin winding instructions.
The bobbin thread is tangled or breaks.5 checks
- The bobbin thread is wound improperly.
- Use the specified Class 15 bobbin and follow the reviewed spool positioning and bobbin winding instructions.
- The bobbin is scratched or does not turn smoothly.
- Use the specified Class 15 bobbin and follow the reviewed spool positioning and bobbin winding instructions.
- The thread is tangled.
- Correct the bobbin threading by the reviewed winding/installing instructions.
- A bobbin designed for this machine is not used.
- Use the specified Class 15 bobbin and follow the reviewed spool positioning and bobbin winding instructions.
- The bobbin is installed incorrectly.
- Follow the reviewed upper-threading or bobbin-installation instructions, with correct guide and tension-spring routing.
The thread tension is incorrect.8 checks
- Upper threading is incorrect.
- Follow the reviewed upper-threading or bobbin-installation instructions, with correct guide and tension-spring routing.
- The bobbin thread is wound improperly.
- Use the specified Class 15 bobbin and follow the reviewed spool positioning and bobbin winding instructions.
- The needle or thread is improper for the fabric.
- Choose the fabric, thread and needle combination from the reviewed table.
- The presser foot is not attached properly.
- Follow the reviewed foot/holder installation or stitch-length setting instructions for this condition.
- The presser foot holder is not attached properly.
- Follow the reviewed foot/holder installation or stitch-length setting instructions for this condition.
- The thread tension is incorrect.
- Check correct threading first, then adjust upper tension by the reviewed method while test-sewing matching scrap fabric.
- A bobbin designed for this machine is not used.
- Use the specified Class 15 bobbin and follow the reviewed spool positioning and bobbin winding instructions.
- The bobbin is installed incorrectly.
- Follow the reviewed upper-threading or bobbin-installation instructions, with correct guide and tension-spring routing.
The fabric is wrinkled.6 checks
- Upper threading or the bobbin installation is incorrect.
- Use the specified Class 15 bobbin and follow the reviewed spool positioning and bobbin winding instructions.
- Follow the reviewed upper-threading or bobbin-installation instructions, with correct guide and tension-spring routing.
- The spool is not fi tted properly.
- Use the specified Class 15 bobbin and follow the reviewed spool positioning and bobbin winding instructions.
- The needle or thread is improper for the fabric.
- Choose the fabric, thread and needle combination from the reviewed table.
- The needle is turned, bent or the point is dull.
- With power off, fit the needle fully flat-side-back and tighten the clamp screw. Replace a bent, dull or damaged needle.
- If you are sewing thin fabric, the stitch is too thick.
- Sew with stabilizer material under the fabric.
- The thread tension is incorrect.
- Check correct threading first, then adjust upper tension by the reviewed method while test-sewing matching scrap fabric.
Stitches are skipped.5 checks
- Upper threading is incorrect.
- Follow the reviewed upper-threading or bobbin-installation instructions, with correct guide and tension-spring routing.
- The needle or thread is improper for the fabric.
- Choose the fabric, thread and needle combination from the reviewed table.
- The needle is turned, bent or the point is dull.
- With power off, fit the needle fully flat-side-back and tighten the clamp screw. Replace a bent, dull or damaged needle.
- The needle is not installed properly.
- With power off, fit the needle fully flat-side-back and tighten the clamp screw. Replace a bent, dull or damaged needle.
- Dust has accumulated under the needle plate or in the bobbin case.
- Follow the reviewed power-off, unplugged race-cleaning instructions.
The thread is tangled on the wrong side of the fabric.2 checks
- Upper threading is incorrect.
- Follow the reviewed upper-threading or bobbin-installation instructions, with correct guide and tension-spring routing.
- The needle or thread is improper for the fabric.
- Choose the fabric, thread and needle combination from the reviewed table.
There is a high-pitched noise while sewing.4 checks
- Dust has built up in the feed dogs or in the bobbin case.
- Follow the reviewed power-off, unplugged race-cleaning instructions.
- Upper threading is incorrect.
- Follow the reviewed upper-threading or bobbin-installation instructions, with correct guide and tension-spring routing.
- The bobbin case is scratched.
- Contact your authorized Brother dealer or nearest authorized Brother service center.
- A bobbin designed for this machine is not used.
- Use the specified Class 15 bobbin and follow the reviewed spool positioning and bobbin winding instructions.
The needle threader cannot be used. ★7 checks
- The needle is not in the highest position.
- Only for the feature specified in the shared manual: Raise the needle to its highest position; use the threader only with compatible needles.
- A 65/9 needle must be threaded by hand.
- The needle is installed incorrectly.
- Only for the feature specified in the shared manual: With power off, fit the needle fully flat-side-back and tighten the clamp screw. Replace a bent, dull or damaged needle.
- The needle is turned, bent or the point is dull.
- Only for the feature specified in the shared manual: With power off, fit the needle fully flat-side-back and tighten the clamp screw. Replace a bent, dull or damaged needle.
- Upper threading is incorrect.
- Only for the feature specified in the shared manual: Follow the reviewed upper-threading or bobbin-installation instructions, with correct guide and tension-spring routing.
- The needle threader hook is bent and does not pass through the eye of the needle.
- Only for the feature specified in the shared manual: Contact your authorized Brother dealer or nearest authorized Brother service center.
- The needle threader lever cannot be moved or returned to its original position.
- Only for the feature specified in the shared manual: Contact your authorized Brother dealer or nearest authorized Brother service center.
- A size 65/9 needle is being used.
- Only for the feature specified in the shared manual: The needle is incompatible with the needle threader.
- Manually pass the thread through the eye of the needle.
- Raise the needle to its highest position; use the threader only with compatible needles.
- A 65/9 needle must be threaded by hand.
The stitch is not sewn correctly.3 checks
- The presser foot is not appropriate for the selected stitch.
- Use the presser foot specified for the selected stitch and attach it using the power-off replacement instructions.
- The thread tension is incorrect.
- Check correct threading first, then adjust upper tension by the reviewed method while test-sewing matching scrap fabric.
- The thread is tangled, for example, in the bobbin case.
- Follow the complete reviewed caught-fabric removal and operation-check instructions. Do not force removal; contact Brother if they cannot be completed.
The fabric does not feed.4 checks
- The f eed dogs are lowered. ★
- Only for the feature specified in the shared manual: Slide the feed dog position switch right as seen from the rear, then turn the handwheel to raise the feed dogs.
- Move the rear feed-dog switch right as seen from the rear and turn the handwheel to raise the feed dogs.
- The stitch is too fi ne.
- Follow the reviewed foot/holder installation or stitch-length setting instructions for this condition.
- The needle or thread is improper for the fabric.
- Choose the fabric, thread and needle combination from the reviewed table.
- The thread is tangled, for example, in the bobbin case.
- Follow the complete reviewed caught-fabric removal and operation-check instructions. Do not force removal; contact Brother if they cannot be completed.
While winding the bobbin, the bobbin thread was wound below the bobbin winder seat. ★1 check
- The thread was incorrectly passed under the pretension disk on the thread guide.
- Only for the feature specified in the shared manual: Remove any entangled thread, and then wind the bobbin.
- Follow the reviewed bobbin-winding instructions, including correct pretension routing and returning the winder shaft left before sewing.
- Follow the reviewed winder-seat thread-removal method, without removing the seat or guide-post screw.
The bobbin thread cannot be pulled up.2 checks
- The needle is turned, bent or the point is dull.
- With power off, fit the needle fully flat-side-back and tighten the clamp screw. Replace a bent, dull or damaged needle.
- The bobbin is installed incorrectly.
- Follow the reviewed upper-threading or bobbin-installation instructions, with correct guide and tension-spring routing.
The sewing light bulb does not come on.1 check
- The sewing light is damaged.
- Contact your authorized Brother dealer or nearest authorized Brother service center.
The fabric feeds in the opposite direction.1 check
- The feed mechanism is damaged.
- Contact your authorized Brother dealer or nearest authorized Brother service center.
The needle contacts the needle plate.2 checks
- The needle clamp screw is loose.
- With power off, fit the needle fully flat-side-back and tighten the clamp screw. Replace a bent, dull or damaged needle.
- The needle is turned, bent or the point is dull.
- With power off, fit the needle fully flat-side-back and tighten the clamp screw. Replace a bent, dull or damaged needle.
Fabric being sewn with the machine cannot be removed.1 check
- Thread is tangled below the needle plate.
- Follow the complete reviewed caught-fabric removal and operation-check instructions. Do not force removal; contact Brother if they cannot be completed.
A broken needle has fallen into the machine.1 check
- A broken needle has fallen into the machine.
- Turn off the machine, and remove the needle plate.
- If the needle that fell into the machine can be seen, use tweezers to remove it.
- After removing the needle, return the needle plate to its original position and insert a new needle.
- Before turning on the machine, slowly turn the handwheel toward you to check that it turns smoothly and that the new needle enters through the center of the needle plate opening.
- If the handwheel does not turn smoothly or the needle that fell into the machine cannot be removed, consult your authorized Brother dealer or the nearest Brother authorized service center.
- Turn off and remove the needle plate.
- If the fallen needle is visible, remove it with tweezers.
- Refit the plate and install a new needle.
- Before switching on, turn the handwheel slowly toward you to check free movement and central entry into the plate opening.
- If it does not turn freely or the fallen needle cannot be removed, contact your authorized Brother dealer or service center.
The handwheel does not turn smoothly.1 check
- Thread is tangled in the bobbin case.
- Follow the complete reviewed caught-fabric removal and operation-check instructions. Do not force removal; contact Brother if they cannot be completed.
Frequent troubleshooting topics
Instructions from the manualUpper thread tightened upView
Correctly reinstall the bobbin thread following Winding/Installing the bobbin.
Tangled thread on wrong side of fabric3 steps
- Remove tangled thread; cut it if necessary, following the unplugged race-cleaning instructions.
- Remove upper thread and rethread correctly.
- If the bobbin was removed, reinstall it correctly.
Incorrect thread tension4 steps
- For right-side-visible bobbin thread or a straight upper-thread line on the right side, reset tension to 4 and correct bobbin threading.
- For wrong-side-visible upper thread, straight bobbin thread or slack stitching on the wrong side, reset tension to 4 and correct upper threading.
- Check the fabric/thread/needle combination.
- Once threading is correct, adjust upper tension while test-sewing matching scrap: loosen counterclockwise for bobbin thread visible on the right; tighten clockwise for upper thread visible on the wrong.
Fabric is caught in the machine and cannot be removed16 steps
- Stop immediately and switch off.
- Remove the needle; if it is lowered in caught fabric, the manual specifically directs turning the handwheel away from you (clockwise) to raise it before removal.
- Remove foot and holder, first clearing thread tangled on the foot.
- Lift fabric and cut threads beneath it; remove fabric if possible and continue cleaning.
- Remove the plate cover, cut tangled thread and remove bobbin and case.
- Brush or use a vacuum mini attachment to remove dust from the race; canned air is not recommended.
- If fabric was not removable, remove fabric and threads from the plate now; if still stuck contact Brother.
- Refit the case by the reviewed alignment method and refit the plate/cover.
- Turn the handwheel to verify that feed dogs move smoothly without touching slot edges.
- Inspect and refit the needle; replacement is recommended after a jam.
- If the plate was removed, check operation: turn on without foot or thread, select center straight stitch, and turn the handwheel toward you to check central needle entry.
- If it hits the plate, reinstall starting at the feed-dog check.
- Select zigzag and maximum length/width; turn the handwheel to check needle and feed dogs.
- If they hit the plate, stop and contact Brother.
- Turn off, fit bobbin and foot without using a scratched foot, rethread upper thread and test-sew cotton; check threading/fabric if poor.
- Never force fabric removal.
If the thread becomes tangled under the bobbin winder seat ★5 steps
- For the model-dependent winder-seat condition, stop winding.
- Cut thread with scissors beside the thread guide.
- Move the winder shaft left, remove the bobbin, and cut its leading thread to detach it completely.
- Hold the end in the left hand and unwind thread clockwise from beneath the seat with the right.
- Do not remove the seat or the screw on the guide post; this can damage the machine and does not clear thread through screw removal.
Operation beep ★
Instructions from the manualOperation beep ★3 steps
- Only on models with operation beeps: correct power-on/key operation makes one beep; powering on while changing a setting makes two.
- Incorrect operations or inactive keys give two or four.
- A locked machine beeps for four seconds and stops automatically; identify and correct the cause before continuing.
Trial sewing
Instructions from the manualTrial sewing3 steps
- Before a project, test on the same fabric and thread, adjusting tension, length and width and using the same number of fabric layers.
- Fabric thickness and stabilizer affect the result.
- Use stabilizer under satin patterns that bunch.
Changing the sewing direction
Instructions from the manualChanging the sewing direction2 steps
- At a corner, stop with the needle in the fabric; if it stopped raised, lower it with the handwheel toward you.
- Raise the foot, pivot fabric around the needle, lower the foot and resume.
Sewing curves
Instructions from the manualSewing curvesView
Sew slowly, changing direction gradually. For zigzag curves use a shorter stitch length for a finer result; follow the reviewed seam-allowance methods for an even margin.
Sewing cylindrical pieces
Instructions from the manualSewing cylindrical piecesView
Pull the flatbed attachment left. Slide the sleeve/cuff onto the free arm and sew from the top. Refit the attachment afterward.
Sewing an even seam allowance
Instructions from the manualSewing an Even Seam Allowance5 steps
- Align the fabric with the right edge of the foot or a plate mark.
- For left-position straight stitch at width 0, needle-to-right-foot-edge distance is 12 mm; width 2 gives 10 mm, width 5.5 gives 6.5 mm and width 7 gives 5 mm.
- Plate marks show distance from left-position straight stitch at width 0 in 1/8-inch (3 mm) increments; the grid is 5 mm.
- For about a 5 mm margin using J foot, choose straight stitch, set width 2 and align with the marking on that foot.
- These width settings change needle position, not a straight stitch zigzag width.
Sewing thick fabrics
Instructions from the manualSewing thick fabrics5 steps
- If thick fabric will not fit under the foot, raise the lever to its higher position.
- If a thick seam causes misfeeding at an angle, use J foot: raise the lever, align the start, hold the foot level while pressing and holding its black locking pin, lower the lever and release the pin.
- It remains level; after the seam it returns to its normal angle.
- Alternatively support the lower side with equal-thickness fabric or thick paper to keep the foot horizontal.
- More than 6 mm fabric thickness, or pushing with excessive force, can bend or break the needle.
Sewing thin fabrics
Instructions from the manualSewing thin fabricsView
Place thin paper or stabilizer beneath lightweight fabric if stitching misaligns or feeding fails. Sew fabric and support together, then tear away the excess paper.
Sewing stretch fabrics
Instructions from the manualSewing stretch fabrics3 steps
- Baste without stretching, then sew.
- For misalignment use non-woven water-soluble stabilizer beneath the fabric; follow its manufacturer for compatible fabrics.
- Use a suitable stretch stitch from the machine/chart and consider the recommended gold ball-point needle.
Sewing leathers or vinyl fabrics
Instructions from the manualSewing leathers or vinyl fabrics3 steps
- If leather/vinyl sticks to the foot, replace it with an optional walking or non-stick foot; if it sticks to the flatbed, place copy/tracing paper over the flatbed, without covering the needle plate, and sew fabric with the paper before removing it.
- The walking foot is for straight/zigzag only: no reverse stitching.
- Sew slowly to moderately and test on scraps to check for marks.
Sewing hook-and-loop fastener tape
Instructions from the manualSewing hook-and-loop fastener tape6 steps
- Use only non-adhesive tape designed for sewing; adhesive tape can cause needle breakage or malfunction.
- Baste tape to fabric first.
- Before sewing, turn the handwheel to ensure penetration.
- Sew its edge slowly.
- If the needle cannot penetrate, change to the needle appropriate for thicker fabric in the combination table.
- A fine 65/9–75/11 needle may bend or break.
Sewing decorative stitch patterns
Instructions from the manualSewing Decorative Stitch Patterns4 steps
- For available decorative patterns on stretch, lightweight or coarse-weave fabric, or patterns that shrink, put stabilizer on the wrong side; thin paper is an alternative.
- Use thread 50–60.
- Use a gold ball-point 90/14 needle for light, regular or stretch fabric and a home-machine 90/14 needle on heavy fabric.
- Choose only a pattern available in the FS20s 20-stitch chart.
Using zigzag foot “j”
Instructions from the manualUsing zigzag foot “J”2 steps
- Attach J foot and choose an available overcasting pattern shown in the guide; if unavailable use the normal zigzag.
- Sew along the edge so the needle drops just outside the right edge of the fabric.
Appliqué stitching
Instructions from the manualAppliqué stitching5 steps
- Baste or glue the appliqué to its base, keeping glue out of the stitched area so it cannot damage the machine.
- Attach J foot and select an available appliqué pattern shown in the guide.
- If none is available, use zigzag, then pull beginning/ending upper thread to the wrong side and tie it to bobbin thread; do not use reverse or automatic securing.
- Turn the handwheel toward you and sew with the needle dropping just outside the appliqué.
- At corners leave the needle in the fabric outside the design, raise the foot, pivot and resume.
Patchwork (crazy quilt) stitching
Instructions from the manualPatchwork (crazy quilt) stitching4 steps
- Fold the top piece edge and place it over the lower piece.
- Attach J foot and select a desired available pattern, checking the stitch number on the machine.
- Sew so the pattern spans both pieces.
- Use pins if needed, but never stitch over them.
Piecing
Instructions from the manualPiecing4 steps
- Cut pieces with a 6.5 mm (1/4-inch) seam allowance, then baste or pin together.
- Attach J foot and choose straight stitch.
- For a right-hand 6.5 mm allowance, align the right foot edge with the fabric and set width/needle position 5.5 mm; for a left-hand allowance use the left foot edge and set width 1.5 mm.
- Adjust needle position for other allowances by the reviewed width method.
Quilting
Instructions from the manualQuilting9 steps
- Baste the layered quilt.
- With power off, remove the foot and holder by the reviewed replacement method.
- Hook the optional walking foot fork over the needle-clamp screw, lower the lever and tighten the holder screw securely.
- Turn the handwheel toward you to verify needle clearance.
- Use a home 90/14 needle.
- Thread manually with the walking foot fitted, or thread with the threader before fitting it.
- Use only straight/zigzag patterns, without reverse or automatic securing; sew slowly to moderately after a scrap test.
- Guide evenly with one hand on each side.
- To use the optional quilting guide, insert its stem in the rear hole of the walking foot or holder and align it with the previous seam for parallel rows.
Free motion quilting
Instructions from the manualFree motion quilting9 steps
- Use the foot controller and a consistent speed; a speed slider is relevant only if fitted.
- Lower feed dogs by moving the rear switch left as seen from the rear.
- Choose an available shown pattern; where unavailable use straight stitch and finish by pulling upper thread to the wrong side and tying it to bobbin thread, without reverse/automatic securing.
- Turn off before removing the foot and holder.
- Fit the optional quilting foot with its pin above the needle-clamp screw and its lower-left aligned with the presser bar; ensure it is not slanted.
- Hold it with the right hand and tighten the holder screw with the left using the supplied screwdriver.
- A loose screw can cause needle impact and breakage.
- Hold fabric taut with both hands and move at a consistent rate for roughly 2.0–2.5 mm stitches, matching fabric movement to sewing speed; moving too quickly can break the needle or damage the machine.
- Afterward return the feed switch right as viewed from the rear and turn the handwheel to raise the feed dogs.
Elastic attaching
Instructions from the manualElastic attaching5 steps
- Use an elastic length appropriate to the finished stretched dimensions.
- Pin it at several points to the wrong side so it is uniformly positioned.
- Attach J foot and choose an available elastic stitch from the chart.
- Sew while stretching the tape to the fabric length: hold fabric behind the foot with the left hand and tape at the nearest front pin with the right.
- Do not let the needle contact pins.
Fagoting
Instructions from the manualFagoting5 steps
- Fold the two seam edges with an iron.
- Baste pieces about 4 mm apart onto thin paper or water-soluble stabilizer; a center line helps alignment.
- Attach J foot and choose one of the shown patterns actually available on the 20-stitch model.
- Set width to 7 mm and sew with the foot center along the gap.
- Remove the paper afterward.
Scallop stitching
Instructions from the manualScallop stitchingView
Attach N foot and select the available scallop pattern. Sew along the edge without stitching directly on it. Trim along the scallops without cutting their stitches.
Smocking
Instructions from the manualSmocking3 steps
- Attach J foot, select straight stitch, set length 4 mm and loosen tension.
- Sew parallel rows 1 cm apart, pull bobbin threads to gather, then press the gathers smooth.
- Select a shown smocking pattern available on this machine, sew between the straight rows and remove the gathering threads.
Shell tuck stitching
Instructions from the manualShell tuck stitching4 steps
- Draw equally spaced lines on the bias and fold along them.
- Attach J foot, select the available shell-tuck pattern and increase tension.
- Sew with the needle dropping slightly outside the edge.
- Fold and sew one line at a time, then remove fabric, unfold and press the tucks to one side.
Joining
Instructions from the manualJoining2 steps
- Attach J foot and sew pieces together right-sides-facing, then open the allowances.
- Choose a shown bridging pattern available on this model, turn the fabric right-side-up and sew with the foot center over the seam.
Operation keys and lcd
Instructions from the manualOperation keys and LCD3 steps
- Read the Operation Manual safety instructions first.
- LCD fields are selected stitch number, required foot, stitch length in mm, width in mm, single/twin mode and needle-stop position.
- Use stitch-selection, length and width keys for their corresponding settings.
Selecting a stitch
Instructions from the manualSelecting a stitchView
Choose a stitch with the selection keys, checking the numbers on the actual machine; the pictured example is 04, but numbering varies by model.
Stitch chart
Instructions from the manualStitch Chart20 checks
- Choosing stitch 00
- Stitch 00, foot J: Straight stitch (Left) General sewing, gather, pintuck, etc..
- Width entries (automatic, then manual range): 0.0 (0) 0.0 - 7.0 (0 - 1/4); length entries (automatic, then manual range): 2.5 (3/32) 0.2 - 5.0 (1/64 - 3/16).
- The second listed value is the manual range; dimensions are mm, with the printed inch equivalents in parentheses.
- Twin-needle use requires J foot and the reviewed twin-needle limits.
- Choosing stitch 01
- Stitch 01, foot J: Straight stitch (Middle) General sewing, gather, pintuck, etc..
- Width entries (automatic, then manual range): 3.5 (1/8) 0.0 - 7.0 (0 - 1/4); length entries (automatic, then manual range): 2.5 (3/32) 0.2 - 5.0 (1/64 - 3/16).
- The second listed value is the manual range; dimensions are mm, with the printed inch equivalents in parentheses.
- Twin-needle use requires J foot and the reviewed twin-needle limits.
- Choosing stitch 02
- Stitch 02, foot J: Triple stretch stitch General sewing for reinforcement and decorative topstitching.
- Width entries (automatic, then manual range): 0.0 (0) 0.0 - 7.0 (0 - 1/4); length entries (automatic, then manual range): 2.5 (3/32) 1.5 - 4.0 (1/16 - 3/16).
- The second listed value is the manual range; dimensions are mm, with the printed inch equivalents in parentheses.
- Twin-needle use requires J foot and the reviewed twin-needle limits.
- Choosing stitch 03
- Stitch 03, foot J: Stem stitch Reinforced stitching, sewing and decorative applications.
- Width entries (automatic, then manual range): 1.0 (1/16) 1.0 - 3.0 (1/16 - 1/8); length entries (automatic, then manual range): 2.5 (3/32) 1.0 - 4.0 (1/16 - 3/16).
- The second listed value is the manual range; dimensions are mm, with the printed inch equivalents in parentheses.
- Twin-needle use requires J foot and the reviewed twin-needle limits.
- Choosing stitch 04
- Stitch 04, foot J: Zigzag stitch For overcasting, mending..
- Width entries (automatic, then manual range): 3.5 (1/8) 0.0 - 7.0 (0 - 1/4); length entries (automatic, then manual range): 1.4 (1/16) 0.0 - 4.0 (0 - 3/16).
- The second listed value is the manual range; dimensions are mm, with the printed inch equivalents in parentheses.
- Twin-needle use requires J foot and the reviewed twin-needle limits.
- Choosing stitch 05
- Stitch 05, foot J: 3 steps elastic zigzag stitch Overcasting (medium, heavyweight and stretch fabrics), tape and elastic.
- Width entries (automatic, then manual range): 5.0 (3/16) 1.5 - 7.0 (1/16 - 1/4); length entries (automatic, then manual range): 1.0 (1/16) 0.2 - 4.0 (1/64 - 3/16).
- The second listed value is the manual range; dimensions are mm, with the printed inch equivalents in parentheses.
- Twin-needle use requires J foot and the reviewed twin-needle limits.
- Choosing stitch 06
- Stitch 06, foot G: Overcasting stitch Reinforcing of light and medium weight fabrics.
- Width entries (automatic, then manual range): 3.5 (1/8) 2.5 - 5.0 (3/32 - 3/16); length entries (automatic, then manual range): 2.0 (1/16) 1.0 - 4.0 (1/16 - 3/16).
- The second listed value is the manual range; dimensions are mm, with the printed inch equivalents in parentheses.
- Choosing stitch 07
- Stitch 07, foot G: Overcasting stitch Reinforcing of heavyweight fabric.
- Width entries (automatic, then manual range): 5.0 (3/16) 2.5 - 5.0 (3/32 - 3/16); length entries (automatic, then manual range): 2.5 (3/32) 1.0 - 4.0 (1/16 - 3/16).
- The second listed value is the manual range; dimensions are mm, with the printed inch equivalents in parentheses.
- Choosing stitch 08
- Stitch 08, foot J: Overcasting stitch Reinforced seaming of stretch fabric.
- Width entries (automatic, then manual range): 5.0 (3/16) 0.0 - 7.0 (0 - 1/4); length entries (automatic, then manual range): 2.5 (3/32) 0.5 - 4.0 (1/32 - 3/16).
- The second listed value is the manual range; dimensions are mm, with the printed inch equivalents in parentheses.
- Twin-needle use requires J foot and the reviewed twin-needle limits.
- Choosing stitch 09
- Stitch 09, foot R: Blind hem stitch Hemming woven fabrics * The stitch width setting is in neither millimeters nor inches..
- Width entries (automatic, then manual range): 0 - 3 - 3; length entries (automatic, then manual range): 2.0 (1/16) 1.0 - 3.5 (1/16 - 1/8).
- The second listed value is the manual range; dimensions are mm, with the printed inch equivalents in parentheses.
- Choosing stitch 10
- Stitch 10, foot R: Blind hem stretch stitch Hemming stretch fabric * The stitch width setting is in neither millimeters nor inches..
- Width entries (automatic, then manual range): 0 - 3 - 3; length entries (automatic, then manual range): 2.0 (1/16) 1.0 - 3.5 (1/16 - 1/8).
- The second listed value is the manual range; dimensions are mm, with the printed inch equivalents in parentheses.
- Choosing stitch 11
- Stitch 11, foot J: Blanket stitch Appliqués, decorative blanket stitch.
- Width entries (automatic, then manual range): 3.5 (1/8) 2.5 - 7.0 (3/32 - 1/4); length entries (automatic, then manual range): 2.5 (3/32) 1.6 - 4.0 (1/16 - 3/16).
- The second listed value is the manual range; dimensions are mm, with the printed inch equivalents in parentheses.
- Twin-needle use requires J foot and the reviewed twin-needle limits.
- Choosing stitch 12
- Stitch 12, foot J: Shell tuck edge stitch Shell tuck edge finish on fabrics.
- Width entries (automatic, then manual range): 4.0 (3/16) 0.0 - 7.0 (0 - 1/4); length entries (automatic, then manual range): 2.5 (3/32) 0.2 - 4.0 (1/64 - 3/16).
- The second listed value is the manual range; dimensions are mm, with the printed inch equivalents in parentheses.
- Twin-needle use requires J foot and the reviewed twin-needle limits.
- Choosing stitch 13
- Stitch 13, foot N: Satin scallop stitch Decorating collar of blouse, edge of handkerchief.
- Width entries (automatic, then manual range): 5.0 (3/16) 2.5 - 7.0 (3/32 - 1/4); length entries (automatic, then manual range): 0.5 (1/32) 0.1 - 1.0 (1/64 - 1/16).
- The second listed value is the manual range; dimensions are mm, with the printed inch equivalents in parentheses.
- Twin-needle use requires J foot and the reviewed twin-needle limits.
- Choosing stitch 14
- Stitch 14, foot J: Patchwork double overlock stitch Patchwork stitches, decorative stitching.
- Width entries (automatic, then manual range): 5.0 (3/16) 2.5 - 7.0 (3/32 - 1/4); length entries (automatic, then manual range): 2.5 (3/32) 1.0 - 4.0 (1/16 - 3/16).
- The second listed value is the manual range; dimensions are mm, with the printed inch equivalents in parentheses.
- Twin-needle use requires J foot and the reviewed twin-needle limits.
- Choosing stitch 15
- Stitch 15, foot J: Feather stitch Fagoting, decorative stitching.
- Width entries (automatic, then manual range): 5.0 (3/16) 0.0 - 7.0 (0 - 1/4); length entries (automatic, then manual range): 2.5 (3/32) 1.0 - 4.0 (1/16 - 3/16).
- The second listed value is the manual range; dimensions are mm, with the printed inch equivalents in parentheses.
- Twin-needle use requires J foot and the reviewed twin-needle limits.
- Choosing stitch 16
- Stitch 16, foot A: Narrow rounded buttonhole stitch Buttonhole on light to medium weight fabrics.
- Width entries (automatic, then manual range): 5.0 (3/16) 3.0 - 5.0 (1/8 - 3/16); length entries (automatic, then manual range): 0.5 (1/32) 0.2 - 1.0 (1/64 - 1/16).
- The second listed value is the manual range; dimensions are mm, with the printed inch equivalents in parentheses.
- Choosing stitch 17
- Stitch 17, foot A: Narrow squared buttonhole stitch Buttonholes for light to medium weight fabrics.
- Width entries (automatic, then manual range): 5.0 (3/16) 3.0 - 5.0 (1/8 - 3/16); length entries (automatic, then manual range): 0.5 (1/32) 0.2 - 1.0 (1/64 - 1/16).
- The second listed value is the manual range; dimensions are mm, with the printed inch equivalents in parentheses.
- Choosing stitch 18
- Stitch 18, foot A: Keyhole buttonhole stitch Buttonholes in heavyweight or thick fabrics for larger flat buttons.
- Width entries (automatic, then manual range): 7.0 (1/4) 3.0 - 7.0 (1/8 - 1/4); length entries (automatic, then manual range): 0.5 (1/32) 0.3 - 1.0 (1/64 - 1/16).
- The second listed value is the manual range; dimensions are mm, with the printed inch equivalents in parentheses.
- Choosing stitch 19
- Stitch 19, foot A: Bar tack stitch Reinforcement at opening of pocket, etc..
- Width entries (automatic, then manual range): 2.0 (1/16) 1.0 - 3.0 (1/16 - 1/8); length entries (automatic, then manual range): 0.4 (1/64) 0.3 - 1.0 (1/64 - 1/16).
- The second listed value is the manual range; dimensions are mm, with the printed inch equivalents in parentheses.
Included accessories
Instructions from the manualIncluded Accessories6 steps
- The supplied sheet lists J zigzag foot (on machine), A buttonhole, G overcasting, N monogramming, I zipper, R blind-stitch and M button-fitting feet; seam ripper, four bobbins including the installed one, needle set (75/11, 90/14, 100/16), gold ball-point 90/14 needle, cleaning brush, L-shaped screwdriver, installed bobbin case, foot controller, dust cover, operation manual and quick guide.
- Part codes are J XZ5134-001; A XC2691-133; G XC3098-051; N XD0810-031; I X59370-021; R XE2650-001; M XE2137-001; seam ripper XZ5082-001; bobbins SA156/SFB XA5539-151; needle set XC8834-021; ball-point needle XD0360-021; brush X59476-051; screwdriver XG0918-001; case XF5707-101; cover XA2112-022.
- The European foot controller is XD0501-121, other areas XC8816-071.
- Obtain manuals through an authorized Brother dealer.
- The holder screw XG1343-001 is available through that dealer.
- Preserve regional part-code differences rather than substituting a universal controller.
Controls and parts
See the manual diagrams 1 diagram
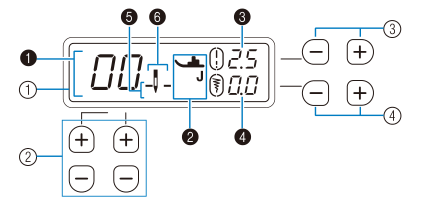
Diagram key
- outlined 1: LCD (liquid crystal display).
- outlined 2: Stitch-selection keys.
- outlined 3: Stitch-length keys; repeated labels identify the same key pair.
- outlined 4: Stitch-width keys; repeated labels identify the same key pair.
- filled 1: Selected stitch number.
- filled 2: Required presser foot.
- filled 3: Stitch length in millimetres.
- filled 4: Stitch width in millimetres.
- filled 5: Needle-stop position.
- filled 6: Single/twin-needle mode.
Model details
Model and compatibility
- Bobbin type
- SA156, Class 15 type; SFB XA5539-151, 11.5 mm high. [1]